Fridge magnets are pleasing to the eye and keep our lists, photos, postcards, business cards and coupons visible. Making them with your own hands for yourself or as a gift is very interesting and easy. After all, if you think about it, to make magnetic crafts you can use almost everything that is at hand, just use your imagination, stock up on glue and mini-magnets. In this article, we have presented 70 inspiring photo ideas, as well as 5 step by step lessons, how to make cool refrigerator magnets (and not only) from improvised, natural and even waste materials.
By the way, Neodymium magnet Unlike ferrite, it does not lose its magnetic properties over time. Ferrite steel turns into a useless piece of iron after 8-10 years.


In turn, the magnetic organizing board can be installed anywhere, for example, on a cabinet door
You can hang keys, towels, ladles and other things on these branch hooks.

Materials and tools:
Instructions:


If you have some nice tin or glass jars, put them to work by turning your refrigerator door or magnetic board into an organizer.


Glass baby food jars are great for storing spices on the refrigerator or hood.


Materials and tools:
Instructions:


The idea of recycling soda or beer bottle caps as refrigerator magnets will appeal not only to environmentalists, but also to decorators. After all, they cost nothing at all, but provide a lot of opportunities for decoration.
So, for example, you can paste family photos or just nice paper (card scraps, magazine clippings, etc.) inside the lids.

Homemade photo frame magnets


You can paint the lids, fill the insides with hot glue or cork, and then glue magnets to them.


Sometimes bottle caps don’t need to be decorated at all.
Instead of beer caps, you can use larger caps, such as Nutella jars or baby food caps, to make refrigerator magnets.


Materials and tools:
Instructions:

The most stylish magnets are easy to make from plastic toys, namely animal figurines.


Materials and tools:
Instructions:

Let us reveal a little life hack - magnets made from clothespins can not only store lists and bills, but also clamp bags of food as shown in the photo below. It turns out to be very convenient - I took the clothespin off the refrigerator and immediately fixed the opened bag with it.

Wooden clothespins can also hold a piece of paper on the refrigerator door and at the same time clamp something between the teeth.


Clothespins can be painted, decorated with glitter, covered with colored tape or appliques, or decorated using decoupage technique, following the following simple instructions.

Materials and tools:
Man first became acquainted with magnets in ancient times. However, very quickly this natural stone ceased to satisfy people's needs. It was then that the technology for making magnets was developed. Of course, a lot of time has passed since then. Technology has changed significantly, and now it is possible to make a magnet at home. You don't need any special skills or knowledge to do this. It's enough to have everything at hand necessary materials and tools. So, making a magnet looks like this.
All materials capable of magnetization can be divided into soft magnetic and hard magnetic. There is a significant difference between them. Thus, soft magnetic materials retain magnetic properties not for long.
You can conduct an experiment: run iron bars over a strong magnet several times. As a result, the material will acquire the properties of attracting others. metal objects. However, the production of one with these abilities, in in this case impossible.
Such materials are obtained by magnetizing an ordinary piece of iron. In this case, the properties are preserved much longer. However, they disappear completely when the object hits enough hard surface. They are also destroyed if the material is heated to 60 degrees.

Making permanent magnets at home is a fairly simple process. However, you should be careful when using certain schemes.
Neodymium is considered the most powerful permanent magnet. You can make it at home, but this requires a piece of rare earth metal - neodymium. In addition, an alloy of boron and iron is used. Such a workpiece is magnetized in a magnetic field. It is worth noting that such a product has enormous power and loses only 1 percent of its properties over a hundred years.
In this article I want to tell you how you can make a cute magnet with a photo for your refrigerator. And not only produce it, but also sell it profitably.
My site was originally dedicated to sublimation printing. But this does not mean at all that you can make money only by selling mugs, plates, puzzles and other sublimation products. There are a lot of ideas! This includes thermal transfer and the production of watches with a photographic portrait and the printing of various calendars and much, much more.
The first article is about magnets.
What attracts me most about making vinyl magnets is the simplicity (no equipment needed) and the amazing price tag. Judge for yourself - a magnet measuring 65 x 90 mm costs me less than 5 rubles. I sell it in kindergartens for 120 rubles!
There are different magnets - plastic, metal, sunset ones. We will make a magnet based on magnetic vinyl. It looks like this:

In a nutshell - this is the most regular photography, pasted on magnetic vinyl.
Choose any photo frame and insert a photo of the child. You can draw a photo frame yourself or download it from the Internet. Just don't forget about copyrights. Not all authors allow you to make money from their frameworks and templates.
To make a magnet we need the simplest tools:

This is a small piece of glass stationery knife and a metal ruler. And it's all? - you ask! Yes, this is enough to make good money. You don't even have to have your own printer. You can always order photo printing on the side. And your magnets will not become much more expensive. We'll calculate everything later.
A few words about magnetic vinyl. It is sold in rolls, usually 30 meters. Such a roll is not only quite expensive, but also very heavy. And this increases the cost of delivery for those who order vinyl by mail or through transport company. Those who have the Zenon company nearby are luckier - they will sell at least half a meter of magnetic vinyl. Agree, this is very convenient.
Magnetic vinyl comes in different thicknesses. I recommend purchasing vinyl no thinner than 0.7 mm to make magnets. Magnets made from thinner vinyl look cheap and not solid.
Magnetic vinyl also comes with an adhesive layer and without an adhesive layer. Has an adhesive layer protective film and with equal thickness it costs a little more.
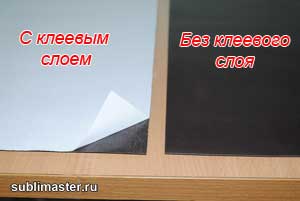
All you have to do is choose a link:
Magnetic vinyl with adhesive layer + regular photo on paper
Magnetic vinyl without adhesive layer + photo on self-adhesive photo paper.
I'll use the second option. I have glue-free vinyl 0.75 mm thick on hand and for inkjet printing Privision.
So, let's start making our magnets.
I think finding a cute photo frame won't be too difficult for you. We will assume that you already have it. Adjust the photo frame to the size you need - mine is 65 x 90 mm. With this size, 9 magnets fit on an A4 sheet. Of course, you can choose absolutely any size.
You also photographed the children. All that remains is to insert the photos into the frame. This can be easily done using or.
By the way, a large section will soon appear on the site about how to photograph children in kindergartens and schools and process photographs. Don't forget to not miss the announcement.
The photos have been inserted, now they need to be placed on a sheet of paper and printed. You can use Photoshop for this, but I like CorelDraw. I import one photo frame at a time and place it on A4 sheet. If you order more than one magnet, I duplicate it required quantity once.

All photo frames are placed, self-adhesive photo paper is inserted into the printer. We send the sheet for printing! We print with regular water-based ink.

Now we will stick the photo paper onto the magnetic vinyl. I first cut it into A4 sheets. More precisely, they turn out to be a little smaller - 20.5 x 29 cm. The width of the magnetic vinyl roll is 61.5 cm. I cut it equally into three parts. And I deliberately reduce the length a little; with my size of magnets this is quite enough. You also try to calculate everything so that there is less waste.
To ensure that the photo paper lays flat on the vinyl without bubbles or creases, just watch me do it and repeat.
First, turn the sheet face down and bend the backing paper about 15mm along the short edge of the self-adhesive.
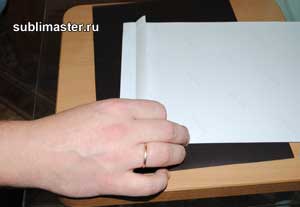
Now we turn the sheet over and, holding the edge with the folded paper (not letting it stick), place the sheet exactly on the magnetic vinyl.

Having positioned the sheet as needed, carefully glue the edge of the sheet to the vinyl and iron it well with a dry soft cloth.

Now our sheet is securely attached to the magnetic vinyl and will not move anywhere. Left hand place it under the sheet, grab the edge of the protective paper and begin to smoothly pull it to the side, exposing the adhesive layer, and right hand Using a rag, smooth the sheet onto the vinyl with upward and downward movements.

So we smooth it to the end.

Set the resulting sandwich aside for 15 - 20 minutes so that the adhesive layer sets well. Now the magnets can be cut. A reciprocating cutter is ideal for this purpose, but you can do just fine without it.
A metal ruler and a utility knife are what you need. To ensure that the knife cuts rather than tears the vinyl paper, keep the angle of the knife as small as possible to the surface.

Renew the knife blade by breaking off the dull part. I usually do this after cutting the next A4 sheet.
Here are the first nine magnets ready.

I put each magnet in a separate bag. I have them 75 x 120 mm. This bag costs pennies, and parents really like the individual packaging.

That's the whole process. As you can see, nothing complicated. Now let's do some math.
I bought magnetic vinyl without glue 0.75 mm thick for 310 rubles for linear meter(width 0.61 cm), which is 504 rubles per square meter or 30.3 rubles per A4 sheet (rounded to 31 rubles).
I bought self-adhesive for 100 rubles for 20 A4 sheets. This means one sheet costs 5 rubles.
31 + 5 = 36 rubles.
36 rubles: 9 magnets = 4 rubles per piece!
Let me remind you that I sell them for 120 rubles. I know that some people sell similar magnets for 150 rubles.
Now a few words about quality. Water-based inks have a serious drawback - they fade quite quickly. Particularly compatible inks. If your customers' refrigerator is located near a window, the magnet on its door may fade within a year. In this case, I will advise you to print the photos in a darkroom and glue them onto vinyl with an adhesive layer. In this situation, the cost of your magnet will increase by 2 - 3 rubles, but it will not fade over the years.
Alternatively, the magnet can be covered with a thin cold laminate (laminating film). This makes the process a little more complicated, but the magnet looks great!
You can also purchase an inexpensive corner cutter and beautifully trim the corners of your magnets.
In a word, I gave you an idea. How you put it into practice is entirely up to you. Now you know how to make a magnet with a photo. Take my word for it, such magnets are in constant demand in kindergartens and schools!
There are several ways to make a magnet at home. The first and second methods are suitable for simple home experiments and for showing to children. The third and fourth methods are somewhat more complicated and require care and caution.
To create a magnet you will need the most simple materials available at hand:
The simplest electromagnet made of wire, battery and nail
We take a metal blank and wrap it with copper wire. A total of 300 turns should be obtained. We connect the ends of the wire to a battery or accumulator. As a result metal blank will be magnetized. How strong its field will be depends on the power of the current coming from the power source.
Method 2
First you need to make an inductor coil. The future magnet is placed inside it, so a compact size blank is used. The procedure is exactly the same, except for the fact that the number of turns of wire should not be 300, but 600. This method is good if you need to make a magnet of increased power.

Copper wire on ferrite magnet
Method 3
Involves the use of mains electricity. The method is quite complex and dangerous, so manipulations must be verified and careful. A fuse is added to the standard set of accessories, without which it will not be possible to create a magnet. It is this that is connected to the inductor coil, inside of which there is a metal workpiece. The fuse is connected to the network. As a result, it burns out, but at the same time manages to charge the object inside the coil to high levels.
Be careful! Such experiments pose a danger to life and often lead to a short circuit in the electrical network! When choosing this method of manufacturing magnetic elements, take the necessary precautions and prepare a fire extinguisher that will allow you to quickly extinguish a possible fire.

A special magnetometer will help you evaluate the result of the work - it will show how strong the resulting product is.
Method 4

Magnetic head in an open hard drive
Disks have a magnetic head that is used to control the writing and reading of data. The second step is to completely disassemble HDD and gain access to this head. On it are curved plates made of a neodymium-iron-boron alloy. They can be glued to steel members, but are often held in place by their own magnetic force. The largest neodymium magnets are found in the oldest hard drives.

Of course, the easiest way is to buy a neodymium magnet of the desired shape and strength. On the other hand, if you have several non-working hard drives, then it would be extremely imprudent to simply throw them away.
The World of Magnets online store offers you to buy neodymium magnets at the most attractive prices. Select suitable products from the presented catalog and place an order. Purchase finished products with the necessary parameters - it is always easier, faster and more profitable than trying to make neodymium magnets yourself.
For many people, a magnet is still a mystery, although in principle people became acquainted with this metal and phenomenon a very long time ago. Even then, a whole system for the production of various magnets was developed. Today this is far from uncommon, and even powerful magnets can be made at home.
Making a magnet using improvised materials
Of course, for many this will even seem like something supernatural and may even be a shock, but even now, sitting at home, most people can make a magnet with their own hands. Below are four methods that describe how to make a powerful magnet at home.
Method No. 1
The first and probably therefore the simplest way: to implement it you just need to take any object that can be magnetized (the object must be metal) and move it several times along permanent magnet, and this should be done only in one direction. But, unfortunately, such a magnet will be short-lived and will very quickly lose its magnetic properties.
Method No. 2
This magnetization method is performed using a 5 or 12 volt battery or accumulator. Most often it is used for magnetizing screwdrivers and is performed as follows:
A copper wire of a certain length is taken, which will be enough to wrap the screwdriver shaft 280 - 350 times. The wire from transformers, or the one intended for their production, is best suited.
The object is insulated; in this case, the entire shaft of the screwdriver is wrapped using electrical tape.
The winding itself is carried out and connected to the battery. One end is to the plus, the other to the minus. The winding should be carried out turn to turn, evenly. The insulation must also be tight.
As a result of these manipulations, it will be much more pleasant to work with a screwdriver. This operation can turn any old unnecessary screwdrivers into a truly convenient tool.
Method No. 3
This option describes how to make a powerful magnet quite in a simple way. In fact, it has already been fully described above, but this particular method involves a different material. In this case, ordinary metal will be used, or rather a small piece of it, preferably cubic in shape, and a more powerful coil. Now the number of turns needs to be increased 2-3 times for magnetization to be successful.
Method No. 4
This method is very dangerous and is strictly prohibited for use by people who are not electrical professionals. It is carried out strictly in compliance with safety precautions, the main thing is to remember that only you and no one else bears responsibility for life and health.
He talks about how to do strong magnet at home, while spending a small amount of money. In this case, an even more powerful coil, wound exclusively from copper, will be used, as well as a fuse for a 220-volt network.
The fuse is needed so that the coil can be turned off in time. Immediately after connecting to the network, it will burn out, but during this period of time it will have time to go through the magnetization process. The current strength in this case will be maximum for the network and the magnet will be quite powerful.
DIY powerful electromagnet
First, you need to figure out what it is. An electromagnet is a whole device that, when a certain current is supplied to it, works like a regular magnet. Immediately after cessation, it loses these properties. How to make a powerful magnet from an ordinary coil and iron was described above. So, if you use a magnetic circuit instead of iron, then you will get exactly the same electromagnet.
In order to figure out how to make a strong magnet at home that will work from the network, you just need to remember a little information from the course school physics and understand that as the coil, as well as the magnetic circuit, increases, the power of the magnet will also increase. But this will require more current to reveal the full potential of the magnet.
But neodymium remains the most powerful; they have all the most desirable properties and, despite their strength, are small in size and weight. How to make neodymium magnets with my own hands and whether this is even possible and will be discussed further.
Making a neodymium magnet
Because of complex composition And special technique production, the question of how to make a neodymium magnet with your own hands at home disappears by itself. But many are still interested in how to make neodymium magnets, because it would seem that if you can make an ordinary magnet, then it is also quite possible to make a neodymium one.
But everything is not as simple as it seems in reality. Serious companies are engaged in the production of such magnets; they use special technologies very powerful magnetization of the material. And this is in addition to the fact that an alloy that is quite difficult to extract and produce is used. Therefore, the answer to this question can be clearly - no way. If someone manages to do this, then he can easily open his own production, since necessary equipment he will already have it.
Application of created magnets
Application for industrial and economic purposes
Used in various electrical appliances. They are especially common in devices equipped with speakers. Any dynamic head includes a magnet, ferrite or neodymium; in rare cases, others are also used. Magnets are also used in furniture production, toys. In production, when filtering bulk materials.
Use at home
Refrigerator magnets are one of the most common uses of magnets. Also, some use them to stop meters in order to reduce the fee by public utilities, but doing so is strictly prohibited, and even impractical.
Conclusion
Based on this article, you can understand how to make a powerful magnet at home, without spending any money on it. special effort and material resources. But people who do not understand electricity and generally have no idea how it works should not experiment with a powerful network, because it is serious and very dangerous for human life.


