You have decided to renovate your balcony. You naturally face the question of what type of glazing to choose. Currently, the miracle of construction thought can offer several options with different characteristics insulation from moisture, noise, heat preservation. I propose to dwell on each of them in more detail so that you can make the right and conscious choice so that the balcony pleases you and meets the functions assigned to it. Warm or cold balcony - let's try to answer this question.
IN summer time such a balcony can become a place for pleasant relaxation, a greenhouse or even a bedroom. IN winter period suitable, if only for storing some homemade preparations that are not afraid of frost. If you do not require more from this room, then you can safely choose this option. Most Popular modern type cold glazing is glazing with aluminum sliding frames.
Cold balcony without take-out

Cold balcony With take-out


A distinctive feature of a cold balcony is its efficiency. A balcony can be made for only 8,000 rubles, but the final price depends, of course, on the complexity of the project.

In addition, the cold type of balcony repair includes:


When choosing a cold type of balcony, you need to pay attention Special attention on materials for finishing the walls and floors of the room. Wallpaper, drywall, and PVC panels are definitely not suitable for these purposes. They are not intended for rooms with temperature changes, high humidity. It's better to give preference wooden lining, PVC lining for external repair work, artificial stone.
As flooring You should not choose linoleum or laminate. They will quickly become unusable due to changing temperature and weather conditions. The most suitable option would be a wooden floor or trim floor tiles. It should be understood that a cold balcony does not require the use of additional insulating materials.
This type of balcony makes it possible to use the room at any time of the year, in any weather conditions. Warm glazing is carried out using plastic windows. Single or double glazing.


It should be noted that to create a high-quality warm balcony you need two key ingredients: warm glazing, insulation with thermal insulation materials. One without the other will not work to the desired extent.
There is a third option. It is neither warm nor cold. Located in the middle. Glazing is carried out with a plastic profile, but with sliding system windows The design is not so heavy. Protects against noise and heat loss to a greater extent than with aluminum glazing. The cost of this option varies from 11,000 to 16,000 rubles

In combination with finishing with insulating materials, a rather warm balcony can be obtained, especially if the room is equipped with additional heating devices.
8918 0 0
A warm balcony can partially solve the problem of lack of space in a cramped apartment. He might become cozy office, a smoking room, a clothes dryer, a meeting place for friends over a drink…. kgm, tea and even a small game room for children. In my article I will try to answer a number of frequently asked questions about insulation and heating of balconies.
A little effort - and the balcony will turn into a full-fledged living space.
So, how to make a balcony habitable and warm?
In temperate climates, you should prefer foam blocks or aerated concrete with a density of D600. The porous structure of the material will allow you to do without additional insulation. If winter temperatures in your region fall below -15 - -20C, you will still have to insulate the fence.

Yes. For this purpose it is collected wooden frame, to which the frames are attached and external cladding- , profiled sheet, etc. The cross-section of the frame is determined by the requirements for insulation; Usually a 100x50 mm beam is used, which allows you to lay slab insulation 10 cm thick. The timber is attached to the floor with anchors, and to the fence railings with bolts with wide heads through pre-drilled holes.

The frame elements must be treated with an antiseptic, which will protect the wood from rotting and increase its fire resistance. Waterproofing is needed between the bottom beam and the concrete slab: it will prevent the absorption of moisture into the wood in damp and rainy weather. This role can be played by a couple of layers of roofing material or bitumen mastic.
Another option - complete dismantling fencing and installation of panoramic glazing. There are a couple of problems here, however:

Both problems are solved by installing an impost in a metal-plastic frame and replacing the lower part of the glass unit with an insert made of plastic-laminated polystyrene foam.
The answer is easy to find in the current regulatory documents. In general, it is equal to 100 centimeters for a building height of up to 10 floors and 110 centimeters in buildings with higher floors. If children will visit the balcony, the height of the fence should be 120 cm.

With him inside(when metal fence- right around it) a wooden frame is assembled, which is filled with glued slabs of mineral wool. It is better not to use polystyrene foam: when heated, it releases harmful styrene, and heating in the summer heat will be inevitable.

Necessarily. On the inside, the mineral wool is protected with a vapor barrier film. Windproof membrane outside it is only needed in the case of a metal fence covered with wind-permeable material (siding or corrugated sheet).
If instead vapor barrier film use thin penofol (foil insulation based on foamed polyethylene), heat loss through the fence due to infrared radiation will be noticeably reduced. The penofol foil layer should be directed towards the environment with more high temperature(in our case - towards the balcony).

I highly recommend using... laminate flooring. It is much more durable and resistant to moisture compared to wall panels from MDF. It is better not to fasten laminate boards with self-tapping screws into a tenon, but to glue them to the frame using liquid nails or silicone sealant.

To cut laminate, it is very convenient to use a grinder with a diamond wheel. The cut is perfectly smooth and with minimal deviations from the markings. Do not try to use an abrasive wheel instead of a diamond: the edges of the cut will burn.
In this case, it is better to use extruded polystyrene foam with a thickness of 30 - 40 mm, laid in a wooden crate made of a block of appropriate thickness. Expanded polystyrene, unlike cheaper foam, tolerates heat without releasing styrene. It is superior to mineral wool in terms of insulation quality with a small thickness.
It is advisable to fix the sheets on the ceiling surface. This is easy to do by spot-applying liquid nails, acrylic putty or silicone sealant. In this case, vapor barrier is not required, but it is advisable to fill the wide gaps between polystyrene foam and the frame with polyurethane foam.
It would be a good idea to use penofol here too, placing it under the sheathing bars before attaching them to the ceiling.

PVC wall panels. Cheap (about 200 rubles per square meter) and cheerful. The only drawback plastic panels- their low strength is offset by their location on the ceiling, where no one will touch them.
The panels can be fastened using either a furniture stapler or tenon screws, or with clamps.

I recommend doing it like this:

Two-layer floor insulation: penofol is laid on the bottom, polystyrene foam on top.
The instructions for choosing this particular insulation are due to the fact that it remains effective despite its small thickness. Thick insulation of the floor and ceiling will make the room uncomfortably low.
In my opinion - linoleum. If the balcony is not heated for some time, condensation or frost will inevitably form on the windows. When it melts, the water will flow down. For laminate, parquet or wooden flooring moisture will create serious problems in the form of swollen seams and deformation; It’s enough to wipe away puddles from linoleum.

Aluminum is a metal with high thermal conductivity. The frame will become a cold bridge between the street and the balcony. It will contribute to heat loss and collect condensation.
Let's sweep it aside.
Modern frames made of pressed wood are not much inferior to metal-plastic ones in terms of strength, geometric stability and resistance to moisture. However, with the same functionality, they are noticeably more expensive. At the same time, nothing prevents you from ordering metal plastic windows wood-like, with a very reliable imitation of its texture.
The conclusions, I think, are obvious.

Our choice - metal-plastic windows.
It all depends on the climate zone. Perhaps I'll just refer the reader to someone else's practical experience window operation:


When purchasing glazing, you can save up to a third of its cost by not installing it. However, installing windows yourself will completely void your warranty.
In my opinion, it would be a good idea to install an adjustable supply valve. It allows you to more accurately regulate the inflow compared to the window microventilation system (adjusting the position of the sash in transom mode). The influx of fresh air will relieve you, among other things, of condensation on the windows.
If the balcony will be equipped with a constant source of heat, the supply valve should be located directly above it. Thermal curtain will eliminate the appearance of cold drafts.

First and foremost: all options for a warm balcony with a water-heated floor are swept aside immediately and for good. Believe my experience: defrosting a heated floor on a balcony is easy, but restoring it is just hemorrhoids.
In addition: the water heated floor is laid in an insulated screed. It will raise the floor by at least 10 - 12 cm and create a serious load on the floor slab.
The most obvious solution is to place a radiator on the balcony, connected to the central heating system in parallel with the battery in the room. Even 20 years ago, housing organizations turned a blind eye to such changes in the configuration of the heating system, but now there is quite real chances receive an administrative penalty for unauthorized connection and an order to restore the original wiring configuration at your own expense.

What's in the bottom line?


The photo shows an electric film heating element. It can be laid under linoleum, laminate or tile.

I hope that I was able to answer all the questions of the dear reader. The video in this article will help you learn more about how a warm balcony can be equipped. I look forward to your comments and additions. Good luck, comrades!
IN Lately The concept of expanding the living space of an apartment through a loggia is becoming increasingly popular. Warm loggia opens up many possibilities - you can move part of the kitchen space here, place a rest room, equip a study, etc. It all depends on the preferences and personal taste of the apartment owners.
However, in order to make this room cozy and truly warm, you will need to do a number of works. This includes:
To turn a balcony into a full-fledged living space, all insulation work must be carried out comprehensively and at the same time.
Let's look at how to make a loggia warm step by step.
Glazing the loggia is the main condition for creating a thermal circuit that prevents the outside cold from penetrating inside. This is one of the most critical stages of work to transform this utility room apartments into a full room, so you should approach it as responsibly as possible.
First of all, the windows must be large enough, because the main part of the food will flow through them. sunlight to the internal rooms - living room and kitchen. The larger the glazing area, the brighter the apartment will be during the day. But on the other hand, it is through the windows that the main heat losses in the room occur - the larger the windows, the more intense the heat exchange between the interior and the street will be. Therefore, windows for insulating a loggia should be chosen as warm as possible. If these are plastic windows, then at least with a three- or four-chamber double-glazed window. If the windows are classic with wooden frames, then with double glazing.
The next stage in insulating the loggia is sealing all seams and joints. If you leave at least small through gaps at the joints balcony structures, That cold air will penetrate under the inner lining. This will be especially felt on windy winter days, when cold drafts can negate all the work on insulating the room. Therefore, before making a warm loggia, it is recommended to carefully examine the joints balcony slab, enclosing parapet and side walls. If cracks are found, you need to cover them with plaster or putty mortar.
Particular attention should be paid to window structures. All joints between window units and the parapet and walls should be carefully sealed using polyurethane foam. On the doors wooden frames in places of their contact with window blocks it is necessary to glue the seal.

After all the seams have been carefully sealed, you can begin work on insulating the external walls, ceilings and floors. At the same time, you should approach the insulation of everything with equal responsibility. internal space, with the exception of the wall between the balcony and interior rooms apartments. If necessary, a balcony entrance group can be completely dismantled. This, on the one hand, will improve the illumination of the apartment, and on the other, will allow warm air, heated by the radiators of the central heating system, to penetrate onto the insulated balcony.
Work on arranging the thermal circuit should begin by covering the façade part of the loggia with thermal insulation materials - a fence railing or a brick parapet. Experts recommend attaching insulation to the outer part of the fence. Thus, the brick parapet will cool less in winter, and condensation will not form in the interior. But in practice, this DIY option is often not feasible due to the need to attract special equipment and specialists in high-altitude work.
In addition, if you decide to insulate the balcony with outside, appropriate permission must be obtained from management company or the city architectural committee. We should not forget that the facade of the building is common property.
 Thermal insulation of the balcony from the inside
 In this regard, insulation is often done from the inside. To do this, you can use almost any available thermal insulation - polystyrene foam, penofol, mineral board, etc. The main thing is that the material has sufficient thermal insulation properties. It should be noted that it is necessary to insulate not only the front fence of the loggia and side walls. Floors and ceilings should also be carefully covered with insulation. The fact is that uninsulated concrete plates, cooling in winter from the street air, they will take heat not only from the balcony room, but also from adjacent rooms.
A vapor barrier, for example, isospan, should be laid on top of the insulation. It will prevent condensation from penetrating into the room and prevent fogging of windows with accumulation of dampness. You can also use liquid waterproofing compounds for these purposes, which are applied to concrete and brick structures from the inside using a brush. As a “finishing touch”, on top thermal insulation material Internal decorative cladding made of plasterboard, lining, and laminated chipboard is attached to the walls and ceiling. The floors are covered with boards and any floor coverings.
The video below explains very well how to insulate a loggia:
To create and maintain a comfortable temperature, a heating system should be installed on the insulated balcony.
It should be taken into account that, according to the standards for the use of residential premises, apartment owners do not have the right to make changes to the circuits of the central heating system without approval.
That is, if you decide to install on the loggia heating radiators and connect them to the heating system of a residential building, this may result in a fine and a ruling heating system apartments in their original condition.
 Loggia heating system
 Therefore, the best solution is to install electric heating devices. In this case, heaters and heat guns can hardly be considered as a constant source of heat due to the high electricity consumption. It is much more profitable to use the “warm floors” system. It consists of insulated wires placed under the floor, enclosed in a polymer film. When plugged in, they begin to heat up, giving off heat to the floor. The advantage of such a system is its greater efficiency in minimum costs electricity. “Warm floors” evenly heat the room, creating the most comfortable temperature in the lower half of the room.
Another option is refractors that work on the principle of infrared radiation. They are placed on the ceiling or at the top of the wall. When the system is turned on, the rays heat the surface of the walls and floor, creating required temperature. When installing underfloor heating systems or infrared refractors, you should strictly follow the factory instructions. And finally, it should be remembered that only comprehensive work on insulating the loggia will make it possible to turn it into a full-fledged living space.
Making a warm loggia with your own hands is not difficult. Work on creating a warm loggia can be divided into three stages: glazing, insulation, finishing and heating. It should be noted that the second and third stages of work are interconnected. Since the technology of insulation work depends on the chosen interior finishing option.
It is impossible to make a warm loggia without good glazing. Glazing itself is not only protection from precipitation, as in the case of an uninsulated loggia, but should also prevent heat from the loggia from penetrating into the street. Therefore, the glazing should be similar to that used in the apartment.

Fig.1.
Two points are very important for the loggia. Firstly, it is necessary to use an expansion profile that will compensate for the thickness of the heat insulator and interior decoration.

Fig.2.
Secondly, since there is no quarter on the loggia, it is necessary to provide special pads for the gap between the wall and the window frame.

Fig.3.
When installing sealed windows, you should think about ventilation. Solving loggia ventilation problems can be of three types.
When ordering windows, provide a window; this part of the window has not lost its relevance over the years. However, given the height of the window opening on the loggia, as well as the increase in the cost of glazing, this option is not the most successful.
Another solution would be to install special ventilation valves on the frames.

Fig.4.
If windows are already installed on the loggia and are not provided ventilation valves, then you can install the valve supply ventilation, it will solve many problems.

Fig.5.
Good windows will not allow you to make the loggia warm; this requires additional insulation. You can insulate the loggia from the outside and from the inside. In most cases, the loggia is insulated from the inside, since it is easier to do it yourself. To insulate a loggia, three types of heat insulators can be used: mats based on basalt wool, polystyrene foam and polystyrene foam.
All of them perform their functions perfectly, but differ in their thermal insulation characteristics and cost. For insulating a loggia, two main factors are important: reducing the area of the loggia due to insulation and dampening of the insulation due to the penetration of warm, humid air from the loggia into it, and as a result, loss of the thermal insulation characteristics of the insulation.

Fig.6.
The following characteristics of insulation can be given. To fully insulate a loggia, a layer 70 mm thick is required for basalt or mineral wool, for polystyrene foam 50 mm, for expanded polystyrene 30-35 mm. Expanded polystyrene and polystyrene foam do not absorb moisture, therefore, there will be no loss of thermal insulation properties. Mineral wool absorbs moisture well, therefore, additional vapor barrier is necessary.

Fig.7.
It’s up to you to decide which insulation to choose, but from the description given we can say that the most the best option is polystyrene foam, since it minimally reduces the area of the room and does not require additional protection.
With the help of insulation, the problem of thermal insulation due to heat transfer is solved, but the problem of heat transfer by radiation remains. To solve this problem, use folgoizol or analogues. With its help, the transfer of heat by radiation is blocked, and at the same time a vapor barrier is performed.

Fig.8.
The finishing of the loggia can be done with any building materials, from lining to plasterboard. However, as mentioned earlier, the insulation work also depends on the method of finishing the loggia. This is due to the fact that, regardless of the material, a pre-assembled frame is required for finishing. Moreover, depending on the finishing method, the frame design will be different.

Fig.9.
There are also two options for possible assembly of the frame: on top of the insulation or in the body of the insulation. Naturally, this in turn affects the laying of insulation.

Fig. 10.
Without going into details, we can say that when finishing the loggia PVC panels or clapboard frame used as a frame wooden blocks, which are installed horizontally. If the loggia is finished with plasterboard, then the frame is also assembled from bars, but by analogy with the frame for plasterboard from metal profiles.

Fig. 11.

Fig. 12.
Depending on the type of insulation, the frame can be assembled on top of it or in the body of the insulation. If insulation materials such as polystyrene foam or expanded polystyrene are used, then the frame can be fixed to the wall directly, through the insulation. If mineral wool is used, then it is more expedient to first make a frame, and then lay a heat insulator into it.

Fig. 13.
By and large, if the loggia is well insulated, then heating is not required. As practice shows when open door on the loggia, the temperature difference between the loggia and the room is 2-5 degrees. However, if the loggia will be used as, for example, a study, then additional heating is still necessary.
Balcony as standard - unheated room, little functional in the cold season. Modern construction technologies allow you to turn this object into a full-fledged living area, where the internal temperature is maintained at a comfortable level even in harsh winter conditions. A well-equipped warm balcony can be safely combined with a room without losing heat in the room. The main thing is not to make a mistake with the materials and follow the installation technology.
The difference between a cold and warm balcony room
The purpose of insulating any construction site- creation of a heat-insulating shell that prevents the entry of cold air from outside and retains the heat generated heating devices indoors. To achieve such indicators on the balcony and loggia, insulation work is carried out in the following sequence:
The heated floor system on the balcony serves as a source of thermal energy, without which it is impossible to achieve comfortable conditions in a cold room. No matter how high-quality the double-glazed windows and insulating materials are, they do not generate heat, and therefore by themselves are not able to provide the required temperature on the balcony.
The heating source, in addition to the heated floor, can be a wall-mounted or free-standing radiator. However, if the neighbors below have not insulated the balcony or there is basement, this is ineffective.
It is difficult to make a warm balcony with your own hands from start to finish without experience in such work. Each stage has its own difficulties. For example, for glazing you will need the help of at least one person; without the skills to install window blocks, it is better not to undertake such work yourself. The situation is simpler with internal insulation balcony At correct selection materials and compliance with installation technology, the likelihood of a high-quality result is high.

Warm balcony in section
To ensure that a sufficient amount of natural light penetrates into the room, most of the balcony space is occupied by windows. Standard glazing does not serve as a serious barrier to cold air. PVC profiles with multi-chamber double-glazed windows will correct the situation.
Why PVC? Wooden window designs, made taking into account heat saving criteria, are an order of magnitude more expensive and create an increased load on the base of the balcony. Aluminum profiles have the lowest price among all glazing options, but have low thermal resistance, therefore they are not used to create warm objects
PVC profiles have a hollow structure, inside of which there are partitions that form separate chambers. Depends on the number of cameras thermal insulation characteristics profile.
On the market you can find 3-chamber, 4-chamber and 5-chamber frame profiles. The latter are considered the best option for arranging a warm balcony or loggia with a heat transfer resistance coefficient of 0.8 m² °C/W. For comparison, in a 3-chamber profile the same parameter is 0.6 m²·°C/W.
An important point when choosing a PVC profile is the presence of reinforcement (insert into one of the internal chambers metallic profile made of durable galvanized steel), which increases the rigidity of the structure. Some manufacturers save on metal when producing frames and windows, making the product cheaper. For load-bearing structures, which include balcony glazing, this option is unacceptable.
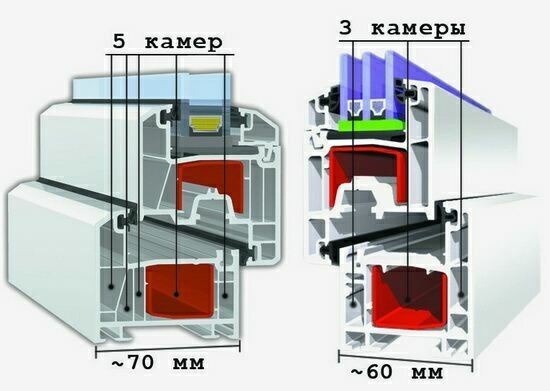
For warm glazing a 5-chamber profile with a thickness of 70 mm is used
Like metal-plastic profiles, double-glazed windows are classified by the number of chambers: 1-chamber, 2-chamber, 3-chamber, etc. A double-glazed window with one chamber consists of two glasses of 4 mm each, between which there is an air partition 10-16 mm thick. The heat transfer resistance of such a product is 0.32 m²·°C/W, which is not enough to organize warm glazing for a balcony.
To obtain the necessary thermal insulation properties of a window block, at least 2-chamber double-glazed windows with a total thickness of 32-42 mm are used. In addition, the glass must have a special coating designed to reflect thermal radiation generated by heating devices. Such energy-saving glass allows you to increase the overall thermal resistance coefficient of a 2-chamber double-glazed window to 0.9 m² °C/W.

The principle of operation of energy-saving double-glazed windows
The frame design and glazing configuration affect reliability, durability, and ease of use. If the length of the balcony or loggia exceeds 3 m, then making a solid frame is impractical for the following reasons:
For large balcony objects, the frame is divided into several separate sections of 2-3 m each. If the apartment is located below the 9th floor, then it is permissible to use a solid 3-meter product, which is lifted using ropes. In the case of a higher location of the object, delivery is possible only by stairs or using an elevator, which forces sections to be made with smaller dimensions.
Quantity warm windows on the balcony is determined by the length of the room and its interior arrangement. For a 6-meter loggia, the glazing is divided into 8 equal parts with 2-4 tilt-and-turn sashes. There is no point in making all the doors open:

Opening windows should be placed in such a way as to be able to service outer surface blind doors
When installing warm glazing on a loggia or balcony, adhere to the following rules:

Warm glazing of the balcony is carried out by a team of installers of 2-3 people
After glazing, the balcony is insulated internal surfaces: ceiling, side walls, parapet, floor. Only the back wall, which borders the room, is not subject to thermal insulation.
The rear wall is not specifically insulated for heat exchange between the balcony and the interior living space.
The main criteria in choosing insulation are the dimensions and thermal insulation characteristics of the material. For balcony insulation, polystyrene foam, extruded polystyrene foam and isolon are mainly used.
It has been used for insulation of construction sites for more than half a century. Containing 98% air, which is located in closed polystyrene cells, the foam has a low mass, so it does not load the insulated structure.
Technical characteristics of polystyrene foam:
To make a warm balcony, a 50 mm thick sheet of foam plastic is used for the walls and ceiling, the heat transfer resistance of which is 1 m² °C/W. The sheets are secured with special glue or plastic mushrooms, and the joints are treated with polyurethane foam.

Foam plastic is the most affordable insulation for balconies
Read more about the technology of insulating a balcony with polystyrene foam.
Like polystyrene foam, extruded polystyrene foam is made from polystyrene, so the materials are similar in appearance. The difference lies in the production technology. Thanks to the extrusion method it turns out polymer product with a dense structure, which increases its strength and thermal insulation properties.
Technical characteristics of extruded polystyrene foam:
When installing extruded polystyrene foam, the insulating layer is thinner compared to using polystyrene foam. It is possible to install sheets 30 mm thick, which have almost the same thermal resistance coefficient as 50 mm polystyrene foam.

Extruded polystyrene foam allows you to create a uniform insulating contour on the balcony
The “extruder” is dense and easily bears the weight of a person. used for walls, ceilings, and floor insulation without additional sheathing.
How to insulate a loggia with Penopex (modern insulation based on extruded polystyrene foam), watch the video tutorial:
Elastic polyethylene foam is well known to tourists; rugs for relaxation and overnight stays are made from this material. Even with a small thickness of the coating, foamed polyethylene is an excellent heat insulator. Builders use the material when arranging warm balconies and loggias.
Technical characteristics of foamed polyethylene:
The main advantage of polyethylene foam over other insulation materials is its size. Roll material with a thickness of only 10 mm is able to provide a heat transfer resistance of 0.97 m² °C/W, this is enough for high-quality insulation surfaces.

Foamed polyethylene on the balcony saves internal space
Compared to electric convectors and oil radiators, heated floors are a more efficient source of heat. The room is heated from the lowest point, which makes staying in it as comfortable as possible.
When using a heated floor system, heating costs will be lower and efficiency will be higher.
If you have basic construction skills, you can make a heated floor on your balcony with your own hands. First, decide on the type of system and calculate required power heat source.
The heat source in a heated floor system can be:
Inside the cable are one or two metal strands that heat up when exposed to electric current. The current-carrying conductors are insulated with silicone rubber and polyester film, shielded and reinforced with aluminum foil, so the cable can withstand high mechanical loads. The heating element is placed like a snake in the middle of a kind of “pie”, where a layer of insulation is located below (expanded polystyrene with a density of 35 kg/m³), and is poured on top concrete screed minimum thickness 30 mm.

Warm floor pie based heating cable
This is the same heating cable, but with a smaller diameter and additionally secured to a 50 cm wide mesh. This option is used if the concrete screed has already been completed and there is no point in raising the floor further. The mat is mounted directly into a layer of tile adhesive or filled with a thin layer of self-leveling floor up to 10 mm thick, on top of which a finishing floor covering is placed.

Heating mat laying diagram
In this embodiment, the heating element is a thin film with a thickness of only 0.4 mm. The film is divided into separate sections 25 cm long, which can be cut and thus form a covering area. Infrared heated floors on the balcony can be laid in thin tie under tiles or mounted directly under laminate without additional reinforcement.

Design of infrared floor heating system
A system based on a pipeline with a coolant is used on the balcony less often than an electric heated floor, due to the complexity of installation. It is impossible to make water heated floors in high-rise buildings. She has the right to live in private homes, where it is possible to connect to the heating circuit of a residential premises.

The water circuit is connected to the boiler or the nearest heating radiator
The installation diagram for a water floor is identical to the heating cable installation diagram. The difference is that instead of a cable, polyethylene or metal-plastic pipe with a diameter of 16-20 mm.
Choose suitable option A video educational program from Alexey Zemskov will help:
The main parameter of an electric floor heating system is power. This indicator is calculated at the design stage in order to order and install a system with optimal performance characteristics.
Note! Heating mats and infrared films have a fixed power per square meter. The use of a cable allows you to increase or decrease power density by changing the heater installation step.
The power of underfloor heating for a balcony is calculated based on the following coefficients:
That is, for a balcony or loggia with an area of 5 m², the total power of the cable, mat or film should be 900-1100 W (main heating) or 550 W (auxiliary heating).

Correct calculation of the power of the heating element - important stage on the way to creating comfortable indoor conditions
When laying heated floors, non-professionals often make mistakes typical mistakes, which ultimately lead to a malfunction of the system and, as a consequence, forced rework of the floor covering. Therefore, when starting installation, it is important to understand what not to do when working with a heating cable, mat or film.
How to properly make a heated floor on a balcony is shown in the following video:
A full range of works - from glazing and insulation to attaching the loggia to the room:
Main insulation mistakes:
Installation of film heated floors on the loggia:
Construction of a warm balcony and loggia is a technologically complex process that includes several key stages. Only trained craftsmen with a sufficient base of knowledge and tools can perform such turnkey work. Therefore, if you lack the necessary experience, and also do not want to spend money on correcting mistakes, entrust the installation of glazing, insulation and floor heating to professionals.


