 An excellent option for a simple wooden shoe rack that you can easily make with your own hands from wood. This shelf has a large surface area, which means you can put more of your shoes on it. This shelf is also perfect for toys, books, tools, shoes and other things. The shelf is highly mobile, which means that you can place it at any time wherever you might suddenly need it.
 You can make such a multi-storey shelf with rotating shelves for shoes using any ready-made cabinet square sizes base, or you can make the cabinet yourself again.
We fix it motionless in the closet metal pipe, and on it we already install rotating round shelves for shoes. We insert pins into these round shoe shelves, on which, in our own words, our shoes will be located.
The author of the shelf (who, unfortunately, is unknown to us) recommends making two types of round shelves, for 9 pairs of shoes (for children) and 12 pairs of shoes (for adults) (see drawings in the photo below). This way, the closet will fit a lot more shoes and its efficiency will increase.
Look step by step photos and manufacturing drawings:

Let's look at the photo how to make such a shelf for shoes from metal water pipes with your own hands. See step-by-step photos in the photo gallery below.
This shelf will look great by the window, in the bathroom, hallway, living room or kitchen.
Step-by-step photos of the masterclass:
 Floor shelf or table with shelves for shoes in the hallway
 Most likely, this option applies more to tables than to shelves. But still, we placed this model here because... We hope that this option for organizing personal information will be interesting to you, and most importantly useful, because... When arranging your home, you need to keep in mind all the options!!!
See below step-by-step photos of the master class
Photo source: dailyinteriordesignblog.com Author Photos: Josh Rhodes and Elsie Larson
 This bench shelf is also perfect for toys, spare parts or tools in the garage.
We did not post the entire remodeling process, because... It is unlikely that you will buy a shelving unit to make a bench out of it. Therefore, we have placed only the most necessary photos, so that you just get acquainted with this option. Based on the photo, you can make the same one simply from boards.
Beautifully thread the threads to support the books
Photo source: instructables.com.
 Make four planks and making a regular shoe rack is not at all difficult, but what if we add a little twist. How do you like this option? So to speak, three in one, compact, creative, on wheels. You can adjust the sizes of the main and internal shelves as you need, and mobility is very convenient.
These step-by-step photos will help you build this fun shelf.
Operating procedure
The shelf is ready, further decorative works at your discretion. You can paint it, cover the top shelf with fabric, it’s up to your taste.

 It is known that you can never have too many shoes, especially this topic is very relevant for women. But why is it needed? You can probably get by with a regular, stationary structure. The problem, as always, is free space; in a small apartment there is always not enough space, and in the summer, as you know, the number of shoes used doubles. So a folding portable shelf is perfect as an additional place to store shoes on summer season. Or another option, suddenly you have guests. In order not to create a dump in the corner of the hallway, just take your folding shelf from a secluded corner and organize it. In general, it’s a useful thing, if you like it, make your own folding shelf
not difficult.
It is known that you can never have too many shoes, especially this topic is very relevant for women. But why is it needed? You can probably get by with a regular, stationary structure. The problem, as always, is free space; in a small apartment there is always not enough space, and in the summer, as you know, the number of shoes used doubles. So a folding portable shelf is perfect as an additional place to store shoes on summer season. Or another option, suddenly you have guests. In order not to create a dump in the corner of the hallway, just take your folding shelf from a secluded corner and organize it. In general, it’s a useful thing, if you like it, make your own folding shelf
not difficult.
The most common tools are a drill, a jigsaw, and sandpaper. The materials are shown in the photo, but it is your choice, boards or plywood, see for yourself. The assembly process is shown in step-by-step photos, everything seems to be clear there. You can read the instructions on the website, link under the gallery. In the photo you can see the shelf in the unfolded and folded state. According to the author, if you have all the tools and materials, it will take a maximum of two evenings to make the shelf.
Photo source www.instructables.com/id/Folding-Shelves
 It won’t be difficult for you to make such a simple wooden shelf for your hallway with your own hands. Check out the step-by-step photos below to see how this is done. The bench shelf is suitable in the hallway for shoes, in the bathroom, in the children's room for toys, in the room for books, magazines and newspapers.
Photo source: howtospecialist.com
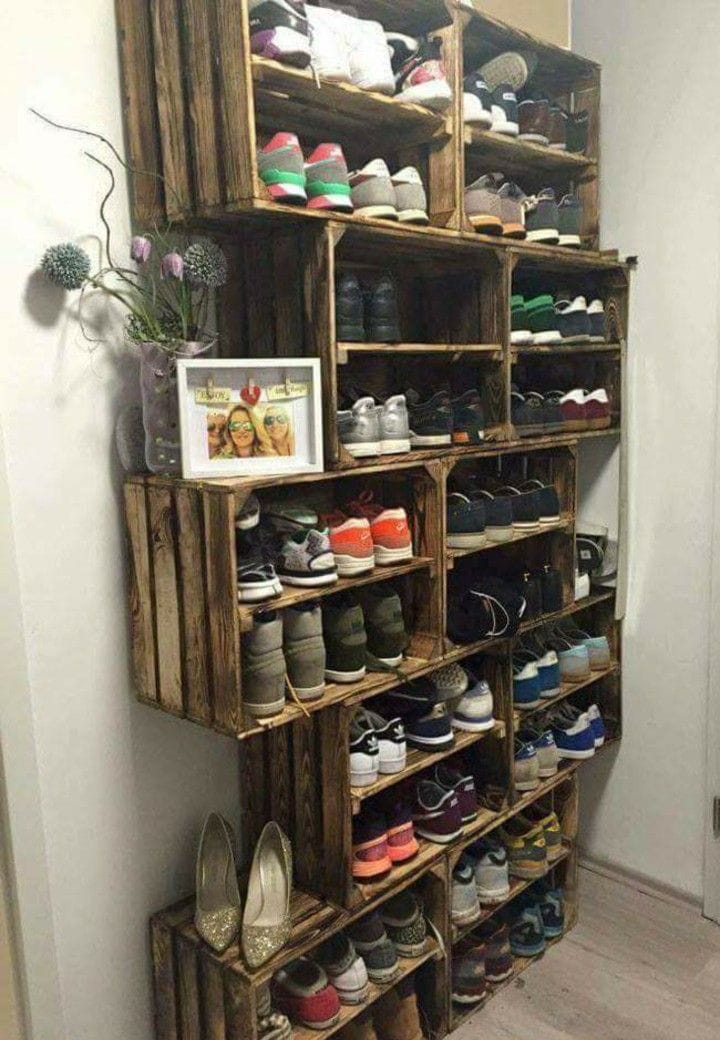
 Another option for a shoe rack made from wooden boxes, which you can do yourself.
This shelf is perfect for toys, tools for the garage, shoes, flowers (if you knock out the back wall of the drawers), as well as for other household items.
Below you can find a step-by-step master class on how to make this shelf.
Photo source: instructables.com.
 This might be the easiest shelf you've ever made.. So, you need to find five boxes and a can of paint. Then take a brush and paint the container in the color that best suits your interior. When the paint dries, that's it, the shelf is ready.
 You just have to decide how to put them. If there are small children in the house, the structure, of course, must be connected with bolts or screws, or even better, attached to the wall, this will be more reliable and safer. But if there are no children, then there is no need to fasten them; the boxes are strong enough. And the main advantage you can change the shape of the structure at least every day. Imagine, every day you new shelf and no nails
So, for example, today you have a pyramid, and tomorrow a ladder, depending on your mood.


Folded into a durable design, it is very convenient to store shoes. For variety, you can take one box and put whatever you want.


Well, what do you think of the idea?
Photo source creatingreallyawesomefreethings.com
DIY corner shoe rack for the hallway.
 Let's see how to make a simple wooden one corner shelf With rounded shelves
to your apartment. This shelf is suitable for books, magazines, for shoes in the hallway, for soap accessories in the bathroom, for tools in the garage, as well as for kitchen utensils to the kitchen.
Let's see how to make a simple wooden one corner shelf With rounded shelves
to your apartment. This shelf is suitable for books, magazines, for shoes in the hallway, for soap accessories in the bathroom, for tools in the garage, as well as for kitchen utensils to the kitchen.
Photo source: howtospecialist.com
 Watch the master class on how to make this shoe rack using the photo above.
Minuses:
Pros:
This design uses two types of boxes
All boxes are secured with regular tape.
Adviсe:
Photo source: wikihow.com
 Cardboard shoe rack
This is the most simple furniture that you've ever done. I present master class on making a shoe rack from cardboard with your own hands , an indispensable thing for new residents. In short: we make three equal strips of cardboard, press them so that they bend well, using a dull knife. We glue the sheets on one side with tape. We make triangles from the sheets and secure them with tape. Fix the resulting triangles with glue on a sheet of cardboard. The pyramid can be made of any size no matter how many triangles you make, it will be like this. Attach another cardboard sheet on top, this will be the top shelf. Anyone can do this kind of thing. This will come in handy before you buy a locker so that your shoes don’t end up lying around.

But that's not all, if there is very little space, can be done hanging shelf for shoes made of cardboard, it's even easier. You need to make a rectangle from a sheet of cardboard, like in the photo. Choose the size yourself, depending on what kind of shoes you will put there. Then lay out the box again, and using it as a template, cut the blanks. Then make as many pockets as you need, insert them into each other and secure them at the back with tape. The shelf can be hung on the wall or on the door.
Of course, not very good for winter shoes good option, but in the summer it’s very convenient, you’ll save a lot of space.


 Let's see how to do it secret door in an apartment, for example, in a closet, in a dressing room, in a wall.
If you want to make a secret room, or hide some unsightly part of the apartment, what to do more aesthetic appearance, then follow the step-by-step photo instructions below.
Don't use loops because your the structure must withstand up to 450 kg! The author of the photo advises using bolts as hinge pins, which should be welded into the frame.
IMPORTANT secure the frame strictly vertically; to do this, use a plumb line. First attach the top mount to the ceiling, and then plumb the bottom mount (see photo).
See step-by-step manufacturing photos:
Don't forget to install wooden door stopper (see photo). Attach a magnet to this stop to keep the door pressed against the wall. Be careful when choosing a magnet; it should attract neither too strongly nor too weakly.
IMPORTANT!!!: according to the rules fire safety: all entrances to rooms containing ovens or gas stoves And gas pipes, must be clearly visible.
Photo source: wikihow.com
with your own hands
Just as a theater begins with a coat rack, so does any apartment with a hallway. Shoe racks are not just a useful piece of furniture, they are part of the interior design, so if you are a hobbyist creative solutions, you can start surprising guests from the hallway. In this collection you can see some interesting ideas unusual shelves for shoes
.
A shoe rack is not a closet or a sofa, it is easy to make with your own hands. It's much easier to do this if you already have finished project . Of course, you can draw a sketch yourself if you have experience in this matter, but it’s easier to use ready-made diagrams; why reinvent the wheel.
For example, using this scheme to make a shoe cabinet is not at all difficult
Species shoe shelves a lot of - The main ones include Bona, Slim, Coupe, Cabinet, or shoe rack - shoe rack.  For the manufacture of some of them, various mechanisms are often needed, but today it is not a problem to buy any accessories in furniture store. To save space often use slim shelves, although they have design features, if desired, such a shelf can be made independently. Of course, making it yourself is quite difficult; you need to purchase a lot of different accessories. It’s easier to buy ready-made ones and assemble them yourself. You can see how this is done in this detailed diagram.
In this collection you can find schemes various types shelves If you have experience with wood structures, these drawings can help with proportions and dimensions.
When planning the interior of hallways, one problem most often arises - not enough space. To save a little space, you can use various tricks, for example, here is one of the methods, though only for women's shoes with thin heels. This feature women's shoes can be used. Attach a long handrail to the wall at a distance of 5 centimeters and the shoes will be held solely by the heel. 
If such an original shelf is beautifully decorated, it looks very original 

from beer do it yourself for shoes
 Let's look at how to make a shoe shelf (rack) from beer bars glass bottles with your own hands. If you already have four beer bottles (or champagne bottles) and two boards, then consider that you have already done half the work. Of course, in addition to this, you will also need inexpensive fasteners, which can be bought at almost any hardware store.
 Choose beer bottles with long necks.
The boards for the shelves are sanded and covered with dark varnish.
Surprisingly, these glass bottle shoe racks are distinguished by their durability, as they can support the weight of an adult.
By placing one such shelf on another you will get shoe rack from glass bottles.
See step-by-step photos of the master class:
The source of the photo could not be determined(((
We learn about the huge variety of shelves for only when we start looking suitable option milking my hallway. Closed and open, one, two and who knows how many tiers, hanging, floor, wall - in general, very different. To get an idea, check out this gallery
And this is only a small part of the options
For residents of small apartments, the issue of placing shoes in the hallway is a very pressing issue. Families with children know what it means to have shoes scattered throughout the apartment. The problem is no less pressing for those who like to select a variety of accessories to complement their look. To maintain order in your home and conveniently arrange each pair, it is not at all necessary to buy expensive shelves from the assortment of furniture stores. Make convenient devices for storing shoes you can use available materials, if you show your imagination. Here are some examples for inspiration.
Making such an interior item is quite simple. The four boards are connected to each other using furniture screws. Thin ones are attached to the cabinet facades wooden planks. The best paint for painting is water based. Optional top part can be made contrasting and adapted for sitting.
The idea is brilliant in its simplicity. To avoid dirtying the floor with dirty soles of boots and sneakers, you just need to keep them suspended. 
They make a lot of things out of such an affordable and practical thing as pallets. They are also suitable for making shoe racks. Building such a piece of furniture is quite simple, since parts of the pallets for the hallway can be left untreated.

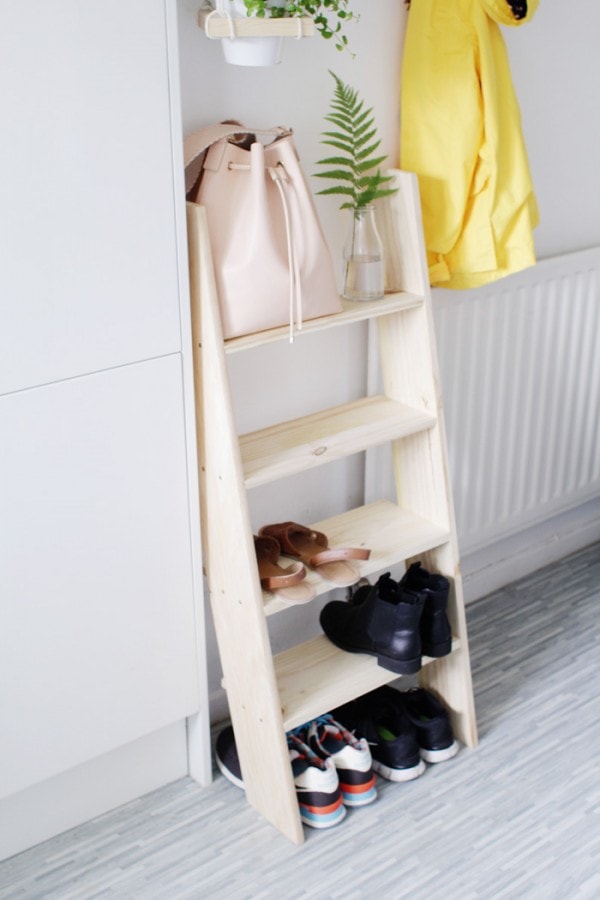
For this idea it will work as a ready-made wooden staircase, and made independently from planed boards. The main thing is that the steps are located at an angle so that shoes do not stain the wall.
Wooden boxes are another universal remedy for lovers original furniture. If you place the drawers vertically, they are suitable for storing tall autumn and winter shoes. Lateral surface can be adapted to store keys, accessories for hoopoe behind shoes and other useful little things.

In spring and autumn, the weather is very changeable, and shoes of almost all seasons can be relevant. Such simple design with shelves different heights allows you to store Autumn boots next to sandals and sneakers.
Very original design can be created by combining several wooden hexagons, each of which is suitable for storing one or even several pairs of shoes, depending on their size.

An ordinary piece of furniture can become a real hallway decoration if you glue it to back shelves special film or paper with printed text. With this design, it is better to choose a neutral color for the shelf itself.

True skateboarding fans always have a few old boards that have fallen into disrepair. As a last resort, you can turn to fellow hobbyists for help. Multi-colored shelves are great for storing sports shoes.

The design of shelves of different heights allows you to store shoes for different weather conditions. A small mirror in the hallway will allow you to evaluate your image before leaving the apartment.

It is very convenient to store shoes in closed drawers located on the shelves of the bench in rustic style. This storage method gives the hallway a neater look, since shoes are hidden from view.

So that the design does not seem cumbersome, it is better to choose boxes from thin plywood and arrange them in the form brickwork. The strength of such a cabinet is ensured by a wide board to which individual shelves are attached.
By placing regular wide shelves diagonally, you can significantly save space in the hallway.

An original piece of furniture can easily be made from pipes left over after a bathroom renovation. To attach the shelf parts together, special adapters from a plumbing store are suitable.

Bars of the same size are attached to the wall using special movable corners. When folded, the structure is decorative panel, and if necessary turns into space for storing shoes and accessories.
An excellent option for a simple wooden shoe rack that you can easily make with your own hands from wood. This shelf has a large surface area, which means you can put more of your shoes on it. This shelf is also perfect for toys, books, tools, shoes and other things. The shelf is highly mobile, which means that you can place it at any time wherever you might suddenly need it.
You can make such a multi-story shelf with rotating shelves for shoes using any ready-made cabinet with a square-sized base, or you can make the cabinet yourself again.
We fix a metal pipe motionlessly in the closet, and then install rotating round shelves for shoes on it. We insert pins into these round shoe shelves, on which, in our own words, our shoes will be located.
The author of the shelf (who, unfortunately, is unknown to us) recommends making two types of round shelves, for 9 pairs of shoes (for children) and 12 pairs of shoes (for adults) (see drawings in the photo below). This way, the closet will fit a lot more shoes and its efficiency will increase.
See step-by-step photos and manufacturing drawings:
Let's look at the photo on how to make such a shoe rack from metal water pipes with your own hands. See step-by-step photos in the photo gallery below.
This shelf will look great by the window, in the bathroom, hallway, living room or kitchen.
Step-by-step photos of the masterclass:
Floor shelf or table with shelves for shoes in the hallway Most likely, this option applies more to tables than to shelves. But still, we placed this model here because... We hope that this option for organizing personal information will be interesting to you, and most importantly useful, because... When arranging your home, you need to keep in mind all the options!!!
See below step-by-step photos of the master class
Photo source: dailyinteriordesignblog.com Author Photos: Josh Rhodes and Elsie Larson
This bench shelf is also perfect for toys, spare parts or tools in the garage.
We did not post the entire remodeling process, because... It is unlikely that you will buy a shelving unit to make a bench out of it. Therefore, we have placed only the most necessary photos so that you can simply familiarize yourself with this option. Based on the photo, you can make the same one simply from boards.
Beautifully thread the threads to support the books
Photo source: instructables.com.
Make four planks and making a regular shoe rack is not at all difficult, but what if we add a little twist. How do you like this option? So to speak, three in one, compact, creative, on wheels. You can adjust the sizes of the main and internal shelves as you need, and mobility is very convenient.
These step-by-step photos will help you build this fun shelf.
Operating procedure
The shelf is ready, further decorative work is at your discretion. You can paint it, cover the top shelf with fabric, it’s up to your taste.
It is known that you can never have too many shoes, especially this topic is very relevant for women. But why is it needed? You can probably get by with a regular, stationary structure. The problem, as always, is free space; in a small apartment there is always not enough space, and in the summer, as you know, the number of shoes used doubles. So a folding portable shelf is perfect as an additional place to store shoes for the summer season. Or another option, suddenly you have guests. In order not to create a dump in the corner of the hallway, just take your folding shelf from a secluded corner and organize it. In general, it’s a useful thing, if you like it, make your own folding shelf
not difficult.
The most common tools are a drill, a jigsaw, and sandpaper. The materials are shown in the photo, but it is your choice, boards or plywood, see for yourself. The assembly process is shown in step-by-step photos, everything seems to be clear there. You can read the instructions on the website, link under the gallery. In the photo you can see the shelf in the unfolded and folded state. According to the author, if you have all the tools and materials, it will take a maximum of two evenings to make the shelf.
Photo source www.instructables.com/id/Folding-Shelves
It won’t be difficult for you to make such a simple wooden shelf for your hallway with your own hands. Check out the step-by-step photos below to see how this is done. The bench shelf is suitable in the hallway for shoes, in the bathroom, in the children's room for toys, in the room for books, magazines and newspapers.
Photo source: howtospecialist.com
Another option for a shoe rack made from wooden boxes, which you can make yourself.
This shelf is perfect for toys, tools for the garage, shoes, flowers (if you knock out the back wall of the drawers), as well as for other household items.
Below you can find a step-by-step master class on how to make this shelf.
Photo source: instructables.com.
This might be the easiest shelf you've ever made.. So, you need to find five boxes and a can of paint. Then take a brush and paint the container in the color that best suits your interior. When the paint dries, that's it, the shelf is ready.
You just have to decide how to put them. If there are small children in the house, the structure, of course, must be connected with bolts or screws, or even better, attached to the wall, this will be more reliable and safer. But if there are no children, then there is no need to fasten them; the boxes are strong enough. And the main advantage you can change the shape of the structure at least every day. Imagine, every day you have a new shelf and no nails
So, for example, today you have a pyramid, and tomorrow a ladder, depending on your mood.
Folded into a durable design, it is very convenient to store shoes. For variety, you can take one box and put whatever you want.
Well, what do you think of the idea?
Photo source creatingreallyawesomefreethings.com
DIY corner shoe rack for the hallway.
Let's see how to make a simple wooden corner shelf with rounded shelves
to your apartment. This shelf is suitable for books, magazines, shoes in the hallway, soap accessories in the bathroom, tools in the garage, as well as kitchen utensils in the kitchen.
Photo source: howtospecialist.com
Watch the master class on how to make this shoe rack using the photo above.
Minuses:
Pros:
This design uses two types of boxes
All boxes are secured with regular tape.
Adviсe:
Photo source: wikihow.com
Cardboard shoe rackThis is the easiest furniture you will ever make. I present master class on making a shoe rack from cardboard with your own hands , an indispensable thing for new residents. In short: we make three equal strips of cardboard, press them so that they bend well, using a dull knife. We glue the sheets on one side with tape. We make triangles from the sheets and secure them with tape. Fix the resulting triangles with glue on a sheet of cardboard. The pyramid can be made of any size no matter how many triangles you make, it will be like this. Attach another cardboard sheet on top, this will be the top shelf. Anyone can do this kind of thing. This will come in handy before you buy a locker so that your shoes don’t end up lying around.
But that's not all, if there is very little space, you can make a hanging shoe rack made of cardboard, it's even easier. You need to make a rectangle from a sheet of cardboard, like in the photo. Choose the size yourself, depending on what kind of shoes you will put there. Then lay out the box again, and using it as a template, cut the blanks. Then make as many pockets as you need, insert them into each other and secure them at the back with tape. The shelf can be hung on the wall or on the door.
Of course, it’s not a very good option for winter shoes, but in summer it’s very convenient and saves a lot of space.
Let's see how to make a secret door in an apartment, for example, in a closet, in a dressing room, in a wall.
If you want to make a secret room, or hide some unsightly part of the apartment to make it look more aesthetically pleasing, then follow the step-by-step photo instructions below.
Don't use loops because your the structure must withstand up to 450 kg! The author of the photo advises using bolts as hinge pins, which should be welded into the frame.
IMPORTANT secure the frame strictly vertically; to do this, use a plumb line. First attach the top mount to the ceiling, and then plumb the bottom mount (see photo).
See step-by-step manufacturing photos:
Don't forget to install wooden door stopper (see photo). Attach a magnet to this stop to keep the door pressed against the wall. Be careful when choosing a magnet; it should attract neither too strongly nor too weakly.
IMPORTANT!!!: According to fire safety rules: all entrances to rooms containing stoves or gas stoves and gas pipes must be clearly visible.
Photo source: wikihow.com
with your own hands
Just as a theater begins with a coat rack, so does any apartment with a hallway. Shoe racks are not just a useful piece of furniture, they are part of the interior design, so if you are a fan of creative solutions, you can start surprising guests from the hallway. In this collection you can see some interesting ideas for unusual shelves for shoes
.
A shoe rack is not a closet or a sofa, it is easy to make with your own hands. It is much easier to do this if you already have a ready-made project. Of course, you can draw a sketch yourself if you have experience in this matter, but it’s easier to use ready-made diagrams; why reinvent the wheel.
For example, using this scheme to make a shoe cabinet is not at all difficult
There are many types of shoe shelves - The main ones include Bona, Slim, Coupe, Cabinet, or shoe rack - shoe rack. For the manufacture of some of them, various mechanisms are often needed, but today it is not a problem to buy any fittings in a furniture store. To save space often use slim shelves, although they have design features, if desired, such a shelf can be made independently. Of course, making it yourself is quite difficult; you need to purchase a lot of different accessories. It’s easier to buy ready-made ones and assemble them yourself. You can see how this is done in this detailed diagram.
In this collection you can find diagrams of various types of shelves If you have experience with wood structures, these drawings can help with proportions and dimensions.
When planning the interior of hallways, one problem most often arises - not enough space. To save a little space, you can use various tricks, for example, here is one of the methods, though only for women's shoes with thin heels. This feature of women's shoes can be used. Attach a long handrail to the wall at a distance of 5 centimeters and the shoes will be held solely by the heel.
If such an original shelf is beautifully decorated, it looks very original
from beer do it yourself for shoes
Let's look at how to make a shoe shelf (rack) from glass beer bottles with your own hands. If you already have four beer bottles (or champagne bottles) and two boards, then consider that you have already done half the work. Of course, in addition to this, you will also need inexpensive fasteners, which can be bought at almost any hardware store.
Choose beer bottles with long necks.
The boards for the shelves are sanded and covered with dark varnish.
Surprisingly, these glass bottle shoe racks are distinguished by their durability, as they can support the weight of an adult.
By placing one such shelf on top of another you will get a shoe rack made of glass bottles.
See step-by-step photos of the master class:
The source of the photo could not be determined(((
We learn about the huge variety of shelves only when we start looking for a suitable option for our hallway. Closed and open, one, two and who knows how many tiers, hanging, floor, wall - in general, very different. To get an idea, check out this gallery
And this is only a small part of the options
Furniture designed for storing shoes can be varied. Conventionally, such pieces of furniture having different sizes And appearance, are united by a common name - shoe rack.
Furniture designed for storing shoes can be varied
Shoe racks can be presented different types furniture. It could be:
In addition to size and color, important parameters that you need to decide on when choosing include the material used in manufacturing, as well as the configuration.
Shoe racks can be open or closed.
Classification of shoe furniture is carried out not only according to the type of material used in production, but also design features, operating principle and appearance. For production, MDF, laminated chipboard, forging, durable metals and high-strength modern plastic, wicker and natural processed wood are most often used.
Standard models are usually 600-800 mm wide. More wide option is installed in spacious hallways and can have a width of 100-120 cm, which allows you to store any type of shoes and prevents deformation. Narrow models are designed specifically for small spaces, and their width, most often, does not exceed 13-18 cm, which makes convenient installation even behind a swinging door. It should be noted, that narrow structures are not intended for storing winter shoes with high tops.
A compromise option is represented by narrow shoe racks with a width of 400-500 mm, in which shoes are installed quite loosely and dry well. Some manufacturers produce narrow and tall exclusive models with a depth of 150-200 mm. Among other things, the consumer can order a model that is non-standard in shape or size, as well as manufacture it independently using standard drawings and diagrams.
 Narrow shoe rack models are designed specifically for small spaces
Widely used in fairly spacious rooms are designs equipped with a seat, which is most often covered with soft upholstery fabric, velor or leatherette. Shoe ottoman or shoe rack-bench – perfect solution for small hallways. The advantage of such models is the presence of seats installed on top of the cabinet, which will save usable space.
The seat can be equipped with a backrest, and this design resembles the appearance of a small sofa. Additional equipment for models with a seat is most often represented by sections for umbrellas and side shelves.


The open type of shoe storage includes several options that differ design features and presented:
Panel systems are popular, very stylish, but expensive designs that are easy to use and can become a real decoration for almost any interior.
Shoe racks of any size and type serve as part of the furnishings of the room, and can not only be open, corner or wall-mounted, but also vary in style. Designs can be made in the style of “modern”, “rococo”, “classic”, “baroque”, “high-tech”, “Provence” and “country”, as well as “fusion”.
Particularly popular in last years They use light and practical, incredibly attractive wicker structures that allow you to decorate your hallway in the Provence style.
 A shoe rack of any size and type serves as part of the room’s furnishings
 Traditionally, the simplest and cheapest option for shoe storage is a DIY one. wooden structure. Wood is a natural, very easy to work with and aesthetic material, characterized by environmental cleanliness. Among other things, shoe structures made of wood and treated with special antiseptic compounds are durable and suitable for installation in hallways decorated in almost any style.
At the first stage, a design sketch is developed. You can already take it as a basis ready-made diagrams and drawings of such a piece of furniture for the hallway, or develop a sketch with a designation yourself, based on the size of the room and its layout. In the drawing being executed, it is necessary to display the number and dimensions of shelves or other elements, as well as general dimensions the entire structure.
As a material for self-made Shoe racks can use MDF boards, chipboards, plywood sheets or wooden boards. One of the most durable and easy-to-use materials is plywood sheet, but even moisture-resistant plywood needs additional processing and painting. The high cost of MDF boards allows only the front part of the furniture to be made from such material, and the body of the structure, as a rule, is assembled from fairly inexpensive chipboards.
 At the first stage, a design sketch is developed
To produce a structure made in the minimalist style popular among designers, it is necessary to prepare the basic materials and working tools presented by:
All elements of the drawing are transferred to the material chosen for the manufacture of wooden shoe racks. In accordance with the markings, the parts are cut out using a hacksaw. After all the parts have been cut out, the sidewalls are drilled with the shoe construction being made. IN drilled holes It is necessary to reliably fix the metal drawers using confirmations, the end part of which must also be drilled. If the selected depth is 55-60 mm, then the diameter of the holes drilled should be 0.5 cm, and in the sidewalls - 0.8 cm. Be sure to check the coincidence of all holes made.
 Shoe ottoman or shoe rack-bench is an ideal solution for small hallways
 At the next stage, you need to securely screw four metal furniture corners. The remaining four similar furniture parts must be fixed to back wall manufactured design, which will allow them to be used as convenient wall fasteners. After the lid is screwed on, it is necessary to connect all the remaining cut out elements of the shoe structure to each other.
Very important in the process self-assembly It is imperative to check the geometry of the piece of furniture being manufactured - the diagonal direction must be the same.
On the front part of the rack in the form of a dryer, it is necessary to make markings for installation furniture hinges.After screwing them in, you need to hang the shoe rack doors. Then the place for installing decorative elements is marked, if they are provided for in the sketch, and the fittings are screwed onto the doors.
Despite the fact that the dimensions of the product depend entirely on personal preferences and the size of the hallway, the standard distance between installed mesh shelves should not be less than 30 cm, which will ensure ease of use of the structure. Among other things, shoe shelves made on the basis metal mesh, will be more convenient if they are installed at a slight angle.
On final stage it is necessary to check the completed design using building level, and also, if necessary, sanding and painting if moisture-resistant sheet plywood was used for production. As practice shows, if there is a need to perform original design spacious hall, then it is best to order a furniture product, having previously selected a design and optimal configuration that matches the style of the room.
Attention, TODAY only!
A hanger, a bedside table for shoes, a mirror - this is where you begin to get acquainted with the apartment. Homemade interior elements look especially interesting. Today we will tell you how to make a shoe rack.
You can develop an original shoe cabinet or use open sources. The second option will allow you to avoid mistakes and gain the necessary experience. A shoe rack in the hallway can be a simple two-row shelf or a carved casket with an advanced ventilation system. Today on thematic websites you can find a drawing of any furniture for shoes in the hallway.
Popular models include:
You can make any shoe rack from this list. But how to do it right? Here are the signs of impeccable shoe furniture:
With due diligence and care, anyone familiar with electrical and electrical equipment can create a shoe rack. hand tools. The main thing is to believe in yourself.
Our task is not to create another masterpiece for the Hermitage. This shoe rack will appeal to people who appreciate practical solutions no frills. This product is based on a classic dish drainer. Don't smile - it's comfortable and functional. You will see this for yourself.
Such furniture fits well into the interior of an apartment decorated in a minimalist style. By the way, it is very popular among apartment owners and professional designers.

In a house where pets live, you need to hang lightweight glass or plastic doors on the counter. They will not prevent the shoes from drying out, but will save them from the fate of becoming a toy for a puppy or a sleeping place for a kitten.
A beautiful, comfortable shoe rack is a source of legitimate pride for a craftsman. However, several nuances need to be taken into account. The characteristics of furniture depend on the materials, fittings and tools. To a greater extent, the durability of the product is influenced by the material.
Shoe dryers are made from furniture panels- They can be bought at construction stores. Along with the materials, do not forget to purchase the accessories:
The set of tools for work includes: tape measure, marker, screwdriver ( hand drill), screwdriver, Sander(sandpaper), hacksaw or electric jigsaw, hammer and pliers.

After preparation, the shoe cabinet is assembled in a few hours:
The distance between the wire shelves should be at least 0.3 meters - boots can be placed on the bottom one. However, for furniture made by yourself, dimensions are not decisive: the dimensions of the product depend on your desire. Shelves for shoes made of metal mesh will be more convenient if they are installed at a slight angle.
Later we will definitely amaze our friends and family with creativity, but for now we are learning. One of the simplest furniture options for storing shoes is wooden shelves. By the way, among aesthetic ordinary people similar products called buzzword"slim". But for us, this is an ordinary closet with shelves for shoes, elongated in height.
To work we will need a standard set of tools described above, a lath, furniture metal corners and several boards 15–20 mm thick. Two of them will be the future sides of the shoe rack, the rest will act as shelves. The height and width of the boards depend on the size of your hallway and the number of shoes. Products with a height of 90 cm and a width of 60–70 cm are considered standard.
Stages of making storage for shoes:

At the final stage, the product can be coated with a layer of varnish or acrylic paint. In fact, this furniture is the basis of most shoe racks. Let's prove this with an example. The next product is a two-piece shoe cabinet.
The master determines the dimensions and material of the furniture based on his own needs. Can be used in production MDF boards, chipboard, wood, plywood. The latter option is durable, however, at the last stage it will have to be treated with varnish or paint.

Our future shoe rack will have the following dimensions: width – 1100 mm, height –700 mm, depth –250 mm. You can change them according to your needs. We will use plywood as the main material. To create shoe furniture we will need the following parts:
Dimensions of parts are indicated with the necessary indents and gaps for cutting and edging.
Components and consumables that cannot be made at home:
Add an awl, drills and confirmation bits to the standard tools and you can start assembling.
At the first stage, a box is assembled from the side posts, lid and bottom. Minifixes are used as fastening elements. The next step is to install two internal shelves (fasteners - corners or minifixes).
In principle, there is nothing complicated in assembling such a product. By and large, this is a slightly modernized shoe rack. But you will have to tinker with the installation of overshoes. However, this process is described in the accompanying documentation. But just in case, here are the drawings:


The work is done in the following sequence:
Important! The dimensions of the parts are indicated with the necessary indents and gaps for cutting and edge cutting.
The greatest difficulty in latest version is the installation of overshoes. However, the drawings and diagrams included with it will make your work easier. By the way, if you just hang the doors, you get a regular closed shoe rack.


