Beautifully and evenly laid paving slabs in the yard are not only an aesthetic exterior of the site. but also practicality of operation garden paths and sidewalks. Despite the simplicity of the installation technology, you need to know it thoroughly, only then high-quality styling tiles will turn into a durable surface. Therefore, let's start with the advantages and disadvantages of this material for paths and sidewalks.
The products have two working layers: front and main. These layers differ in composition, and a different solution is prepared for each of them. The mold for casting one product is first filled with facial solution, which as a result should have glossy surface, be resistant to abrasion and have a thickness of ≤ 1.5-2 cm. The remaining volume is filled with the main composition - the substrate.
The solution for the front layer is made as follows:

The most widely used dispersant is the NF plasticizer (it contains formaldehyde naphthalene), the substance is produced in two varieties: A and B, you can also use the C-3 plasticizer. Both of these brands give excellent result, but brand B of the NF dispersant is more expensive, since it has a more complex composition.
It is quite simple to prepare the mixture for adding to the tile mortar in the yard: the dry powder needs to be mixed with water heated to 60 0 C, the proportions are 1 part powder and 4 parts hot water. Consumption: 1 liter is poured into 50 kg of Portland cement ready solution dispersant. After preparation, the solution can be allowed to cool before adding it to concrete mixture it is not necessary to heat it up. Dispersant storage time is no more than 5 days. Dispersant powder consumption for cement mass is 0.5-0.7%. When preparing the dispersant, be sure to use personal protective equipment (PPE) to prevent dust from entering your respiratory tract or on your skin.
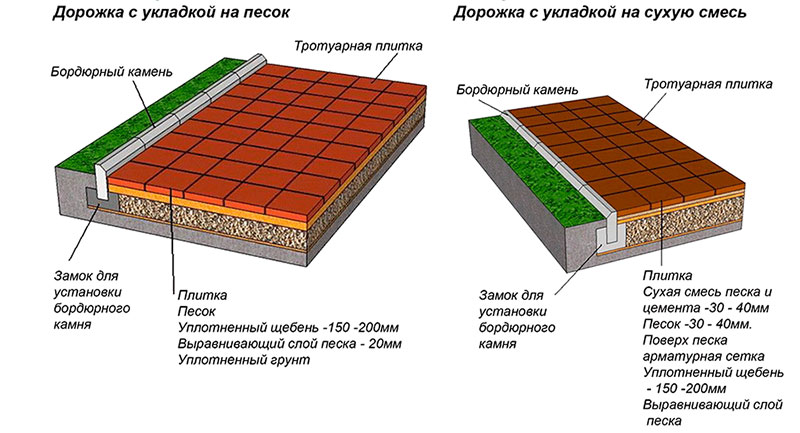
After preparatory work lay the tiles on construction site so that it is convenient and fast access from all sides. Next, prepare the base surface for laying tiles:
Despite the fact that the statement that laying paving slabs is a simple matter, for a novice builder it will present some difficulty. Before laying, you must have a laying diagram ready according to the designed drawing or pattern. If the tiles are monochromatic, then the whole process is much simpler. The pattern or design should first be marked on the prepared surface (sand), and the edges of the path should be marked along a stretched cord. If the path has a curvature, it is recommended to prepare patterns (templates) for constructing the angle of turns. The tiles are laid away from themselves, the seams between the products should be minimal, but taking into account the fact that the tiles may differ by 1-2 mm in the size of the sides.

Schemes for laying tiles for paths and sidewalks
And finally, about some of the subtleties of laying tiles:
Many people who want to lay paving slabs on their own in a residential area need to familiarize themselves with step by step instructions technological process. Paving paths and parts of the territory creates aesthetic appearance landscape, makes it possible to move in any direction, regardless of weather conditions.
The duration of operation of paved areas is influenced by the quality of the material used, and the technology for laying paving slabs in the courtyard of a private house or summer cottage. It is interesting to do the work yourself, receiving satisfaction from the result of the work. Not every home owner will trust the installation of the purchased source material invited specialists without verifying their professionalism. By following the step-by-step sequence of the process, and the advice of the specialist in this article, the final result will be achieved.
They vary in thickness, color, shape and wear resistance. On construction market Products manufactured according to different technological specifications are offered for paving; this is a casting or pressing method.
Use the following tile thickness in millimeters:
Large sizes of material are more difficult to install. The heavy slab has to be lifted frequently to level the level. When working with small and medium-sized products, it is easier to create ornaments.


The new territory of land will require preliminary layout of paths. When making markings, take into account standing objects, requiring an approach. The shortest lines of communication are not always direct. They study paths formed naturally, if they are absent, they lay new ones, leaving them unpaved for a while. Having made sure that the map of movement on the ground is correct, they begin work on cleaning the soil.

The structure of the earth influences the choice of material for the base under the tiles. Soil is divided into the following types:
It is advised to complete all work on laying communications before paving the paths. It is difficult to restore their level and pattern after dismantling. Pre-laying option allowed plastic pipe with a diameter of 50 millimeters, for subsequent use.
Geotextiles are laid on the ground for subsequent layer-by-layer embankment or concreting. It will prevent weeds emerging from the ground from destroying the seams of the joint.
The sand base absorbs excess moisture through the joints, which cannot be said about the concrete pad. In any of the selected options, the path is made at an elevation above ground level, inclined to one side, or oval. The size of the slope is 1 centimeter or 5 degrees per 1 meter of length. Water is absorbed by concrete slowly. The lack of drainage will lead to its stagnation and cause swelling of the layers. On the side of the curb, a hollow is laid - an aryk, to drain water and drain it to a specially designated place.
Laying tile products is possible under the following conditions:


Using the design of the location of the tiles and the calculated width, adjusted to the size of the material, markings are made on the ground. The stakes are driven in along the contour. On straight sections their number is limited. For round and oval shapes of areas covered by flooring, more marks are required. Stretch the thread using a level.

Before filling the mound cushion, clear the separated area of weeds, plant roots, stones, and remove upper layer turf. Loose soil watered and compacted with a tamper.
It is allowed to use geotextiles that prevent weeds from growing through the joints.

The border is installed in the prepared trench along the contour of the proposed paving, fixed with supports, and poured concrete mortar. After complete hardening, the excess parts are removed and the resulting mixture is sprinkled monolithic frame sand or earth. The border protects the structure from deformation of the contours, initially fixing given parameters, and makes the drawing complete.
The material for the contour limiter is tile, stone or plastic, installed at the level of the track, or slightly higher, with a reserve for shrinkage.
On the side of the slope (slope), lay a jug for water. It is effective when there is a natural slope of the path, providing drainage.
Depending on the wishes and type of soil, it is made with different material compositions. It is proposed to consider each option in more detail.

The artificially created bed in the ground is filled. The first layer is sand, 10 cm high, then drainage bulk material. They use gravel or crushed stone, raising the level to 20 for sidewalks, and 40 centimeters for the driveway and parking lot. Clean sand is poured onto the crushed stone, in a layer of 200 millimeters or higher, depending on the thickness of the paving blank, filling the existing voids in the mass of crushed stone, and creating a base for the tile.
The base, ready for laying, is leveled and water is sprayed on top. For the top layer, fine sand is used, which provides good fixation. After lightly moistening, allow the surface to dry, then level it and maintain the angle of inclination.

Both components are combined into a single composition. Make a dry solution in the following parts:
The mixture poured into an intermediate layer on gravel is not moistened before placing paving slabs.

Tile paving on a reinforced base, or an existing one, is not advisable. Water does not seep into the ground at the joints; the remaining moisture crystallizes in winter, increasing in volume. This properties formed ice destroy the created structure, leading to deformation of individual sections.
By adhering to the direction away from you, you ensure that the selected level of inclination is maintained. The master moves along the laid surface without violating the integrity of the substrate. Begin installation in the following order:
Leave a gap of 2-3 millimeters between the joint seams, fixing each subsequent form with wedges made of plastic or wood. Technological process provides for the deepening of the side planes by 50% of the material into the mass of the base made of sand or its mixture. Therefore, when making a substrate, take into account the thickness of the paving slabs used for flooring.
The level of control over the angle of inclination is constantly close to the worker. A stretched transverse rope becomes a guide to the height. Having laid out three rows, make control measurements. Surface convexities are corrected rubber mallet or a wooden block. Sand or dry mixture is poured under the sagging tiles.
Move carefully along an unsecured sidewalk until the surface is completely fixed. Correct protruding material by tapping from above or from the side.
Video recommendations for correct installation paving slabs from specialists
It’s not difficult to finish the work you started with your own hands. Using clean sand for the first layer, for the second filling of the openings a dry mixture with cement in a 1:1 ratio.
By vigorously directing the composition with a brush into empty spaces, they ensure the density between the tiles specified by the technological conditions. A visual assessment of the surface after cleaning from any remaining solution will help you verify the quality of the work performed.

The surface is thoroughly cleaned of residues and irrigated with water. Moisture, combining with a mixture of sand and cement, spontaneously concretes the seams. Without allowing it to harden completely, the spacers are removed. After some time, re-sprinkle the dry solution on the surface of the path, evenly distributing it over the remaining openings, clean off the residue, and water it with water without pressure, using the spray method until puddles form on the surface.
Not every paving slab in the courtyard of a private house, photos of which are presented on this page, is sold everywhere. Some options are not available to residents of small towns. Other options, on the contrary, are produced locally and are not exported to other regions.
However, general principle styling and basic color solutions can be used by you to decorate your yard. At the same time, it is not necessary to exactly copy someone’s yards; you can use the basic idea.
So, why exactly do we lay paving slabs in the courtyard of our house? There are several reasons for this.
Firstly, the paving slabs in the courtyard of a private house, the photo of which you see, are absolutely all intended for use on the street. That is temperature regime, the number of freezing-defrosting cycles, strength characteristics fully correspond exactly.
No other tile will withstand such conditions.
Any ceramic tile it will crack in the first winter season, and the porcelain tiles will be broken by you when removing snow. As they say, “every tile has its own corner.”

Secondly, those paving slabs in the courtyard of a private house, the photo of which is presented below, do not generate dust, unlike concrete, and have an almost continuous, even surface, unlike any crushed stone coverings.
That is, in the summer your yard is clean, and in the winter there are no problems with removing snow from the territory - you can use any snow removal mechanisms.
If we're talking about about paving paths, there are few options here. It's a different matter when it comes to paving the local area with tiles.
In this case, you cannot do without a pre-planned and drawn layout. You cannot start laying tiles without a laying plan or at least without a drawing with approximate distances indicated.

Otherwise you will end up with a misaligned pattern. This will not be visible from the ground, but it will be enough for you to look out of the 2nd floor window own home, and you will understand what we are talking about.
Please note that re-tiles cost more than the original installation. After all, the workers will first have to assemble all the tiles, and only then level and compact the sand cushion again and lay the tiles again.
Here are several options for laying tiles in the courtyard of a private house. As I wrote above, it is not necessary to copy what is in the photo. Enough to take general idea and compose own plan layouts for your yard.


Extremely simple technology laying paving slabs in the courtyard of a private house allows the work to be completed by an individual developer without the involvement of specialists. It is enough to organize the slopes of the pavement, install a storm drain, choose a rational layout scheme and the material to be used for paving, depending on the operational loads.
Before you start decorating your yard with FEM shaped paving elements, you need to learn how to properly plan the topography of the site and reduce the budget for landscaping the area. FEM are budget option finishing, in comparison with asphalt concrete pavement, allows you to level out unevenness by terracing and making slopes of 4 - 7 degrees, necessary for gravity removal of rain and melt runoff.
To lay paving slabs evenly and ensure maximum coverage life, you should consider the following nuances operation:

Important! Storm drainage (point or linear) is necessary in any case, since FEMs are made of concrete, rubber or polymer concrete, and all these materials retain moisture on the surface.
Laying tiles in the yard should take into account the technology features:
Advice! It is better to calculate the number of paving slabs after marking the yard, taking into account the layout scheme, the presence of curved sections and retaining walls for terracing the area.
At this stage, it is necessary to create a single horizontal level of the yard, create slopes and outline the paving area with cords. To lay paving slabs on granular mixtures, you need a rigid base, preferably from soils with a minimum clay content. In practice, the developer faces the following problems:

IN latest version steps are automatically added to transition between terraces. It is better to make them from FEM elements in order to maintain the unity of the landscape design style.
Therefore, marking the yard is necessary to outline the paving area from the surface of which it will be removed fertile layer and replaced with non-metallic material. To do this, pegs or cast-offs are used, the cord is pulled along the outer edge of the curbs or storm drainage trays.
If there is clay in the soil, it will swell in winter and destroy the coating. On a fresh embankment, on the contrary, the soil will subside over time. Therefore, in the first case, part of the soil (upper 40 cm) is replaced with an inert material that does not contain clay and swelling is minimized.

In the second option, the black soil is also removed, but to a depth of 0.6 m, a 15-20 cm layer of crushed stone is poured and a 10 cm footing is cast over the entire yard surface. Figured paving elements are laid on a layer of sand with a minimum thickness of 15 cm or paving (1/6 cement, sand, respectively) with a thickness of 10 cm minimum. All layers are necessarily compacted with a vibrating plate.
Putting road surface You can use a solution, a dry mixture, or clean sand. The first option is expensive, the coating has zero repairability and is extremely sensitive to movements of the base. Gartsovka does not provide any special advantages in comparison with pure sand, since for normal formation cement stone What is needed is at least a minimum water-cement ratio, and not moisture accidentally penetrating into the lower level.

Preparation of prancing from cement and sand.
The resource and quality of paving directly depend on the technology for installing storm gutters and garden borders. These elements are higher than paving slabs; for them, trenches will have to be deepened along the perimeter of the paving area. When laying them on the base, you should follow the following technology:

The laid curb is covered from the outside with soil, from the inside with non-metallic material (sand or crushed stone) at the same level with the surface of the underlying layer. Storm drainage trays and storm water inlets are installed at the lowest points of the paving area. To reduce the landscaping budget, storm drainage trays can replace curbs on one side of the yard.
The paving stones are laid on the manufactured base using the following technology:

Rice. 8 Alignment of the prancing rule
The rule is made from flat, dry edged boards, in the lower part on both sides of which rectangular cuts are created with a hacksaw. Unlike tiles laid with glue, you can walk on paving stones right away, so it’s easier to work with the work in front of you. This makes it possible to level the entire paving surface along the beacons and lay the FEM elements in one go, which dramatically increases productivity.

Tool-free laying of paving stones on leveled and compacted sand
Advice! With high-quality leveling along the beacons of grits or sand, the paving slabs do not even need to be upset with a rubber mallet. After filling the seams, the entire surface of the FEM is leveled and compacted with a vibrating plate, eliminating home handyman from manual labor.
It is possible to avoid cutting figured paving elements only in areas of correct geometric shape, and even then, not for all FEM collections. Trimming of paving slabs is necessary at junction points:
FEM cutting is carried out diamond blade or using an angle grinder for stone. Unlike some curbs, paving slabs do not have reinforcement and are quite easy to cut.

For some modifications of FEM, manufacturers produce halves, which allows you to do without trimming.
At the last stage laid facing material must be additionally protected from displacement during operation. To do this, the seams should be filled with quartz or washed quarry sand. Particles of these materials have torn edge, therefore they self-weed inside the seams under their own weight, are not washed out by rain and are not blown away by the wind.

Backfilling of joints with FEM.
Sand is poured in heaps over the paving area before compacting the lining with a vibrating plate, and swept with a brush over the entire surface of the yard. Bulk material penetrates into the seams on its own; after treating the surface with a vibrating plate, the remaining bulk material is swept away.
If you plan to pave the entire courtyard area with paving slabs, then the blind area is also decorated with this material by default. Therefore, it is necessary to take into account the nuances:
Therefore, a linear storm drain from surface trays should be installed along the perimeter of the blind area. Or provide drainage from a waterproof surface concrete covering into point rainwater inlets installed at the lower points of the yard, and arrange the slopes of the paving stones in their direction.

Interface unit for the blind area and paving of the yard with storm drainage elements.
Important! At the stage of manufacturing the underlying layer, pipes are laid drainage sewer from storm water inlets towards an underground reservoir for receiving and storing wastewater.
Thus, paving the yard with paving slabs on our own does not pose any difficulties for an individual developer, even on uneven terrain. It is necessary to take into account the composition of the soil and its bearing capacity depending on the operational loads on this decorative coating.
Advice! If you need repairmen, there is a very convenient service for selecting them. Just submit in the form below detailed description work that needs to be done and offers will be sent to your email with prices ranging from construction crews and companies. You can see reviews about each of them and photographs with examples of work. It's FREE and there's no obligation.
Currently, paving slabs are mainly produced by small private enterprises. Therefore, a homeowner who wants to improve his site using this material needs to know the criteria for its selection.
The first thing you need to ask the paving slab seller is how these products are made. There are two main methods: vibration casting and vibration pressing. The first is more preferable, since it does not involve continuous production, but is actually manual. Therefore, tiles made by vibration casting have a gloss and have no equal in the quality of the pattern. But the geometry of its forms is not ideal. If the aesthetic appeal of paving stones is of primary importance to the homeowner, it is recommended to choose these products.
The tile obtained as a result of vibration pressing is less beautiful in appearance than the previous one. But each product has clear shapes and is resistant to mechanical stress, high strength. These paving stones can withstand heavy weight loads, so they can be laid in areas with heavy traffic. If on local area Cars, including trucks, often enter the area; it is better to buy paving stones made using this method.
When choosing paving slabs, you need to pay attention to their color. You should know that being too bright and saturated is not an advantage, but a disadvantage. He reports that the technology was violated during the production process: an excessive amount of pigment was added. Such paving stones will quickly crack and begin to crumble.
To ensure the quality of the paving slabs, you need to take two of them and knock them against each other. If the sound produced is dull, it means that the drying technology of the products was violated. If it is loud enough, the paving stones contain a minimum of water, and therefore have the proper quality.
If the paving stones have correct forms and all products are the same size, it will be easier to install. If the edge of the tiles is carved, you need to make sure that there are no chips on the products. It is important to find out from the seller how many freeze-thaw cycles the selected paving stones can withstand. A quality product must be designed for at least 150 cycles.
If the adjacent area is planned to be used as a parking lot, you need to choose products with a thickness of at least 6 cm. If the vehicle is a truck - 7-8 cm. In other cases, it is enough to lay paving stones 2.5-4 cm thick in the courtyard of the house. If you lay the tiles on concrete base, it will last much longer.


