Mosaic is an interesting and popular finishing option; in addition, it can be easily made with your own hands from scrap materials. The easiest way is to use broken tiles.
Making panels yourself is an exciting creative process.
At home, mosaics can be made from the following materials:
The most popular option is made from tiles. The good thing about this method is that it allows you to create products similar to traditional mosaics and saves money by using inexpensive tiles, as well as their unnecessary remnants.
It is worth noting that using the same material completely different samples elements. Much depends on the manufacturing method. To figure out which technique is best for you, consider a master class on making home mosaics.

When creating a mosaic, any ceramics will do: broken dishes, old tiles
Most cheap option- this is the use of unnecessary residues after repairs, defects obtained during the process of cutting or laying tiles. Mosaic made from broken tiles allows you to turn construction waste into an extraordinary material for interior creativity.
If you have started producing mosaics at home that are as similar as possible to store-bought ones, it is better to purchase new tiles. To save money, pay attention to defective samples in a batch of tiles or leftovers. This material is sold at a discount.
Here is a short master class on making two options mosaic tiles:

Homemade mosaics are made using a tile cutter and a hammer.
If you use the second approach, try to make the elements various sizes. This way their layout will look more interesting. Additionally, create individual pieces in a precisely marked configuration to form a specific pattern.
Now let's look at how to make a whole composition from the resulting pieces. Evaluate what parts you have in stock: their sizes, shape, colors. The last factor is the most important. With single-color tiles, the most profitable solution is to create a standard layout. With different-format fragments you will diversify the monotony of the coating. Nevertheless, colored details can also be obtained from plain tiles. They are painted or covered with film.

Before laying the mosaic with glue, experiment: try to make a pattern, lay it out randomly or in the form of shapes
You have a lot of room for creativity and experimentation. If there are a lot of multi-colored fragments, make a variegated lining. The more contrasting details, the brighter the picture.
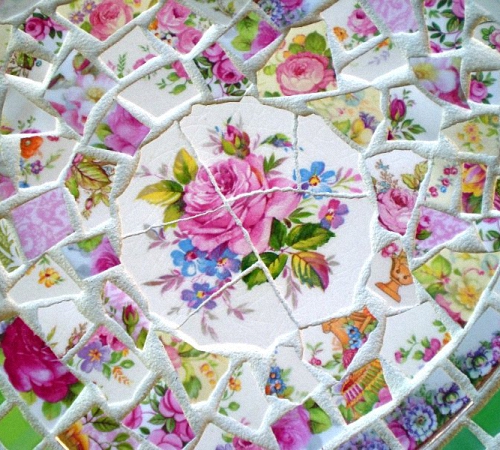
Lay out the mosaic not only according to a chaotic principle, but also according to a clearly defined pattern. To create an image on the surface to be coated, draw it on paper. The simplest patterns or simple images, such as flowers, are suitable. For more complex options, paintings and landscapes are suitable.
To ensure that mosaic tiles look neat, be extremely careful when laying them. With a chaotic installation, this will not be difficult, but if you have started an artistic composition, even the simplest ornament, take care that all positions coincide.
Laying homemade ceramic tile mosaics is done in small sections. First, glue is applied to the wall, and then tile fragments are laid out on it. The outline of the future design is drawn on the surface.
If the mosaic elements do not fit in size or shape, they are corrected with nippers.
For small errors, grind down the edge sandpaper. It is advisable to maintain the same distance between fragments. After the glue has dried, the seams are filled with grout.

Mosaic creation process
As you can see, even construction waste turns into elegant decoration interior You just have to show your imagination and arm yourself with patience.
The mosaic does not necessarily have to be ready-made or purchased. It can be laid out simply from fragments of broken tiles. Sometimes even broken dishes are used. The RMNT website will give you examples of mosaics made from fragments, and also tell you how to create such compositions with your own hands.
Remember when we showed you the most famous buildings of the iconic Spanish architect Antoni Gaudi? So, a bright mosaic made from fragments is often called “Gaudi-style mosaic.” The architect actually often used this decorative technique, creating a mosaic from fragments ceramic products, vases, dishes, regular tiles. By the way, it was Gaudi who invented hexagonal mosaic tiles, but this is a completely different topic.


Let us separately mention the use of mosaics made of broken tiles as decoration of garden paths. In this case, it is advisable to use fairly large pieces of ceramic tiles, combining them as you like. It is thanks to chaos that it can happen original decor, and the track itself will ultimately prove durable and comfortable.

In addition to designing garden paths, broken tiles, or rather, a mosaic from it, can be used:


The process of laying mosaics from broken tiles looks like this:


Please note that the process of laying broken tiles is painstaking and quite long. Therefore, if you want a quick repair and are not going to save on material, this option is not for you. But if you need original decor or have leftover tiles in your household, be sure to try it! For clarity, here is a video of laying a mosaic from pieces of tiles:
Garden path design with broken tile mosaic
Mosaic pavement of paths garden plot can be made from broken tiles. It may seem that laying broken pieces of tiles is done as expected, but in fact it is done according to certain rules that ensure the symmetry and strength of the garden path.
To lay out the outer edge of the path, large pieces of broken tiles are used, which must have at least one straight edge.
Pieces of various shapes are laid out in the center of the path.
Shards irregular shape used to fill voids between laid out elements.
The coverage of such a path depends on source material and the fantasies of the stacker.

Broken tile mosaic
Here is an interesting example of a path with a mosaic of broken tiles - with fun inserts: bat and a frog.
Before laying, you need to select and sort the pieces of tiles by size, shape and color if you plan to lay the path in a certain color scheme. The sorted pieces should be placed near the installation site so that what is needed is at hand.

Bright paths - mosaic of broken tiles
Now you need to make a base for this track. Filming upper layer turf and compact the bottom of the trench. If the soil is very loose, then it should be removed and filled with a 10 cm layer of greasy clay and compacted thoroughly.
Pour a layer of sand 5 cm thick, level the surface and compact it. After this, they begin to lay out the tiles, having previously pulled the marking cord at the required level.

Existing tiles with straight edges are laid dry along the perimeter of the path along the cord. Next, you should mix a little cement mortar, lift the first tile, put the mortar under it and press the tile by rotating it.
You need to make sure that it fits well and only then begin laying the next tiles, checking the horizontalness each time. Or you should check the slope of the path if it has one.

Mosaic made of broken tiles - patio at the dacha
Having laid the tiles around the perimeter, make the center of the path from large pieces of irregular shape, laying them directly on the sand base using the prepared mortar, removing or adding base sand if necessary.
Once you have laid all the center tiles, check the level in the center and around the perimeter. To do this, place a wooden block on the path and level the tiles by tapping them with a hammer.

Playground with mosaic made of broken tiles
The remaining free space between large pieces of tiles should be filled with small pieces of irregular shape, securing them mortar. To do this, apply mortar to the bottom of the tile with a trowel and lay it on the base.

In order to level the path surface after laying small fragments, you should use wooden block and a hammer. The joints formed between the tiles should be filled with liquid cement mortar, which will ensure the strength of the coating. In order to prevent rainwater from retaining on the path when jointing, small holes need to be made.
Can be achieved decorative effect when laying out a mosaic path, if you skillfully combine various ways styling and various materials.

Mosaic tiles for garden paths
Nowadays it is very popular to lay out a mosaic path using thick colored glass. Some will want to get a runner that looks like a patchwork quilt, using the most unusual and bright materials. Then feel free to combine colored glass, a natural stone and tiles.
In any version, the path can become a decoration of the garden and the pride of the owners. But do not overuse the number of combined surfaces, the intricacy of the pattern and the number of colors.
It is better to skillfully use different surface textures, rather than color contrasts in the material. Sometimes variegation is appropriate, for example, among a green lawn or on the path leading to the playground.

A path made of decorative slabs and large natural stones can be laid along the shore artificial stream, then its bed will set the direction of the track.
Mosaic coating does not have to be expensive. Here you can combine red brick, cobblestones, concrete, and wooden cuts. The mosaic path should be arranged and designed in accordance with the available material suitable for covering.

Example of round mosaic slabs
The main disadvantage of mosaic pavement with various materials is the difficulty of maintaining the path. In winter, the surfaces will need to be cleared of ice, or in the fall all paths will need to be covered from water with a layer of polyethylene.
I have always been impressed by those people who, working on their land, transform and decorate the space. How long have I been walking? summer cottages, I always pay attention to those of them where the handwriting of a passionate person is visible.
Antonina and I got in touch after she commented on my post with a mosaic made of broken tiles, saying that she was also creating paths from this waste material. We talked and Antonina sent me her short story with photographs. Let's admire the author's tracks!


We bought a house four years ago. At first, they grabbed their heads: the area was unkempt, the grass was waist-deep, the trees were in disrepair. But the eyes are afraid, but the hands do.
True, we had to take into account our modest capabilities, since we are, after all, although young, but pensioners.

Each person has his own approach to decorating a home: some use stained glass, some photo wallpaper, and some gravitate towards various kinds of stencils and sculptures... But of all this, mosaics deserve more attention.
Even as a student, studying at the Faculty of Design and Architecture, I enthusiastically studied the work of the great Antonio Gaudi. It’s my dream to go to Barcelona and see his unsurpassed creations live. But absolutely anyone can create at least a small piece of furniture in his style.
Mosaic cladding- one of Gaudi’s favorite techniques. For his collages, he used fragments of dishes, ceramics, and bottles. Masterpieces were made from trash!
It was these photographs that fueled my desire to create a “piece of Barcelona” at home.
Broken ceramic tiles is an excellent material for creativity. It's great for creating decorative elements both in the country house or in the house, and in the apartment.
This type of work does not require any special skills, but perseverance will come in handy. And if you, like me, want to try yourself in this field for the first time, then for starters it’s better to choose something not particularly grandiose. As you gain experience, you can move on to more complex fantasy decorative elements.
Editorial "So simple!" I have selected 25 great ideas for you on how to use remnants of broken tiles for home.


Coziness in the house is created with the help of fancy details, chosen with taste. And better - made with your own hands with soul and immense love for creativity. I hope these ideas have inspired you to create your own. decorative solutions for home.
Complete home renovations original mosaic Anyone can make broken tiles, especially if you become familiar with the basics of the work. Lay out a colored pattern from the remnants of the tiles, adding fragments of other decorative materials- one of the most simple methods creating an original panel in the bathroom, kitchen or garden design. This painstaking work is not very popular, but hand-made panels in the interior will never go out of fashion.
An original do-it-yourself tile mosaic provides enormous opportunities for the expression of imagination, especially when there is material and good ideas. In childhood, many tried to master the method of drawing by cells, when the grid on the portrait reproduces the sketch, enlarging the layout several times. Using the same method, you can reproduce any scene or portrait on the wall in one of the rooms - Viktor Tsoi, Marilyn Monroe, “the mask of a stranger,” birds, an aquarium. Good examples- mosaic from broken tiles photo.

Getting the job done is not as difficult as it seems, and if you hire a specialist, it will be expensive. None of the guests will be able to distinguish the step-by-step drawing from the artist’s work. It will take more time than the master’s workflow, but it is a pleasant creative experience, and it’s nice to post your work on social networks. If you manage to master the technique of laying mosaics from broken ceramic tiles, this can become both an exciting hobby and additional income.
Mosaic panels - execution of thematic or abstract compositions from different elements. Each drawing is unique because it is made up of fragments whose color and shape cannot be repeated. The mosaic may consist of:
Construction supermarkets throw away broken tiles, ceramic tiles and other finishing materials or sold as recyclables, and can be purchased at a reasonable price. For those who are interested in how to lay a mosaic from broken tiles, it is important to know that various materials are suitable for these purposes. This:

Tip: When laying out a colored pattern, there are not always pieces of the desired shape and size - you can pinch them off with pliers from a large fragment or cut them evenly with a tile cutter. While doing this work, protect your face from splinters and dust! When starting work, protect your eyes with safety glasses and your nose and mouth with a household respirator. Wear a robe and gloves to avoid cutting yourself from the edge of a splinter. It is important that no casual spectators are present during this process - sharp fragments of chipped tiles can injure them.
Mosaic made from special tiles like smalt is an expensive pleasure, and it is also used for interior decoration. However, the most budget option will be a self-made mosaic made from broken tiles. This finish is widely used:
If you're looking for finished pieces that inspire, look for views of Barcelona. The great Spanish architect Gaudi left to his descendants many talented examples of mosaic panels. But gifted contemporaries also left us many artistic paintings:
This universal method decorative finishing today you can try it at home country house or at the dacha, in a city apartment or at the entrance. A bench in the yard, decorated with a mosaic of broken tiles, can withstand frost and rain well; it will not lose its appearance for years. original appearance, and the material can be collected from apartment to apartment for free. You can familiarize yourself with the basics of mosaics made from broken tiles - a video where all stages of the work are described in detail.
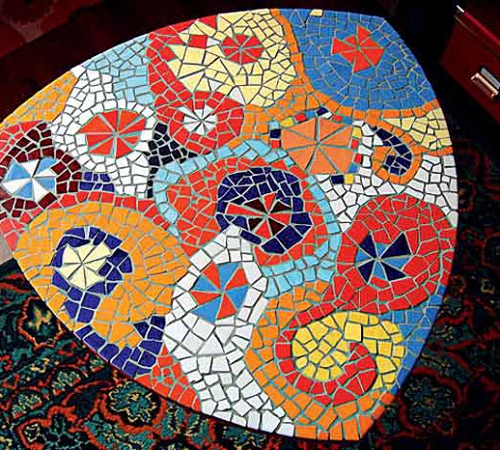
Mosaic canvases are not only an exciting creative process, but also original way savings. Against the backdrop of a stable rise in price building materials there is an opportunity to show resourcefulness by collecting elements for a picturesque panel from scrap materials. Shards of broken colored tiles helped Gaudi not only discover new facets of his talent, but also create famous masterpieces in Park Guell!
There are several options for choosing a theme for a panel:
1. Try to see your theme in the colored fragments and color scheme, then add some missing material.
2. Select ready-made diagram mosaics from broken tiles, based on personal preferences.
3. It is better to create a mosaic from broken tiles according to your own sketch, but based on familiarization with highly artistic samples.

4. You can decide to recreate the painting that inspired you in a mosaic version, using magnification of the images.
5. Try to repeat the finished mosaic masterpiece with your own color scheme.
6. Review offers for the sale of ready-made mosaic tiles, and choose the material that impressed you the most.
7. Using ready-made broken material, lay out on any smooth surface an abstract design that your imagination suggests.
It is important to have an understanding of artistic principles:
Fragments of broken tiles are also laid in the form of abstract paintings, using color contrasts. But abstraction is also built on the principle:
However, large natural elements look most impressive in mosaic canvases:
Before you start laying out the mosaic canvas on your permanent place, try to work out the layout on another surface, for example, on the floor or table. It is important to measure the size of the finished work with the surface where the mosaic will be. Try to imagine the finished result with grout between the fragments; you may need to add pigment of the desired shade to it for a continuous pattern. Black filler between large pieces of colored broken tiles will resemble stained glass, and white filler will give cleanliness and freshness.
On the image future work It’s better to think through all the options in advance so as not to regret the haste - redoing a mosaic is extremely difficult. If it is difficult to create a mosaic with a recognizable image, then it is better to start with a simple abstract composition.
Tip: When choosing pieces of tiles, it is important to sort them - higher quality fragments are suitable for central elements and semantic accents, the rest goes to the edges. Face-cut, chipped and defective pieces with cracks in the enamel are suitable for edges and chipping off missing pieces (filling voids). For mosaic tiles, the dimensions can be adjusted using nippers. When the finished panel is dry, refresh it with a glass cleaner and wipe with a fluffy rag.

Mosaics are laid out on the wall in different ways:
1. Before applying markings for the mosaic sketch, clean the wall from any remaining wallpaper, peeling paint, cement dust, and small particles.
2. Wipe the cleaned surface with a damp, clean sponge and let it dry.
3. Fill everything with starting putty, apply a small layer to the entire surface under mosaic panel, cover with a reinforcing mesh, and apply pieces of tiles onto it.
4. Mosaic fragments are well attached to a flat surface; if the pattern is initially laid out on a mesh, it is applied to a perfectly plastered surface.
5. When transferring tiles, it is better to use 2 stencils - on one the primary layout of the panel will be done, and on the second we apply markings on the wall or other plane. The most convenient way is with chalk or marker. Do not be afraid that the lines will be visible; they will subsequently be filled with a special solution - grout.
Tip: When laying scraps and fragments of tiles, protect your hands with gloves from small cuts from sharp edges. The tile adheres well only when optimal temperature- within +5°С - +30°С.

Solution for working with ceramic and tiles is in everyone hardware store. Give preference to light shades - it’s easier to evaluate preliminary results.
For cullet, use a light or transparent solution; it will be visible under the fragments. In some cases, a little foil is placed under each piece of colored glass to make the mosaic sparkle like precious stones.
The finished solution is applied to the wall with a small spatula from a corner or central area, where it is more convenient to lay out the panels. Each fragment is pressed a little into the solution so that it adheres well.
Tip: It is best to attach the lining from below, and the finished areas should be allowed to dry before the next step. It is convenient to lay out pieces of the same color using a stencil pattern, for example, a sunflower petal. On a small panel, the solution will successfully replace “liquid nails”.
Mosaic pattern from broken ceramic tiles - perfect option where there should be a curved washable surface that cannot be laid with ordinary tiles. It is good to attach small fragments along a grid with regular glue, and fill the gap with grout or finishing plaster.
This method is suitable for rounded and streamlined surfaces in the bathroom and pool, in the hallway and kitchen. Looks good:
Surfaces flowing into one another look beautiful in a bathroom, sauna or swimming pool - from the floor to the walls and outside tanks, as in the photo. The greenhouse looks picturesque, the loggia under winter Garden with rounded multi-level terraces for plants, lined with mosaics of broken tiles, shells and stones.

To master the features of laying mosaics, it is important to carefully study the master class on tiles made from broken pieces. For this you will need:
General rules:
1. It is convenient to lay out the pattern from the central semantic fragment, gradually covering new areas.
2. First, the installation of the main figures is completed, then the background and background of the composition. If a lot of mortar or glue has come out here and there, it is important to carefully remove it front side each element can be left in between.
3. At the final stage, the pattern is left to dry for a day. Then wipe the mosaic with a damp sponge to remove excess composition.
4. The final stage is grouting the mosaic canvas or filling the gaps. Special grout for tiles can be purchased at a construction supermarket or made from dry finishing putty. If you do it yourself, prepare the batch under small areas, working through each fragment.
5. If necessary, add pigment to the grout to match the mosaic tone.
6. After about 20 minutes, the grout will set and darken slightly - you can remove the excess from the tile pieces with a damp sponge.
7. When the mosaic is completed, treat with glass cleaner and wipe dry thoroughly.

Tip: When the mosaic fabric is laid out on pieces of mesh in fragments, it is important to remove excess edges so that they do not overlap. It is better to immediately cut out individual fragments using templates and lay out individual sections according to the sketch.
Mosaics for outdoor use can be laid on cement mortar with the addition of glue:
After the cement base has set a little, they begin to decorate it with mosaics. Don't forget to level horizontal surfaces building level, vertical - plumb.

Caring for mosaics is simple:


