IN modern apartments inspection hatches under tiles are no longer something new or outlandish. Every year they receive more and more wide application, their designs are improved and adapted to new requirements. Of course, this cannot but affect the price of such products - than newer technology, the more perfect the mechanism and design - the higher the cost.
On our website there is a lot of information about secret hatches from different manufacturers, from the most simple and cheap to the most complex and expensive. But, to be completely honest, not everyone can afford to install an expensive device for a number of reasons. If from famous expression“A good show-off is more valuable than money” You smiled broadly - this article is for you.
In this article we will look at how you can do inspection hatch under the tiles with your own hands. We’ll discuss what arrangement options there may be, what materials will be required, and pay attention to all the nuances and subtle points.
At the first stage, we will decide on the material from which the secret hatch under the tiles will be made with our own hands. Depending on how the wall or floor is finished, these could be:
Let us fully explain the question that arises - what difference does it make, with the exception of the floor, what material the homemade inspection hatch will be made of? And the difference is adhesive composition, with which you will stick the tiles on the door. For drywall, for example, traditional tile adhesive is used. But on the stove OSB installation ceramics is carried out using a polyurethane-based mixture.

The next step will be to choose the type of fixation of the hatch under the tiles, made with your own hands in its seat. Let us immediately note that to arrange the invisible structure you cannot use ordinary furniture hinges, and that's why. The door needs to be masked ceramic tiles. The seams between the tiles of the door and the wall should not differ from the other seams. If these requirements are met, the inspection device will not open, or the tile will be damaged when opening.
You can use specialized loops - but then it is more advisable to install a standard viewing device for access to hidden communications and nodes.
To fix the hatch you can use:
We immediately draw your attention to the fact that the magnets must be powerful enough to reliably hold the weight of the device. Magnets from souvenirs on the refrigerator will not provide reliable fixation; the door may open from an accidental touch or spontaneously, under the weight of the tiles. The consequences of such a situation may be breakage of the tiles and damage to the surfaces on which it may fall. The best solution small neodymium magnets can become. Let's consider each option in detail

Installation of an invisible hatch under the tile in an inconspicuous place (behind the toilet, under the bathtub, in a hard-to-see corner), on drywall, can be done using long screws. Let's do it as follows.
Work is done. All that remains is to sand the seams - but more on that a little later, since this procedure is the same for all types of installation of inspection hatches under tiles. A similar procedure for making a door from plywood or OSB board, depending on what became the basis for the decorative layer.
If a niche for laying communications is cut directly into the wall, and the inspection hatch under the tiles will be mounted directly on the plastered wall, we will do the following.
It is best to install the hatch under the tiles on the floor in this way, since only in this case the device is securely fixed and will not become loose or move if people walk on it.

Making a magnetic hatch under a tile with your own hands is quite simple. The only way this method of fixation differs from previous methods is that instead of drilling holes for self-tapping screws, magnets are glued to the door, as you already guessed.
A hatch is cut to the size of the niche, lined with tiles and installed in place. Along the edges of the opening, matching parts of magnets, or simply metal plates, are glued, which, when closed, fit tightly with the door magnets.
This method does not ensure complete immobility and the device can move downward under its weight. One little trick will help you avoid such problems. During installation, on the lower edge of the opening (this is the upper end of the tile located under the inspection window), it is enough to use glue mixture attach a fragment of a cross for seams, with the help of which the size of the gap is adjusted. The door will rest on it and will not disturb general order rows of cladding.
You can open such a hatch using a suction cup or a decorative handle attached to the surface (this option can be considered if the surface is rough and the suction cup does not stick to it). In the same way, you can install a floor hatch under the tiles, but only on the condition that it will not be walked on.
When building a house, the owner suburban area plans to equip comfortable spot for storing vegetables. No matter where the structure is built - under a house, garage or shed, it should be carefully sealed. The lid for the cellar is of no small importance. It should ensure the preservation of an optimal microclimate in the room. This will allow the vegetables to stay fresh for a long time.
When the cover is only in the project, an accurate drawing should be drawn up. Also, when planning a future design, you will need to take into account the following factors:

If all the tips presented below are put into practice, visiting the cellar will be much more comfortable. The basement will last quite a long time, and the items stored in it will always be suitable for use.
To figure out how to make a cellar lid in your home, you should choose its location. Once the location has been determined, you can begin arranging the entrance to the cellar. To do this, prepare tools for working with wood (if the floor is wooden). Then you can proceed directly to the door. It consists of a frame and sheathing material. It is not possible to insulate the door with special materials.
The optimal size of the hole into the cellar is 75x75 cm. A size of 0.6x0.8 m is also often found. In addition, for the door you should create comfortable handle. If it is also secret, household members will not trip over it while moving. The entrance is equipped with support bars on which the hatch will rest after closing.
The cellar lid is made from various materials- depending on the condition of the floor and the expected load on the cover. A common option is bars covered with plywood. You can also use boards equal in thickness to flooring. Sometimes tiles are used to finish the lid. Metal is also one of the common options. Anyone can build a cellar lid with their own hands according to the instructions.

A wood cover is usually constructed in the case of a plank floor. This material perfectly masks the entrance to the underground space and also looks quite attractive. In addition, the mass of such a structure is much less than that of a metal one. During the work, a saw, hammer and screwdriver are used. To process the finished lid you will need a brush.

Necessary materials:

The gap between the edges of the door and the floor should be 5 mm. In this case, the lid to the cellar will be easy to open and will also fit perfectly against the support bars.
To create a door you will need to perform the following steps:
The cover is made at a height equal to the thickness of the floor. For this reason, the structure is created layer by layer. The plywood is attached to the lathing. Thermal insulating material will be laid on it. Then comes the finishing layer of boards. The top covering should be equal in thickness to the flooring.
Covers made of metal have greater strength compared to wooden structures. Typically, such covers are installed to close a garage cellar. The outside of the lid is covered with a steel sheet. Before making a metal cellar hatch cover, prepare:
Making the lid itself is not difficult. The work is divided into several simple steps:
All that remains is to install the cover. First the frames are installed. Individual elements corners are welded to each other. We fasten the resulting frame with anchors to the concrete. One of 4 is selected as the supporting side. The edges of the outline that will protrude should be equipped with spacers. This will protect them from mechanical damage, and the cellar from penetrating warm air.

The steel lid can also be successfully used as a hatch into the cellar from the living space. In this case finishing layer can be made from plywood. This way the lid will look as natural as possible.
If the floor in the room is covered with tiles, and it is necessary to arrange a cellar under it, it is better to make a lid in uniform style. For this you will need:
There are several significant differences between a lid made of metal and a door with tiles. Making the latter is much simpler:
The cover is decorated taking into account the pattern existing on the rest of the floor surface. In order not to spoil it, you should adhere to a predetermined geometry.

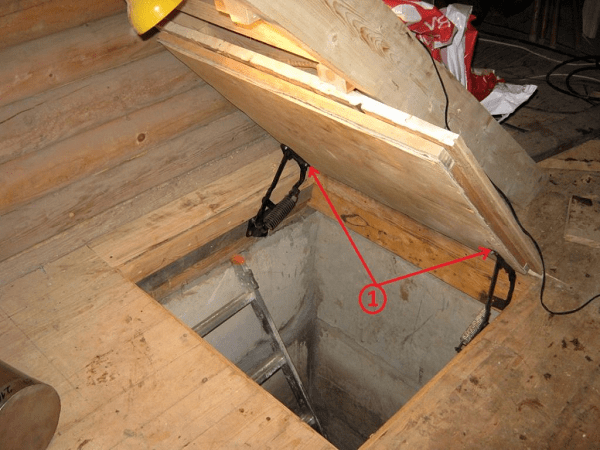
To secure such a hatch, you will need to prepare simple hinges that are used for doors. You can also use hood hinges that can lock the lid in any position when it is open. To make lifting the hatch not so difficult, you should use a special mechanism made of a spring and a rod, as well as a jamb fastening and a hinge.
You can also install an automatic opening system on the cellar door. It will be the most convenient. Such a mechanism consists of an electric motor, a power source and a toggle switch.
In order for the microclimate in the cellar to remain stable, the entrance should be reliably sealed. Thanks to this, it does not penetrate into the living space cold air, A unpleasant odors remain in the cellar.

When installing an insulating layer, use:
To seal the joints between the hatch and the ceiling, use felt tape. Also, thanks to this finishing, mechanical damage to the frame when closing the lid can be avoided.
Successful operation of the cellar is possible only with proper arrangement of the entrance. If you make the lid as high as possible, it will protect winter preparations from moisture and temperature changes. The convenience of opening the hole will depend on the right choice loops You should also consider the dimensions of the structure.
As soon as the work of constructing a cellar lid with your own hands is completed, you should think about proper finishing cellar lids. At the final stage, you may need the following advice:
These tips will help you equip your hatch in such a way that it is as convenient to use as possible.

Having understood the technology of constructing a hatch, you can understand that you can create it quite quickly with your own hands. You just need to pay attention to certain aspects of the process. However, the door to the cellar is not always made simply and without any difficulties. Sometimes you have to create a mechanized system. There are also cases when the lid must have certain characteristics:
Only by taking into account the interior, the operating features of the cellar and your capabilities, can you make a truly high-quality door.
As you can see, you can make a cellar lid with your own hands using standard tools. To construct such a structure, they are used available materials. The main thing is to carry out a certain technology of work. You should also take into account design features such as appearance doors, location of furniture in the living room above the cellar, intensity of operation of the manhole.
Until recently, most basements were planned in such a way that the entrance to the basement under the house was outside the living area of the room. Today, with the advent of new materials, it has become possible to make the hatch into the basement practically airtight and unnoticeable, which means that the construction of the basement has become simpler and cheaper, and most importantly, using the dungeon has become much more convenient due to the fact that this can be done without leaving home.
There is nothing unusual in the design of the floor hatch, from similar warehouse or garage structures it's only different external finishing and the quality of fit of parts. But still, when planning a home basement hatch with your own hands, before starting work you need to think through several basic details:
Most often, when arranging the entrance to the basement, a so-called elevator hatch is used, in the design of which the lid is opened by an electric drive or by hand. This arrangement and fastening of the lid has proven itself to be the most convenient and reliable:

In addition to the single-leaf design, there are double-leaf and sliding hatches, but such solutions for home floor systems turned out to be less convenient. Therefore, such floor hatches into the basement are used only in cases where it is necessary to build an entrance to the basement of increased size.
Important! In addition, the hatch frame must have at least a margin of strength and rigidity similar to the characteristics of the floor.
If this is not done, over time the manhole cover will sag relative to the level of the floor covering, this place will become a dirt collector and an obstacle to the normal use of the room. In addition, for certain types of flooring, high rigidity of the floor hatch cover is the main condition for laying the cladding.
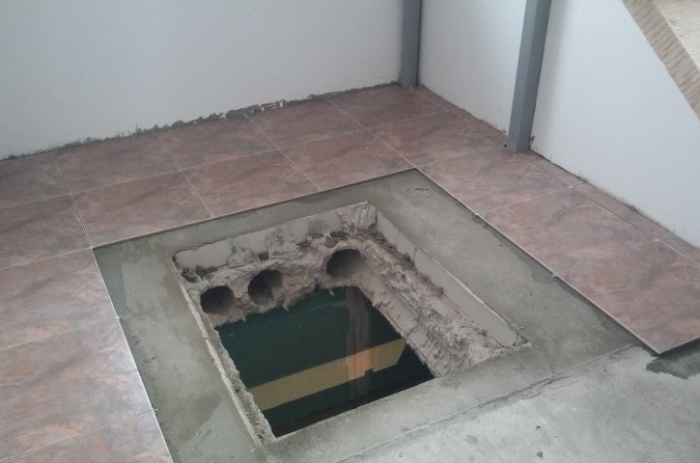
The layout of a floor hatch is practically no different from laminate or parquet flooring. To post outer surface covers with ceramic tiles, it is necessary that the base for installation has the same characteristics as the rest of the floor. In addition, the horizontal level of the lid when closed must coincide with the horizon concrete screed floor.

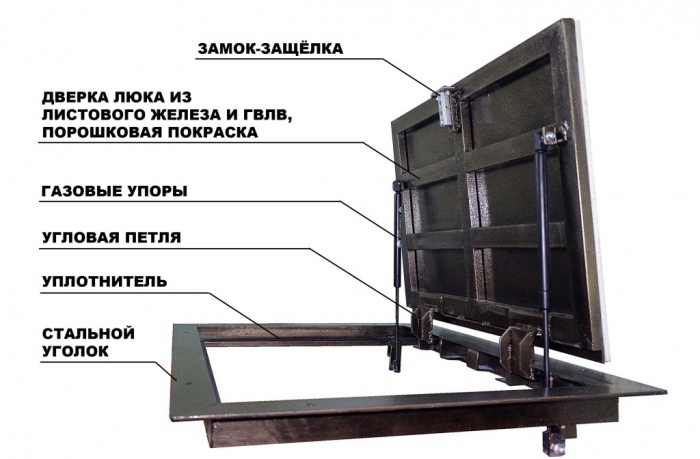
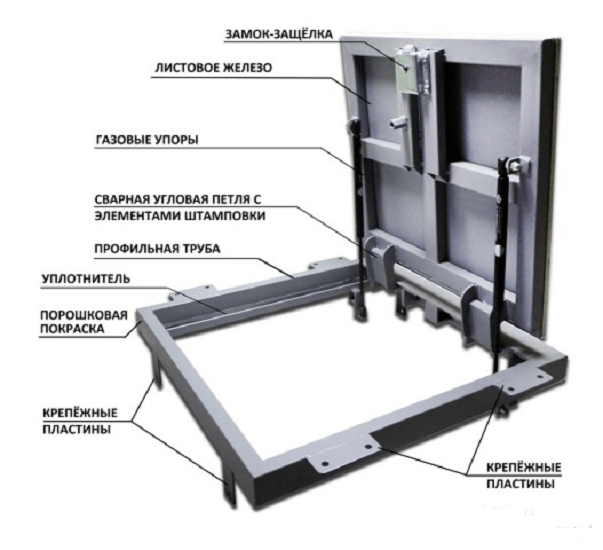
The cover frame and the mounting frame of the floor hatch are made of durable steel angle. The lower part is welded with a steel sheet, and steel reinforcement is welded inside the lid frame.
During the concreting process, a steel frame is installed on embedded elements at the entrance to the basement. After laying the tiles on the floor, the hatch cover is installed on the hinges and poured concrete mixture level so that after the mortar shrinks, the cladding can be laid exactly to the size and pattern of the floor covering.
The design of the hatch turns out to be heavy, so gas stops are installed on the frame, and a seal made of foamed polypropylene or soft rubber is laid along the contour.
First of all, the floor hatch should be convenient to use. When opening the cellar entrance cover, the door should not remain in a neutral, unbalanced position. If the floor hatch is not equipped with gas stops, the likelihood of the cover falling and injury increases by an order of magnitude.
The location for installing the entrance to the basement or cellar is selected based on the design and orientation of the basement under the house. The most convenient way is to walk up a two-flight staircase.
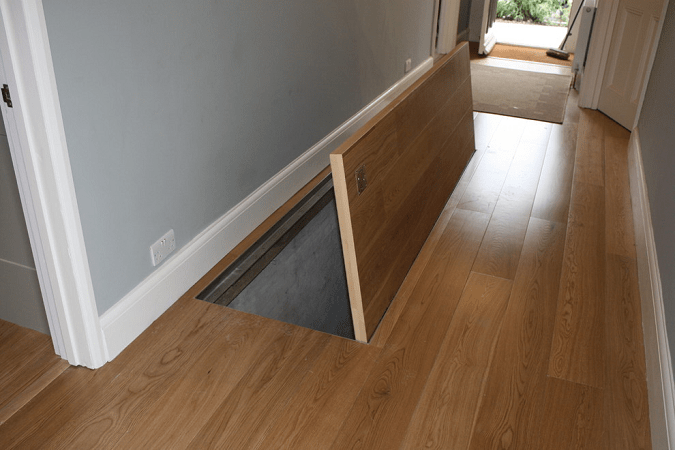
In this case, even elderly people or those with a heavy load in their hands can get into the basement without any problems. With this arrangement, the hatch is made elongated rectangular shape and is placed under the wall, for example, in the hallway or kitchen. This arrangement of the floor hatch can be considered ideal:
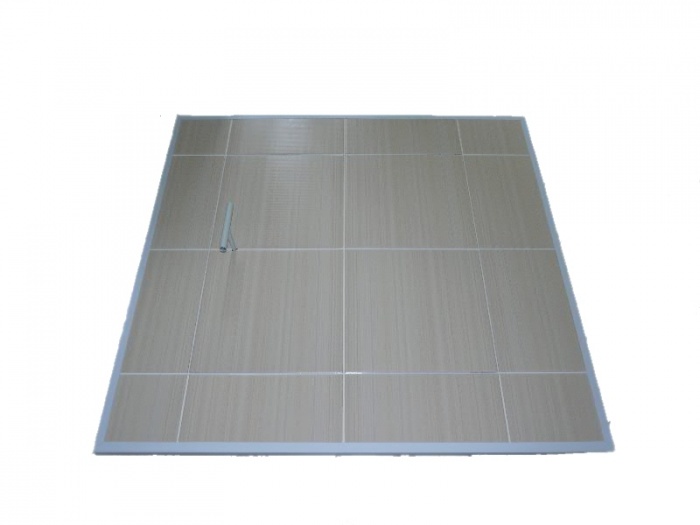
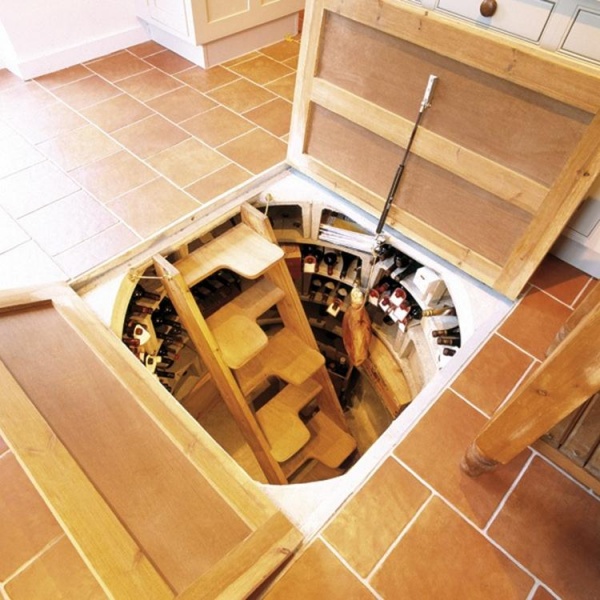
For a small basement or cellar built under the tiled floor of a kitchen or dining room for storing perishable food, wine, fruit, a spiral staircase and a round transparent hatch, as in the photo, are best suited.

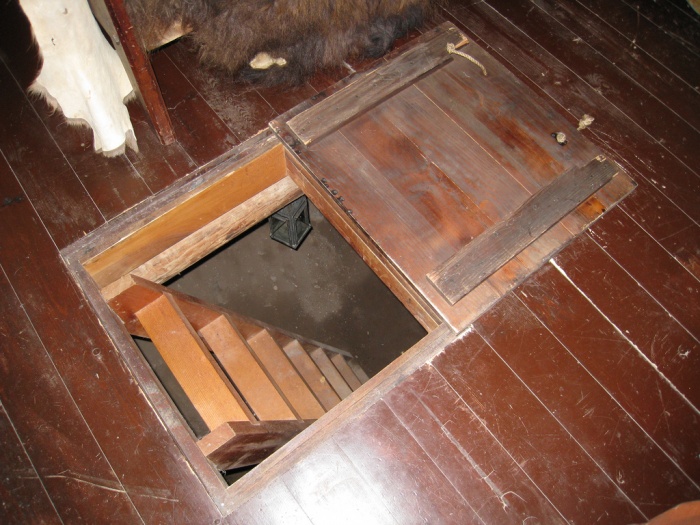
For a wooden floor or one with a laminate coating, the floor hatch is always made invisible, that is, it matches the color and pattern of the entire floor.

In a wooden oak floor in a country house or country house the floor hatch can be made deliberately rough, made of boards and fastened with classic forged hinges made of black metal. Of course, due to such a device, the lid should be located away from the passage parts of the room and house.
The most important and loaded element of the entrance to the basement are the hinges on which the hatch is hung. When you step on the lid, half the load falls on the hinge.
For lids of normal size and thickness covering the entrance to the basement, ordinary ones will suffice. door hinges, but they need to be placed in such a way that the hinge axes remain recessed into the “body” of the lid.
For heavy and thick structures, it is recommended to use luggage awnings from passenger car. Such a device for hanging the floor hatch radically changes the trajectory of the cover. Opening and closing occurs very smoothly and exactly where it fits on the frame.
The second most important element is the electric lifting drive. To understand the importance and benefits of using an electric lift, it is enough to go down into the basement at least once through a wide manhole with a massive lid and try to close the hatch with one hand. Not only is doing this while standing on a ladder inconvenient and difficult, the lid can injure a person at the most inopportune moment.
For children and elderly citizens, lifting a heavy sash sometimes becomes an impossible task, so installing an electric drive will be a very useful and necessary task. The design itself can be made with your own hands or purchased ready-made.
Advice! To avoid being a prisoner in the basement due to a broken lift, purchase a system with a manual drive release that allows you to open the hatch flap with your hands.
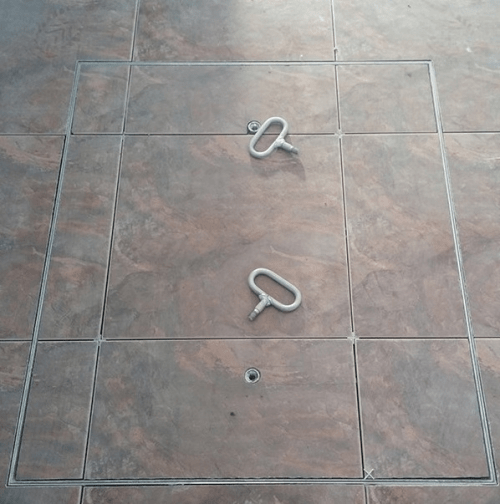
In most cases, a handle or hinge must be installed for the hatch, with which the cover can be safely lifted into position. The most commonly used handle is a key or folding handle. metal loop. Such devices are very reliable and unpretentious in operation, in contrast to beautiful locking mechanisms like the one shown in the photo.

The design of the hatch should be as simple and durable as possible. Every day the lid will be stepped on dozens of times, objects will be dropped, and dust and debris will get into the lock and cracks. If the hatch and hole into the cellar are installed in the kitchen, then it is possible that detergents and water. All this suggests that, even if you do not use the entrance to the basement, you will still need to periodically open the hatch cover, clean it, lubricate it, and repair it from time to time. Only then will the floor system last for several decades.
The process of making a basement hatch is divided into several stages: choosing the material, thinking through the design, acquiring the missing parts and implementing the project.
When developing a homemade hatch to the basement, the main points are taken into account:Additionally, the structure can be equipped with a soft closing/opening function and a locking device.
It is logical to make the hatch from boards 30–50 mm thick and a sheet of plywood. The lumber is cut to size, planed and impregnated with drying oil or an antiseptic before assembly.The procedure for making a wood lid:
Necessary materials:
The work begins with measuring the hole and drawing up a drawing.
The blanks are cut independently with a grinder, if the farm has suitable material. Otherwise, parts are ordered at the metal warehouse according to certain sizes. The steel sheet should slightly overlap the dimensions of the hole, the corners are placed at a distance of 5–10 mm from the edge. 1–2 stiffening ribs are added in the middle. The cut pieces are welded without gaps, the assembled lid is cleaned of rust and primed. Foam plastic is placed in the internal cells, which will be hidden under a thin sheet of iron. The finished hatch is mounted using anchors, after which the seal is glued. There are two ways to make the basement hatch move smoothly and lock it in the open position:The parameters of the closers are calculated based on the weight of the structure, and the attachment points are marked so that a fully unloaded shock absorber opens the lid at an angle of 90°.
It is rare to find a private house structure that does not have a cellar. It is in the cellars that a variety of products are stored, which the owners grew on their own land, and are happy to treat their neighbors in cold weather.
Housewives also store in the cellars pickles and other baked goods made with their own hands, which are the most important delicacy on the table in winter. But the presence of a cellar also implies the presence of a hatch leading into it. If you do not want to spend extra money, you will have to make a cellar hatch with your own hands.
Before you begin, you should pay attention to the following points:

Note!
The light weight of the lid should not in any way affect its strength.
In order to build a lid that is both strong and light, you should use materials such as:
Tip: For greater reliability of the structure, you should thoroughly soak all the boards with drying oil.
The price of a basement hatch becomes much lower if you build it yourself.
In order to build a cellar hatch with your own hands you will need:

In order to outside The lid looked more pleasant if you covered it with linoleum. Before fixing the linoleum, be sure to let it rest well. The linoleum needs to be secured around the perimeter of the entire hatch cover using aluminum corners. This option exterior finishing The cover is quite practical and reliable.
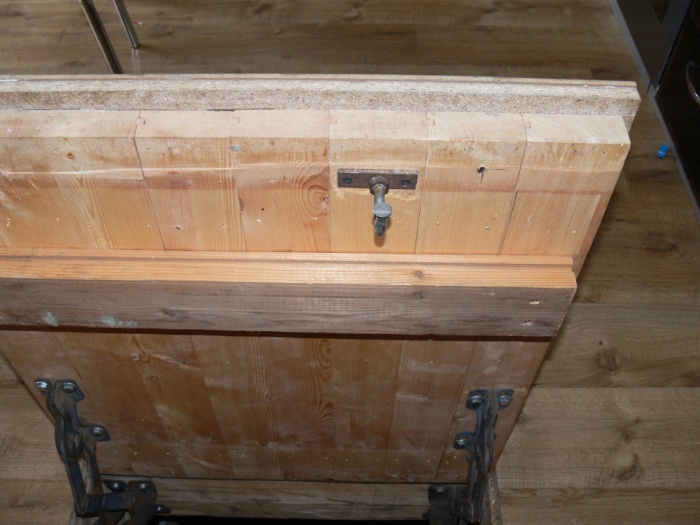
An important element of the hatch design is the handle, which should provide ease of opening and closing the lid. If you screw a handle to the lid, even if it is very beautiful, it will cause inconvenience. Your household members will, without a doubt, constantly trip over the handle sticking out of the floor.

There are very suitable designs called flip handles. At correct installation such a handle, as the instructions say, it will not interfere at all. And if necessary, it will be easy to raise and lower.
For convenience, you can provide a removable handle. This design is especially suitable for families with small children. After all, the basement is not a place for games.
If you want the hatch cover leading to the basement to not only be removed, but to be able to open and close, then you should provide hinges. Absolutely any hinges can be used; even old hinges from the hood of a Soviet car will be a completely suitable material.
When installing your sunroof cover on car hinges, you will have the following benefits:

Installation of such hinges is carried out only when the springs are removed. To begin with, the hinges are installed from the bottom. After installation, the hatch opens completely and the hinges automatically fall into place.
Installation of the cellar cover is carried out as follows:
Note!
If the hatch is installed after the floor covering has been laid, it should be disassembled around the planned opening.
In order to seal the hatch and insulate it from noise and moisture, you will need insulation. As insulation of this kind, you can use ordinary door insulation, the price of which is low. But ordinary felt tape may also be suitable.
In any case, the use of insulation can save you from such unpleasant moments as:
If you decide to make a cellar hatch with your own hands, you should take into account even the smallest nuances.

Everyone decides for themselves whether to buy a factory-made cellar hatch or make it themselves. The main thing is that the structure being installed is reliable, durable and will please you for many years. The video in this article will help you see how to make a cellar lid with your own hands.


