Metal tiles are one of the most common roofing materials. Made mainly from thin steel(although there are types of metal tiles made of copper or aluminum), stamped in such a way that ready product takes on the appearance of classic ceramic tiles, the use of which has been proven by centuries of experience.
The surface of each sheet is covered with a special protective layer of polymer-metal coating, which reliably protects the material from corrosion - the declared service life is 15-60 years. looks very solid and elegant. The weight of the material is approximately two times lower than that of slate, which makes it possible to use lightweight material and reduce the load on load-bearing elements the buildings.
If the installation is done correctly, no problems arise, although there are some disadvantages: relatively high price, the possibility of corrosion, the risk of condensation and good sound conductivity - when it rains, the roof is quite noisy. When installing, these points must be taken into account and, if possible, try to mitigate the negative impact. In this article you will learn how to make a sheathing for metal tiles and how to correctly calculate the sheathing pitch.

Fastening the coating using self-tapping screws
How to properly make sheathing for metal tiles? We'll talk about this further.
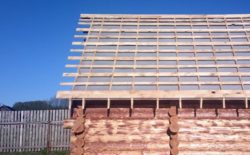
The roof sheathing for metal tiles is carried out from the lower edge of the roof in a certain sequence. We present to your attention - installation of sheathing for metal tiles ( step-by-step instruction).

Metal roofing pie
Important! It is necessary to constantly carry out all available operations to control the maintenance of the plane of the substrate; this will help eliminate deflections and increase the service life of the roof.
 Metal roofing is most dangerous due to the possibility of condensation. In this regard, no measures will be superfluous, since getting wet rafter system, and the roof itself in short term will damage the roof. You will have to completely change all the elements, which means a lot of expense and labor. Therefore, it is important to correctly carry out hydro- and vapor barrier of the roof.
The main condition will be the provision between the waterproofing film and the roof itself. This will allow moisture to evaporate, steam to escape through the membrane, and will contribute to preservation.
Air movement is ensured by the sheathing for metal tiles, which creates a sufficient gap between the layers and ensures that there are no points of contact.
CAREFULLY!
Waterproofing metal tiles is advisable even when non-residential attic, since from internal space At home, water vapor is constantly being squeezed out, which will gradually affect the roofing material. The presence of a cut-off will allow it to be removed without contact with metal, eliminating corrosion.
We invite you to watch a thematic video on self-installation battens:
In conclusion, it should be noted the importance of competent and careful installation of sheathing under metal tiles as an element responsible for the safety and effective work roofs in general. The quality of the sheathing determines the service life of the roof, and to some extent, the load on the walls and the general condition of the building. A responsible attitude to the installation of sheathing will allow you to avoid unnecessary costs of labor and money and guarantee the most efficient operation of the roof.
Thanks to the roof sheathing, the reliability and quality of laying roofing sheets is ensured. To equip the frame, you will need to know some nuances, including the dimensions of the sheathing for metal tiles.
Continuous flooring is constructed from timber or edged boards laid end to end. Distance between separate elements the frame should not exceed 1 cm. Suitable parameters for timber are 50x50 mm, for boards - 32x100 mm. Before installation, wooden elements are impregnated with antiseptics. Installing a lattice sheathing is much more difficult, although this reduces the number of consumables. The result is a reduction in financial costs and overall weight of the structure.
The lattice frame is installed after the rafters have been waterproofed. It is important not to forget about the ventilation gap between the film and the wooden structure. It is advisable to make the distance between the individual battens of the sheathing under the sheathing 350 mm: this is the distance from the cut of the bottom board to the middle of the adjacent one. In this way, metal tile sheets are fixed to the lower part of the wave. With this mount general form the roofs are much more beautiful.
The initial sheathing board is 15 mm wider than the rest. Typically, the accompanying documentation of the roofing material contains instructions on the pitch of the sheathing. The same applies to the optimal gap between frame elements: for example, taking into account the recommended frame pitch for this material is at least 300 mm.
The main parameters of the frame for metal tiles are the pitch of the sheathing and the size of the lumber. When determining optimal step The pitch size of the metal tiles is taken into account. This is a very specific indicator, depending on the type of profile being laid. The profile section at the bottom of the wave, during the transition to the next one, is the most rigid. This explains why this particular location is the most optimal for installing fasteners. Unedged or semi-edged boards are usually not used when constructing a frame.

To determine at what distance to lay the sheathing for metal tiles, the following considerations must be taken into account:
It is better to avoid joining the entire sheathing on one rafter, because the structure will not be rigid enough. A situation often occurs when the profile has a different wavelength. For this reason, the supporting structure may have different distances between frame jumpers for one type of metal tile. Lightweight, simple structures for products with a low wave height and a metal sheet thickness of 0.4-0.45 mm are constructed from 25x100 mm edged boards. More complex roofing systems usually equipped with 32x100 mm boards.

The same board is used when laying metal tiles with a significant wave height, with a sheet thickness of 0.5 mm. In both cases, the distance between the rafters is 0.6-0.9 m. Bars with a cross section of 40x60 mm and 50x50 mm are used in cases where the distance between the rafters exceeds 1 m.
Metal tiles are available in three main wavelength sizes - 300, 350 and 400 mm, which directly affects the pitch of the sheathing. This interval is set aside from the center of the jumpers. Having all the necessary data in hand, you can begin calculating the frame for metal tiles.
When laying sheathing under metal tiles in the area of the valley, chimney pipe and around skylights A solid structure is used. When arranging the frame, it is important to avoid miscalculations, as this directly affects the strength and durability of the building's roof. Sometimes, due to mistakes made, it is necessary to redo the roof, which entails significant financial losses. It must be taken into account that dismantled metal tiles cannot be used again.
Step-by-step instructions for installing lathing for metal tiles:
To additional roofing elements It is customary to include the heating system and drains. Snow guards consist of special brackets, the installation of which is carried out in a checkerboard pattern. They make it possible to prevent massive snow removal from the roof surface. Most often, buildings next to which there are sidewalks and pedestrian crossings are equipped in this way. It is also advisable to install snow retention elements above the porch or windows. More often we're talking about about tubular and lattice systems, which are often included in the kit metal tiles.

A well-equipped sheathing that meets all requirements and building codes will ensure ease and speed of installation of roofing material. If you do the work yourself, this will allow you to reduce the cost of constructing a roof by an order of magnitude: its reliability is a prerequisite for ensuring comfort indoors. To do this, you will need to know the step-by-step instructions for lathing under metal tiles.
Warning: Use of undefined constant WPLANG - assumed "WPLANG" (this will throw an Error in a future version of PHP) in /var/www/krysha-expert..php on line 2580
Warning: count(): Parameter must be an array or an object that implements Countable in /var/www/krysha-expert..php on line 1802
Corrugated sheeting is a truly universal material. It can be used to create various buildings, fences and, of course, as a roof covering. In this regard, it is especially good - it makes it possible to quickly cover any structure, and lasts a long time. But in order for such a roof to be truly durable and reliable, it is important to ensure that the roof sheathing under the corrugated sheeting is done according to all the rules.
This corrugated material is made from thin sheet steel, chrome-plated or galvanized to protect the sheet from rust. Its density and rigidity directly depend on the thickness of the workpiece used, as well as on the parameters of the corrugation. The material has certain advantages and disadvantages.

Advantages of using corrugated sheeting as a roofing material:


On a note! Corrugated sheeting can be used in the construction of cottages, residential buildings, garages, sheds, boxes, etc. Moreover, roofs can be made as single-pitched or double-pitched, with an angle of inclination of the sides up to 60 degrees.
But the material is not without its drawbacks:


NS44 corrugated sheeting for the roof - characteristics, diagram

N57 corrugated sheeting for the roof - characteristics, diagram
Corrugated sheets must be secured to the sheathing using special self-tapping screws with rubber seals. Thanks to these elements, you won’t have to worry about the material starting to rust.

The lathing, which was already mentioned above, is wooden boards, slats measuring about 30x100 mm, laid perpendicular to the rafters and secured to them using self-tapping screws or nails. The sheathing can also be made of metal, but for private construction this option is used extremely rarely.

The main function is to ensure reliability and strength roofing structure and the possibility of attaching roofing material. If the sheathing is not made, the entire roof will not be strong enough, and roof covering will deteriorate over time or cannot be installed at all (depending on what type of coating is used).

If we consider corrugated sheeting as a roofing material, then it is precisely attached to this very sheathing. The structure can also be used to carry out various communications; a ventilation gap of the required width is mounted under it, and insulation can be laid.
On a note! The sheathing can be continuous or done with a certain step, that is, there will be free space between the sheathing boards. Solid sheathing is usually used when the roof is covered soft material type bitumen shingles. This option is also installed next to chimneys and similar structures.

Table. Types of lathing.
| Type | Description |
|---|---|
| The most commonly used option for corrugated sheets. The distance between individual elements is 20-40 cm. |
| For such a lathing, the width of the gap between its parts is only 10 mm. Free space is necessary to avoid deformation wooden elements, which can change their physical parameters due to fluctuations in humidity and temperature. IN in this case When constructing a roof, plywood, chipboard, OSB and similar materials are used to construct the sheathing. It is practically not used for profiled sheets. |
| This type of lathing has the widest pitch - 50-75 cm, but it can be more. |

Installation of the sheathing is carried out after laying the waterproofing and vapor barrier materials, which will protect the roof from water and collect excess moisture from the surface of the insulation.
This roof part can also be double-layered, when slats or boards are again mounted on top of the first sheathing, which will be called a counter-lattice. In this case, the lower lathing is usually made sparse, and the upper one is made solid or with a regular pitch. The counter batten parts are mounted perpendicular to the elements of the previously completed sheathing. A two-layer sheathing can be used if there is a need to lay a thick layer of insulating material.

The width of the gaps between the sheathing elements is affected by:

The most important thing is to look at the thickness of the corrugated sheeting used, as well as the angle of the roof. According to SNiP, if the angle of inclination of the slope does not exceed 15 degrees, then it is better to “sew up” the roof with a continuous sheathing. In this case, exceptions can only be made for metal structures, which are more durable than wood. And then - even in this case, the step cannot exceed 40 cm. If the slope of the slope is 15-20 degrees, then the sheathing is often made of wooden elements and has a step of about 30-65 cm. With a slope of more than 20 degrees, the step can be even 1 m , but this option is suitable only if the corrugated sheet itself is highly durable and of excellent quality. You can navigate when choosing an option using the table shown in the figure below.

On a note! As a rule, when purchasing corrugated sheeting, you can read information directly about each type of material - manufacturers provide full information about the product, and recommended installation requirements will also be present.
In private construction, the sheathing is usually made of wood. You should opt for spruce, oak, alder - the main thing is that the material is durable. The wood must be dried, free of cracks, and as smooth and neat as possible. Before installation, it is coated with antiseptic compounds and anti-rotting agents.

To calculate the required amount of wood, you need to know such indicators as the width and length of the roof slope and directly determine the pitch itself. Next, the most basic mathematical calculations are used. It is important to remember that boards must be nailed along the cornice and ridge, and the step count begins from them. And in the area of pipes, ventilation windows and others additional elements the sheathing must be reinforced.
On a note! When calculating the amount of wood, it is necessary to take into account that some of the material may be discarded in the form of trimmings. Therefore, about 8-15% of the reserve must be added to the calculated quantity.

As for corrugated sheeting, it is better to buy material with a corrugation height of 35 mm and a thickness of about 0.6-0.7 mm. This best option With good value“price-quality-strength-reliability”. It will cost more than a corrugated sheet made of thinner steel, but it will easily withstand the average loads on the roof. When using corrugated sheeting with a lower profile height, the lathing will have to be made with a minimum pitch or continuous, otherwise the material will not last long and will be deformed.
Metal tiles "Monterrey" thanks high quality and the widest range today is one of the most in demand. But it will function properly only on a properly installed base. Let's see how and from what materials the lathing for Monterrey metal tiles is made.
Metal tiles are classified as rigid roofing materials, so continuous sheathing, which requires a significant amount of wood, is not required. However, it is important to lay the bars or boards with the correct step, the size of which depends on geometric parameters leaf.
The steel from which this roofing material is made, as well as other metals, has high thermal conductivity, so it is important to ensure that there is a well-ventilated ventilation gap under the metal tile. The resulting draft will quickly remove steam coming from living quarters to the outside, preventing it from condensing on the cold metal.
Without a ventilation gap, the appearance of moisture on the lower surface of the metal tile will be inevitable, and this leads to detrimental consequences: damp wood begins to rot, steel in places of damage protective coating- corrode.
To create a ventilation gap, the sheathing structure is supplemented with a counter-batten. These are boards that are nailed to the rafters (along) on top of a waterproofing film laid on them. And only then, parallel to the cornice and across the rafters, the sheathing itself is packed, serving as the basis for the metal tiles. The thickness of the counter-lattice boards is 20 mm, the width usually corresponds to the width of the rafter leg.
The ventilation gap will protect the roofing material and wooden structures rafter system from the negative effects of condensation
Taking into account the fact that waterproofing film laid with a sagging of 1.5–2 cm, the ventilation gap will be 35–40 mm. In order for it to be well ventilated, it is necessary to leave holes under the eaves (they are called vents) and under the ridge. If the slope is long or has a complex configuration, special devices - aerators - are additionally installed on it to allow air to escape.
In an insulated roof, the same gap should be between the insulation and the waterproofing, except in cases where a superdiffusion membrane (vapor-permeable material) is used as the latter. To minimize the amount of steam reaching the metal tiles from residential premises, the insulation on the side of the rooms is covered with a vapor barrier film.
In addition to steps imitating the surface ceramic tiles, there are transverse waves on the metal tile sheet that give it rigidity. The step between the sheathing elements should be equal to their length.
The wavelength of Monterrey brand metal tiles is 350 mm - this parameter determines the sheathing pitch
Having a lathing diagram at hand, you can easily calculate the required amount of materials
Calculation of the amount of lumber for installation of sparse sheathing is carried out taking into account the pitch between the boards. To make the task easier, you can use computer programs, but it’s not difficult to do it manually.
Let us take the following initial data as a basis:
Let's determine the number of bars (or boards) on one slope: 5: 0.35 = 14 (pieces). To calculate how many linear meters of boards are needed to install sheathing on one slope, we multiply its length by the number of laths: 8 x 14 = 112 m.p. Therefore, the entire roof will require 112 x 2 (number of slopes) = 224 m.p. The standard length of the board is 6 m.p., which means that 224: 6 = 37 (pcs.) will be needed to install the sheathing. The volume of one board 150 x 6000 x 25 (W x D x T) is 0.15 x 0.025 x 6 = 0.0225 m3.
Usually the required amount of lumber is specified in cubic meters; we will not deviate from the generally accepted rule. To translate linear meters into cubes, you need to multiply the number of boards by the volume of one of them: 37 x 0.0225 = 0.8325 m 3.
The calculation method is slightly different in the case of continuous sheathing:
The following recommendations will help you install high-quality and reliable sheathing:

TO rafter leg each element of the sheathing is nailed with two nails having a diameter of 3–3.5 mm and a length at least twice as long as the thickness of the board being attached. Please note that large diameter nails may split the wood. You can also use galvanized screws with the same diameter, but this method of fastening will be more expensive.
You should start laying metal tiles 2-3 days after installing the sheathing, when it is completely established. If you start laying right away, the weight of the roofing material may cause the lumber to shift.
Procedure:
Laths for attaching waterproofing can be cut from boards that will be used to make laths
The second row of sheathing is marked from the outer edge of the first
During the work, it is necessary to control the position of the rows for deflection, wave and other distortions: to eliminate them, wedges or slats are placed.
The functioning of any roofing material largely depends on the correct installation of the base. This also applies to Monterrey metal tiles. If you follow our advice when installing the sheathing, the roofing covering will last at least 50 years.
Warning: Use of undefined constant WPLANG - assumed "WPLANG" (this will throw an Error in a future version of PHP) in /var/www/krysha-expert..php on line 2580
Warning: count(): Parameter must be an array or an object that implements Countable in /var/www/krysha-expert..php on line 1802
Warning: Invalid argument supplied for foreach() in /var/www/krysha-expert..php on line 2735
Metal tiles currently occupy a leading position in popularity among domestic developers. Such roofs are found not only on private buildings, but also on commercial premises, factory floors, schools and government institutions. The design of the lathing largely depends on the type of roof.
The purpose of the lathing is to ensure long-term and safe operation roofs, based on these tasks, the right solution is selected. Particularly taken into account design features roofs, and they have two options.

There are cases when counter-lattice is also built for cold types of roofs, but this has nothing to do with technological necessity. This is done in two cases: if hired builders want to earn more and if they lack knowledge.
Metal tiles
There are two types of lathing; when making a specific choice, you need to understand their purpose.
Table. Types of lathing for metal tiles
| Lathing type | Purpose and brief description |
|---|---|
| To arrange the sheathing, slats or boards are used, the distance between the axes of symmetry is 300–400 mm. The specific values depend on the wavelength. In most cases it is 350 mm, but some manufacturers make roofing materials in increments of 300 mm or 400 mm. | |
| The sheathing has sections with stepwise arrangement of slats and with solid boards. Solid flooring is used in areas of valleys, roof windows, chimneys and other architectural elements and engineering structures. Solid flooring is needed not for fastening sheets of metal tiles, but for fixing waterproofing membranes. |
Every experienced master thinks over the type and parameters of the sheathing even before the start of execution construction work. This approach makes it possible to minimize the likelihood of errors, speed up the process of sheathing construction, and increase its reliability and durability.

The cost of construction largely depends on the materials used, when adopting the right decision it is possible to reduce the estimated cost by 25–30%. What can be used to make the sheathing for?
Table. Types of lumber for installation of sheathing
| Type of lumber | Performance characteristics |
|---|---|
| The most expensive option, used very rarely. The only advantage is that the process of making sheathing and installing metal tiles is somewhat simplified. The large width makes it easier to screw in self-tapping screws. | |
| They are used most often and are the best option in all respects. The dimensions of the slats are approximately 40x50 mm, the height of 50 mm ensures effective natural ventilation under-roof space of insulated roofs. | |
| The boards must be sanded, otherwise they are damaged by pests and after a few years they lose their strength. The cost is approximately 30% cheaper than slats. Unedged boards Depending on the width, you can cut it yourself into several slats. This type of lathing is made for cold roofs that do not have counter lathing. | |
| Most cheap option. Lumber has two mandatory conditions: uniform thickness and no critical damage. Used lumber is used on non-critical buildings and outbuildings. |
It is advisable to impregnate all lumber of the sheathing with antiseptics. But professional roofers skip this stage; they guarantee the tightness of the roof, which eliminates the possibility of putrefactive processes.