Stair railings are not at all that part of the interior that is determined solely by aesthetic or design requirements. On the contrary, it is this design detail that must meet very specific requirements and is clearly regulated by SNiP and GOST 25772-83.

Not only stairs need it, but also a porch, balcony, roof, platform, and so on, and in all cases the requirements for railings are different. This is due to the fact that different heights and at in different ways operation, the design must be designed for varying degrees loads. At the same time, under different conditions operation implies many different factors: sloped or flat roof, building height, number of residents, number of users, weather, appointment and so on. All possible cases are regulated by GOST 257672-83.
The fences themselves differ in their design. There are:

Solutions can have very high aesthetics if desired. However, the type of filling is not chosen arbitrarily: the instructions for fencing stairs GOST 25772-83 indicate exactly which structures can be used and where.
There is quite a large number of various staircase structures, as well as platforms and balconies. It is not surprising that there are quite a lot of railings. Moreover, the standard offers not only restrictions, but also design drawings of all types. Steel fencing for balconies and roofs in accordance with GOST 25772-83 should be as follows.

External staircases must have railings. Best made of metal at a height of 120 cm.
Landings are fenced according to the same classification:
Railings are elements of the fencing structure on the stairs. Handrails ensure safe movement when going up or down the stairs. Railings come in a variety of shapes and materials. Some designs are simple in appearance, safe and convenient. Some can become the real thing designer decoration, especially if the stairs are located indoors.
You can make a railing for the stairs from various materials: metal, wood, concrete, plastic. The easiest way to make barrier structures with your own hands is from metal and wood. In the article you can find detailed information on how to choose the right material, process it and make beautiful and reliable railings for the stairs.

The height of the fencing structure must be at least 90 cm.
Handrails should be smooth and not too wide.
On narrow stairs, one side adjacent to the wall, one span of fencing is installed. If the flight of stairs is wide, it is recommended to install two fencing structures.
If a steep or high staircase is installed in a house where there are small children, it is preferable to install an additional low fence that will be comfortable for the child to hold on to.
The distance between the balusters should be such that a child cannot crawl through the opening. Optimally -15-20 cm.

Handrails.
This is the top bar located above the railing structure. It is the handrails that people hold on to when going down. Handrails should be smooth, monolithic, so that they are comfortable to hold on to.
Balusters.
Cabinet.

This is a powerful end post located at the end of the stairs. Handrails are attached to the cabinet. Material selection Aluminum. It is quite difficult to make a structure from this metal with your own hands. Most often, various fasteners and fencing elements are sold ready-made. Assembling a railing with your own hands from a set of parts is quite simple; the main thing is to choose a design and calculate the number of parts required. The material itself does not have high performance properties; it bends when impacted, gets scratched, becomes dull, and becomes covered with corrosion spots. Chrome fencing are also sold ready-made, the main thing is to correctly calculate and purchase everything necessary elements

. Flaw chrome parts - rapid abrasion of the coating, especially if the stairs are located in crowded places. Forged fences. Hot forging is primarily a factory job; it is very difficult to make fencing elements from hot forging at home. Cold forging is a more doable job; if you have special tools, you can make railings with your own hands. Pros - versatility in fencing design, cons - enough high price

material, special tool


The metal has a shine that does not fade. Stainless steel stair railings are strong and reliable, but to build them yourself requires the skills of a welder and metal cutter.
Video - Installation of stainless steel fencing
Set of tools and materials
Welding machine, pack of electrodes, access to electricity, protective suit and mask.
Place for welding work.

The height of the fence is calculated. The standard is 95 cm. But the railing frame should be raised above the steps by 10 cm. It is also worth considering 5 cm for the handrail. In total, 15 cm is subtracted from 95 cm and the result is 80 cm. This is the size to which the metal profile is cut for cabinets and balusters.

If the length of the frame is 3 meters, then the transverse upper and lower profile, to which the balusters between the pedestals are attached, should also be cut into 3 meter elements.
Frame welding. A frame is laid out from the cut profile and lightly tacked by welding. There is no need to immediately tightly weld the elements; in case of defects or misalignment, you will have to do extra work. The welded frame is reinforced: balusters are welded after 10 cm. It is worth considering that the outer pedestals must be at least twice as thick as the internal metal vertical lintels.
If the design fully complies with the standard and has no distortions, you can begin the final welding of all elements. It is recommended to weld the seams on both sides to ensure that the fence is as strong as possible.
After the frame is ready, pillars with round or square plates, 10 cm high, need to be welded to the lower profile. Holes are drilled in the plates for fastening to the steps.
For this purpose, you need an angle grinder with a grinding wheel. It is necessary to carefully polish all welding residues: drops, build-ups.
Experts recommend giving homemade product beautiful and unusual look using purchased forged elements. Specialized stores offer a variety of forged accessories that can be welded to the frame sheathing: climbing vines with leaves, flowers, ornaments.

You also need to consider the type of handrails. Most often they are made of wood. Wooden blanks rounded on three sides and thoroughly polished.

The first layer is a primer that will protect against corrosion. Then you need metal paint. Color depends on individual preference, but black is most often used. Designers recommend adding chic to your homemade fencing. For this purpose, patina is used - a material that gives the metal an old and noble appearance. Metal railings ready with your own hands.

Pine. This material is quite affordable and is very often used in construction. Pine is soft, its wood has an uneven structure, due to which, when painting, the covering material is absorbed with different intensity. It is easy to process and can withstand changes in temperature and humidity.
Birch. Dense and durable material, practically free of knots. Well processed and polished. But wood has a number of disadvantages: it is susceptible to rotting and cracks when temperature and humidity change.
Beech. By physical characteristics This wood is in no way inferior to oak. But it is not recommended to overdry the beech. At low humidity, a layer of wood breaks along the fibers, which leads to damage to the elements.

As in metal, in wooden structures There are handrails, balusters and cabinets. But, in wood products, balusters are not only a supporting element, but also a decoration of the structure. Most often, they are made from laminated veneer lumber and are machined into columns of various shapes.
Milling of balusters involves cutting screw patterns on the surface of the elements.

When turning on elements you can see several combined geometric shapes: balls, squares, rectangles, etc.
Hand-cutting balusters is a real work of art. Patterns, ornaments and much more are cut out on the surface of the parts. Some wood carvers create these elements in the form of animal figures.

Flat balusters are boards on which patterns are cut. This is the easiest way to decorate a staircase with your own hands.

As described above, the standard and safe height of the structure must be at least 95 cm. The width of the handrail is 5 cm, the distance between the steps and the fence is 10 cm. As a result, the height of the balusters is 80 cm. For these elements, wooden planks are needed, 10 cm wide. 15 cm, thickness 30-35 mm.

To create a carved and beautiful fence, the planks need to be shaped. Specialists who have mastered lathe, can cut carvings on the ends of the board using equipment. If the machine is not available, then a hand-held power tool, for example, a jigsaw, is used.
To do this, you need to draw a template on paper or cardboard that has real dimensions. Then, using a pencil, trace the template on each board and cut out the shape according to the marks. After all the balusters have acquired the desired shape, you need to carefully process the ends, clean them with fine-grained sandpaper and polish them to a shine.
Flat balusters, unlike wooden figured posts, are not recommended to be attached to steps. The fence will be unreliable and shaky. The elements must be mounted on a transverse beam, which is located 10 cm above the bowstring. It turns out that the handrail, the lower beam and the upper and lower pedestals form a frame into which flat balusters need to be inserted.

The crossbars need to be fastened every 15 cm, but no more. You can use two types of connections - in grooves and on metal studs. If the balusters will be inserted into the grooves, then grooves must be machined 2 cm deep on the lower part of the handrail and on the upper end of the cross beam. The length of the recess should be equal to the width of the baluster.

Don't forget about the slope of the stairs. It is worth knowing that the lower ends of the balusters should be smooth, but the upper ends should be cut to the angle of inclination of the stairs. It is on the cut ends that the handrail will be attached.

Balusters are attached to metal studs if it is not possible to mount a cross beam. In this case, there will be no gap of 10 cm between cross beam and steps. The height of the balusters in this case should be 90 cm. The baluster is attached to the step with one pin; during the work it is important to attach the element evenly, without distortions. For these purposes, you can use an angle.

After all the protective elements are attached to the steps, you can install the handrail. It uses timber, which is rounded on three sides and carefully polished.
The last stage of creation wooden railings for stairs - finishing. For this you can use acrylic paints, varnish, stain.
A beautiful DIY staircase is ready.
Although stair railings are considered a minor design detail because they are not always used, they are important enough to be discussed. The main function is to ensure safety and convenience when moving along a flight of stairs. The design of the railings plays an important role.
Wood, concrete, metal and glass are traditionally used for manufacturing. The latter is usually used to fill the distances between posts.
In this article we will talk about metal railings for stairs .
The handrail sketches are integral part design and help present the final picture in more detail. Photos of railings, computer graphics or hand drawings are suitable for these purposes.

Railing - these are fences flights of stairs, which protect a person from falling out and ensure convenient operation of the structure. Accessories for railings:
Handrails - fencing elements that are installed on balusters on one side of the flight of stairs or on both. Can also be mounted on the wall. Handrail overlays provide a comfortable and pleasant hand grip.
Before explaining how to make a railing for a staircase, you need to choose what metal would be better suited for our purposes.
The choice of material depends on many factors, but the most important is the purpose of the product. For example, for exterior railings, stainless steel is best, which produces nickel-plated railings. Or cast iron, products from which can be seen in old entrances or on bridges.
Aluminum railings are great for indoor use and can take on more complex shapes (screw or rotary). Iron is generally used for mass production. It is difficult to process and is not suitable for homemade products.
According to the manufacturing method, they distinguish the following types railing:
The railings are assembled from steel or aluminum parts. In the first case, upon completion of the work, the railings are painted, in the second, a special protective coating. Aluminum railings have the following advantages:
The listed advantages are due to the fact that prefabricated fences are manufactured without the use of welding. If necessary, the structure can be easily dismantled.
According to the method of applying the protective coating, railings and handrails are divided into:

Welded railings for stairs are made of steel or ferrous metal. Their advantage is strength and durability. However, with proper finishing, such products also turn out to be very beautiful. To shape railings made of of stainless steel The method of “cold” bending of metal is used. This type of design is characterized by the presence of geometric patterns.
The disadvantage of welded iron railings is their susceptibility to corrosion and the need for periodic painting. Stainless steel railings do not have this drawback. Life time similar products about 50 years old. They do not require painting or additional care. If necessary, you can repair the railings yourself. The surface of the steel is processed using polishing, grinding or satin finishing.

Welding of railings is divided into two types:
The disadvantage of the first method is a large amount of splashes. The second method does not have this drawback and is therefore more common. The seam produced by argon welding is more accurate and lends itself well to further processing, which includes stripping and polishing. The handrail is fastened using a hardware assembly or by gluing with a special glue.
Wrought iron stair railings are exquisite appearance ohm and complex manufacturing process. They are made using the method of artistic forging, often according to individual project. Any finishing options and a mixture of styles are possible - from light, openwork, airy structures to massive ones that create a feeling of reliability.
Forged stair railings will give any product or interior a unique charm of antiquity and good quality.
Forged stair railings offer a huge variety of colors: gold, silver, copper, etc. The only drawback of such products is their extremely high price.
To make cast fences and railings, a sample of the future product is first prepared, from which a mold is made. Next, molten metal (bronze, cast iron, brass) is poured into it. After the material hardens, it is further processed. Casting has a number of advantages:
Combined fencing involves a combination of different materials. For example, powder coated chrome railings, steel handrails and glass inserts, or aluminum railings. Such variety makes combined railings universal solution, suitable for almost every staircase.
Requirements for fencing (GOST and SNiP) are determined by their main function— ensuring safety during ascent and descent. In this regard, the design must comply with certain standards:
On stairs installed in children's institutions, the handrail should be duplicated at a height of 50 cm. And the distance between the posts is reduced to 10 cm so that the child cannot stick his head through.
It is difficult to overestimate how important reliable installation stair railings. First of all, the safety of people depends on this. If you don’t know how to install railings, but want to do it yourself, choose one of two methods:
Fastening the handrail to the wall is used if the staircase is located near the wall. In this case, racks are not needed; the handrails are installed using special brackets, the size of which is designed so that the distance from the handrail to the wall is about 7-10 cm.
The handrail bracket can be of two types:
When using the second type, it is possible to adjust the tilt of the handrail, which is very convenient. The structure is easy to assemble and can be quickly dismantled if necessary.

Installation of balusters can be done in three ways:


Stainless steel handrails can be attached either on top of the balusters, with self-tapping screws, or on the side, using flanges.


The disadvantage of fastening “on a step” is that the fence reduces the width of the flight. That's why this method undesirable for narrow stairs. In this case, it is preferable to mount the racks at the end.
Such fastening of the railing is possible when the distance between the flights is at least 70 cm. The baluster is installed at the end using two anchors. There are four possible ways:


After the balusters are secured, the remaining installation of the railings is carried out. In the same way as when installing ON a stage (described above). The stainless steel staircase railings are ready.
If you follow these rules, you can assemble the stair railings with your own hands. This is quite real challenge, if you approach it methodically and slowly.
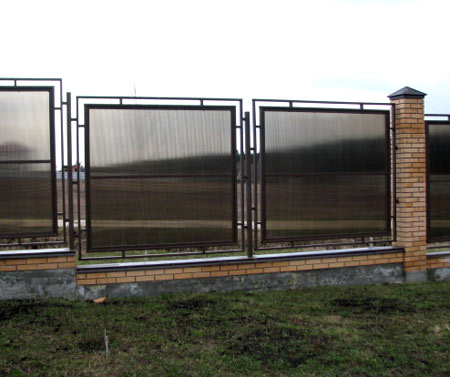
Relatively recently, new options for garden fences made of polycarbonate have appeared. The well-proven material is now used in the production of fencing. This fence is very easy to install and is next to advantageous advantages compared to standard fencing.
Example of a polycarbonate fence
Thanks to its excellent operational characteristics the use of such a fence is quite relevant both for urban development conditions and as a country fence.
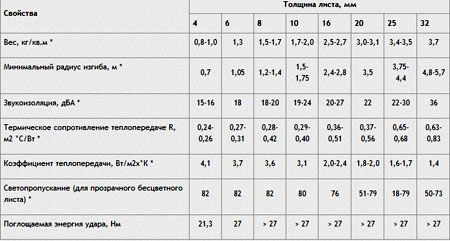
There are two types of polycarbonate: cellular and monolithic. Each of them has its own strength characteristics:
Like the construction of any other fence, the installation of a polycarbonate fence with your own hands begins with the installation of supports.
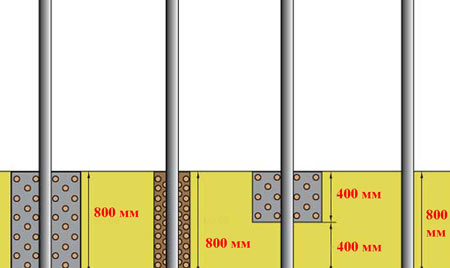 Installation diagram for fence posts
 As a rule, concrete or metal are chosen profile pipes, which are installed in pre-drilled wells.
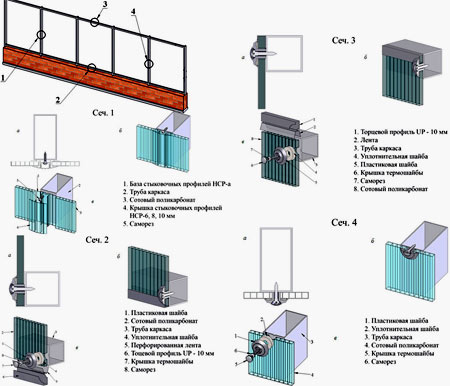
The next step should be the manufacture of a frame, which is impossible to do without. Otherwise, there is a high probability that the sheets will move or simply be torn off by gusts of wind.
The fact is that polycarbonate does not have sufficient rigidity, which is why additional reinforcement with a metal profile or corner is required.
 Polycarbonate fence option
 As a rule, the design is made in the form of three guides, the distance between which should be about 0.5–1.0 m. In some cases metallic profile run on the sides of each polycarbonate sheet. This not only gives extra strength to the fence, but also provides a more attractive appearance.
The polycarbonate itself is already mounted on the frame, and there are some installation nuances that must be taken into account when carrying out work.
Even a beginner in construction can install a polycarbonate fence with his own hands, however, during installation it is necessary to take into account some factors due to the characteristics of the material.
The last stage of working with polycarbonate is removing protective film and material design additional elements. For these purposes, you can use decorative elements made of stone or install additional lighting. Looks particularly advantageous.
Polycarbonate goes well with almost any type of material, with the possible exception of wood. This is due to the peculiarity of the characteristics: both are distinguished by their ability to expand under the influence environment.
Therefore, this combination can lead to bending of the polycarbonate and loss of appearance of the entire fence. However, there are many other poles that are quite suitable for installation.

Which option to choose directly depends on the size of your budget, since the cost of materials varies quite a lot. Most budget options pillars are made of metal and concrete, brick and stone will cost a little more.
 Example metal poles for the fence
 It’s worth mentioning right away that a polycarbonate fence is not shock-resistant enough, but the quality is quite acceptable.
If such a fence is installed in compliance with the technology and heavy stones are not deliberately thrown at it, then it will stand for quite a long time.
Polycarbonate is available in transparent and translucent versions, which makes this material extremely convenient for use in the country.
The following advantage of polycarbonate is especially relevant for summer cottages: this material absorbs sound waves due to its cellular structure, providing reliable sound insulation of the area behind the fence. No less effectively, such a fence protects the area from dust.  In accordance with its manufacturing technology, polycarbonate is produced in various color scheme and does not require additional processing. In addition, plastic plugs, corners and other elements produced for this fence also have a wide variety of colors.
Such a variety of tinted solutions allows us to produce original fence, which will carry not only a functional load, but will also become decorative element surrounding landscape. In addition, there is a significant saving of both money and time, since the material does not require additional painting.
 Example of a polycarbonate fence with forged elements
 Polycarbonate is practically not exposed to the environment, the material is not afraid of moisture, does not mold and does not corrode.
Tolerates temperature changes well (at correct installation), excellent resistance to wind loads and long-term exposure to sunlight.
In addition, the material is absolutely not subject to negative impacts insects These properties of polycarbonate distinguish it from other types of fencing.
Polycarbonate is also quite flexible and can bend in the desired direction, which allows you to install fences of various shapes. For example, if the fence is planned to be made in the form of a semicircle, it is not at all difficult to make the necessary structure from polycarbonate.
Railings are an indispensable attribute staircase design. They perform the function of a protective element that ensures the safety of movement along the span. Railings are distinguished by a variety of shapes and materials; they can be simple in appearance, or made in an unusual, original style. This enclosing element can be a striking design addition to the interior, becoming chic decoration any home.
Having studied various photos railings for stairs, you can see the variability of these structural elements and choose the option that is most suitable for your case.


It's easy to make handrails for stairs with your own hands. We’ll try to figure out how to make fencing elements for a staircase structure ourselves, what material is best to use, and where to start the installation process.

First you need to figure out what materials the staircase railings are made of. The following fencing elements are the most popular.

Aluminum. If you prefer railings made of aluminum, then making them yourself will be difficult. Basically, such products are sold ready-made, and all you have to do is make them correct calculations, buy the required number of fencing elements, assemble them with your own hands and familiarize yourself step-by-step installation railing for stairs.

Chrome plated. They, just like the previous ones, are sold in construction stores in a ready-made form, so to install them yourself you need to perform the steps listed above.

Forged. Such fences look incredibly beautiful and interesting, but making forged railings at home is a rather difficult task.

Hot forging can only be carried out in a specially equipped room, as regards cold forging– you can do it at home, but you need to know the basics of this process and have everything in your arsenal necessary tools.


Made from stainless steel. Such railings are very wear-resistant, strong and reliable, but in order to install them yourself you will need welding and metal cutting skills.

Wooden. This is the most popular material used in the manufacture and installation of handrails on your own. Let us dwell in more detail on wooden fencing elements and provide the reader with brief instructions how to make a wooden railing.

Wood has long been used to create railings; the main advantages of this material: wood allows you to create a fence of any stylistic orientation, shape, with interesting carvings and ornaments. In addition, there are many decoration options wooden fencing, they can be painted, varnished, etc.

For novice craftsmen, it is better to start with just such railings, in the absence of experience in carpentry You can choose a simple design; wood, due to its texture, will in any case look interesting and aesthetically pleasing in the interior.

Let's try to figure out how to properly make a railing for a staircase made of wood. First, decide on the type of tree, whether it will be beech, pine, oak, birch or something else. The costs incurred for manufacturing, the quality of the railings, their resistance to sudden temperature changes, susceptibility to rotting, and ease of processing will depend on the selected species.

Second, become familiar with the main parts of stair railings. Any railing will contain the following elements: handrails, posts, balusters, cabinets.

Particular attention should be paid to the balusters, because the appearance of the flight of stairs will depend on them. You can make them in the form of neat columns, if you can use metalworking equipment - carve various patterns and ornaments on the surface.


Hand cutting can turn these structural elements into a real work of art, the scope for creativity is incredibly wide, craftsmen carve figures of people, animals and other incredible compositions from bars.

After preparing all the necessary elements, the question arises of how to install the railings on the stairs. Wooden figured posts can be attached directly to the steps, using grooves or metal pins, while flat balusters (presented in the form of thin boards) are best mounted on a special beam located 10 centimeters above the bowstring.

In this case, the handrail, beams and pedestals will form a frame, where it is necessary to place flat balusters. The distance between the crossbars in both cases should be no more than 15 centimeters.

This is, in general terms, the process of adding enclosing elements to a flight of stairs. Having decided to install the railings, evaluate your strengths, choose a suitable project, calculate how many materials you will need for the work, prepare the necessary tools and begin this interesting activity.