Having free space on a plot of land, you can build a strong and very functional bathhouse. Moreover, the last factor is due to the competent design of premises, their decoration and furniture. Regardless of the size of the building, rooms such as a steam room and an entrance hall with a wardrobe should be equipped inside.

But such an economical option can hardly be called quite comfortable, therefore, among the recommended rooms for design, decoration and equipment with all the necessary equipment, the following can be distinguished:


Depending on the available budget, you can equip only some of the proposed premises, for example, a bathroom, shower and relaxation area. If you plan to build a truly luxurious health complex, and it’s not difficult to shell out a “tidy sum” for comfort, you should think about including all the above-mentioned premises in the estimate.
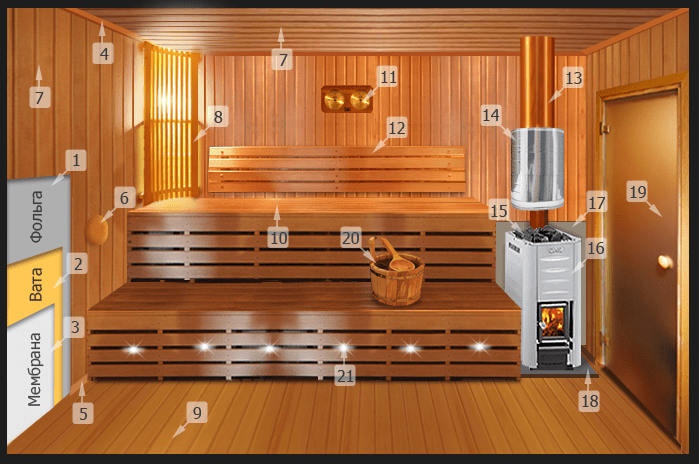
Arranging a steam room. 1 – foil. 2-insulation. 3-membrane. 4-ceiling plinth made of wood. 5-floor wooden plinth. 6-vent valve. 7-ceiling from wooden lining. 8-light. 9-floor made of wood. 10-shelf 11-thermometer and hygrometer. 12-back shelf. 13-chimney. 14-water tank. 15-heater. 16-stove sauna. 17-protective screen. 18-non-flammable base under the stove. 19-door to the steam room. 20-bath accessories. 21-light therapy or LED lighting.
It is customary to arrange a steam room on the first floor of a building. The entrance to the steam room can be from the shower or dressing room. The door to the steam room is installed from tempered glass or wood, strictly without metal decorations, inserts and fittings (except for hinges), because the metal can heat up and burn the visitor. It is customary to allocate 1-2 meters for one steamer square areas premises. The oven will take about another meter. Accordingly, the comfortable dimensions of the steam room are 3-5 sq.m. Too big steam room with high ceilings It’s not worth doing - it will take a lot of time and fuel to warm up the room, and the air will dry out from the hot stove.


The ceiling height is set from 2.2 to 2.6 m, depending on the height of the bathhouse owners and the height of the shelves, which in turn can be 1-3 tiers. The shelves themselves are made so that it is comfortable to sit and lie on them, and a steamer with a broom can stand nearby and perform bath procedures. The top shelf is made the widest, and the recommended height of each tier is 35 cm. It is better to sew up the space under the shelves to reduce fuel consumption for heating the unused area of the room.

It is advisable to make shelves from deciduous wood; the use of cedar/larch is acceptable. Wood can be combined, but it must be of good quality - dry, without knots, resin pockets, traces of rot and mold, carefully sanded. For convenience, it is worth purchasing or making your own headrests from aspen or linden, as well as a tub and a bucket with a long handle. You definitely need to hang a bath thermometer with a hygrometer in the steam room to regulate the degree of heating and air humidity.
 In the photo - a dial thermohygrometer and an hourglass

bath thermometer
The lighting in the bathhouse is rarely bright. Mainly ceiling and Wall lights covered with wooden lampshades/shades so that soft twilight reigns in the steam room. Additionally, it can be used for color therapy diode tape, as well as optical fiber to create the effect of a starry sky.


The stove is usually located closer to the door. Moreover, the heater can be made of brick or made of steel (wood-burning, electric).
 Sauna stove at the entrance to the steam room
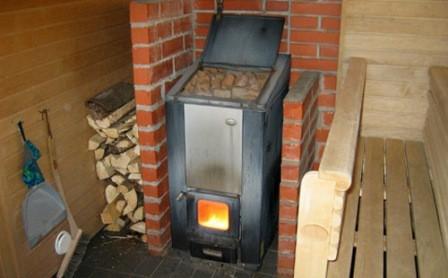
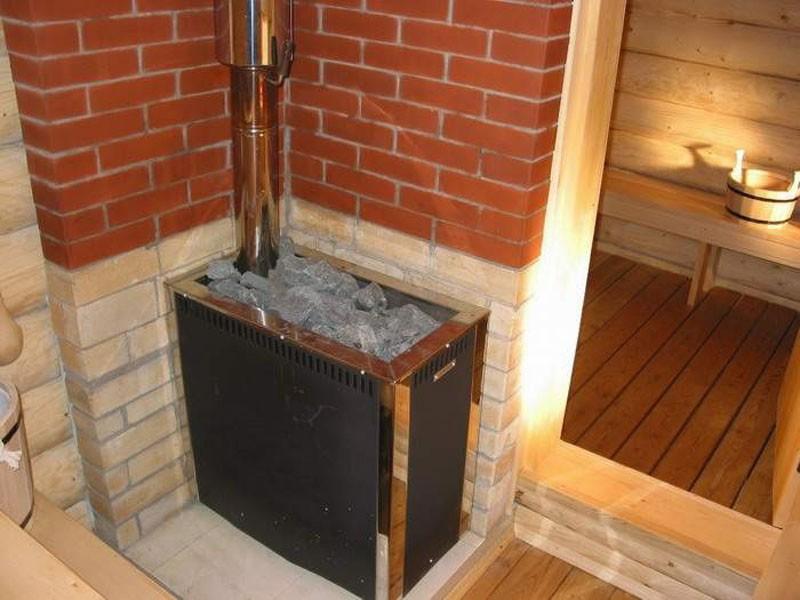
 Sauna heater installed on ceramic tiles
When installing a stove, it is extremely important to properly insulate the wall, floor, and ceiling at the point of contact with the exhaust chimney. The stove is placed at a distance of at least 10-15 cm from the wall, if the firebox door opens into the steam room, if the sauna stove is located simultaneously in two adjacent rooms and the firebox door opens into the dressing room, in interior partition a recess is cut, its dimensions exceeding the dimensions of the oven by 10-15 cm on each side of the heating surfaces. Insulation is made using asbestos cardboard, brick, ceramic tiles, stainless steel sheets.

Separately, it is worth considering options for finishing the walls, ceiling and floor. In addition to the standard lining and wooden floor, there are several interesting ideas.
Table. Steam room wall decoration
| Material | Advantages | Peculiarities | Installation method |
|---|---|---|---|
| Salt crystals or blocks for halotherapy in your own bath/sauna | They have a pronounced therapeutic effect on the body as a whole, the respiratory system and the skin in particular. | Salt crystals are installed in dry steam saunas. Maximum evaporation of microelements occurs at 60 degrees, but already at 75 degrees the blocks turn into a salt solution. Salt bricks should not be allowed to come into contact with water, because... salt dissolves in it. | Salt crystals are used to make spectacular rectangular wall inserts; it is also possible to decorate one or more walls from floor to ceiling. Cladding with salt blocks is combined with diode or other lighting; to fix the masonry, a two-component quick-setting adhesive is used (hardening time from 10 minutes). |
| Wild stone or decorative brick | Uniqueness of the interior unusual combinations stone with wooden surfaces. Improved fire safety. When using medicinal types of stone, for example, soapstone or jadeite, there is an additional healing effect. | Stone can be used to cover both part of the wall behind the stove and the entire wall behind the heating device. Sometimes stones are attached instead of baseboards to the floor and ceiling. It is worth remembering that the stones in the sauna get very hot, so you should not allow them even to come into accidental contact with the skin of visitors to the steam room. | If a wooden wall is faced with stone, you will need to attach construction waterproofing paper to it (overlaps on all sides of 4-8 cm). A painting mesh should be secured on top of the waterproofing layer with galvanized staples or nails (fastening spacing vertically is up to 15 cm, horizontally - up to 40 cm, at the corners the mesh is laid in two layers). The mesh is plastered, and after drying 1-1.5 layers of plaster are laid out facing stones for cement-sand mortar. It is recommended to first lay out the stones on the floor and number them for convenience. It is better not to use stones that are too heavy for cladding. |
| Ceramic tiles, porcelain tiles, polished natural stone tiles | Fire safety, aesthetics, interior decoration of the steam room, durability. | All of these tiles are laid on the wall behind the stove (all or only part of the wall). Tiles with a thickness of more than 10 mm are installed using metal fastenings and pouring cement-sand mortar/glue/mastic into the seams. | The tiles are fixed to the plastered surface of the walls. To fix the tiles, highly specialized adhesive compositions, for marble - latex or polyurethane based (waterless). The laying is carried out from the bottom up, the seams are laid with crosses or wedges to maintain the same thickness. |
| Cork moisture resistant coating | Suitable for both additional insulation of walls and their finishing. | Plates are used with a thickness of 20-40 mm. | Installation of slabs on the wall is carried out using specialized adhesive for cork coverings. It is permissible to use cork plinths for arranging a steam room. |
Table. Materials for arranging flooring in a steam room
| Material | Advantages | Peculiarities |
|---|---|---|
| Beautiful, durable, looks noble. | Quite cold, it is advisable to install heated floor systems under a porcelain stoneware covering. Must be non-slip. The seams are treated with moisture-resistant grout to prevent the spread of mold and mildew. | |
| Shock absorbent, warm to the touch, goes well with wooden surfaces. Not slippery. | Suitable for installation in a steam room, because the floor temperature rarely exceeds 30-40 degrees. | |
| Wooden boards and wood mats | Such coatings can be laid on concrete or porcelain stoneware. | Treatment with moisture-proof impregnations and periodic air drying are required. |
Note! It is unacceptable to use any plastic, rubber coverings, linoleum, PVC tiles and panels for arranging a steam room. Finishing materials and furniture should not emit chemical odor or resin when heated.
The ceiling in a Russian bathhouse has long been made of timber, lining, and boards. It is wooden surfaces that withstand high temperatures well, fill the bathhouse with a pleasant aroma and do not contribute to the accumulation of condensation - wood tends to “breathe”.
There is no point in painting the ceiling, covering it with plywood, chipboard, or plastering - high humidity and temperature will quickly ruin such a finish. In Turkish baths, mosaics are often used to decorate the ceiling, but it is worth remembering that the humidity and temperature in hammams are much lower than in Finnish and Russian steam rooms. It is possible to use Thermocork cork covering 100 mm thick, specially designed for bathhouse ceilings (cost 3900-4000 rubles per 1 sq.m.).

It is advisable to equip the steam room with one window. A particularly eccentric option is panoramic blind window all over the wall. Such a window allows you to admire nature from your own steam room, while the mirror coating on the outside will prevent the curious from looking inside. But remember that the larger the window, the greater the heat loss.
The most common option is an opening single-leaf window 60x60 cm or 40x60 cm. The window is not placed on the wall behind the stove or sun loungers. The height from the floor to the bottom sash cannot be less than 170 cm - this is the height that implies effective ventilation of the room (natural air circulation). The frame can be made of wood or high-quality plastic that can withstand temperatures up to 120 degrees.


Sometimes glass blocks are inserted instead of a window. They allow you to save on lighting the steam room during the day.
The shower room can be organized as a separate room or adjacent to the steam room, for example, separated only by a glass damper or a partition made of glass blocks. A cabin can be installed here or a shower tray with a drain for water drainage can be arranged. If you plan to have a large number of visitors, it is recommended to install two or three showers.
Directly in the shower room, in addition to the shower itself, there should be a bench, a mirror, as well as hooks and non-hazardous shelves for toiletries.
Often the washing room is equipped with a dousing bucket and a bathtub made of acrylic or cast iron. Fonts are also installed in the washing room, especially if there is not enough space to arrange a full-fledged swimming pool.
The temperature in the shower should be higher than in the dressing room, but significantly lower than in the steam room.
Hot water supply is organized by connecting to a central water supply, installing a boiler or installing a heat exchanger and a remote water tank (from 80 to 120 liters).
Water disposal is organized into a central sewer, septic tank or drainage well. A drain ladder is installed in the shower room (the floor is poured or laid with a slope towards the drain funnel), from which waste liquid is discharged through a pipe with a diameter of 110 mm. One person needs about 50 liters of water to take a shower; accordingly, using this figure, you can calculate the volume of a septic tank or storage cesspool for a bathhouse. By the way, treatment and storage installations should not be located near the walls of the bathhouse or in the underground - an unpleasant odor will penetrate into the room. It is recommended to install a local installation 5-10 m from the walls of the bathhouse.
Coating options for wall, floor and ceiling cladding are shown in the following table.
Table. Arranging a shower in a bathhouse
| Material | Peculiarities | Example of finishing, photo |
|---|---|---|
| Wood | Showers adjacent to the steam room are often decorated with wood so as not to disturb the overall style of the premises. Wood does not tolerate constant humidity well - fungus develops and rot appears. It is worth considering the possibility of installing shower tray or cabins to minimize the effect of moisture on the material of the walls and floors, as well as regularly dry the boards and treat them with antiseptics. | |
| Wood Ceramic tiles, porcelain tiles, mosaics | These materials are most appropriate in a shower room, but it is important to choose products with a non-slip surface, and seal the seams with compounds that prevent mold. It is recommended to place wooden or rubber mats on tiled floors. | |
| PVC panels | This material can be used for finishing walls and ceilings only in showers that are not adjacent to the steam room. Plastic does not tolerate high temperatures, but it is not afraid of high humidity. The panels are quite easy to install and clean, but the strength of the material leaves much to be desired. | |
| Natural stone | This solution is not to everyone’s liking due to the extraordinary nature of the interior and the coldness of the coating. However, the stone tolerates high humidity well and is quite suitable for cladding shower walls. |
Don't forget about ventilation in the shower. There should be a hood with an electric fan under the ceiling. For natural ventilation It is worth placing a small opening window closer to the ceiling, this is especially true for wooden baths and showers finished with timber and clapboard.
Advice! To ensure less heat escapes from the shower room, it is recommended to install a threshold at the entrance to the room, and also install a door of small height (from the standard 2.37 m, 2.07 m, 2 m and 1.87 m, the smallest is selected, and this value should be reduced further by 10 cm). The justified width of the doorway is 75-80 cm.
The bathroom can be a separate room or combined with a shower room. In the first case, in addition to the toilet or dry closet, it is recommended to install a washbasin with a mirror, a cabinet, a shelf, and a paper holder in the room. The finishing of a separate bathroom can be absolutely anything, from classic tiling and plastic panels to cork, linoleum, and a combination of various materials.


Ventilation in the toilet is very important. According to the rules, a toilet room with 1 toilet should receive up to 50 cubic meters of fresh air every hour.
Often a heating radiator is installed in the toilet to make it comfortable during the cold season. It is also worth placing a boiler here so as not to spoil the interior of the washing room.
If you plan to install a toilet in the shower room, it is worth installing two forced hoods. One will prevent moisture from accumulating under the ceiling, the second will ventilate the space above the toilet.

The finishing of the shower room and toilet is done in the same style; for convenience, the toilet is installed in the far corner of the washing room and is fenced off with a partition, curtain, or screen. It is unacceptable to use materials similar to linoleum in the shower and toilet. Standard finishing options include tiles, lining, mosaic, stone, plastic, etc.
Water drainage from the toilet bowl can only be carried out to a local treatment plant or central sewerage. If leaky floors are installed in the bathhouse, a separate sewer network must be provided for the toilet (or an independent mobile dry toilet, for example, of a composting or liquid type, is installed).

Of course, each private developer designs a bathhouse based on his own capabilities and preferences, but it’s worth familiarizing yourself with federal regulations prescribing the rules for arranging baths in general and restrooms in particular:
Files for download:
Plumbing sizes
Prices for dry toilets
dry closet
Dressing room and wardrobe
The dressing room is the last room that must be on the first floor. This room can be large and spacious or very tiny. In any case, there must be an entrance to the shower from the dressing room. The finishing of dressing rooms is most often made of wood to emphasize the style of the bathhouse. It is advisable to arrange furniture made of wood.
The recommended air temperature in the dressing room is 26-28 degrees. Ventilation can be natural, for which opening windows are installed, which in turn are a source of additional light during the daytime. Artificial lighting should be sufficiently saturated (chandelier and wall sconces), but not sharp.
The dressing room can be combined with a dressing room if the entire bathhouse is small. In this case, you should follow the following recommendations:
- The height of the ceiling should exceed the height of the person, taking into account raised hands. Optimal – 2.4-2.6 m;
- the number of seats, hooks and shelves for clothes should correspond to the expected number of bathhouse visitors;
- the floor in the dressing room and dressing room should be warm and non-slip so that it is comfortable to walk barefoot. For example, you can install a “warm floor” or lay a carpet;
- it is worth providing one or more electrical outlets;
- It is recommended to equip the dressing room with a mirror.
By the way, the dressing room can be combined with the kitchen area by installing a corner kitchen set with household appliances. If you plan to not only brew tea in the kitchen, but also fully prepare food, you need to install a separate hood, and also plan to lay water and sewer pipes to connect the sink.
Advice! You should not install kitchen cabinets under the stairs so that dust from the steps does not fall on the dishes.
Video - Dressing area design
Second floor
In the photo - a cozy bedroom in the attic of the bathhouse
Everyone decides for themselves how to arrange the second floor. Whether there will be a bedroom, a billiard room, a solarium or a simple storage room upstairs depends on the size of the bathhouse and the budget of its owner. However, we strongly recommend installing a safe staircase with wide steps between floors, and adding a small balcony to the residential floor.
Arrange the bathhouse so that you feel cozy and comfortable in it.
Video - Bathhouse project with billiards
Video - Construction of a bathhouse with a plunge pool
The interior decoration of a bathhouse requires a clear algorithm of thoughtful actions. Firstly, it is necessary to decide on the purpose of the room, and secondly, on the conditions of its operation. Only then can you choose the right design concept and suitable materials.
Making a “bathhouse like your neighbor’s” or “like the picture from a magazine” without taking into account your realities is not just a mistake, it is a waste of effort, time, money and, alas, health.
Attempt to veneer interior walls for a steam room not with solid wood, but with laminate (or even not with solid hardwood, but with solid pine), or making a tiled floor without prior insulation is fraught with trouble.
The article will show and tell you how to finish a bathhouse most correctly and effectively.

Deciduous wood has a low heat capacity, due to which the room warms up faster. Such wood does not emit resin.
When buying materials for finishing the inside of a bathhouse, you should not save money, since it depends on them how comfortable it will be to steam in a new bathhouse.
Can not use:

Good waterproofing of foundations is also important, not only from “external” soil waters, but also from internal leaks.
The basis of the bath is. A building with extreme temperatures and large variations in temperature different rooms– this is a huge load on the foundation. You shouldn't skimp on it.
Good water protection is also important, not only from “external” soil waters, but also from internal leaks (after all, a bathhouse is a very “wet” room). Under no circumstances should wastewater reach the foundation or subfloor.
Steam room- this is a zone of extremely high temperatures; any section of the wall poorly protected by thermal insulation, for example a window, will require increasing the power of the stove, and the costs of operating the bathhouse will increase. For economic reasons, the stove heats all the rooms of the bathhouse, one part goes into the washing room (where, as a rule, the water tank is located), the other - the heater itself - into the steam room.
Naturally, the foundation is poured taking into account the size and planned temperature of the stove: for a Russian bath the stove gives one temperature regime, for a Finnish one it gives a completely different one.
The stove is lined with refractory bricks on a clay mortar, while at the same time laying out a brick partition between the steam room and the washing room. The stove can serve as a full-fledged decorative element, with unusual design screen, various options installation of a brazier, stone cladding.
The floor may be clay (for aesthete reenactors), but when wet it becomes very slippery. It is better to make a wooden or tiled floor laid on a rough concrete screed.
The concrete floor in the bathhouse (both in the steam room and in the washing room) must be thermally insulated:
When pouring the floor, it is necessary to ensure a slope for water drainage and installation of a receiving pipe that drains waste water into the sewer. This is especially important if tiles are installed directly on the screed. This technology allows the floor to always remain warm. To lay tiles and stone in a steam room, you need to use heat-resistant tile adhesive, such as adhesive for fireplaces or heated floors.

The best floor for a steam room is biscuit tile, porcelain stoneware, unpolished a natural stone.
The optimal choice of flooring for a steam room is biscuit tiles, porcelain stoneware, smooth but unpolished natural stone. It is better not to use ceramics with glazed coatings; they heat up quickly and are very slippery. You can put rubber mats on the floor (undesirable, rubber is still a synthetic material) or wooden sheathing (a little better, but when there is a lot of steam in the room, you can get injured if you trip). You can lay the steam room floor from tongue and groove boards.

The walls are sheathed with wooden clapboard made of hardwood - aspen, linden, alder, abashi, preferably not spliced.
The dividing wall between the steam room and the washing room can be made of wood; it is only important that the part of the wall adjacent to the stove is brick. The door is cut in it so that steam does not enter the washing room and is not wasted.
Ventilation is traditionally performed in the form of a window-vent with a valve, between the steam room and the washing room, less often - in street wall. Ventilation of the room is combined or completely mechanical, forced.
When finishing the bathhouse, the walls are caulked inside, if necessary, leveled and thermally insulated - preferably with mineral wool or foil (when heated, these substances do not emit harmful substances). Foil also functions as a vapor barrier. The walls are sheathed with wooden clapboards made of hardwood - aspen, linden, alder, abashi, preferably not spliced (because they are spliced, albeit into a tenon, but with synthetic glue). You should not take boards with knots - the knots fall out due to temperature changes and heat.
When covering, it is advisable to avoid any metal parts; they become very hot, damage the wood and can cause burns to a person. As an exception, the lining can be sewn on with furniture. A bathhouse, the interior of which is made of wood, can withstand 10-15 years of use.
For the bath, only high-quality insulated copper wire is used. There are no sockets and switches in the steam room; they are located in the next room. The wire goes through the wall exclusively to the lamp or exhaust fan; the lamp must be hermetically sealed.

Thermal insulation of the ceiling with synthetic materials is completely eliminated vapor barrier membranes
The ceilings are thermally insulated with mineral wool, foil and sheathed with boards. The most people gather at the top hot air, therefore, high-quality boards must be used there; thermal insulation with synthetic vapor barrier membranes is completely excluded. If a false ceiling is being sewn up in a room where there is already a rough ceiling (false ceiling), the lining will have to be sewn to the ceiling sheathing with a stapler, additionally reinforced around the perimeter instead ceiling plinth thick beam - it holds the ceiling boards. The beam can carry a functional load (hooks for hanging equipment and towels) or be purely decorative.
Additionally, false beams are used to fasten the flooring, resting on the grooves of the frieze beam. If the ceiling is made from scratch, you can lay lining in a pseudo-medieval style on square section beams on top, in this case additional fasteners do not need to be made. On top of the flooring the ceiling must be steam and heat insulated with foil, mineral wool, expanded clay or perlite(penofol and glass wool cannot be used!). If there is no second floor, then the insulation must be able to be ventilated.
Important: A suspended metal reflective screen is required above the stove.

Furniture is usually made with “steps” made of wood.
The furniture in the steam room is shelves. Usually they are made of “steps” made of wood or tiled, or according to the principle of a carriage compartment - the lower level is stationary, the upper two are on hinges.
You can decorate the steam room by modifying the standard furniture. Shelves can be arranged in a “zigzag”, “fan”, “compartment” pattern, get rid of right angles, introduce carving or annealing, choose the color of the wood and the tile pattern.

The principle of arranging a floor in a washing room is similar - the floor must also be warm, moisture-resistant, non-slippery and have a slope for water drainage. But its operating conditions are slightly different: the air temperature in the room is lower, there is less steam, but water (and soapy water) pours directly onto the floor, which serves as an additional chemical load on the coating and makes it slippery.
High humidity and temperature within 20-45 degrees are ideal for the development of microflora, which is almost absent in the steam room. Therefore, in the washing room they try to avoid easily rotting wooden floors and gratings and prefer to lay the floor with very rough ceramic or stone tiles. At the same time, you can arrange terraces and “pallets”, create a mosaic set, as in ancient Roman baths. The issue of washing is solved in the “marine” way using a hard mop, detergent and a stream of water from a hose.
A compromise would be to use decking boards.
Typically, decorative tile cladding or glass mosaic, greatly facilitating care and disinfection in rooms with high humidity. It is also possible to decorate the walls of the bathhouse with clapboard, which provides high waterproofing.
Particular attention should be paid to waterproofing the sheathing. If the waterproofing is poor, condensation can accumulate under it, which leads to the destruction of the wood.

Wall-mounted mirrors look good and are functional in the washroom.
In the washing room, wall-mounted mirrors look good and are functional - both full-length and small decorative ones in the form of a frieze, inserts, or mosaics. The tiles on the wall adjacent to the steam room are mounted with heat-resistant tile adhesive; on other walls and floors you will need adhesive with increased moisture resistance. Be sure to seal the seams between the tiles with sealants and waterproof the joints of the floor and walls.
The ideal design is one that combines the floor, walls and furniture into a single whole. Some of the furniture can be built-in - seat pads, a washing surface, or a warm sofa bed near the stove. The storage tank built into such a surface is very convenient and looks stylish. warm water, designed like a Japanese sit-down pool. Usually it is made in the form of a cylindrical or oval “barrel” with an internal step-seat, and the inside is lined with decorative tiles. Since this sitz bath is deep, its bottom will be almost at floor level, so you can install a drain tap there. You can raise the bath higher and create several steps. This will add originality to the finish. Portable furniture can be plastic or wooden; it must be taken out, washed, and dried often.
The ceiling is traditionally made of lining (linden, alder), hemmed. In this room there are no longer such extreme temperatures, so penofol, mineral wool, glass wool, and polystyrene foam can be used as a heat insulator. The insulation technology is conventional; it is important to provide double vapor barrier and air gap between it and the lining.
You can simply make a concrete screed on top of the insulation and tile the ceiling. It is important that there is a reflective pendant above the stove. metal screen, at a height of no less than 10 cm from the ceiling.
These rooms are practically no different in microclimate from ordinary living space, so there are no special subtleties in decoration. Insulation and vapor barrier are needed insofar as the room adjacent to the washing compartment and steam room must ensure that the building does not have surges in humidity or temperature changes. different walls and heat loss.

The floor for the dressing room should be made of flooring or parquet board, which is pleasant to walk on barefoot.
The floor can be made of any kind, but if you adhere to the principle of environmental friendliness, you should make it from flooring or parquet boards, which are pleasant to walk on barefoot, or warm, tiled (it’s good to install heated floors using copper pipe, along which from the container in the stove it's hot water, easy). Since the stove heats the steam room and washing room, why not heat the floor in the dressing room?
Enough dry room allows you to use any material for finishing after steam-heat insulation. However, it is better to take a moisture-resistant one. The walls can be decoratively plastered, painted or tiled. However, wood cladding is more often used for both walls and ceilings.
When covering (no matter horizontal or vertical), waterproofing will be required with the installation of a frame (70 cm increments). If the wall is made of brick or timber, 50x50 mm timber is sufficient. The timber is leveled in one plane. Thermal insulation made of foam plastic can be laid between the bars; at the same time, it provides additional support for the sheathing. The bottom board of the lining is leveled with the tenon facing up. The next board is put on the tenon of the lower board and tapped for a strong connection (to do this, you need to make a plank with a groove from a piece of the same lining), otherwise the grooves will separate later.
Traditionally, the lining is fastened using galvanized nails 50–60 mm, with a reduced or removed head. They are driven slightly obliquely down into the base of the tenon. You can use a furniture stapler with a large staple, but here it is not so important to minimize the amount of metal. A board placed over the tenon will hide the fasteners. It is better not to use clamps in the bathhouse, even in the rest room.

Rattan furniture perfectly withstands the microclimate in the bathhouse.
The furniture of the waiting room and rest room is usually wooden furniture or rattan, which can withstand the microclimate of the bathhouse well. The only condition for it is that it must be easy to disinfect and not absorb moisture. Naturally, upholstered furniture in such a room will constantly “get wet”, taking moisture from the air into the padding. It is convenient to use folding and stationary chairs made of polished (can be varnished) for the rest room. solid wood, with anatomical seats and backs, benches, table. Lockers and chests made of solid wood will look great in the dressing room.
An important element will be a wardrobe, a massage couch with a bedside table and a screen. Absolutely necessary in the rest room are full-length mirrors, possibly trellis type, several sockets (for connecting a hair dryer, electric razor, trimmer), and lighting with the ability to illuminate different areas of the room.
The quality of interior decoration in a bathhouse consists not only of an attractive design and a pleasant aroma, but also of the practicality of the structure itself. In a Russian bathhouse, the temperature of the humid air sometimes reaches +120 degrees, so correct cladding a steam room can not only protect walls from aggressive influence steam, but also protect a person from burns and allergic reactions.


Many home craftsmen are confident that all work on finishing the inside of the steam room comes down solely to stylish design walls, floor and ceiling. This is a common misconception; in practice, the organization of many other processes is required: hydro- and vapor barriers, insulation of floors, engineering communications, treatment of coatings with antiseptics, fungicides, antiprenes and much more.
The temperature in a traditional Russian bath, as a rule, ranges from +80 to +120 degrees, and the humidity level is over 30%. Such operating conditions are considered extreme for any finishing materials. That is why, in the internal arrangement of such premises, only the strongest and most environmentally friendly materials are used. safe materials, which do not emit toxic substances and do not emit any unpleasant odors.


For finishing, only such raw materials are suitable that heat up to a maximum of +50-60 degrees; only ceramics and wood meet this requirement. The area near the firebox, as well as the stove itself, as well as places that may come into contact with human skin, are lined only with natural materials with a low level of resin. That's why coniferous varieties wood is suitable only for finishing auxiliary premises. Otherwise, there is a high probability of burns and the development of a spasm of the respiratory tract, which leads to a sharp deterioration in well-being.
Wood must be treated with fungicides, as well as solutions that increase its hygroscopicity - this is necessary to protect the coating from the destructive effects of moisture and prevent the appearance of mold and mildew.


Many people wonder what material is best to decorate the interior of the bathhouse with. The most widely used lining is small panels used for cladding vertical surfaces. It is made from wood of different species. The main advantages of lining are as follows:


For finishing the interior of the bathhouse, finishing with unedged boards is allowed.
Cedar is widely used in medicine, where it is famous for its healing properties due to its calming and anti-inflammatory effects on the human body.


Very good species for finishing baths are meranti, cedrella and ofram - these are expensive types of wood. Their main difference is that even when exposed to high temperatures, they maintain a temperature equal to that of the human body. Therefore they are very convenient to use. However, their cost is quite high.
Not all wood is good for interior cladding of bathhouses. For example, pine and spruce can only be used to decorate the shower room and recreation area. Using them in a steam room is not allowed, since the material releases resins at elevated temperatures, which can burn the skin upon contact.


Wood is used to cover not only the walls, but also the floors. However, to finish the latter, you can also use ceramic tiles, and the place where the firebox is installed is lined with brick. Perlite is used directly under the floor covering - this is sand with good thermal insulation properties. This material is very light, so it is optimal for indoor use. closed type where there is no wind, otherwise it will blow up.


The materials used for lining the steam room should not contain any knots, protruding metal parts should not be installed - all handles and holders are made only of wood. Even the shelves are made without the use of nails, since any metal object becomes very hot at high temperatures and can cause burns. Some consumers decorate their baths with clay, brickwork, salt tiles, bast and stone.


Special attention should be paid to materials that cannot be used in finishing the bath, especially around the stove. Fiberboard and chipboard are flammable products that also absorb moisture well. The only place where their use is permissible is the locker room.
Regardless of the material used, they cannot be coated with varnishes and enamels, as well as stains and other organic compounds. When exposed to high temperatures, they begin to release harmful substances, which can lead to general intoxication of the body.


The interior decoration of the bath includes several technological processes, each of them helps protect the structure from the aggressive effects of hot steam and forms favorable microclimate in sauna. Moreover, absolutely all work can be done with your own hands without the involvement of specialists.
First, the premises need to be insulated and a vapor barrier installed. For this, basalt wool, which has good thermal insulation, and foil, which prevents the accumulation of condensation, are widely used. The sequence of actions and stages of work are standard.


You can start work by finishing the ceiling. At the first stage of the internal arrangement of the bathhouse, its thermal insulation is carried out. To do this, a foil film is fixed onto it with the reflective side down, while the coating is overlapped, and the joints are insulated with aluminum tape. The sheathing is mounted from wooden blocks, which are secured with screws. It serves as a frame for the finishing cladding of the steam room.
By the way, do not forget to protect the ceilings from the attic. Before adding a layer of insulation there, you should take care of laying a plastic film that will not let dust and debris inside the bathhouse.


The principle of insulating walls in a bathhouse is the same as for the ceiling. The only difference is that before insulating the walls, you must carefully cover all kinds of cracks and joints, only after that you can proceed directly to installation. Thermal insulation material is mounted from bottom to top, perpendicular to the floor in three layers.
The first layer is waterproofing, which is applied to prevent condensation from settling on the walls. The second is the insulation itself, which helps maintain the required temperature conditions. Vapor barrier is needed for effective protection thermal insulation material from moisture.


The most practical and durable floor is considered to be one made of concrete. However, such a coating is quite cold, which leads to discomfort in the steam room. That is why most consumers prefer wood for finishing the floor in a bathhouse. To begin with, a foundation is laid on which beams and logs are laid. The voids formed between them are filled with insulation; as a rule, a layer of sand or expanded clay is applied for this purpose. Some insulate with sawdust, but this material is in conditions high humidity will not last long.
Then, traditionally, a vapor barrier and the “first floor” are applied, insulation, a layer of waterproofing and only then the base “finishing” floor are laid on top. The first floor is a coating made of concrete and crushed stone, it is applied in a layer of 10–15 cm. To ensure effective waterproofing, roofing felt is used, and mineral wool or expanded clay should be preferred as insulation. The finishing floor is made of lining so that it lasts for a long time; it is treated with special antiseptic solutions.


The guide to finishing the bath has its own nuances. As already mentioned, lining is considered the best option for cladding steam rooms and washing rooms; it looks stylish and aesthetically pleasing in any interior. You can make it yourself, however, the modern market offers a wide selection of products from any wood, so everyone can choose a ready-made coating to suit their taste and budget. The main advantage of the lining is its ease of installation. To fix it on the wall, it is enough to use simple nails without heads or clamps.
The floor, ceiling and walls are finished in the same style. If the walls are lined with clapboard, then it is better to mount the ceiling from the same material. It is fastened with a small gap, which avoids deformation in case of swelling of the coating.
Such a gap protects against the need to rework the entire coverage area. It allows the lining to move if the situation requires it.


As for the floor, it can be made of wood or ceramic tiles. Wood floors can be leaky or non-leaky. In the first case, the boards are mounted on logs with a gap, which is usually 5–20 mm. The boards of the non-leaking coating are laid tightly to each other, so tongue and groove material should be used for them.
If you choose clay tiles, keep in mind that stepping on such a surface after the steam room is not very comfortable. In addition, you can easily slip on it. That is why experts recommend laying wooden flooring on top of the tiles, made in the form of a narrow sheathing, or using cork. The tiles are laid on a pre-leveled surface using a special glue, and all seams are treated with sealant or grout of a suitable color.


Separately, I would like to draw attention to the processing of lining and other materials that are used for interior decoration of bathhouses. So that the cladding lasts for many years and does not lose its aesthetic appearance, has not cracked or become covered with fungus, it is treated with special antiseptic compounds. The tree has a loose structure in which microbes like to “settle in.” If you neglect treatment, then most likely fungi and mold will simply colonize all the wood and destroy it.
There are certain requirements for impregnations: they must protect the raw material, however, they must not interfere with its “breathing”. In addition, the material must be made from environmentally friendly components that do not emit toxic substances at elevated temperatures. In addition, the impregnations used to cover shelves, benches and tables must withstand regular wet cleaning.
The shelves are additionally treated with deep absorption solutions. They are available in the form of gels, solutions and sprays.


The design concept for the interior design of a bathhouse can embody the ideas of a wide variety of styles. The most common is Russian classical. This perfect option for decorating a wood-burning sauna. Its main advantage is that such decor does not require large expenses and can easily be arranged with your own hands.
The main components are wooden walls, plank floor, laconic benches and always a large wooden welcoming table. This interior is complemented by a Russian embroidered tablecloth and all sorts of little things in the Russian folk style ( wooden utensils, brooms on the walls and other elements). In such a bathhouse you will always feel cozy and comfortable.


Country style is very close to Russian design. This is also a model of a “village” bathhouse, but with national motifs from other countries. Light wood-burning furniture, usually skillfully aged, dishes depicting rural landscapes and bright textiles are the main features of a country-style design that any bathhouse owner can do.


Oriental lovers can be recommended to introduce the features of a hammam into their Russian steam room. From a decorative point of view, the main feature of a Turkish bath is considered to be mosaic, which is used in this country for cladding all rooms or a room with a swimming pool, because this is where such a design would come in handy. In addition, the relaxation room can be converted into a hookah room, place a low table and scatter pillows in bright colors.


The Scandinavian style, which is fashionable these days, has also reached the bathhouses. This is not surprising, because the main feature of this trend is simplicity and natural chic. Deliberate roughness is combined with classic design, and all decorative elements are simple and functional. You can decorate a relaxation room in Scandinavian style. To do this, the surface is plastered with light shades and a couple of bright accents are created, for example, a lamp rich color or unusual paintings on the walls.


Elements of classics can be introduced into the design of the washroom. If you build several arches, decorate the ceiling with stucco or install a multi-level floor.
Less common is the Art Nouveau style in the interior. bath rooms. It involves an abundance of curved lines, abstract images and bright colors. This is a solution for those who do not like stereotypes and are not afraid to experiment. Most often, this design is used in saunas made of foam blocks.


The steam room is considered a fundamental element of any bath, so only the highest quality materials should be used for its decoration. At the same time, as a rule, it has small dimensions, so interior layout should be carefully designed so that there is enough space for everyone, as well as for all the necessary shelves and deck chairs.
Separately, it is worth paying attention to lighting. Usually small lamps are mounted in the ceiling, which will give a dim, dim light. A good visual effect is achieved if you equip semicircular ceilings and combine them with oval-shaped sun loungers and benches.

Having completed the construction work on the construction of a bathhouse on his personal plot, you need to think about the interior decoration of the room. This is quite a serious job, but if you approach it correctly, then interior decoration baths (we will also try to show it to you in pictures) will seem like a fascinating process.

Of course, the most important decision in this work will be the choice finishing material. At the same time, you should not stop at one type of wood - a combination of different types of wood will bring special charm and comfort to the bathhouse. Also, when choosing a finishing material, you need to know its properties. Otherwise, staying in the bathhouse will bring disappointment instead of pleasure.
For finishing dressing rooms, rest rooms and other rooms that are not in contact with high temperatures, you can use pine. This material is quite cheap, easy to process and has a beautiful structure. It is highly not recommended to use pine in steam rooms, since when the wood is heated, resin is released, which will constantly cause a lot of inconvenience. As a rule, the steam room and washing room are decorated with linden or larch. This material retains color perfectly and, moreover, even in the hottest bath, touching the casing is impossible to get burned.
It is important to immediately think about where the shelves will be installed and where accessories for bath procedures will be placed. After all, they are the most important elements ancient rite ablutions and have great importance. But you should not pile up bath equipment, especially if the room is small, otherwise the risk of injury when visiting the bath increases.
Interior decoration in the bathhouse is not carried out with all types of wood. Moreover, there should be no linoleum or particle boards in the bathhouse. These are flammable materials that become toxic when heated, which is hazardous to health. Alder, larch, birch, aspen, poplar, cedar, abashi or linden are excellent for these purposes. Such wood does not heat up too much even in very hot rooms, since it has low thermal conductivity. No resinous substances are released from it, and after bath procedures everything dries quickly.
Wood for interior decoration of a bathhouse is not coated with paints or varnishes, since when heated, these chemical coatings will certainly begin to evaporate, poisoning the air and negatively affecting the human body.
Most often, the walls in the bathhouse are covered with clapboard. This process should occur after the walls are covered. mineral insulation and a layer of aluminum foil. Alternatively, foil tepofol. It performs the same functions, but is much more practical and easier to install. All this will seal the room.

It should also be taken into account that the lining should not be closely adjacent to the layer of foil or insulation. An air gap should form between them. This is what happens, because the lining is mounted on a pre-installed timber sheathing.

The beams (yards) are installed on the walls parallel to the floor at a distance of about 50 cm from each other. They use a level. After installing the frame, it is coated with an antiseptic. Before installation, the same is done with the lining. Begin laying the lining from the corner. Fastening is carried out using nails, staples or clamps. 
If you fix the lining in the places of the locks with nails, they will remain invisible.
Once you have chosen the materials for the interior decoration of the bath, you can begin to work. The finishing process begins with the floor, which is mounted on joists.

The logs must be laid on brick pillars, which are installed on a sandy or concrete base.

The size of the log is 200x200 or 250x250 mm, the laying step can be chosen close to 1 m, since the load on the floor will be minimal. Floor boards are used tongue-and-groove or edged. It should be noted that in order to retain heat in the steam room, the floor in it must be at least 150 mm higher than the floor in the washing room.

The material used is hardwood boards about 30 cm thick. Both joists and floor boards are coated with an antiseptic to prevent the growth of fungus and mold.
If the use of wooden floors is allowed in rest rooms or locker rooms, then this is not recommended in the washing and steam rooms of the bathhouse. These places are constantly under the influence hot water and a pair, so the tree will quickly become unusable. In addition, a wooden floor will always be dirty as it is very difficult to clean.
That's why ideal material Ceramic tiles will be used to finish the floor in the steam room. Due to the fact that hot air rises, the temperature at floor level remains close to 30 degrees, which means it will not bring any discomfort. To prevent your feet from slipping on the tiles, you can build small wooden grates, which after bathing procedures are taken outside to dry in the fresh air.

The floor in the bathhouse is made with a slight slope (1:100) and equipped with a drain so that excess moisture does not stagnate.

Any bathhouse must have shelves and benches on which you can sit or lie. As a rule, they are made in a round shape - this type is the most convenient and aesthetically pleasing. But the main requirement that is presented is their reliability and strength: the shelves should not creak or wobble. The material is softwood, which does not contain resin pockets and has a light and pleasant odor. You can make shelves yourself or buy ready-made ones in specialized stores. If you are wondering what the interior decoration of a bathhouse should look like, the photos below will demonstrate this.

The surface of the lining and boards for finishing the shelves is carefully cleaned and sanded so that it becomes perfectly smooth. Boards or clapboard are attached to pre-installed timber posts. The materials are nailed onto the seats with a small gap so that moisture does not stagnate and the wood dries well. For fastening, either wooden pegs or nails are used, which are driven in deeply so that touching them does not cause a burn.

The shelves in the bathhouse are arranged in two or three tiers. This is the so-called stepped design. The second option is an L-shaped arrangement of shelves: one wall has two steps, the other has only one. The “compartment” option, when the top shelf is located above the bottom, like on a train, is good for small spaces.

The dimensions of the shelves in the bathhouse depend on the size of the room. On average it is up to 2 m in length and 60-90 cm in width. From the top shelf to the ceiling there should be at least 1 - 1.20 m, from the top step to the middle and from the middle to the bottom - 0.4-0.6 m.
The material used for finishing the walls is also used for the ceiling. Since the temperature under the ceiling will be as high as possible, the material for finishing it should contain a minimum amount of resins. If you ignore this requirement, then the cost of the interior decoration of the bathhouse can increase significantly after the first steam bath. “The miser pays twice,” which means that the lining of the bathhouse ceiling will have to be changed. To avoid having to do this, immediately choose high-quality materials - pine and spruce are definitely not suitable for a steam room. But in the dressing room they can be fully used.
The modern washing compartment in the bathhouse is a regular shower stall, equipped with a pair of shelves for storing various small accessories. When decorating the interior of a bathhouse with your own hands, and especially if we are talking about the washing compartment, you should use moisture-resistant materials. These are tiles for walls, self-leveling floors or tiles for floors. These options for finishing the washing room are the most durable and practical. To prevent slippery walking on such floors, use wooden stands or rubber mats.
A bathhouse is a rather dangerous facility in terms of electrical safety, so the maximum permitted voltage supplying electric lamps should not exceed 12 W.

Most often, incandescent lamps and fiber optic systems are used in baths. LEDs are not entirely practical in this case, since they do not withstand high temperatures well.
Lamps used to illuminate all rooms must be hermetically sealed to prevent moisture from getting inside. The wires are laid under a layer of thermal insulation and are carefully insulated beforehand. Switches must be placed outside the steam room. Electrical wiring should be laid and secured to the walls and ceiling before the interior finishing of the bathhouse is completed. This is done in order to hide the wires from mechanical damage or destruction under the influence of hot steam and prolonged exposure to elevated temperatures. If the wires are laid on the surface, then they are hidden in a special box.


For baths, there are wooden lampshades that diffuse light. Lamps are placed in the bath on the sides under the ceiling or along the entire wall.

In some cases, lamps are placed under the backs of the seats: the back is also a decorative grille for the lamp. There should not be many lamps so that the light does not hit the eyes.

Fiber optic lighting systems for saunas emit beautiful diffused light. These lamps are safe because the lamp itself (projector) is located outside the steam room, and only light-conducting optical fibers are located in the steam room.
With the help of such a device you can create the most unimaginable lighting options in the bath and color combinations. Do you want the starry sky, do you want the northern lights, do you want the flames of fire. Such lighting is also economical and durable.

If you watch how the interior decoration of a bathhouse is carried out in the video, you will already know exactly what is being done and how. The whole process is quite labor-intensive, so you need to prepare well, study all the stages, select the right materials, and then proceed to the interior decoration of the bathhouse. The price for such work will no longer be of interest to you, since you can do everything yourself. What you get as a result will delight both you and your loved ones for many years.
A truly conscientious finishing of a bathhouse is not only aesthetic visual characteristics, but also the excellent smell of natural wood, the long service life of the finishing, as well as the bathhouse building itself.
The interior decoration must be done with high quality and in such a way that everyone who gets there will admire not only the beauty of the finish, the smells, but also how well the steam is preserved in the treasured steam room.
Finishing the steam room in the bathhouse - the best options
The so-called “lining” or modern panels for cladding as a bathhouse finish is a truly universal choice. The question may rightly arise: why?
Well, for starters, because decorating a steam room in a bathhouse with your own hands using the indicated materials is not a difficult process, and with such finishing the walls look smoother and acquire the ability to “breathe,” which is determined by good microcirculation. Condensation will not form on such a wall of the steam room in the bathhouse, let alone the external characteristics. In addition, the installation of the “lining” itself is very simple; for such work you do not need to be a carpenter or a master in this matter.

Decorating a steam room in a bathhouse with your own hands using lining
It is worth remembering one very, very important detail - the bath will not tolerate varnish for wooden “lining”. Some varnishes and so-called “stains” at sufficiently high temperatures will release substances that are harmful and dangerous to human health.
Interior finishing of a bathhouse is a fairly simple process, but you should prepare well for it.
A considerable part of the whole process and the subsequent operation of the walls, their durability, depends on the quality of the wood from which the finishing material is made. High-quality material will always be sufficiently well dried, properly hewn, and will not have various nicks, cracks or protruding marks from knots on the surface structure.
For example, “lining” made of hardwood is almost the most ideal option. It is characterized by a reduced heat capacity, which is why the bath room will heat up very well and quickly, and at the same time the walls will not be so hot that you can get burned or scalded.
Each breed is good in its own way. For example, birch panels have the ability to positively influence the human body as a whole, aspen has healing properties.
A truly universal solution can be your desire and the implementation of a combination of several types of breeds at once.
Although, if you look carefully, birch has a loose structure, so when harvesting it will dry out quite a lot. It is easy to process, but if there is an alternative, it is better to abandon it.

Finishing the steam room with clapboard made of hardwood
And larch, as an example, has good durability due to the fact that it copes excellently with changes (sometimes very sharp and quite large) in temperatures and high humidity.
As for linden, it is attractive with its light shade. In addition, it is quite moisture resistant and has good mechanical properties. It also takes a long time to heat up, so it is suitable for finishing both walls and ceilings. You can even line the wall near the stove with it for fire safety reasons. With all this, when heated, linden begins to smell very pleasant. To avoid darkening on this type of material, it will have to be treated with special compounds.
Linden is also classified as a “honey plant,” which adds to its property and ability to “breathe.” It perfectly absorbs moisture and provides additional sound insulation. What can we say about the medicinal properties.
The most the best option there will be aspen according to your taste. It is also suitable for finishing steam room ceilings. Its mechanical characteristics are so perfect that it has long been used even in the construction of drinking wells, even cellars.
With proper preparation and drying of this rock, the strength indicators increase significantly, so that it will be difficult to even hammer a nail into such a plate. Suitable for the floors of your bathhouse.
Also, aspen is not at all susceptible to rot, and a pleasant plus will be its resistance to various fungi - mold, for example. In addition, there are opinions that aspen helps get rid of migraines and headaches.

The floor in the steam room should have a quick “water drainage”
When it comes to finishing the floor in your steam room, you should keep in mind that the temperature there is much lower than closer to the ceiling. It rarely reaches 30-40 degrees Celsius. The floor in the steam room of your sauna can even be earthen, concrete or clay.
It is important to take into account the fact that the floor must have rapid “water drainage”.
Of course, in order to avoid various types of thermal shock, it is recommended to additionally cover your floor with a special mat, boards or special cork covering.
For working with the floor and its finishing, ordinary tiles or sanded boards are also suitable.
The technological process for finishing the floor is quite simple: we place the boards on the joists, preferably closer to each other, and fasten them with self-tapping screws.
If the choice is made in favor of tiles, then you will first need to screed, then thoroughly level the working surface. The tiles are laid on the intended special mixture. All seams are treated with a special moisture-resistant compound, which will not allow water to get under the facing layer and contribute to the formation of mold. It is worth remembering that this finishing option will make the floor dangerously slippery, which means you need to consider a wooden shield to create safe conditions for steamers.

Finishing the floor in the steam room with tiles
When choosing wood or tiles, remember: the good thing about tiles is that they are quite easy to care for, while wood will help create a general feeling of comfort and, from a decorative point of view, benefits more from the overall composition.
No matter how high-quality and correct from the point of view of work technology your finishing is, the following materials are completely unsuitable for steam rooms and bath rooms:
The listed types of materials are characterized by insufficient resistance to high temperatures, and plastic and linoleum will even emit harmful substances. Pine is characterized by increased release of resins.

Finishing baths and saunas with Abashi wood

Finishing the inside of the bathhouse with linden and pine
It is worth considering that spruce and pine emit a rather pleasant smell, and this, in turn, gives a therapeutic effect from visiting such bathhouses decorated with this material. Despite the profitability and accessibility, you need to understand that this type of material is very demanding in processing.
A steam room in a bathhouse, finishing it with modern and high-quality materials is a delicate matter. Now that we have discussed this issue, let's move on to the issue of thermal insulation.
The future thermal insulation itself will depend on what material we chose for building the bathhouse. If we are talking about wooden log house, then additional insulation may not be required. Although, due to the shrinkage of the timber, after some time, cracks and gaps form between the logs of this very timber. Taking this feature into account, “caulking” is made between them using flax or a special mixture of sawdust and clay.

Thermal insulation of a steam room in a bathhouse
Among a narrow circle of bathhouse builders, there is an opinion that a completely lined steam room in a bathhouse with “lining” is not quite the right solution. The opinion is explained by the fact that wood is a living material, and such serious cladding will prevent the evaporation of moisture from the steam room.
Although, on the other hand, under modern conditions, there is another opinion that insulating a steam room is almost a priority task.
Of course, at the very beginning you need to decide on the position of the steam room. According to the classics, the entrance to it should be from a room where you can wash. If the decision is made to move from the dressing room, then they should be connected by a mini corridor.
Market building materials offers a whole line of insulating insulation for baths. Such materials can be either artificial or natural.
TO natural types relate:
These materials are environmentally friendly; at high temperatures they do not emit hazardous substances and have excellent insulating properties.

Materials for thermal insulation of steam rooms
On the other side, natural materials They are subject to fairly rapid rotting and decomposition; they are very loved by various types of insects.
The line of artificial insulation materials is presented mainly by:
They are distinguished by a fairly long service life, they are resistant to humidity and are unloved by insects. The thermal insulation performance is simply impressive.
Requirements for seals
Any insulation or sealant must be fire-resistant and withstand temperatures over one hundred degrees Celsius, as well as have good insulating properties.
It has such wonderful and necessary properties basalt wool(for walls), and for the floor - expanded clay slabs. If we are talking about the ceiling, then perfect choice– expanded polystyrene.
Insulating the ceiling in a steam room usually requires much more materials than insulating walls or ceilings. This is explained by the fact that steam, by its nature, rises very quickly to the ceiling and, in order to avoid its cooling, sufficient attention should be paid to the thermal insulation of the ceiling.
The step-by-step instructions are as follows:

Step-by-step instruction:
About how to conduct decorative finishing and what materials are suitable for this, we talked earlier.
If the floor of your steam room is made of concrete, proceed as follows:
Plywood is attached to the floor, on top of which the so-called hydrosol is laid. We place its edges behind the wall and secure it with tape containing aluminum. If there are gaps, we process them construction hairdryer. We lay a reinforced mesh on top of the resulting one and pour concrete mortar.

Waterproofing the floor of a steam room
If the floor is made of wood, then first we attach a 15-centimeter layer of so-called mineral wool under the joists, and fix roofing felt on top of it. Next, we treat the wooden surfaces with special compounds such as antiseptics. We lay a subfloor on top of the roofing felt and cover it with clapboard.
Although the interior finishing of a steam room seems at first glance to be a labor-intensive and complex process, it should be understood that at the same time, decorating the interior of a steam room with your own hands is a fairly simple and easy process if you correctly follow all the described rules and recommendations in this article.
Good luck in your construction endeavors!


.jpg)


