We will send the material to you by e-mail
P planning renovations in city apartments or country houses, many property owners decide to divide large rooms using partitions. For these purposes, it is recommended to use, thanks to which it will be possible to create very complex designs, and bring to life the most daring design ideas.
If the owners of apartments and cottages have decided to build with plasterboard with their own hands, step-by-step instructions will help them carry out the whole range of activities quickly and in accordance with established standards. Before starting installation, property owners need to purchase the required amount of material and consumables, as well as purchase or rent construction tools:
Related article:
The construction of plasterboard partitions must be carried out in strict sequence. This process is usually divided into several stages:

DIY plasterboard partitions. Step-by-step instruction
Owners of country houses and city apartments who plan to make gypsum board partitions with their own hands often cannot decide what material to use to create the frame. There are two options available for them: metal profiles and wooden blocks. To decide and do right choice, it is necessary to study the technical and operational characteristics of both materials. As a result, metal profiles “win”, since they have a large number of advantages, which include the following:
If the owners of residential premises do not know how to properly construct plasterboard partitions with their own hands, step-by-step instructions will help them with this. They need to act in a certain sequence: Related article:
Step-by-step instruction
They have become an integral part of planning and redevelopment interior spaces, be it a house, apartment, office or something else. They are light in weight, easy to install, and do not create additional load for load-bearing walls and beams, and you can create partitions of any shape and design. In general, this type of structure has a lot of advantages.
Maybe you need to break one large room into two or simply select a separate zone in it. Or maybe you want to move the doorway or fence off the room from. Probably in office space it was necessary to isolate some of the employees. In any of these cases, it won’t hurt you to know how to build a plasterboard partition with your own hands.
First you need to decide on the desired thickness of the future partition. In accordance with this, we select the profile and gypsum board. If the thickness of the wall in the room is 13.5 cm and you need to match this value, then you need a 100x40 mm profile and 12.5 mm plasterboard. As a result, after very simple calculations, we determine that the thickness of the partition will be 100 + 12.5 + 12.5 + 100 = 125 mm. A difference of 1 cm is not critical.
Let's prepare necessary tools and materials:

Let's start with our step-by-step instructions for making a plasterboard partition with your own hands.

Because the standard width plasterboard sheet is 120x250 mm, then we will mount it exclusively vertically. Accordingly, every 60 cm you need to install a rack profile. But for a more durable structure, you can put them every 40 cm. All that remains is to mount the horizontal jumper.

As we install all the necessary horizontal jumpers, we get this “skeleton” of our future partition.

In this case, all profiles can be fastened together with self-tapping screws without a drill, and cut with metal scissors. At the end, be sure to check the plane of the frame and, if necessary, add attachment points to the ceiling, floor, and walls.

“Recess” the screws into the drywall by 1 mm.

First, we cover one side of the partition, and proceed to the second only after all communication systems inside it have been installed - sockets, wires, switches, etc.
 |
 |
 |
Places of gypsum board joints using stationery knife“we embroider.” This is done so that when sealing the seams, the mortar penetrates well into the joints, and the finish turns out smooth and of high quality.

This is how you can easily and inexpensively make a plasterboard partition with your own hands. All that remains is to process the seams and glue the protective corners, after which we can begin finishing our new wall.
Articles on this topic:
There are many designs interior partitions, they can be used regardless of the materials from which the house is built. It is important to make partitions technologically correctly and ensure that they meet exactly the requirements that are necessary for certain premises.
Among vertical structures Inside the house there are load-bearing walls and partitions. The first ones are supported by floors and roof structures, they themselves must rest on the foundation, and on the second floor - on the underlying wall. The position of the load-bearing walls on the house plan is rigidly fixed.
Interior partitions are not load-bearing structures. They only divide into separate rooms inner space house, limited by main walls. Therefore, they can be made from both heavy massive materials (for example, brick) and light ones (for example, plasterboard, wood). Sound insulation, environmental friendliness, aesthetics, and the possibility of remodeling the space depend on the material and quality of the partitions.

All interior partitions in the house must:
In addition, there are special requirements:
In most cases, the systems must provide soundproofing of the premises. Massive structures cope well with this task, and in lightweight partitions, soundproofing material is used between the skins for this purpose.
Airborne noise insulation index for interior partitions between rooms, a room and a kitchen, a room and a bathroom according to regulatory requirements must be at least 43 dB. The higher this indicator, the better design prevents the spread of household noise - from colloquial speech, radio, TV. However, it does not take into account the isolation of low-frequency sounds from a home theater or operating engineering equipment(ventilation, pump). With equal airborne noise insulation indices, a massive partition attenuates low-frequency sounds much better than a lightweight frame partition. It is also important to take into account that holes in the partition (for example, cracks in doorway) significantly reduce the level of sound insulation. There are many nuances in matters of acoustics, and if for some reason it is important to perfectly soundproof a room, you should contact an acoustics engineer.
Traditional types of interior partitions allow you to provide a comfortable level of sound insulation. Structures made of massive and at the same time porous materials - ceramics, aerated concrete, gypsum concrete, shell rock - absorb and reflect sounds of any frequency well. Such partitions, about 10 cm thick, provide an acoustic insulation index of 35-40 dB, and 15 cm thick - up to 50 dB. In order, if necessary, to improve the sound insulation of systems made of these materials, create an air gap between two rows of masonry or additionally line the wall with plasterboard.
Multilayer structures are also effective, in which outer hard layers that reflect sound (for example, plasterboard sheets) are combined with soft layers that absorb it. In frame partitions, mats or slabs of basalt fiber are used as soft layers, which are laid between the cladding. At the same time, the level of sound insulation frame systems the higher, the greater the mass and rigidity of the cladding layers, the wider the gap between them and the better the insulating properties soft material. Therefore, noise absorption will significantly improve the use of a double layer of cladding and special sound-, rather than heat-insulating, materials.
To achieve the same soundproofing effect, sometimes you have to choose between thick monolithic and narrow multilayer partitions. The latter can save usable area Houses.
 |
The places where frames are attached to rigid structures, as well as the places where they are connected to the floor and ceiling, must be insulated with elastic gaskets |
 |
As a middle layer, a material with a thickness of 100 mm is used (fiberglass, mineral wool, cellulose insulation), for cladding - gypsum plasterboard or gypsum fiber board (12 mm) |
 |
Taking care of safety, electrical cables laid in, and the freon tubes of the air conditioner are thermally insulated |
Massive partitions include partitions made of ceramic materials, shell rock, aerated concrete, sand-lime brick.
Such designs are used in houses made of appropriate materials with reinforced concrete floors. It is not advisable to use aerated concrete partitions in rooms with high humidity.
Brick partitions made from building ceramic or silicate bricks of at least M25 grade. Sufficient thickness single-layer system - 12 cm (half a brick), if the partition is small - 6.5 cm (made of brick laid on edge). To improve sound insulation, structures can be made three-layer - mineral wool (5 cm) is placed between two walls 6.5 cm thick or an air gap is left.
If a brick partition (or part thereof) is installed ventilation ducts or hide pipelines, its thickness reaches 38 cm. Such systems are already too heavy to be installed on the ceiling. On the first floor they are supported on the foundation, on the second - on the wall of the lower floor. The traditional finishing of a brick partition is 1-2 cm plaster.
In a house made of ceramic blocks, partitions can be partially or completely made from the same material, namely from one layer of blocks 10-12 cm thick. For aerated concrete structures, blocks 8-12 cm thick in one layer are used. Partitions made from these materials are lighter than brick, they are advantageous to use if it is necessary to reduce the load on the ceiling, in addition, they are easier to finish.
The installation of massive partitions begins after the installation of the building’s load-bearing structures. The base is leveled with cement-sand mortar. To ensure accuracy when laying corners, a wooden (from panels) or metal template is used, and the verticality of the masonry is checked with a plumb line. To connect the partitions to the walls, when laying the latter, grooves (grooves) 5-6 cm deep are left at the junctions of the partitions. Bricks are placed in them when installing the system. If grooves are not left, the partition and wall are connected with metal rods. Wooden wedges are driven into the gap between the top of the partition and the ceiling, and the gap is filled with gypsum mortar.
At the same time, the peculiarity of the installation of structures made of ceramic blocks and aerated concrete is that the large and precise dimensions of the blocks allow the mason to work without templates. To ensure straight lines, the partitions are fixed on the floor and on the wall at the junction points. wooden slats, along which blocks are laid out.

Based on gypsum and various fillers, prefabricated large-sized slabs are produced for partitions.
Structures made of gypsum concrete slabs are used in houses with reinforced concrete and wooden floors. For rooms with high humidity, moisture-resistant boards treated with a water-repellent agent are used.
Gypsum concrete slabs can have dimensions of 30-50 x 80-125 cm and a thickness of 6, 8, 10 cm. Usually, grooves and protrusions are made along the edges of the slab, which ensure quick and durable assembly. The material is easy to cut and groove for laying utilities in it. Gypsum concrete partitions are three times lighter than brick ones and have a smooth and even surface. The thickness of the structure from one layer of slabs is 6-10 cm. If it is necessary to improve the sound insulation of the room or lay pipelines in the partition, it is made double.
The system is installed on a floor leveled with cement-sand mortar, and roofing felt waterproofing is placed under the lower blocks. The template is made of two racks with a movable rail. The slabs are installed on top of each other, usually with the long side horizontal, with the seams bandaged. Use gypsum solution. Reinforcement is placed in horizontal seams and secured in the walls that border the partition. The gap between the ceiling and the partition is sealed with gypsum mortar. There is no need to plaster the slabs, just putty.

Video guide for installing partitions and non-load-bearing walls made of gypsum concrete slabs:
Basically, two types of partitions using wood are used - solid and frame.
Wooden partitions can be used in houses made of any materials, even without reinforcement wooden floors, they are ideal for the second floors of buildings and attics. Structures made from this material are easy to disassemble, so they are appropriate if redevelopment is possible in the future. In rooms with high humidity wooden partitions must be protected with a waterproof finish.
Solid wooden partitions are made from vertically standing boards that are as long as the floor height and 4-6 cm thick. To improve sound insulation, the boards are installed in two rows, placing soundproofing material or an air gap between them. The disadvantage of the design is the high consumption of materials and, accordingly, cost, as well as high weight compared to frame partitions. Systems based wooden frame made from racks - beams with a cross section of 50-60 x 90-100 mm and upper and lower frames ( horizontal beams, which frame the frame) of the same section. Soundproofing boards are laid between the frame posts. The cladding is made of lining, plywood, OSB or gypsum board. At a partition of two rows of frame with a separating air gap or with double-layer cladding, the sound insulation index increases significantly. This design is 15-18 cm thick and can be mounted inside engineering Communication.
At the base of the partition, a strapping beam is laid, which must rest firmly on the floor beams. The easiest way is to place it directly along the beam, and when placing the partition parallel or perpendicular to the beams, as well as diagonally, the beam is installed on a crossbar resting on adjacent beams. To create a continuous structure, two horizontal guides are fixed to the frame, between which boards are installed vertically, connecting them at the top with a fastening bar. When installing a frame partition, racks are placed on the strapping beam in increments of 40-60 cm (it is desirable that it coincides with the size of the cladding slabs), combining them top harness. The frame elements are fastened together with nails or self-tapping screws, using metal corners. Sheathing is installed on one side, and then the space between the beams is filled with sound insulation. The frame structures are attached to the walls with metal spikes and to the sheathing with self-tapping screws.

A special system for installing frame partitions from gypsum plasterboard, which contains all the necessary elements, allows the work to be completed especially quickly.
Lightweight gypsum plasterboard partitions can be used in houses made of any designs and materials and in any rooms, even with high humidity (special moisture-resistant sheets are provided for such objects).
The system includes metal profiles frame - horizontal guides and vertical racks (section 50-100 * 50 mm), as well as gypsum board sheathing 1.25 cm thick and 120 x 200-300 cm in size and soundproofing material. They use designs with one-, two- and three-layer cladding, as well as on double metal frame(with space for utilities). The level of sound insulation of a partition depends on the number of sheathing sheets, the thickness of the internal soundproofing layer, and the presence of an air gap. Depending on this, the thickness of a partition with a single skin can range from 7.5-12.5 (single) to 17.5-22.5 cm (double), and with a double skin and an air gap - correspondingly greater.
Structures are installed during finishing work before installation floor coverings, on a screed or ceiling. Polyurethane or foam rubber soundproofing tape is glued onto the horizontal profiles and secured to the floor and ceiling using dowels and screws (in increments of about 1 m). Rack profiles are installed in increments of 30, 40 or 60 cm. The frame sheathing on one side is secured with self-tapping screws, and soundproofing material is placed between the profiles. Then the sheathing is installed on the other side of the partition. Irregularities in the cladding and screw heads are sealed with putty.

This video guide clearly demonstrates all the stages of building interior partitions from small plasterboard sheets (small size):
To create partitions, glass blocks are produced, which are distinguished by a wide palette of colors, an assortment of surface textures and sizes.
Glass partitions are used so as not to block the access of natural light to rooms located in the depths of the house.
Glass blocks are hollow “bricks” with walls made of transparent or colored glass. Due to the presence of air inside, they have good soundproofing properties and transmit 50-80% of light. As a rule, they are square in shape with dimensions of 19 x 19 cm or 24 x 24 cm and a thickness of 7.5 - 10 cm.
Glass blocks are laid at the stage of finishing the premises after screeding and plastering the walls, but before finishing the floor and finishing walls and ceiling. Glass blocks can be laid on cement screed. The process of laying them in the wall is similar brickwork, however, the sutures are not ligated. The thickness of the seam is about 1 cm. Cement or cement-lime mortar is used, which is applied to the horizontal and vertical surfaces of the block itself before laying. From an aesthetic point of view, high-quality jointing is mandatory.

The final cost of the partition depends on many factors. Moisture-resistant and fire-resistant materials are more expensive than usual; the price is increased by the quantity and quality of finishing, frame and soundproofing material. Installation of the partition is 30 - 40% of the cost of the material, and its delivery and unloading, especially in the case of heavy materials, can be equal to their cost.
The desire of every person to make their home unique and comfortable found a way out in the zoning of the premises.
The most inexpensive and easiest way to do this is to install a gypsum plasterboard partition in the room as a tool for zoning the space. And to further reduce costs, you can install it yourself. Before the advent of drywall, partitions were built from foam blocks or bricks.
Advantages of gypsum plasterboard construction:
Before you start installing a partition in a room with your own hands, it is advisable to first think about what load will be on the wall and what decorations are expected there. This will help to provide in advance auxiliary jumpers and places for their attachment.
First you need to find out what you will need for the job. The main thing is a metal profile specially designed for use under the base. Two types are used:
For each main standard size, additional types have been developed:
To build a simple partition wall with your own hands, you will need UW and CW type crossbars. If a wide structure is planned, and even with communications, use UD and CD.
To build the wall, choose plasterboard measuring 12.5 mm. If zoning is planned in wet rooms, it is allowed to use only moisture resistant drywall(Green colour).
 Tools
Tools Tools needed:
Zoning of the room begins with the selection of a base for the wall being constructed.
It happens:
Everyone chooses the type that suits them. But it is better to use a metal base:
Wooden sheathing is exposed to moisture, which causes it to change in size, and the edges of the gypsum board may diverge.
After this, they begin to mark the room.
Before applying markings, make sure that the ceiling and floor in the room are level, dry, and free of dirt.
Using building level and a plumb line, draw a line where the base of the frame will be located, starting from the floor, then moving to the walls, and then the ceiling. Keep in mind that the thickness of the wall itself along with the finishing will be added to this line.
The zoning of the room begins with the installation of the main guide. It is cut to the required length, taking into account the possible doorway. If provided, make a bend with scissors up 15-20 centimeters and cut lateral surface.
 Basis of design
 Before we begin, between metal base and sealing tape is secured to the surface. Installation of the skeleton of the structure begins with fastening it to the floor every 60 cm with a screwdriver.
The base is installed to the ceiling exactly above the bottom one. Next, a vertical bar is installed and screwed to the bottom and top. Wooden beams strengthen the supporting skeleton of the septum. They are inserted inside the base, secured with a self-tapping screw. The size of the bar must correspond to the size of the plank.
To mark the openings provided in the wall, a guide (UW) is used. Starting from the edge of the plank, the sides are cut at an angle of 45°. By bending them, you get a U-shaped structure, which is attached to the first vertical profile of the opening using a self-tapping screw. Thus, the skeleton is formed along the entire perimeter of the opening.
The installation of the partition sheathing is completed.
Plasterboard partitions can be decorative or simple.
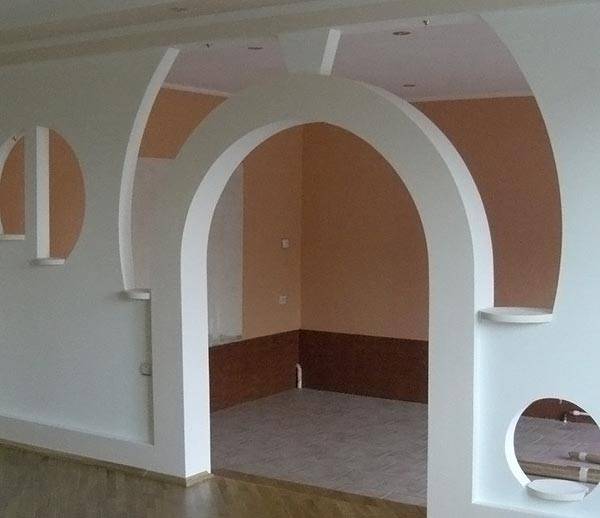
Curly plasterboard partitions made of gypsum boards perform the function of zoning a room, but they are more decorative and do not have a doorway. Instead, they create arches of various beauty and all kinds of figured elements.
A simple design is also used for zoning a room, but this is not its only function. Such partitions hide pipes or electrical wiring.
 Curly partition
 Unlike a wall, a plasterboard zoning partition is sheathed with sheets on both sides. The material varies in thickness (9-20 mm), and is selected based on the design requirements. For shaped elements, it is better to choose thinner raw materials, since drywall is flexible.
Everything here is easy to do with your own hands. Attach the layers of drywall to the grid using a self-tapping screw. Start from the edges, moving towards midline. The distance between the screws is 10-25 cm. Plasterboard sheets are placed 10-15 mm above the floor to maintain the integrity of the structure.
After attaching the first sheet, measure the remaining distance to the ceiling and cut off a piece of drywall accordingly. The following ones are installed whole, without cutting. It is advisable to ensure that the edges are always in the center of the wall skeleton. This is how the first side of the wall is sheathed.
The sheet is placed on a flat surface. Mark the cutting line with a pencil and cut with a construction knife upper layer, after which the gypsum board is moved from the support and carefully broken off. On the other hand, the drywall is cut (but not all the way through), placed on its edge and bent, then, moving it to the edge, it is broken off.
If you need to stretch the electrical wiring through the wall with your own hands, do this before installing the gypsum board on the second side of the structure. First of all, the wires are placed in a special tube, which is made of non-flammable material, which reduces the risk of fire to zero. The pipe is laid 15-20 cm from the ceiling or floor, therefore, the outlets for the switches must be placed vertically. The pipe is laid without pulling too much, after which it is attached with clips.
 Soundproofing
 The material does not require additional fasteners. Then the second side is faced. The edges of the sheets should lie on different profiles for distribution correct load on the design.
This video will show you this process in more detail:
After installation is completed, finishing begins. To do it yourself, it is enough to prime the surface, use plaster to treat the seams, the places where the screws are attached and the structure as a whole. The joints are treated with fiberglass mesh. To do this, apply a layer of putty to the seam and immediately apply a mesh. It is important to press it in thoroughly with a spatula. Then another layer of putty is applied and smoothed out efficiently. Now everything should dry, after which the seam is sanded.
 Sealing seams
 When the plaster is completely dry, start painting the wall or wallpapering it. You can decorate the building as much as your imagination and finances allow.
Creating zoning in a room is not difficult, and thanks to drywall, everything can be done with your own hands. Whether it’s creating a kitchen connected to the dining room, a separate children’s room, or separating the bathroom and toilet. After all, such a partition will cost much less and will delight residents with its functionality and aesthetics.
Read also: – types of products, rules for mounting on walls, examples of interiors with finishing, photos and videos
Some beautiful ideas for implementation:
 How to install a partition for zoning a room made of plasterboard
  Great solution for zoning
  Any room can be demarcated
  Several profile zones thanks to plasterboard
 Another worthy option to implement
  Good decision for an apartment or house
  The partition allows you to increase the space
  Several zones in one room
  Comfort comes first
  The children's room also requires zoning
  Everyone will appreciate the comfort in the apartment
  Partition instead of a massive cabinet
  Wardrobe or modern partition
  Non-standard solutions in the interior
  Sleek design
  Partition with shelves
  Openwork design
  Decorative partition for a room
  Two zones in one room
  The partition in the room serves several functions
  Decorative functions of partitions
  Several ways of interior zoning
  Not just for differentiation
  Drywall is ideal for partitions
If you need to build a wall, partition, arch or niche from plasterboard, then it is extremely important to know not only technical aspects installation, but also the characteristics of the material itself.
A sheet of plasterboard is a lightweight and flexible material with which you can quickly and easily transform an office, home or apartment. From this material you can either build a wall or build an ornate interior structure.
The structure of the plasterboard sheet (GKL) fully corresponds to the name: its core is made of gypsum with mineral pigments, to which the surface layer of cardboard is attached using glue.

The advantages of the material are well known to professional finishers. They are as follows:


The use of gypsum plasterboard can significantly reduce the time spent on finishing work; for example, a partition made of plasterboard can be built in a few hours, while the construction of a similar structure made of brick will require two or more days.
Like any building material, plasterboard has some disadvantages that significantly limit the scope of its use - the panels are not durable, they are destroyed by mechanical damage, and in addition, they absorb moisture.
And attaching anything to such a covering is quite problematic - only dowels and screws can hold a picture or a bulky shelf on it. But even in this case, it is undesirable to place anything heavy; this will cause the wall to collapse at any moment.


Using plasterboard, you can build structures that are diverse in appearance and functionality, namely:
A plasterboard wall or partition has practical functionality or performs a purely decorative function. Using sheets, you can divide the space into zones, build niches, change the location and shape of the doorway, create a false wall, and achieve increased heat and sound insulation.

Partitions made from gypsum plasterboard are considered to be more appropriate than similar installations made from other materials: brick, wood and foam blocks. Partitions made from plasterboard fiber are produced in short time, their cost is much lower than options made of brick or wood. The false wall remains hollow inside, which makes it possible to lay the necessary utilities and provide additional insulation.
The material is light in weight and small in size, it is easy to cut, so installation can be carried out even by a person with minimal experience using the usual tools found in every home.


There are a great many options for gypsum plasterboard partitions. The following are distinguished:
In addition, partitions and interior walls from gypsum boards differ in thickness and some other criteria.
Decorative plasterboard partitions, as a rule, are installed in order to hide flaws in the room and cover heating radiators. They do not require serious fasteners, and are often complemented by stylish elements: lighting, mosaics, inserts from other types of materials. Usually the same elements are fixed with glue or installed on a frame. Models that have a practical purpose are mounted during internal repair work. They modify general form premises, contribute to its division into different zones and add additional functionality to the finishing elements. Such walls and partitions are installed frame method and are attached to all walls in the room.


Regardless of the type of partitions, each has the same structure, namely:


Depending on the technical characteristics There are several types of drywall:


It is worth paying attention to the fact that the cardboard covering of all types of gypsum boards is fire resistant. This material does not burn, and at most only chars. But the core resists flame only in GKLO.

Drywall has found application in covering surfaces and creating decorative elements indoors.
Today, plasterboard is one of the most popular materials for cladding ceilings and constructing multi-level suspended structures. Drywall is necessary for design in the following situations:
Ceiling finishing using gypsum plasterboard can be carried out in rooms of any type and purpose.


Almost any interior work for interior decoration are associated with the installation of drywall. It is used to create a perfectly smooth coating, arranging all kinds of niches and shelves, as well as constructing other elements of the design structure. In addition to its decorative function, gypsum boards also have a practical purpose - creates enhanced sound absorption and room insulation. Gypsum fiber sheets are mounted directly on the wall using glue or on a pre-assembled frame; as a rule, sheets with a thickness of 12.5 mm are used for this. Sometimes, to ensure greater structural strength, gypsum boards are laid in two or three layers.
Plasterboard lining is carried out in any room; it is most effective for cold walls facing the street, which freeze in the winter.
A plasterboard wall with thermal insulation helps to insulate the room, preventing the accumulation of dangerous condensation and the appearance of fungus. Finishing plasterboard wall could be anyone.


Drywall can also be used to finish the floor using the dry method. Of course, for this purpose, exclusively especially durable sheets with increased abrasion resistance and resistance to mechanical damage are used. This coating is applied in two layers, then covered with any standard finishing coat– parquet, linoleum, carpet, tiles or laminate. The advantages of this method are obvious - the high speed of work and its cost-effectiveness.
In design, gypsum boards are often used to construct multi-level compositions, for example, podiums and ledges, which effectively mask unaesthetic pipes and other communications.


When creating partitions, plasterboard is the number 1 material. It is most often used to divide a room and create a stylish and functional zoning space. Some structures can be built on the basis of a metal profile frame, which is fixed to the walls and ceiling, and then sheathed directly with gypsum fiber plates.


Shelves with drawers look very impressive in the interior. plasterboard structures, and in houses with small children they are simply irreplaceable, because the baby will not be able to hit the sharp edges of the hanging elements. Niches are used to place small decorative elements in them that make the room cozy. These could be photographs, small souvenirs or books. The shape of such niches can be very different. As a rule, they are equipped with lighting, which makes the interior unusual and spectacular.
Tip: when installing niches Special attention You should pay attention to the weight of the products that are stored in the niche. Drywall can only support lightweight objects.


Most often, work on covering the surface with plasterboard is carried out using a frame method; for this purpose, wooden or metal sheathing. It is very important to apply the correct markings, since the strength and evenness of the future false wall largely depends on the accuracy of the calculations.


To do this, first mark the place on the floor where the mounting of the supporting panel will begin, the resulting indicator is projected onto the ceiling - this is the length of the frame. The distance between the wall and the marking is its width. Markings for rack-mount metal profiles are applied perpendicular to the floor on a nearby wall. The markings are presented in the form of vertical lines with a pitch of 50–60 cm; in the future, when attaching drywall to the plank, the edges of the sheet will be located along them.
When facing walls, it is important to remember that one wall is finished first, starting with the installation of guides and ending with the installation of gypsum boards, and only then is the transition to the next surface made.


The work is carried out in several stages, namely:


Drywall is used for various designs, such as:


Drywall with increased moisture resistance is usually used for finishing bathrooms and kitchens. Fire-resistant modifications are widespread when lining communication shafts and air ducts, when telephone and Internet cables, plumbing systems and heating pipes, as well as ventilation devices. Drywall is used in both wooden and brick houses.


The installation technology is quite simple. First, the sheet is cut. To do this, use a regular construction knife with a spare block of replaceable blades. The sequence of actions is described by instructions according to which the following actions must be performed:


After the sheet has been prepared, you should begin directly assembling the installation with your own hands in accordance with the step-by-step instructions.
You need to do the following:


It is worth paying attention to following points when installing gypsum boards:

Drywall is a very popular material, so it is widely represented in construction stores. At the same time, it absorbs moisture well, so if it is stored improperly in a warehouse, its consumer parameters can be significantly damaged. To avoid problems and purchase the product yourself High Quality, you should adhere to the following recommendations:


To protect yourself from counterfeits and defects, you should give preference to products from well-known brands.
About 70% of Russian construction market occupies the products of the German concern Knauf. This giant has production facilities all over the world. In Russia alone there are about 10 production plants building materials. Knauf company Many people associate it with high quality, reliability and practicality. About 10% of the market is accounted for by other European brands – Lafarge, Gyproc, Rigips.
Gyproc is a Scandinavian brand that has successfully established itself as one of the leaders in the global plasterboard market. In terms of production volumes in 2002, it took first place, leaving all its main competitors far behind. A distinctive feature of this brand of gypsum boards is its high environmental safety, confirmed by the “Leaf of Life” and “Ecomaterial” certificates. In addition, Gyproc has released drywall that is 20% lighter than products from other manufacturers. However, its price is slightly higher than the cost of Knauf products.


Lafarge is a Polish manufacturer that has established production of drywall throughout the world. Even Knauf is inferior to this concern in terms of the number of production workshops. This allows you to reduce the cost of production, which is why Lafarge plasterboard has a fairly affordable price. It was this company that, at the beginning of this century, made a real revolution in the production of drywall, bringing to the market semicircular sheets, all edges of which were covered with cardboard. This processing of panels has become a kind of calling card of the company.


About 20% of the market belongs to domestic companies. From the leading Russian manufacturers the following can be distinguished:


