In short, then main conclusions on the topic of installing windows and doors:
A lot of time has passed since this article was written.Yeni, so I recommend that you definitely pay attention to my subsequent articles related to the topic of windows and doors:
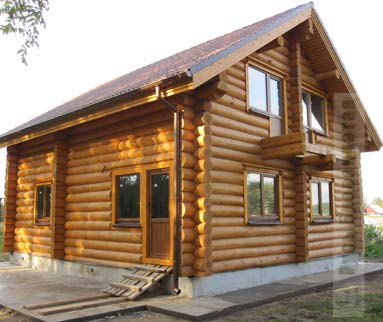
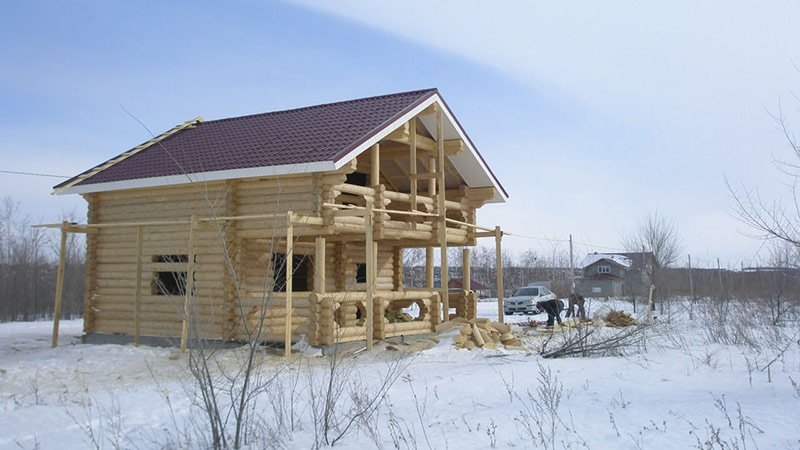
Let's return to the article itself - 2009 has arrived. My wife and I, having finished major renovation city apartment, finally concentrated their efforts on their country house.
First of all, light was installed in the house (the long epic of obtaining permission to connect was completed) - this is described in the next article.
Secondly, windows and entrance doors were installed. Then a fence was erected and a blind area was made.
In this article, we will try to describe possible options installation of windows and doors, taking into account the specifics of log houses.

What windows should I install? The question is rhetorical and depends more on the financial capabilities of homeowners.
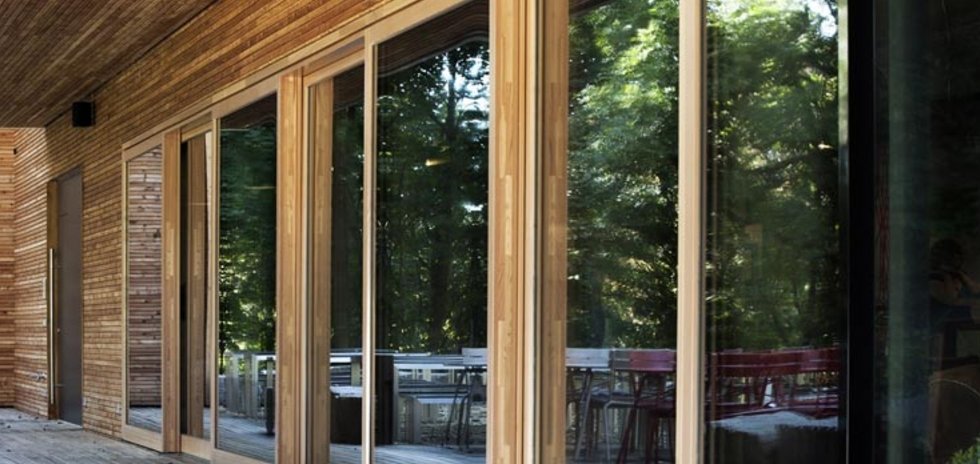
More optimal in wooden house put wooden double glazed windows, they will fit more harmoniously into the interior, will be more environmentally friendly, breathable, etc.
Even more heat-saving is the installation of modern double frames. The inner frame is a wooden multi-layer glass unit described above, and the outer frame is aluminum window(or wooden, but covered with aluminum on the outside) with a single glass. There is a gap of about 10 cm between the frames - it turns out very warm. This approach is used in our neighboring Finland.
The main disadvantage of these approaches is the cost. Given the number of windows and doors in the house, we decided against these expensive options.
|
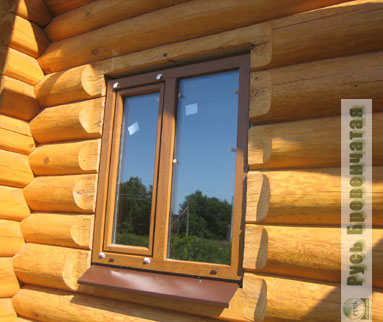
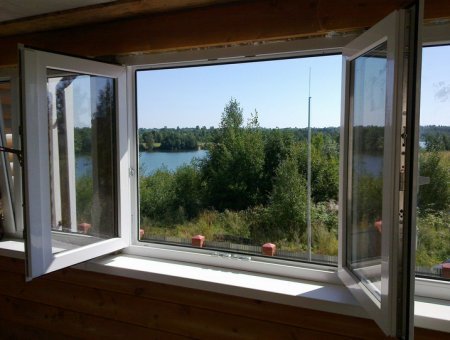
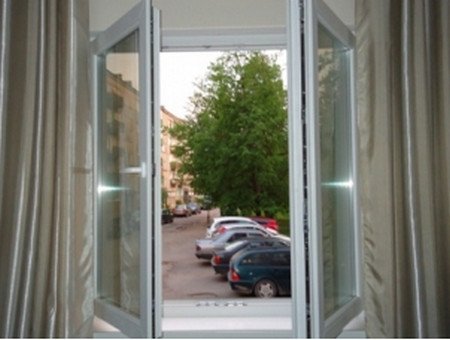
A diametrically opposite solution would be to install conventional wooden frames with single panes. The big advantage of this solution is the low price, but there are incomparably more disadvantages. The main thing is very high thermal conductivity. Gone are the days when heating costs were not taken into account in our country; now, in a market situation, this will be money thrown away. In addition, such frames need to be constantly tinted, tightened, etc. A reasonable compromise is to install metal plastic windows . But the Customer did not want to see them in the traditional white design, so it was decided to tint, or rather laminate them to match the color of “golden oak”. Of course, this increased the cost somewhat, but left complete moral satisfaction, especially since, on the advice of the gene. Director of "Rus' Log" I turned to our partner company, where I received a very significant discount on windows. |
|
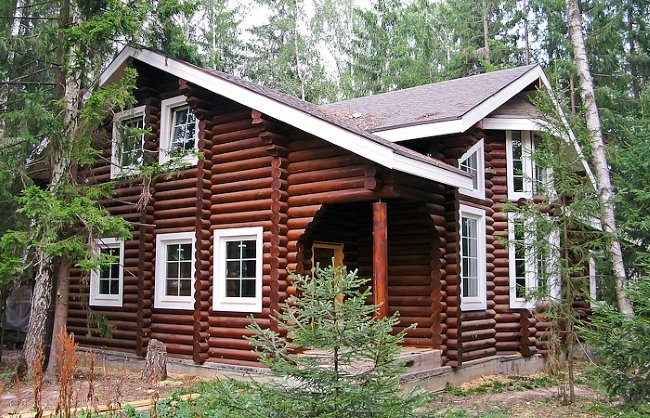
In general, “Log Rus'” tries not to abandon its clients after installing a log house on their site and always helps them with advice and recommendations. For their part, the company’s clients respond in kind, recommending “Rus” to their friends and acquaintances, or turning to them again when building a bathhouse, gazebo, etc.
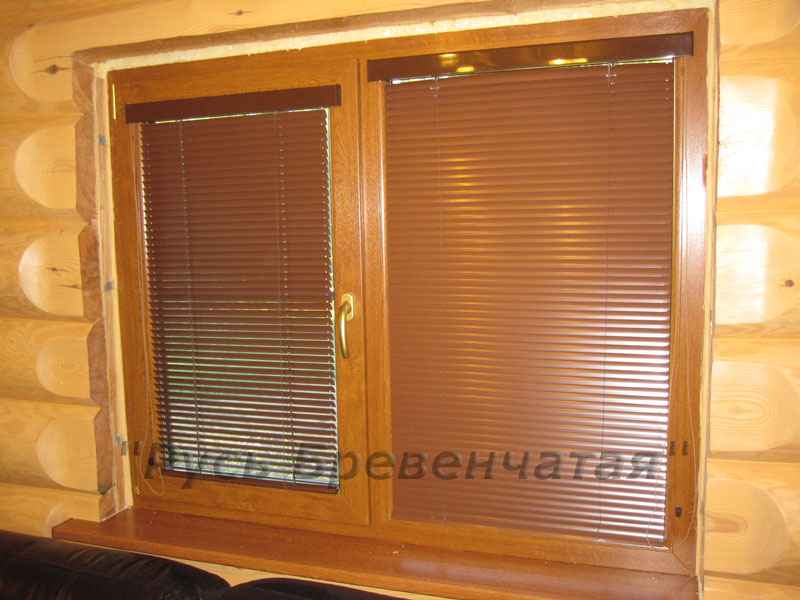
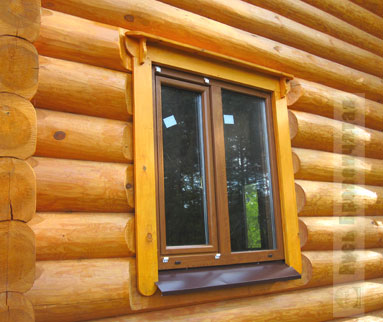
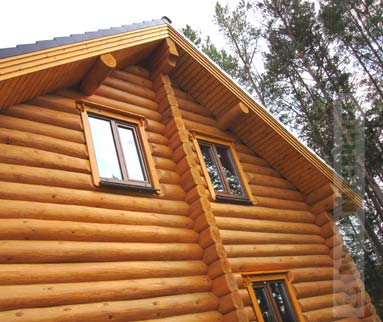
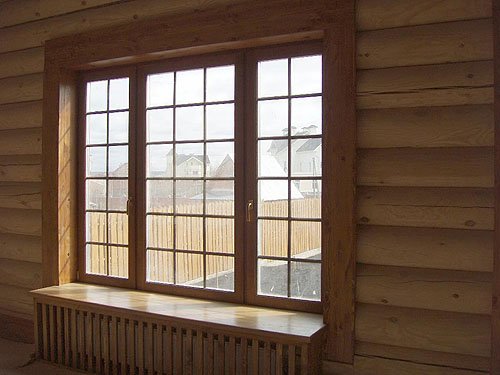
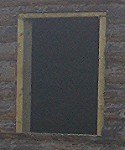
This is how the windows began to look with blinds and a window sill in September 2013, all that remains is to finish the slopes and trim, we plan to do this in the spring. There will be a separate story about choosing blinds; there are many important points there.
So, we have decided on the windows. Now let's think about how to install them in our window openings. For those who are completely unfamiliar with this topic, we recommend reading the article about the design of window and doorways.
|
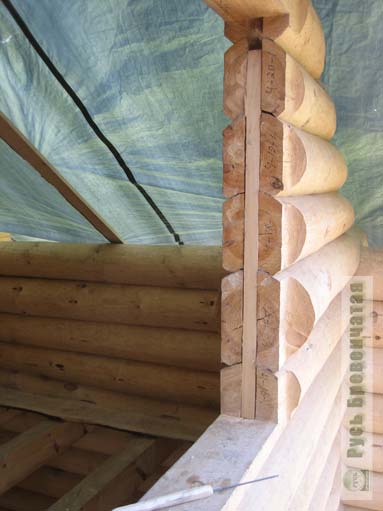
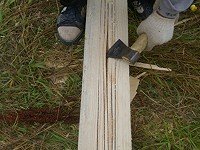
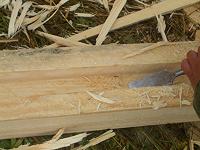
Let us remind you that the log house is like Living being, lives his own life. In frosty winters and hot summers it dries out slightly, decreasing in height. In spring and autumn, on the contrary, it absorbs moisture and “grows”. Not to mention the significant shrinkage of the log house in the first 2-3 years. We must not forget about this, otherwise you will have to “pick out” your windows from under the sagging logs, or observe the surrounding nature in the cracks between the crowns (if you have rigidly secured the casing to the logs with nails). To solve these problems there are cranial bars(photo on the right) which are inserted (precisely inserted - without rigid fastening) into specially cut grooves at the ends of window and door openings. Please note once again that the height of the bars is slightly less than the height of the groove; this was done specifically so as not to interfere with the shrinkage of the frame. Everything is clear with the cranial bars - you can’t go anywhere without them. But how to attach window unit into the structure described above. |
|
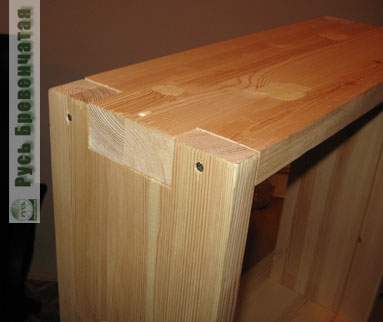
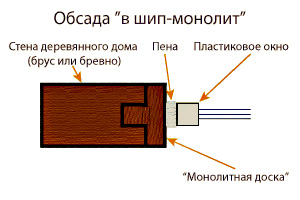
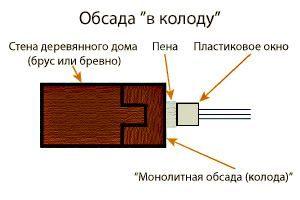
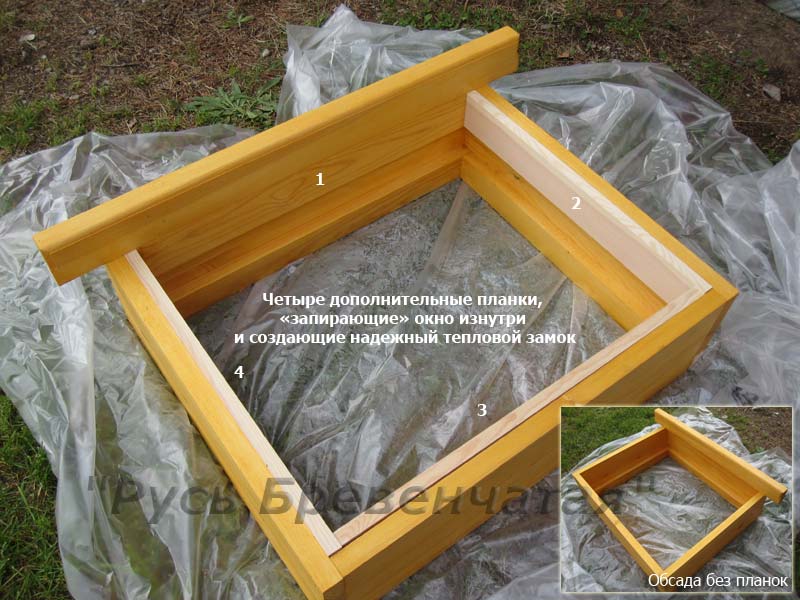
There are several options here. Classic - creating a casing (casing box). In the old days it was made from solid logs, cutting grooves into them. Now everything looks more elegant.
The lower right photo shows the fastening of the casing elements to each other. The casing box is quite powerful and reliable design. It is attached to the cranial bars with self-tapping screws through the side walls. The window block is attached to the casing either with self-tapping screws or mounted with glue (sealant).
Outside and inside the house, platbands are attached to the casing.
The design is very reliable, but, unfortunately, quite expensive. When building the house, I didn’t do this, but during the subsequent construction of the bathhouse I used the casing (see photo below). If you have the financial means, then of course try to use casing boxes for both windows and doors.
|
|
|
And this photo is from 2013, when we installed plastic windows in the bathhouse, but in improved casing boxes. Urgently.
A more economical option for installing windows is the option of directly attaching window blocks to the cranial block. This option was suggested to me by Rus specialists, since it had already been implemented several times and had shown its reliability.
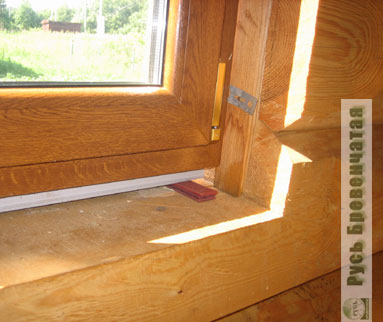
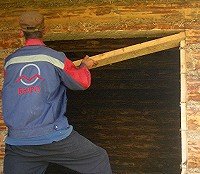
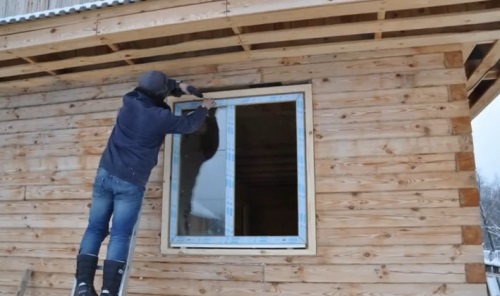
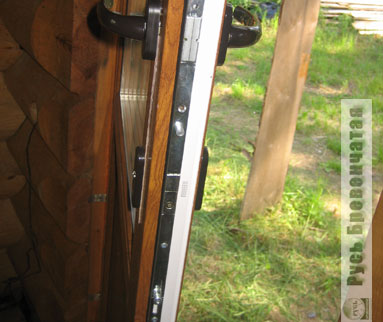
We will dwell on this second option in more detail in this article. The next two photos show how the window is attached to the skull block. The photographs were taken from two angles (on the left - inside the house, on the right - outside). The windows are attached to self-tapping screws using special standard metal strips. A transport bar (white) remains under the window block - it compensates for the thickness of the internal window sill. Plastic rulers are placed under the bar, with the help of which the window is aligned vertically.
|
|
|
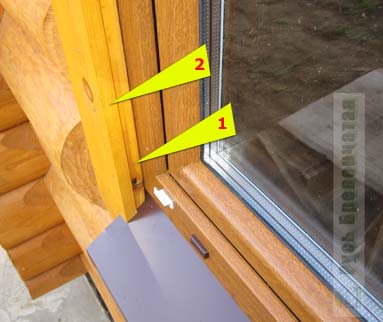
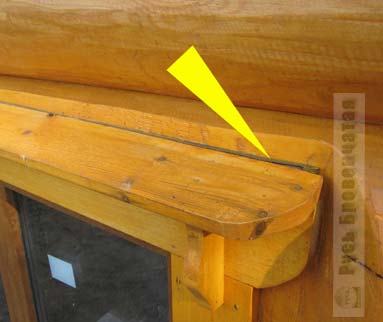
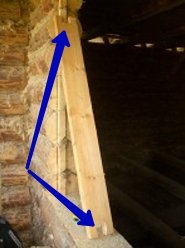
What such a mount looks like from the outside is shown in the photo below on the left.
Please note the 5-7 cm gap at the top. Be sure to leave it, otherwise during the shrinking process your windows may jam and you will have to remove them, cut off the top log and repeat the installation procedure. The gap on the inside of the window is shown by the arrow in the lower right photo.
Sometimes windows are attached to the cranial block not through metal plates, but directly. In this case, the window is located in the middle of the window opening. In our opinion, this method has two drawbacks:
- the design is not so flexible, which can lead to jamming or distortion of the window unit in the future;
- gets lost inner space window sill and vice versa, b O
The majority of the outer part of the window opening remains exposed to precipitation.
However, this option also has a right to exist.
But this is only the first stage of window installation, although it is the most expensive.
Let's go into more detail during the formation of the specified casing boxes in the version proposed by our company.
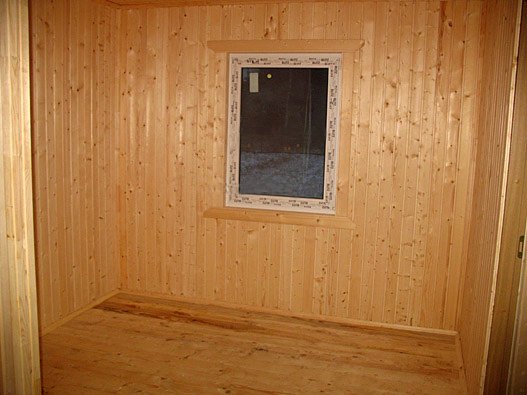
Inside the house, along the window block, an internal casing is installed. It is created from planed dry boards 2 cm thick (for the window sill, i.e. the lower element of the casing, a thicker board is taken - 4-5 cm) These boards fastened with self-tapping screws to the cranial bars and the lower log (through roll insulation), the upper board is attached only to the side casing boards. This creates the so-called internal slope window;
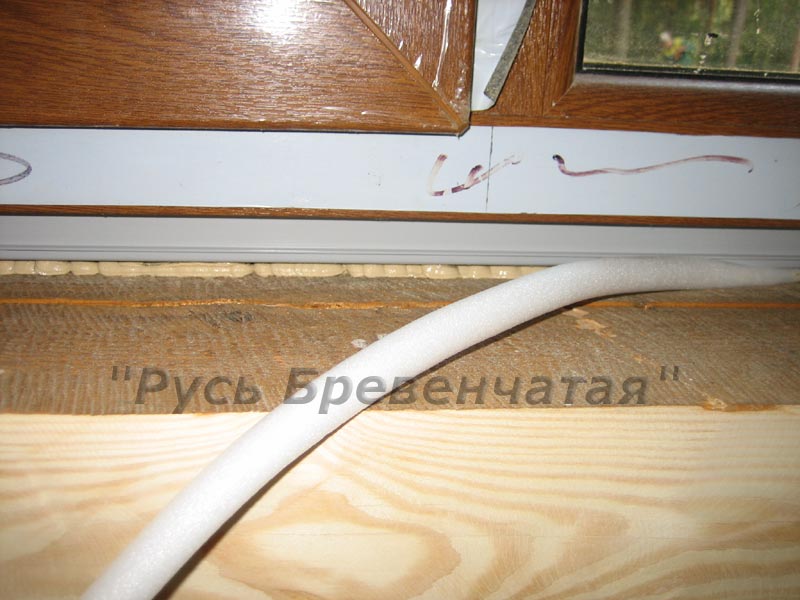
Addition from 2011. I decided to improve the process of insulating windows and used a special sealant for log houses, as well as cords made of extruded polyethylene. This is an original and reliable solution with this approach to window installation -
Internal trims are attached to the ends of the resulting casing with self-tapping screws. The interior window decoration is ready;
|
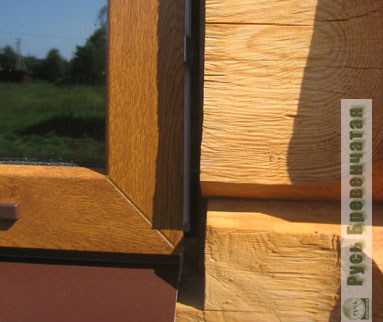
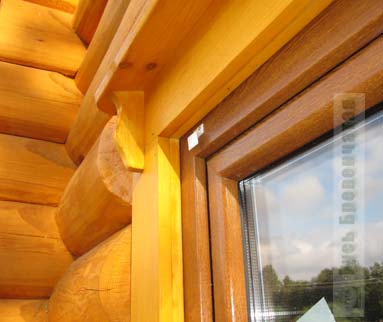
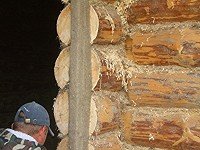
Now be careful. Elements of the external casing (and these are fragments of the same board 2 cm thick, usually about 2 cm wide - to be placed under the outer cut of the log house) are attached to the window itself! Fastening is carried out using self-tapping screws. The outer casing is shown as number 1 in the lower left photo. Don’t forget to lay insulation between the casing and the window opening. We attach external platbands to the ends of the outer casing with self-tapping screws (number 2 in the lower left photo). The bottom right photo shows the top corner of the outside of the window opening. |
|
|
|
|
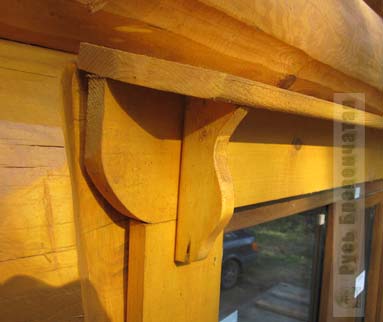
An important functional and decorative element of the external casing is a small canopy at the top of the window (see photo below). In principle, it is optional, especially if it does not match the style, but in general it is desirable. The fact is that in the upper part of the window there remains a gap of 5-7 cm and it is simply closed from the outside with an upper casing, which does not always help in slanting rain, when streams of water flow down the walls.
Having discussed its feasibility, we decided to install it, and a little know-how was introduced: a soft rubber strip was glued to the end of the horizontal strip of the canopy (shown by the arrow in the lower left photo), sealing the joint between this canopy and the wall log.
|
|
|
|
That's it, the window is completely ready. Of course, before installation it is necessary to properly paint the casing elements and trims several times. |
|
|
|
|
|
In the future, we will definitely illustrate the completion of the process of installing the inside of the casing and trim.
|
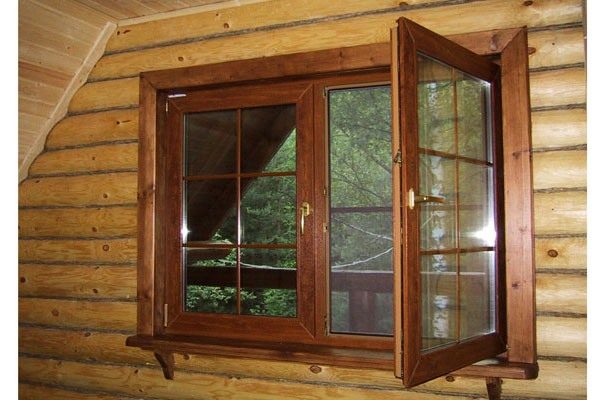
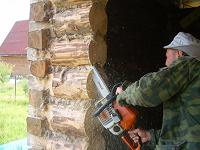
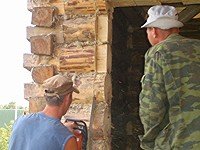
Now I would bet front door, similar to the one shown in the photo on the right. Deglazing (dividing the window into parts) allows you to make the door safer from burglary. Another problem that emerged after the door was installed - this is the height of the door. At surveyor's departure, he traditionally counted 2-3 cm from the floor level and calculated the height of the door from this level. But the fact of the matter is that there was no floor as such yet, there were only floor beams. And a normal “pie” for a floor is at least 5-7 cm (lathing, plywood, finished floor, etc.). Therefore, when, when installing the casing and platbands, I asked the builders how we would actually organize the floor in the future, then this problem came to light. The only solution was to expand the doorway upward and lift the doors. The result was a not very straight line of the door and window casings, but this is less evil than a door not opening. |
1526 0 0 Windows in log house: even the hut needs good eyesOctober 18, 2016
In this article we will talk about windows in a wooden log house. I will tell you which models can be used to arrange such a home, and also describe in detail their features, advantages and disadvantages. And the instructions given at the end of the material will help you figure out how to install plastic window blocks in a log house yourself. This process has certain nuances that you should be aware of. Types of windows usedFirst, let's look at what windows can be used for cottages built from logs. All existing varieties can be divided into several groups-categories. I have drawn a small diagram to help you navigate.
And now about each variety in more detail. By materialI’ll start my story with a description of the materials from which you can make windows for a wooden home. There are three varieties that are most popular here. Wooden windowsThis can be inexpensive coniferous and deciduous lumber (spruce, pine and others), as well as valuable wood (red, oak, wenge, teak).
Not so long ago, exclusively wooden windows were used in private and commercial construction, but now they have given way to more modern designs made of aluminum and plastic. However, many people use wood window units. And this is understandable, because such windows have many advantages.
Here it is necessary to clarify that all the shortcomings inherent in wooden windows that were installed in houses built in the middle of the last century have now been eliminated. If previously the described products were deformed over time, had many cracks and quickly dried out, now, thanks to new technologies, this is out of the question. For the manufacture of wooden windows hardwood or laminated veneer lumber is used, which does not deform during operation. For glazing, multi-chamber sealed double-glazed windows are used, which have a low thermal conductivity coefficient and a high degree of sound insulation. The fittings on which the doors are hung allow them to open in any plane, including for slot ventilation. All window blocks that are sold in construction stores, are treated with fire retardants, which reduce the flammability of the material and prevent further spread of flame during a fire.
Modern plastic windows are far from the cheapest pleasure. The price of high-quality window blocks made of wood, even of not very valuable species, is higher than similar structures made of plastic. Plastic and metal-plastic windowsSuch structures first saw the light of day in the 50s of the 20th century, but their active use in civil engineering began only in the 2000s. Polyvinyl chloride is used to make window blocks, so the cost of the products is not so high.
A metal-plastic window consists of the following parts:
Due to the ease of processing of plastic, models of any shape, configuration and size can be made from it. However, in this case, you will have to take care of further textile decoration of the window. For example, buy curtains with beveled frames or something similar. The window itself has many advantages and several disadvantages. For comparison, I made a small table.
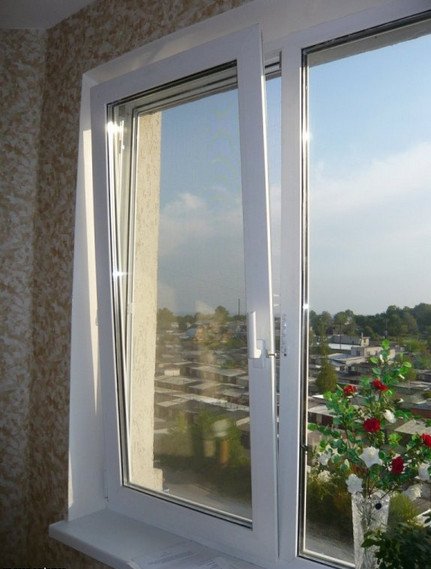
In order for plastic windows to blend seamlessly with walls built from logs, the windows may not be white, as in most cases, but painted in other colors. Also, the surface of the frames can be decorated with films that imitate the color and texture of wood. Aluminum windowsWindows made from this material were previously used only in commercial construction for furnishing shopping centers, production premises etc. But now they can be seen more and more often; they are also used in the construction of log houses.
The characteristics of the material are as follows:
However, to choose a suitable design, it is not enough to decide only on the materials. There are also other criteria. By opening typeAnother the most important criterion window selection - type of opening of the sashes. Unlike buildings of the last century, where they simply swung open to the sides, now there are many more ways. The following options exist:
The disadvantage of this solution is that to open the window it is necessary to provide free space. You will also have to remove all items placed on the windowsill and near the window. And the last drawback is that there is no possibility of slot ventilation, which complicates the operation of the window in winter.
Another option for using a blind window is the need to glaze a large area. For example, if you want to make a log gazebo with a lot of glass walls.
These types of windows are the safest from the point of view of use in children's and other similar institutions. It is impossible to open the window completely, so no one can fall out.
In my opinion this is optimal scheme windows for arrangement log house. You can open the windows in the summer, enjoying the sounds of nature, and provide ventilation in the winter, avoiding significant heat loss.
The product has two independent doors, but does not have a partition in the middle (it is called an impost). As a result, when you open a window, no details of the window block prevent you from contemplating the opening landscape. There are also other windows, in particular sliding and folding windows. Installation of a plastic window in a log wallDespite the huge selection of windows, as you can see, the most popular are plastic products thanks to optimal ratio performance properties and cost. Some nuances of the processFirst, about the principles of installation. I note that the service life of a PVC window block directly depends on the quality of construction of a log dwelling. In particular, it is necessary that the structure completely shrinks and is preserved.
Otherwise installed products can be deformed and sometimes completely destroyed due to changes in the geometry of the walls and window openings. Therefore, I strongly recommend starting to install windows only after at least 9 months have passed after the completion of the construction of the “box”. Before installing plastic windows, it is necessary to install the so-called frame (casing). It is made from boards and takes on the load when the structure deforms, preserving the plastic product from damage. There are several ways to design a pigtail:
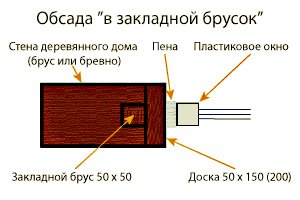
In this case, in window opening A groove is made at the ends of the logs of the log house, into which a beam with a cross section of 5 by 5 cm is inserted. To avoid the embedded element falling out and to reduce the thermal conductivity coefficient, the structure can be insulated with felt, jute or flax fiber. Then from edged boards with a cross section of 5 by 15 or 5 by 20 cm, a U-shaped pigtail is assembled, which is already assembled form installed in the window opening. At the same time, it must be attached not to the walls of the house, but to the embedded beam. Only the lower parts of the pigtail can be attached to the crown. Between the top part of the window frame and the top log of the wall, it is necessary to leave a gap of 8 cm thick, which is later filled with insulating material ( Under no circumstances should you use polyurethane foam).
To make this type of frame, it is best to use laminated veneer lumber, which does not change its geometric dimensions during operation. Its cross-section should be 10 by 15 or 10 by 20 cm, depending on the thickness of the walls. A tenon measuring 5 by 5 cm is cut into the timber itself (that is, the same as the embedding timber described in the previous paragraph). First, you need to place jute insulation in the pre-cut recess, and then insert the two side casing parts. They, as in the previous case, are attached only to the lower rim of the opening. Then in top part of the opening, the last one (third board) is inserted. It is fixed side by side between two side casing parts. It is not firmly fixed in order to be able to “walk” during the further shrinkage of the house.
The difference with the previous options is that the tenon is located at the ends of the wall, and the recess under it is in the beams of the frame. The size of the element protruding on the logs should be the same - 5 by 5 cm. The selected recess on the casing corresponds to it. After preparing the parts, the protruding part is insulated with insulation, after which two side elements with a recess are stuffed onto it. The further scheme is similar to that described in paragraph 2. The lower part of the parts is attached to the lower beam of the log house, and the upper element is placed apart between the side ones. A thermal gap in the upper part is also required and is filled with thermal insulation material.
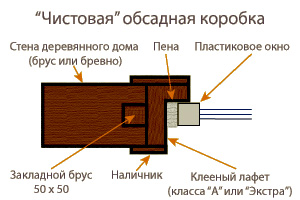
This installation method is used in cases where you want to make casing elements of a special shape. They usually repeat window quarter in standard buildings and allow for more accurate and visually attractive installation of windows in the log house. For decoration in this case, additional decorative elements– – which decorate the uneven edges of the window opening from the outside and inside of the house. Installation technologyFrom all the variety described above, I chose the third design of the casing of a plastic window, so I’ll tell you about it further. Sequencing:
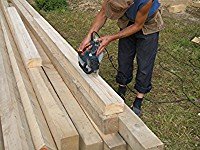
So, for my work I will need a beam with a cross-section of 15 by 10 cm. The dimensions of the selected groove should be 5 by 5 cm. As for the length, it can be adjusted during the installation process. But the parts need to be cut so that they are 5-7 cm less than the height of the window opening of the log house. The groove selection scheme is as follows:
You need to start, as everywhere else, with markings. First of all, I draw an even vertical line along the ends of the logs, along which the center of the window block will be located. In my case, the line falls exactly on the center of the end of the wall, but this is not necessary. You can shift the central axis to outside, then it will be possible to install a wider window sill inside.
Afterwards, it is necessary to set aside 25 mm from this line in two directions (the thickness of the ridge on which the casing will be placed) and draw two more parallel lines. They will be used for cutting. The production of the comb itself is carried out as follows:
How to do it:
Then you need to install these details:
Pay special attention to securing the parts to each other. You only need to use self-tapping screws to screw together the vertical beams and the horizontal board, never getting into a tenon on the wall. Otherwise it will be tough related design, which is what we are trying to avoid with the help of a pigtail.
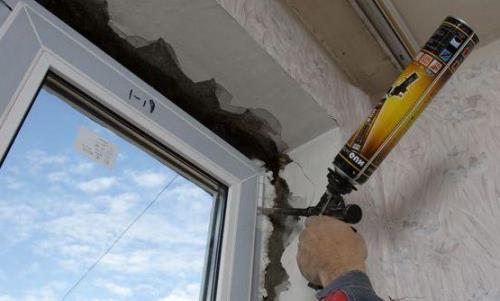
Then all that remains is to execute final installation, foaming the gaps between the window frame and the window with polyurethane polyurethane foam. The gap between the casing and the wall (above) is insulated with tow or jute, and not with foam. Some methods of combining plastic windows with a window opening require special consideration. This is, of course, not about visual combination, but about how to install these plastic windows in window openings. For example, typical way installation is strictly not applicable when installing windows from PVC profiles into wooden log house or a cottage made of laminated timber. How to install windows in a wooden house correctly?The key to the long service life of PVC windows in a wooden house is, firstly, the quality of construction of the building itself - that is, the house. If you are a builder, then you probably don’t need to explain what shrinkage is and why conservation is needed wooden house. For those who don’t know, let us inform you that in order for the house to “not warp”, so that the window openings do not “walk”, it is important to let it stand so that the logs (or beams) from which the building is built can get rid of excess moisture and acquire some semblance of static. Only after following this important condition, you can start finishing, or rather, installing windows. This condition, let us make a reservation, should be put forward when installing windows not only in the house, but also windows in the bathhouse, gazebos, and for other buildings of small architectural forms made of wood, logs and timber. Technology for installing a window opening in a wooden house provides for the installation of a frame or casing in the opening(which essentially means the same thing) from boards, which will take the load from wooden elements to myself. There are several basic types of casing (casing) device. Let's take a closer look at each of them.
Video on installing plastic windows in a wooden house.PVC windows are salvation from cold, drafts and noise. But to window design served properly, it is not enough to choose a quality product, the correct installation of plastic windows is also important. Installation in a regular opening1. Before starting work, the opening needs to be prepared: dismantled old window, clean off loose plaster, dirt and anything that will interfere with the installation of the window. It is advisable to maximize the walls in accordance with the horizontal and vertical. All large holes and seal the cracks with plaster mortar.
2. Remove the sashes from the windows and remove the double-glazed windows from the stationary frames. First, pull out the glazing beads (in factory windows they are usually not pushed in all the way so that they can be easily removed during installation). Place the glass units vertically on a flat, clean surface.
Correct installation plastic windows are available in 2 options: fastening with anchors through (see photo below) or on anchor plates. 3. Install mounting angles on the frame five centimeters from the edge. 4. Place the frame in the opening on wooden wedges and level it vertically using a level. 5. Mark points on the walls through the mounting holes in the plates.
6. Drill holes according to the marks. Secure the frame. 7. Foam the installation gaps, wait until the foam hardens and cut off the excess. 8. Treat the slopes from the outside, install a drip.
9. Return the double-glazed windows and sashes to their place. 10. Treat the slopes from the inside, install the window sill and trim. Installation technology in a log houseCorrect installation of plastic windows in a wooden house has its own characteristics. Wooden buildings tend to shrink throughout their life. This harms any built-in structures, primarily windows: the frames become deformed. To prevent this from happening, windows are not placed immediately in the opening. First, additional compensation is made for them wooden frame- a pigtail. It performs two functions at once: Protects window frames from deformation;
Windows installed in this way provide a kind of rigidity frame for the walls and prevent uncontrolled horizontal movement of the logs during shrinkage. How to install a pigtailInstalling windows in a log house is possible in two ways: Video “How to install plastic windows correctly”:
Grooves are selected in the opening posts, and ridges are cut out at the ends of the beams for an additional frame; On the contrary: the ridges are cut out in the pillars of the opening, and the grooves are selected in the bars.
Instructions for installing a plastic window: 1. The comb (or spike) is made square section with sides five by five centimeters. A groove is adjusted under it, with a small allowance: before installing additional (movable) racks, the ridge is covered with insulation (jute). During the shrinkage of the house, the timber with the ridge slides along the groove and remains vertically oriented.
2. Horizontal bars with selected grooves are installed at the top and bottom to align with the posts. A gap is left between the top beam and the log to compensate for shrinkage. Upon completion of installation, it should be filled with tow or other similar material. 3. The lower beam can also serve as a window sill. To do this, select a beam of appropriate width.
4. After installing the pigtail, select a quarter in the bars and insert window frame. The gaps between the frame and the beams should be minimal. They should not be filled with polyurethane foam; it is better to plug all the cracks in a wooden house with tow. 5. Correct installation of plastic windows in a log house means that when attaching the frames, you need to select hardware of the appropriate length: they must securely fix the frame to the frame beams, but not reach the log house logs. Related articles:
Aphorisms and quotes about people
Reign of Ivan the Terrible
The beginning of the reign of Ivan 4 summary
Quotes: fortitude, self-confidence, overcoming difficulties Julius Caesar
Aphorisms and quotes about the kindness and mercy of humanity
New:
Popular:
|