Traditional wooden garden paths in the country are natural, stylish and durable. In addition, such paths can be made even without the involvement of specialists. Before you start work, familiarize yourself with the structure and technology of laying paths from wooden saw cuts, boards, pallets and modern decking boards. In some ways, their construction is similar, but each wood material has its own characteristics.
Tree cuts in garden design
Ordinary stumps or tree slices make nice winding paths. If you are interested in this idea and decide to do garden path from wood cuts with your own hands in the garden or at the dacha, you need to choose the right material and understand the installation technique.

Wood cuts can be combined
The construction of a garden path from wooden saw cuts resembles paving stones. Instead of stones, flat wooden dies of the same height are laid. To make the path from tree cuts as dense as possible, use both large cuts and stumps of small diameter, for example, from large branches. They are convenient to fill the space between the main elements.

Garden path without borders
If we're talking about For a decorative path that will serve not so much as a path but as a garden decoration, you can get by with a narrow passage one element wide. Such a path will only indicate the direction. Technology in in this case much simpler. The prepared stumps are placed directly into the ground, allowing free space between them.

Curbs protect against soil contamination
Preparing the wood is extremely important stage. Poorly selected and not properly processed wood will very soon become unusable, and the path made of tree rings in the country will have to be redone. The first step is to decide on the type of wood. Suitable:
In principle, any raw material that is available can be used. The difference between hardwood (larch, beech, oak) and other types is the service life. In terms of durability, larch is unrivaled. You can count on 25 years of operation, while pine will last 5-7 years.

Maximum naturalness
The tree must be dry, without traces of pests. The logs need to be cut into dies of equal height. The optimal size is 15 cm. For convenience, you can use a template. If you do the harvesting yourself, make sure that the cut is made strictly perpendicular to the log.
When all the pancakes are cut, sort them by size. It is better to remove cracked specimens immediately. Clean all the rings from the bark. Next, you need to choose how to treat the wood cuts for the paths in order to protect them from rotting and destruction.
An elementary method is treatment with drying oil. The drying oil is brought to a boil and each die is dipped into hot oil one at a time. The boiling substance seals the pores of the wood and prevents moisture, the first enemy, from getting inside. wooden products. Disadvantages of this method: long and dangerous. Hot drying oil can burn you.
A more expensive option, but much more practical, is special formulations. You can treat wood with an antifungal agent yourself using a brush or spray bottle. After preventive treatment, the tree should dry out.

You need a lot of these rings
If you don't like the natural color of the wood, the garden path can be aged. Painting logs with copper sulfate will give them a dark, noble shade. Then the lower part of the dies (as a rule, the cuts are placed with the more attractive side up) is treated with hot bitumen and allowed to dry.
When all the material has been prepared and sorted, you can proceed directly to constructing a country or garden path. Before laying a path from wood cuts, preparatory and excavation work is carried out:

Preparing the trench
When you have planned how the country path will be placed from wood cuts, transfer its image to the area - use pegs and thread to mark it. Do not forget that passages with complex, intricate shapes will not always be convenient. After marking, try walking along the garden path and make sure that it is functional enough and planned correctly.
Now you can safely take up the shovels. The trench should not be too deep. Add 10 cm to the height of the dies - this depth will be optimal. Then proceed like this:

After the geotextile, crushed stone and sand are poured and compacted
Preparatory stage completed, installation can begin. If the base is well prepared, this will not be difficult. You will need this tool:

Lay dies only by hand
Laying can be carried out in compliance with some pattern or done in any order. The logs are placed on a sand cushion, then they need to be compacted a little and leveled. Sand or crushed stone is poured into the gaps. The seams on top can be sealed with other material. Mulch is suitable sawdust, pebbles, moss.

It is important to tamp well
Here are some simple tips that will tell you how to properly lay out a path from wood cuts with your own hands:
Video: Do-it-yourself paving of a wooden path
Ordinary boards are great for making garden paths in the country. You will have to fuss with them less than with the piece-by-piece laying of individual cuts. The advantage of such wooden paths is the speed of installation and neat appearance. The manufacturing process begins with the selection of materials and tools.


Garden path made of boards
The most inexpensive and widespread lumber is boards made from coniferous species tree. It is best, of course, to choose larch, but the cost in this case will be quite high. Use an edged board with a thickness of at least 5 cm.

Edged board required thickness
Process the wood according to standard scheme: antiseptic, and then covered with varnish or paint - for further protection. Clear varnish will highlight the wood texture, and colored paint will help create accents. The boards are cut into pieces of equal length. If you are planning a path of complex shape, the length of each plank is selected individually.

Imitation sleepers
Wood is not the most durable and practical material. Modern industry offers a worthy analogue to plank wooden paths in the country - laying terrace boards. Decking is a mixture of wood (dried and ground into powder) and polypropylene. Together they form a strong, plastic substance from which products of any shape and size can be formed.
One of the advantages of a material based on wood flour and plastic is that it is completely ready for use. This means that you will not have to additionally process the tracks or open them with varnish.

Terrace board
Working with natural wood and working with wood-polymer material requires certain tools. So the boards can be connected with nails, leveled with a plane and cleaned with a sander. At the same time, decking requires a much more careful attitude.
You will need:

Deking is not afraid of water
Laying plank wooden paths is carried out in a certain sequence:
The base for paths made of larch or other natural wood is a sand-crushed stone cushion of the same structure as for a wooden path made from saw cuts. Preparatory work are carried out in the same sequence: marking, foundation pit, geotextiles, crushed stone layer, sand layer, compaction.

Pit for a path at the dacha
Then the boards can be laid directly on the base, by analogy with a path made from slices of wood, or they can be placed on an elevated platform - a specially constructed frame. Boards laid directly into the ground look more natural and relaxed, but such a wooden path also deteriorates much faster. The structure on the frame will be stronger and more durable, in a word - capital. However, to implement such an idea, more effort is needed.

Path level with the ground
The frame is usually built from timber or boards. Its shape follows the contour of the path; a transverse stiffener is installed every 50 cm so that the flooring does not fall through. The connecting elements can be metal corners or the same wooden beam. When the frame is completely installed, begin laying the plank flooring. The boards are laid tightly across the path to create a continuous surface.
If the site has relief features, you can try to level the slope at the stage of constructing the sand cushion, and if this is not possible, you will have to make steps. The frame for the steps is mounted with extreme precision, checking the level and plumb line so that the steps are level.

Combined path made of wood and crushed stone
Laying garden paths from decking boards with your own hands is done a little differently. The difference between decking is that if the load is distributed incorrectly, the board can burst. Therefore, it is extremely important to achieve a perfectly level and solid base for decking.

The decking board looks impressive
To prevent the frame from deforming as a result of soil subsidence over time, use cement screed. It will provide the decking board with the required rigidity. The base can be a concrete slab or single concrete blocks, installed at the support points of the frame.

Logs are laid on concrete slabs
The supporting parts of the structure are made of the same material as the flooring. The elements used for installation are logs and beams. They are placed at a distance of 20-30 cm from each other. The frame is slightly raised above the concrete surface to ensure water drainage. For the same purposes, small gaps are left between the boards.
Decking is laid in two ways:

Laying scheme
The choice depends on the wishes of the customer. Garden paths made from deck boards are laid perpendicular to the joists. When installing at an angle, the decking is laid at 45 degrees.
All components for installation can be purchased along with the decking, these are:

Installation of decking end strips
The boards are attached to the frame using self-tapping screws and special clips. The caps are covered with caps or painted over. Another option is a hidden connection. In this case, no traces of screws are visible on the surface.
Features of laying decking boards for garden paths:

Decking does not require repair or treatment
If you like the “cheap and cheerful” option, make paths in your dacha from pallets - wooden pallets. Typically pallets can be found in large quantities on construction site or in warehouses. They are used for temporary storage of building materials.
Advantages of this material:

Pallets are reused for garden decoration
There are two options: you can lay the pallets as is, or you can disassemble them and put them in order, clean, sand, and sort them out. For the first option, pallets with small gaps between the boards are suitable. If you still have to disassemble the pallets, any will do.

The simplest option– just lay out the pallets

Disassembled pallets in new role
Laying a path from entire pallets with your own hands takes very little time. Installation is carried out big blocks, and not one element at a time. The length of a standard pallet is 1.2 m, the width can be 1 or 0.8 m, and the height is 145 mm. Both narrow and wide pallets are suitable for a path in the country.

Euro pallet dimensions
If you need to achieve more decorative wood, the pallets can be sanded, varnished or painted with a tinting compound. It is necessary to process not only top part flooring, but also pay attention to the ends so that the wood does not become limp from moisture.

Design idea

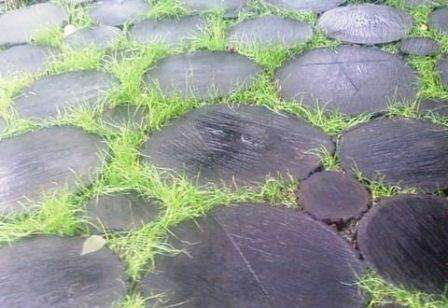
Grass between tree cuts
Natural wood- an excellent choice for a summer residence. You can safely walk on such paths barefoot; they are warm and pleasant to the touch. If you approach the issue responsibly and correctly plan the placement of paths, their size, process the material and prepare the base for the structure, wooden paths in the garden will serve faithfully for many years.
It's hard to imagine a comfortable dacha plot, if there are no garden paths on it. Paths not only connect the house with the gazebo, pool or garden, but also play a key role in landscape design. If you don't want to spend a lot of money, try make paths from wood cuts. A simple and original way to decorate an area and make it convenient to move from one area to another.
Before you begin, prepare all the necessary materials:

Before starting work, you must carefully prepare the initial wood material. Cuts of stumps are suitable for this, in general, any part of the tree that you have available. Since wooden paths in the garden will be exposed to moisture and elevated temperatures, you should carefully choose the type of wood. Thus, oak cuts will last about 10 years, pine cuts up to 5, and larch cuts will not lose their original attractiveness for several decades.

If you have an already prepared log, then saw it into cuts up to 20 cm high. Keep in mind that the larger the width of the log, the greater the height of the cut. This is necessary to increase the strength of the track. To ensure that the sawn wood does not rot for a long time and is not exposed to insects, it must be well treated.

Most often, drying oil is used for these purposes, which should be boiled and then coated with saw cuts. Processing with drying oil requires special skills, so work with it carefully or buy ready-made compounds to protect wood from rotting. Another option for high-quality processing of saw cuts is to cover the lower part with bitumen. By using copper sulfate you will be able to artificially age the wood.

Now you can start preparing the track itself. Think over the route and optimal size so that it is convenient to move around. It is also important to make a small trench to make it easy to fix. The depth of the trench should be 5-10 cm greater than the height of the cut; the width of the trench depends on the width of the path. You need to lay waterproofing material at the bottom of the trench, and then make drainage from gravel and crushed stone. This will help protect the wood from moisture. Use a level when laying the pillow, then it will make it much easier for you to install the wood cuts.

Photos of cuts for a garden path
If you plan to make curbs to separate the path from the site, they must be installed before installing the tree cuts. It is best to use wooden posts as borders, however, sheets of iron, stones and bricks are also suitable.

When the curbs are installed, sand is poured onto the path, leveled and watered. This way, it will be possible to compact the pillows completely and prepare the path for installing the wood cuts.

Beautiful path made of log houses

Photos of paths from saw cuts
After all the cuts are installed, you can fill the space with sand or earth. Some gardeners add seeds of ground cover plants to the ground so that they can later decorate the path. You can also paint the tree cuts with colorful paints to make your garden path more attractive.
A sidewalk made from wood cuts needs constant maintenance, otherwise after a couple of years it will lose its attractiveness. Every year you will have to use a metal scraper to clean dirt from the saw cuts, and then treat them with an antiseptic or paint them.
If you are making a path from saw cuts yourself, then set aside a few good cuts in case you need to repair the path. In this case, you don’t have to look for a cut suitable diameter or type of tree.

Garden path made from saw cuts It has undeniable advantages, because you can do it with minimal effort with your own hands. The original path - good way and give country house notes of originality.
When the main work on arranging a garden plot, accompanied by excavation work and use various equipment, are finished, then it’s time to improve the surrounding landscape. First of all, you need to organize the space of the site and make moving around it convenient and pleasant. For this purpose, garden paths are laid. However, not everyone has the opportunity to entrust this to specialists and purchase modern building materials. There is always a way out; armed with knowledge and desire, you can make do with your own resources and available materials. Paths made from old tree cuts look very good and stylish, and this option is not very expensive. Even if you buy wooden cuts, it will still be inexpensive, and if you have your own trees that can be used for this, then this is simply an ideal option.
In order to make it convenient to use the paths in the garden plot in the future and not have to redo or move them, you need to think through everything in advance, plan it and sketch it on a diagram of the plot.
First of all, think over the main routes for moving around the site. These may lead to various buildings or areas of the direction, or maybe the path will simply be intended for leisurely walks.
The next thing to consider when planning paths is the look they will give to the site. Straight and angled paths give the site an organized, more orderly and strict appearance (for this, borders made of wood, brick or stone are used). Paths made with smooth curves, winding and of different widths will create a feeling of naturalness and naturalness.
Next, you should take into account the topography of the garden plot. The path will facilitate the flow of water along it during rain or melting snow towards the slope. Therefore, this situation must be taken into account and it is better to direct excess moisture to trees or bushes than to the foundation of a building or to a children's sandbox.
And finally, the width of the track. It is selected mainly based on functionality and expediency. If, for example, it is planned to be on the site at the same time large quantity people, then the path should allow two people to separate along it (about 90 cm). If the area is small or there is a limited amount of building material, then wide paths may be superfluous and you can get by with a width of 50-60 cm.
As a result of the entire planning process, a plan for the location of paths on the site should appear. It is a large-scale plan of the site with marked marks with high and low levels of relief, buildings and other elements (trees, shrubs, beds, etc.). A scale diagram of the path network is drawn on this plan. It is worth considering that the bends of the paths on the plan diagram in reality do not look as clearly on the earth’s surface as in the figure.

It’s better to prepare everything you need for work in advance than to be distracted later and waste time and energy searching for, and maybe even purchasing, everything you need.
It is necessary to prepare the following before starting work:
Both hard and soft wood are used as materials for wooden walkways. Oak, aspen and alder, as well as cedar and pine, are suitable. However, larch is recognized as the best material. In any case, the main thing is to properly prepare and lay the cuts, then such a path will serve you for at least ten years. The thickness of the log does not matter much; on the contrary, cuts of different diameters will allow them to be placed more tightly together and even create a certain pattern.
The saw cuts are dies or blocks with a height of 8 to 15 cm, depending on how deep they are supposed to be to increase reliability in operation.

Using an electric or chainsaw, the log is cut crosswise. When sawing logs, it is important that the cut is smooth, without bevels, otherwise the surface of the path will be under different planes and it will be uncomfortable to walk on it. In addition, laying beveled cuts will also require additional effort and material to align them. It is also necessary to maintain the same height of the dies, for which you can use a template prepared in advance or use a tape measure to make cuts with a regular hacksaw.
The resulting pieces are treated with an antifungal agent or drying oil, which will protect the wood from rot and insects, and also increase its durability. To give the saw cuts an “aged” look, they can be treated with copper sulfate, then they will darken and acquire the appropriate texture.
At the next stage, the saw cuts are dried until the antiseptic is completely dry. After which the lower part of the die is treated with a bitumen mixture and again everything is dried until completely dry.
Wooden cuts for sidewalk path You can buy them ready-made, either processed or simply raw.
Now you can begin preparing the trench for the path and laying the cuts.
Marking a path made from wooden saw cuts is somewhat different from the similar procedure for other materials used. Since the tree cuts are oval in shape, they will not fit into the rectilinear markings of the side borders of the path. However, marking is necessary not to maintain the edge boundary, but to maintain general direction, in addition, the marking also specifies the approximate width for each individual section.
As for marking paths made of any other material, twine with pegs is mainly used for marking paths from tree cuts. Alternatively, you can use a watering hose of sufficient length. The pegs are driven around the perimeter to the width of the path and in the intended direction, and then a string is stretched between them.
After marking, it is advisable to walk along the proposed path and evaluate the ease of use of it. If something seems inconvenient or non-functional, then it is better to fix it at the markup stage than after any other stage.
You can move on to the stage of digging a trench already at a time when the prepared saw cuts dry out after processing as antiseptic, and bitumen mixture.
The trench for the garden path is dug to the depth of the height of the die plus the height of the waterproofing and drainage layer. Depending on the height of the dies, this is 20-35 cm. Earth-moving work is described in more detail in the article. The width of the trench should correspond to the width of the future path.
The bottom of the trench, along the entire length of the path, must be at the same level, otherwise additional material consumption will be required or the surface of the path will be uneven. If the terrain of the site has large differences in height, then you need to create a base for the cuts from soil or sand with a smooth transition or step.

![]()
After digging the trench, before you begin laying the cuts, you need the following:


After preparing the trench and all necessary layers, ensuring the durability of the path, comes the no less important and labor-intensive stage of laying the cuts.
You can first lay out large and then smaller diameter dies, you can immediately lay out patterns planned in advance, this is at your discretion. The main thing is to do the following:

Since the cuts are round in shape, there are always gaps between them. It will be inconvenient to walk along such a path, and the sawed wood will wobble in its shallow nests. Therefore, all gaps must be filled and aligned in a common plane with wooden dies.
To fill the gaps, both materials left over from the drainage and cushion are used, as well as others. For example, for greater durability, the space between the saw cuts can be filled with concrete. So as not to spoil natural look wooden path (since concrete does not natural material) filling can be done half the height of the die, and topped with pebbles, sand or soil. However, if there is no need for increased strength and there is a limitation on funds, then it is better to fill it with the remaining sand. To do this, sand is poured in small portions, moisturize and compact.
The gaps can also be filled with soil and laid river pebbles or plant moss or other plants used for decorative soil cover.

If curbs were not planned or laid out, then you can simply sprinkle the path with soil along both edges and compact it tightly. You can lay out the edges decorative stone or, just like in the gaps, plant moss. In general, this stage is creative and everything is limited only by your imagination.
Do-it-yourself garden paths from wooden saw cuts require some effort in maintaining them. operational condition and attentive attitude towards them.
To extend the life of paths made from wooden saw cuts, follow these tips:
From the visual, aesthetic side, everything is clear. U wooden paths all advantages. What about from a practical point of view? How long will the tree last? How to make a path, what needs to be taken into account and why? Let's find out in the article.
The tree is certainly a very beautiful natural construction material. But due to its naturalness, it requires proper protection and processing.

As a rule, wood has different properties in terms of resistance to moisture, strength, hardness, and so on. It is best to choose hard wood for the path. For example, such as aspen, oak, beech, elm, walnut, larch, ash. These breeds will last the longest. Pine is also a good option, but it will last a little less.
However, paths are usually made from what is available. It all depends on your desires and capabilities.
To begin with, we will need, in fact, the cuts themselves. You can purchase ready-made ones, or you can, if possible, cut the log yourself.

We need cuts about 10-15 cm high, but no less. A thin saw cut will not be securely fixed in the sand and will “walk.” Make sure the cuts are the same thickness.
Next, the cuts need to be impregnated protective equipment. Such as bitumen, drying oil, . What you usually use. Do not neglect treatment with protective compounds. Soon, without impregnation, the wood will begin to rot, will be susceptible to attacks and will bring you many unpleasant “surprises”. After processing, the saw cuts must be thoroughly dried.

The width of the path depends on your desire, but you should not make it narrower than 35 centimeters; it will be more uncomfortable to walk on such a narrow path.

We lay plastic film or any other suitable waterproofing material at the bottom of the trench. Pour crushed stone on top of the film, in a layer 3-5 centimeters high. Compact the crushed stone thoroughly (gravel can be used) and level it.

This step is optional. Depends on whether you need a curb or not. Some people think that without a curb, the path seems not fully completed. And some people think that the curb spoils the look of the natural path. In general, it's up to you.
You can use logs to frame a wooden path, wooden blocks, sheet iron, brick or wooden chibouks, sawn lengthwise.

We have already completed the first layer of the “cushion” by filling the trench with crushed stone or gravel (see step 3). Now add sand as the second layer of the pillow and water it with water. This way the sand will be compacted better.
Now we lay down the wooden cuts. It's up to your imagination. You can lay the cuts any way you want, at any distance, in any pattern, and so on. The main thing is that you need to “drown” the saw cuts well into the sand, not forgetting to level the path.

You can add soil between the cuts and sow lawn grass, For example. Plant flowers along the edge of the path. Any options of your imagination. And the wooden path is ready!
Wooden paths are quite popular as paving in country houses and adjacent areas. The paths made of charming logs are not only convenient and pleasant to walk on. Having a high decorative quality and unique texture, they organically fit into the green landscape with sunny lawns and shady corners, with flower beds and cozy gazebos.
Interest in arranging paths from saw cuts is due to such attractive factors as:
There are also disadvantages such as the vulnerability of wood to insects and the formation of fungus/mold. This can significantly reduce the service life of the logs.
But with appropriate wood processing and proper installation, the path can serve and delight you with its appearance for up to 25 years.
Wooden design elements always look very natural among the surrounding greenery. For summer residents and homeowners, for example, the Russian estate style is living on the land in our traditional sense. Of course, with modern conveniences and various devices, but with an eye to the age-old foundations of our ancestors.

A characteristic feature of the Russian garden style is the presence of ordinary fruit trees and at least a small garden. And details from the bygone past give a flavor dear to the Russian heart:
And a wonderful addition to such nostalgic beauty are paths made from wood cuts.
Such paths look organically in similar rustic style country, and in permissive small areas eco-style paths, with its almost primitive untouched green plantings.

Modern landscape fashion is quite democratic and allows both a mixture of styles and the presence of different style islands in one area.
For example, input front area may be on a regular basis landscape style, the backyard is in French, and the area of flower beds and lawns is in the style of a country or Russian estate, with paths made of wooden saw cuts.
Wooden paths organically coexist not only with wooden benches, gazebos and pergolas, but also with metal elements landscape, especially with forged parts of small buildings. And also with wooden and ceramic sculptures, with hedges and vertical gardening.
Options for paving wooden blocks on the trail, depending on their diameter and the owner’s ideas, can be different. Such as:
And yet, the most picturesque paths are made from randomly arranged sections of different diameters - such free alternation harmoniously emphasizes the natural style.
With any chosen scheme, the hemp can be placed either staggered, at a certain distance, or close to each other.

The choice of paths from wood cuts, in addition to aesthetic wishes, is also supported by the possibility of making them yourself : This is both the self-realization of the owner, and the opportunity to subsequently admire the result of his own labor, and, of course, basic savings on the costs of landscaping the site. Moreover, such savings can approach a full hundred percent.

Wood cuts, simply cut or already treated with special agents (from rotting), can be found ready-made for sale, but their cost is unlikely to allow this option to be considered economical. Prices for the thinnest and smallest saw cuts - from 50 rubles/piece. More massive 20-centimeter logs - within 400 rubles / piece. and higher. Such a purchase is acceptable only with a sufficient budget.
Billets from purchased round timber, sawn yourself, will cost much less.
And for absolutely nothing you can get saw cuts from a tree felled on the site or from lumber remaining after the construction of buildings. The paths made from saw cuts look interesting rectangular section located almost close to each other. Remains from log house construction (with logs square section) or old wooden sleepers can be a great help.

For wooden paths, the ideal material in terms of strength and durability is larch and oak wood. Elm, beech, hornbeam, and acacia wood also performs well in use. But these rocks have a hard structure and are more difficult to cut. The knots are especially twisted, but they have the most picturesque cut pattern.
Such logs will surely last up to 15, or even up to 25 years. Pine and aspen are somewhat inferior in durability to the above-mentioned species, but they also serve well as paths.
Any selected tree must be dried before processing so that when laid in the ground it does not warp or crack. The design of paths made from saw cuts is also good because it can easily replace failed (damaged or destroyed over time) individual stumps. To do this, you can stock up on the appropriate lumps for future use and then, when replacing them, do not waste time processing them.

Round cut of a tree
To lay ready-made cuts, it is enough to have a shovel and a mallet (wooden or rubber mallet). But to make cuts yourself, you will also need:
For the manufacture of wooden elements tracks you will need:
Impregnation of cut pieces is carried out in two stages.
Stage 1. Treatment with insect and fungal protection.
For this, various compositions are used:
The influence of impregnating compositions on the color of the cut:
Stage 2. Waterproofing the bottom of the cuts
On the part of the dried saw cuts that will be buried in the ground, it is necessary to apply a thorough layer of waterproofing. This may be one of the bitumen-based compositions:
The application of bituminous compounds can be done by brushing or partially dipping the stumps to the desired level.

While the harvested logs are being dried after the next treatment, and the weather is dry, you can start planning the area for the path and preparing its base:
The base for laying the cuts is ready.

Now the prepared cuts can be laid on the drainage pad at the planned distance from each other:
Now walking on wooden blocks among the surrounding garden and flower beds is a real pleasure!

But in order to prolong this pleasure as long as possible, such trails require periodic maintenance:
At correct device and with proper care, a path made from saw cuts will be a cozy decoration of your site for many years.


