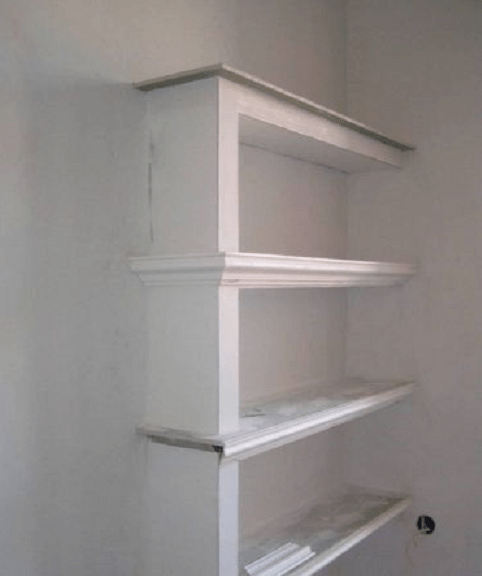
Built-in plasterboard shelves are one option. Moreover, unlike factory-made furniture, gypsum board samples will have individuality. However, in order to make shelves according to your drawings, you should carefully measure all the parameters for a specific product and, of course, select the appropriate materials.
This material has many positive and negative points, But main feature is versatility.  Decorating a room's interior using built-in plasterboard shelves
With the help of gypsum plasterboard you can not only quickly and inexpensively carry out repairs in a room, it is important that it can be used without problems for the manufacture and interior of built-in walls. What material features are suitable for assembling a plasterboard shelf with your own hands? 

It is these features that give it an advantage over other materials that can be used to assemble design and interior elements.
To assemble a plasterboard shelf you will need others related materials and equipment for their processing.  Shelves made of plasterboard in the interior of an apartment The plasterboard itself is selected depending on the room where the product will be installed. If this is a kitchen, bathroom or toilet, then you will need. Suitable for living and other rooms wall types material. Most often, those left over from the kitchen are suitable for assembling shelves. interior decoration premises. You will also need a certain quantity marked CD and UD (and a guide). If you plan to create a shelf of a non-standard curved shape, then it is best to buy an arched type of profile or make it yourself from guides.
  Example of shelf design non-standard shape

The shelf configuration is built into general design premises. If the presence of rounded shapes predominates, then the shelves should be rounded. (bugs) and are used as fasteners.
The initial finishing of the shelves is carried out using serpyanka to seal the joints between sheets and universal putty.
The tools for assembling the shelves are the same as for finishing the walls:  Design option for built-in plasterboard shelves
Read also
Creating a plasterboard podium
For decoration you will need the selected material:
List necessary materials and tools may vary depending on individual characteristics work.
Bringing the idea of assembling plasterboard shelves to life is not so difficult; it is only important to follow the work technology and adhere to the stages of work.
Sketching a future built-in shelf will help resolve several important issues.
Firstly, the diagram will make it clear how well the built-in shelf can fit into the overall design, and most importantly, the combination of proportions with the size of the room.  Project of plasterboard shelves
  Drawing of plasterboard shelves
Secondly, the prepared sketch allows you to more accurately calculate the required amount of materials that need to be purchased.
Thirdly, the drawing can be used as a reminder so as not to forget to make this or that part. 
Today there are computer programs allowing you to model walls and interiors. However, not everyone has this opportunity. Therefore, the simplest version of the project is to sketch out a diagram indicating the dimensions.
Shelves that are small in size can be drawn one to one on paper and the image can be estimated at the site of future installation.
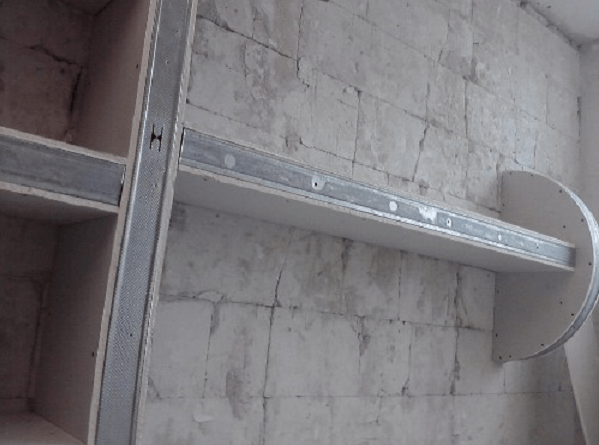
The frame, assembled from metal profiles, will serve as the base of the entire shelf and will also take on all the loads.  The process of assembling the frame of plasterboard shelves

In this case, you can use two methods of assembling the base: directly on the wall or separately, followed by installation on a load-bearing surface.
In the first option, the sequence of actions is as follows:

When mounting a shelf on plasterboard surface, use special fasteners that need to be selected depending on the weight of the structure and purpose (light ones are fixed with umbrellas or butterflies, heavier ones with a moth dowel).
The rack frame rails are attached to the guides. All connections of metal parts are made using bugs.  An example of assembling a frame for plasterboard shelves
In the case of pre-assembly of the frame, proceed as follows:
Progress and innovations in the construction industry force us to use increasingly cheaper and safer materials in apartment construction, sometimes using a completely unexpected approach. Let us recall, for example, the buildings of the 50s of the last century - solid wood panels, timber, boards, ceramic and sand-lime brick. Since the 70s, chipboard, fiberboard, and alabaster blocks have appeared. Now the time has come for plasterboard sheets, metal profiles and all kinds of structures made from them. Why not try making your own plasterboard shelves.
As a material for homemade products, gypsum board is quite suitable for plasterboard shelves, despite its apparent fragility. Among the closest competitors are plywood, panels made of solid wood, particle boards and fiber boards, gypsum board sheets have lower specific strength and require increased accuracy in work.
But its main advantages are:
At the same time, working with the material, even in the case easy to manufacture do-it-yourself plasterboard shelves requires the worker to think through the design in advance so that assembled form the shelf could withstand the planned load.
Important ! Techniques for processing drywall sheets are fundamentally different from processing wood or OSB. If you don’t have enough experience working with gypsum boards, rehearse any problematic operation using scraps or waste.
If you have certain skills, you can make more than just a shelf or stand from plasterboard. You can easily assemble the most intricate designs from it, as is easily demonstrated by the photo of do-it-yourself plasterboard shelves.

In wooden or plastic products shelves, the material of the product, as a rule, provides a decorative surface for the structure and works as a solid base, absorbing all the loads from things or objects located on the shelf.
You can do the same with a plasterboard sheet, but the strength of a single sheet of plasterboard, even 18mm thick, may not be enough. In this case, the shelf is made of two sheets, and if the length of the product exceeds a meter, it is even possible to use a plywood or wooden insert. For a small decorative shelf of 40-50cm for a vase or a dozen books, a single sheet of plasterboard 12-15mm thick can be used. The shelf must be secured along the entire line of contact between the sheet and the walls using self-tapping screws, but appearance such a shelf does not cause much enthusiasm due to the difficulties in processing the end edges.

Advice ! Even for small, cantilevered shelves, use the frame design of the product. This will ensure its strength under any form of loading.
The separation principle is always used in plasterboard structures:
This makes working with drywall much easier. The metal profile itself for the shelf frame is made of thin-sheet galvanized metal, easily cut with metal scissors, and bends and bends in the most intricate ways.

Thanks to the wide range of reinforcing profiles, you can quite simply select and assemble the shelf frame on your own:

Among the many options, you should choose a scheme with a minimum number of joints and connections.
Important ! When working with drywall, a layer of fine alabaster dust is formed, even with certain guarantees of the safety of the material, try to remove waste and calcium sulfate shavings more often with a vacuum cleaner or a damp sponge.
Most often the house remains empty corner areas premises, therefore, to give a more sophisticated look or for utilitarian reasons, you can always make several shelves on the wall from plasterboard with your own hands.

For work we use a sheet of plasterboard, a 25x50 metal profile, putty for sealing seams and gypsum-metal fastening screws.
Unlike wood or metal, where the product is manufactured separately and then hung on the wall, when using plasterboard, the shelf structure is formed as a single unit, with supports, a supporting frame and wall mounting.
On the wall, draw with a pencil the attachment points, the length of the load-bearing surface of the shelves and the connection points of the frame elements. After that, fragments of wall mounting are cut out of the profile and secured according to the markings with self-tapping screws.

Next, the vertical profile posts are “sewn” along the edges of the shelves. By using building level and plumb line, we carefully align the horizontal and vertical positions of the external frame elements of each shelf. We sew up the vertical support post on both sides with sheets of plasterboard, cut to the size of the opening with a small allowance for processing of 1-2mm.

Along the leveled horizons of the shelves, we cut out the remaining sections of the frame and secure them in the structure. We sew up the planes of the shelves with sheets of plasterboard, first the lower horizontal surface, then the upper.
Advice! Drywall sheets for the upper plane of the shelf can be cut a couple of centimeters larger, this will allow using ceiling plinth perform additional decoration of the end surface of the shelf.

After sticking the decor, carefully putty all the cracks and joints in the structure, and after drying, sand the surface for painting with water-based paint.
This method is universal and allows you to easily make the simplest plasterboard shelves in the bathroom.

After some practice, a complex but attractive version of a plasterboard shelf in the bedroom is quite possible.
As you can see above, working with drywall does not present any particular difficulties for neat and thoughtful people. The construction of even the most complex shelves or cabinets is more reminiscent of the “Lego principle”, and even a novice master can do it. But for professional work With shelves or partitions, there are a few things to consider.

Drywall sheets cut into thin strips are prone to breaking even under light load. Therefore, when starting any dizzying project, avoid using thin and long strips of material to cover the frame. For example, a piece of gypsum board with an aspect ratio of 1:5 or more is almost guaranteed to burst either when fastening it to the frame, or under load, after all the work is completed.
Thickness frame elements Compare with the overall dimensions of the structure. An example is a very competent construction of the size of the windows and the thickness of the racks of a plasterboard shelf for a TV. Thanks to optimal thickness vertical and horizontal partitions, this design is highly stable and will withstand significant loads.

The most difficult option, from the point of view of fastening, can be considered the installation of a single shelf on the wall without the use of additional support posts. Often, to ensure the longitudinal and vertical stability of the shelves, additional side canopies are installed. If you show some imagination, they will not only not spoil the appearance of the shelf, but will also give it a more attractive look.
As a rule, a structure made of plasterboard is heavier than one made of wood board or plastic, so you should use the maximum number of attachment points to hang it on the wall. If you need to fix the shelf on a wall lined with plasterboard, use a special fastener.

Shelves create a special atmosphere both in spacious apartments and in apartments with a small area. They make the room space more functional, which is so important in a room where you need to find additional space for things. Experts recommend making shelves with your own hands from - this light material and aesthetically pleasing.
The use of plasterboard when creating shelves is justified by the fact that few materials can be so functional and, moreover, safe for health. Drywall is made from natural materials . Its basis is gypsum, which is tightly pressed on both sides with cardboard. With its help you can realize almost any design idea.
This product has many advantages:
Along with its advantages, drywall has its own specific disadvantages:
This is especially important in cases where, after creating the shelves, they will be placed on it. heavy household appliances.
To create a more aesthetic appearance finished design coated with any of the selected paints and varnishes. You need to pay close attention to the seams and work them with putty material. The seams in such work are covered with tape, and then a layer is applied so that the entire surface looks like a single whole.
If the putty work is not done efficiently, the shelf will lose its attractiveness.
Before starting work, you need to decide functional purpose created product. If the owner of the premises assumes that such a shelf will have to withstand increased loads, then its strengthening should correspond to this wish.
 Sometimes it is advisable to carry out additional reinforcement along the entire perimeter of the shelf being manufactured. To strengthen it is recommended to use wooden or metal profiles
. For additional reinforcement, you can use metal corners.
Sometimes it is advisable to carry out additional reinforcement along the entire perimeter of the shelf being manufactured. To strengthen it is recommended to use wooden or metal profiles
. For additional reinforcement, you can use metal corners.
Read our article about which profiles are used when working with drywall.
No need to create a shelf special tools, which greatly simplifies the process of creating a product. Accuracy in calculations is ensured by correct markings, which are carried out using a pencil and instruments designed for measuring work.
Cutting the product into pieces is carried out with a regular knife for construction work. Another tool that can effectively cut sheets of drywall is scissors designed for cutting metal.
 If the design of the future shelf is conceived with a curved slope, the specialist will need a special arched profile.
So, to carry out the work you will need:
The first stage consists of a drawing of the proposed product. At this stage of work, you can make changes to the dimensions and, if desired, reduce or increase them.
When making a drawing, it is important to know that it is better to carry it out in life size, thus, you can attach it to the wall and imagine what the future shelf will look like and how much space it will take up.
The project is important for correct calculation required quantity material during work.
 Installation begins with the frame of the product, which is attached to the wall with dowels. For this in the wall holes are made. Then you need to make the nodes in the frame. The nodes are where the shelves and corners will go.
Creating angular shelves involves production of two blanks. Such work begins with the selection of two metal profiles with the required length. On the profile you need to mark the required value, which will be equal to the length of the shelf. After this, small cuts are made on both sides.
The profiles are secured to the wall surface using dowels.
It is important to know that accuracy must be controlled by the building level.
You need to give the profile the shape of a rectangle; to do this, you need to bend it in places along the cuts. Shape is maintained screwing in the screws using a screwdriver.
The second profile also bends at the places of the cuts. After which it is fixed to the wall with self-tapping screws.
The next step is recommended to carry out product covering plasterboard sheets. All work should begin with markings on sheets. The procedure is carried out from the top. The sheet is marked and cut with a knife, then with reverse side make the same incision.
It is important for a novice craftsman to know that such work on cutting drywall must be carried out wearing glasses and a respirator on the face. This will protect it from dust when cutting material.
Parts of the material that have already been cut out are attached to the metal with self-tapping screws so that the heads of the fastening material are tightly inserted into the product.
 The lower part of the shelf is sheathed according to the same principle as the upper one. When carrying out work on covering the side parts, you need to ensure that the corners are even. They are attached in the same way as other parts with self-tapping screws.
One of important points consists of overlaying the side corners mounting grid, which will not only protect the shelf from the formation of cracks on the surface, but also give it a smooth and aesthetic appearance.
After installing the mounting grid, it covered with putty to carefully conceal this material.
In order for the product to have decent looking And flat surface, needed final finishing carried out in several stages:
Stages finishing completed and the procedure can begin surface decoration.
A shelf in a room will have a presentable appearance if you choose a covering for it that matches the color of the walls and interior. The following materials will help you do this:
 The lighting in such shelves not only creates a spectacular look, but is also additional lighting source, which is so important in any room. Light intensity and different light shades can be realized in modern plasterboard shelves.
The backlight is made from LED strip or lamps. The holes intended for lamps are made with a drill with a certain bit-crown attachment. Insert into the resulting hole lighting fixture. After the lamp is tightly installed, it is connected to the electrical network.
Hanging a shelf on a drywall surface is enough difficult task, but if you develop your construction skills and choose the right tools, then it's possible.
Drywall is one of the most popular materials in modern construction, but him disadvantage of increased fragility. Improper impact on its surface can cause damage to its integral structure and spoil the appearance of the wall. If the shelf has bulky and heavy properties, then there is a high probability of damaging the wall structure.
Many builders believe that drywall material is so fragile that any impact on its surface will ruin it. But if you approach the installation of the shelf with care, you can get a spectacular look of the product on a flat wall.
If the master wants to hang a light shelf, he you will need dowels for the wall. This can be a butterfly dowel or an umbrella dowel, designed for plasterboard walls. The essence of how such dowels work is in a special technology: when twisted, the cap begins to open, creating a stop and taking on some of the load.
To attach such a shelf you need:
A beginner needs to be more careful, even a light shelf when incorrect installation can cause damage to the wall surface.
Before installing the painting on the wall surface, you must first weigh it. The described method is suitable for paintings with a weight not exceeding two and a half kilograms.
 This method involves attaching the picture to self-adhesive hook. Pasting it will not cause any difficulties, you just need to choose the right place for the picture to be visible. It is better, of course, to choose the middle part of the wall for this. The picture is simply put on this hook with a special loop.
For paintings with high weight, the screw tightening technique is used. The required screw diameter is found on the packaging of the screws or anchors used. The screw is inserted into the wall, applying minimal pressure when pressing, so as not to spoil the plasterboard surface. You need to screw the screw into the installed dowel and then tighten it with a screwdriver.
There is no need to tighten the screw all the way; its head should protrude above the wall.
The last step is to install the picture using a hook or cord on the protruding screw.
If you need to install a mirror on a wall surface, it is recommended to do it using double-sided tape or liquid nails . This method is suitable for mirrors not exceeding twenty kilograms.
For heavy mirrors, dowels are used. When working, you need to use butterfly dowels; you need to insert bolts or hooks into the dowel for convenient installation of the mirror. If butterfly dowels are not available, you can use anchor bolts.
The most popular mounting method kitchen cabinets on a plasterboard wall - this is using butterfly dowels, facilitating installation and creating additional support.
When carrying out work, the first stage consists of making holes and installing fasteners. The second stage will involve direct installation of the cabinet onto the mountings. This method will allow you to install the structure, not exceeding five kilograms.
Often used for heavier objects mounting rails, which are attached to the wall, and not to the cabinet. The planks are fixed with self-tapping screws. The kitchen cabinet is subsequently installed on the slats.
It is possible to hang a TV on a plasterboard wall, and if the installation is done correctly, the wall will not compromise its integrity.
First you need define a zone in a plane where installation will take place. On the back of the TV you need to screw the guides, which should be included in the package.
A panel made of metal is attached to the selected area on the wall. Using a level check the installation is correct. Make holes in the designated places with a drill. You need to unscrew the “molly” screw from the dowel.
Fasteners are driven into the holes by tapping them to ensure a tight fit into the wall. The screw is screwed back in, but not all the way. The same procedure is carried out with all holes. The plate is installed on Right place and tighten the parts to the full stop.
It is important not to overtighten the parts.
The last step is to insert the equipment guides into the grooves in the plate. With this installation, the weight of the TV should not be more than fifteen kilograms.
How to mount a TV on a plasterboard wall - watch the video:
Corner shelves are functional and stylish solution for any room. They not only serve as a place to store interior items, but also create a special atmosphere in the house.
The first stage of creating such a shelf is making a shape from the profile right triangle. First, a right angle is bent from the existing profile, and then this piece will be attached to the walls.
The next stage is cutting out a segment from a piece equal to the distance between the ends of the sides right angle. This part will be attached to the edges of the corner.
The right angle is fastened with self-tapping screws to adjacent walls.
A segment is attached to the resulting square. After this, the entire structure undergoes the procedure of sheathing with plasterboard.
To create a straight shelf, you will first need to make a drawing where to indicate required sizes and only then start creating the frame. After installing the frame, the structure covered with plasterboard sheets.
Bookshelves for the kitchen, made of plasterboard material, carry not only a practical function, but are also original decorative solution. With the help of such structures you can correct defects in the room.
In the room with low ceiling It is not recommended to install cabinets with great height, and an open shelf will look original and appropriate.
 The use of plasterboard to create an arched structure with shelves is justified in those rooms where, for some reason, door is missing. It could be small apartment. Arches not only correct imperfections doorways, but also serve as a zoning element in the room.
The old walls are replaced by partitions, shelves and niches, which, after installation, look elegant and make even the oldest bedroom modern. On such shelves you can install a TV and books, and you can also place figurines or lamps.
Shelves can be installed on the wall, next to the window, and plants can be placed in them. This is a convenient and practical design idea for those housewives who prefer the exciting hobby of growing plants. In addition to aesthetics, flower pots on such shelves can hide the unevenness of the wall.
A shelf made of plasterboard would be appropriate in the hallway. The main thing is to strengthen it efficiently. This is important because designers suggest placing many objects on it to create an atmosphere of comfort in the hallway.
Built-in bookshelves made of plasterboard can fit into any interior and give it individuality, combined with stylish interior. Experienced craftsmen it is recommended to install additionally backlight on such products. This will add additional lighting to the room.
Original shelves and niches made of plasterboard in the video:
One of the most important recommendations designers for small rooms - make the most of free non-floor space. Corner shelves made from plasterboard with your own hands - this is exactly what you need. These are exactly what we will talk about in our article.
If you are pretty tired of standard cabinets with mirrors and doors, equipped with a dozen identical and inexpressive shelves, then you need to take an alternative path - to make your own shelves from plasterboard, according to your sketches. What is all the “salt”? It's simple - nothing limits you here, and you can create shelves of any size and shape.


Shelves made of plasterboard for a TV, shelves for books and all kinds of souvenirs, shelves for a wedding service and so on. With the right approach, you can strengthen structures by sufficiently simple solutions and place large objects on them.
In order for us to obtain high-quality and reliable assembled shelf from plasterboard with your own hands, you will need the following tools and materials:

For those who have never installed plasterboard shelves before, below is step-by-step instruction, in which we tried to take into account all the nuances and answer all possible questions.
If you do not strive for beauty and extravagant forms and the main criterion for your work is reliability and high quality, then you will need to follow several recommendations below:
As for corner plasterboard shelves, they are made according to the same principle as conventional (longitudinal) ones.

Advice!!! As a reinforcement, instead of one guide profile, you can use two - undoubtedly, the shelf will become thicker, but it will be much stronger and more powerful in its design.

Plasterboard sheets are attached to the frame according to the principle - the greater the load on the shelf, the smaller the step between the screws. If you decide to hang shelves in the bathroom, then only moisture-resistant plasterboard and no other will be suitable for this type of room (sheets moisture-resistant plasterboard mostly green).
After installation, do not forget to seal all seams and joints with sickle tape and coat them with putty.
Attention!!! If your shelves are equipped with lighting, it is necessary to complete all work related to the installation and installation of wiring and lighting equipment before attaching the drywall. It is also better to drill holes in the drywall for spotlights in advance.

As for fastening the sheets and cutting them, everything is simple here - do it as you wish. You can cut pieces straight away required size, or fasten the entire sheet, and only then cut off the excess.
So, step by step, we get this:
People are faced with the problem of lack of space in their apartment for things and accessories. By making plasterboard shelves with your own hands, you solve this problem. Built-in plasterboard shelves give you a chance to realize design ideas into the interior of a house or apartment. The main thing is to think through each stage to the smallest detail and complement the interior with a design that will give comfort and help organize the space correctly.  Design and design of plasterboard shelves Of course, people turn to craftsmen for help, but this will require additional costs. But it’s better to make shelves from plasterboard with your own hands, this will allow you to pour a piece of the owner’s soul into the living space. And also gain a new skill that will be useful in life.
IN modern interiors There are also additional racks and shelves that will allow each item to find a place. Why choose? This will become clear if you look at the photo, because the ideas allow you to choose an option for each property owner individually.  Design option for plasterboard shelves
Of course, the frequency of choice falls on this type of material for various reasons:

These are just some of the advantages that are decisive in the process of choosing a material for creating shelves with your own hands.
So that the process for a house or apartment is not complicated, you need step-by-step instructions on the basis of which you need to work.  Drawing with dimensions for installing a plasterboard shelf In order for everything to work out quickly and to please you with the result, you need to follow the instructions one by one. The order of work is as follows:

By carrying out work with gypsum board shelves in the correct order, the property owner will in any case be satisfied with the result and will qualitatively arrange the space of the room.
Read also
Installation of a plasterboard shower cabin
The step-by-step guide indicates that the first step is to create a project for the future shelf. This can be done in several ways:

Whichever option you decide to use, in any case, creating a drawing is very important process. Using a detailed diagram you can create perfect design without flaws.
Installation of the frame under the gypsum plasterboard shelf is carried out in several stages:

In order for the sheathing under the gypsum plasterboard shelf to be durable and last for many years, you should Special attention pay attention to marking the wall or partition on which the fastening will be carried out. This must be done using a level, which will allow you to determine the differences in surface heights, and therefore the frequency of screwing.  Drawing with the dimensions of the shelves for marking the surface of the wall. The surface should be marked with a special marker or an ordinary pencil. When marking, it is necessary to take into account the load that the shelf will bear.
Calculating the load is quite simple. You need to decide for what purpose the niche is being established. If this is a TV shelf made of plasterboard, then the strength level of the frame should be high. It is best to make additional fastening of the frame with jumpers from profiles.
If this is a shelf for shoes, then it is enough to create a regular sheathing for drywall, securely fixing the profiles together. If we're talking about about a niche for various decorative ornaments , pictures that weigh little can be collected lightweight design  without the use of additional fasteners.

Niche design with plasterboard shelves
In any case, the issue of calculating the load must be taken into account, because the reliability and durability of the structure depends on this. Most often, profiles that serve as guides are taken as the basis for the frame. This is justified by the fact that there are few different sections on such a beam. And this will allow you to create a neat and beautiful design  . To bend the profile to shape, you need to make cuts. The more complex the shape of the structure, the more cuts will be required. This process can be carried out using scissors or a metal knife.


The process of attaching guide profiles to the wall  The prepared segments are combined with each other of a pre-calculated length. Each fastener must be tightly screwed. The steps should be performed one by one to ensure that the frame is strong and durable. Assembled frame for
plasterboard shelves
Wall mount  Fixing a hanging shelf on the wall is quite simple. After all, there are pre-applied markings on the surface. If necessary, you can vary the distance during the process. The greater the load on, the more often you need to screw in dowels or screws when attaching shelves in the kitchen, in the rooms or in the bathroom. Fixed on the wall hanging shelves


