The direct purpose of plasterboard is covering ceilings and walls. This material is so pliable to work with that it is also used for organizing internal space. It is perfect for constructing partitions, various designs, which can successfully replace massive furniture. Today we will try to describe in as much detail as possible how to make plasterboard shelves with your own hands that are durable, neat and beautiful, and with their help get a completely exclusive room design.
Before you begin calculations and installation of the shelf, you need to focus on several important points.

You can only make durable shelves that will delight you for many years if you take these small details into account.
On initial stage you need to think through the design of the shelves on the wall, imagine the end result in detail, and only then start making calculations. Start by drawing up a diagram of the future design. Don’t be afraid to show your imagination - with the help of arched plasterboard you can create the most incredible designs and bends, so the shelf can have any shape. Only after compilation detailed project Once the exact dimensions are plotted, you can begin making calculations. For work you may need the following tools and materials:
After drawing up a sketch and purchasing everything you need, you can begin assembling a frame for plasterboard shelves, which can be mounted in two ways: externally (on already finished wall) or internal (during the assembly of the partition). Here, too, you need to follow some rules. 
Installation of built-in lamps
By making a plasterboard shelf with your own hands, you can create a unique project. For example, supplement it with lighting. This will give the structure an attractive, stylish look and become an additional source of light in the room.
All you need to install the lamp is a drill and a special round bit for cutting a hole.

The wiring must be done in advance, even before the sheathing, by hiding the wires in a protective corrugation. Instead of spotlights, you can use LED strip, which, due to its flexibility, is perfect for shelves with curves.
Installing drywall is much simpler than the extensive work already done to build the shelf frame. Before sheathing, you need to cut the sheets into parts. All dimensions are transferred to the material, a cut is made on one side, the sheet is bent and only after that the second layer of cardboard is cut.

All irregularities at the ends must be sanded. After this, you can begin installing the sheets using spacer dowels. The end part can be covered with a single sheet, having previously cut “windows” in it, or individual small parts can be used. The second method is simpler, but you need to be careful not to create too many joints.
If you want your DIY wall shelves to be perfectly smooth and neat, then pay Special attention processing of joints. They need to be sanded, apply a layer gypsum putty, cover with reinforcing mesh and repeat the treatment with putty. To strengthen and make the structure more aesthetically pleasing, the corners can be covered with putty corners made of aluminum or plastic.
The final touch - finishing putty. It is made in several layers and rubbed with sandpaper. Before painting or other finishing works finished shelves must be primed.
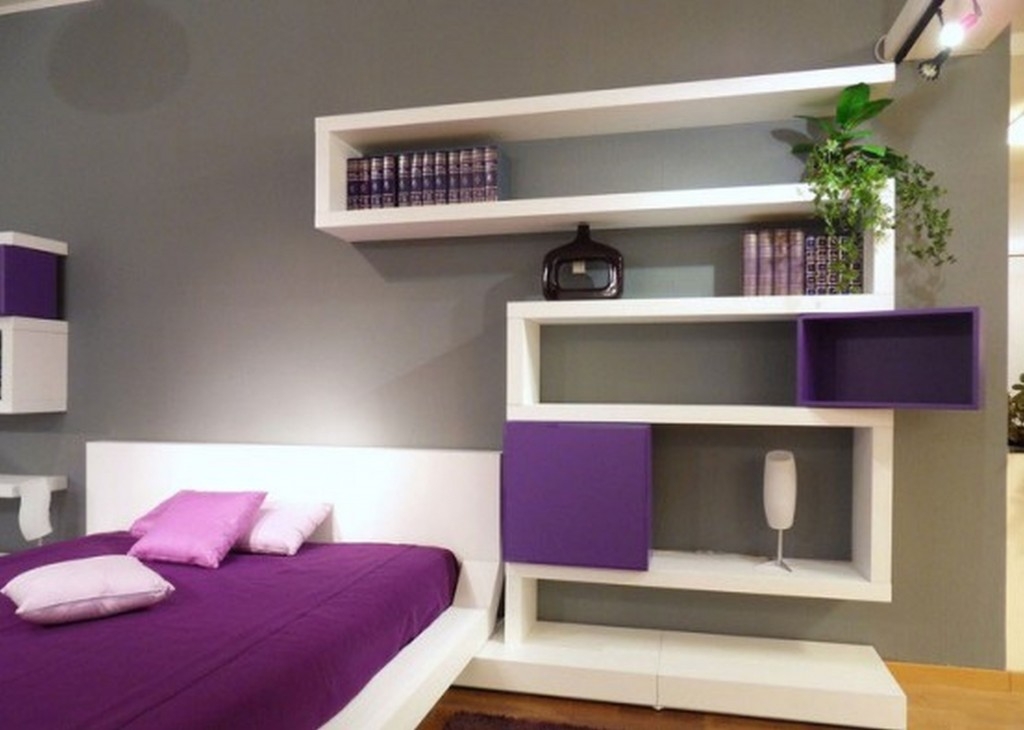
Using drywall, you can make a shelf for flowers or decorative items, as well as for more massive things - books, household utensils, TV. Depending on the interior style finished building You can paint, wallpaper or use any other finishing materials.
The shelf can be of any design, but if you have not encountered such work before, then it is better to go “from simple to complex.” To give you a better idea of what plasterboard shelves can be like, we suggest looking at a few photos with examples.


In this article, we tried to explain to you in detail how to make a plasterboard shelf with your own hands. Shelving and partitions with decorative niches in Lately are becoming increasingly popular for two reasons simple reasons– originality and low cost of design. All you need is basic skills in working with drywall and a little imagination. Many designers consider shelves made from this material to be the most modern and a good decision. What do you think?
"Don't clutter your space extra furniture“,” sounds like one of the rules of Feng Shui. No matter how hard you try, sometimes it’s very difficult to give up shelves and cabinets, sideboards and cabinets. By installing niches and shelves made of plasterboard indoors, you can immediately solve several problems:
Even TVs can be placed on decorative plasterboard shelves! You just need to keep the proportions correctly and strengthen them. What is needed so that instead of a blank wall there appears an openwork bookcase with mirror inserts and glass shelves? The first stage is to decide what exactly you want to do, the second is to find out how to make shelves from plasterboard, acquire necessary tools and materials, and if necessary, consult with specialists.

Such shelves will not only be a compact and practical device for storing books, dishes and other household utensils, but will also significantly decorate the room. Indeed, now when decorating plasterboard shelves, both spotlights and perimeter lighting are used. If you take the time to create a harmony of light and color, the result can be a real masterpiece. Just imagine using colored lighting or a combination of mirrors and glass! Using these materials, you can create exclusive stands on which your collection of souvenirs will look better and more mysterious than in a museum. In addition, the room will acquire another local light source, and this helps create a soft, romantic atmosphere and a breathing space.

Racks and shelves made of plasterboard can even be used to install a TV. In this case, you need to choose the right galvanized profile and use several layers of drywall. Modern TVs are not so heavy, so a plasterboard niche will become ideal place for your plasma.
They use plasterboard shelves even in the bathroom. In this case, you need to choose not ordinary, but moisture-resistant drywall. With the help of such designs in the bath you can get comfortable stands, and hide the pipes.

So it turns out that shelves made with your own hands from plasterboard are very practical. If you don’t already have such shelves, there’s nothing stopping you from making them. We will try to tell you in detail what is needed for this.


If you remember the proverb “measure seven times, and only cut once,” then you understand that before doing anything, you need to:
When the diagram is ready, you will be able to accurately calculate the required number of profiles, slats, jumpers, fastening materials and gypsum board sheets.

Shelves made of plasterboard can be installed at the stage of constructing a plasterboard wall or separately. In the first case, the general frame is installed so that a niche is formed, which is sheathed with plasterboard, like the entire wall.
In the second, the base for the shelf is prepared. It is made from a profile, and most often builders choose a profile measuring 50x25 mm. After marking the wall using a level (the shelves must still be level), you need to drill holes in the places where you have provided fastenings. You can use a drill-driver, which will allow you to quickly and efficiently fix metal carcass on the wall.
If the shelf is designed for load, you will need:
Guides are attached to the profile fixed to the wall, creating the volume of the frame. These are transverse and longitudinal yards. It is good if they are fixed to the ceiling or floor, and jumpers are mounted between them and the profile on the wall. All this strengthens the frame structure.

After the frame is ready, they begin covering it with sheets. These can be sheets of plasterboard, chipboard, MDF and other materials. In some cases, glass and mirrors are used. But the easiest and most common option was and remains drywall. It is secured using self-tapping screws, screwing them into a sheet of drywall and into a hole in the profile. The greater the planned load, the more often you need to attach drywall to the profile.
After the frame is ready, you need to take care of the wiring. This is done if a backlit shelf is planned. For fire safety purposes, cables and wires are laid in a protective corrugation.
To sheathe the frame with sheets, you will need to carry out appropriate cutting work. First, measure the dimensions of future shelves, transfer them to sheets, and cut out the necessary parts. To do this, cut through one layer of the sheet, make a break along the laid recess, then bend the sheet into a right angle and reverse side Use a sharp knife to cut through the second layer of paper.

The ends are treated with sandpaper or sanded with an electric planer. The sheets are secured to the frame with spacer dowels. The end part of the shelves is mounted in two ways:
In the second case, you need to try to have as few joints as possible. The result will be plasterboard shelves like these. See photo below.

In order for the surface of the shelves and ends to be perfectly smooth, they will need to be further processed. To do this, the ends of the sheets are sanded. A layer of putty (gypsum) must be applied to the joints, sealed with reinforcing mesh (40 mm), and then treated with putty on top again. When using mesh, you will have to putty the entire surface of the sheet (layer thickness 1-2 mm). This will also help hide the recesses from the screws. After the putty has dried, the final finishing layer is applied.

To make the corners aesthetically pleasing, putty corners are glued onto them with a primer. They can be galvanized, aluminum or plastic. The most durable are galvanized, but the metal may corrode over time and rust stains will appear through finishing material. All types of corners will prevent the destruction and abrasion of drywall at the corners.
Above we described the easiest way to create shelves from plasterboard - it’s geometric correct designs. What if you want something smooth and non-standard? Drywall is a material with which you can and should experiment. Using thin sheets, you can create curved shelves or their elements. To create such forms you will need a template. It is made from more durable materials. The plasterboard blank prepared for installation is pierced with a needle roller on one side. On the same side, the drywall is moistened and laid on the prepared template, fixing the ends of the workpiece. The structures are allowed to dry overnight. The result is a smooth shape, which is fixed to the profiles using self-tapping screws.

There are arched profiles for this. But you can also bend a regular profile if you use a grinder or metal scissors to make cuts on it and bend it.

Working with smooth forms is much more difficult, so start your experiments from simple to complex and take on a responsible task only after several training sessions.
The use of plasterboard in the interior allows you to experiment not only with its design, but also with the layout of the room.

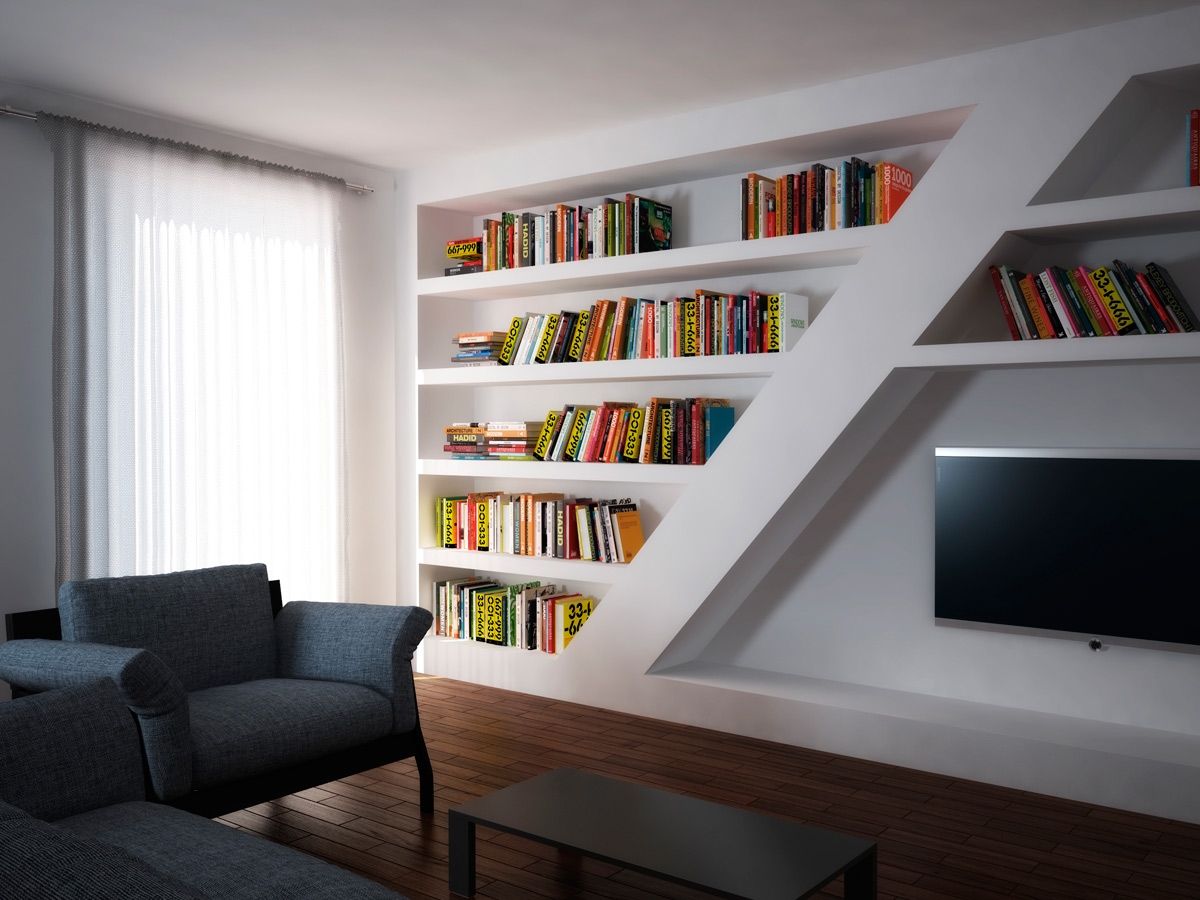
Using shelves, you can delimit the existing space into zones in a studio apartment or in a separate room. You can visually make the room more voluminous if you can’t experiment with multi-level ceilings. Decorative plasterboard shelves make the room stylish, beautiful and comfortable.
Built-in plasterboard shelves are one option. Moreover, unlike factory-made furniture, gypsum board samples will have individuality. However, in order to make shelves according to your drawings, you should carefully measure all the parameters for a specific product and, of course, select the appropriate materials.
This material has many positive and negative points, But main feature is versatility.  Decorating a room's interior using built-in plasterboard shelves
With the help of gypsum plasterboard you can not only quickly and inexpensively carry out repairs in a room, it is important that it can be used without problems for the manufacture and interior of built-in walls. What material features are suitable for assembling a plasterboard shelf with your own hands? 

It is these features that give it an advantage over other materials that can be used to assemble design and interior elements.
To assemble a plasterboard shelf you will need others related materials and equipment for their processing.  Shelves made of plasterboard in the interior of an apartment The plasterboard itself is selected depending on the room where the product will be installed. If this is a kitchen, bathroom or toilet, then you will need. Suitable for living and other rooms wall types material. Most often, those left over from the kitchen are suitable for assembling shelves. interior decoration premises. You will also need a certain quantity marked CD and UD (and a guide). If you plan to create a shelf of a non-standard curved shape, then it is best to buy an arched type of profile or make it yourself from guides.
  Example of shelf design non-standard shape

The shelf configuration is built into general design premises. If the presence of rounded shapes predominates, then the shelves should be rounded. (bugs) and are used as fasteners.
The initial finishing of the shelves is carried out using serpyanka to seal the joints between sheets and universal putty.
The tools for assembling the shelves are the same as for finishing the walls:  Design option for built-in plasterboard shelves
Read also
Creating a plasterboard podium
For decoration you will need the selected material:
List necessary materials and tools may vary depending on individual characteristics work.
Bringing the idea of assembling plasterboard shelves to life is not so difficult; it is only important to follow the work technology and adhere to the stages of work.
Sketching a future built-in shelf will help resolve several important issues.
Firstly, the diagram will make it clear how well the built-in shelf can fit into the overall design, and most importantly, the combination of proportions with the size of the room.  Project of plasterboard shelves
  Drawing of plasterboard shelves
Secondly, the prepared sketch allows you to more accurately calculate the required amount of materials that need to be purchased.
Thirdly, the drawing can be used as a reminder so as not to forget to make this or that part. 
Today there are computer programs allowing you to model walls and interiors. However, not everyone has this opportunity. Therefore, the simplest version of the project is to sketch out a diagram indicating the dimensions.
Shelves that are small in size can be drawn one to one on paper and the image can be estimated at the site of future installation.
The frame, assembled from metal profiles, will serve as the base of the entire shelf and will also take on all the loads.  The process of assembling the frame of plasterboard shelves

In this case, you can use two methods of assembling the base: directly on the wall or separately, followed by installation on a load-bearing surface.
In the first option, the sequence of actions is as follows:

When mounting a shelf on plasterboard surface, use special fasteners that need to be selected depending on the weight of the structure and purpose (light ones are fixed with umbrellas or butterflies, heavier ones with a moth dowel).
The rack frame rails are attached to the guides. All connections of metal parts are made using bugs.  An example of assembling a frame for plasterboard shelves
In the case of pre-assembly of the frame, proceed as follows:
What to do if you have too many books, various home accessories, souvenirs brought from travel, but there is no room for them? After all, the scale of an apartment or house does not always allow you to purchase large furniture, where it would be possible to place all household supplies. The way out of this situation is quite simple - plasterboard shelves. They are easy to make with your own hands. You can create products of any shape and size, depending on how many accessories you need to place on them.


Drywall – excellent material for assembling shelves, although many believe that it is not at all durable. GCR can be used in rooms with high level humidity and flammability. Drywall is perfect for children's rooms; it is one of the safest materials.
Shelves are great alternative large furniture, for example, a closet or shelving unit. In addition, they are quite spacious; you can put books, vases, dishes and even electronics on them. Such shelves have many advantages:


It is not for nothing that drywall is considered one of the most universal materials. It can be used when repair work not only to create partitions and ceilings, but also to create an exclusive interior. Shelves can be made from drywall for various purposes. Thus, they will help to conveniently place any interior items.

There are many options for placing a TV in a room. You can buy a special bedside table for the TV, hang it on the wall on brackets, or make a shelf for it from plasterboard. Last option called a niche. With its help you can hide wires and sockets. A screen placed in this way will fit perfectly into the surrounding space and decorate the interior.
You can build a niche from plasterboard at almost no cost, without having any special skills.. Around the niche with the TV, you can make additional shelves to place a stereo system, various decorative accessories and books, photographs, paintings on them, decorating a hall or another room.

Plasterboard book shelves experience the greatest load. If you are worried about their strength, you can create a reinforced frame from a metal profile. Braces and buttresses can also be added later for maximum security.
Bookshelves can have varied design, shape and size. If they will be in the library where you spend time reading, you can build in backlighting.


Plasterboard shelves for bathroom and kitchen sinks are popular nowadays. As a rule, in many apartments the bathrooms are quite small, but loaded with plumbing fixtures. Often, kitchens also have a small area, but they have a lot of furniture and appliances, and there is also a sink. One of the best ways to borrow free place in such rooms - make a shelf under the sink.
You can use the available space under the sink wisely. If the sink is in the corner, then you can add it corner shelves from plasterboard. They take up little space, such shelves are always practical.


If you want your room to become brighter and more comfortable, you can make a plasterboard shelf with lighting. However, it is not customary to install it near a window. With the help of such lighting you can make even the darkest corner of the room brighter. It can also be installed in a small bedroom and children's room.
Backlight can perform a variety of tasks, for example, illuminate significant objects placed on shelves, mirrors. It can also replace a night light and become integral part interesting interior. For illumination, you can use an LED cord or strip with a transformer.
They are presented in a huge number of colors and have different saturations. There are even convenient options with remote control.

By using plasterboard shelves you can easily diversify the design of your living room. They look especially modern and harmonious in such rooms. wall shelves and niches. The niche can be decorated with special chrome-plated tubes, which are pre-coated with paint. This design can fit into any design and will definitely highlight all its advantages. In addition, it can be covered with natural or artificial stone, decorate with plaster or unusual glass, which will attract attention in the interior.
Such interior solutions:
On such shelves it is customary to place original vases, electronics, decorative flowers and other elements that will help complement the interior.

In the hallway and corridor, a shelving unit with plasterboard shelves will look aesthetically pleasing. It can be made functional and at the same time save a lot of space. The rack may be opposite front door or near it. They place them there decorative elements, because when guests come to you, they find themselves in the hallway. Based on the first impression of what you see, as a rule, an idea of the interior of the apartment as a whole is formed.
Having built a plasterboard wall, you can finish it decorative stone , build in lighting, add a variety of small shelves. The size of the wall must be selected based on the height of the ceiling and the width of the corridor, then the design will look harmonious. It can become a unique art object, especially if you paint it or decorate it with fabric.


Shelves made of plasterboard for the kitchen can be used not only as a functional element for storing dishes and other kitchen utensils, but will also become an excellent decorative addition to your design. Plasterboard shelves are combined with other materials, such as wood or glass. The surface of such shelves can be decorated with wallpaper.


You can also lay tiles or small decorative tiles on the surface of the shelves. Such shelves will look good in a bathroom or toilet. But before applying these materials to drywall, it must be carefully primed, taking into account the level of humidity in these rooms. Otherwise, the tile may not adhere well.


Before making plasterboard shelves with your own hands, you need to take into account the step-by-step instructions. It’s better to make drawings of the future design yourself, so that it’s easier to implement them when creating shelves. It is recommended to take into account all the nuances at the creation stage draft so that when final installation do not encounter unpleasant moments.
To make sure that you have chosen the right place for the shelf, the drawing can be transferred to whatman paper and attached to the place of further attachment. This is important when the shelf will be located next to the doors. This way you can assure yourself that the structure will not interfere with the passage.
A well-made drawing will help you understand whether you have chosen the right place for placement, calculate how much material you will need, and also avoid inconsistencies during the installation process. Thanks to the drawings you can build the perfect shelf.

There are several rules for creating a good drawing.


If you have a rather small kitchen, then the perfect decoration for it will be plasterboard niches, which will help save space in the room and create an interesting design.
Shelves made of plasterboard are also perfect for the kitchen or dining room. They will replace massive hanging cabinets; you can place dishes on them or decorate them with decorative accessories.


Interesting and original version It is considered to create shelves from gypsum plasterboard in the wall that separates the kitchen and dining room. There they look harmonious and therefore will be appropriate.


You can also fill the corner with shelves. This option looks especially good if it stands there corner sofa and a table. The shelf located above them can be decorated with a lamp.

Low shelves are suitable for a children's room. This way the child can easily reach any shelf. You can place textbooks and school supplies there. The shelves in children's rooms are decorated with LED strips and soft toys. It is advisable to make a box for the tape; it will greatly simplify installation and prevent it from overheating.


Recently, it has been fashionable to combine columns and shelves made of gypsum plasterboard. This design can serve as a unique way of zoning, for example, to separate the living room and dining room. On such shelves you can place various household items or interesting decorative items for decoration.

In the living room, instead of a large TV stand, you can make a niche, which will significantly increase the space in the room. A niche made of such material, unlike a wooden one, does not require special care. In addition, it looks compact.


Shelves and niches made of plasterboard look interesting in the bathroom. They allow you to save the maximum amount of free space when it is limited in such premises. They can be placed both above the bathtub and above the sink, and even under these plumbing elements.
DIY plasterboard shelves often have an unusual appearance and accommodate a large number of various items. Thus, even equipment can be installed on a rack with additional metal reinforcement. In order to make a structure with your own hands, you first have to decide on its shape, then purchase all the materials. Of course, such work requires certain skills, so it is better for beginners to choose the simplest shelf option or turn to specialists. Below we will tell you how to do this work yourself.
Drywall is classified as a universal material that has various purposes- ceilings, niches, and all kinds of figured structures are made from it. This popularity is due to the following advantages:

Despite the large number of advantages of this material, some of its disadvantages should be highlighted:
There are several main parameters by which such designs differ. Before choosing one option or another, you should familiarize yourself with them.
Table No. 1. Types of gypsum plasterboard shelves

Table No. 2. Types of shelves by type of placement
| Accommodation | Description |
|---|---|
| In the center of the room, a large structure consisting of many shelves is most often installed. This option will best fit into the interior of the living room. |
| Such plasterboard structures will fit perfectly into the interior of a small room. Moreover, they are not only decoration, but also perform a functional task. Quite often, a bookcase is placed in the corner. |

In this case, any plasterboard structures can be designed as follows:

Shelves made of gypsum plasterboard are:

Universal gypsum plasterboard shelves can be installed in any type of room:

In the process of creating shelves you will need the following materials:
In addition, we will need the following tools:

It is worth noting that not all devices and materials may be useful, because if we plan to make a structure for heavy objects, then we will need a metal profile to create the frame. For decorative shelves A simple rack profile with guides will be sufficient.
Important! In order to make the final finish, you will need putty, paint, a set of brushes, and rollers.
First we need to develop a design for the finished shelf. It is recommended to do this in the following ways:

Important point! It is advisable to design a universal design that will be not only decoration, but also functional element interior That is why it is recommended to strengthen it.
Typically the following parameters are displayed on the drawing:
Important point! When drawing up a drawing, it is necessary to take into account the thickness of the materials used (gypsum board sheets and metal frame).

Regardless of the choice of one option or another, creating a diagram is important stage, thanks to which it will be possible to make a structure of an ideal shape. This way you get the opportunity to evaluate the correct placement of the shelves and avoid various problems during the installation process.
Before the start installation work To make plasterboard shelves, you will need to prepare the walls. Here, any irregularities can become an obstacle to the normal fastening of the frame, causing the structure to turn out crooked.
It is necessary to assess the condition of the surfaces. If there are all kinds of cracks, sagging, and depressions, they should be eliminated. In addition, it is better to treat the walls with several layers of primer so that they do not crumble in the future.

Important point! In some cases, preliminary floor preparation is required.
Frame installation
Step 1. We mark the wall. In order for the base for our shelves to be reliable, it is necessary to take the markings with special responsibility. In this step we will use building level, mark the location of all heights and fastening of dowels. To mark the surface, you must use a marker or a simple pencil.

Step 2. We calculate the load. Calculating the load on the shelves is not difficult - it is important to know what these shelves are supposed to be used for. For example, if a TV is installed in a niche, it is important to make it durable. For such purposes, it is better to strengthen the frame with metal jumpers.
If you plan to make a small shelf for shoes or other not very heavy objects, then a standard sheathing for drywall will be sufficient. The shelf for various postcards and souvenirs does not have to be strengthened at all.

Step 3. We assemble the frame. The basis of the frame is metal profiles, which serve as guides. Thanks to the use of such beams, you can make a structure of any shape - for this you will need to make notches on the metal. It turns out that the more different bends there are, the more such notches will need to be left. It is recommended to use metal scissors when working. All parts of the frame are secured to each other with self-tapping screws. It is necessary to carefully tighten the fasteners to ensure a strong base.

Construction levels
Step 4. We fix the profiles to the wall. It’s not difficult to fix the shelf on the wall, because it already has markings that we set in advance. In any case, even at this stage you can still slightly change the location of the structure.

In the case of assembling built-in structures, it is necessary to secure the racks along the facade. To do this, lay a jumper according to the markings and then attach a jumper. Supports are fixed at its ends:
It is worth noting that the more you plan to load the shelf, the more dowels and screws you will need to use to secure the frame. Typically the pitch between fasteners is about 200-250 millimeters.
Installing drywall sheets
Step 1. We mark the gypsum plaster boards. Some masters prefer to count required quantity material at the stage of project creation. The standard length of sheets ranges from 200 to 450 centimeters, and the width is 120-130 centimeters. Since additional changes are often made during the frame assembly process in order to mark the sheets, it is necessary to measure the frame. In this case, you will need to leave a few centimeters for gaps, because the entire base must be covered with plasterboard panels.

These patterns should be transferred to gypsum board sheets - for this we need a marker or a simple pencil
Step 2. We cut out sheets of drywall. It is best to cut this material on a perfectly flat surface (on a table). Now you need to place the drywall cutting knife on the mark and press firmly. Next you need to move along the intended lines. This should be done very carefully to ensure that the parts are as even as possible.

In case the project involves the presence of too complex bends, then we will need a knife for cutting gypsum plasterboard small size— it will be much easier for them to move along such contours.
Step 3. Lighting installation. It is at the stage of creating the frame that it is necessary to carry out wiring for the lamps. Of course, this step is not mandatory; it is only necessary if lamps are included in the project.

Important point! There is an easier way to install lighting - using LED strip.
Step 4. We install the parts on the frame. It is important to be especially careful at this stage. The sheets are used either immediately after cutting, or they are additionally given different shapes. If you choose the second option, it will be necessary to carefully process the sheet with a wet roller on all sides, as a result of which it will become very plastic.

After preparing all materials, it is necessary to begin installation:

Here you also need to calculate optimal distance between the screws, depending on the purpose of the shelves - it is important to remember that they should be no further than 100 millimeters from each other. However, it is recommended to take a minimal step between them.
Finishing
Putties
When the entire structure is securely fastened, you can begin the finishing stage.
Step 1. We prime the surface. In order for the putty to adhere securely to plasterboard sheets, you should pre-treat them with a primer (a total of 2 layers are required). It is better to apply the primer using a roller, this way you can quickly distribute it even over a large structure.

Step 2. We apply putty. Now we have to apply the first layer of putty to the structure. It should be quite thick to hide all fasteners, joints, and irregularities. It is better to use a spatula to apply putty. The result should be a smooth surface.

Step 3. Sand the surface with sandpaper. When the first layer of putty has dried thoroughly, it will need to be sanded using sandpaper- this will allow you to achieve an ideal surface.

Next, you will need to putty this structure again. If desired, you can apply decorative plaster because the next step will be painting. The design of the shelves can be different, here everyone can show their imagination.
In order to make a design in accordance with the project, it is necessary to eliminate mistakes that both beginners and experienced craftsmen in progress:

Of course, for making plasterboard structures you will have to put in a lot of effort with your own hands. However, this is a great opportunity to save money and create your own unique product. In addition, you will be able to acquire a very useful skill that will come in handy someday.


