For dismantling the most popular type of air conditioners - split systems - specialists charge a fee of 1 rub. for every kilowatt of power. Many owners of cooling devices who have to move, in order to save their money, undertake to dismantle the air conditioner themselves. A number of useful recommendations will help you get the job done cleanly and avoid fatal mistakes.
The story about how to dismantle an air conditioner with your own hands should begin with a warning about the pitfalls that await an untrained technician. Here's what can happen:
When performing such a complex operation with your own hands as disconnecting the evaporator indoor unit, it is highly advisable to use not improvised tools - a screwdriver and pliers, but professional ones designed specifically for it.
 A set of necessary tools and materials for dismantling
 Users at this stage often use whatever they have to, resulting in damage to the evaporator tubes located close to the fastenings. The problem is that a professional tool is quite expensive and even renting it can cost an amount quite commensurate with the cost of the services of a qualified craftsman.
So, first of all, it is necessary to ensure the safety of the refrigerant. To understand how this is done, you need to remember the design of the split system. It is a closed circuit filled with freon, which consists of a compressor, two relatively speaking chambers (evaporator and condenser) and freon pipes connecting these elements ( copper tubes).
 Split system design diagram
 The refrigerant flows from the condenser to the evaporator in liquid form, so the tube through which it flows has a smaller diameter.
Along the second freon line - from the evaporator to the compressor - freon flows in a gaseous state, so the diameter of this branch is increased.
To carry out dismantling without loss of gas, it is necessary to collect it in a condenser:
 Shut off the refrigerant
 Important point: After what time should the second valve be closed? It is best to monitor gas pressure using a vacuum pressure gauge. But for this you will have to borrow from the masters special tool- pressure manifold.
Those who do not have this option simply wait about a minute: as experience shows, during this time a household air conditioner usually manages to pump almost all the freon into the condenser.
 Pressure gauges for monitoring pressure when pumping freon
 Let's move from theory to practice:
That's it, now the freon is trapped and the system can be safely disassembled and dismantled.
Let's proceed directly to uninstallation.
Disconnect the freon lines. This can be done by unscrewing the nuts with which the lines are screwed to the fittings of the outdoor unit. This method is used if the length of the tubes allows them to be used in a new location. Open fittings must be securely sealed with electrical tape or tape - this will prevent them from clogging.
 Dismantling the outdoor unit
 But in most cases, freon pipes are not reused, especially since their extension is not allowed. Then the tubes are simply cut with a pipe cutter at a distance of 150–200 mm from the fittings, immediately caulking their ends with a bench vice.
 Caulked highways
 Advice. If it is known that the air conditioner will be stored unassembled for a long time, the tubes can be filled with nitrogen and sealed tightly. Unlike air, or more precisely, the oxygen contained in it, nitrogen does not lead to oxidation of the material.
After all manipulations, it is necessary to remove the thermal insulation from the outer part of the freon pipes.
After making sure that the device is disconnected from the network, remove the protective cover over the electrical cable connection point. Its terminals must be marked in some way to avoid confusion when connecting in a new location. After this, you need to unscrew the clamps with which the cores are screwed to the contacts of the outdoor unit. The freed end of the cable is screwed to the freon pipes, which are then manually straightened in order to be able to pull them out through the hole in the wall.
Now we unscrew the nuts holding the outdoor unit to the brackets, and together with an assistant, remove it, and then the brackets themselves.
Note! The outdoor unit must be in an upright position during storage and transportation. When transporting, it is very important to avoid shaking and shock - for this it is better to place the unit in a box with foam plastic pre-laid in it.
If the air conditioner is dismantled to repair the compressor, the latter must be properly disconnected. This is done like this:
By doing this, you will eliminate the risk of damage to the piping pipelines. Another plus: it becomes possible to repair several elements of the outdoor unit at the same time, which will allow you to cope with the task faster.
In order to be able to operate the compressor, you need to pour out the oil in it.
In the case of the piston model, it drains without problems through the suction pipe. For spiral and rotary models, you have to drill the bottom (hole diameter is 5–6 mm). You cannot drill through, otherwise chips will get inside. A thin septum is left, which is then pierced with a punch.
To gain access to the latches of the indoor unit, you need to remove the front panel. Then disconnect the freon lines and electrical wires, snap off the latches and remove the block from the guides.
 Dismantling the indoor unit
 Note! At this stage, the average person faces some difficulties: careless actions can easily damage the evaporator latches.
The manufacturer usually closes this element with a lid, the latches of which are pressed against the wall. They were made difficult to access on purpose: this precaution, according to the developers, is a guarantee that only specialists will dismantle the device. To get to the fasteners, use two thin screwdrivers. In this case, it is necessary for someone to hold the block.
You should also be careful when unlatching the latches that hold the block on the guides. If they are damaged, the device cannot be firmly fixed in a new place and it will quickly fail due to vibrations.
 Be careful with latches!
 Having removed the internal block, unscrew mounting plate, remove the freon pipes with the power cable from the wall and unscrew the decorative box laid along the outer wall.
At low temperatures, it is not possible to pump freon into the condenser: the oil in the compressor becomes thick and an attempt to turn on the air conditioner in such conditions will lead to damage to the supercharger. This danger does not occur only in models equipped with a so-called winter kit, which includes heating of the compressor crankcase and drainage, as well as a fan speed retarder.
 Pressure gauge station for refrigerant collection
 Those who do not have such a system can remove the refrigerant using a pressure gauge station to collect freon. It is connected, like the pressure manifold, to the shredder valve.
The procedure for dismantling the air conditioner is technically quite simple. The difficulty, from the point of view of the average user, is that some operations are difficult to perform without professional tool. If you still firmly decide not to turn to specialists, we recommend inviting another person to help - then even without special tools the task will be quite feasible.
Sooner or later, every owner home air conditioner faced the problem of its contamination and unpleasant odor. Accordingly, before fixing this problem, he had a question about how to disassemble the indoor unit of the air conditioner.
In order to get an answer to this question, it is worth understanding what constitutes internal system air conditioner

There are several types of air conditioners on the market. At first glance, it seems that they are all completely different. But it is not so. The principle of operation is similar for all of them. The simplest and budget options Window and mobile air conditioners are considered. Both options consist of only one block.
A window air conditioner is mounted in a window opening, and a mobile air conditioner can operate in any place where there is an open window or a slightly open door to route the hose outside.
A more complex unit is a split system. Installing them requires certain knowledge and skills. It consists of two blocks: internal and external.
Composition of the outdoor unit:
Indoor unit composition:

If, when you turn on the air conditioning system, the flow of cooling air carries with it a sour, stagnant, moldy smell, then you should think about cleaning it. To do this, you need to rinse the outdoor and indoor units of the split system.
In order to solve such a problem, you can use two methods: attract a specialist, but this is a very expensive method, or disassemble the internal unit of the air conditioner with your own hands to perform cleaning work.
The latter method is more preferable, since it will save a significant amount of money, and the purchased useful experience will come in handy in the future.
This method of disassembling a home air conditioner is universal; it is also suitable for disassembling the vast majority of brands that exist today.
In order to begin disassembling the block, you should stock up necessary tools. To work you will need:
You need to know that in order to disassemble and clean the unit, you do not need to dismantle the unit from the wall, drain the freon and open the copper route.
First you need to disconnect the device from the power supply. After this, the protective filtration located in the block is removed. You can read how to remove it correctly in the instruction manual that came with the air conditioner. The whole process is described there in very detail and clearly.
After which, the outer panel is removed from the block. And then two bolts are unscrewed, which are closed with fuses, and the frame pulls in its direction. It is secured on the top side with two latches.
The entire panel that was on the top side will be covered in mold and dirt. It needs to be sent to the wash immediately.
Using a little force, a blade is pulled out of the grooves, which is responsible for directing the air masses.
Then the lower area of the indoor unit of the unit is removed from the valve mounts, where the drainage hose and the wire supplying the air conditioner are disconnected.
If you have basic knowledge of electronics and radio engineering, then you don’t have to write it down, but when reassembling it, refer to the drawing on the back side of the block, to detailed diagram connections.
Next, the fastening brackets are pressed out, and the housing of the electrical unit and transformer is removed. To dismantle the drain and outlet hose, you should very carefully and slowly squeeze out the three supporting fasteners. The opening, which serves to blow air masses out of the block, will also, like the blade part, be covered with mold, which causes the spread of such a nasty aroma.
After that, you should unscrew the supporting bolts of the electronic motor of the split system and lift the radiator with great care, after which you can remove the motor support. Next, the blades and the engine located in the cell are removed. In order to eliminate the possibility of the radiator accidentally falling, it can be placed back.
Then it is necessary to remove the thermal lock located on the mounting bolt of the friction wheel with the rim of the electric motor. But you need to keep in mind that it will be difficult to disassemble these things yourself. In order to avoid accidental combustion of the rubber part that transmits energy, it is necessary to very carefully heat the bolt head using a thin soldering iron, and during the soldering process you need to try to unscrew it. After successfully separating the blades from the motor part, all moldy and dusty parts are placed in the sink.
In order to rinse thoroughly, remove all foreign odors and disinfect all removed elements, it is worth purchasing special remedy for air conditioners. It does an excellent job of removing fungi, mustiness, mold and germs.
When starting cleansing, you first need to shake the can. The product is sprayed over the entire surface that requires cleaning. Wait twenty minutes. Then use a long-haired brush to scrub through the contaminated areas. And washed with water. The air conditioner is assembled in the reverse order.
Everyone understands that the time for complete filtration greatly depends on the cleanliness of the room. If the room environment is polluted, then the air conditioner will require frequent cleaning. In order to understand whether the air conditioner needs cleaning work, you can carry out an experiment. To do this, you should disassemble the device; if the filter is already completely clogged, then next time you need to do this a little earlier, and if the filter is still clean, then the procedure can be postponed until later. Also on some modern models, you can determine the level of filter contamination using an indicator that provides information about the current level of contamination.
In some residential areas where there is perfect order, daily wet cleaning is carried out - filters are changed only once a year. But this, of course, is an exceptional moment.
Ideally, the air conditioner requires cleaning every two weeks. Proper and regular maintenance of the device will ensure a pleasant and comfortable atmosphere in the house.
Thus, it is clear how to disassemble the indoor unit of the air conditioner, and there is absolutely nothing complicated about it.
You just need to stock up on a little patience, some free time and no distractions.
Disassembling on your own will help in preserving family budget and will give you new experience that will be very useful in the future. Air conditioners need to be cleaned periodically and calling a technician every time is not only expensive, but also not always convenient. As a rule, you have to wait for specialists and adjust to their arrival time.
And the ability to tinker and understand technology also brings moral satisfaction.
how to open the air conditioner to get to the fan I found the bottom 2 screws, what needs to be done to open
Vadim Unscrew two or three screws under the horizontal blind.
Nikita hits the floor with all his might
Victoria Download the instructions for it - there is a breakdown in pictures. At least that's how it works on my HITACHI.
Yuri It is removed from the case. very tight.
Tags: How to remove the cover of the indoor unit of a Samsung air conditioner
24 Nov 2013 - 29 min. - Added by user Split-infoDisassembling the internal unit of a split system. ... Dismantling the indoor and outdoor air conditioner units. - Duration: 8:39. Cool Van 89,139...


disassembled indoor unit. How to remove the air conditioning compressor and the outdoor unit itself with your own hands... Remove the protective cover from the housing; ...
THE SPLIT SYSTEM HAS LONG LONG Ceased BEING AN EXOTIC TYPE OF EQUIPMENT: IT CAN BE FOUND IN ALMOST EVERY MODERN APARTMENT. MANY ADVANTAGES, CONVENIENT SETTINGS, EASY TO USE, AND MOST IMPORTANTLY, CREATION OF AN OPTIMAL MICROCLIMATE IN THE ROOM MAKE THE BUYING OF AN AIR CONDITIONER A NECESSITY THAN A WANT. BUT LIKE ANY OTHER EQUIPMENT, THE SPLIT SYSTEM NEEDS TIMELY CARE AND REGULAR CLEANING. HOW TO CLEAN AN AIR CONDITIONER AT HOME, WHERE TO START AND WHAT IS THE PROCESS?
Air conditioner cleaning can be done either with the help of specialists or with your own hands. In the second case, you simply cannot do without an instruction manual. But first, let’s look at the signs that make it clear that it’s time to clean the split system.

As they accumulate, contaminants deteriorate the performance and quality of the air conditioner. And most importantly, polluted air affects your health. There is mold, mildew, dust mites, and whole families of different bacteria in the air we breathe. Hence, asthma, various dermatitis and other skin diseases.
To avoid such a situation in the apartment, split systems are lightly cleaned: from one to three times a week, depending on the intensity of use of the device. There are several obvious indicators that your air conditioner is dirty.
What you should pay attention to?
Once you notice any of these signs of system deterioration, you can either call a professional to clean it or do it yourself. We will now figure out what and how to start.

On your own You can clear internal filters, fan, drainage system and heat exchanger. What will you need for this?
It is unlikely that you will enjoy touching contaminated internal parts and breathing dust. Before starting work, do not forget to put on a respirator and gloves.

The process of cleaning a split system at home will take place in several stages, depending on the part being cleaned. To figure out how to access each of them, let's look at them separately from each other.
Before flushing the air conditioner, be sure to unplug it! Cover the floor with newspapers, plastic wrap, or wet rags so as not to stain it.

Let's start with filters. To get to them, you need to understand how to open the air conditioner. It's simple: lift the lid of the split system, pull it towards you and up and push it all the way. Filters will open before us - curved mesh plates, to remove which you need to slightly lift them up, then pull them towards you and down. Already at this stage you can see the degree of contamination of your device.
Next, the filters must be washed with cool water. If the dirt is not washed away, keep the filters in warm water about half an hour. To enhance the effect, add a few drops there liquid soap or crumble the usual one and stir - let the soap completely dissolve.
Then rinse the parts again running water, wait until the removed parts dry naturally, and wipe them again soft cloth. You can dry the filters on the windowsill if the weather outside is sunny.
Do not dry filters with warm air currents, such as a hairdryer, as this may deform them.
Before reinstalling the filters, you need to vacuum the internal elements of the split system and wipe accessible areas with a soft cloth.
So far we have been talking about strainers. If you use pocket filters, you will not be able to clean them - such filters are simply changed after their service life has expired.
It is highly not recommended to wash filters more than six times, since the filter may lose its properties and degrade its throughput.
Radiators are designed to change the temperature of the distilled air and represent one large plate, which consists of many small ones. They are located at a very small distance from each other, and if the dust is not so deep in the spaces between them, then you can remove it with a long-bristled brush.
A high-power vacuum cleaner will also cope well with this task. After the cleaning procedure, wipe the area with a damp cloth until all dust is removed.
If the dirt has gone deep, most likely it has already mixed with condensation and formed a dirt film. It is not possible to remove it yourself. To clean such contamination, steam cleaners are used, and this work is best left to professionals.
You can find the radiator by opening the bottom cover of the split system. Pull the plate out. After cleaning, repeat the sequence in reverse order.
An important element of the system is the rotary fan. This is an oblong shaft with blades that “pushes” cooled air into the room. Its contamination can lead to complete failure, since the resulting deposits of dust and dirt block the operation of the fan.

To prevent this from happening, you need to dissolve a little soap in warm water and spray it on the blades. After the dirt has soaked, turn on the fan at the lowest speed. Be prepared for drops of liquid to fly away. Then stop working and clean the area manually using a brush or toothbrush and the same soap solution.
Before starting to clean the fan, cover the wall protective film and lay newspapers on the floor so that dirt flying out of the air conditioner does not get on them.
You should be extremely careful: try not to damage the fan blades, otherwise a complete replacement will be necessary.
If the resulting grease and dirt clog the passages drainage channels, then the water will begin to flow not outside, but inside the room. The fungus will not “sit” in the pipes for long and will begin to spread: first to the drain pan, and then to the radiator. All this will again affect the purity of the inhaled air.
You can clean the drainage with your own hands only superficially: using a brush and detergent, for example, for washing dishes. After treating the drainage itself, check the cleanliness of the drainage pan, or better yet, wash it for prevention.
Professional treatment of the drainage system involves an antibacterial effect using steam. Another option is to completely clean the entire air conditioning system by spraying a special substance.
This completes self-cleaning of your home air conditioner. If you do not want to spend a lot of time, then there is a simpler option, you can purchase a split system with automatic system cleaning. This system works by simple principle: periodically switching to the “idle” mode, it dries the internal components and parts.
Sometimes such air conditioners are accompanied by an ion air purification system - dust ionization occurs, and it passes more easily into the dust collector. However, even such “smart” air conditioners have to be cleaned manually, since they will not wash the filters themselves, and the process itself is still ambiguous and mysterious.

The most difficult thing in cleaning an air conditioner is perhaps its external part. Outdoor unit, as a rule, is located outdoors, and access to it is most often complicated by its height and location from the street. The only good thing is that such a block only needs to be cleaned 1-2 times a year.
What should be done?
To clean the external unit, steam cleaners or mini-washes are often used, which give a greater effect. It is important to remember that you should not start the air conditioner until all internal parts are completely dry.

Even if everything is fine with your device and it works like a charm, there are several simple tips equipment care instructions that must be observed.
If paired with an air conditioner you use supply ventilation with filters, the air conditioner, as a rule, gets dirty less often. For example, it supplies already purified air to the room. The windows can be closed to prevent dust and fumes from entering the house. In addition, the breather also works in recirculator mode, that is, it will help clean the air already in the room. Of course, as in the case of a split system, maintenance is required for the equipment, but with such equipment it is much easier - it is enough to change it periodically. In return you will receive a clean Fresh air indoors, its recirculation, heating of incoming air in winter, silent operation and complete protection from dust and dirt.

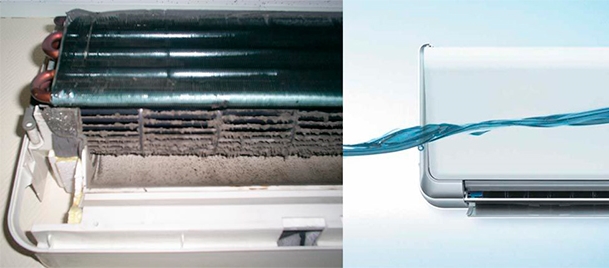
If you notice that cold air the air coming out of the split system has an unpleasant sweetish smell of rot - this means that the unit urgently needs preventive cleaning
In addition to the unpleasant odor, clogging of the internal components of the air conditioner leads to faster wear of the power system of the device, increased energy consumption and, most unpleasantly, can cause a number of allergic respiratory diseases.
Of course, you can have a service technician perform this procedure, especially if the air conditioner is still under warranty. But if you have been using a split system for a long time and do not intend to pay a lot of money for something that you can easily handle on your own, then you should know the procedure for disassembling the air conditioner for its preventative cleaning.
In fact, today there are quite a lot of companies producing split systems, but they all assume a more or less unified system for constructing indoor units. Therefore, even if you encounter some design differences, the basic disassembly technique will remain the same.
How to disassemble the indoor unit of a split system for maintenance
The first thing you should do is prepare a set of screwdrivers various sizes and workspace configurations. Also, do not forget to put boxes next to you for collecting fasteners, as well as a functional and electrical diagram of the air conditioner (in some models electrical diagram applied to inner side top cover of the unit). For the cleaning internal elements Split systems will need a vacuum cleaner, detergents and clean rags.
Assembling the indoor unit of the split system should be done in the reverse order.


