Fabulous beauty that has come down to us from time immemorial. It is visible to everyone on ancient, beautiful, log houses, decorated with interesting carvings of platbands with openwork patterns and rich kokoshniks located on the roof, and delights many modern people. You can admire such beauty for a long time, but creating it yourself is a very difficult task. However, if you have a great and irresistible desire, you can make carved window frames (templates) with your own hands.
The question is not that you need the skills of a real artist or imagination to create geometrically correct, interesting, ornate patterns. The problem is more that products from natural materials, for example, from wood, are quite short-lived due to exposure external factors. The disadvantage of wooden platbands and carving elements is that they can retain their original appearance for many decades. original appearance, if they are stored in dry areas inside the house. And outdoor humidity will quickly cause the wood to warp, crack, and possibly even cause chips to appear in places where the carvings are thin. Any paintwork inferior to the influence ultraviolet rays, and rains only aggravate the overall picture.
This leads to the need to paint the product every year, constantly spending money on coating and spending a lot of time on labor. Not to mention the fact that you will have to repair or even replace such carved ones. Do-it-yourself templates for these products can be made from various materials.
This moment can cause difficulties, but do not get upset ahead of time. There is always a way to better create a cozy and pleasant atmosphere and improve the appearance of the building. Modern technologies made it possible to create many materials that are more resistant to environmental influences.

At the same time, in all construction stores they can be found in abundance. You can, for example, use flat iron instead of wood. With its help, you can make durable and no less beautiful carved window frames; in this case, they are needed in exactly the same way as when making this decorative element from wood.
Flat iron or sheet, as it is commonly called, taking into account factory classifications, is a thin tin, the thickness of which is approximately 0.4-0.7 millimeters. In the store you can find rolls of this material from 20 to 50 meters. The standard width of such a roll is 1025 centimeters. This material is usually coated with different colors, and you can find both light and dark tin. In addition, each sheet of iron is covered with a protective film, which allows it to maintain its original characteristics during transportation and prevents scratches and dents.
To independently make carved ones from flat iron (templates can be seen in this article), you will need the following materials and tools:

Before you start creating carved frames on windows, high-quality window slopes should be manufactured and installed. This is necessary for removal correct sizes and in order to make carved window frames with your own hands. The drawings can tell you how to do this correctly. This is done taking into account the protruding edges of the slopes extending onto the walls. After all the dimensions have been taken, it is worth calculating the characteristics of future platbands. Standard width this product is approximately 30 centimeters.

Next, you need to choose any smooth roll of wallpaper from which to make carved window frames with your own hands (templates, of course). When a sample design has been selected, three “patterns” will need to be prepared. One of them will be longer, it is needed for the side symmetrical parts, the second and third, respectively, will be shorter, for the upper and lower parts of the window.
The cut strips need to be folded in half, so that when drawing the sketch, the center of the pattern corresponds to the fold. This manipulation will save time and reduce the likelihood of errors when creating a template.
The fact is that when cutting out the pattern, both halves of the template will be created at once, in other words, this will allow you to create perfectly even and correct carved window frames with your own hands. In this case, pattern drawings will not be used as often as when each part of the workpiece is drawn separately.
To create the perfect workplace for further work, you need to move two tables together, the height of which will be the same. You need to leave a gap of about 8 centimeters between the tables. This distance is necessary for the operation of an electric jigsaw. To make platbands you will need metal of two colors. This combination is the most simple option. You can change this setting if you wish.

For example, let’s choose white as the applied top color. It is on this that the patterns will be cut out. As a second layer, you can choose a material of any color, since it will still not be visible, since it is used exclusively as a lining under the outer layer of the product, which is called carved window frames. We make templates with our own hands, let us remind you again.
You need to take a sheet of flat iron and cut it into strips to create platbands of the required width. You should turn the blanks of the upper overhead part face down, and also turn them over reverse side after securing the template with paper clips. After this, the openwork pattern is transferred to the material.

After the drawing is displayed, you will need an electric drill with a drill with a diameter of 8 millimeters. You need to drill through holes and start cutting out the casing with a file and a jigsaw. Next, you need to place the iron strip on the table, and it is important that it is located clearly in the center of the table. This will allow you to cut out the design clearly and evenly without compromising the overall picture.
Once the top part has been cut out, you can move on to the next step, which is responsible for creating the bottom part, which will serve as the background. To do this, you also need to cut the material into strips with necessary characteristics width and length. At the same time, do not forget that the part will have a border, that is, the width of this pattern should exceed the indicators of the external blanks. Ideal option V in this case there will be an increase in width of about five centimeters. We turn the sheet over again so that the front side is on top. Next, you need to place the top blank of the casing on this part, which is located face down, and trace the outer edge along the edge of the picture, taking into account the indentation, and after that you can start cutting out the part.
After both pieces have been prepared, you need to remove them from protective film and put them on top of each other. After this, the parts should be secured with paper clips. Next, you should make one or more holes with a drill with a diameter of four millimeters. Using riveting manual machine, you need to make a control coupling of the parts, thereby preventing their divergence. Having completed this action, you can begin to drill and rivet the entire structure.
That's it - the product is completely ready for use. You can start next stage- install carved frames on windows with your own hands. We made templates for them earlier.
In order to install the platbands, you first need to find a ladder or stepladder that will allow you to reach the windows. To install products on a wooden wall, you will need:
To install platbands on a wall made of stone, you will need:
It is necessary to fit the platbands close to the edges of the window slopes that protrude and secure them to the wall. After which you need to eliminate all cracks and irregularities using silicone. After bringing the product into aesthetic appearance the work can safely be considered completed.
Based on the information given above, it is immediately clear that it is quite possible to create carved window frames with your own hands. Templates - simple or complex - can be found or you can also make them yourself. Therefore, using even minimal skills and imagination, it is quite possible to improve the appearance of a building without spending a lot of money and time.
After installing windows in wooden house there is always a gap between the wall and window frame. The easiest way to eliminate it is to install platbands. In addition to functionality, they play a role decorative element, which decorates the facade of the house and makes its appearance unique and complete. One of the most beautiful are carved wooden frames.
Today, there are not only wooden platbands, but also wood-fiber, plastic and even ceramic. But the most popular material for their manufacture is still wood. This is due to its environmental friendliness, affordable price and high aesthetic qualities. In addition, wood can be restored, thereby extending its service life.
Smooth or profiled from solid bars. If the platbands will be painted in the future, then coniferous species are used, most often pine. When made from valuable wood, they are varnished. Nails, screws or liquid nails are used as fasteners.
With figured carving from solid bars. They are mainly made from valuable wood and varnished. They can be attached either to screws or to simple and liquid nails.
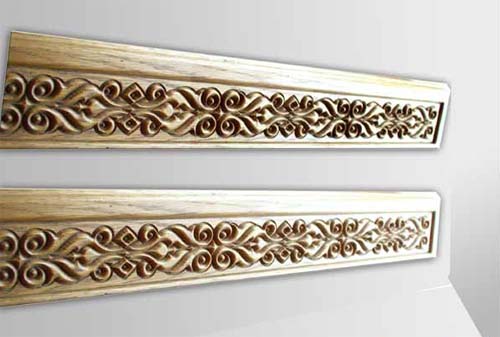
Smooth or profiled from laminated veneer lumber. They can be produced already finished with laminating film or expensive wood veneer, which eliminates the need for additional finishing. But they also come without finishing, intended for painting.
Stylized to a certain style. The most expensive type of platbands, which are made exclusively to order.
In addition, they are divided according to appearance for flat, shaped and figured platbands.
Flat. The cheapest and simplest type of platbands. But it has low aesthetic value.
Shaped. Most often they have a convex surface that has cuts, projections or grooves. They cost more than simple flat ones. This is due to production technology, which requires the use of special equipment.

Curly wooden platbands. They are decorative elements and give the house personality. They are produced on special machines equipped with vertical cutters. In this case, the desired pattern is programmed, and the machine automatically mills the surface. But despite Newest technologies, the capabilities of such equipment are limited.
And only a master can make an openwork relief. Wooden frame price self made will depend on the complexity of the ornament and the type of wood.
But the main difference between manual milling and machine milling is that the machine does not make through carvings, but only applies a pattern to a certain depth of wood.

If it is necessary to make a flat or shaped casing, then simple pine is used. To make carvings, you need soft wood, such as linden. It is easy to process even hand tools and is easy to sand. But due to its high hygroscopicity, it needs high-quality finishing coating. This involves applying several layers of paint and varnish.
In regions where significant temperature changes are possible, as well as high humidity or, on the contrary, a dry climate, wooden frames are made from dense and hard wood. These include birch and oak, which are extremely difficult to process, but will last for decades. Therefore, platbands from these types of wood are most often made on milling machines.
The only drawback of all types of wooden platbands is their high hygroscopicity, which over time leads to cracking and drying out. This can be avoided by periodically renewing the protective paint layer.
Through thread most affordable way trim decorations for non-professionals. It does not require special skills, you just need patience, diligence and a sense of beauty.
A large number of companies offer a variety of industrially manufactured platbands. But it’s much more pleasant to make it yourself. Hand tools can be used as tools milling machines, regular or electric jigsaws, various types of drills, chisels and hacksaws.
When making wooden frames with your own hands, it is important to take into account that after installation they should not interfere with the normal opening of the windows. That's why inner dimensions casings are made larger size window frame by 2-3 cm.
The upper part of the casing is called “kokoshnik”; if necessary, it can be extended by fastening the parts with spikes. The lower part is called “towels” and is attached at an angle from the wall to drain water. It also has a carving that matches the style of the “kokoshnik” carving, but the bar for it should be 1 cm thicker than the top bar.

Before installing the casing, it is necessary to nail the slats around the perimeter of the entire window - this will completely cover all the unevenness of the wall. The joints must be carefully adjusted.
All platbands are made in the same style.
To make a carved wooden frame, you should choose a board 3-4 cm thick. It is optimal for freely opening window sashes. The width should be sufficient to cover the edges of the walls and protect them from moisture. Alder, linden, aspen or coniferous species can be used as wood.
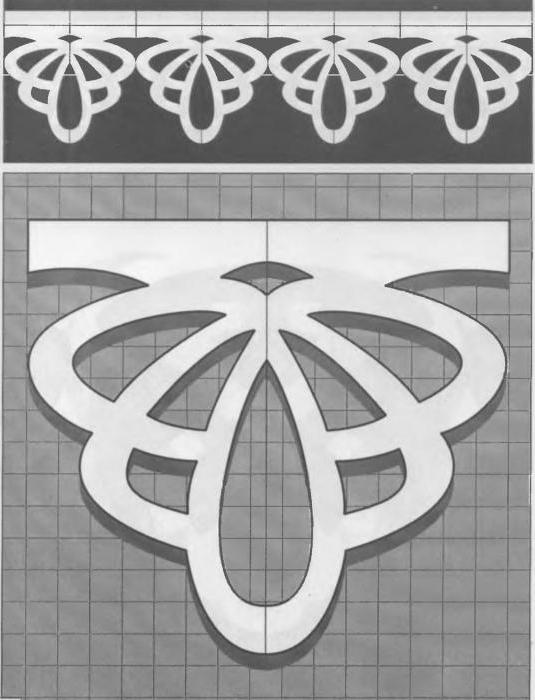
The choice of small ornament is not the best good decision. It will be difficult to see from a distance, and will require more time and a special thin tool to manufacture. Therefore, the ornament must have large elements that are clearly visible from afar.
The placement of carved elements along the wood fibers will protect the casing from cracking. This especially applies to wood coniferous species.
Use simple patterns first. The easiest for beginners in carving are the round pattern elements, which are simply drilled with a drill. Below are sketches of samples of wooden platbands.


You can watch the video in more detail about their production.
You can make stencils yourself or transfer the design from ready-made sketches. First, a pattern is applied to the workpiece, then a hole is drilled using a drill and the required pattern is cut from it with a jigsaw. Next, the cut out platbands must be sanded well. sandpaper.
After the carved blanks are made, they should be connected correctly. There are two connection methods: tenon or half-tree connection. The first method is much simpler and more popular, the second is used extremely rarely.
To attach the casing, special glue is used. It is important that it be synthetic, because organic compound Fungus may appear and moisture may collect. All this is very harmful to wooden platbands.
If the elements are fastened with nails, it is advisable to first lubricate all joints with glue, and only then fasten them with nails. We should not forget about treating all joints and especially spikes with glue.
The easiest way to install platbands on windows is with wood screws. You can decorate their caps using sawdust mixed with glue, which will later be painted over. But even without this work, the screws will be almost invisible against the general background.
Finished platbands must be coated protective composition, which will extend their service life for many years. To do this, it is better to use special impregnations that need to be updated periodically. The paint, no matter how high-quality it is, will begin to crack and peel over time, and it will be much more difficult to fix this.
When choosing the pattern of the future platband, it is very important to take into account the style of the entire house, because they should harmoniously complement it. Here are some examples of photos of wooden carved platbands.


Wooden window casings– element decorative finishing facade of private houses, which is more common in rural areas. They embody the traditions of native Russian architecture and are true works of art.
It is difficult to find beautiful carved platbands on sale, since this type of facade decoration is gradually losing its popularity, and there are fewer and fewer craftsmen who know the intricacies of their creation, and their services are not cheap. But connoisseurs of traditional home decoration can decorate their home themselves by making the trim with their own hands. Of course, this work will require patience, training and preliminary study of the technology. You will find useful tips on making and installing wooden trims in this article.
Previously, people believed that certain patterns on platbands were endowed with magical properties and are able to protect the inhabitants of the house from the evil eye. Now they are valued mainly for their decorative qualities: the ability to emphasize the style of the house, give it a complete look and enliven the facade. In the case of log houses, this type of window decoration is the only possible one, since plastic in combination with wood will look out of place, and the building will lose its flavor.
However, platbands also have functional purpose. This window element protects the room from heat loss, drafts, dust and noise by closing the gaps between the opening and the frame. The only drawback of wooden platbands is the need for them correct processing and careful selection of wood.
The production of platbands depends on their design features and installation method. By design, they are shaped, flat, figured and openwork. Flat ones do not have threads and are easy to manufacture; shaped and figured ones have a convex surface with a non-through pattern applied to it and are produced on a milling machine. But handmade products are valued higher, since the equipment cannot create an end-to-end openwork pattern.
Wooden frames are installed in two ways:
 Design options
 There are also many varieties of visual design. We will look at specific patterns and the technology for creating them below.
 The material must be easy to process
 To make wooden window frames that will last you a long time, you need to choose the right type of wood for them. Suitable for this purpose: larch, linden, oak, pine, beech, walnut and fruit trees(apple tree, cherry tree). You can decide on the option that is suitable for you by assessing the qualities of these breeds:
Advice! In areas with significant temperature changes, high humidity or, conversely, excessive dry air, it is recommended to use platbands only made of hard wood.
The manufacture of carved frames will require the use of tools designed for woodworking, namely:
You can’t do without a ruler, pencil or marker and a pattern with a pattern. You will also need a tool for filing spikes. To make it yourself, you need to take 3 slats, place 2 hacksaw blades between them and fix the structure. This tool allows you to simultaneously saw through the eyes and tenons of the platbands.
 Set of chisels
 The appearance and meaning of this decorative element depends on which pattern you choose. When the art of creating platbands arose, patterns were created not only for the sake of beauty, but also endowed with meaning. Here are interpretations of some of them:
Having decided on the desired images, find the corresponding patterns on the Internet and print them out. Make slits in the diagram and transfer it from paper to plywood or thick cardboard, so you will get templates for carved platbands. You can read more about making templates (stencils) in.
 Platband templates
 The main methods of creating window decorations are slotted and applied carvings. In the first case, using platband templates, the pattern is transferred to wood, and then individual structural parts are cut out of it. In the second case, first the platband is made from a solid board, then overlay patterns are cut out using patterns and fastened with nails, creating a three-dimensional pattern. The ornaments of all parts must be harmoniously combined.
Upper part The structures are made in the form of a kokoshnik, the bottom is in the shape of a towel, and two sidewalls are placed between them. The parts are connected to each other with spikes. The upper part needs to be made 1 cm larger than the lower part and given a slope to prevent moisture stagnation.
 Kokoshnik made with slotted carvings
 When cutting out patterns, movements are made along the wood fibers, otherwise the material will quickly crack. It is more convenient to make round elements with an electric drill. The ornament is made up of repeating patterns, it is desirable that among them there are more rounded parts - they are easier to make.
To make wooden frames for windows with your own hands, first of all, measure all sides of the window and select strong boards of the required size, at least 3-4 cm thick. This thickness ensures the strength of the structure without interfering with the opening of the window sashes. The width is chosen depending on the pattern; standardly it ranges from 15 to 30 cm in different parts clypeus.
It is better to compose a pattern from large elements, since too small details, when viewed from afar, lose out, merging into a single whole. In addition, creating a small pattern takes more time. Before cutting out the “finish” version, it is worth testing window trim templates on unnecessary pieces of wood. This will allow you to “get your teeth into” and check whether the patterns you have chosen look good on the material.
 Practice cutting out a pattern on a small sample.
 The cut out parts of the structure are sanded with sandpaper and connected. Fastening is carried out using the tongue-and-groove method; both parts are coated with synthetic glue before joining.
The installation of platbands on windows differs depending on whether the structure is attached to a wooden or stone facade. To work with stone walls you will need:
 Finished design before installation
 Window trims wooden house require another set of tools and materials, consisting of:
In addition to the above, in both cases you will need a stepladder.
The finished structure is mounted on the wall using self-tapping screws or nails, making sure that it fits tightly to the edges window slopes. All formed cracks and loose joints are coated with silicone, then the fastener heads are hidden, painting them with a thin brush. Do-it-yourself wooden platbands are ready.
Although the carved platbands themselves look original, correctly selected decor will make them more attractive. In addition, wood processing is needed to increase its service life. Ready product It is recommended to impregnate with a moisture-repellent composition, paint or varnish.
 Painted platbands
 Among the ways to diversify the design are: painting, firing and painting in contrasting colors. Painting can repeat patterns and focus attention on individual details, and contrasting coloring looks good when combining several types of carvings in a product. No less beautiful trims on windows are obtained by firing. Wood processing blowtorch or gas burner forms spectacular tan marks on its surface.
 Contrasting coloring of elements
 Whatever processing method you choose, remember that the structure needs careful care and periodic minor repairs, then the platbands will decorate the facade of the building and delight you for many years.
The originality of carved frames for windows and doors is striking in its spirituality. If you are not afraid of carpentry and want to make wooden trim with your own hands, then all that remains is to come up with a composition for framing.
Below are sketches of carved frames in a small size and mediocre quality. But these templates can be downloaded for free. The main idea is the idea, and the template can be made to the desired size.
Optimal and simple ways, how to make templates for cutting.
There are many programs for image processing (Photoshop, etc.).
If you don’t want to deal with programs, you can make a photocopy of the drawing and immediately set right size copies (enlarge, reduce, compress, expand). Or scan and print the sketch on a printer in the desired format.
In the end, you can make a template manually using the technology of scaling (copying) by cells (linear scaling).
By scaling by cells, you can change the proportions of the drawings. For example, you don't like the original form and you want to change it. To do this, when transferring the drawing, keep one of the sides at the original size, and increase the second in the new square.
Scaling by cell
Changing the proportions of a picture when scaling by cells
Template for platbandsThe template for platbands is made of cardboard, the size of life size. A separate template is made for each element, pattern and ornament.
The resulting template is placed on the board and the outline is traced with a pencil.
Making holes You can immediately mark the locations for the holes. Holes are drilled inside the pattern, in places where there will be a turn when carving. First, the internal patterns are cut out, and then the external ornament.
Platband carving
The method involves the use of carbon paper. A sheet of copy paper is placed on the board, and a drawing is placed on top. The drawing is secured with pushpins. An outline is drawn with a pencil and copied onto the wood.
Stencil template for carved trims
Now you know how to make a stencil template for carved platbands.
Window trim template - 1
Window trim template - 2
Window trim template - 3
Window trim template - 4
Window trim template - 5
Window trim template - 6
Window trim template - 7
Window trim template - 8
Window trim template - 9
Window trim template - 10
Window trim template - 11
Window trim template - 12
Window trim template - 13
Window trim template - 14
Window trim template - 15
Window trim template - 16
Window trim template - 17
Window trim template - 18
Window trim template - 19
Window trim template - 20
Window trim template - 21
Window trim template - 22
Window trim template - 23
Window trim template - 24
Window trim template - 25
Window trim template - 26
Sketch of window frames - rooster
Sketch of window frames in the form of a cockerel on a spire
Sketch of window frames - horse
Sketch of window frames - horse
Sketch of window frames - boat
Sketch of window trim - butterfly
Sketch of window trim - leaflet
Sketch of window frames - maple leaf
Sketch of window trim - pattern with fish (right)
Sketch of window trim - pattern with fish (left)
Sketch of window trim - pattern with a bird (left)
Sketch of window trim - pattern with a bird (right)
Sketch of window frames - ornament with goldfish
Sketch of window frames - acorns
Sketch of window frames - flowers
Sketch of window frames - flowers
Sketch of window frames - roses
Sketch of window frames - ornament of interlacing leaves (right)
Sketch of window frames - ornament of interlacing leaves (left)
Sketch of window frames - ornament of weaving leaves-2
Sketch of window frames - ornament of weaving leaves-3
Sketch of window frames - ornament with grapes
Sketch of window frames - ornament with flowers
Platbands are special strips for hiding assembly seams between the window frame and the wall. In addition to its direct purpose, platbands can be used to decorate windows and the facade of a house. To choose the right platbands and produce them correct installation, check out our article.
The basic rule when choosing platbands is that their material matches the material of the window. If you have a wooden window, then the frame should be wooden; if it is plastic, then plastic. Although there are exceptions, such as good combination platbands and windows made of different materials.
Wooden trims are made from planks at least 30 centimeters thick. The width of wooden platbands can be different, depending on the profile pattern and design. The profile pattern of simple wooden trims is made using a milling machine.
Advantages: affordable price, easy installation.
Disadvantages: poor design, poor resistance to moisture and temperature changes, the need for regular painting or varnishing.
Release form: rounded or beveled planks with a convex pattern, or smooth, 1.5-2 meters long.
Application area: hiding installation seams on wooden windows. Additional protection seams from environmental factors.
Carved wooden frames, manufactured manually or using a jigsaw. There are many options for the pattern of platbands: from simple ornaments to sacred symbols that protect the house from evil spirits. Self-production carved frames is a job that requires skills in carpentry. If you want to make platbands with your own hands, but do not have experience, choose a pattern without complex elements.
Advantages: very beautiful appearance, the ability to improve the facade of the house without significant financial investments.
Disadvantages: high price, difficulty in manufacturing, fragility, need for regular painting.
Release form: depending on individual order or a design developed by the manufacturer.
Application area: decorating windows and the facade of the house, hiding installation seams. 
Plastic trim is the general name for planks made of plastic, polyvinyl chloride and foam. Platbands made of plastic are often included in the installation kit plastic window. Due to the specific nature of the production of this type of platbands, they cannot be made at home. Plastic platbands can have a regular or carved pattern. The planks are installed using special fasteners, liquid nails, glue or double-sided tape.
Advantages: moisture resistance, long-term operation, easy installation.
Disadvantages: fragility of some products, small choice of design when simulating carved frames.
Release form: smooth, carved or with a profile pattern, 1.5-2.5 meters long.
Application area: hiding installation seams on plastic, sometimes wooden windows. Additional protection of assembly seams from environmental factors. 
Due to poor resistance to moisture, fibreboard platbands medium density It is recommended to use only for interior window decoration. MDF planks are great for wooden windows, especially if they repeat the color and texture of wood. The platbands are fastened with nails, screws or glue.
Advantages: low price, good appearance.
Disadvantages: poor resistance to moisture, inability to use for exterior decoration.
Release form: smooth, rounded or with a profile pattern, 1-3 meters long.
Application area: interior decoration wooden or plastic windows. 
Aluminum trims are mainly designed to hide assembly seams when installing windows and stained-glass windows made from the same material. In appearance and design, aluminum trims strongly resemble plastic strips. Aluminum trims are fastened using a special profile or latches.
Advantages: durability, long service life.
Disadvantages: poor combination with windows made of other materials.
Release form: aluminum strips with various types pattern except carved, 1.5-2.5 meters long.
Application area: external and internal finishing of windows and stained glass windows made of aluminum. 
You can make platbands yourself only from wood. For this you will need special tool and wooden planks.
To make simple wooden frames you will need:

Manufacturing technology of simple platbands:
If you don’t have a milling machine, you can make trims with a smooth surface. To do this, use a plane to bevel the front side of the plank at an angle of 20-30 degrees and sand it with sandpaper.
If you are planning to make wooden frames with a carved pattern, keep in mind that this is not a quick task and requires “iron” patience. To create carved frames, in addition to the basic tools, you will need a set of special chisels with different shapes blades and manual jigsaw. To make it easier to navigate large selection patterns, below are several templates for cutting: 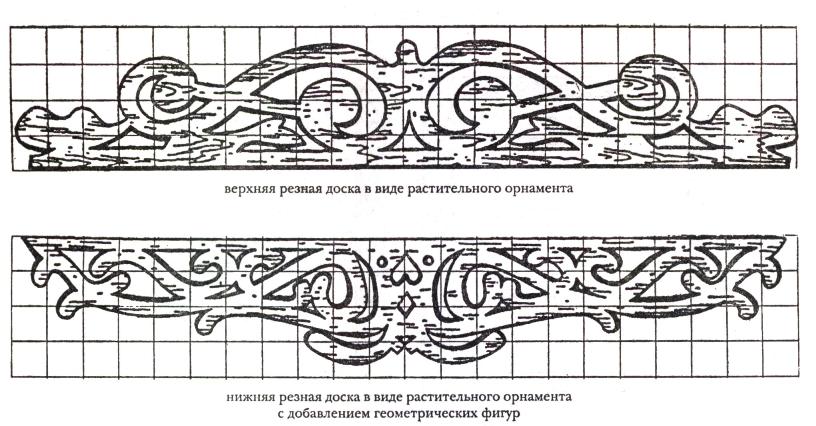


You can make carved platbands in two ways - regular and overhead. IN the usual way, the pattern is cut directly onto the casing itself. In the overlay method, the pattern is made in the form of overlays, at least 10 millimeters thick, after which the overlay is attached to the main casing. For beginners, it is recommended to use the overlay method, since in case of an unsuccessful pattern, the overlay can be replaced with a new element.
The correct choice of wood type for the carved frame is very important. It is easier to carve softwood because it is soft. Platbands made of hard larch will last longer.
If you have not done wood carving, choose a very simple pattern for the first time and, as your skill increases, move on to more complex patterns. 
Stages of manufacturing a carved platband using the overhead method:

You can install wooden trim on the window using nails, screws or glue. The strips are attached to the sides and top of the frame. In some cases, the casing is also installed on the lower part of the window, if this is provided for by the design.
For beautiful joining of simple platbands, their edges are cut at an angle of 45 degrees. This can be done using a hacksaw and a miter box.
If the window is located deep in the opening, the platbands can be placed on the wall using extensions.
Attaching the platband to the wall depends on the material from which it is made. For wooden wall It will be enough to use nails or screws; for concrete or brick - dowel screws.
Installation of carved platbands mainly depends on their design and composition. The carved platbands are joined in such a way as not to disturb the overall pattern.
After installation, the platbands are treated with wood impregnation, then painted or varnished.

Correct installation plastic and aluminum trims, requires the presence of a special installation profile that is attached to the frame. Platbands are installed in a groove located on the profile. In the absence of a profile, the platbands are installed on snap fastenings attached to the frame or wall. In rare cases, plastic trims can be secured with glue, but this type fastening is unreliable.
Using telescopic platbands, fastening is carried out by inserting the edge of the strip into the groove, which is located on the frame.
Foam trims are attached only with glue.


