Make a milling table with your own hands, having the drawings in front of you, necessary materials, fastenings are not difficult. Some people think that it is better to purchase a finished product. Others are confident that a homemade table allows you to accurately adapt the work platform to your needs, the nuances of a CNC machine or a conventional manual router. What to choose is up to you.

To make yourself a table for a router, you first need to decide what kind of table it will be. Working with a milling machine can vary depending on a number of factors, including the size of the machine itself.
Working on a table for milling machine CNC starts with you choosing which drawing will become the basis for production. It is not uncommon for work to be carried out without drawings. But then you must draw the parameters of the future table yourself and cut its elements using a circular saw. You should choose the components that you will need to make a homemade table based on its main elements.
All the necessary elements can be cut out using a circular saw. Making a homemade table is not a problem. The tabletop, stop, guides, and fasteners are clearly indicated by size if you use standard drawings. Taking finished drawing, you can adapt a homemade table for a CNC machine to suit your own needs. Act in what is best for you. Finding the drawings themselves will not be difficult, and you probably have a circular saw in your arsenal of power tools, since you are going to make a table for a CNC machine.

To make yourself a table for a manual router or a machine with a CNC module, you will need drawings and the necessary elements of the future design, which we described above.
When choosing a drawing for a future design for a milling machine, be sure to focus on the dimensions of your machine, as well as the dimensions of the space available to place the equipment. Do big table It doesn’t make sense for a small CNC machine, just like vice versa.
You can always redo the drawing, make some amendments, based on available materials, features of the machine, the presence of a circular saw and other nuances. If you need a good coordinate table for a router, it is better to purchase a factory-made one. Making a homemade coordinate table is quite problematic.
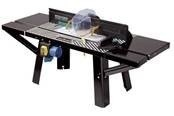
We offer you an option small table, work on which will easily accommodate a small desktop router with or without a CNC module. The advantage of this design is that it is easy to make with your own hands, it is small in size, and simple fastenings are used here.
A similar table for a desktop or manual milling machine can be made using a circular saw, electric jigsaw and standard tools. The coordinate version of the table is much more complicated, so the work involves the use of appropriate drawings and materials.
Which table to choose for you - a coordinate table or a regular homemade one for a CNC router or without it, decide for yourself. The work must be performed efficiently, observing all specified dimensions. Watch the video instructions that will help you determine which table is suitable for your machine. fits better Total.
Professional processing and manufacturing wooden parts only possible using a milling machine. This tool can be fully used in a special installation. This is what a milling table is. This installation is rare, and those options that are on sale are quite expensive. There is no point in spending a lot of money on purchasing this design, since you can make it yourself.
The convenience of using a router placed in a table lies in the optimization and safety of working with wood, as well as the speed of manufacturing parts. The principle of operation of this installation is quite simple, since it is not the milling cutter that moves along the surface being processed, but the part that moves relative to it. A router fixed to the table provides greater possibilities for processing parts. As a result, product blanks are obtained as in professional furniture workshops with the appropriate equipment. Before making a milling table, you need to decide appearance and size. It is necessary to take into account the possibility of upgrading the table. It is important that the table is reliable and stable in use. The presence of drawers will create additional comfort in work
Compact homemade design will replace an industrial machine
There are three main types of router tables:
To make your own countertops, you usually use MDF boards covered with various plastic coatings, thick plywood or boards. These materials are easy to process, lightweight and durable.
Wooden structure is easy to process and use
Some craftsmen believe that a metal countertop is the most durable and durable. They are right, but such a table with an electrical appliance will become an excellent conductor, which is unsafe. The metal is also susceptible to corrosion, so it needs to be painted.
The covers of the milling tables must be smooth. They are often made of plastic or metal. These tables have perfect flat surface, which is impervious to moisture. Phenolic plastics are easy to process. This is very convenient when making grooves for aluminum profile or when drilling holes for fastening the longitudinal stop. Like MDF, plywood and boards, these materials have reasonable prices.
Branded countertops made of steel or aluminum already have holes for a specific model of router. If the manufactured countertop models are made of MDF boards or plastic, then the companies prepare only holes for the plates. Although this does not always happen.
There are holes in the base of the plate through which the router is attached with screws to its base. These plates can be made of metal, plastic, polycarbonate or aluminum. The router plate must be installed flush with the surface of the countertop. If any part of the plate protrudes above the surface, the workpieces will catch on it.
The table cover is equipped with adjusting screws or other devices for leveling the plate. It is better to choose a plate with replaceable rings. This is necessary to select the holes of the rings according to the diameter of the cutter. This makes it easier to remove chips and other debris from the work surface. milling table.
Creates convenience when selecting cutter diameter
When performing milling operations, a longitudinal stop is often needed to guide the workpiece at the desired angle. In order for the work to be done accurately, it must be even along its entire length, positioned strictly perpendicular to the surface of the table, and be easily reconfigured for various processes. The front parts of the stop can be made either solid or in the form of several overlays. To prevent chips and debris from accumulating, the side stop is equipped with a pipe. The vacuum cleaner hose is connected to it.
The front parts of the stop are in the form of several fastened overlays
The milling table can be upgraded with a frame into which the grinder will be attached. Read more about self-production You can read this design.
To make a table for a router you can use separate surface, which is fixed in wooden supports or between two cabinets. Most in a simple way To create a table top, support part and parts for a milling table, you will use MDF board or birch plywood with a thickness of 16 to 25 mm. If the plate is covered with plastic, then there will be less resistance during operation. The board, laminated on both sides, will not warp during use. In our case, in the manufacture of the milling table we used:
The structure of the upper part of the table will consist of wooden parts that are cut from a solid 19 mm MDF board. As a replacement for this material, you can use birch plywood.
1 - working surface; 2 - support base; 3 - its support wall; 4 - gusset (4 pcs., dimensions for 19 mm plywood); 5 - drawer (2 pcs.); 6 - side bar; 7 - connecting strip (4 pcs.)
Before sawing into parts, it is necessary to check the thickness of the MDF board, as often it may not coincide with the specified parameters or be defective.
The plastic pad will serve as a template for marking
The mounting holes must line up with the trim
Determining its diameter
Measurements are taken from the cut of the sole of the lining
Using an overlay as a template
There are no semicircular cutouts in the diagram.
Use wood glue or epoxy as glue.
1 - side bar for fixing with clamps on trestles; 2 - drawer; 3 - countersunk guide holes; 4 - front wall of the stop; 5 - self-tapping screw with countersunk head 4.5x42; 6 - scarf; 7 - support base
1 - outer side pillar; 2 - internal stand; 3 - rear pillar; 4 - base
1 - side stand; 2 - support on wheels; 3 - bottom of the structure; 4 - inner panel; 5 - rear pillar
Allows the cutter to process parts as much as possible
A pre-drilled hole will make the process easier
The holes of the table top and the plate must match
Rotary and side stop will make the process convenient
The part is made of plywood
Wing nuts are used for convenience
Allows you to fix parts when processing small fragments
When working on a milling machine, accidents and injuries are possible from contact with the rotating mechanisms of the cutter and particles of workpieces flying off from it. Before starting the router, you need to remove all tools from the surface of the tabletop, clean its surface from debris and fine particles. You can also equip the milling table with a protective screen that will prevent particles from flying away.
While working at the table, cleaning and lubricating parts, removing protective screen and measurement of workpieces. To avoid flying particles from getting into your eyes, you must use safety glasses. This is especially true when high-speed milling or processing bronze, cast iron or silumin elements.
It is necessary to cut the cutter into the part gradually. The mechanical feed must be turned on until the part comes into contact with the cutter drill. During rotation of the milling mechanism, it is unacceptable to keep your hands close to the tool rotation zone. Before installing drills, you must ensure their reliability and strength, as well as their integrity and correct sharpening. Drills should not contain metal chips or cracks. If such defects are detected, they must be replaced.
Thanks regarding inexpensive materials and your skill can build a compact design of a milling table. This will allow you to produce parts with high-precision cutouts and high-quality processing at home.
One of the main assistants of a carpenter is a wood router. This hand tool is indispensable when wooden blank necessary:
However, when performing some carpentry work, it is not always convenient to use this tool due to the fact that you need to simultaneously hold the workpiece and operate the router. Therefore, many craftsmen resort to tricks by making a milling table for a hand router. With the help of a table, which is a reliable addition to a milling tool, you can end up with wooden elements that are in no way inferior in quality and precision to carpentry products made in professional furniture workshops on milling machines.
Homemade table for a hand router significantly increases the productivity of the tool and facilitates the work of processing wooden products. It is not difficult to make such equipment, and, in addition, unlike a standard milling table produced by various manufacturers, this table will have the dimensions, design and options chosen directly by the craftsman who makes it.
To perform any engineering work, and the manufacture of equipment is precisely one of these, it is necessary to draw up a sketch of the future machine. On it you need to indicate your vision of the project indicating the actual dimensions. Based on the sketch, you can easily select materials for the manufacture of the future structure, their quantity, determine the construction budget and stock up on the tools necessary for processing machine parts.
To build a milling table you will need:

In any case, before you start making any such table, the drawing must be completed indicating all dimensions and determining the location of the working elements relative to each other.
Let us consider in detail each step in the manufacture and fastening of each element of a homemade milling table.

1st step. To make a stationary base for the table, you will need bars and chipboard cuttings, from which we twist the legs and further strengthen the rigidity with the help of horizontal connecting panels made of plywood. In the right side part we cut a hole for the start button, which will be connected to the hand router.

2nd step. The table top is made of chipboard. We make it liftable together with a router, for which we install hinges and make an additional support base from 15 mm plywood.


3rd step. To move the workpiece smoothly along the table, for example, to cut a groove in it, a moving carriage-stop is used. We cut a groove in the tabletop for the guides of the movable stop and install a metal profile into it. You can use a guide from an old saw as a stop carriage.

4th step. We also make the longitudinal stop from chipboard and make it movable to adjust the gaps around the cutter. To ensure mobility, we cut perpendicular grooves in the upper part of the stop and fasten the stop to the tabletop with clamps. We cut a small groove in the middle to suck out chips and other milling waste.

5th step. From thin plywood we make a box with a hole for connecting a vacuum cleaner hose, which will remove dust and shavings formed during the milling process. We fasten the box behind the perpendicular stop.

6th step. We take a six-millimeter steel plate and screw it to the tabletop flush with the surface. During the fastening process, we make sure that its edges do not protrude above the tabletop, otherwise the parts being processed will cling to them. A manual router will be attached to the plate from below.
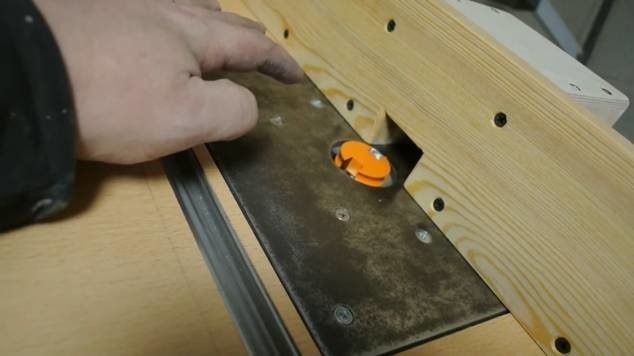
7th step. We attach the router by the aluminum base to the bottom of the plate using bolts, but do not forget to pre-drill holes for the bolts in the base. Attaching the hand tool to a removable plate rather than directly to the table saves routing depth and allows for easy cutter changes.

8th step. We are building a router lift. To do this, we use a car jack, which allows us to change the height of the cutter with maximum accuracy.


9th step. We remove the handles from the router and instead screw in aluminum guides, which we connect to the jack mechanism.

Before you start making a milling table, you need to accurately determine its design features. This article provides instructions on how to make a simple router table. For other details of the first assembly option, see the video below.
We check the reliability of fastening of all elements - and the milling table is ready with your own hands!
We offer several more models of wood milling machines made by yourself for your taste.
We offer a table design for a router with a detailed analysis of its components.
Materials and tools.
In order to make a table for a manual router with your own hands, you will need the following materials:
The following tools are also required:


An existing workbench can be adapted for a milling machine. But it is more expedient, to eliminate the influence of strong vibration during cutter operation, to make separate design, ensuring the stability of the table.
The main loads during equipment operation are transferred to the base. Therefore, the frame must be reliable and stable. The bed is understood as a fixed base on which the router is located. It takes all the loads and is a structure in the form of a table with a fixed lid. It can be made from a metal pipe, angle, channel, wood, chipboard.


It is necessary to take into account that the router itself is attached to the tabletop from below, which means that there needs to be empty space there.

The router is attached to the table through a high-strength and rigid plate to perform installation work. It is preferable to make it from metal, textolite or tongue and groove board.

The base of the router has threaded mounting holes for mounting. In case of absence threaded holes, cutting is done independently. If the task is impossible, secure the milling device using special clamps.

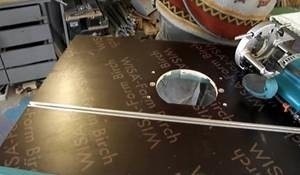
Start the work by using a milling cutter to select the shape and thickness of the mounting plate. To make it easier, straight corners on the mounting plate must be rounded with a file. A recess in the table top ensures that the plate is positioned flush with the table top.

Make a hole in the center of the plate for the tool to exit, drill holes for attaching the plate to the table. The next step is to drill holes to attach the milling device; keep in mind that the fasteners must be countersunk.


Making the base of the future milling table begins with the frame. For ease of work, the table cover should protrude 100-200 mm from the front part. Special attention When designing the frame of the bed, pay attention to the installation height of the working surface. This size is decisive for the convenience of working at the machine. According to ergonomic requirements, it should be 850-900 mm, depending on the person’s height. For convenient operation of the future milling machine, you can install height adjusters at the bottom of the support. This will allow, if necessary, to change the height of the table; if the floor is uneven, it will help to align the tabletop.
It will be useful as a working surface for a future machine kitchen countertop Soviet times. Most often it is made of 36 mm chipboard sheet covered with plastic. The wood-based material will reduce the vibrations that occur during the milling process, and the plastic coating will ensure excellent movement along the surface of the workpiece. With absence old table top apply MDF boards or laminated chipboard, with a thickness of at least 16 mm.

Choose a place for the future milling machine in your workshop; the dimensions and type of future design depend on this. This may be an aggregate machine located on the side of the circular saw, desktop version, or maybe a free-standing stationary machine.
If the use of a milling machine is not regular, reduced to one-time work from time to time, it is enough to make a small compact table.
You can make a milling machine yourself. It is a design that fits on a standard table. To work you will need a chipboard and two boards. Fasten two boards parallel to a sheet of chipboard. Attach one of them to the tabletop with bolts; it will serve as a guide and as a stop. Use the second one as a limiting stop. Cut a hole in the table top to accommodate the router. Attach the router to the table top using clamps. The compact milling machine is ready.
If you have a lot of free space in your workshop, then make a full-fledged stationary milling machine. It will be more convenient to work on it than on the desktop version
The sketch is ready. Materials have been purchased. The tool, laid out in its place in the workshop, is waiting for the moment to serve its owner. The master is also serious and is not going to grab everything at once. He will sort everything out and do everything step by step.
Stage No. 1.


Start by making the frame of the future machine. You can use the following method for making a frame. Using a grinder, cut the 25×25 profile pipe to size, then weld the blanks intended for the frame on which the working surface will be located. Weld a pipe on one side along which the parallel stop will subsequently move. Weld 4 supports to the frame.
To fix the table cover, frame the perimeter of the frame with a corner, then it will sit in the recess.
Use the second method of making a frame. It implies additional supports for the working surface. Weld stops for milling equipment in the middle of the table. The size between them should correspond to a convenient mounting of the router.
For structural stability, connect the lower supports with jumpers at a height of 200 mm from the floor.
Stage No. 2.
Paint the resulting structure. Why prepare surfaces: clean metal pipes and degrease with solvent, then prime. If there is a need to putty surfaces, apply a special putty mixture and apply primer. After complete drying, paint with PF-115 enamel.
Stage No. 3.
Cut the work surface according internal size frame, install it tightly in the corners. Then drill holes in the upper frame for fastening the table cover. Mark the tabletop itself, drill and securely connect it to the frame using furniture bolts. Table dimensions 850×600×900.
Stage No. 4.


Step back 200-250 mm from the edge and cut a T-shaped guide along the length of the working surface.
Stage No. 5.

Trim half of the milling axes. This will make it possible to almost double the distance from the sole to the guide axis, which in turn will expand the range of capabilities of the tool.
Stage No. 6.
Remove the sole from the milling equipment, mark holes in the middle of the working surface of the table for its fastening and drill them. Drill a hole in the middle of the table cover for the device. On both sides of it, drill holes for attaching the clamps of the router axes.
Stage No. 7.
On the underside of the tabletop, make a hole for the base of the router.

On both sides of the hole drilled through the hole, make grooves for installing the router axes. The size of the groove and the axis must match.


Along the edges of the grooves, use a Faustner drill (picture above) to drill holes for the hexagon adjustment bolts.


Stage No. 8.
Cut two pieces of pipe to fit the width of the large groove and drill holes in the center for the permanent bolts. They will serve as clamps for the axes of the milling device. Screw the nuts onto the bolts.

Stage No. 9.
Install hexagon bolts and nuts on both sides of the axles to adjust the plane of the milling equipment.

Stage No. 10.
Now make a rip fence. Take a small piece of plywood and cut a groove in it so that it can move along the pipe that was previously welded for this purpose. Using a jigsaw, cut three strips of identical size, where its length is equal to the sum of the length of the table and the width of the guide pipe and four plates for them in the form of stiffeners.
On strip No. 1, make a semicircular hole to remove wood waste. It should coincide with the slot in the working surface of the table. In strip #2, cut a square hole in the same location.
Cut strip No. 3 of plywood into equal parts. Attach one to the back of the strip with square hole bolts or using guides. The plywood halves should move in opposite directions. Install an aluminum guide along the upper edge of this strip.

Stage No. 11.
Fasten plates No. 1 and No. 2 together with the sides with half holes. Fasten two stiffening ribs along the edge of the resulting hole and two on the sides at a distance of 70-100 mm from the edge.
Cut a square of plywood to the size of the distance between the ribs, cut a hole in it the diameter of the vacuum cleaner hose. Attach the square to the stiffeners.

Stage No. 12.
Secure the rip fence with clamps. This is done to make it easier to move the stop. If it is intended only for a milling machine, then secure it with brackets with grooves for movement.
Stage No. 13.
Weld a bolt to a 6 mm thick metal strip. Make the clamps from wood with two grooves for two bolts.


Stage No. 14.
Install the milling equipment: insert the cut axes into the side holes of the device, put nuts on them and secure the device with pipe clamps.

Stage No. 15.


Turn the table over and use the hex key to lift up the router.
To make it easier to lift the router, it is advisable to install a lift based on a jack.

A milling machine based on a desk is considered economical and convenient option solutions. The list of photo drawings contains a table with specifications of parts by size and recommended material.

Part sizes and materials


Having a homemade or purchased milling table for home work and construction is the most necessary unit in the garage. This is a universal machine for processing modern building materials, if there is a wide range of cutters of different diameters.
It is important to know that if you have a manual router of any brand, you do not need to spend money on a branded machine. It is not difficult to assemble a milling table with your own hands.
It is customary to take strong sheet material as the basis for the design. It could be:
For each type of table, a material that is convenient for processing is selected. But it is logical to assume that the working part itself (the cover) or the plane receives the most load. Therefore it must be made of metal. Stainless steel is the ideal option.
Important! The working surfaces of the structure should not absorb moisture or the resin of raw wood.
To install a manual router, use a classic workbench or assemble a separate structure. The latter must be as stable as possible, since vibration during operation is guaranteed.
The tool itself is installed at the bottom of the table or workbench, so they provide such a position so that it is easy to remove and put back the hand router. After all, stationary milling machines are increasingly used for woodworking not on an industrial scale. In theory, nothing complicated: they assemble the stand, mount a power tool (drill, not a new router). If you try, then such an installation will not be inferior to the commercial version, because the master prepares the device for himself.

We mean the set of elements from which it is not difficult to assemble the installation on your own:
On this kind of tables, it is advisable to install the buttons necessary for turning on and quickly stopping (emergency lights). Upper clamping devices are included in the assembly plan in case of working with large parts.

There are only three of them. Milling tables are:
This is just a recess for a movable longitudinal stop or a built-in carriage. The groove is an ideal element of the table design; additional devices are used due to it. An analogue of a groove is a movable slide. They are perpendicular to the longitudinal stop, plus they are also movable.

The hand tool is mounted on a rigid plate made of steel, stainless steel, aluminum, textolite, etc. The plate itself is mounted with a recess so that it can be recessed into a level with the lid.
To attach the base of a hand router, you need to prepare countersunk screw connections.
Fixed on the table. Its purpose is to correctly feed the workpiece. Longitudinal stops are stationary. This is convenient for processing the same type of material.
Sliding stops are ideal for milling various elements according to dimensions. The quality of operation of the entire machine depends on the longitudinal stop, its stability and smoothness.
Before assembly, we study the design in parts. If there is nothing to choose from, then we buy the necessary materials for one-by-one assembly.
It is not forbidden to assemble a structure with your own hands from available materials. Everything comes into play:

It is necessary to purchase additional components if a CNC milling table is planned. But a classic stationary machine is not difficult to make from:
For work we prepare:

Before starting to purchase the material, determine the location in the workshop for future installation. When the future design will be used occasionally, then portable tables are chosen. But if there is a lot of space in the carpentry workshop, then a wide milling table, convenient for processing boards or panels of 2 meters, is productive.

By frame we mean a frame with a support, but which also houses the tabletop itself. It is customary to assemble a bed from whatever is spared. No particular preference. You need to achieve rigidity and stability.
Before assembling the frame, it is advisable to take care of the operator’s comfort. Typically, the lower part of the frame deepens 10-20 cm from the lid itself. It’s more comfortable and therefore safer.
If you study the drawings and design features, it is not difficult to fit a convenient carpentry workbench under an old router. We remember that vibration occurs from the operation of the machine, so we are considering this option if the workbench is firmly standing.
It is customary for homemade products to use a reliable, stable, motionless frame, and it is advisable to weld it from a profile, since the entire load is transferred to the base. Fits:

Only then wooden beams and chipboard.
Inexpensively assemble a milling table for occasional use from profile pipe 25x25 or 40x20. Using an angle grinder, cut the profile into 4 legs, a rectangle (frame) and lower connecting parts. All this is strictly in size.
Then the profile is welded into a frame, complementing the structure with a pipe. The latter is necessary for the parallel stop. 4-6 legs must be framed with a profile or corner. But this is after installing the table top itself. Plus, the metal frame makes it possible to pre-weld a limiter for electrical equipment.
The mounting plate must be wider than the diameter of the cutter if you plan to work with several cutting attachments. It is more profitable or cheaper to form this element from 20 mm birch plywood.
But it is more practical to work on a homemade machine with cast polycarbonate as a mounting plate. The essence of the work is this:

Start with the tabletop or lid:
Having the structure assembled, you can apply paints and varnishes, if necessary.
Parallel stop:
If the table is on metal frame, then it contains a pipe, it is necessary just for installing the parallel stop.
The easiest way to make one or more pressure combs with your own hands. Here they use dry, strong wood. For a large stationary table, a 450x50 mm comb is suitable.
To make it you will need a saw, jigsaw or band saw. This tool can be used to make bevels; an angle of 30 degrees and cuts of 50 mm are sufficient. It is advisable to make bevels on both sides of the clamp.
Then these elements need to be secured by drilling holes for installation. The finished “comb” must be polished. It is most convenient to equip clamps with threaded clamps. Thus, the auxiliary tool can be quickly reconfigured. It is better to do this on a stop, where a groove will be machined in advance for the movement of the combs themselves.
For a drive, the most important parameter is power. Manual assembly implies a motor from Soviet or Russian technology, with a minimum parameter of 500 watts.
If you succeed at homemade machine If you set the drive to be more powerful, 1-2 kilowatts, then it’s easy to work with any type of cutter. It is important that the electric motor has reinforced bearings. Then, long-term resistance to heavy loads occurring on the transverse or longitudinal axis of rotation is guaranteed.

Any type of this kind of homemade product will be more convenient if you have a metal ruler. It will help you set up the rip fence and maintain the size and angle.
On the reverse side there is a very useful recess for mounting the casing of a vacuum cleaner or cyclone. This optional equipment It is advisable to sum it up after studying the drawings.
A hand-held or stationary milling cutter is a high-risk class of power tool. The operating rules are as follows:

Assembling a milling table requires the presence of auxiliary tools, good fasteners and the required amount of material. This type of machine is a private craftsman’s dream. You need to treat the assembly as carefully as possible even at the drawing stage, deciding on the nature of the future machine, its main working element.
The milling machine is designed to perform various work on surface treatment of materials and parts. When working with large machines that are mounted on a work surface, it is necessary to use special tables. In this case, it is possible to achieve a better result, the work itself will be safer, since it is not the machine in the form of a simple manual milling cutter that is moving, but the workpiece.
It is the milling table, on which the equipment will be permanently mounted, that allows you to obtain a high-quality result. You can assemble the table with your own hands; it will be convenient to make shaped holes, groove connections with preliminary cutting, and profiling edges of various types. The work becomes simple, safe and accurate, requiring much less time. The machine can be securely mounted on the work surface; only the workpiece will move.

To make a milling table, you need to prepare the following tools and materials:
The milling table has two important parts - the bed and the tabletop. The bed is a permanently reinforced element, i.e. a frame on special supports. The main working surface, the tabletop, is attached to the top of this frame. The base is best made from chipboard, steel pipes, wooden beams. When using steel pipes individual elements structures require welding, so at home many people prefer to work with wood.
When fastening the tabletop, it must be installed securely and firmly, since various loads will be placed on it when processing parts. Overlays are used for the end part; they make it possible to give the structure additional rigidity and strength. The height of the resulting table should be approximately 850-900 mm; this value is optimal and convenient for work. For the tabletop, you can provide a special mechanism that will allow you to raise or lower the work surface to the required level. The countertop itself can be made from chipboard or an old kitchen base of the required dimensions.
Return to contents

When installing, attention must be paid to the special mounting plate. The thickness of the tabletop will be approximately 26 mm. The plate is used to prevent the cutter from flying out during operation. It is attached to the place where after final assembly The milling machine base will be installed. The thickness of the plate is not too large, but its strength is at the proper level.
It is best to make a mounting plate from metal or textolite. Its thickness should be 4-8 mm. A hole is made in the center of the mounting plate, the diameter of which is equal to the hole in the base of the machine. To secure the machine to the surface of the plate, it is necessary to provide special threaded connections on back side soles. If there are no such holes, then you need to make them yourself. Total quantity – 4.
The milling table is assembled in this way:
During work, care and precision must be observed so that the table after assembly becomes comfortable and durable, and the machine’s fastening is reliable. It is immediately necessary to provide that the milling table will have protective covers, dust collectors. If all the preparatory work has been completed, it is necessary to connect the individual parts together. The milling machine is started when mounted from below; the mounting plate is secured to the tabletop with self-tapping screws. The caps of the screws must be recessed into the material, otherwise they will interfere with the processing of workpieces, clinging to their surface.
Return to contents

When assembling a milling table with your own hands, it is necessary to mount a structure with upper clamping devices to ensure additional safety. Such safety measures are used when work is carried out with large workpieces, for example, in the manufacture of various door trims.
The clamp itself has a simple device. This is a ball bearing, it acts as a roller that is mounted in a special holding device. After this, the roller is rigidly fixed on the surface of the working milling table at the required distance. As a result, sufficiently tight clamping of the workpiece to the working surface during processing is guaranteed.
If a homemade milling machine is being made, then utmost attention is paid to the electric drive design. An important criterion is the drive power that will guarantee the execution of certain types of processing. For example, if you need to make a shallow recess in a wooden piece, you can use a motor with a power of 500 V. But such a machine is not suitable for more complex work. Therefore, it is not worth taking a low-power motor if intensive work is planned; it will constantly stall.
It is best to install the drive at 1100 V, it is optimal for any machine, not just household ones
The difference in cost is fully justified, since with the help of this router you can perform various jobs. A drive with a power of up to 2 kW makes it possible to work with any type of wood using various cutters. Drives can be stationary or manual; a special fastening system must be provided on the table.
When choosing a drive for a milling table, you need to pay attention to the number of revolutions. For a three-phase motor, a special connection diagram should be provided to ensure smooth starting and smooth operation. If such a motor is used single-phase network, then the efficiency will drop by about 40-50%.


