It's hard to imagine our life without doors. Their purpose is to freely let us through walls, limiting this opportunity for outsiders if desired: people, animals, smells or bad weather. Present in every home, these guardians of comfort and security, as if in payment for their work, often limit usable area premises due to the opening radius, and the wider the opening blocked by the door, the greater these losses. IN Lately, in construction the principle of “free planning” is actively used, when the room inside is an empty box, without load-bearing walls or other partitions. This method is beneficial both to the developer (by reducing the delivery time of the project) and to the end user, allowing him to furnish an apartment or office to his own taste and color. In this case, the question of rational and aesthetic zoning of the room inevitably arises.
An excellent solution in this case would be to install partitions, sliding doors, roller shutters or accordion doors, allowing, in addition to the lightness and functionality of the design, to significantly increase the usable area. In turn, for standard small apartments, in conditions of limited free space, this method of dividing rooms can become almost a panacea. In addition, installing glass sliding doors with a mirror base will visually expand the space and, thanks to the reflective effect, make the room brighter.
In a slider system (also called: on rollers it slides along one or two guides fixed along the wall, hiding behind one of its sides when opened. Moreover, both for installing a single-leaf sliding door and in the case of two door leaves, the installation technology remains the same and depends only on the length of the guides and the availability of space for placing the door leaves. A widespread option is when the door goes inside the wall, in the so-called door pocket or pencil case. This method, despite the additional difficulties of installation, allows you to ensure the integrity of the design of the room and protects the surface of the door from accidental damage.

In addition to saving space, a big advantage of slider mechanisms, compared to the same accordion door, is the possibility of using a leaf similar to conventional swing doors, with their huge range (as in appearance, and according to the material of manufacture). In this aspect, only the slider system can compete with rotary door, however, it is much more expensive and more difficult to install, and also takes up more space when opened.
If the walls, floor and doorway have ideal geometry, then the process of installing sliding interior doors do-it-yourself, in a certain sense, is even simpler than traditional installation, which is explained by large tolerances when mating surfaces. As mentioned above, two methods of arranging doors are used: along and inside the wall. Let's look at each of these options, understanding the installation process step by step.
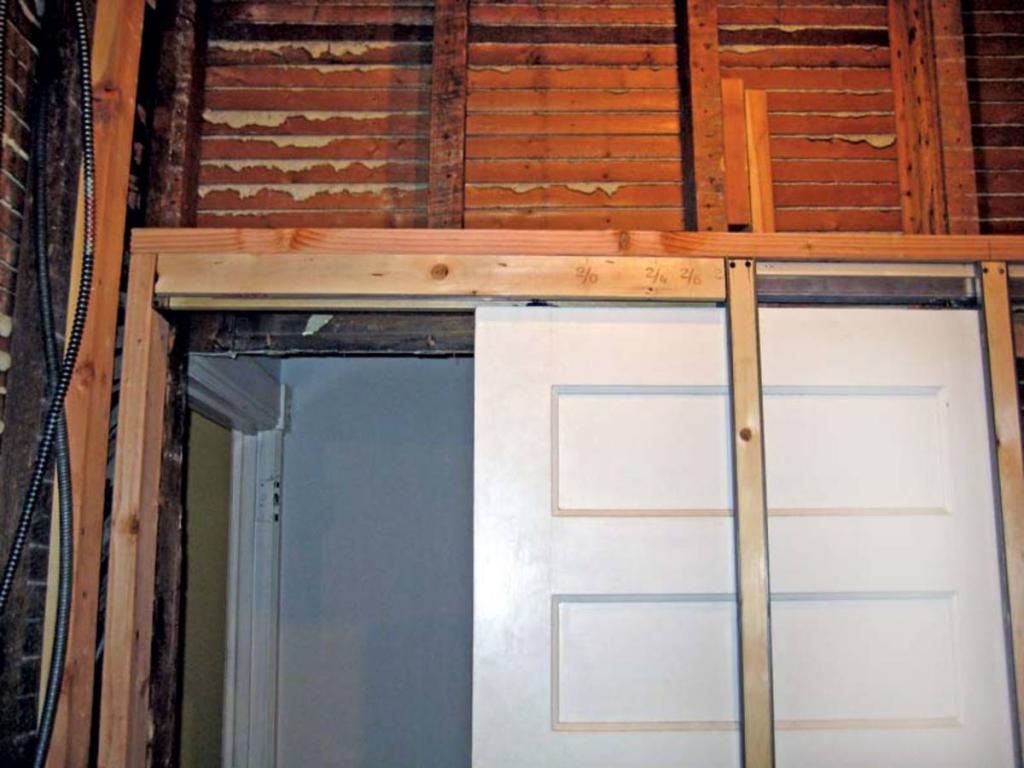
The first step is to clear the opening from old door(if installed), including trim and box. Regardless of the installation method on preparatory stage installation, it is necessary to perfectly align the walls around the doorway.
The opening for the door must have a clear geometry: the side slopes correspond to the vertical, and its upper part must be parallel to the floor and the horizon (to check, use a tape measure, building level and plumb line). The permissible difference both horizontally and vertically is no more than 5 mm along the entire length of the opening. Then, using self-tapping screws or liquid nails, additional strips are attached, on which they are mounted door frames. The resulting size of the opening must be completely, without gaps, covered by the hanging door leaf taking into account the roller mechanism. The height is selected so that, after installation, the distance between the bottom of the door and the floor is 5-6 mm, which is important for improving sound insulation.
Using a long rule, you need to make sure that the wall (in the direction the door opens) is in the same plane as the opening being closed.
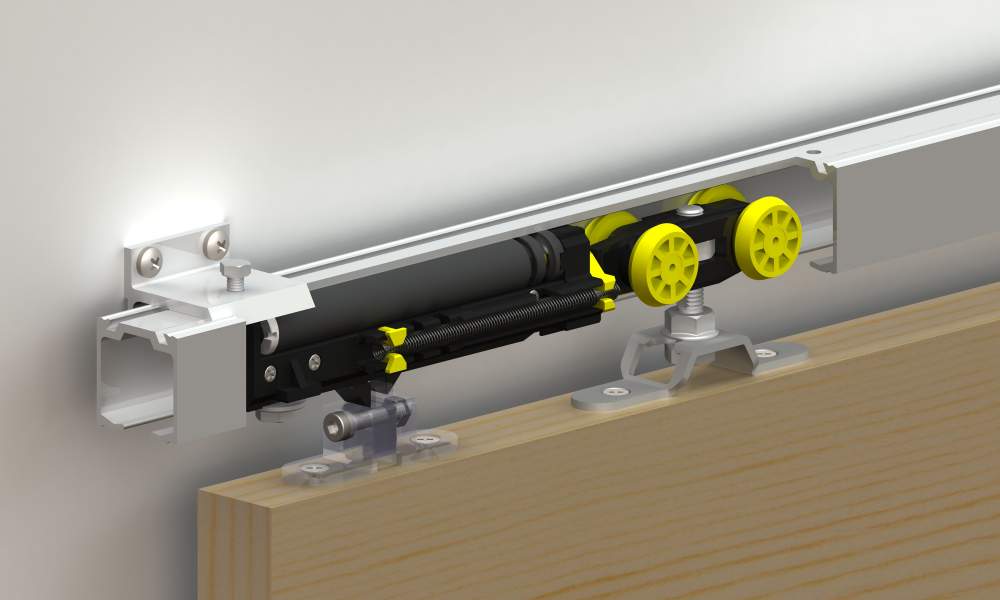
Now we proceed to install the sliding door mechanism, which is a kit consisting of a metal profile, a pair of roller carriages, a lower guide, movement limiters and fasteners. The choice of a high-quality sliding system is very important for the smooth and durable operation of the entire door unit.
When moving a door along a wall, as a rule, one (upper) guide rail is used, the length of which should be no less than twice the width of the door leaf (or better, exceed it by 100-150 mm). Manufacturers offer profiles of 2, 3, 4 and 6 meters in length, which are often equipped with notches that determine the required size of the guide to suit one or another standard width doors.


For the second installation method (using a “door pocket”), we will get acquainted with the installation instructions, which differ from the first option only in the additional, albeit very serious, amount of construction work. The very same fastening of the slider mechanism is similar to the process given above.
First you need to decide on the principle of forming a “door pocket”, and here, depending on a number of factors, there are two options:
The first method of creating a “secret shelter” for installing sliding interior doors with your own hands is preferable, since it allows you to make the frame less massive, indistinguishable in thickness from regular wall, and is most often used in new buildings, especially in “open plan” conditions.
If you are an adherent of the principle of beauty, which requires sacrifice, then you will have to work hard to expand the doorway to the required width. The main thing is to pay attention to some important aspects:
The material for creating the frame can be galvanized building profiles or wooden beams of the appropriate size, which are attached along the perimeter of the future “door pocket” in two parallel rows. When using an existing wall, you will need one row, but it will have to be installed over its entire area minus the doorway. The technology for constructing a false wall frame itself is similar to creating a partition from plasterboard and involves the installation vertical racks with a pitch of 400-600 mm, fastened together by jumpers in order to increase the rigidity of the structure. For not so much heavy doors(up to eighty kilograms) if it is necessary to form the upper part of the opening, use timber with a side width of about 50 mm, and if more high load the frame is made welded (which is hardly justified in a private house or apartment).

The space between the rows should guarantee the unhindered movement of the door leaf and, as a rule, is 20 mm wider than the thickness of the door. The depth of the niche should correspond to the width of the sash hidden in it with a small margin (5-10 cm).
Don't forget to provide space and make a frame to hide the sliding mechanism. This will require either increasing the height of the opening or using a shorter door leaf.
Next, you should mount the slider mechanism and install the sliding door similarly to the recommendations above. The only difference is that the guide profile does not need to be attached to the spacer or bracket, but directly in the middle and along the top of the slope of the door opening or support beam.
Checking, adjusting and fine-tuning the operation of sliding doors is carried out before covering the wall with plasterboard, since then, without dismantling the covering, this will be impossible.
Then handles and locks are mounted and attached to the frame facing material and carry out the final finishing of the walls.
Specialized stores offer comprehensive solutions for sliding systems, including both a sliding mechanism and a built-in unit. Its installation is almost identical to the installation of a conventional door frame, and comes down to rigidly fastening the finished pencil case to the wall or installing it in the doorway, observing the strict positioning of all components of the kit. As a rule, fastening is carried out using polyurethane foam, having a small expansion. Then they install the guides, door leaf, handles, lock, drywall and the list goes on.
When installing sliding doors, it is possible to use two sliding systems, which, located parallel, support the door leaf from above and below. This installation method allows you to withstand significant loads and is used, as a rule, when the door weighs significantly (more than 80 kg). However, for high-quality sliding in such a system, ideal symmetry of both guides is required, and the bottom rail, in order to avoid stumbling when walking, will have to be recessed into the floor, positioned at the same level with the floor covering. In addition, the inevitable debris and small objects that get into the lower profile can easily damage the rollers and damage the entire opening mechanism.

Sliding door systems require an ideal wall surface and high precision when installed, they are less reliable than classic swing doors, noisier when opening, and do a worse job of protecting the room from extraneous odors and sounds.
Nevertheless, scrupulous installation, the use of high-quality sliding mechanisms, and the installation of additional seals at joints can largely eliminate these shortcomings, and thanks to high ergonomics and stylish design, sliding door systems have earned recognition and are widely used throughout the world.
What motivates you when you create your cozy nest? The desire to stand out, to follow fashion trends or just a desire to make practical use of space? If everything together matters to you, then installing sliding doors is optimal design solution. By choosing the type of product suitable for your interior, you will create a real oasis of home comfort, where you will want to return again and again.
Thanks to the ingenuity and ingenuity of manufacturers, the range of sliding products is so large that even the most picky buyer will find something for himself. suitable option. The products are not similar to each other in shape, design, dimensions and the raw materials from which they are made.
When choosing a design, consumers pay special attention to the last distinguishing feature - material. For the production of products the following are used:
Products from natural wood– this, as they say, is a classic of the genre. They can give a sophisticated look even to simple interior . From time immemorial, good wood has been a symbol of wealth and luxury. High price The product is justified by durability, practicality, and beauty.
Wooden sliding doors are durable and reliable in operation
Doors made of glass and mirrors are preferable for rooms small area . They visually enlarge the room, making it feel much more spacious. When choosing these types of products, you do not need to worry about their fragility. They are made of high-strength materials that are not subject to mechanical stress.


MDF products are a budget alternative to wood. Over the years, they do not lose their presentable appearance and impress with their light weight and ease of installation. A significant drawback is their instability to moisture. Therefore, such products are not recommended for installation in the bathroom or toilet.
 MDF door systems are an affordable alternative wooden products
 Plastic sliding structures are no less popular among consumers. They are resistant to deformation, temperature changes, moisture, ultraviolet rays. Doors with protective decorative coating will serve for many years without requiring special care.
Sliding systems are also made of metal. Such devices can be found in pawnshops, banks, and jewelry stores. However, the imagination of designers is limitless, so they found ways to use similar products V country houses and even apartments. At the request of clients, the metal can be decorated with patterns that give the product lightness and texture.
 In private homes you can install metal sliding doors
 Sliding systems are divided into two large classes: sliding-folding and parallel-sliding. U folding structures the doors do not ride along the wall, but move to the side and fold in the shape of an accordion or book.
In parallel-sliding systems, the blades move along a vertical surface. According to installation methods there are:
Sliding doors can be single-leaf or double-leaf. The canvases move along a vertical surface on rails in one or different directions. Compartment designs are perfect for bedrooms, living rooms, kitchens, balconies, and closets.
 You can install sliding doors yourself
 Installation of this type of product is quite simple and is quite within the capabilities of a novice master. You can put them either during repair work, and after. The main requirements are a smooth opening and the ability of the wall to withstand the expected load.
Along with a huge number of advantages, this system has negative aspects. Considering that the canvases move tightly along the wall, it is impossible to place furniture near it.
In addition, compartment products do not protect the room from sounds and odors. This is due to the design features. To prevent the doors from touching the vertical surface, small gaps are provided on both sides.
Cassette products, like compartment ones, can be made of one or two doors. The peculiarity of this model is the presence of a niche in the wall where the canvases are rolled up. The cassette design provides a high degree of sound insulation due to the fact that it is possible to install seals around the perimeter of the opening.
 Cassette sliding door provides high sound insulation
 Speaking of disadvantages cassette doors, then the most significant of them is the installation of the structure only during repairs. The second disadvantage of the model is the installation of a false wall under the pencil case at the expense of additional centimeters of space.
Cascade structures consist of one or more doors and are considered a type of compartment doors. The number of guides corresponds to the number of panels that, when opened, are assembled on one side of the vertical surface.
 Cascade door - a type of sliding door
 Installation of this model is not easy. It includes many parts that require high-precision installation. Only experienced craftsmen can handle this work, because there is practically no room for error.
There are two large groups of devices.
A hanging device is called load-bearing beam, to which the U-shaped guide is fixed. It is along it that the door leaf or, in technical terms, a hanging door moves on rollers.
Installation of such a door assumes that the floor covering remains intact. Only on the right or left side of the opening is a roller mounted from below. It rides along a groove made in the lower end of the blade. The main function of the roller is to prevent vertical deflection of the product during movement.
 Suspension system design
 Install suspension system won't be a big deal. Installation is carried out in several steps:
Suspended structures perform a purely symbolic role interior partition. They do not protect the room from odors and do not provide adequate insulation from noise.
Rail structures are used in closets, dressing rooms, bedrooms, and living rooms. This type of mechanism is represented by two rails located at the top and bottom.
 The rail system is characterized by high strength
 This design is characterized by durability. The door is firmly fixed in a vertical plane and does not allow smells and noises to pass through. The imperfection of the system is that cleaning is difficult, since the bottom rail periodically becomes clogged.
After weighing all the pros and cons of each system, choose the most suitable one for yourself and begin the step-by-step installation process.
When assembling sliding structures, make sure you have the required tools and materials. To work you will need a whole set:
Armed with everything you need, move on to the next block of work.
Install a multi-leaf structure, mirror doors or large weight products can only real professional. A novice master, having taken on such responsibility, is capable of making many reckless actions, which will later prove costly.
Therefore, if this is your first time encountering sliding structures, start from the very beginning simple option– assemblies of compartment doors. If you purchase a ready-made kit, you will save a lot of time and effort. The kit contains all the components for installing the sliding system, including fittings.
When starting work, you should be extremely careful and careful. The whole process begins with preparing the opening. The quality of installation depends on how accurately its measurements are made.
The height of the opening is determined in several places: the right, middle and left sides are measured. Its width is measured in the same way. Then check how perpendicular and straight all sides are. When installing platbands, measure the thickness of the vertical surface in several places and in the corners of the opening.
 The height of the opening is measured in several places
 To avoid mistakes when installing sliding doors with your own hands, carefully follow these instructions. Break the whole process into blocks and gradually move from one to another.
Empty the box from cashing, remove the old canvas and door hinges, and then dismantle the box itself. However, you can leave it alone if it holds well and does not interfere with the doors moving freely on the rails.
 At the first stage, the old door frame is dismantled
 If necessary, eliminate the curvature of the walls, seal the gaps and cracks with putty.
The contours of the opening should be smooth, so make sure that there are no bricks or drywall sticking out anywhere.
Check how parallel and horizontal the part of the opening is from the top to the floor covering. Maximum maximum deviation up to 5 mm permissible. This is also mandatory for the sides of the opening. Here the tolerance is a maximum of 0.5 cm per 2 m.
After dismantling old box a new one is installed. It is leveled with small wedges. Adjust the angle of the structure relative to flooring and vertical surfaces by moving or pressing the wedges.
 Wooden wedges are used to level the door frame
 Secure the box with screws. When working with a screwdriver, you must be extremely careful so as not to damage the product.
After placing the box, place the door against the opening and mark its top border. Repeat this action again, placing the product in the opening. This is only necessary if the floor is not very level.
 Installing the Top Rail
 If the straight line turns out to be horizontal, measure 0.7 cm from it and draw another line. A wooden beam will be installed on it in the future. To fasten the beam, take enough screws so that it fits tightly to the vertical surface.
The rail is fixed to the lower end of the beam. First, it is slightly screwed on one side. To accurately determine the location of the screw, the thickness of the leaf is divided by two and added from 0.3 to 0.5 cm, which are necessary for the smooth movement of the sashes. Follow the same principle on the other side.
 Before fixing the guide, make sure it is straight.
 Before the rail is finally fixed, make sure that the gap between the canvas and the wall is sufficient. Also pay attention to the straightness of the guide. No kinks or curvatures should be allowed, otherwise the structure will not work properly.
Moving on to installing the sliding door rollers, insert the bolts into the carriages so that they protrude slightly from the hole. Run the carriages into the rails prepared for them and make sure that they move smoothly.
 The next step is to install the carriages
 Stoppers should be installed at both ends of the guides to prevent the canvas from leaving the rails. In this case, make sure that the rubber shock absorbers are directed inward.
To make a recess in the lower end of the sash, step back 1.5 cm from its edge on both sides and drill one hole with a radius of 3.5 mm and a depth of 2 cm. Between them, in the center, select a groove for the guide.
 A groove for the guide is selected in the center of the sash
 The depth of the recess should be 1.8 cm, and the width should be 0.3 cm greater than the width of the guide, which is a flag or a knife. Taking into account that it is not easy to make a completely even groove, it is recommended to mount two slats or a profile in the shape of the letter “P”.
Moving two millimeters away from the side borders of the sash, fix the fasteners to the carriages exactly in the middle. Important point: The semicircular cutouts on the brackets should be directed toward the wall.
You won't be able to install the door alone, so call someone to help. Once you find an assistant, start doing the following:
To hide the rails at the top of the opening, platbands are used for decorative purposes. The lock and handle are installed at the end.
The above instructions can be used as a guide for installing guide rails. When installing this model, there is no need for decorative finishing. Instead, an additional false wall is installed.
 When installing cassette doors, a false wall is installed
 The distance between the false wall and the vertical surface is approximately 10 cm. It is calculated based on the thickness of the sash, the gaps on both sides and the size of the profile.
The profile frame does not require reinforcement, since most of the load falls on the wall. But if you want to give the structure rigidity, then install wooden blocks inside and secure them with self-tapping screws.
Installing sliding doors is not a very complicated process, but it requires certain skills in construction. If you are not confident in your abilities, invite better than the master. This way you can avoid double work in case of an error or save an extra penny.
Sliding door systems occupy special place in the design of premises. Their functions combine several advantages - convenience, efficiency and originality. The installation of such doors differs significantly from the installation of conventional swing models. You can get acquainted with the principles and features of installing sliding systems by reading the section - installing sliding interior doors with your own hands: assembly video for non-professionals. 
Do-it-yourself single-leaf sliding door installation
Designers do not skimp on ideas, developing new models of sliding interior systems. They may vary in the following ways:

Double sliding doors made of translucent glass between the kitchen and living room
Sliding doors, the top guide of which is attached to the ceiling, visually increase the height of the room. Designs that do not involve a bottom rail will maintain the unity of the floor covering of the entire room. 
IN open position The cassette sliding door leaf is located in a niche inside the wall
When purchasing sliding interior systems for DIY installation, make sure that standard equipment is available. It includes:

Double sliding doors with double row of top rails
The model of roller mechanisms and their number depend on the weight of the door leaf. If you purchase a door without a set of fittings, ask what its weight is.
To install sliding interior doors with your own hands, there is no need to have special tool. For DIY installation you will need the usual “standby” kit:

White wooden sliding doors with glass inserts
As for accessories, you can stock up on a number of wooden wedges and a square beam measuring 50 or 40 (mm) for attaching the guides.
As can be seen from the video, even a non-professional can install a sliding interior door with his own hands. As soon as desired design The door has been selected and the appropriate components have been purchased, installation can begin. 
Sliding doors as an element of space zoning in the interior
The most popular models for do-it-yourself installation are sliding interior single-leaf doors. The assembly and fastening of such doors is relatively simple, and at the same time they have common installation features with other types of sliding doors:

Step 1: taking measurements of the doorway

Step 2: assembly of the door structure and pseudo-frame
When you decide to install a door model that moves along the wall, plan the arrangement of furniture and accessories so that they are not in the area of the door movement. 
Schematic representation of the movement of a sliding door along a wall

Step 3: installing the pseudo-box in the opening, aligning it vertically and horizontally

Step 4: Attaching the Top Rail

Step 5: attaching staples to the upper end of the door leaf
Don't skimp on accessories! Choosing sliding mechanism for interior doors, make a choice in favor of quality products. This determines how softly, silently and how long the mechanism will function. 
Step 6: Installing the Roller Carriages in the Top Rail

Step 7: Adjusting the Position of the Roller Carriages

Step 8: Attaching the Bottom Guide Rail
Sliding systems with a sliding door inside the wall. Do-it-yourself installation specifics
For interior sliding systems, the doors of which are “hidden” into the wall, the installation technology is somewhat different. This does not concern the basic principles of assembling and fastening the sliding mechanism, but rather the calculations and preparatory work for constructing a false wall. The door will be rolled into the niche of this wall or a cassette will be installed (if you purchased a door with a cassette block):

Step 1: arranging the frame for the double wall partition

Step 2: designing a space inside the wall for the sliding door to move

Step 3: covering the false wall with plasterboard and finishing
When determining the installation location of the limiter on the top rail inside the cassette, do not forget to take into account the thickness of the decorative trim that will frame the opening. 
Schematic illustration of the location of the door leaf inside the wall partition

Step 4: sliding door, sliding inside the wall
Installing sliding doors with your own hands is a process that does not require professional skills or effort. Enough to have minimum required tools and feel free to begin installation yourself. Accurate measurements, following the recommendations - and your room will be transformed by a functional and stylish sliding door. In addition, self-installation will “balance” the costs of purchasing structures that are more expensive in price than swing analogues.
There is probably not a single person who is completely satisfied with the dimensions of their home. No matter how much space there is, for some reason there is always not enough. Installing sliding doors will help free up space at least a little, which also look very attractive and modern, giving the room some zest. These doors can be customized to suit any style. If their design is well chosen, they can become a chic addition to the interior.
Before you move on to installing sliders, you need to weigh the pros and cons. Like all other designs, sliding doors are not perfect. They have their own advantages and disadvantages, due to which their installation in some conditions will be impractical.
Let's start with the advantages:
At correct installation such doors open very easily;
They are a wonderful way to disguise a room; they can fit perfectly into the interior;
They will not receive damage from hitting the jamb in a draft;
The main thing is that they take up virtually no space when opened. Such doors can go behind a closet, sofa or any other furniture or decorative element, however, for this, the interior items must be located at some distance from the wall.

It seems that sliding doors are good for everyone, but, as usual, things cannot happen without a few fly in the ointment:
The biggest drawback of slider doors is the impossibility of a tight fit, which is why they practically do not become an obstacle to smells, sounds and light. The movement mechanism simply does not allow the canvas to press against the doorway. That is why they are not used as entrance or balcony doors;
It will not be possible to hang pictures or mount switches, sockets and other electrical elements on the wall into which the door leaf is hidden or onto which it runs;
If selected hidden design, then you will have to periodically clean the niche, which is very problematic to do. To make this process a little easier, you can make one of the walls removable, for example from plasterboard.

So, the disadvantages do not frighten you and the decision to change the interior doors has been made. Where to start? First you need to decide on the type sliding design.
All sliding doors can be divided into two main groups:
1. Parallel sliding.
2. Sliding-folding.
Each of these types differs in assembly technology, fittings and has its own design features.
Parallel sliding doors can have one, two or even several leaves. Usually the number of sashes does not exceed four, and the entire length of the opening is divided equally between them. The most common subtype of parallel-sliding structures are compartment doors, which are a single-leaf or double-leaf slider, the operating principle of which is similar to compartment doors passenger cars. They are distinguished by ease of installation and higher, in contrast to other options, sound insulation properties.
Installation of single-leaf sliders will not cause any special problems even for a person completely unfamiliar with construction work, but multi-leaf structures are complex. That is why in this article, intended more for non-specialists, we will consider the simple process of installing single-leaf sliding doors.

Another option is pencil doors. When opened, the doors go into a special niche built into the wall. If it is not possible to arrange a hollow part in the ceiling, the canvas can be disguised as plasterboard partition, hiding the mechanism.

Sliding-folding structures consist of several sections, usually four to seven, folding together like an accordion book. Such doors are well suited for zoning a room and are indispensable for narrow corridors.

Speaking about sliders, we must not forget about the so-called rotary doors, which can either open in any direction or move in any direction. The leaf of such a door can rotate 360° around its axis; it is neither right nor left. This makes them convenient to place in narrow rooms with limited space.
If a hidden structure is chosen for installation, then you need to make sure that there are no chimneys in the wall where you plan to install a “pocket” for the entry of the sash, ventilation holes, hidden electrical wiring, as well as water and heating pipes. Generally in finished wall making a niche is very problematic, so if it is impossible to do this during construction or major repairs, then it is better to use a camouflage panel made of plasterboard applied to the wall.
When buying a door leaf, do not forget to take into account that when closed it must also cover part of the doorway, at least by 50-70 mm, otherwise the cracks will simply catch your eye. Moreover, if it is mounted only on the top rail, its weight should not exceed 50 kg. It is also necessary to ensure that the door has somewhere to move away, that is, that the length of the wall on which it fits is greater than the length of the movable door.
Be sure to make sure that the ceiling and floor are parallel. A deviation of 1 mm per 100 cm is allowed. Large non-parallelism can lead to misalignment of the entire structure and its jamming during operation.
If the door is planned to be installed in wooden or plasterboard openings, they should be reinforced with a metal frame made of channels, corners, or attached for a guide metal beam. This beam must be attached to load-bearing walls using anchor bolts.
Handles and locks for sliding doors are chosen to be of a hidden type, otherwise they will interfere with the full opening of the door.

So that when working you are not distracted by such trifles as searching stores for suitable fittings or a missing bar the right size, it’s worth being fully prepared in advance. You will need:
1. Of course, the door leaf itself.
2. Wood block, the length of which must be at least twice the width of the sash, and the width and height are equal to 50 mm.
3. Set of fittings for sliding doors. Typically it includes rollers, an upper and lower rail, travel stops, carriages, a decorative strip for masking the rollers and rail, two extensions, two trims, handles and locks. For each leaf you should purchase two rollers, and if the weight of the door leaf exceeds 75 kg, then four.
4. Anchor bolts.
5. Self-tapping screws.
So, installation of interior doors. Let's break the whole process into several stages:
1. First you need to measure the upper border of the door leaf, placing it against the wall adjacent to the opening. This is done in a closed and open position in order to prevent possible unevenness of the floor. From this line you need to measure another 70 mm upward and draw a horizontal line at this level. This is where we will place the main mechanism.
2. We attach a wooden beam to the marked line, so that its middle is located exactly above the upper corner of the opening from the side open door. This must be done as tightly as possible, without leaving the slightest gap, even if you have to bend the beam to make the connection.
3. We proceed to fastening the upper guide rail. The location of its outermost hole is calculated as follows: the thickness of the door leaf is divided exactly in half and 5 mm is added to this value. Now the guide is attached on both sides with self-tapping screws without the slightest bend; for this, the previously found distance to the hole is set aside from the most protruding point of the wall. After this, you need to make sure that the door leaf moves freely along the rail. It should not touch either the wall or the opening.

4. We insert the assembled carriages inside the top rail. There is no need to apply any lubricants inside the guide to facilitate their movement. If the movement of the carriages is difficult, it means that either during their assembly or at the stage of installing the guide, some mistakes were made, for example, the rail was not laid straight, but with a slight curvature. After ease of movement is achieved, we install stops along the edges of the guide.

5. Move on to the bottom groove. In order to make it, on both sides of the lower end of the sash, at a distance of 15 mm from the edge, we drill holes with a 6.5 drill to a depth of 20 mm. Now we select a groove across the entire width of the blade, the width of which should be a couple of millimeters greater than the width of the guide knife, and the depth should be 18 mm. Alternatively, attaching two slats or plastic profile at the bottom of the door, with a distance between them slightly greater than the width of the flag.

6. We hang the door on the guide. First, we attach fastening brackets to the upper end strictly in the middle of its width, so that they are not visible after installation. We roll the outer carriage to the first bracket and connect them by hanging the cutout on the adjusting bolt, so that the nut and washer are on top of the bracket. We tighten the fastening.

7. Slightly tilting the bottom of the door towards you, insert the guide flag into the lower groove.
8. Install platbands.
The video below will demonstrate the main stages of installing hidden sliding interior doors.
As you can see, the installation technology interior sliding doors It is not particularly complicated, and if you really want to, you can do this work yourself. If you want something extravagant, original design, then it is better to turn to professionals who know the intricacies of this process.
Sliding doors - perfect solution for small rooms. Such designs do not hide space; moreover, they look very original and non-standard. In this article we will talk about the features and types of such doors, and also tell you how to install a sliding door with your own hands.
Such designs can be classified according to various criteria. For example, depending on design features, sliding interior doors are divided into:
Doors can also be made from different materials, the most popular are wooden and glass structures. This factor is important if the system is to be installed by hand. For example, to install the simplest wooden door you will need a guide with one channel, as well as two carriages with rollers. In case of installation glass door you will have to stock up on a large amount of materials, namely, prepare a lot of roller mechanisms, since heavy glass puts significant pressure on the entire structure.
If glass sheets are poorly secured, they run the risk of falling and breaking, so it is recommended to mount them using two rails: top and bottom. This installation method will ensure good stability of the door. In this case, the sliding mechanisms themselves are fixed between two plates lined from the inside with special rubber pads.
There are two types of sliding door systems:
The external sliding mechanism allows for a variety of door movement options, so you can choose the one that suits you best convenient way. To close a very wide doorway, it is recommended to use systems with four leaves, where the internal leaves will open towards the external ones.
Before installing a sliding door, you should familiarize yourself with their classification by type of fixation. Depending on this characteristic, three types of structures are distinguished:
Before installing sliding interior doors, it doesn’t hurt to familiarize yourself with the pros and cons of such structures. First, let's look at the advantages:
Such designs are not without their disadvantages, among which are the following:

Regardless of the mechanism of action and fastening, all sliding doors consist of the same type of elements. These include guides, roller mechanisms, as well as the door leaves themselves. In addition, various decorative details, fasteners, extensions, as well as various accessories in the form of locks and handles are used. The work of installing a sliding system can be described step by step.
The first step is to apply markings to the wall in those places where the structure will subsequently be installed. Using these markings as a guide, guides for sliding doors are fixed to the surface. If the system has lower hangers, they can be embedded into the floor to get rid of the threshold. In this case, you will have to make a gap in the thickness of the floor covering, but you can plan everything in advance and fix the guides on the concrete screed before finishing the floor.
Important: during the installation of profiles, be sure to check their horizontalness using a building level.
The next stage is the installation of the upper guide profile. This profile must be fixed strictly above the lower one, and its position can be checked using a control line. The installation height of the top profile should be equal to the height of the door itself and take into account a small increase of 1.5-2 cm. This increase is needed to ensure gaps between the door leaf and the surfaces of the ceiling and floor. Please note that the guides must be mounted strictly horizontally so that the structure stands level and does not move spontaneously.
As for the length of the guide profile, this figure should be equal to double the width of the leaf and take into account an increase of 5 cm for normal door movement. If the system has a door closer, you need to leave a reserve for it.
When installing normally wooden structure profiles can be fixed with brackets, but if we're talking about about a heavy glass door or solid board, it is better to further strengthen the system with wooden beams. First, such a beam is mounted on the wall, and subsequently a guide profile is fixed to it.
If the wall in the house is lined with bricks or consists of monolithic concrete, then dowels should be used as fasteners. In case of plasterboard wall, in its frame you need to equip an additional profile in advance, and install the guide directly on it. It is recommended to use drywall anchors.

The next step in installing sliding doors is to attach brackets to the leaf that will hold the door on roller carriages. Such brackets are mounted according to the instructions and are located on the sides of the upper end. Optimal view holders for all types of sliding systems, with the exception of the accordion design, are considered to be clips that are attached to the sides of the door. In the case of glass sheets, they are used metal fastenings with rubber gaskets between which the glass is fixed. These clamps eliminate the need to drill holes for fasteners in the glass door.
When installing an accordion door, special brackets with a rotating roller are placed on each section.
During the installation of the holders, the doors can also be equipped with handles and locks if they are needed. Then, when sliding system will take its place and be adjusted, it will be possible to install the lock response mechanism. Please note that during installation hidden systems, handles and other fittings must be recessed into the thickness of the door leaf.

The next step in installing a sliding door with your own hands is the direct installation of the door leaves. This type of work is best done together. One person will hold the door while the second moves the carriages into the grooves of the guide profiles. If the door serves as an interior partition and the profiles are mounted from wall to wall, the rollers for the sliding door are inserted into the groove in advance through a specially provided window. After this, the holding brackets at the end of the blade are connected to the anchor extending from the carriage.

To prevent the carriages with rollers from falling out of the grooves of the guide profiles, you need to install stops. As such limiters, special plugs in the shape of the profile are used, as well as studs, which are installed in the guide in designated places.
Tip: to prevent the door from making loud sounds when opening, choose stops with rubber stops. Such details will also prevent the moving elements of the system from deteriorating too quickly.
The trims on the sliding door are mounted in order to protect the mechanism from dust and various contaminants. Another function of such details is decorative. Platbands are used to give a neat look to systems with an open mechanism; they are not needed for interior doors.
The platbands are mounted on the wall using brackets, but you can fix them on the guide profile with special latches.

The last stage of installing a sliding door is to check the result of the work and adjust the system. If on initial stage When installing the door, the guide profiles were fixed strictly horizontally; the door leaf should remain level and not move anywhere on its own. In this case, the adjustment process will not take much time. It will be enough to check whether the door fits tightly to the restrictive structure, whether the door leaf moves parallel to the floor, and whether there are unnecessary gaps where the door comes into contact with the wall. At the very end of the work, you also need to check whether the shutters move easily and freely along the guides, whether the fittings work properly, and whether all parts are well secured.
Sliding doors, photo:


