Before starting the construction of a future driveway for a car at the dacha, first of all, you need to decide on its dimensions, which ideally should be 2.5–3 meters. Too wide a driveway is hardly justified on a small summer cottage, when it is desirable to save meters. On average, the length of a car is about 2.5 meters; accordingly, the length of the drive should be four meters. Based on this, the dimensions of the site are 3.5 by 4 meters.
An example of covered parking in a country house
After preparing your check-in plan, you can begin to calculate the cost building materials. To do this, you need to decide what kind of driving surface will be used: asphalt or concrete. If you decide to use an asphalt surface, then keep in mind that you will have to tinker with it a lot, additionally using an asphalt roller. You need to put in a lot of effort and time to complete your own high-quality styling asphalt. It is for this reason that many people choose to work with a simple concrete surface.
First of all, you need to make a foundation pit for the covering. You need to mark the race itself with pegs, then dig a pit about 20 centimeters deep. Then you should level the surface of the base for the coating, and then make formwork around the entire perimeter of the pit. Formwork can be constructed using plywood or ordinary boards.
 Scheme of installation of formwork for pouring a parking lot
 Then you need to make a base of sand approximately 10 centimeters high. The amount of sand that will be used is about 4 cubic meters. For arrangement concrete base it will take four cubic meters of concrete mixture. When building a driveway, you will also need to arrange its drainage, which can be done using a specially designed basalt mesh.
But if you approach the construction of this important system professionally, then drainage pipes are used. From the point of view professional construction, then you need to lay drainage pipes: they are hidden in the sandy base.
The top layer of the sand base is made from a dry cement mixture.
After preparing the pit, you can start pouring sand into it. The result should be a coating approximately 8 centimeters deep. Now you need to spill the sand with water and compact it.

To do this, use a special tamping tool or an ordinary wooden block with two handles. The remaining sand must be mixed with dry cement mixture (just one bag is enough). After this, pour the resulting cement-sand mixture onto the first layer, level it and tamp it.
At this point we can say that the work on the foundation of the future race has been completed. After this, concrete work can be carried out.
A basalt drainage mesh is laid on the finished base, after which the concrete layer can be poured.
Should be leveled upper layer coating, and it is better to do this using a special construction vibrator. To ensure that water flows down the sides, the coating is then profiled. This surface drainage of water is done using special plastic trays.

The entry for the car at the dacha is ready. Now he needs to let it sit for 20 days.
Many summer residents are concerned that upon arrival they have nowhere to park their car. For this reason, if you are going to travel to your dacha by car, sooner or later you will have to make space for the car on the site.
A situation in which there is no parking for a car occurs very often - the car is simply parked near the site and overheats in the hot rays of the sun. You need to get rid of this inconvenience as quickly as possible.
Read also
Crafts from plastic stoppers for garden decoration
The arrangement of the parking lot, first of all, should take place on the dacha plot itself, and not somewhere beyond its border. In addition, parking should not cause any inconvenience, for example, not interfere with children playing on the playground. It should also not interfere with the passage of other vehicles near your home. Therefore, first you need to equip the entrance to the parking lot, and then just begin its construction.
The entrance to the site can be equipped with swing or sliding country gates, which can also be installed after all construction work Location on. You can even build a temporary entrance to your dacha using crushed stone with your own hands. When the entrance to the site is ready, you can begin construction of the parking lot.
You will need for this:
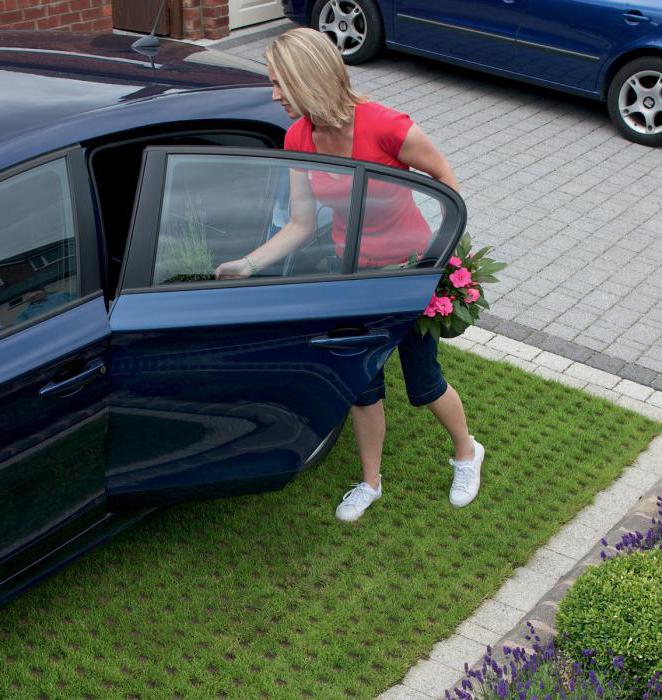
For good parking, you will need a flat and spacious space where it would be convenient for you to drive your car. For its construction, a variety of materials can be used, which will be most convenient for you to use, taking into account the characteristics of your summer cottage. One of these options could be ordinary. It is possible to plant it in any soil, and from time to time just mow it with a lawn mower.
 Example of a lawn parking lot for a car
 To arrange the site, you can use sand - it is not only a very convenient material, but also very economical. Its consumption for this kind of work is small: the sand layer for the site should be approximately 10 centimeters. You can also save money by using gravel for this purpose. They just need to evenly cover the parking area. Both materials allow you to reliably get rid of water. Even prolonged rains will not be a problem for the site, because the water in the parking lot practically does not stagnate.
Decorative elements can be a low fence that can be used to surround a parking lot, a small border planted nearby ornamental plants or flowers. But the most important thing is that it will protect the car from the sun, rain and snow. By the way, equipping a canopy is much easier than constructing a parking lot itself.

In the case where the place for the car is located near the building, it is not difficult to shelter it from weather troubles. Several metal pipes are installed in the corners; the “roof” itself is made of the material you prefer, for example, tarpaulin or film. When parking is located on considerable distance from buildings, it is necessary to make an arch, which then needs to be strengthened and covered with roofing materials.
The most reliable and durable construction option would be the construction of a permanent parking lot with the development of a project and the possibility of its subsequent decoration. You can not waste time on design, but simply draw the proposed layout of the future parking lot, while simultaneously calculating the costs and the amount of material that will be spent.
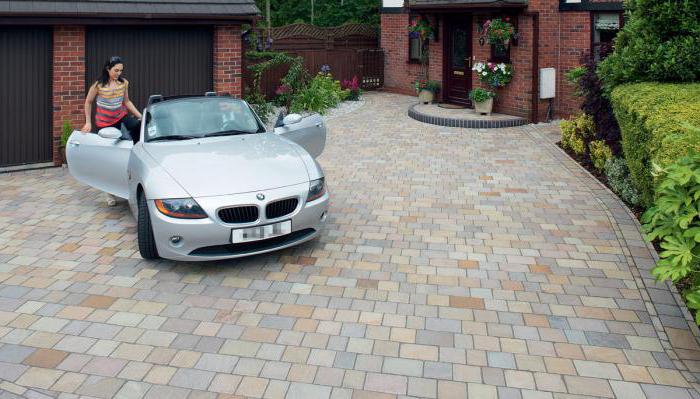
 This is what a permanent parking lot looks like on the site
 To build a permanent parking lot you need to purchase:
A home parking lot should be built in such a way that moisture from precipitation does not accumulate on it, forming slush, then this good option. This is only possible if it is perfectly flat. The formation of depressions and pits on the surface coating should not be allowed.
When starting to lay the coating, you need to have the appropriate knowledge and professional skills, have special equipment and tools, which can require considerable expenses. But a fundamental parking lot for a car at the dacha fully justifies all the money invested in it, because it will be used for many years.
Those who often have to travel to their dacha in their own car sooner or later have to decide where to permanently park their car during dacha work. Where is the best place to park the car? The option of parking it on the street (outside the property line) is not very attractive - the car will disturb the neighbors, which will naturally cause complaints. And no one can vouch for its integrity. If you drive a car onto the site, sooner or later deep furrows will appear from the wheels, requiring constant leveling. What is the best way to overcome such a serious problem?
The optimal solution that can make dacha life easier and resolve several issues at once is to install a parking area for a car at the dacha. By organizing one, you will put an end to worries about the safety of your iron friend, in addition, you will be able to protect it from the sun (the upholstery material will not fade) and precipitation (hail will not be able to damage the car’s coating).
How to make a platform for a car in the country? Where to start arrangement? Of course, first of all you should choose appropriate place, meeting all the necessary requirements. It must be level, without a significant slope. If there is one, then each time you will have to put the car on the handbrake and place limiters under the wheels. And constant worry about whether these precautions are working does not add to optimism.
It is best if the slope of the parking lot is very small. This will make it easier for a car to enter there and at the same time prevent rainwater from stagnating in the area. To prevent precipitation from accumulating on it, the parking lot should be located slightly above the level of the site.
Before the actual construction of the site, you should decide on its size. When you have only one car, you can limit yourself to an area measuring 5x2.5 meters. If the car is quite large (minivan or jeep), plan 6.5x3.5 m. When your personal fleet consists of a couple of cars, you will need twice as much land.
The next point is to decide on the type of parking for the car at the dacha. What could it be like? There are two main options: closed (in the form of a garage) or open (fully or with a canopy).
Let's talk about open type parking lots It can be considered one of the most budget options. Making such a parking lot at your dacha with your own hands is not at all difficult. All that is required is the preparation of a pre-designated place, the delivery of materials and the actual work. In terms of time, this option is also the most economical. Before you have time to look around, your car will already be neatly parked in your country yard.
When we talk about a closed type of parking, we mean a real garage. To build it, you will need much more resources - finances, effort and your personal time. The tasks facing the owner are digging a pit, thinking through and drawing a construction plan, and importing all the necessary building materials. In cases where there are no construction skills, you will have to resort to a team of craftsmen, which entails additional (sometimes quite significant) costs.
What is a semi-closed type of parking? This refers to a carport. This solution can be considered an intermediate option between the construction of a full-fledged garage and a conventional open area.
As already mentioned, a slight slope is necessary to ensure that the parking area always remains dry and clean. Take care of the durability of your parking lot - prepare the base for it correctly. What is the sequence of actions when building a platform for a car at the dacha with your own hands?

Having prepared the base, you can begin coating. You should first decide on its composition - based on your own financial capabilities and taking into account the practical qualities of each option. We should not forget about the need for a competent aesthetic solution - the design of the site must be organically combined with the overall design style of the site and the country yard.
What are the quality requirements for the material chosen for coating? The main ones:
What is eco-parking? This concept has become very popular these days. It looks like a rigid, durable plastic lattice laid on the ground and seeded with special lawn grass. This option is one of the easiest to construct. As a rule, additional care for such a parking lot is not needed.
The grille perfectly withstands the weight of the car, does not bend, and has excellent properties regarding water drainage and resistance to low winter temperatures. Speaking about the durability of this parking option, they call it about 25 years.
What needs to be done to create such a nice eco-parking site on your site? The sequence of actions is as follows:
Please note that in dry summers your eco-site will need periodic watering.
This option for a summer residence is one of the most economical. This solution will be especially practical in the case of soil subject to periodic swelling. What kind of crushed stone is best for parking? After all, as you know, it can be different. For example, you should never choose crushed limestone - the bottom layer will soon be crushed into powder, and after rain it will turn into real dirt. A place filled with such gravel very quickly becomes overgrown with weeds and takes on a sloppy appearance.
It is best to choose river gravel. Its advantages are that it does not cake, is not susceptible to crumbling, and easily allows water to pass through. The bottom layer should be made from a fraction of 30-60, the top 5-20. Fine gravel laid on top will perfectly fill all the voids and level the surface.
What is the procedure for constructing such a parking space? The algorithm of actions is as follows:

The main advantage of such a gravel parking lot is the absence of water that will flow through a layer of small stones. The disadvantage of this design is the need to periodically clean it from fallen leaves that get clogged into the space between the rubble.
If the soil on your site is prone to swelling, a parking space made of water will be even more suitable for them. Water will easily flow away and evaporate due to the gaps between the tiles. Such a parking lot will warp much less compared to the rest of the site.
The tiles chosen for these purposes exist in a wide variety of colors and textures. Its size is from 30x30 to 50x50 cm, thickness is about 4-5 cm. An excellent option in in this case can become granite paving stones.
When going to the store, calculate in advance the number of required units of purchased material, based on the area of the future parking lot. Tiles should be purchased with a reserve of about 3-5 pieces in case they are damaged during the working process.
In addition to granite paving stones, you can use natural stone or clinker bricks. The increased density of such paving slabs is given by the addition of a vibration compactor.
Here is a brief technology for tiling the chosen parking space:

If the soil of your site is quite calm and not subject to swelling, then a concrete platform for a car in the country may be a good option. This material is quite durable, but the work is performed in the following order:
To obtain the working material, you will have to buy cement, the required amount of sand and a sand-gravel mixture. Using a shovel, the mixed concrete is spread in an even layer on top of the sand cushion.
If for some reason you decide to refuse to build a full-fledged garage and plan to limit yourself to an open area for your car in the country, it is advisable to provide it with a canopy, thanks to which your car will be protected from rain, ultraviolet rays, hail and snow. It is most convenient when parking is planned next to some building, for example, a barn or country house. The continuation of the roof of this building will be an excellent carport.
First of all, several pipes are installed to form the structure. After this, a roof is erected from a variety of materials - awning, film, tarpaulin. A good solution would be sheets of slate or tin left over from the roof.
In the case where the site is located separately, a major arch will need to be erected for the canopy. Remember that too high a height does not contribute to the stability of the structure, which will be shaken by the wind and slanting streams of rain hitting the car. The optimal height of such a canopy can be considered 2.3-2.5 m.

What is the procedure for constructing a carport yourself?
In each of the cut pieces of polycarbonate we drill holes for fasteners. Their diameter should be slightly larger than that of the selected screws. This is due to the ability of polycarbonate to expand in hot weather. If the screws are tightly seated, such a roof may burst at the fastening points. When starting to fix the sheets with self-tapping screws, each hole for fastening should be covered with a rubber gasket.
Comfortable country holiday brings joy to tired residents of megacities, charges them with energy and optimism. But even on vacation, you should not forget about your faithful assistant, who ensures the transportation of the entire family and accompanying cargo to the dacha and back. Your car also needs a comfortable and reliable place to rest. Making it yourself will not be difficult.
Based on the technology of work and the final result, country sites are of the following types:
The cells serve as protection for grass roots and allow plants to develop despite mechanical influences. This type of parking lot needs to be mowed periodically, and due to frequent vehicle entries, “bald” ruts can form on it. Installing a lawn parking lot will not be cheap, since plastic gratings are quite expensive. The service life of this type of parking is more than 25 years, if you periodically sow grass into the cells.
Crushed stone is poured in a layer of 15-20 cm, so as to form a platform raised above the surface. The site is leveled and carefully compacted in order to avoid slipping of the car's wheels. If desired, you can make special tracks for wheels from concrete tiles. If the site is large around the perimeter, it is recommended to install a curb to prevent crushed stone from “spreading” across the site.
Before pouring concrete, the site is surrounded by formwork, crushed stone and sand are poured onto the bottom and carefully compacted (possibly with spillage). The depth of sand and crushed stone filling depends on the type of soil and is 20 cm on ordinary soils, 30-40 cm on clayey soils. The width should extend beyond the parking lot by approximately a meter.
The first layer is laid out 5-7 cm thick, and gravel can be added to it to increase strength. A reinforcing mesh is laid on the first layer of concrete, so that its edges do not reach the boundaries of the pit. The second layer is filled with a more liquid concrete solution, which is easier to level with a rule or a trowel. Ironing can be done on top of the concrete by spreading cement chips evenly.
It takes 2-3 days for the site to harden, after which the formwork can be removed. It’s not worth driving the car into it earlier than in a month. The total thickness of the concrete layer for passenger cars must be at least 10 cm, for jeeps and semi-vans - 15 cm.
Choose a durable one for parking paving slabs 4-5 cm thick, paving stones, clinker bricks or natural stone. It is better to choose large-sized tiles (30x30cm, and 50x50cm), made by vibration pressing - they are the most durable and resist mechanical damage well, and are also resistant to temperature changes. It is done from the corner, tightly pressed to the base and tapped with a rubber mallet.
It is necessary to leave a small distance between the tiles, the uniformity of which is ensured by installing special beacons. After laying, all seams between the tiles are tightly filled with a mixture of sand and cement. To prevent sprawl, the edges of the tiled parking lot are protected by a dug-in curb.
Depending on the parking space, sheds can be adjacent to the house or standing separately. To build attached canopies, you will need to install support pillars only on one side, but for free-standing ones - along the entire perimeter.
The material for supports can be either metal pipes and profiles, as well as wooden beams, concrete or brick. The strength of the structure is given by deepening the supports into the ground and filling them with concrete. Wooden supports pre-treated protective composition. The supports are installed starting from the corners, carefully aligning them vertically using a building level.
Along the top of the supports, longitudinal beams are laid and secured, to which the rafters are attached at a distance of 0.8-1.0 m. from each other. The selected roofing material. Such materials can be used ondulin, polycarbonate, corrugated metal sheets, and tiles. It is also possible to use traditional roofing felt, but in this case you must first lay boards on the rafters.
A parking lot built with your own hands can be decorated in accordance with the overall design of the site: install a fence, provide lighting, install original figures and elements around it. However, all design delights should not interfere with the entry/exit of the car, as well as access to it for washing and minor repairs.
At the dacha, it is not always advisable to equip a garage for transport. A more affordable and easy-to-implement solution is to arrange your own mini-parking. It can be of two types:
Lawn grass is used as a covering. Used to prevent tire marks and damage to vegetation. Before making eco-parking on the lawn, the top layer of soil is removed, a cushion of crushed stone is laid out, and then a geogrid is laid. The fertile layer is poured into it and sown. Such parking is environmentally friendly, does not disturb the appearance of the green landscape, and looks organically against the backdrop of ordinary lawns.
Before making a parking lot for a car at the dacha using this method, you also need to remove the fertile layer and fill it with crushed stone. On soft soils, it is advisable to familiarize yourself with how to lay and use this material for the purpose of soil reinforcement. Sidewalk curbs are installed along the perimeter of the site, then backfilled with crushed stone (layer thickness - 15 cm or more) and compacted.
Placed on compacted crushed stone or sand-cement bed, using rubber mallet or other similar instrument. A sidewalk curb is laid around the perimeter.
City residents who have a dacha in the suburbs, as a rule, get to it by personal transport. This is where the question arises of how to properly equip part of the territory for a parking space where you can park your car.
Parking a car on the lawn or turning the soil into mud after rain is not a bright prospect. In such cases experienced summer residents It is advised to concrete the area for the car with your own hands.
This method of solving the problem with parking lot equipment can be classified as a budget option in comparison with paving stones, which also require base preparation. In addition, over time, street tiles can crack, and weeds grow in the seams between them, which disrupts the appearance of the site and the yard at the dacha looks sloppy.
At first glance, it may seem that doing such work with your own hands will not be easy, but as practice shows, even an inexperienced beginner can fill a car parking lot.
The concrete platform for the car is installed in several stages:
Before concreting the site begins, it is necessary to outline the boundaries of the area where the solution will be poured. It is important to take into account that all surface irregularities (pits, bumps) will disrupt the dense structure of the screed and increase material consumption - therefore, the territory must be leveled.
If a parking space is adjacent to a driveway for a car, it must be laid at a certain angle. This is done in order to rainwater flowed outside the site and did not stagnate on the screed.
At the first stage, it is necessary to remove all debris, clean off the grass and compact the soil thoroughly. Then you will need to prepare the materials and tools necessary for the work. To complete all the work correctly, we will need:
Without formwork, it is impossible to pour quality concrete on a flat surface. This special design creates the shape of the screed as it dries. On a horizontal section, wooden walls fixed with pegs will prevent the construction mixture from spreading, and concreting will be reliable.
 For an optimal platform for a car, a layer of mortar of 15 cm is enough, and such an amount of material will not create much pressure on the formwork, so it does not need additional strengthening.
According to the technology, it is necessary to concrete a horizontal surface using beacons that fix wooden boards. Drywall profiles (UD) are usually used as beacons. It is attached to a cement-sand mortar (proportion 1:4), which is laid out in slides and a metal profile is pressed into them. It is better to do this kind of work under the level.
Installation of formwork beacons is carried out in a certain sequence.
First of all, pins made of round metal rods are installed in the corners. A thread is stretched between them and lowered to the notches previously applied to the pins.
The first thread is knitted randomly, and the next one is secured in relation to the previous one using a level. A pair of transverse threads are knitted between the stretched guidelines. Beacons will be installed in the places where they touch. It should be remembered that the optimal distance between beacons is 0.5 m.
 In order to properly concreting a parking space, a sand cushion must be created. It can be formed both before and after the installation of the formwork; there are no strict restrictions here, and the sequence of this procedure is carried out at the discretion of the master.
The only difference is that when laying agrofibre, which holds sand and allows moisture to pass through, it is better to do this with ready-made formwork. It is more convenient to spread the fiber like a “pillowcase”, which will prevent the sand from moving under the weight of the concrete.
Before you start laying agrofibre, you need to thoroughly compact the sand and spill it with water. Level the sand embankment with any available device, which is usually used when installing paving slabs.
Before reinforcement begins, a 5 cm layer of crushed stone is poured on top of the sand cushion and compacted. The reinforcement strengthens the concrete structure, so when constructing a parking area for a car, you cannot do without it.
The reinforcement procedure is performed in one of two ways. You can knit metal rods with wire, creating a kind of honeycomb. An easier way to strengthen the solution is to purchase a special grid.

The second option is suitable for places that will not be subject to heavy load. For pouring foundations, exclusively metal rods and wire are used. Concreting the area for the car is carried out using reinforcing mesh with rods, the cross-section of which ranges from 8.5 mm to 10.5 mm.
 The reinforcement frame is made directly at the installation site. The rods are placed crosswise and tied with wire at the joining points. It is strictly not recommended to use welding to connect the reinforcement, as it will deprive the frame of mobility. This, in turn, will lead to deformation and damage to the reinforcing base.
After laying the reinforcing mesh, concrete begins to be poured. As mentioned earlier, in some cases the solution is mixed with crushed stone, and sometimes the crushed stone is placed under the reinforcement independently, and only then they begin to pour concrete.
To fill the platform for a car, it is necessary to prepare it in compliance with the proportions. According to the technology, cement, crushed stone and sand are mixed in a ratio of approximately 1:3:2.5 (to obtain at least m300). It is worth taking cement grade M400. To facilitate labor-intensive process It is better to use a concrete mixer. First, pour a bucket of water into it (water should be 2 times less than cement) and fill in the remaining components. You need to stir until the sand is evenly distributed in the total mass.

To do this, the rail is installed on the beacons and pulled along the poured mass, pulling the excess solution towards itself. For better effect, this procedure is repeated several times until the surface becomes perfectly smooth.
If crushed stone was poured in front of the reinforcing mesh, then there is no need to add it to the solution. Cement and sand (1:1) are poured into a concrete mixer, and then water is added until the required consistency is obtained. In this case, the solution should not be as thick as in the first option, otherwise it will not seep through the gravel layer. The entire filling procedure is identical to that described above.
In order to prevent the concrete from cracking due to temperature changes due to expansion, it is necessary to leave grooves.
They are cut with a grinder afterwards or done with a tool until the solution hardens.
The flooded area can be covered with film so that the water does not evaporate and the concrete does not crack. In case of hot weather, the stove should be additionally watered.
After a couple of days, when the solution has finally set and does not stick, it is necessary to clean out all the bumps and bumps using a construction spatula. At this point, concreting the parking space can be considered completed.
Entrance to the site and a parking area for a car or family car park is an important element for any dacha. It would seem that there is nothing difficult in creating a parking lot: I filled up the area fine crushed stone or screening or laying paving slabs over a layer of compacted sand - and the parking lot is ready.
Reinforced concrete pipe at the entrance to the site.
But what to do when the site is located in a swamp, and peat soil does it compress noticeably even under your feet, not to mention the wheels of a car? The author got just such a peat plot of land. The garden house on the site was built on reinforced concrete piles, which cut through the peat to a dense compacted sandy soil.
But why not spend money on installing piles and casting a grillage slab as a parking lot? The author decided to use another, less well-known method of construction on peat to construct a parking lot on peat - the method of constant “floating” loading of compressible soil.
First of all, it was necessary to prepare an entry into the area, which is separated from the road by a deep ditch. We laid a reinforced concrete pipe with a diameter of 40 cm in the ditch, filled it with sand, compacted the sand and laid a layer of crushed stone on top.
Instead of reinforced concrete pipe You can use a two-layer corrugated plastic pipe: it costs less than concrete, and you can bring it on the trunk of a car.
Plastic pipe can also be used to repair a broken concrete or asbestos cement pipe. In this case, a plastic pipe of smaller diameter is inserted into the lumen of the damaged pipe. At the entrance to the site, concrete curbs were cast to keep sand and crushed stone from falling into the drainage ditch. The ends of the curbs were beveled at an angle of approximately 15 degrees to prevent damage to the car body when steering onto a relatively narrow gardening road.

Plastic pipe at the entrance to the site.
A pit for a parking lot, lined with geotextile, with 110 mm drainage pipes in filters.
The method of loading peat allows you to get out of an insoluble situation not only during the construction of parking lots, but also when, due to the great depth of peat, it is impossible to build a traditional foundation for a house. The method of loading peat soil was widely used in the USSR during the construction of roads in swamps and is currently used in the construction of houses on marshy soils both in Scandinavia and in Malaysia, where there is also a lot of marshy soil.
The loading method as a method for constructing foundations on peat soils is recommended in paragraph 6A23 SP 50-101-2004 “Design and installation of foundations and foundations of buildings and structures.”
Construction using the classical loading method is divided into two stages: in the first, lasting 8-12 months, the peat is compacted under the influence of a mass of sand. After compaction is completed, construction of the foundation begins. However, we are not building a house and we can afford not to wait for the peat to compact.
To create a constant soil loading, we create a “bath” in peat 0.3 meters deep and 5 by 9 meters in size, which we fill with sand and granite screenings. A significant mass of bulk materials (approximately 15 tons) will compress the peat soil as much as possible and create a strong, stable surface. To prevent sand from gradually filtering into the spongy layer of peat under the influence of precipitation, we cover the dug pit with durable road geotextiles with a density of 200 g/m2, which allows water to pass through well, but retains sand particles or screenings. At the bottom of the pit, trenches were previously dug for laying perforated drainage pipes with a diameter of 110 mm, which will quickly drain water from the surface of the future parking lot into a roadside ditch.
We cast reinforced concrete curbs at the entrance to the site.

Drainage pipes We connected it with tees and led the drainage pipe at a slope into the ditch, protecting the lumen of the pipe opening with a double layer of geotextile secured to the pipe with wire in a polymer sheath. Now neither frogs nor algae will clog the pipe lumen. We covered the drainage pipes in the trenches with a layer of crushed stone. On top of the backfill, we rolled out rolls of chain-link mesh, which will serve as an improvised road net to evenly distribute the loads from car wheels. Thanks to the mesh, which absorbs loads, the parking surface will not sag too much under the weight, even with a relatively small backfill thickness.

Laying stone slabs on the parking lot surface.
Filling the parking lot surface with crushed stone.
Construction of a parking area on a slope.
We laid another layer of geotextile on top of the mesh. Then we poured a layer of sand and granite screenings on top of it. This bulk material is one and a half times cheaper than crushed stone, has a higher density, and thanks to the admixture of fine sand fraction, it is perfectly compacted under the influence of precipitation. To speed up the process, the screenings can be compacted using a vibrating platform. But we used another method of compaction: driving back and forth across the site in a car. It took us two dump trucks to fill the pit.
The screening can be left as is as finishing coating parking spaces: it allows water to pass through perfectly and has an attractive appearance(all paths in the parks of St. Petersburg are made of pink granite screenings). The only drawback of screenings is that particles get stuck in the grooved shoe soles and are carried into the house. To get rid of this problem, you can lay stone limestone slabs on top of the screenings or fill it with a layer of small crushed stone.
It must be said that the peat indeed continued to compact under the relatively small load of the parking lot for several more years. Therefore, after three years, we had to add another screening dump truck to the parking surface.
If desired, the entire loading of peat could be done with sand, and a reinforced concrete slab 12 cm thick could be cast on top of the sand, as we did at another site.
When constructing another parking lot on a slope, to prevent the sand-gravel mixture from slipping, it was necessary to first strengthen the slope with piles, connecting them with a reinforced concrete grillage box, and only then fill it with soil.
Parking based on a monolithic reinforced concrete slab on top of a sand loading pad.
Canopy support posts driven into a pile foundation.

The canopy over the parking lot is very practical: it protects the car well from rain, hail, snow and scorching sun rays. One of the most popular canopy designs is a welded metal frame made of profile pipes, covered with translucent polycarbonate sheets.
Metal profile pipes with a cross section of 60 x 60 mm served as the base for the canopy. We painted the metal posts with Hammerite paint and cast them into drilled reinforced concrete piles 2 m deep, which will serve as the foundation for the canopy.
The strength structure of the canopy frame was reinforced with braces, which impart rigidity to the entire structure of the canopy and save material on additional support posts.
To further strengthen the structure of the canopy posts, the posts are reinforced with welded profile pipes of smaller cross-section, which remain after cutting the parts for the canopy roof frame.
We welded the canopy roof rafters from T-shaped profile pipes. This design will provide them with greater rigidity.
Strengthening the steel frame of the canopy
Additional reinforcement of the racks with the remains of profile pipes.

The improvement of any suburban area begins with the formation of paths and platforms. Their layout sets the basis for the entire landscape. That is why special attention should be paid to their construction.
Do you need to make parking for your car on the territory of your private home? Tired of the constant dirt and potassium in your yard? In this case, you should look towards the rubble platform. After all, constantly parking the car outside the site is not a way out of the current situation. In some cases, the roads there are narrow, making it difficult to pass each other comfortably. Besides all this, it would be nice to have a flat and clean area near the summer kitchen. Here you can always organize picnics with barbecue or shish kebab.
The “Dachny Uyut Plus” company is ready to solve all these problems. We are ready to organize a very convenient and practical platform for a car made of crushed stone on your territory.
The estimated cost of constructing parking lots and crushed stone platforms on a garden plot is shown in the table below:
The technology for forming this place is based on making a recess. Its dimensions directly depend on how many layers of materials you plan to lay there. After the recess for the future site of crushed stone at the dacha has been made, you should begin to compact it. Performed this operation using a special vibrating plate or a regular roller.
The next step is to create a sand layer. In most cases, its thickness is about 15 centimeters. The sand must be well leveled over the entire area in an even layer and then compacted. In order to avoid mixing of layers, a special universal material is used - geotextiles. After this, you can safely begin filling the hole with crushed stone. The thickness of this layer is also about 15 cm. Well, the stone itself should be about 2-5 centimeters.

The separation of the crushed stone platform under the car is carried out using a curb stone or wooden beam. It all depends on your preferences.
However, a site for a car in a country house made of crushed stone requires the most basic initial stage - drawing up the layout and markings. You definitely need to thoroughly think through the configuration itself, calculate the quantities of all the necessary materials, and only then begin to manufacture it. This is done so that in the future you do not encounter various problems, and you do not have to redo everything all over again. Also, a site for a car in a dacha made of crushed stone should have a slight slope and a drainage system. Thanks to this, you can safely drain surface water. Compliance with all these simple rules will allow you to create a reliable and durable parking lot at your dacha using crushed stone with a curb.
Specialists of the “Dachny Uyut Plus” company are always ready to come to you, make all the necessary measurements with calculations and build a high-quality and inexpensive site for crushed stone. We provide an official guarantee for all types of services provided. Many of our clients have already been able to verify the quality, reliability and durability of our work.
It is extremely difficult to give a final price for these types of work over the phone. This is influenced by many different factors:
If we talk about the average cost, then a parking lot made of crushed stone at a dacha (15 cm of sand, geotextiles, 15 cm of crushed stone) will be 1,500 rubles per 1 square meter (including all materials).


