An important element The walls and partitions of any house are considered. Without them, it will not be possible to divide the building into separate rooms. Particularly in demand today are Knauf partitions, which consist of a steel frame and plasterboard sheathing. This popularity is due to the excellent quality and affordable cost of the products. All its characteristics comply with European standards, and installation is so simple that anyone can handle it.
Knauf partitions have found their application due to their advantages:
These partitions have also gained popularity among consumers due to other qualities:
As mentioned above, this system consists of plasterboard panels, internal filler and fasteners. Additionally, it can be equipped with specialized plates that have increased fire protection. The covering can be one-, two- or three-layer. In this case, plasterboard, hyposavo fiber or aqua panels are usually used.

As for them, they come in guides, rack-mounts and load-bearing types. Together they form a frame, with each element having a standard length of 3 or 4 meters.
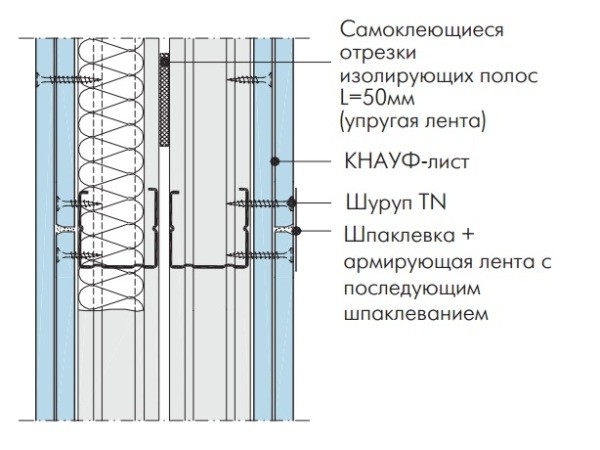
If necessary, the profiles can be lengthened by overlapping them. They are fastened with self-tapping screws: four on each edge and two in the middle. The outer side of the guide element is covered with insulating tape. Self-tapping screws are placed on it every 300 mm (maximum pitch - 1000 mm). The partitions are attached to the supporting structures with dowels.
Depending on the purpose and device, Knauf partitions are divided into types: W111, W112, W113, W118. The W111 system is a frame covered with single-layer material on both sides. Sound insulation is placed inside it. The guides are attached to the supporting structures using dowels. After attaching the drywall, the joints between the sheets are filled with a special compound.
The W112 partition includes a frame, two layers of sheathing on both sides and sound insulation between them. The structures are also fastened with dowels, but additional fixation of the second layer of sheathing is necessary. This has a positive effect on fire resistance and sound insulation.

The W113 structure consists of a frame and three layers of skin (on both sides). There is non-flammable sound insulation inside. Such a wall has serious cladding, so it must be fastened at a maximum interval of 50 cm.
The W118 partition has the same structure as the previous design, but it is reinforced with a galvanized sheet 0.5 mm thick. It is also equipped with a reinforced profile frame, 0.6 mm thick. The article presents drawings of Knauf partitions and how they are attached.

Depending on the purpose, Knauf profiles are divided into rack-mount, guide and arched. Rack structures have a cross-section in the shape of the letter “C” and are located vertically in the frame. The racks are installed together with guide profiles of the appropriate size. The ends of the products are equipped with two holes through which utility lines are laid (hidden in the walls). They are attached to the guides with self-tapping screws, which are easily centered thanks to the longitudinal grooves.

They have a cross-section in the shape of the letter “P” without curved edges - this allows you to get a tight fit of the racks to the upper and lower elements. They are needed not only for fastening rack parts, but also for installing jumpers between them. During manufacturing, holes are drilled in the structures into which dowels are inserted during installation.
Knauf partitions, the technical characteristics of which are indicated in the table below, can also consist of arched profiles, which serve as the basis for curved structures. They are made of different radii, and the shelves can be wrapped inward or outward.
During installation, structures can be sheathed different types plasterboard sheets. The sheathing is attached to metal profiles and can have 1, 2 or 3 layers. This is necessary when the building is subject to deformation loads.
Conventional plasterboard is used in rooms with normal humidity and differs from other types gray. The composition includes protective additives that make the material “breathable”. When manufactured, it is painted green.

Special additives are added to fire-resistant sheets that are not subject to combustion. The material is different pink. Combined gypsum plasterboard combines the properties of fire-resistant and moisture resistant types. It can be recognized by its green coloration with red markings.
There is nothing complicated in this process, but it is important to know some rules and nuances. First you need to prepare the walls, floor and ceiling. They will need careful alignment so that the guides fit without distortion. The next stage is applying markings, the evenness of which is checked by a level, a cord and a plumb line.
After preparing the base, begin installing the profiles:
The result should be a frame with square cells 600x600 mm.

Installation of the Knauf partition also includes laying a soundproofing layer. Most a budget option allows you not to use Additional materials, however, if necessary, you can put foil-based insulation or mineral wool inside the frame.
After installing the frame, laying insulation and engineering communications You can start attaching drywall. For these purposes, special screws are used. You should know that the sheets can be connected arbitrarily, but a checkerboard order is preferable. Thanks to this, there will be no cracks in the structure and a stronger connection will be obtained.
Partitions “Knauf” - designs with original elements, characterized by durability and high quality. Their use will allow you to erect a small building in a short time.
The concept of “dry” construction implies the design and construction of lightweight frame-sheathing structures, the installation of which requires a minimum of money and physical effort. The German company KNAUF produces high-quality materials necessary for such work and is a kind of legislator that sets standards for this type of activity. The KNAUF system for plasterboard partitions is known to any professional builder. Now it’s our turn to get to know these structures in more detail.
The company’s specialists classify all frame-sheathing partitions into several standard types:
| Horizontal sectional view | Construction type |
| C 111 – frame made of steel profile, covered with 1 layer of plasterboard sheets. | |
 |
C 112 - steel frame covered with gypsum plasterboard sheets in 2 layers. |
 |
C 113 - a “single” frame made of steel profile covered with a three-layer gypsum plasterboard covering. |
 |
C 115 - KNAUF partitions of this series have a double metal frame and 2 layers of cladding made of gypsum plasterboard sheets. |
 |
C 116 – double steel frame with space for communications. The structure is covered with 2 layers of plasterboard on each side. |
 |
C 118 – “Intrusion protection”. The frame is made of steel profile and sheathed with gypsum board in 3 layers. Galvanized steel 0.5 mm thick is laid between the sheets. |
 |
C 121 – partition frame made of wooden beam covered with 1 layer of gypsum board. |
 |
C 122 – wooden frame with a two-layer gypsum plasterboard coating. |
For the external coating of frame structures, the KNAUF company produces a durable high-tech gypsum-based material that does not contain toxic substances, is absolutely non-flammable and has excellent performance properties. Drywall is produced in the form of KNAUF sheets (GKL) - rectangular elements consisting of a reinforced gypsum “core” covered with cardboard that has undergone special treatment.
Depending on the area of application, these sheets have different properties and are divided into types:
In addition to this classification, KNAUF sheets have differences in the type of side edge. All features of the material are indicated by markings that are applied to each sheet.

Features of the partition frame
Next constituent elements frame-sheathing structures of the KNAUF system are metal profiles– strips of galvanized steel with a thickness of 0.5–0.8 mm. These products add strength to the frame, but do not add to its overall weight. Let's consider what kind of profile is needed for a plasterboard partition, which will be made using the KNAUF system:

The design features of KNAUF systems require strict compliance with all manufacturer’s recommendations regarding their installation. The company’s specialists pay great attention to the characteristics and quality of the fastening material used during assembly. frame partitions their drywall.
To connect the profiles to each other, it is recommended to use screws (self-tapping screws) for metal LN 9 and LB 9 (piercing and drilling). To fasten Knauf sheets, self-tapping screws of the TN and TB type with a length of 2.5–4 mm are used. The guide profile is attached to the ceilings with simple or anchor dowels measuring 4, 6, 8 or 12 mm.

1 - LN screw; 2 - LB screw; 3 - TN screw; 4 - TB screw
The design of a partition made of plasterboard from the KNAUF system is very simple, and for its installation all you need is simple tool, which is included in any “home” set:
KNAUF specialists have developed step-by-step technology installations plasterboard systems, implying a strict sequence of execution of all work. So let's consider brief instructions for installation of plasterboard partitions:
This short review plasterboard systems developed by the famous German company KNAUF is a kind of instruction that must be followed when installing partitions. Additional questions issues that arise during your work will be carefully reviewed by our experienced specialists. Rest assured, we will give you an answer that will provide a “pleasant” result in such a difficult task as home renovation.
Partitions made of plasterboard sheets (GKL)
Sets of materials necessary for the construction of partitions The consumption of materials is given per 1 sq. m of partition (based on a partition measuring 2.75 m x 4 m = 11 sq.m without openings and cutting losses).
1. Values in parentheses are given for the case when the height of the partition exceeds the length plasterboard sheet . 2. *Depending on the type of sheet, packaging, etc. 3. ** Not required when connecting profiles special tool using the "cut-and-bend" method.
Frame installation
| ||||||||||||||||||||||||||||||||||||||||||||||||||||||||||||||||||||||||||||||||||||||||||||||||||||||||||||||||||||||||||||||||||||||||||||||||||||||||||||
Today, plasterboard is the most popular material for finishing partitions, decorative installations, niches and arches in rooms. But it is worth noting that these structures need strong support. Wooden or profile frames are used.
Knauf PPRs are in greatest demand today. The frame of such a base is exclusively metal, and the installation itself is made of sheets of plasterboard. But manufacturing and installation require compliance with certain rules in order for the structure to be complete and reliable.
Material for thermal and sound insulation
Knauf technology – installation plasterboard partitions– involves the use of practical and high-quality materials: profiles, drywall sheets, screws, cutters and putties.
The installation of PPR partitions gives good results, because no irregularities or protrusions are formed at the junction of the racks and guides. This provides additional savings, since there is no extra costs for finishing mixtures.
Installation of Knauf plasterboard sheets requires the use of moisture-resistant materials. It is important that the manufacturer indicates the PPR indicators on the moisture-resistant packaging. The range of such products includes five standard sizes, which speeds up the construction of plasterboard installations. If it is planned to enhance heat and sound insulation in a room, then builders recommend using mineral wool.
It is worth noting that Knauf fasteners and hardware products are made from durable appearance plastics, and metal parts are treated against corrosion.
A standard set of metal profiles includes prefabricated parts for frames (guides, load-bearing and rack parts). The length of the profiles is 3-4 meters. If the length of the frame is not enough, then it can be increased without any problems, you just need to take into account the standardized dimensions of the sides of the profile. Extension is carried out using the overlapping method. But the craftsmen claim that its length should not exceed the height of the edge of the side profile.
 Partition installation technology
 If this connection is equipped additional elements, then the overlap is also twice as long. To install such profiles, self-tapping screws are used, holes for which are made along four edges and two in the middle. Be sure to glue the spacer tape onto the outside profile. This foam rubber tape insulates the joints.
The distance between fasteners depends on the frame design, but cannot be more than one meter. Professionals recommend taking a step no more than 0.3 meters. The structure is secured using dowels and self-tapping screws.
The products of this company are distinguished by durable service and high quality, therefore the installation of such partitions must be carried out at the proper level. . There are several rules that are recommended to be followed to achieve excellent construction results:
 PPR partition, reinforced using the described technology
 There are several types of partitions, depending on how many claddings are present on the product:
 Single-type, double-layer partition
 If structures are installed simple type, then additional materials are not needed. But if desired, the gap between the wall and the frame can be filled with a special material with soundproofing or insulating properties.
Master class from the manufacturer:
The master claims that price policy such materials is not at all an indicator of their quality. To get an excellent soundproofing material, it is enough to use egg cartons, and the heat in the room will best help preserve mineral wool. Also acting as insulation is the foil base, which, on the one hand, perfectly retains heat, and on the other, repels it.
- This ready-made solution made of plasterboard and insulation, which come with fasteners. They are easy to install and are famous for their high quality and fireproof properties.
In contact with
Alfons and Karl Knauf are brothers. Both were educated as mining engineers and, due to the nature of their activities, became particularly interested in natural material– plaster. Having studied its properties, they decided to use them in order to speed up, reduce the cost and improve the quality of some construction processes.
The implementation of their project fell on time economic crisis. It’s as if time itself was helping the future bigwigs of the construction industry. In 1932 they founded the company "Reinische Gipsindustri und Bergwerksunternemen".
Having collected Required documents and having received an indulgence to develop a gypsum mine in Schengen, the brothers opened a plant in the city of Perl. There they began to produce dry construction mixtures based on natural gypsum for plastering surfaces.
In 1949, in the city of Iphofen, which is located in Northern Bavaria, the Knaufs established a plant for the production building mixtures based on gypsum. The headquarters of the Knauf company are currently located here. In 1958, they opened the first plant for the production of plasterboard sheets.
During the years of German economic prosperity, the company developed rapidly and from a relatively small enterprise turned into a family with subsidiaries around the world. In 1993 they began their activities in Russia. Many enterprises equipped with modern equipment, where a uniform production technology and quality standard are used.
But Knauf does not rest on its laurels, the company is developing new projects and offering the consumer:
Knauf enterprises produce high-quality finishing materials:
On two latest groups products, we will stop and tell you what drywall and Knauf profiles are, about production characteristics, sizes and installation.
The products manufactured by this manufacturer are used to perform work on interior decoration"dry" method. It's practical and fast. Drywall sheets are classified according to their properties:
A sheet of ordinary (standard) plasterboard is used in rooms where natural temperature conditions and normal humidity are maintained. They can be used to veneer interior walls residential premises, offices, enterprises.
Standard sheets according to external sign differ from other species in color scheme– have a gray color and blue markings. They are not expensive and are used much more often than others.
Having studied its characteristics, we talked about them in detail in the article “”, we can state that such a sheet:
When you plan to make repairs in your home and change the contours of its premises, you can use the following Knauf plasterboard sheets for the walls:

Sheets moisture-resistant plasterboard should be used where it is intended high humidity or the room is poorly ventilated. Specifications sheets make it possible to install additional partitions and improve the walls:
For these works, it is better to use Knauf sheets shown in the table below:
The color of the leaf is green and has blue markings.

Fire-resistant plasterboard sheets are used where the temperature is high and safety precautions must be strictly observed. fire safety. Technical characteristics of the named finishing material they say that they can:
For these purposes, Knauf offers the following sheets:
GKLO differs from other types by its pink color and red markings.
Now that you know what types of drywall there are, its sizes, technical characteristics, insignia, you can proceed to the next section and find out how to install sheets to a vertical surface.
All metal profiles at Knauf factories are manufactured in accordance with the conditions TU 1121-012-04001508-2011. These are elements of a certain length, made of steel strip using the cold rolling method on modern roll forming machines. They are for protection from aggressive influence environmental protection are covered with galvanized coating.
With the help of such structures, a frame for sheathing is assembled; they serve as a rigid base, on which plasterboard sheets are then laid.
Profiles have standard lengths: 2750, 3000, 4000, 4500 mm. But at the request and agreement with the customer, their height can vary from 500 to 6000 mm.
Work on cutting and assembling metal products is carried out using specialized tools, such as electric shears, cutters, a hacksaw or other devices.
The following structures are required for the frame:

Knauf brand plasterboard sheets are quite popular in construction market Russia material. The technology of their installation has a significant advantage over other facing building materials.
The absence of so-called wet processes during operation significantly reduces time and installation becomes easier. With minimal labor and money costs, a perfectly flat surface is achieved.
Designers had a unique opportunity to realize their most daring projects. And the technology for laying sheets is so simple that it can be done by a person far from construction.
It is worth remembering that installation work must be carried out under normal humidity and temperature conditions.
You need to know that gypsum board can be installed in two ways, each of them has its own technical differences:
We will dwell on this technique in more detail, reveal its technical aspects and give recommendations from the manufacturer.

By Knauf technologies the entire process should include the following steps:
Installation work should begin before the installation of a clean floor, provided that the room has plumbing, technical and electrical systems. Temperature not less than +10 °C and the humidity should be normal, this mandatory requirements according to SNiP 02/23/2003. If winter time– the building must be heated.
This technology makes it possible to insulate a room without any problems, improve its sound insulation, lay and hide communications, and create various structural elements.
Each specialist has a certain minimum of tools and equipment. We recommend a standard set that you cannot do without:

This profile is more durable and reliable. All its varieties are produced at Knauf industrial plants and comply with standards. The installation process undergoes quality control at all stages of work: first after installing the frame, then after laying drywall, then installing joints and seams.

This technology is:
The sheets are joined in a staggered manner. Avoid joints where window mullions are or where a drywall doorway is. As a result, a crack will definitely appear in this place. It is better to pre-install the intermediate profile and additionally fix the sheet.

The heads of self-tapping screws or screws must be well recessed into the surface by 1 mm or more. After puttying there will be no depressions on the surface.
Do not forget to leave a gap of 10–15 mm high between the gypsum plasterboard and the floor, and 5 mm at the junction with the ceiling. Subsequently, it will be covered with a putty solution and taped with a separating tape, the edges of which will then be carefully cut off.
External joining corners can be reinforced with a protective perforated corner. finishing it will be completely covered with putty.
Where the sheet meets the door or window frames, decorate its edges decorative trims when you do the finishing touches.
For moisture-resistant plasterboard sheets, screws with a sharper conical head are used. The pitch is no more than 300 mm.
If there is a need to hang a hundred or on the wall, then know that with a weight of no more than 10-15 kg per 1 linear meter wall surface, it can be secured using special anchor bolts for gypsum boards or dowels for gypsum boards anywhere. These may not be heavy openwork shelves, cornices, paintings, sconces or others lighting. But if you plan to exploit kitchen cabinets, then it is necessary to install additional embedded parts in the places of future fastening. Specialists should take care of this during the installation process. metal frame.
As soon as your walls have received a new look, you should begin to putty, process the joints and places where the screw heads are located.
But we will talk about this in the article, which will be called “;”.


