Entrance intercoms - devices with magnetic keys, electric intercoms, push-buttons and control public order in residential and public spaces. This device is connected to or to power sources that operate autonomously. The device helps to carry out control, in which the user can not only identify a guest by voice or video image, but also open the door without leaving the apartment.
Existing types of entrance intercoms
This is possible thanks to the advanced intercom functions.
All components of the structure are mounted on the entrance door and in the residents’ apartments. The calling panel, on which the buttons are located, is installed at the entrance. Recorded in the intercom memory digital code, which powers the switch that transmits the signal. How does a digital entrance intercom work:
An audio intercom is simple and reliable, but, unfortunately, it begins to become outdated very quickly. Color panels based on a sensor are becoming fashionable, since their cost is constantly falling; there are models that have the ability to record all incoming calls to a flash drive. The user has the opportunity, upon arriving home, to see who came in. Like apartment intercom stands on almost every entrance in many cities.
 Intercom connection diagram in an apartment building
 Intercoms are divided according to the method of codifying incoming guests and the principle of addressing the number of subscribers who need to be served.
Maloabonensky - installed at facilities and in. These devices can serve only one subscriber, for example, in cottages, at security posts, at the entrance to a house, or. Multi-subscriber – designed for entrances to multi-storey and administrative buildings.
Not so long ago, these structures could only serve 6 people, but progress does not stand still, and at the moment you can buy intercoms of various configurations that can serve more than 1000 subscribers, while making dozens of entrances accessible.
 Various brands of intercoms
 The installation of an entrance intercom must be carried out by specialists from the company that will subsequently service it. Device types:

An intercom with a camera allows you to view the area from the side, in front, or into the stairwell. A special feature of the device is covert filming from inside the building. Particularly prestigious intercoms can provide audio and video surveillance; they have a control panel with a perceptive and particularly sensitive screen. Can record and save events and faces of visitors in the amount of 16 pcs. 
Some manufacturers have gone further - through an intercom screen they began to use identification using a mobile or TV. This is done manually or automatically: the signal arrives at the device and the intercom role is activated, and after the conversation is completed, it switches to standard mode. Such properties have wireless types intercoms. The above aspects affect the price and popularity of blocks. Ordinary audio intercoms, unlike video intercoms or the most elite modifications, have a low selling price.
Metakom intercoms are innovative systems. By purchasing these devices, we can be sure of their flawless operation for a long time. The principle of operation and installation is no different from other similar devices. Metakom intercom is the simplest and consists of a handset and a panel. The intercom will work correctly if it is installed correctly.
 This is what the Metakom intercom looks like
 Installation of entrance doors with Metakom intercom is carried out by specialists from a company that sells intercoms. The systems have a number of advantages:
For the Metakom intercom to work correctly, you need to install it correctly, connect it and configure it. It is better to entrust this work to a company that employs specialists in the installation and maintenance of entrance intercoms of this brand.
Manufacturers have developed inexpensive and high-quality Vizit intercoms.

The external panel of this device is made in a housing that prevents break-ins. At the same time, the intercom can operate in very harsh weather conditions. Vizit intercoms have various components and are assembled at the request of the client; often the installation of access doors involves the installation of a Vizit audio intercom. You can select a control unit for the call block, which determines how many subscribers will be connected, video cameras - dome or case, electromechanical locks. There are dozens of options for completing the installed equipment.
Installation of the intercom must be carried out strictly according to the instructions. Cyfral includes this with every kit they manufacture. You can install the intercom yourself by reading this manual, but if you don’t have enough knowledge, then do not risk your safety and the integrity of the device, contact the installation company.
These digital intercoms are connected using a telephone cable, to which the subscriber handsets will be connected in parallel.
When connecting Cyfral intercoms, you need to program it correctly.
Commax intercoms are produced by a Korean company; they are one of the leading manufacturers in the market for the sale of these products. The Commax video intercom kit includes:
 Commax video intercom equipment
 Commax video intercoms differ in characteristics, since they are not the same for different models:
This video intercom can be connected to a regular intercom using an interface unit - a module that helps connect almost any video intercom. This interface unit will allow not only a video intercom, but also several cameras that are installed in the entrance and a panel installed directly on the subscriber’s floor. An interface unit with an entrance intercom is connected for devices with a coordinate or digital device.
 Intercom connection diagram via interface unit
 Today, homeowners are thinking about whether they need to install an intercom in their home. They are also haunted by thoughts regarding which manufacturing company to choose for their own building and whether it is possible, if they try, to install an intercom on our own without turning to special companies.
There is also a special contact on the calling device, which is necessary to control the electric lock.
This is the absolute minimum for a video intercom to work; it will allow you to identify the person calling, but you also need a lock to provide or deny access to the premises; locks are either electromechanical or electromagnetic.
The locks on the electromagnet remain locked due to the fact that current flows through the coil inside, but this is where design features come into play. If the voltage disappears, the lock will automatically open; to prevent this, it is necessary to install an uninterruptible power supply.
Uninterruptible power supply – power supply with an installed battery.
An electromechanical lock closes automatically and opens using a built-in electromagnet; the lock itself comes in two types, with a conventional electric latch or with a key hole. The second option should be chosen by those who want to install an intercom in Vacation home, since in this case the owner of the house will be able to open the gate, even if there is no one at home.
Electromagnetic locks consume quite a lot of current, which is why it is best to use a separate power supply. At the moment, there is such a thing on the market as a BUZ, a lock control unit, which can replace standard power supplies in electromagnetic locks.
The BUZ can receive energy from a weak current source and accumulate it for a long time, and when it is necessary to open the gate, it will give part or all of the accumulated energy to an electromagnet.
In Russia the climate is especially harsh, so sometimes severe frost It is not always possible to open the gate with a key; here you will need an additional lock in the form of an electronic key or a chip; for its operation you will need a reading device and a controller for the lock.
To open the gate from the inside and at the same time, being in the courtyard of the house, a special button with good contact is useful; such a button is installed next to the gate itself.
Also, for the intercom lock to work properly, you may need a door closer.
Based on the above, to create a full-fledged intercom in the house you will need the following things:
When you buy components for an intercom from different manufacturers, look at their voltage and current to ensure compatibility, and do not forget about the temperatures at which devices located outdoors can operate.
In addition to the equipment described above, wires will also be needed; the main wire for the power supply can be a double copper wire with the name VVGng 2x0.75.
For signal wires, you can use twisted pair, as is done in computer networks, especially good option there will be an FTP or STP pair, they transmit almost no interference and are shielded.
You can also find special wires for intercoms; they are produced by industry.
So, for a regular intercom, the KSPV cable is perfect, and for a video intercom, a good option would be SHVEV or SHVEP, they have one shielded core.
It is worth noting that the letter “P” in the ShVEP cable means that it is suspended, so it can be used for open installation.
Cables can be laid both underground and above ground; for the first option, corrugated or ordinary straight plastic pipes will be used, and in the second case, a regular cable channel, which is used for the rest of the wires, will help.
You may also need the following things:
To install an intercom in a house, you will need a standard set of electrician's tools, this includes a screwdriver, wire cutters, pliers, a drill or hammer drill and other similar tools.
To solder the wires you will need a regular 40-60 W soldering iron with flux and solder.
In addition, a hot air gun would be a good addition; it perfectly removes old insulation from wires and can be used to connect lugs together.
This subheading will describe standard circuits connecting an intercom, it is best to install them if you understand electrical engineering; if not, you can simply ruin a recently purchased device. If you don’t understand what you’re doing, it’s better to contact a specialist.
Before you start installing the intercom, carefully read the instructions from the seller, you can highlight a lot of useful information there.
This is what one of the ways to connect a regular intercom with a calling device, as well as an electromechanical lock, looks like:
Notice that here the normal open contract that controls the lock is inside the speaking handset.
Also make sure that the output voltage and power of the control unit or power supply correspond to the lock parameter.
This figure shows a model for connecting a video intercom; here the contact that controls the lock is located inside the calling panel:
Often, in order to install a power supply, you have to run 220 V wires to it, and this is not always convenient, here the BUZ, which was already mentioned above, will come to the rescue, here is a picture that shows how to connect an intercom with a BUZ:
The BUZ itself is small in size, so many experts install this drive inside the lock itself.
When installing this option, you should understand that it will function only if the voltage of the call block matches the voltage parameter of the opening lock.
The last one will be a diagram of how to connect an intercom that has an electronic key reader and a controller for working with an electromagnetic lock:
Before you begin installing all the components of the intercom, you should determine where they will be located, especially attention should be paid to where the handset for conversation or the terminal with a monitor will be located, excellent option the location of these elements can be the kitchen or hallway, in other words, those places where people visit most often.
The next step will be laying the wires, both power and signal, only after that the installation of the intercom itself begins.
At the end of the work, the connection is made electrical parts and check the overall performance of the device.
Wires and cables can be routed using special corrugated pipes, as well as using plastic or metal pipes.
The first option is perfect if you need to run wires outside or behind a plasterboard wall, also additional opportunity The wires will be laid using a cable channel.
Underground, it is best to use low-pressure polyethylene pipes and bury them to a depth of about half a meter.
Remember that when laying a cable for an intercom, power and signal wires should not be placed in one place, if they are located close to high probability interference will appear in the form of sound signals during a conversation and interference on video calls.
Here are some more tips that will help you install an intercom efficiently:
When you install a call panel for a video intercom, you should do it in such a way that there is maximum visibility in front of the gate; a good option would be to rotate the panel towards the gate.
In most cases, the intercom complex always comes with convenient fasteners and additional things, because of this, serious problems should not arise.
A socket should be placed next to the handset, and the handset itself should be placed at such a height that it is comfortable for all family members.
The controller should be placed next to the calling device and the virtual key reader; it can be placed in a special sealed box or hidden somewhere in a niche. Make sure that the controller is not exposed to water or direct sunlight.
On video: Z-5R controller programming touch memory keys
The intercom blocks should be connected based on the installation diagram; before doing this, in order to avoid confusion, all the wires should be marked in different colors on the diagram itself.
When using wires with big amount The cores should be fitted with special tips, this will improve the connection of the contacts.
Based on extensive practice, it should be said that a well-configured intercom starts working immediately and does not need to be configured several times.
On video: Connecting a video intercom, calling panel, controller, reader, electro-mechanical lock
When using the controller as a key reader, you can program the chip.
This can be done either by using a special master key or by going into programming mode using jumpers.
This is how programming using a master key is performed: first, this same key is brought to the reading device, and the controller must be switched to programming mode. Then a key is brought to the same device, which in the future will open the gate, after which the controller includes the key number in the base and it can safely open the door.
If there is no special key, then jumpers will help; how to use them is written in detail in the instructions.
From the article you learned what it is like to install an intercom in a private house with your own hands.
We hope this helped you.
Now almost any entrance multi-storey buildings, office buildings equipped with intercom. This is done in order to prevent unauthorized entry into the territory, access to which is by definition limited. What kind of device is this, how exactly does it work?

An intercom is an electromagnetic locking device with an opportunity remote control the process of opening and closing from remote controls (handsets) located in apartments or offices. The system is installed on the entrance door and protects the building from unwanted entry.
Depending on the system for connecting apartments to the intercom device, a distinction is made between digital and coordinate devices.


With a coordinate switching system, a separate cable goes from the intercom to each apartment, but with a digital system, there is only one connecting cable. It would seem that digital intercom devices should be cheaper, however, in fact, everything is exactly the opposite - their cost is almost 3 times higher than that of coordinate ones. But it is believed that this pays off with the higher reliability and security of such a communication system.
Based on the type of communication, intercoms are divided into audio and video devices. From the name it is clear that video intercoms have a screen that displays the identity of the calling visitor, while audio devices provide only voice communication. Naturally, devices that transmit video images provide more high level protection, but do not forget about the price aspect - they are much more expensive than voice intercoms and, as a result, much less common. Typically, video devices are installed on the gates of large private properties.


How to properly connect a digital intercom handset in an apartment? This is not at all difficult, provided you follow a few rules. The subscriber node of the intercom system consists of a panel and a handset. The panel is usually installed on the side of front door, the installation location of the tube can be anywhere, if desired, the only thing is that you will need to run the cable from the panel there. Internal structure An intercom handset is almost no different from a telephone - it also has a microphone with a speaker and a microcircuit. The access door unlock button can be located either on the handset or on the wall panel.
On the rear side of the panel part of the device there are two terminals with polarity symbols (“+” and “-”). You need to connect a two-wire line to them. It is important not to reverse the polarity of the wires during installation - otherwise the system will not function.
To facilitate this process, wires of the same polarity are usually the same color.


The initial installation of an intercom system is always carried out by professionals, self-replacement comes down to buying a new intercom, actually replacing and connecting the wires. Before purchasing a handset, check the type of intercom you have. There are different models for digital and coordinate systems. The connection diagram of the handset to a digital intercom has its own characteristics. During the installation process, you must dial the apartment number. It's done like this.
Please note that problems with one apartment intercom can affect the functioning of the entire system, this is main drawback similar systems. To localize a fault within one floor, floor controllers can be additionally integrated into the system.

Connecting a handset to an analog (coordinate matrix) device differs from the same operation with a digital device. An analog intercom system operates on the principle of a telephone exchange - reception, analysis and connection with the desired subscriber is carried out by a switch. Subscribers are most often connected to the system in parallel.
There are 2 special buses for connecting the intercom with the switch. On the first bus, the contacts (D0-D9) are responsible for tens in apartment numbers, on the second (E0-E9) - for units. Connect the wire from the terminal with a plus sign to the contact responsible for the ten in your room (for apartment No. 87 - 8), the wire from the negative terminal is connected to a single contact (7 in our example).
If there are more than 100 apartments in your entrance, the intercom model must correspond to this number (there must also be a third bus, responsible for hundreds in apartment numbers). The principle is the same.


In some cases, when installing an intercom system, installers reprogram the panel, shifting the numbers by a certain amount. This action is performed, for example, if it is impossible to connect hundredth numbers. In such a situation, you will not be able to connect the handset yourself; you will have to call the specialist who set up your system. Switches are usually installed on each floor in distribution panels and connected to each other in a parallel circuit.
It is also possible to install one switching device for the entire entrance, but in such a situation additional tens of meters of cable will be required in order to sequentially connect the apartments on the upper floors. If, when connecting at least one subscriber intercom to the entrance analogue system, the polarity of the wire connection is violated, this may affect the functioning of all system devices, as is the case with digital intercom communication.

During the operation of the intercom system, various problems may arise. malfunctions:
In the first case, it is easier to replace the damaged part (pipe), because they are not so expensive. The main thing is to choose the right intercom for your intercom system model. In situations where the call signal does not turn off when the handset is picked up, there is no connection with the calling visitor and there is no reaction to pressing the lock control button - look for a breakdown in the handset switch. You can repair or replace it yourself, however, it is still recommended to entrust this to professionals, especially if you have never done anything like this before. This procedure requires some experience and appropriate tools.


If you have to press the electric button several times to open the lock, the microswitch is to blame. It is not difficult to change this part yourself, even if it is located on the intercom handset. It is enough to carefully unsolder the contacts of the faulty part, remove it and solder a new one. If the visitor is hard to hear, the problem is in the speaker or microphone. In some models, such a malfunction may be caused by a clogged “Balance” resistor installed on the intercom handset board.
In the latter case, you can try to twist the resistor lever yourself; in most cases, audibility is restored.

Unauthorized disconnection of a call when the lock is unlocked may be caused by an interruption in the electrical circuit coming from the speaker. In this case, carefully inspect all cable connections - both on the panel and on the intercom. Of course, turn off the device first. If there is a break somewhere, you need to replace the wire or solder the contacts of the wire and terminals. To summarize, we can say the following: in many cases, you can replace a damaged tube of both a digital and a coordinate matrix intercom yourself; this is a fairly simple action. Only in some cases is it worth calling the adjusters of your intercom system.

To learn how to connect different intercom handsets, see the following video.
In modern entrances, special conversational devices are most often installed as access devices. They allow you to protect your safety and the safety of your property. Connecting the intercom Vizit (Visit), Falcon Eye, Commax (Commax) and Metacom is most often carried out by special service companies, but this can be done with your own hands.
An intercom is a device that allows someone to enter a room, or vice versa, to deny entry, without direct contact with him. The device has gained particular popularity literally in the last decade; previously, combination locks were most often used to protect front doors.
Photo - system designAn intercom in an apartment or private house consists of a handset, a calling panel, video equipment (if necessary additional connection monitoring the door or gate), lock and switch. Let's consider functions of each part:

As an additional security feature, the call can also be supplemented with the ability to connect a video intercom (Kenwei KW-4HPTN, Kocom KCV-A374SD). In this case, all data is transmitted using the camera to a special TV or computer. Unlike an audio intercom, a video system is more reliable in use, because in addition to making a call, visitors are also visually monitored.
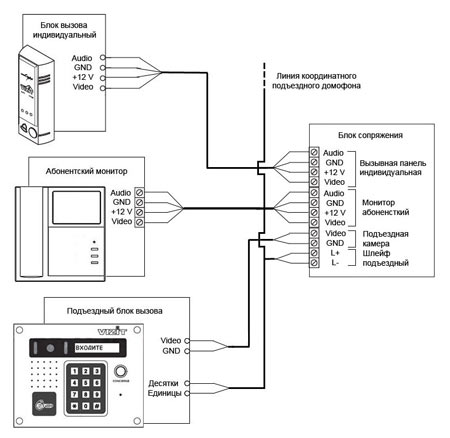
 Photo - video intercom wire connection diagram
 There are several types of intercoms that are used to protect against uninvited guests apartment or private building. Their connection varies depending on the type:
Digital They work on the following principle: when making a call, they transmit a signal over a two-wire line, in which the number of the connected apartment is recognized. IN in this case For pairing, so-called jumpers are used, which transmit signals through a twisted network to a specific handset. Each tube, in turn, is equipped with microcircuits. It is very convenient that you can connect all apartments not only in the entrance to such a controller, but also on a specific floor.
Intercom connection diagram coordinate matrix type simpler and more reliable, therefore it is more popular. A switch is connected to the coordinate communication device, which switches the signal to a specific handset when calling. The connection is made using wires of tens and ones, i.e., each apartment is designated by two cables, the numbers of which are not repeated. To establish communication, the signal is sent through the DAT1 line to the switch. After this, the modulator transforms and processes the received information and connects to one specific “Unit” and one “Ten”. Afterwards, thanks to an electromagnetic relay, a connection is made to a specific apartment via a LIN telephone line.
 Photo - digital model connection diagram
 Most often, such a connection is parallel, which greatly facilitates self-installation. The only thing you need to remember is the polarity of the intercom calling panel, electric lock and apartment handset. If electrical connection is performed incorrectly, the operation of not only a specific subscriber, but also the entire security system is disrupted.
 Photo - intercom control unit
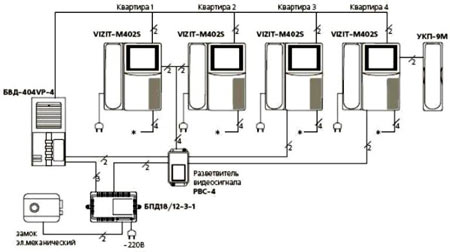
 Installation rules VIZIT intercoms
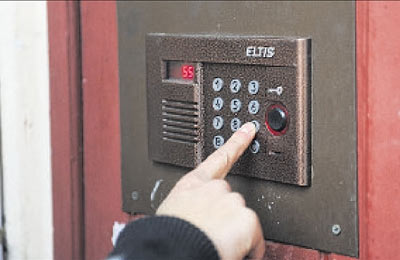
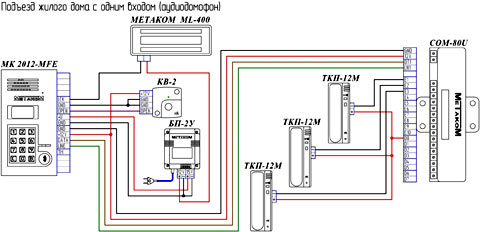
Step-by-step instructions on how to independently connect the Eltis, Cyfral (Digital) video intercom with the z 5r controller:
Domestic intercom models are also very popular, in particular the KS-2006. To connect them, schemes with two switches, one connection module, for several subscribers, etc. can be used.
What to do if the Factorial or Eltis intercom is disconnected from the power supply:

Prices for repairs or installation of intercom systems may vary depending on the city and the specific company. On average, the price of connecting an intercom varies between 200–500 rubles (the price is indicated only for the work, without the price list for the wires used). For example, connecting the MVK-325 UKP calling panel in Moscow and St. Petersburg will cost 500 rubles.
This article will discuss how to properly install an intercom. Many apartment owners have already installed this useful device and it was appreciated. We will not delve into its advantages or operating principle; we will only note that if you intend to install an intercom, but do not know where to start, then you should read this article to the end.

First, you should familiarize yourself with the key points. Calling device The intercom is installed outside and is intended to call one of the residents and conduct negotiations. Some modern models designed for two or even several subscribers, and also combine different access control options.

An intercom is no less important protection against unwanted entry than a strong door
The intercom itself is installed indoors and is intended for conversation with the visitor. The simplest version of the device is an audio tube.
Note! There is a more complex version of the intercom - a video intercom, which allows you not only to negotiate with visitors, but also to see them.
Before installing the intercom, you should acquire all necessary tools. The work may require:

The choice of one or another set depends entirely on financial capabilities. Yes, most simple option is audio communication equipment, consisting of a ringing device and a “telephone” handset and only allows you to talk remotely with a visitor.
The video intercom mentioned above is more expensive. It can be of two types:
Most of the current video intercoms support multiple communication channels and allow you to connect three or four additional cameras that expand the viewing angle.
Almost all intercoms provide the ability to control electric combination locks.

Not only the viewing angle, but also the ease of use of the equipment as a whole depends on where the calling device is installed. Often such a device is installed on the door opening side at a height of 1.5-1.6 m from the floor.
Note! If we're talking about about a video intercom, the preferred installation height is precisely 1.6 m, since the viewing angle of a standard camera often ranges from 70-75ᵒ vertically and 80-90ᵒ horizontally. This feature must be taken into account when choosing a location.
Regarding the intercom itself, it can be installed in any suitable place. The main thing is that the call signal can be heard in all rooms.
This is one of the most critical stages of installation, since the stability of the operation of all equipment depends on the quality of the wiring. One of the three cable options listed below is suitable for this:
A cable 35-40 m long (no more) is taken and led from the calling device. Of course, gating the walls of the entrance landing This is undesirable, so the wiring is carried out along the walls and fixed with special fasteners. It is recommended to avoid high-voltage power cables, as they can cause interference in the circuit or even damage all equipment. At best, the quality of the audio or video signal will deteriorate.
Note! When installing an electric lock in a door, a power cable is laid in parallel. It can be carried out from a call to the door or from it to the intercom - it all depends on the chosen connection scheme.
Also, 220 V power is supplied to all system modules.


After competent preparatory work This stage will not cause any difficulties, the main thing is to strictly follow the instructions.

Step 1.

Step 2. Mark the place where you need to install the intercom; the fastening points are determined by the building level.
Step 3. Holes are made in appropriate places for the screws (in most cases there are no more than three) necessary for attaching the fixing metal plate. It is worth remembering, however, that in concrete walls First, the dowels are installed, and only then the screws themselves.

Step 5. The stripped ends are attached to the connecting terminals - this is necessary not only for fastening strength, but also for safety.
Step 6.

Step 7. The system connects to the network. If the wires are connected correctly, then everything should work.
Note! The installation technology described below applies to an intercom installed directly near the apartment, but not outside.
To install a video intercom you will need:
The sequence of actions should be as follows.

Step 1. First, determine the location for the monitor. Due to the fact that power will be supplied to the monitor, it is advisable to mount it on the wall near the electrical panel.
Step 2. The cable is pulled to the door.
Step 3. At a pre-selected location, attach a bracket for mounting the monitor to the wall. For convenience, the monitor is installed at eye level.

Step 4. The panel is removed from the shield, after which liquid nails the socket is attached and the cables are connected: one to the phase through the machine, the second to the zero bus.

Note! In the absence of a free machine, you need to install a new one, specifically for the video intercom.
Step 5. To lay the wires in the hall, a 1x1.6 cm box is attached, then the wires from the power supply and video surveillance are pulled.

Step 6. The monitor is hung up and the wires are connected to it (according to the instructions):
In most cases, such monitors are equipped with spring contacts: they are pressed, the cable is inserted and released - the contact is clamped. All wires are pre-stripped.
If the instructions do not contain a detailed diagram, you can always find it on the Internet.

Step 7. Next comes the installation of the lock. It is advisable to choose an electromagnetic one, since it can function even without electricity. The lock will be opened from the inside using a mechanical button, and from the outside using an electromagnetic key.

The lock is installed on the non-opening side door leaf, “response” - on the opening one, but in such a way that the camera is one and a half meters from the floor (maximum - 1.6 m). To mount the camera, holes are made in the door, then screws marked “MB” are used. The holes are closed with decorative plugs.

Step 8. Then a closer is installed to adjust the speed of closing the door. Using the adjusting screws, the closing speed is set, after which the closer is closed with a lid.

Step 9. Controllers are installed. Usually they come in a pair - one controls the lock, the second controls the Touch Memory reader (for opening with an electromagnetic key). The last option allows you to install similar videophones in apartment buildings, but with a preliminary reading of all keys to the entrance.

The power source (necessarily stabilized) is connected to an energy-saving lamp and mounted under the ceiling.

Step 10. All wires are connected (using the good old “twisting” method) and insulated with heat-shrinkable cambric.

Despite the apparent simplicity of the steps described above, installing an intercom requires a lot of effort and time. Moreover, you need to be extremely careful when working, because even the most trivial mistake can affect the quality of video or audio signals. Therefore, it is better to entrust the installation to professionals.
First, the contractor sends a specialist to inspect the apartment, take measurements and draw up a rough estimate. There are many factors that influence the cost installation work, but the main one is the type of living space.

In this case, the installation procedure will proceed as follows.
An intercom is a great way to protect your home from thieves and uninvited guests. It allows you to observe everything that is happening outside without leaving the room. In this case, the main factor determining the stable and reliable operation of the device is proper installation. The work can be done with your own hands, but in the absence of experience or minimal knowledge in the field of radio engineering, it is better to turn to specialists.
And finally, another useful video.


