When we come home, the first thing we do is take off our outerwear and hang it in the closet or on a hanger. Last option has some significant advantages: it takes up little space, provides fast access to things, easy to install, suitable for corridors of various shapes and sizes.
Thanks to the simplicity of the design, it’s not at all difficult to build a hanger in the hallway with your own hands.
Advantages of self-production:

Original wall hangers in the hallway are an important and integral element of the interior.
Before starting production, you need to analyze the shape of the corridor. If it is quite elongated, it is better to give preference to a long hanger with compact shelves or without them at all. For large rooms, you can choose any model.

It is also worth considering the features of the interior: style, details, predominant colors.
The simplest type of coat rack is a wooden board with hooks attached to the wall. It is allowed to have a shelf for hats, sides located above or below it. The design can be based on either a homogeneous large wooden board or several smaller ones fastened together.

IN traditional version execution of a wall hanger is a bar on which hooks and pins are located.
If you want to show your creative potential, a custom model can be made. For example, you can make an excellent hanger for a nursery if you create a blank in the shape of a cloud, tree or twig. For the corridor, it would be better to cut out something else: antlers, a fence or an inscription.

Wall hangers in the hallway and coat hooks are selected according to the interior style of the room.
Now in almost every hardware store the buyer is provided with such a rich assortment that he can purchase everything necessary to create a wooden hanger with his own hands in as soon as possible, will not be difficult.

Wall hanger in the hallway with your own hands - simple work happy with the result.
To do this, you should buy or prepare the appropriate tools:

Tools that will come in handy at work.
Materials you will need:

Materials for future hangers.
For decoration:

Materials for decorating hangers.
A classic hanger made by yourself for the hallway does not require significant effort. Manufacturing takes minimal time. Initially, you need to think through the design in detail; it is recommended to make a drawing on graph paper and calculate the consumption of materials.

You need to transfer the drawing using a pencil or marker.
Then you should get wood sheet(or board) and place it on stable supports so that there are a few centimeters between it and the surface of the floor or table. Armed with a jigsaw, cut out the blanks of the required shape, following the contour. If you want to make the edges embossed, you need to go over them with the same tool.

It is necessary to handle roughness, sand the cut areas and sand them.
Next step - giving the desired appearance. To fire the boards you will need blowtorch, which is successfully replaced by a gas burner. On at this stage Care must be taken not to injure your fingers or damage the material. Then you need to get paint or varnish and cover all the sawn parts.

After drying, the product is assembled using screws.
The hinged method involves mounting small round metal strips called “ears”. Holes are drilled in them for fastening into dowels with screws. Moreover, reliability is determined by their length.

A DIY wall hanger can be attached in several ways.
Another, no less popular method is making through holes. After they are created and processed, screws or nails with a long stem are passed through and the hanger is attached to the wall.

For fastening, as a rule, screws or small nails are used.
To complete the work you need to attach metal hangers. They can be arranged randomly, in one or several rows.
Fixation is possible with the following devices:
Such methods do not cause difficulties and take little time. In this case, the fastening is not very reliable and is only suitable for hats.

Any bold design options will favorably emphasize the relevance and originality of the interior.
This design resembles a lattice and involves making a base attached to the wall from horizontally and vertically arranged elongated boards. In this case, we can conditionally distinguish two layers: the first- with transverse arrangement, second- with longitudinal.

Drawing of a wall hanger with dimensions.
To create a wall hanger with your own hands, you will need to stock up on several long boards. It is better to give preference to lumber 10-20 cm wide and 1 m long. Having decided on the size, you should obtain the required number of blanks.

How to assemble a hanger.
After which it is necessary to process them so that there are no bulges, chips or roughness, paying special attention to the edges. Then you need to first lay out the first layer, maintaining parallelism and the same distance between the planks. If everything is satisfactory, it's time to move on to the second level. Armed with a screwdriver (or, if you don’t have one, a hammer), fix their position at the intersection points.

A simple hanger option for making yourself.
The hooks need to be attached to the top boards. If they have a vertical position, then it is better to place the hooks in the upper part in one row. For hanger, outer side which is formed by vertical planks, you can create several levels by attaching hooks to each of them.

Dimensions of hanger with shelf.
You can complete the production by giving the product an original appearance. The most interesting surface will be if:

Before you begin applying the coating, you should clean the wood from traces of dust, dirt and grease.

DIY materials for decoupage hangers.

We need to prime our wooden hanger with white acrylic paint.
Glizal is a transparent paint that, with some effort, forms a textured surface. Before starting work, you should dilute the glisal with water according to the instructions. Then the mixture is applied to the prepared workpiece and a pattern is created using a textured sponge. You must act quickly, otherwise the coating will harden in half an hour. To artificially age wood, a type of varnish called craquelure is used.

It is applied to a pre-painted surface, which as a result becomes covered with small cracks.
Decoupage allows you to create wooden products suitable for any interior. Most often they resort to it when they want to get furniture with an antique effect and complex patterns. To decorate such a hanger, you will have to arm yourself with scissors and blanks with a pattern.

Having cut out paper patterns, it is better to lay them on the surface and evaluate how they will look.
If everything suits you- Spread the wrong side with glue, apply it to the wood and level it so that bubbles do not form later, then cover it with furniture varnish and leave until completely dry.

Which finishing varnish you choose is up to you. After the varnish has dried, screw the handles into place.
If you have artistic skills, you can apply a drawing acrylic paints. Initially, the background and large elements are created, then the details are drawn. It is better to complete the work by applying varnish and craquelure.
As you know, theater begins with a hanger. The hallway also begins with hangers. The hanger is important element interior, capable of decorating and complementing, as well as streamlining the environment. It should look attractive and not take up much space. Today furniture industry produces a wide range of various designs of various designs, but many are interested in how to make a clothes hanger with their own hands. It is these products that transform the atmosphere, make the premises unusual, original and with a “zest”.

Making a hanger yourself is quite simple. This will require imagination, as well as the desire to make something extraordinary, something that cannot be bought in a store. A homemade hanger will undoubtedly decorate any room and attract the admiring glances of guests. To make it, you can use any available materials - empty bottles, beads, wire and all sorts of little things that you will probably find at home. Gifts of nature are perfect for this purpose, for example, bizarrely shaped branches, as well as leftovers. building materials after repair.
The design and shape of the future product depend on the wishes of the owner. You can look for inspiration on the Internet, look at photos of original hangers, or download a diagram of an idea you like. In any case, you first need to decide on the type of hanger and the material for its manufacture.

There are two types of hangers that you can make yourself - wall and floor.
Wall hanger is the most simple solution. It usually consists of a horizontal crossbar to which hooks are attached in one or several rows; it may have an upper shelf for hats or a special transverse beam for “hangers.” The shape of the horizontal crossbar-base is usually rectangular or with rounded corners, but if desired, it can be made absolutely anything. For example, in the shape of a heart or a tree leaf.
Typically, a wall hanger in a hallway is made of wood. The fact is that wood is an excellent natural material that can be easily processed at home: cut the desired shape from canvas and cover it with any paint.

A floor hanger is a structure consisting of a vertical support on a base. Hooks for clothes are attached to the top of the support. It is important that the hanger is not only decorative, but also practical. Special attention need to be given to the base. It must be very stable so that the structure can withstand the weight of the clothing and not fall. There are many design options for such hangers, but they differ not only in shape and size, but also in the material they are made of.

First, you need to decide on the material. Floor hangers are:
Metal products are very strong and durable, have a lot of weight, and therefore are considered the most stable. Metal hangers with elements of artistic forging are real works of art that will add elegance to any hallway. However, not everyone can make this kind of product at home, because the work will require complex tools and skills in working with metal.

The simplest option for making a metal floor hanger at home is to re-equip an old floor lamp. It has a support and a lampshade to which you can attach hooks made of thick wire. By the way, you can weave original patterns from it and use them as hooks for clothes. The base can also be decorated decorative elements.
Wooden hanger - wonderful a budget option for the hallway. Wooden crafts do not go out of fashion. They fascinate with their natural beauty; they can be used for any style and direction in the interior.
To make a wooden hanger, you can use a sheet of plywood or boards, but if you want to make something truly unique, it is better to turn to the gifts of nature. So, a small dry tree can become the basis of a future hanger.

It should be cleared of bark and knots and thoroughly processed. sandpaper and secure to the base. IN in this case It is better to provide a support on three legs, it is considered the most stable. Then you need to decorate the top of the hanger. It can be made like a tree crown. You can use beautifully shaped branches as hooks, which should first be cleaned and sanded.
The final stage is coating the entire structure with varnish or paint. As decoration, you can use balls or large beads, which are fixed with glue to the base of the hanger or on hooks.


This video shows the process of making a wall hanger.
Here are some more ideas for inspiration.
An invariable element of the interior is the hanger. We encounter this object when we enter a room from the street. Today, many varieties of such products are produced. They are built into a closet, hung on the wall, or placed on the floor. Clothes hangers easy to rearrange in Right place, floor products can be an independent piece of furniture.
If there was no storage structure outerwear, people would put their coats and jackets on the shelf after folding the items. The clothes would take on an unpresentable appearance, so this element is difficult to overestimate. Interesting design and convenience makes these items popular. Such products are purchased for the hallway, veranda, and placed in the bedroom and bathroom. Designs in the shape of wood, letters of the alphabet, interesting figures, etc. are used as hangers. Hangers complement the interior, it takes on a finished look.
When entering a room, a person immediately takes off his outer clothing. Removed items are hung in the closet, on wall hooks; they are used for these purposes. floor models. You have access to the desired wardrobe item placed on it. When clothes are placed in a closet, you have to spend time searching for the right thing. You don’t have to look for a coat on a floor hanger; it’s in plain sight. The cabinet occupies more space than a floor structure. Not all hallways have space to install it, so a floor product becomes the preferred option. 
The advantages of such interior items:
On such a device, clothes hang freely; some models are equipped with hangers on which wardrobe items are placed. If your clothes are wet and need to be dried, hang them up carefully and move them close to a heat source.
Depending on the material used, hangers are as follows:
 Select suitable option for office, home, cafe. There are many original models for solving interior problems on sale. Unique products are created by designers to order, in which case they fit perfectly into the home decor.
A huge selection of such items allows you to choose the right option for a specific design. There are many types of floor hangers.
Tripod hanger is a tripod with hooks; they are often equipped with additional hooks for bags and a horizontal hoop for umbrellas. The bottom is made like a tripod or with flat base. This convenient design will solve the problem with many things in the hallway. It is convenient to hang jackets, coats and other things on it. 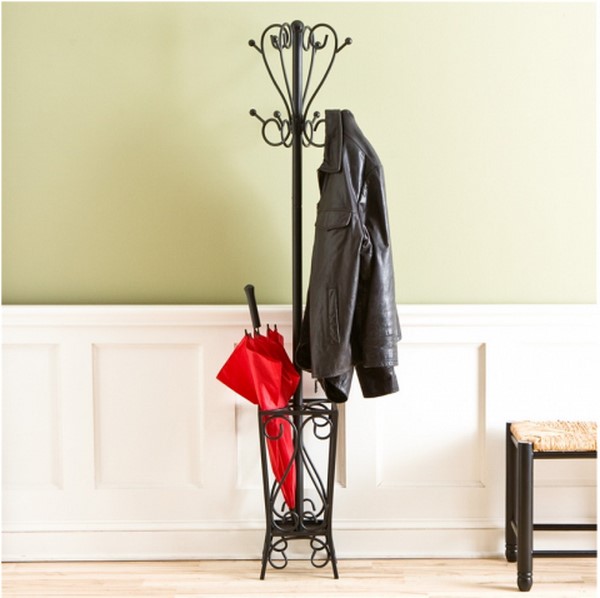
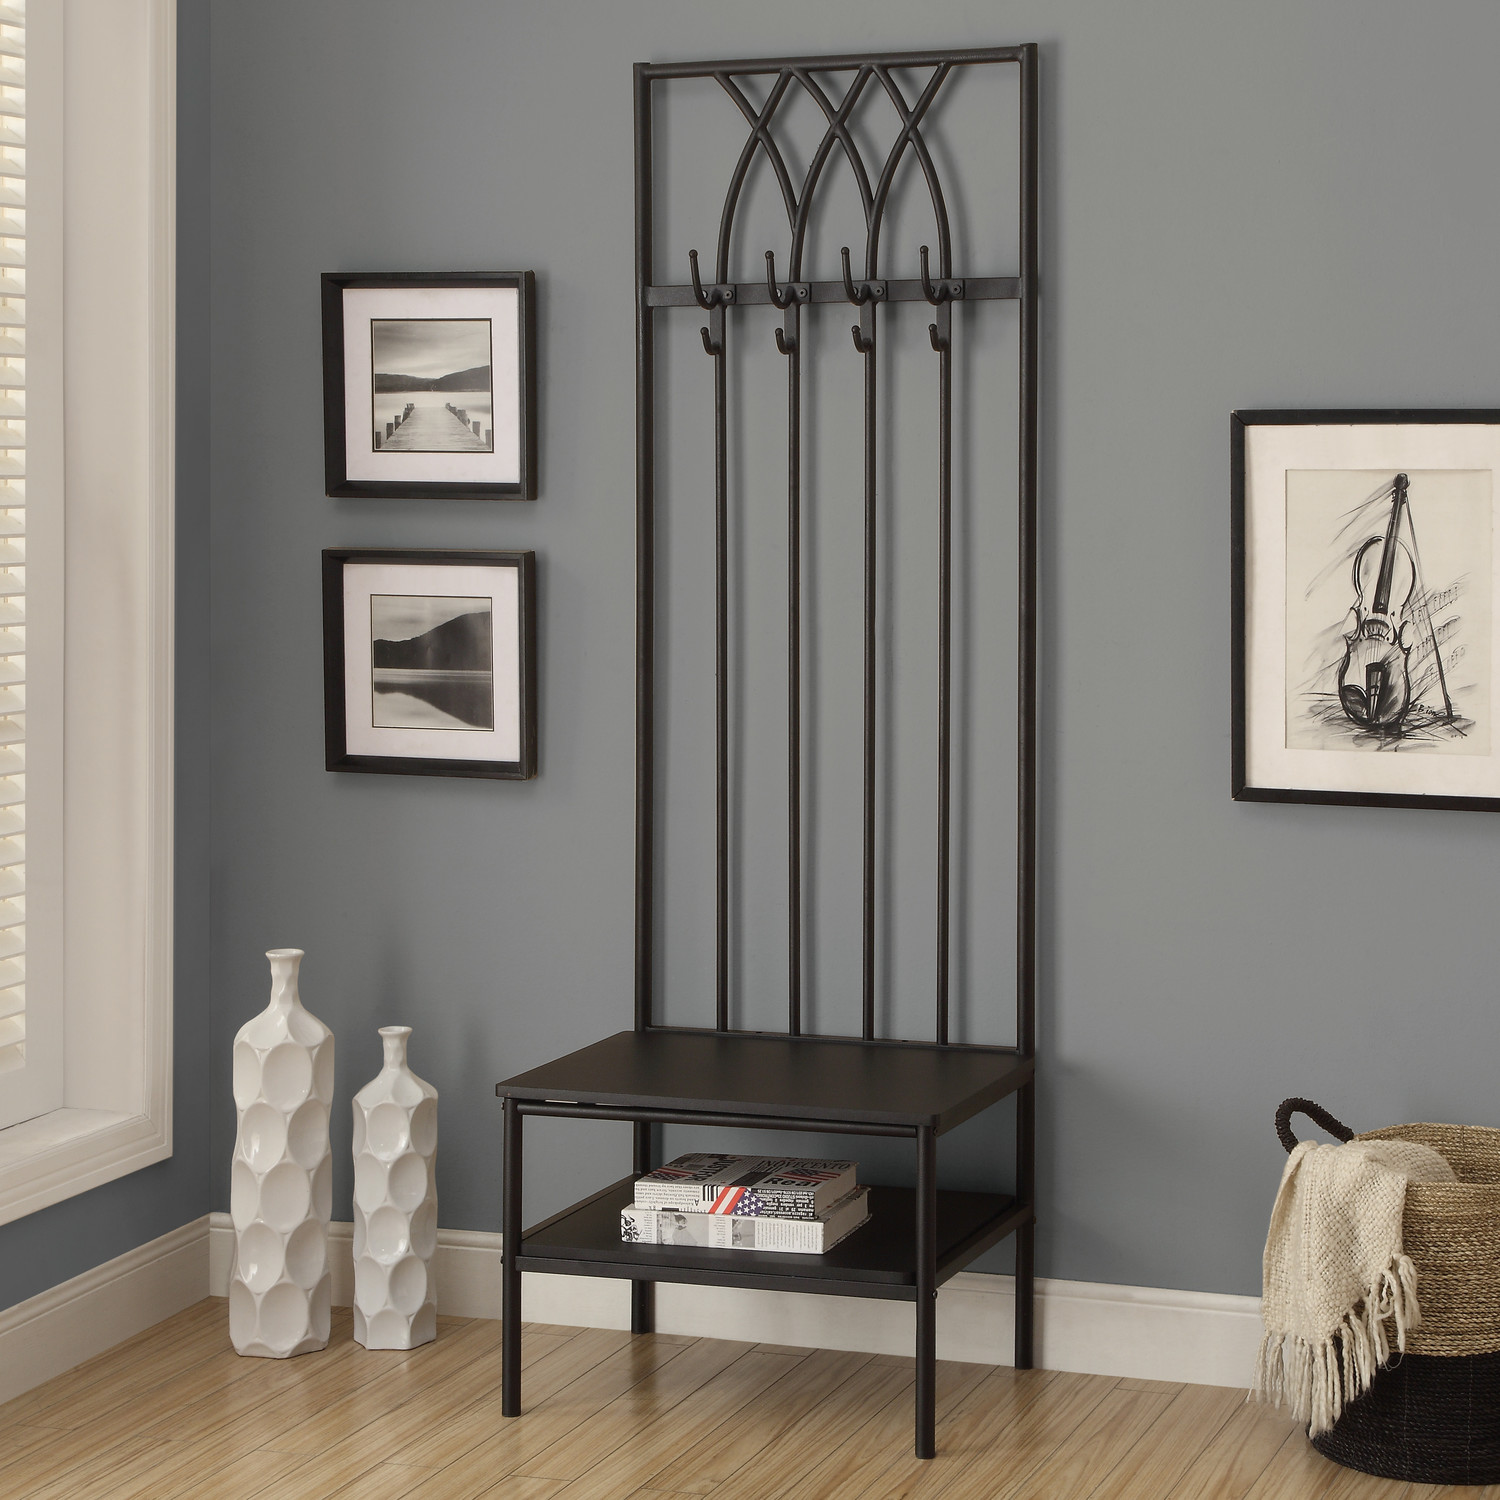
Model in the form of a chair with a high back will allow you to change your shoes by sitting on it. It has a shelf for shoes and a bar with hooks for clothes. This convenient option, especially if the apartment has old man or small children. There are folding models that can be hung in a closet. This original and functional item will become the highlight of the hallway interior. 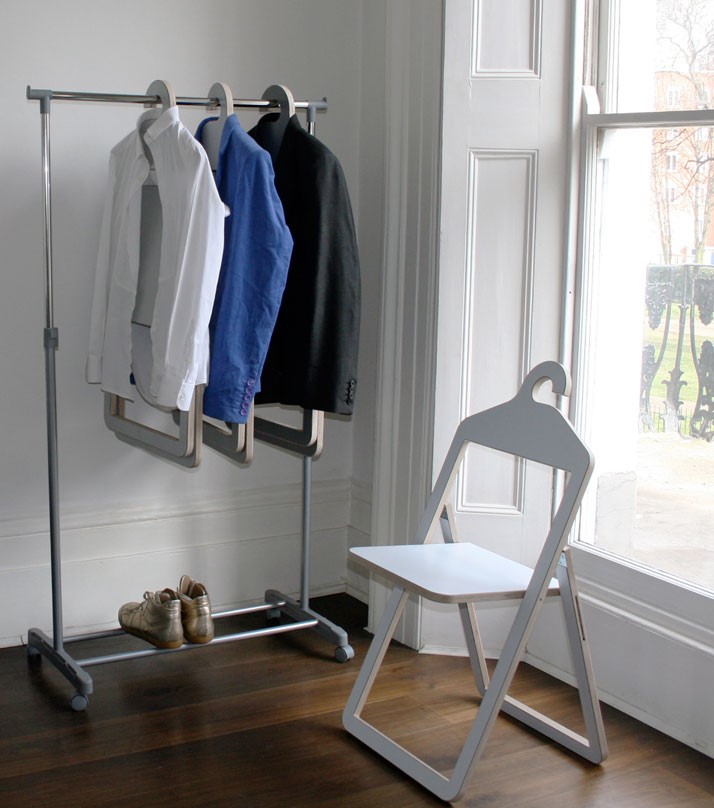
Hanger rack It has U-shape. The crossbar is equipped with hooks or is intended for placing clothes on hangers. This product is placed in the dressing room. Your things will not get wrinkled and will look impeccable. A good option is a model with a stand for umbrellas, shelves or special holders for hats. 
Hanger-basket has a base made in the form of a basket. Umbrellas, slippers and other things are stored in it. It is indispensable in your home, but takes up more space than the previous option. 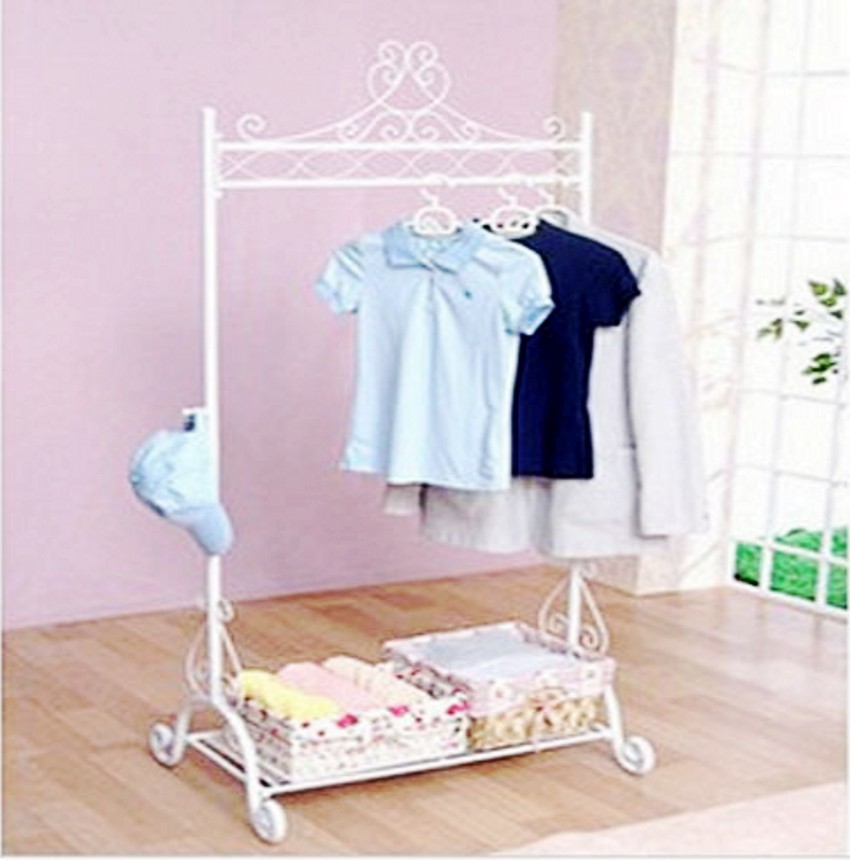
Suit model Convenient for storing trousers and jackets. It is also suitable for a dressing room. Helps keep your suit neat floor hanger. It will be a wonderful addition to your office, and your jacket will always be in perfect condition. Such an item is necessary not only for men's suits and ties. Women's items can also be hung on the product: cardigan, shawl, coat. 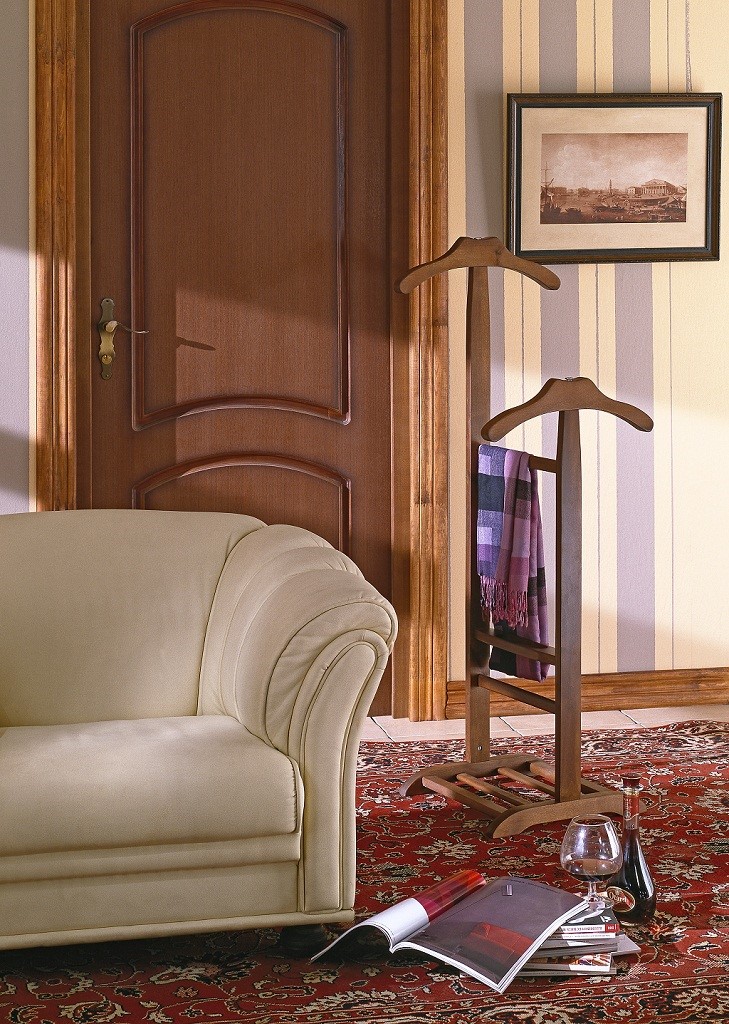
They combine functionality and beauty. Unusual products became fashionable back in the 70s of the last century in Italy. Scandinavian designers once came up with tree-shaped hangers that look great in the interior. If you have the desire and space, you can place several of these ornamental trees at the entrance. Today in interiors you can find hangers in the shape of flowers, abstract items, etc. Mobile objects are in fashion. Products on wheels are used in offices as they are easy to move. But they can be a great addition to your home decor. 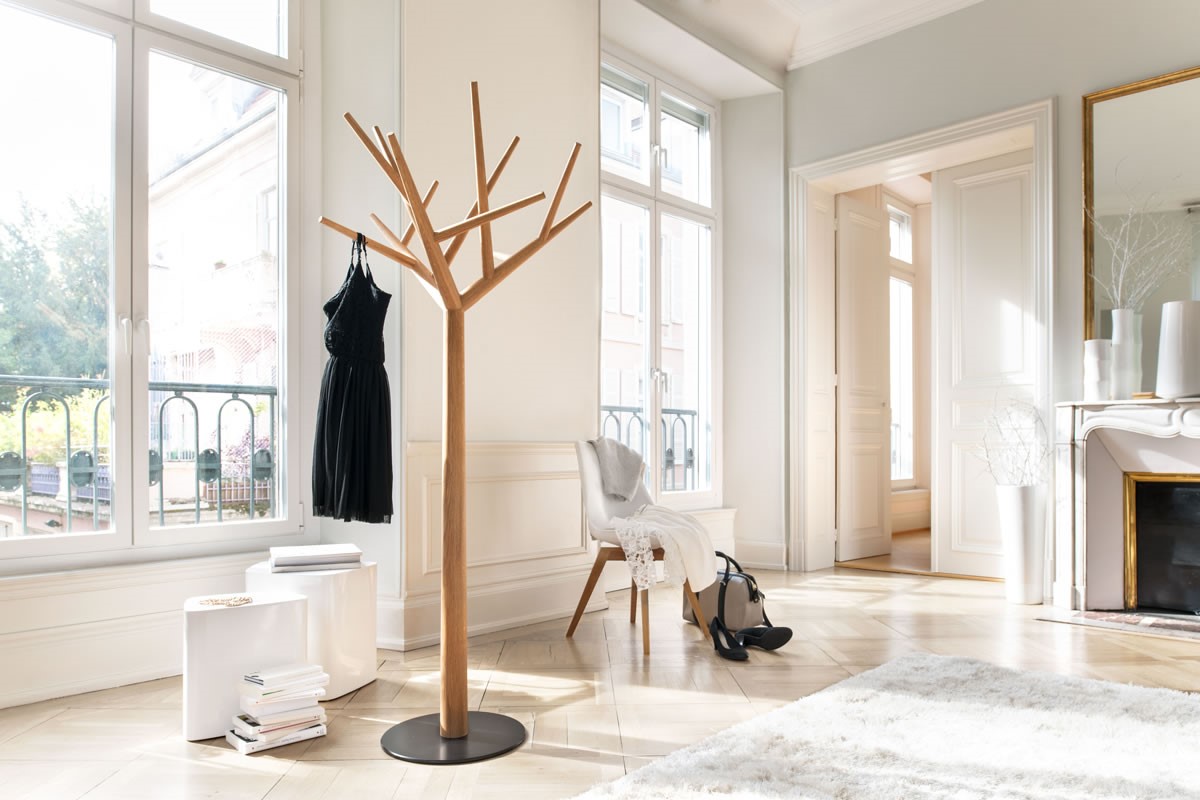
Products with a special adjustment system allow you to change the height. The system of a standard hanger will make a convenient design for children. This is especially true when many children are invited to the house for a celebration. Geometric designs from chromed metal, original models in the form of art objects are available to everyone. Having purchased a bright design, focus on it. Owners of spacious apartments and country houses can safely choose a fancy model that will become an original piece of furniture.
It’s difficult to do without a hanger in an apartment, country house, the office needs it. The appearance of the hallway depends on it. The hanger should be in harmony with the interior and accommodate all the necessary clothes. For an apartment, it is better to opt for a compact floor-standing product. Floor hangers often have questionable stability, so when choosing, you need to consider what items they will be used for. There are many interesting items on sale, from which it is easy to choose a high-quality, stable and safe model. 
The choice of hanger depends on the design of the room; you can buy a product made from valuable wood different shades or stop for more simple version. Hangers have hooks that are made of wood, metal, and plastic. Products with metal hooks stronger, they will serve properly for a long time. You should think about where exactly the item will be placed.
Advice! It is necessary to take into account the size of the room where you plan to place the item, as well as the number of residents in the apartment or house. If one or two people live in a home, then any compact option will suit you. For an apartment where a large friendly family lives, they buy floor option, on which the clothes of all household members can easily fit.
More massive models are selected for the hallway, and a lighter version is suitable for the bedroom and bathroom.
Build such a piece of furniture from an old floor lamp. To do this, remove the lampshade and wire, and attach the hooks to the tripod. If on personal plot or there is a tree growing in your dacha that has not produced fruit for a long time, then use it for hanging. The plant is cut down and the branches are removed. The bark is removed; if left, it will begin to fall off over time, and things will cling to its uneven surfaces. After cleaning the wood, you need to go over it with sandpaper. The structure is then attached to the base. 
The item for storing clothes should not have sharp parts, so as not to damage the floor or things. It must be stable aesthetically pleasing, reliability. Stability is ensured by the base, which is made in the form of a circle and crosses. The center of gravity is placed as low as possible. For this, heavy bars and metal parts are used. Installation of the product on three points of support is necessary for the stability of the structure. The bottom of the hanger is upholstered with a material that is softer flooring. This will prevent leaving marks on the floor. To give the product functionality, hooks are attached to it.
Important! The center of gravity of the clothing placed on the product should not extend beyond its cross. Otherwise, the product will not be stable and will fall.
The final stage is giving the structure a finished look. Cover the lower part of the product with fabric, wood, or plastic. The structure is covered with a layer of paint or varnish.
Basic interior items form the style of the room and make it attractive. It's the little things that create an impression of the room and the owner. Interior items can emphasize the individuality of a home and tell about the character of the owner.


Can be easily done with your own hands. It is quite often used not only in residential apartments and houses, but also in offices. Of course, such an item can be purchased at a relevant store, but quite often the cost of a hanger is high and not all models are suitable in color and size. This item is an excellent solution for a hallway that does not have enough free space. Such designs, which can be purchased in a store, most often have two sides for easy access (out of four). The coat hanger-hook does not have such shortcomings; purchasing and fixing it is as easy as shelling pears. Often, in its manufacture, accessible hooks are used, which are located as close as possible, this subsequently makes it difficult to access the other sides. Ultimately, the floor hanger ends up loaded on one side, which quite often causes it to fall. This is due to the fact that the structure has a too high center of gravity. You may have noticed that not all hangers have hooks for hats and bags. That is why you can come up with your own design, taking into account all the shortcomings of factory products.
The floor hanger can be made by any novice craftsman. However, initially it is necessary to prepare a set of tools and materials, among them: self-tapping screws, laminated chipboard, a rotating mechanism, confirmations, a jigsaw, and an edge.

So, your choice is a floor clothes hanger. By making it yourself, you can save money, because the models presented in stores are quite expensive. However, before starting production, you need to develop a design design, and you should take into account the problems that were described above. This will allow you to get a hanger that will be distinguished by functionality and ease of use. The base of the product will be hollow parallelepipeds, which must be installed on a rotary type base. It has two planes. The rotating mechanism must be located between the supporting bases, which are located below. You can purchase accessories in a specialized store. The mechanism must have bearings that will ensure rotation under a load weighing up to 110 kilograms. The supporting base in the upper plane can be rounded; a jigsaw is used for this.

If you are making a floor, you will need to initially prepare the parts. The structure is assembled using laminated chipboard, the thickness of the material should be 16 millimeters. The color is selected depending on the features of the interior and other pieces of furniture that are in the hallway. When preparing parts, it is important to maintain right angles, so experts advise ordering the cutting of elements from professionals, but you can do the gluing of the edges yourself.

Before you make a clothes hanger, you should learn about how edge gluing is done. It has an adhesive base and can be melamine. Its thickness is 0.5 mm or less. The edge is applied to the end of the element, with the adhesive base facing down. Then it is ironed with an iron, which should not be heated. Until the edge has cooled down, it is smoothed using a dry rag. At the next stage, the edges are processed; excess edges will need to be removed using sandpaper and a sharp knife.

In order to get a clothes hanger on wheels, you will need to prepare a square bottom base with a side of 560 millimeters. The top base should have a side equivalent to 380 millimeters. The side elements of the lower part are made in quantities of 2 pieces, the dimensions of each should be 600x300 millimeters. All other parts are made in the amount of 2 pieces, this applies to the internal side elements that will make up the lower part. The dimensions of each given workpiece must be 600x267 millimeters. The upper and lower parts will have a square shape with a side of 267 mm. Similar parts are made with a square side of 167 millimeters.
The side elements should have dimensions equal to 1200x200 millimeters. The side inner parts of the top have dimensions that are 1200x167 millimeters.

You can purchase a metal clothes hanger in a store - this is easier to do than making it yourself. But if you decide to make your own floor structure from wood, then for assembly you need to use confirmations with dimensions of 50x70 millimeters. For them, holes located at the ends are pre-prepared. To do this, use a 5 mm drill. The depth of the holes should be 60 millimeters. Holes in the plane must have a depth equivalent to 8 millimeters. They need to be done through and through. There is no need to be afraid that the fastener heads will be visible - later they can be hidden using plugs. You can also make a wall-mounted clothes hanger with your own hands. To do this, you need to prepare a laminated chipboard strip, several hooks and fasteners. All these components are connected to each other, and then the structure is hung on the wall. In the case of a floor structure, everything is different. The hanger will rotate due to the presence rotary mechanism, it is fixed with 4x16 mm screws.

The rotating mechanism has a one-piece design, and it is attached to the base by creating technological holes 10 millimeters deep. Initially, markings have to be made. After the hanger is assembled, the fasteners will be hidden by the top plane. The hanger can be equipped with different hooks. Thus, the top ones may be longer, allowing them to be used for hats. The middle ones are intended for children's clothing, but as for the lower ones, bags can be placed on them. The structure is stable due to the fact that the center of gravity moves closer to the floor surface.
A wall-mounted clothes hanger in the hallway can also be made by you. To do this, you need to prepare a board, timber, and hooks. The board must have the following sections: 25x150, 50x100, and 25x80 millimeters. As for the timber, it must have square section with a side of 100 millimeters. The base will be a beam, which is marked taking into account the required length and cut off. If the hanger is not wall-mounted, but floor-mounted, then legs should be attached to it. The structure must be processed with sandpaper. If legs are provided, they must have a length of 350 millimeters. The legs on one side are cut at an angle of 45 degrees, which will add aesthetics. There should be supports at their edges that are fixed. These additional blanks are cut from a board whose cross-section is 25x80 millimeters.
The legs can be strengthened with elements 330 millimeters long. These blanks are made from 50x100 mm boards. There should be four of them. When making a wall-mounted clothes hanger for the hallway, top part can be made more elegant by decorating it with decor, which is made from a 5-centimeter board. The lumber is used to cut a square, which is screwed to the top of the base using two screws. The workpiece is strengthened with the help of fittings, but if you want to make a decorative element yourself, then it should be deprived of fasteners for screwing. In this case, the workpiece is glued using carpentry compound.
When making clothes hangers for a closet, it is important to ensure high-quality fasteners. Quite often, not only the mechanical, but also the adhesive method is used. In the latter case, both surfaces should be lubricated. After this, the structure is left until the composition has completely dried and only then can it be treated with varnish or stain. The mixture is applied in several layers, between each of which the product should be left until completely dry. Afterwards the surface is treated with sandpaper. Before applying the next layer, the surface must be wiped with a damp cloth. In the process of making clothes hangers for a closet, the above technology can be used. However, no matter what design you choose, if it is based on wood, all corners must be cleaned, and the same applies to the ends of the structure. This can be done between applying layers, then the surface will acquire the effect of antiquity.
There is no way in the hallway without a hanger - you can’t throw taken off raincoats, coats and hats on the floor. You can, of course, drive several large nails into the wall, but this is not at all aesthetically pleasing. And the wallpaper will become greasy, getting dirty from outerwear. The real one will be much more pleasing to the eye and more practical - or, as you like. And you can build it yourself, and you don’t need to be a furniture ace to do this.
We will need skillful hands, simple home tool and a minimum of materials. You can even use waste, by the way. Or beautiful twigs with twigs found in the forest.
So, the arsenal of the tool will be as follows:
To create some variants of hangers, metal corners and a jigsaw may also be useful (if you need to cut out shaped surfaces). If you want to create, then there will be a need for welding machine. However, for simple products it is not needed.
Simple DIY hallway hanger
Now about the materials. The most popular - wooden boards, plywood and bars, as well as their trimmings. Hangers are often made from wood boards - it is better to take laminated ones, which look more attractive. However, you can also paint regular chipboards by first priming them. It will also turn out impressive.
And if you have an old floor lamp with a stable base that you can’t get around to throwing away, then you can give it a second life in the form of a floor-type hanger. To do this, just remove the lampshade along with the lamp mount and disconnect the power cord. All that remains is to paint the product in your favorite color, not forgetting to first attach hooks to the upper metal circle - woven ones made of wire work well here.
By the way, hooks for hanging in the hallway - important detail. They should be large and comfortable. You can buy them in the store furniture fittings, or you can show your imagination. Natural materials – good help at work. Moreover, the products made from them are exclusive - no one will have anything like them. For example, you can use twigs and branches, sanded and varnished, as hooks. Beautiful and functional.
Another interesting and original version- hooks from teaspoons bent in half. Or aluminum forks. In both cases, the handle is the lower (main) part of the product. You can also bend hooks from thick wire, decorating them with decorative elements - beads, for example.
Photos of wall in do-it-yourself racks for the hallway
From forks From keys From clothespins Old door handles
From sticks From spoons From bicycle handlebars From knots
But, before you start creating a masterpiece, please look at the drawings that we have selected for you.
Drawings of hangers in the hallway
 Wall-mounted
 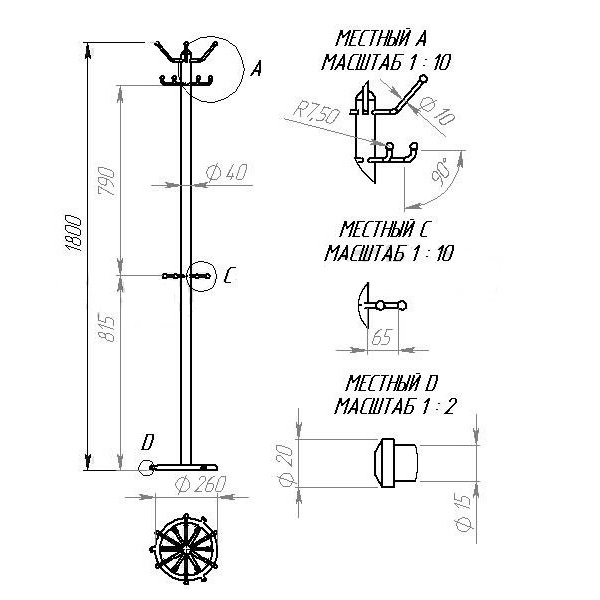 Floor
Floor
The basis of the hanger is the shield on which the hooks will be placed. It can be made solid (from a wood board or a centimeter sheet of plywood) or lattice. The last option is preferable - it is lighter, and less material is used.
The next video promises to teach you how to create wall hangings with your own hands. wooden hangers in the hallway from one board:
Here it is important to take care of a heavy base that should not tip over.
Now - the hanger post.
For those who have a welding machine and like to work with metal, you can make a heavy and durable metal hanger. To do this, you will need a pipe with a diameter of approximately 3 centimeters, as well as steel rods for legs and hooks with a diameter of 1.6 and 1 centimeter (respectively). There will be three legs - they are smoothly bent and welded to the pipe. Several hooks are made at the top, just like in similar finished products. And then the structure is painted.
Floor hanger that is easy to create with your own hands

Natural wood is easy to process and finish, and is also environmentally friendly. In addition, almost every skilled owner will have scraps of slats, bars, boards or pieces of plywood. A little imagination, a couple of free evenings - and here in front of the admiring household members is an original hanger. All you need is two longitudinal strips, several transverse ones (by the way, it’s good to use ready-made platbands for this purpose) and hooks of your choice. For example, wooden knots, furniture handles or bright plastic cups.
Wood boards are a very useful material. You can use a jigsaw to cut out all kinds of shaped products from them. For example, a hanger, the contours of which are made in the form of a stylized tree - this is now fashionable. Having cut it out, we paint it a cheerful color (not forgetting to smooth out the unevenness with sandpaper first) and fasten it to the wall with dowels. Then we attach hooks for clothes at the ends of the branches. By the way, for such a tree you can use thick plywood.
Before moving on to the actual production of the hanger, we recommend that you pay attention to the master class in the video below, which will tell you how to create a creative tree-shaped hanger for your corridor:
You can also build a simpler version from chipboard. do-it-yourself hangers in the hallway, for example, a solid or lattice panel ( the simplest design wall hanger). And by taking laminated boards, we will get rid of the need to finish them. But the ends must be processed - for this purpose a special edge is sold, which is welded with an iron. And one more thing: you only need to cut laminated sheets from the inside out, otherwise they will crack.
Do you want to create a wooden hanger for your hallway with your own hands? And, preferably, with a shelf for hats? Easily! Watch the following video carefully:


