No matter how hard the roofers try to lay roofing material as tightly as possible to the pipe, leaks still form in these places. If you leave them unsealed, then water will leak through them into the under-roof space. Therefore, all cracks in the places where the roof adjoins the pipes and various protrusions must be closed.
There are several ways to seal gaps, depending on the type of roofing material and the size of the gap.
1. Small gaps can be closed silicone sealant. You just need to choose a brand that can be used in high temperatures. This is especially important when sealing the gap around the chimney.

2. On tiled roof an “otter” made of cement-sand mortar is installed around the pipe:
This work must be done with great care, otherwise the structure will crack and leak over time.
If the pipe passes next to the ridge, then the gap is sealed quite simply:

This method perfectly protects the roof from rain, but snow gets into the gap between the slate and the pipe.
To make the joint between the pipe and the slate airtight, you need to do the following:

When installing a soft roof, cutting is carried out around the pipes (apron, framing using Wakaflex, etc.). The cuttings are pressed with a case made of a pipe whose diameter exceeds the diameter of the ventilation pipe. The gap between the pipe and the casing is filled with bitumen mastic.
Note: “Vakaflex” is a roofing tape, the purpose of which is to seal cracks at the junctions of the roof with pipes and walls. It is a self-adhesive rubber-based tape. The tape is reinforced with aluminum mesh. Elastic, easily takes any shape.
Before pouring, wide cracks are caulked with rope or linen floss soaked in oil paint. After this, the gap is filled with mastic and coated with a cement-sand (greasy) solution on top.
As you can see. There are many ways to seal the gap between the pipe and the roof. They have one thing in common: all work must be done efficiently. This is the only way you will achieve reliable protection of the roof from moisture.
Installing a chimney in general is not difficult, but there are some places, for example, passages through ceilings, that can cause difficulties if you lack experience. It is important to remember that when installing a chimney, proper waterproofing should be ensured.
No matter how tightly the pipe is placed to the roof, there will still be a gap. IN rainy weather precipitation will fall into the inner layers roofing pie and cause irreparable damage. That is why sealing the gaps between the pipe and the roof is important stage construction of a chimney, which should not be neglected.
The easiest way to seal the gap between the pipe and the roof is to install a special protective element on top - an apron. You can build such an element yourself, but you will need to provide junction strips on the pipe in advance. You can do it even simpler - purchase a ready-made roof passage from of stainless steel. As a rule, the chimney passage has a round cross-section, and the material for its production is galvanized steel. The passage is placed on the pipe, and the joint is additionally secured with a steel clamp. The galvanized passage for the chimney is shown in the figure:

If you need to seal small gaps between the pipe and the roof, a silicone-based sealant is suitable. Today in any hardware store There is a huge selection of sealants; you need to choose a heat-resistant option.
Except general recommendations There are also specific specifications for sealing cracks for various roofing materials. Therefore, the algorithm for waterproofing differs between slate, tile, bitumen roof, as well as corrugated roofing.
If it is necessary to seal a gap in a slate roof, an asbestos-cement mixture is used. The process technology is as follows:
The best way to seal cracks in a tile roof is to use a cement-sand mortar. It is this method of sealing the pipe that will provide reliable protection against any type of precipitation.

In order to carry out waterproofing, it is necessary:
For waterproofing a chimney that rises above bitumen roofing, self-adhesive tape Wakaflex is used. The stages of the work are as follows:
If it is necessary to remove a smoke exhaust device through a roof made of corrugated sheets, ready-made pipe cutting Master Flash is most often used. This roofing element very convenient to use and can be used not only for corrugated sheeting, but also for other roof materials.

Master Flash is an apron-cap, which is a rubber or silicone apron on an aluminum base.
Silicone Master Flash has more wide range operating temperature, but most often a rubber one is sufficient, which can withstand loads from -50 to +130 degrees.
Sealing cracks on a corrugated roofing looks like this:

There are cases when such waterproofing is not enough and water leaks at the joint. The way out is to use a special self-adhesive tape reinforced with aluminum. It is very convenient to use, because there is no need for preheating before installation.
Choosing the right waterproofing material will help protect your roof from leaks and premature failure. Following the instructions and doing the job diligently will save you from any trouble.
– this in itself is an extremely responsible task that requires special care, consistency of action, and strict adherence to the developed technological recommendations. Whatever roof covering material is used, it should ultimately provide one hundred percent protection of the building from the destructive effects of precipitation.
One of the most vulnerable components from the point of view of possible water penetration and difficult to install is the connection of the roof to the chimney or ventilation pipe. The durability of such areas directly depends on how well such areas are sealed. rafter system, attic floor, and often – even finishing in the house itself. Therefore, it is very important to take at this stage roofing works With special attention and accuracy.
A high-quality connection of the roofing material to the pipe can be made only if the roof has a reliable rigid sheathing, corresponding to the type of roof and the steepness of the slopes, on which the load will be evenly distributed both from the mass of the roof system itself and from external influences.
chimney pipe

Remaining not closed space between the pipe and flammable or even low-flammable roofing coverings, only completely non-flammable materials (usually sheet metal is used for these purposes).
When a reliable foundation for arranging the connection of the roofing material to the chimney is ready, you can proceed to the installation of coating sealing elements.
The design of the system for connecting the coating to the pipe can be different, depending on the selected roofing material. The functions that are assigned to the elements included in the junction structure are sealing and waterproofing the joints of the roof covering and ventilation or chimney pipes, as well as draining and redirecting the flow of water flowing from the roof ridge to the pipe above.
The layout of such a junction should ideally be determined when drawing up the design of the rafter system and roofing system. The fact is that some options involve the installation of individual structural parts before installation roofing.
In addition to the type of roof chosen for covering the roof, when drawing up the project, you should also take into account the location of the chimney pipe, its shape, as well as the material from which it is made.
Professional builders usually recommend using only ready-made designs, which are produced by roofing manufacturers. However, many craftsmen prefer to make these parts themselves.

It should be noted that a chimney pipe passing through the roof directly at the ridge line of the roof is the easiest to seal. With this arrangement, water during rain, as well as snow drifts in winter period, do not have the ability to accumulate higher back wall pipes, which minimizes the risk of roof leakage in this, perhaps, the most vulnerable junction.
It will not be difficult to arrange a reliable connection of the roofing material to the chimney, which is also located in close proximity to the ridge line, that is, almost immediately behind the ridge element. There is also a very small space above the pipe, which prevents the accumulation of snow and water.

But performing high-quality sealing of a chimney located in the middle or lower part of the roof slope is much more difficult. In this case, waterproofing must be especially reliable. Therefore, quite often, and especially, for example, when the roof is covered with a soft bitumen roof, it is necessary to equip an additional pitched structure - as shown in the illustration above. Such a special break in the roof will divert water flows, directing them along the side walls of the pipe. Such protective extensions to the pipe are usually called grooves.

And, of course, the most difficult thing is to properly arrange the junction around the chimney, which is located in the middle or lower part of the valley. In this case, the pipe will be in the path of clearly directed flows of water, which during rain or melting snow will flow into the gutter at the junction of the slopes. In this case, it is extremely important to reliably seal not only the back side of the pipe, but also its side lines. Therefore, even at the design stage, it is necessary to try very hard to avoid such a pipe location.
Now, in order to answer the most popular questions that arise in the process of arranging this roof assembly, it is necessary to consider several options for sealing pipe passages through the roof.
As you know, stoves and fireplaces in last years are increasingly equipped with chimney pipes round section different diameters. Modern chimneys metal pipes most often they are a “sandwich structure”, that is, they consist of three layers - two metal cylinders, external and internal, and a layer of thermal insulation between them. Typically used as thermal insulation mineral wool on a basalt basis.
metal tiles

Manufacturers have provided special elements - penetrations - to seal the junction of such round pipes to the roof covering. These parts can be made of metal or elastic heat-resistant composite material, which is mounted in combination with metal elements.
In principle, the same principle is used to construct a hermetically sealed roof connection for ventilation pipes.
Options for finished metal products for arranging the junction of the roof with round pipes usually consist of two parts. This is an apron cap and the so-called "sole", which is a rigid base and made of a steel sheet on which the manufacturer attaches the cap. Metal penetrations differ from each other in the angle of slope of the bottom plate of the structure in relation to the cap, therefore, they are selected depending on the slope of the roof. As a rule, in specialized stores you can always find the desired version of the products, since they are produced for roof slopes of various slopes.
Before installing the structure on the roof, the upper part of the hood is cut to the diameter of the chimney pipe, since it must pass freely through the hole in the hood. Then, the “sole” is rigidly fixed to the roof surface using roofing screws, onto which sealing elastic gaskets made of rubber or neoprene are put on.
Very often, when installing a metal penetration on a relief roof covering, to enhance the sealing of the junction, a metal sheet is fixed above the pipe, which is brought under the ridge element and fixed with an overlay on the upper side of the “bottom” of the penetration.

After the sole is fixed to the roof surface and the pipe is passed through the penetration, the upper edge of the cap is pressed against the chimney using a special clamp in which a heat-resistant elastic gasket is installed. This element will protect the junction of two elements from moisture entering it.
As mentioned above, in addition to metal penetrations, you can also find elastic ones on sale, equipped with a soft sole at the bottom. flexible metal, such as lead or aluminum. Through this plastic, but preserving the shape given to it, spacer, framing the “bottom” of the penetration, it is fixed to the sheathing, through the surface of the roofing material. The cap itself is made of weather-resistant elastic rubber, and tightly covers the pipe around the circumference, especially since it is usually also “grabbed” with a metal clamp.

The advantage of elastic penetrations is their versatility, since they can be installed on slopes that are built at any slope. Thanks to the flexibility of the combined penetration base, it is easy to shape the base of the roofing material.
Such flexible penetrations for round pipes are often called “master flash”. There is no shortage of such products in our time. And installation is very simple and accessible to any home owner.

In cases where for some reason it is not possible to use ready-made penetrations to seal pipe passages, then special self-adhesive aluminum or lead tape can be used to perform this work. Due to the flexibility, heat resistance and versatility of this material, you can use it to form a penetration yourself.

The vertical part of the pipe with the transition to the roofing is covered with pieces of tape. And then the tape is secured around the chimney - thus sealed abutment joint.
This material is highly resistant to various external negative impacts : high and low temperatures and their sudden changes, moisture, ultraviolet radiation,
So that the tape provides high-quality waterproofing connections, and the sealing lasts as long as possible, the tape must be applied to a clean, degreased and dried surface of both pipes and roofs.
For arranging connections around pipes having a rectangular or square section(most often brick), ready-made standard systems, manufactured by roofing manufacturers. In this regard, when purchasing this or that roofing material, you can immediately buy or order a set of penetration parts for a brick or concrete chimney according to specific sizes.
This standard option, made from sheet metal, can be used for roofing materials such as, profiled sheet, as well as the familiar slate of the old and new modifications. For the above-mentioned coatings, the joint sealing scheme shown below is usually used.

So, before the roofing sheets are fixed on the sheathing frame, preparatory work, which includes the following steps.

One more, more modern version sealing the junction involves the use of self-adhesive waterproofing lead tape, which is convenient for use both on level ground and on any embossed roofing covering.
When using such a tape, it must be fixed on the surfaces of the pipe walls using special metal clamping strips, which can be made independently. The upper junction of the planks with the walls of the pipe must be additionally covered with a layer of weather-resistant sealant.
Flexible waterproofing self-adhesive tape is perfect for sealing the junction of roofing coverings with high enough relief pattern, since it easily takes its shape when gluing and retains it. This tape is often used to cover joints if the roof is covered ceramic tiles, slate or ondulin.
ceramic tiles
It was already mentioned above that many manufacturers of roofing materials strive to accompany their products with proprietary systems for sealing pipe passages. One example is the design system for the connection to a pipe of the currently quite popular corrugated cellulose-bitumen roofing material ondulin.
| Illustration | Brief description of the operation performed |
|---|---|
 | IN in this case An option is presented for arranging the connection of a roof covered with ondulin to a stove or fireplace pipe of rectangular cross-section. The sealing system will be installed after laying the roofing material on the sheathing. The gap between the coating and the sides of the pipe, as well as below it, should be 20÷30 mm. On the rear side of the chimney, that is, facing the ridge, the distance between the pipe wall and the sheathing beam can vary between 50 and 100 mm. |
 | In order to secure the sealing apron around the perimeter of the pipe, it is necessary to include it in the roof structure in advance additional elements battens that are fixed along the walls of the chimney pipe. For this additional sheathing, a timber with a cross-sectional size of 40×40, 40×30 or 50×30 mm is suitable. |
 | The first step is to close the junction at the junction of the roof with the pipe on the front side of the pipe with a covering apron made specifically for ondulin. Typically, the manufacturer of roofing material also produces additional elements for the design of junctions, ridges and other complex and vulnerable covering components. Therefore, when purchasing material, you must immediately inquire about the range of additional elements, and, making preliminary calculations, they must be immediately included in the project. |
 | The covering apron is applied to the place of its future installation - along the lower edge of the pipe facing the eaves. Markings are made on the apron along which it will be necessary to make cuts. The upper, flat part of the apron should remain exactly the width of the pipe, and the wavy part should have one wave on each side. In this case, it is necessary to cut the wavy part along the lower crest of the wave. First, markings are made with a pencil. |
 | And then the apron is cut according to the applied markings. It is most convenient to cut the part with a sharp construction knife. |
 | Next, the finished apron is pressed against the pipe and fixed to the roof surface using branded roofing nails. The nails must enter through the ondulin into the sheathing beam installed around the pipe. |
 | In this case, nails are driven into the top of each wave of the apron relief. Fastening is not carried out only on the extreme waves that extend beyond the dimensions of the pipe on both sides. It is very important to drive the nails in correctly, strictly vertical to the roof surface. And balance the efforts so as not to deform the coating if the fasteners are hammered in too much. |
 | Now you need to prepare the Onduflash-super waterproofing self-adhesive tape. This material is excellent for sealing difficult areas - the butyl rubber component has excellent waterproofing qualities, and the aluminum base allows the tape to be given very complex shapes. The standard tape width is 300 mm. The length of the first segment should be 250÷300 mm |
 | The cut piece of tape is applied to the future installation site and is pre-bent along the relief of the corner to be sealed. The function of this segment will be to seal the edges of the previously fixed apron. |
 | After fitting the tape to the installation site, remove it from its back side. protective film covering the adhesive layer. |
 | The tape is applied at the junction of the roof and the pipe at the front corners so that it can simultaneously cover the upper and lower parts of the apron by 70÷80 mm. In order for the tape to bend into the required position and fit tightly to the material of the roof, apron and pipe, its corner is trimmed. |
 | Next, the tape must be good effort press onto all surfaces. It is especially important that the tape fits as tightly as possible along the joint line. First, such sealing is carried out on one lower corner of the pipe, and then the same is done on the opposite side. |
 | The next step is to apply a side apron to the pipe. The part is pressed against the roof surface and the side wall of the pipe and the cut lines are marked. |
 | The cuts at the top of the apron must be made clearly along the vertical boundaries of the pipe, that is, the edges of the apron are cut at a certain angle. And the lower part of the part, located on the roofing, should extend beyond the pipe in both its lower and upper parts by 100÷150 mm. |
 | The cuts are made along the marked lines using a sharp knife. First, a metal ruler is applied to the marking and a knife must be drawn along it with gentle pressure. |
 | That is, the apron material is cut through approximately ⅔ of its thickness. Then, due to a slight bending force, the apron part neatly breaks off along the cut line. |
 | The next step is to nail the prepared side parts of the apron to the roofing surface, under which additional sheathing elements are fixed. It is enough to drive three nails into each of the side parts of the apron - one in the center and one at the top and bottom. |
 | Next, a piece is cut from the waterproofing self-adhesive tape, the length exceeding the width of the pipe by 200 mm. This section will be used to seal the rear, most vulnerable part of the chimney pipe penetration. |
 | The cut part of the waterproofing tape is applied to the place of its future installation and bent along the line where the roofing sheets adjoin the pipe. At the same time, they try to immediately give its lower part the maximum shape that repeats the waves of ondulin sheets. |
 | Next, the protective film is carefully removed from the tape, and hydro insulating material presses tightly against the surface of the pipe and the roofing. The sides of the tape are cut so that the top of the cut parts can be glued to the sides of the pipe, where the apron elements are already fixed. Thus, the tape isolates the junction of the side element of the apron with the pipe wall, preventing drops of water from penetrating here during rain. |
 | The next task is to glue the waterproofing tape to the front side of the pipe. It is fixed on top of the front upper part of the apron, that is, the one that extends onto the pipe. The width of the tape should be 100÷150 mm, and its length should exceed the width of the pipe by 200÷300 mm, since it will bend onto the sides of the pipe and hide under the side parts of the apron. The tape must also be pressed very well against the brick or plaster surface of the pipe. |
 | Next, the upper edge of the waterproofing tape on the front side of the chimney is pressed with a metal fixing strip. It is secured with dowels. |
 | The same strips are screwed to the sides of the pipe, 15÷17 mm below the edge of the apron. The photo clearly shows how the fixing strip should be positioned, the ends of which are cut along the line of the pipe corners. |
 | Next, the edges of the apron remaining on top of the screwed side clamping strips must be slightly bent from the surface of the pipe. |
 | Now this formed corner between the pipe wall and the slightly bent edge of the apron is tightly filled with a layer of polyurethane sealant. For this operation you will need a special construction syringe gun. |
 | Now all that remains is to cut out and lay an additional piece of ondulin on the back side of the pipe. Its width should be equal to the width of the side elements of the apron. and the length is from the ridge to the pipe. An additional piece of ondulin is laid on top of the already laid covering, as well as on top of the waterproofing tape glued to it and the pipe. |
 | The laid additional fragment of ondulin is nailed to the sheathing directly through the coating that has cooled below. Fixation is carried out with roofing nails driven into the top of each wave of the covering. |
 | When the arrangement of the junction of the roofing material to the pipe is completed, you can proceed to further installation of the ridge elements. This ridge element will cover the upper edge of the additional ondulin sheet on top of the pipe. |
The information presented above quite convincingly indicates that there is nothing supernaturally difficult in sealing the area where the roof adjoins the chimney pipe. This kind of work can be done on our own. However, you should not forget about compliance with all safety requirements, since the work will take place on high altitude. Carrying out any installation operations on roof slopes without safety devices is extremely frivolous!
At the end of the publication, we suggest watching a video that shows in detail the process of sealing the junction of a tiled roof.
Despite all the efforts of the roofers to lay the roofing covering as closely as possible to the chimney and various protrusions, there are still leaks at the junction points. Water from the roof can thus enter the under-roof space through the cracks formed. Therefore, they all need to be properly sealed.
One of the most discussed issues among stove builders is how to seal a pipe on the roof. At a time when stove heating was present almost everywhere, when installing the chimney on the roof, a special thickening was made, which protected the roof from leaks. Nowadays everywhere brick pipes have given way to metal, often serially welded chimneys. It is also worth noting that modern stove makers, when choosing a brick for a pipe on the roof, do not thicken it.
In order not to encounter the most unpleasant situation when a pipe is leaking, you need to figure out how to seal a pipe on the roof.
The cracks are closed using various available materials. Schematically they can be divided into two groups:

As soon as the pipe is made, roofers are faced with the question of how to seal and waterproof the joints , how to seal a chimney. For this they use various materials. Let's note a few of the most common ones.

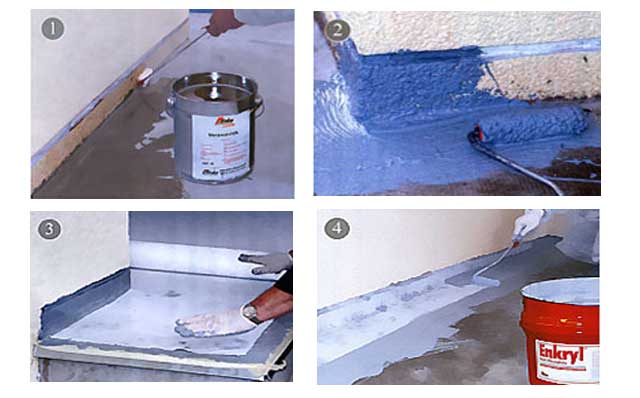
1. degrease the surface around the perimeter of the pipe;
2. Using a brush, apply the first layer of Enkryl liquid mastic;
3. the pipe is wrapped with Polyflexvlies Rolle (this is a viscose-based reinforcing fabric), which will provide additional elasticity to the waterproofing;
4. After 15–20 minutes, when the mastic has already been absorbed into the fabric, apply the second layer.
According to the manufacturer, it will hardly be possible to see that the roof near the pipe is leaking for 9–10 years.
Technologies for sealing gaps depend on factors such as the type of roofing material, the size of the gap, the shape smoke channel. Let's take a step-by-step look at the process of sealing a roof pipe from rain for popular coatings.

When filling gaps, it is necessary to ensure that the solution completely fills all possible cracks.

Sealing with mortar is the most accessible technology sealing slate roof. However, in the case of chimneys round shape using this method is associated with certain difficulties. This problem can be successfully solved using the following algorithm.

On soft roof Usually they do the cutting. The gaps are sealed using a special apron, which is framed with flexible self-adhesive tape based on rubber, for example, “Vakaflex”. The tape is carefully glued to the existing adhesive layer around the perimeter of the chimney, running it from the roof surface to the walls of the chimney. Then the cutting is pressed with a case. The gaps remaining between the flexible roofing material and the chimney are sealed with bitumen mastic.
If the gaps are large enough, they are first filled with tow or rope. Before this, the material is impregnated with compounds that give it waterproof qualities. For example, use oil paint, bitumen and more. Gaps can also be filled with cement mortar.

The connection of the corrugated sheet to the chimney with rectangular cross-section . The most common way to seal a chimney in this case is to install an apron. This shaped element is made of galvanized steel sheet. Install it on the roof, painted in the color of the roof.
In order to bring a chimney or ventilation pipe to the roof, a hole is made in the finished covering, so a gap will inevitably form at the passage site. No matter how great the skill of the roofer is, it will not be possible to avoid the appearance of a gap. This article will tell you how to seal a pipe on the roof to achieve a completely sealed joint and isolate the elements rafter frame from rain or snow.
To bring the chimney through the roof, a larger diameter is cut out into it, so that a gap remains between the walls of the chimney and the roofing material. Regardless of the width of the gap, it is big problem that homeowners and builders face. To eliminate this defect and protect the under-roof space from the penetration of atmospheric moisture, use seals, aprons, collars, made by yourself or purchased. Unsealed gaps between the roof are fraught with the following consequences:
Important! The method of sealing the gap between the chimney and the roof depends on its size, the type of roofing material used and the shape of the chimney. If the distance is less than 5 mm, it is quite possible to get by with a heat-resistant silicone-based sealant. You can close a gap whose width is 1 cm or more using cement mortar, an apron, or a special sealant.
To seal the gap between the slate or tile roofing, use a moisture-resistant cement mortar and a decorative collar. This is the most affordable way Insulate the attic and rafters from moisture with your own hands. This requires dry mortar, water, a mixing container, steel corners and a collar. Installation work performed in the following order:

Important! To ensure that the structure is reliable and does not collapse during the first serious downpour, high-quality waterproof cement is used. Otherwise, cracks will appear on it, through which water will leak into the rafter frame.
To seal the gap between the chimney pipe and the roofing material with your own hands on roofs made of metal tiles and corrugated sheets, use special aprons. They are made of galvanized steel in the color of the roof in the form of additional elements. With their help, you can reliably and aesthetically isolate the gap; to do this, proceed in the following order:


Important! You can make your own apron from sheet steel. However, factory products look more aesthetically pleasing and presentable. When working on the roof, special roofing screws are used as fasteners, equipped with a rubber headband, which, when twisted, flattens, closing the hole from water penetration. If there are no such screws at hand, gaskets are cut out of rubber using them with ordinary self-tapping screws.
Construction stores suggest using Master Flash rubber aprons or Wakaflex sealing tapes to seal gaps where pipes pass through a roof made of any material:

Note! To eliminate cracks big size They are pre-compacted with a fibrous sealant, and then filled with bitumen mastic or filled with polyurethane foam. After this, the passage area is decorated with a decorative collar. Please note that collars are produced with a standard angle, which is selected in accordance with the slope of the roof slope and the diameter of the chimney.
The main condition for long-term operation of the roof is maximum tightness, which is achieved by isolating even minor gaps. Whatever embedding method you choose, remember that reliable protection protection from moisture penetration is more important than an attractive appearance.


