Are you planning a bathroom renovation? Then you need to think about how to quietly hide pipes and all communications from prying eyes, since being in a visible place, they can spoil the most creative design. The pipes must be hidden in such a way that they can be inspected and, if necessary, repaired in an emergency. In this article we will look at the question of how to hide pipes in the bathroom using different ways camouflage. Which? You will learn more about this further.
Before starting work, you need to familiarize yourself with the list of pipes that are installed in the bathroom at the very beginning of all construction work. This information is needed in order to correctly understand the entire system. possible types communications. We will look into the issue of where this or that pipe fits and its compatibility with different finishing materials.
Important! Information such as the purpose of pipes and the selection of material for masking them can be useful when you need to change plumbing, clear blockages or carry out preventive work.
According to their purpose, pipes can be classified into the following systems:
All of the above communications must be hidden carefully down to the smallest details. We will tell you how to hide sewer pipes in the bathroom in the following sections of this article.
This is the simplest and inexpensive option. How to hide pipes in the bathroom behind wall-mounted or built-in furniture? Easily! For example, if the pipes are located in a vertical position, then you can hide them behind a regular cabinet of the required size. You just need to remove the back wall and make cutouts at the top and bottom of the panels, leaving the shelves. As a result, we get a cabinet in which you can hide many different things, including pipes.
The advantage of this method is that it is attractive appearance and convenient location of cabinets for storing all the necessary bathroom accessories. Having installed such furniture, it is necessary to treat all cracks with silicone to increase the tightness of the seams.
Important! The cabinet where the pipes will be hidden can be decorated with a solid opening door, or can be used as a mirror. This is very convenient - they closed the cabinet, but there were no pipes.
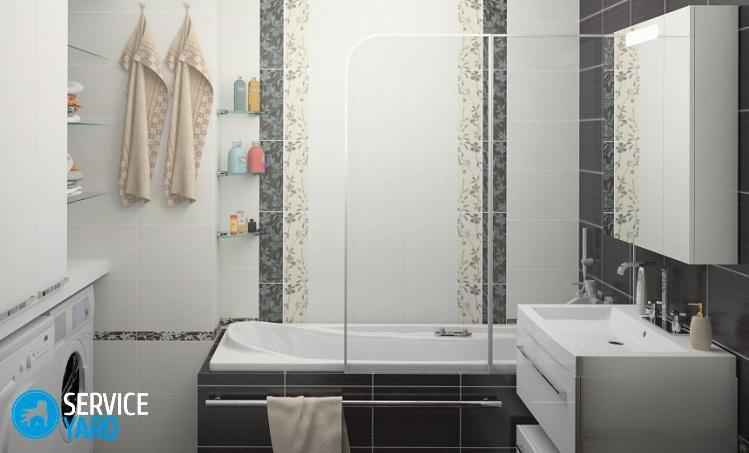
In this case, there is a significant drawback - moisture. In those places where communications pass, humidity is always high, and choosing the right furniture that can cope with this problem is quite difficult. Of course, you can cover all surfaces with a moisture-proofing compound, but such work will take a lot of time, and it’s not cheap at all.
For the manufacture of bathroom furniture, a material such as chipboard, which is not afraid of moisture, is often used. But sometimes this is not enough. Such furniture can quickly deteriorate. Periodically wiping down the furniture in the bathroom will help save the situation. preventive examination asked for siliconized places from possible deformation, where water could get in.
Important! If it turns out that the silicone is damaged or completely deteriorated, then remove the old sealant and fill the gaps again.
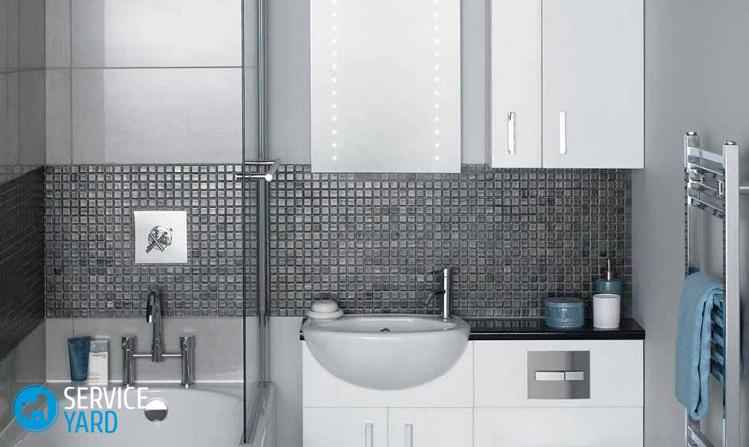
It can take a long time to cover the pipes with tiles. This is a rather complex process that requires special endurance. This material is excellent for the bathroom, as it is highly resistant to moisture. To mask pipes with tiles, you need to install a frame. As the base you can use a wooden frame or a metal base.
Important! Metal base very practical, as it does not require surface treatment with protective products.
We begin to mask pipes with tiles:
Important! Such a door needs to be recessed a little into the wall, and then covered with tiles on top. In this way, the hatch will not be noticeable against the general background of the wall.
This method is very convenient if you are just building your house or remodeling. In order to remove pipes into the wall, you need to cut it with special electric tools. Sometimes the walls are not thick enough to do this kind of work.
Important! If your walls are panel, then such work in a horizontal position is strictly prohibited.
It is necessary to hide in the walls only those pipes that are made of copper or polypropylene. They must be well welded and soldered, without processed joints, then their service life will be as long as possible. In this way, you can discreetly hide passing horizontal risers.
Important! If the surface is to be covered, then the thickness of the tiles must be taken into account.
Features of the work:
This option will make the bathroom much more spacious and aesthetically pleasing, but if you replace the pipe, you will spend a lot of time opening access to communications, since you will need to dismantle the entire structure box and replace the entire pipeline.
Important! Laying laminate, tiles or other coatings can only be done after the screed has completely dried, since if you turn on the water over a damp connecting structure, the coating may crack.
How to hide pipes in the bathroom with your own hands? Using a special screen is another way to mask a pipeline, which can be called fast and practical. Such screens are quite widely represented in construction stores. This design is a frame with guide elements, to which panels made of plastic or plasterboard are installed. This screen is affordable and looks attractive. If necessary, it can be easily removed, simplifying repair work. But at the same time, it has a big drawback - a reduction in the area of the bathroom.
Important! Before purchasing such a camouflage for a pipeline, you should carefully consider whether this option is suitable for you or not.
This option is not only easy to install, but also has a low cost. Supplies. It is better to install a plasterboard wall in an uninhabited room, where the location of the partition is determined by the owner. This method of masking pipes is suitable for large rooms.
Important! The method with a plasterboard box can limit access for repairs or inspection of communications. When replacing pipes, it is necessary to completely dismantle the box, and after repair, reinstall it. In addition, installing such a design will take away valuable centimeters of the bathroom.
We will prepare the necessary materials and tools for the work:
Step-by-step master class on masking communications with plasterboard:
Important! Do not forget to do pipe routing at the stage of construction of the structure, taking into account the thickness plasterboard wall and tiles, if they will be used in finishing this structure.
Important! To speed up the process, all details can be prepared in advance.
In the bathroom, roller shutters look like regular blinds or roller shutters, fitting tightly to the sides of the niche with pipes. They are installed in the direction from the ceiling to the floor or to the level of the panels. They come with everything needed to install them.
Important! The operating principle is based on the fact that metal or plastic roller shutters are wound onto a shaft when opened. In a similar way, they are unwound and secured using a special lock or sliver.
When choosing one method or another for masking pipes, base it on the size and design of the bathroom, as well as personal ideas and financial capabilities. In a word, solving the problem of hiding pipes requires a thoughtful and planned approach, since with illiterate intervention, all residents may be left without water supply. We hope our article was useful. Now you know how to discreetly hide pipes and make your bathroom even more beautiful!
Very many, planning high-quality and modern renovation in the bathroom, be sure to pay Special attention pipelines. The first question that arises is initial stages planning is like hiding pipes in the bathroom in such a way that they do not take up free space and at the same time are as hidden from view as possible. In this article we will answer this question and demonstrate examples in the photo.
Before closing the pipes in the bathroom, you need to decide exactly how they will be closed, taking into account the features of the building, the size of the room and financial capabilities. The first step is to decide what type of wiring will be, open or closed. Only after this can you decide whether to hide the pipes in the bathroom in the walls, in a floor screed or in special plasterboard boxes.
Before removing the pipes in the bathroom, you need to choose the type of wiring based on the number of consumers in the room and the distance between them. Today there are two main types of wiring:
The collector type of wiring is used in cases where there are many consumers installed in the bathroom. In order for them not to suffer from a lack of water or pressure as a result of joint work, a separate line is supplied to each of them from the main distributor. Hiding pipes in the bathroom with this scheme requires large quantity space, since the system turns out to be quite voluminous.
The sequential circuit is used in small rooms with several consumers, to which water flows from a common main through separate branches. So, when the valve in the washbasin is open, the pressure in the shower mixer drops significantly if it is located further along the pipe. Such wiring takes up little space and open pipes in the bathroom can be easily hidden in the wall or under a screed.
At this stage, you need to choose whether to close the pipes in the bathroom tightly or leave them open. If the room is spacious and allows you to arrange open wiring in special boxes without noticeable loss of free space, then this type of wiring is usually used. But if the bathroom has limited space, then here we hide the pipes in the bathroom in such a way as to free up the maximum usable area. The choice of wiring determines which pipes will be used in the plumbing of the room.
Important! For styling hidden wiring Walls need to be chipped. However, violating the integrity of supporting structures is strictly prohibited. Therefore, before hiding the riser in the bathroom, you need to make sure whether the wall is load-bearing.
It is also worth considering that not all pipes are able to provide reliable connection for many years, and in this case, before blocking the pipes in the bathroom, it is necessary to ensure free access to the connection areas for technical inspection or repair in case of leakage. For hiding under screed or finishing materials, only polypropylene pipes are suitable, where the connection is made by hot soldering. Sealing bathroom pipes made of other materials with crimp or threaded connections is not recommended.
Rules for laying hidden wiring
In order for the renovated bathroom to look as spacious as possible and all its plumbing elements to work perfectly, it is necessary to adhere to a number of basic rules when planning the wiring:
Important! If we hide pipes in the bathroom using any type of wiring, it is advisable to provide the hot and cold lines with insulating materials to prevent the formation of condensation.
Today, there are several main types of masking pipelines and sewers from view. The most common are:
Each of the options answers the question of how to hide communications in the bathroom and below we will consider them in more detail.
Laying in concrete screed
This method of wiring is the most practical and easy to implement, since it allows you to lay highways along the shortest route. Before walling up the pipes in the bathroom under a screed, you need to take into account that floor tiles will lie on top and access to the pipes will be completely blocked. Therefore, it is necessary to use only polypropylene pipes with thermal insulation, so that condensation does not form and the hot line does not lose heat. Masking pipes in the bathroom in this way is done in cases where the walls in the room are load-bearing and their stripping is impossible.
Important! If the room uses an electric heated floor system, then before sealing the riser in the bathroom with a screed, the lines must be laid around the perimeter of the room so that the pipes do not intersect with the floor heating elements.
It is also worth remembering that propylene pipes tend to expand when heated. In order to provide sufficient space for expansion, before hiding the pipes in the bathroom, in addition to thermal insulation, a corrugated shell is installed on the line, which provides enough space for thermal deformation. Before covering the pipes in the bathroom with cement, you need to make sure that the thickness of the screed is sufficient to completely cover the pipes and create a flat surface for laying tiles.
Closing pipes with furniture
Using furniture elements to cover pipes in the bathroom is also a very common camouflage option. If part of the main line is laid in a screed, and the outgoing pipes exit vertically along the outer part of the wall, then it is enough to purchase cabinets required height and before covering the pipes in the bathroom, remove the back wall and cut out the holes for the pipes. After which the cabinet leans against the wall and covers the visible part of the highway. However, this option cannot always be implemented beautifully and usually exposed pipes in cabinets quickly collect condensation. In such cases, before covering the riser in the bathroom with furniture elements, the pipes need to be additionally insulated.
Installing wiring in the wall
This does not mean sewing up pipes in the bathroom in finished wall by stripping, and installation of highways in the wall during the construction of a house or redevelopment of a room with the construction of new partitions. In finished panel walls, the thickness of the slab is often not enough for full installation pipes Before hiding communications in the bathroom during panel construction, you need to make sure that the working wall is not load-bearing. IN load-bearing walls Only vertical raking is allowed.
During the construction of walls or the construction of new partitions, before sealing the pipes in the bathroom by laying them into the wall, polypropylene pipes with thermal insulation and corrugated protection are also used. The pipes are laid in advance in the space between the bricks and filled with mortar so that no voids form.
Boxes and niches for closing pipelines
Covering the pipes in the bathroom with plasterboard is the first solution that comes to mind when other masking options are impossible, since this option is the fastest and most convenient to implement. Creating a box is the simplest, fastest and least expensive idea, but it has a significant drawback. The box for pipes in the bathroom takes up additional space, and especially in small rooms this is very noticeable.
Before covering communications in the bathroom with plasterboard or wood, a special frame is created from aluminum profiles or wooden blocks. This structure is then sutured plastic panels, plasterboard, ceramic tiles or decorative wood according to the design of the room. The pipe box in the bathroom allows you to in the right places create inspection hatches through which the technical inspection or repair of communications.
Important! If you already have to create similar structures in small rooms, then before sewing up the pipes in the bathroom, carefully consider the design of the box and try to use it inner space for storing household chemicals, mops, brooms and other household items.
Use of decorative screens and overlays
Before you disguise the pipes in the bathroom, you should pay attention to such modern products as decorative screens or overlays that allow you to simultaneously hide pipes and decorate the interior of the room. Screens for pipes in the bathroom are ready-made frames different sizes with guide rails along which plastic or glass doors move. The price of such products is not high and they are installed very quickly. Their use significantly speeds up the process and they are mainly used as inspection hatches for important plumbing components and providing quick access to them.
Also, closing the pipes in the bathroom can be done with special decorative linings, which are made mainly of plastic or wood. Bathroom pipe covers may have different variants colors or imitate materials such as stone, marble, wood. Such products will good decision for those who don’t know how to hide a riser in the bathroom quickly and beautifully.
This material can be used as a guide for those who still cannot decide where to hide the pipes in the bathroom, saving space or simply updating the appearance of the bathroom.
How to hide pipes in the bathroom, close the riser in a box
When carrying out renovation work in the bathroom, you will most likely want to know how you can hide the water supply and sewerage pipes. This will help improve the aesthetics of the room as a whole. The difficulty of such an event lies not simply in completely hiding all communications from prying attention. This must be done in such a way as to leave them available for ongoing inspections or repairs in the event of an accident.
To decide how to hide sewer pipes in the bathroom, you should carefully analyze and study the communications layout plan. It is very important to draw up an accurate design, since apartment building all systems are interconnected. Because of this, if communications are connected incorrectly, problems may arise for both you and your neighbors.

To properly hide the pipes in the bathroom, you need to decide in advance where the connection points for plumbing fixtures, possible branches and turns of the pipeline will be located, and mark the wiring diagram directly on the wall.
You can also draw a schematic plan for the location of communications on paper. It is important to consider the scale, but it is better to clearly indicate the dimensions.
When planning to hide pipes in the bathroom, you need to lay them along the shortest route and with a minimum number of bends and turns.
Pipes located horizontally are hidden under the screed, and risers (pipes running vertically) are hidden under the plaster. This method involves carrying out related construction work, such as installing grooves, applying a layer of plaster, and laying tiles.

Communications can also be hidden by constructing a system of moisture-resistant plasterboard or OSB. This is done in this way - a special metal profile is attached to the wall, to which sheet material is screwed using self-tapping screws.
You should also not neglect insulation - before fixing sheets of drywall or plywood, it is recommended to lay a layer of foam plastic or mineral wool. After the structure is assembled, it can be covered with tiles.
You can also assemble furniture structures in the form of shelves or cabinets that will help with masking pipes. In addition, there will still be enough space inside to store household items, such as household chemicals.
In the end, the pipes can simply be painted over, decorated with artificial vines, covered with multi-colored mosaics or stucco elements made of foam plastic - in general, you can do whatever your imagination dictates.

You need to remember to exclude the method of simply tightly hiding the places of threaded connections, fittings, valves and meters. They should be easy to access.
To give the bathroom aesthetics and increased comfort, as well as to free up as much space as possible, it is advisable to mask all the pipes if possible. There are a number of rules, the implementation of which will enable pipelines to function for a long time and reliably:
There are several ways to hide bathroom pipes under tiles. Photos, examples of which you can see in the gallery of our website, clearly demonstrate this.

To hide pipes under screed or plaster, professionals recommend using exclusively polypropylene or copper pipes that are not equipped with threaded connections, but are firmly soldered or welded. To choose the option that suits you best, you need to familiarize yourself in detail with the features of each of them.
Hiding communications in a screed
This method of hiding horizontal pipes is the most aesthetically pleasing because they will be hidden so that it will be almost impossible to find them.
Before laying, the pipes are placed in a special corrugated hose. They need to be laid along the shortest route, after which a layer of cement or concrete screed. The layer thickness should be 2–3 cm above the pipes. After the screed has completely hardened, it is laid on the floor finishing coat, such as tile, linoleum or laminated panels.

It will be useful to remember that until the solution has completely hardened, the bath cannot be used, since hot water passing through pipes can lead to cracking of concrete that has not completely hardened.
Construction of tunnels
To make niches in which communications are laid - the so-called grooves - it is reasonable to use an angle grinder or grinder with a pobedite or diamond disk.
Next, you need to make two parallel cuts at a distance corresponding to the cross-section of the pipe, then use a chisel and hammer to remove all excess concrete between the cut grooves. The manual process will be long and tedious, so it is wiser to use a hammer drill with a chisel attachment.

Hoses with pipes are placed in the finished grooves, after which they are covered with plaster. You can lay the finishing on top flooring.
In places of threaded connections, valves or fittings, it is necessary to install inspection hatches to ensure access to them when the need arises.
The advantages of this method of masking pipelines include their complete concealment under the floor. However, this method has its drawbacks. Access to the pipes in the event of an accident will be limited by the size of the inspection hatch. If a breakthrough occurs, it will be very difficult to locate it. To do this, you will need to completely tear off the decorative coating.
Therefore, pipes laid in walls should only be of high quality. In this case, many problems can be avoided.
Plasterboard structures
Let's look at how to cover pipes in a bathroom with plasterboard. This is one of the most common ways to disguise a sewer riser. Boxes of several levels will be an excellent solution to hide communications, visually enlarge the space, while simultaneously gaining unrestricted access to the pipeline. The structure consists of galvanized profiles fixed to all planes of the room, to which sheets of plasterboard are screwed with special screws. It is this material that acts as the basis for laying tiles.

It is important to take into account the need to equip these systems with inspection holes for monitoring at connections, valves, meters, and filters.
Another method of masking pipes using drywall is the construction of an additional partition, the so-called false wall. To do this, you can use another technology. Below is an example of how to hide pipes in a bathroom with your own hands using plastic panels. As a rule, this method is used in large bathrooms.

Masking partitions can be straight or oblique. Oblique false walls are located at an angle relative to the load-bearing walls. They also need to be equipped with inspection hatches for access to communications.
Rolled metal shutters
Installing a roller shutter will completely solve the issue of gaining access to the pipeline. You can also install shelves behind it for storing household small items. In particular, it would be ideal to store household chemicals there. Since roller shutters can be locked with a key, you don’t have to worry about the safety of your kids. Installation of this device will not pose any problems, and the color can be easily matched to the tone of the tile.

However, such shutters may not stylistically match the interior design of the bathroom. In addition, they are made from rather unreliable materials, and shutters can easily be crushed or broken if handled carelessly.
Masking pipes with furniture
One of the most convenient and functional methods of hiding pipes in the bathroom will be furniture systems. Well-chosen furniture will add elements of luxury to your interior design. As a rule, to hide communications in the bathroom, cabinet systems with shelves, equipped with sliding or hinged doors, are often used. This choice directly depends on total area the bathroom and the location of plumbing fixtures in it.
Typically, laminated chipboard is used to make furniture for bathrooms, and it must be moisture resistant. Upon completion of installation, it is necessary to process silicone sealant all gaps and joints to protect furniture from contact with water. Although chipboard is considered moisture resistant, it can become unusable due to constant exposure to water.
Masking plumbing, sewerage and heating in a room using furniture has a significant disadvantage, such as low resistance to the influence of water. Of course, manufacturers make all countertops and laminated slabs for bathrooms moisture resistant, although, as a rule, this does not save the furniture - it quickly loses its attractive appearance.

This can be partially avoided if you regularly monitor the degree of wetting of the furniture in the bathroom. To do this, you need to wipe it dry after each visit to the bathroom. In addition, it is necessary to regularly check the areas where silicone sealant is applied for deformation.
An important advantage of this method of hiding conductive communications in a room is its high aesthetics, as well as functionality, since cabinets can be used as an additional storage system.

In short, solving the problem of hiding pipes in the bathroom requires a thoughtful and planned approach. Because if the pipe distribution is installed incorrectly, almost all residents along the riser at the entrance may be left without water supply. To prevent this from happening, you should take into account all the nuances of carrying out such work and choose the most suitable camouflage method for your bathroom.
How to hide pipes in the bathroom under tiles with your own hands
The ideal option is to hide water pipes in grooves (knocked grooves in the wall). However, few people know that in load-bearing walls only allowed vertical scoring no deeper than the location of the connecting reinforcement (violation of its integrity is not allowed). Horizontal However, grooves can significantly weaken the strength of the wall, so they are strictly prohibited. Laying pipes in reinforced concrete structures is also unacceptable. interfloor ceilings.

Horizontal gating of walls is allowed only if the wall is not load-bearing
Any threaded connections.

Free access must be provided to water meters and stopcocks


Sealing with sand-cement mortar
If pipes leak, removing a sheet of drywall and fixing the problem is much easier than digging out concrete. That is why the method of hiding communications with sheets of drywall and then gluing tiles is the most common.

Profile UD (guide)

Attaching the self-adhesive tape


Fastening profiles using direct hangers

The rack profile is inserted into the groove of the guide

The frame is assembled from wooden slats

Ready-made frame for the box, assembled from metal profiles

Drywall boxes. Bottom view
To protect yourself from mold, you should use false walls and boxes in the bathroom. moisture resistant drywall(marked GKLV). Most often, such sheets are green, but some manufacturers produce it in other colors.
Drywall is attached to the profile using self-tapping screws

Plasterboard can also be used to cover the pipes leading to the toilet.

A ready-made inspection hatch can also be purchased at a hardware store.

The original cabinet will not only cover the pipes, but also become a storage place for household supplies
How to hide pipes in the bathroom in the wall, under the tiles

Photo 1 - Hiding pipes in the bathroom
Sewer and water pipes, being in plain sight, can ruin even the most original design, so you need to hide them.
In order for the bathroom to look stylish and at the same time all systems to work properly and for a long time, you need to follow several rules:

Photo 2 - Plastic pipes in the bathroom
To prevent condensation from forming on pipes, use insulating materials. If the pipes are planned to be hidden in the wall, such insulation will also allow them to expand freely, which is especially important for pipes with hot water.

Photo 3 - Insulating material for pipes
If there is a need to hide communications in the bathroom, then there are several proven methods.
Hide all communications behind mounted, or built-in furniture- the simplest, fastest, and at first glance inexpensive option. For example, if the pipes are located mostly vertically, then you can buy a regular pencil case, the right size. All that remains is to remove the back wall and make the necessary cutouts on the panels at the top and bottom. The result is a cabinet in which you can put away many different things, among which there will be pipes.

Photo 4 - Masking pipes behind a bedside table
However, this method has a significant drawback. In the place where the pipes pass, always high humidity , and choosing furniture that can withstand such a load for a long time is difficult. All surfaces can be further treated moisture-proof material, but it will take a long time and is not cheap.
This method is convenient if the house is just under construction or is undergoing redevelopment. To hide pipes in the wall will have to be tapped, but if the walls are panel, then performing such work in the horizontal direction is prohibited. Quite often the walls are not thick enough to carry out such work.

Photo 5 - Installation of pipes into the wall
It should be remembered that metal pipes, as well as any communications with threaded connections, cannot be used for wall installation. It is important to correctly route the pipes, and be sure to take into account tile thickness, if cladding will be carried out. Next you need to lay the insulation. All that remains is to do the plastering work, close the pipes and you can veneer.

Photo 6 - Pipes in the wall in the bathroom

Photo 7 - Pipes in the wall in the bathroom
The construction of a box can be considered one of the ways bathroom remodeling, quite simple and convenient. A metal profile of the required shape, or several wooden blocks of the required length and cross-section, is sheathed with sheets of plasterboard, which requires subsequent finishing. It is easier and faster to build a box using plastic panels.

Photo 8 - Pipe box in the bathroom
Niches for masking pipes are built in a similar way, but allow you to hide not only plumbing lines, but also washing machine, washbasin, etc.
Boxes and niches have a serious drawback - they occupy area, which is very important in a small room.
Currently, the selection of screens in stores is quite wide. It is a frame with two guides, to which panels made of plastic or plasterboard are attached.

Photo 9 - Screen under the bath photo
The cost of the screen is low, but it looks very original and attractive. In addition, it is easy to remove, which makes access to communications quite easy. The disadvantage is the same as that of boxes and niches - it takes up several centimeters of usable space.
This option is characterized by ease of installation and low cost. Install plasterboard wall It’s better in uninhabited rooms, where the location of the partition is determined by the owner. This option for masking pipes is also suitable for large bathrooms.
At the first stage, you should prepare all the necessary materials and tools.
Now you can start building the frame:

Photo 10 - Installation of a plasterboard box for pipes

Photo 11 - Installation of the pipe box
Now you can start covering the frame with plasterboard:

Photo 12 - Installation of the pipe box

Photo 13 - Finishing the box with tiles
When choosing a way to hide pipes, you need to be guided by the size and style of the bathroom, as well as personal preferences and financial capabilities. You can use any of the options described above, and no one limits you in creating your own method, which will be more interesting and practical.
How to hide pipes in the bathroom the right bathroom to hide pipes in the wall in a closet in drywall
If you dream of turning your bathroom into... cozy place rest and performing hygienic procedures, then you, first of all, need to mask all the pipes there. The most optimal solution is to choose plastic panels that would perfectly harmonize in color with the bathroom, and also reliably hide the water and sewer pipes from prying eyes.
It is possible to close the pipes in the bathroom if you install a plastic cabinet, or use other methods.
Let's look at the most common ones, thanks to:

Please note that by lining and closing the pipes, you will significantly reduce their noise during operation. If the measures taken do not positively solve the problem, then you should resort to special means, for example, insulation. The latter can both reduce the noise level from the hum of pipes and extend their service life, protecting them from moisture and deformation.
For bathtubs, plastic covering is best. Firstly, it is not subject to deformation as a result of temperature changes and high humidity, and is easily washed off. various contaminants, looks stylish and festive.
Of great importance when masking pipes is the ability to attach plastic panels to walls and pipe products. I’m also very pleased with the chic assortment of plastic - imitations of wood, stucco, metal, etc., which can be safely used for a bathroom of every possible style. It’s not for nothing that plastic confidently takes the lead when answering the burning question: how to seal the pipes in the bathroom?

Preparation for masking pipes with plastic starts with purchasing a tape measure, a pencil, a hacksaw for metal with a millimeter blade, nails, self-tapping screws or a stapler, a hammer, silicone glue, plastic, and bars for the frame. The latter can be made from various materials(wood, metal, etc.).
The sequence of masking pipes in the bathroom:
A cabinet is an ideal solution for hiding pipes located vertically directly on the wall or in a niche in the bathroom.
Installation sequence:
Water pipes can be covered with tiles. Its shape, dimensions and color must be identical to the wall cladding. And in the event of an emergency repair or water supply leak, the disguise could be easily dismantled. Therefore, these designs were not invented in vain and are an urgent need in force majeure circumstances.
To seal pipes in the bathroom in this way, you need to prepare tools and materials in the form of:

The sequence of actions when masking pipes with tiles:
To implement this method, you will need specific tools and materials in the form of:
To do this, prepare three boards, calculate the distance from the outside of the pipe to the wall and add 2 cm to the resulting value. This will be the width of the box. Saw off a board of this size, which we will call No. 1. The size of board No. 2 in length should correspond to the height of the room.
The size of board No. 3 can be obtained by attaching No. 2 to the pipe and calculating the length to the wall, taking into account the overlap of No. 2 on No. 3 to firmly fasten both boards with nails. After this you can make board number 3.

The following procedure for sewing up pipes in the bathroom:
The final stage of masking the water supply is painting the pipes. It must be done so that no traces of rust are visible, and the result exceeds all expectations even with high level humidity.
For the procedure you need to buy:

Sequence of actions when painting pipes:
Use our tips:
Having completed all these steps, you will finally cope with the task of masking the pipes at the site of hygiene procedures.
When remodeling or major renovation of an apartment, the question arises of how to hide pipes in the bathroom. Communications located along the wall spoil the interior of the room. Disguising pipes helps make your bathroom more attractive. There are several ways to hide unsightly elements.
Undisguised pipes in the bathroom.
Before starting work, you need to choose what material will be used to close the water supply or sewer lines. It is wrong to consider only aesthetic characteristics.
Materials must meet other requirements:
Some elements of communications cannot be disguised by being embedded in the wall. If malfunctions occur, the cladding will have to be disassembled. Do not fill with cement mortar a recently installed sewerage or water supply system.
Polypropylene and steel pipes are durable, but poorly made connections are not immediately detected. Thin seams leak, which is detected the next day. The pipes are left free for at least a week.
The following parts can be mounted on walls:
You cannot completely block access to the following parts of the system:

Disguised pipes in the bathroom.
When masking communications, consider the following recommendations:
There are different options that help to beautifully seal unaesthetic communications.
Painting is simple and affordable way masking water supply and sewerage systems. Plastic elements can also be coated with a coloring composition. Preference is given to products intended for processing heating radiators. The coating does not turn yellow when exposed to moisture and high temperatures. Acrylic compositions are also suitable.

Pipe decor.
Painting includes the following steps:
No less in an interesting way is decoration. For this purpose, polyurethane tubes decorated with stucco are used. The result is columns that fit well into a classic interior. This option is suitable only for vertical elements. Horizontal ones are hidden with vines or covered with patterns that match the tile pattern.
The creation of such structures requires significant financial and time costs. Both risers and horizontally located areas can be sewn into the box. Plasterboard structures act as a screen for a bathtub or sink.

Stages of creating a plasterboard box for pipes.
Assemble the box like this:
False wall helps close sewer pipe located behind the toilet. The plumbing fixture is installed close to the screen, behind which a volumetric corrugation will be hidden. The disadvantage of this method is the reduction usable space bathroom. The wall cannot be made blank, so a door is installed above the toilet.
For the bathroom, they purchase a furniture set that can hide elements of the water supply and sewerage systems. Vertical details are masked using high pencil cases. The rear wall of the module is removed, and recesses are cut out in the shelves. The places for supplying pipes to the sink faucet are hidden with a cabinet. Her back are also removed.
This design does not have a plasterboard base. A collapsible tiled structure provides access to connection points and metering devices. Dismantle the structure by removing fasteners.

Masking pipes with a frame lined with tiles.
Assembly steps:
Plastic is not damaged by moisture. The panels are easy to install and dismantle. The material is quickly cleaned of contaminants without losing its decorative qualities. Using the screen, you can remove thick risers and horizontal elements located close to the floor from visibility.
The work is carried out as follows:
Using roller shutters is a non-standard way to hide communications with your own hands. The design provides fast access to the required areas.
Roller shutters fit into loft or hi-tech interiors. The lifting mechanism can be manual or electric. The first option is suitable for small widths of the hidden opening. The automatic lift must be protected with sealed plastic.

Masking pipes for plumbing shutters.
It is difficult to seal pipes this way. The method is used for major repairs or redevelopment of a room. Installing parts in the wall allows you to save useful space. When carrying out work, take into account that thin walls cannot be tapped.
Installation begins by drawing up a diagram of the water supply and sewer systems on paper. The walls are tiled along pre-drawn lines. The choice of tool depends on the wall material. The pipes laid in the channels are fixed with cement mortar.
The advantages of masking pipes include:
Disadvantages include limited access to communications. Carry out repairs if any emergency situations it will be hard. In such cases, plasterboard structures are dismantled. The situation is even more complicated with camouflage in the wall. The furniture installed in the bathroom is gradually deteriorating.
Anything unusual design solution sanitary premises can be spoiled by the unsightly appearance of open communications. There are several ways to hide sewer pipes in the bathroom that spoil the view, the main thing is to provide access to the service systems.
Disguising sewerage with tiles
Properly installed internal sewerage in an apartment is the key to the normal functioning of plumbing and the absence of problems with unpleasant odors and dampness. Professional pipe installation will also keep the repairs you just made and your nerves intact. Therefore, before walling up pipes into the wall, make sure that the joints and fasteners are securely glued together, and that the communication diagram is made in accordance with the building design.
Before closing the sewer pipes in the bathroom and toilet, you need to choose the right finishing material. The quality and technical characteristics of the materials used must meet the following requirements:
The best materials for these characteristics to mask communications are: MDF panels, plastic wall panels, moisture-resistant drywall and tiles. A variety of textures and a wide range of colors allow you to use them in any interior and create your own original design.
There are many options for hiding protruding communications in the kitchen and bathroom; we will look at the most popular ones.
Covering sewer pipes in a toilet with furniture is a simple, functional way to hide the pipes from view while still allowing access to them. It is important to choose the right set for the kitchen or bath. It’s even better to make it to order, taking into account all the existing communications nuances.
 How to hide pipes in a toilet with furniture
 Large sewer pipes, such as risers, should be completely hidden behind wide cabinets. To ensure that the furniture fits tightly to the wall and the protrusions are not conspicuous, you must:
The pipes in the kitchen leading to the sink will be hidden by a cabinet, on the back wall of which it is necessary to carry out the same work as with the stand.
 Decorative decoration
 If there is very little space and there is no way to order and install furniture, you can simply decorate or paint over the water supply, making it part of the interior. For painting pipes, there is a special radiator paint that is resistant to heat and does not emit toxic substances. To modify the risers, you can use water-dispersion or alkyd paints.
Before application, the surface is cleaned of rust and dirt. Cover with a primer, which will protect the metal from corrosion and give greater adhesion to the paint. Before painting, make sure that no condensation has accumulated, which should be removed if necessary.
For plastic pipelines, choose paints that do not contain alkali or acetone. This may damage the coating. Acrylic ones based on white spirit are best suited. Next you need to follow our advice:
Decorated pipes look no less interesting. You can, for example, use stucco, which will effectively complement the vertical risers and turn them into columns.
 The original way coloring boners
 One of the most popular ways is to completely cover the sewer pipe in the toilet with plasterboard or make a box out of it. Moisture-resistant drywall- a practical material that is often used in interior design or during remodeling. Its main difference is antifungal and impregnated impregnation, which protects the material from mold, mildew, and destruction.
 Creating a communication box
 To h To sew pipes in a box, you need to create a frame from metal guides secured to the wall with brackets. To create the box, profiles are used, the size of which is 27x60 mm. The work is carried out in several stages:
If the box is created to disguise hot water or heating plumbing, exit holes are left on top warm air. Also make a hole in the bottom. This is necessary to quickly detect a leak and then fix it.
The bathroom is often tiled. It can also be used to mask pipes. The method is characterized by large labor costs and financial investments, but you will achieve a better aesthetic effect. The basis is metal or wooden guides from which the box is assembled. If the guides are wooden, they are treated with a water-repellent compound.
The box can have any shape. For greater functionality, it can be made in the form of a ledge or shelf on which decorative items will be located. Or make it in the form of a small cabinet where you can store household chemicals.
 Masking the plumbing in the bathroom
 A screen made of plastic panels is an easy-to-use and inexpensive way to hide pipes. The panels are not afraid of moisture or air, they do not deform, they are easy to replace if you want to change the interior.
To complete the cladding, you will need a base and metal profile and P-corners. If you know the technology of laying plastic ceiling panels, then everything is similar.
Installation of the screen under the bathtub is carried out according to the same scheme. In this way you can disguise pipes near the floor and counters.
Plumbing roller shutters. This is unusual modern way masking pipes in a bathroom or toilet.
The main advantage of this design is full access to communications. Thanks to a wide range of colors, they are easy to match to your interior and will be an excellent addition to a bathroom decorated in a high-tech or loft style.
 Using roller shutters to disguise pipes
 There are two options for the lifting mechanism: mechanical and electrical. You should choose based on the size of the room and communication conditions. The frame can be made of plasterboard. To ensure stable operation of the mechanism, it is necessary to install roller shutters parallel to the surface of the floor and wall.
To save space, pipes can be recessed into walls. This is a complex, radical process. In addition, the disadvantage is the difficulty of carrying out repair work. Therefore, it is important to provide during work preventive measures to eliminate leaks. To do this, it is advisable to solder the fittings directly, and when laying grooves, equip them with foam rubber sleeves. The insulating material will eliminate condensation and prevent hot water pipes from expanding too much.
 Technology for laying communications in the wall
 At the beginning of work, a schematic drawing on paper must be made. Next you should do the following:
It must be said that there are pipe elements that cannot be masked. These include:
There are several rules for masking communications that should be followed.
Take advantage insulating material to avoid condensation.
Each method of masking pipes has its advantages and disadvantages. But whatever method you choose, the main thing is to follow all the rules during the work, then your communications will not turn out to be a weak point in the interior of the room.


