To make the operation of the garage as comfortable as possible, its arrangement should be approached with full responsibility. Most car enthusiasts spend a lot of free time in the garage.
To create a convenient and comfortable environment, it is worth building a folding one in the room. This type of furniture design is especially relevant for a small garage.
 Every car enthusiast should have a well-planned garage workplace. Table with folding mechanism It will not only help you organize your free space correctly, but will also delight you with its functionality. It can be used as:
Having decided to make a compact and comfortable table to the garage, decide in advance on its location. Firstly, the place where it is installed must have good lighting. Secondly, the product should not block the passage.
Advice: when constructing a folding model, numerous drawers and shelves can be built next to the wall for laying out accessories and necessary things.
In any case, the folding table will delight you with its functionality, ergonomics and ease of use.
As for the choice of manufacturing materials, several options are allowed here. The main thing is that the material you choose has:
 You can build a table for the garage from:
TO benefits wooden models include:
But such a product is not able to cope with heavy loads, and its service life, unlike metal models will be significantly less.
Important: metal table, despite the complexity of its manufacture, will cope with higher loads.
It’s worth noting right away that there are many more options for making a desktop for the garage. Some car enthusiasts prefer to do it completely wooden models, others reinforce them on top with a metal sheet. Someone chooses wooden frame and metal, but some people prefer a completely metal product. There are no special requirements when making a folding table for the garage. The main thing is that the owners feel comfortable working and caring for it.
But keep in mind:
Attention: before you start manufacturing and assembling a folding table, make a competent drawing. It must indicate the dimensions of the product and its materials of manufacture.

The finished drawing can be found on the Internet and modified to suit your needs.
To make a compact and convenient folding table for the garage, you will need to prepare the following consumables: materials:

From tools we will need:
So, the manufacture of a piece of furniture begins with its detailing. According to the pre-drawn drawing, we cut out the elements we need:

That's the whole simple process of making a folding table in the garage. On such a product you can perform different kinds works: drilling, sawing, cutting, grinding. In other words, a durable folding table can completely replace a workbench.
Advice: after making a durable and reliable desktop, the area around it must be equipped with sockets and additional lighting using wall lamps. You can make additional shelves on the walls for storing tools.
After making the table, it should be processed various materials. If the product is made of metal, it is processed anti-corrosion agents.
If the table is made of wood, it is processed primer and paint and varnish materials . This not only improves the appearance of the product, but also increases its service life.
Depending on the materials used and the tasks being solved, the result may be surprising:


A detailed description of the manufacturing process can be seen in the following video:
In conclusion, it is worth noting that making a practical and reliable folding table for the garage on your own is quite possible. The main thing is to correctly select the type of design you need, make a thoughtful drawing of the product, prepare Consumables and tools. As a result, you will get a piece of high-strength furniture that will fully comply not only with your personal requirements and preferences, but also with the dimensions and features of the room.
In contact with
Initially, the owners of the boxes begin to make a table for the garage with their own hands if there is a need for processing wooden products, and also periodically requires space to secure workpieces. Classic version such a workbench consists of a tabletop in which several holes are cut different forms, the wedges are hammered in and combs are inserted for emphasis.
This is the very first version of tables for the garage, which was used 20-25 years ago. Now the garage table has many shelves and several cabinets, and the design itself has changed over time. Let's start the article with a description of the design of a garage workbench.

The simplest version of the table is made from the following elements:
If you need to make a table for working with metal products and spare parts, then you should get a metalworking workbench. If you need to periodically carry out car repairs and various carpentry work, a wooden workbench for the garage will be quite sufficient. Let's look at how to make a DIY bench for the garage.

In order to correctly make the frame of the structure, you must first obtain a drawing or plan of the table. With the help of a clear model, you will be able to correctly imagine the finished result and carry out all the work step by step. If you need not only carpentry in the garage, but also a place for processing steel objects, then you can go according to the following plan:

The metal garage table is universal option for any room. By making a wooden work table for the garage with your own hands, you can create comfortable spot for processing any products. Next to such a workbench, you also need to make your own chair for the garage.

To make it, you need to prepare photo materials and a project. Photos and drawings of a table in the garage with your own hands will help you understand what and how the workbench is made of. When building a workbench from wood, you will need the following tools:
Also, pre-prepare the materials for the work folding table in the garage:

First, we cut all the materials into the necessary elements. By using profile pipes we make the frame. Steel corners are intended for stiffeners. It is also additionally necessary to prepare a corner for edging the table surface.
Next, you need to properly weld the power frame of the workbench. First, we weld all the cut elements for the tabletop. Then, to the finished frame, you need to attach by welding the frame from the corner into which the boards for the tabletop surface will be inserted. After you have actually succeeded in making a table for the garage in the form of a frame, all that remains is to weld the side legs along the entire perimeter of the workbench.
The next step is to weld the structure for the drawers. In this case, the square frame for the drawers is made of a pipe, which is fixed to the tabletop on both sides of the workbench. The frames will only need to be reinforced with longitudinal ribs.
The metal frame of the work table for the garage is completely ready, all that remains is to fasten the sheathing finished panel for securing spare parts and equipment. In the end, all that remains is to secure the panel by welding it to the tabletop.
In fact, a folding table for a garage is made according to the same principle as a stationary one. The only difference is the use of loops that are attached to the side of the table. After making the structure, all that remains is to sand well and paint the tabletop along with the frame. If you want to extend the life of such a workbench, it is best to treat the boards and cabinets with an antiseptic.
Do you want to ensure maximum convenience when working with your workplace? Make a sofa for the garage with your own hands and attach a stationary lamp above the table, which will have a bending stand. With a small lamp you can easily direct the light to the right places when repairing and cutting products.
Initially the workbench was used exclusively when processing wood, and its main task was to secure the workpiece for support when using tools. To do this, they cut out holes of various shapes along the edge of the tabletop, hammered in wedges, and inserted combs and blocks for support or as guides. This workbench was called classical.
The simplest workbench design looks like this:
Interesting: Popular now computer game Minecraft, which, to stimulate creativity, invites players to create virtually wood workbench from A to Z, in any modification.
Improving instrumentation and the emergence of electrical equipment affected workbench modifications. A manual processing created a completely new material - metal the new kind desktop for metalwork. So by appointment Today there are workbenches:
DIY garage table - photo options:

A work table in the garage can be designed for different quantities workers, or zoning locations.
In this case, workbenches are distinguished:
The addition of the capabilities of a specialized workplace has given rise to the following varieties:
Based on the material from which the work table for processing materials is made, there are:
Important: The metal parts of the workbench need an anti-corrosion coating, and the wooden parts need antiseptic impregnation.
What does it look like homemade workbench for the garage, watch the video:
Not much in the garage free space, so it is important to decide for what goals it will be installed:
In any case, limited space will require a garage workbench to:
Dimensions of a workbench for a garage(standard - 6x4) cannot exceed 60 cm in width and 1.5 m in length. The height of the workbench in the garage is determined based on the owner’s height - up to the middle of the hands in a standing position. Best choice will - metal structure, since most of the work in car maintenance is mechanic work. For maximum stability, it is recommended to support the supporting frame with 6, or even 8, legs.
Selecting a location- also a specificity of a garage workbench: after all, it should be convenient to work on it while the car is standing indoors. And, at the same time, it is recommended that it be removed from the vehicle by at least 1 meter. It is difficult to take into account all these subtleties with a purchased copy.
We make a workbench for the garage with our own hands - drawings:
If you make a workbench with your own hands, which one - wooden or metal?
The choice of species again determines special purpose: faster and for simple operations - it will also be acceptable wooden frame from a powerful board (40x80mm) or timber (50x100), assembled into a rectangular structure according to standard dimensions, using self-tapping screws or nails. For structural reinforcement Use wooden spacers between the legs (top and bottom). The lower ones (at a level of 15 cm from the floor) can become the basis of a storage shelf.
The tabletop is assembled from planed tongue-and-groove beech (oak) boards or two sheets of moisture-resistant plywood 18mm thick, glued together and trimmed along the edges. For special strength The surface of the table top is covered with a metal sheet 5 mm thick, making a side on the wall side.
However, if you make a wooden workbench for the garage with your own hands, then this option has its disadvantages:
See how to make a workbench in the garage with your own hands - photo:

Advantages of a metal workbench for a motorist:
For your information: A garage workbench made of metal is a bestseller in specialized stores, where only price and design improvements are of decisive importance.
But the desire for creativity leads along the path of one’s own experience.
Useful video on how to make a DIY workbench for a garage:
Algorithm:
Material required for work:
Tools you will need:
Assembly technology:
DIY metal workbench in the garage - photo drawings:
Final advice: You should make a DIY work table for the garage (metal) only if you are familiar in practice with the art of welding and the safety rules when doing it.
Repairing a car is a difficult and troublesome task. To make this job easier and create favorable conditions, you will definitely need to make a bench. The drawings and diagrams for this may be different, but the principle of how to build a convenient workbench for the garage with your own hands is the same. The device should be compact and not take up much space.
It's best to build a prefabricated workbench so it can fold up or stow away. The simple design can be made entirely of wood. This inexpensive material quite easy to find and very simple to process. But wooden products have a drawback - it is prone to burning. To make a less dangerous and more reliable bench, you need to make homemade design made of metal. However, due to the simplicity and ease of construction, most car enthusiasts most often choose wood.
Necessary materials:
First, you need to decide on a place to build a metalworking table. If the area is long enough, it is better to install a workbench at the back wall opposite the gate. This will make it possible to do work while the car is in the garage. With this arrangement of the workbench, the side passages will remain empty, which will be very convenient for car repairs. When a room has more free space in width, then best option installation will be on the side. For Russian models on the left wall, and for foreign cars on the right, which will ensure safer entry and exit of the car from the garage.

To do this you will need the following tools:
Designing and installing a homemade bench in your garage is easy. But first you need to determine the location and then choose the material. For construction a simple workbench Any boards and wooden blocks will work perfectly. This is the best way, which requires fairly modest knowledge of school level. In addition, the financial costs will not be so high, since old bars and boards can be used to build such a table. Since wood is easy and quick to process, the entire construction of a wooden workbench will take very little time.

When preparation is complete and found suitable material, then you should first start building the frame. To do this, you need to take measurements of the future table in the garage locally and use them to cut 4 bars for the frame. Of these, two long ones will be located along the wall, and short ones perpendicularly. Next you need to make the legs. The height of the workbench in the garage should be just below the waist, which will provide ideal working conditions.
After all the bars have been sawn, they are connected into a frame. This is easy to do with simple nails or screws. Next, the entire structure is turned over on its legs and placed tightly against the wall. Finally, the prepared boards are nailed on top and the simple wooden workbench is ready for work. Often, many car enthusiasts cover the top of the table with tin or sheet steel. This not only increases strength, but also improves safety in case of fire during various welding operations.
Usually, in order to save money, garage buildings are made small in volume. In a small building with limited space, there is rarely enough free space to accommodate a metalworking table. In cases where the length and width of the garage do not allow the installation of any device, a folding structure is used here. The advantage of this method is that in the normal assembled state the entire table is removed and completely frees up space, but there is a disadvantage. To work on a folding workbench, you will often have to drive the car out of the garage, which is very inconvenient when repairing cars.
 The folding wooden workbench has the simplest and most cheap design. Therefore, such a construction will require a minimum of materials and time. At first must be selected the best place in the garage. Then make it with a tape measure correct measurements and use them to draw a simple drawing or sketch a diagram by hand. It will be easy to calculate the quantity and consumption of materials. Any wooden blocks and old boards are perfect for this.
First they make the countertop. The prepared bars are marked using a tape measure and cut to size with a handsaw. Next, they are folded into a quadrangle in the shape of a box and fastened together with nails. Next, boards of the same length are sawed, nailed to the bars, and the tabletop is considered completed. Two hinges are immediately attached to it with screws and screwed to the garage wall at waist level.
It will work out interesting table, which in one position will hang on the wall, and in another will rise and be installed horizontally. To secure the tabletop in working position, you need to make legs. To do this, cut off two identical bars with a hand saw, which are screwed to the free corners of the frame on hinges using screws. In this position, each table leg, like the entire structure of the folding workbench, will also fold easily.
For this you will need materials:
 Every car enthusiast tries to make all the devices in his garage reliable and safe to operate. Although a metalworking table made of wood is assembled very simply and quickly, this design is not very durable. Often additional new equipment is installed upstairs - this is an emery board, a vice, drilling machine. This requires a fairly strong and stable base. In this case, iron is used for construction, which is much more stronger than wood. The metal structure of the workbench will not only withstand any load perfectly, but is also not at all afraid of fire.
To build a metal bench, you need to prepare all the materials. This can be an iron corner or channel, pipe cuttings and sheet steel. During construction also you need to find a tool for working with metal:
A metal workbench in the garage is installed taking into account the available space. It needs to be made in such a way that there is enough free space for car repairs. It is difficult to fit additional equipment on a narrow and too small metalworking table. Therefore, it is advisable to do it maximum dimensions, which will allow you to install not only a vice and emery, but also other devices. For example: a small drilling or lathe.
 The construction of a workbench always begins from the top part - the tabletop. Small sections to fit the size of the table are sawed off from an iron angle or channel using a grinder. Then, on a flat floor, they are folded into a rectangle and connected by welding. Additional spacers are also installed inside between the sides, which will make the frame much stronger. The top of the tabletop is usually made from pieces of tin or sheet steel. They are laid evenly on the frame of the future table and through holes are made around the perimeter for bolts or screws using a drill.
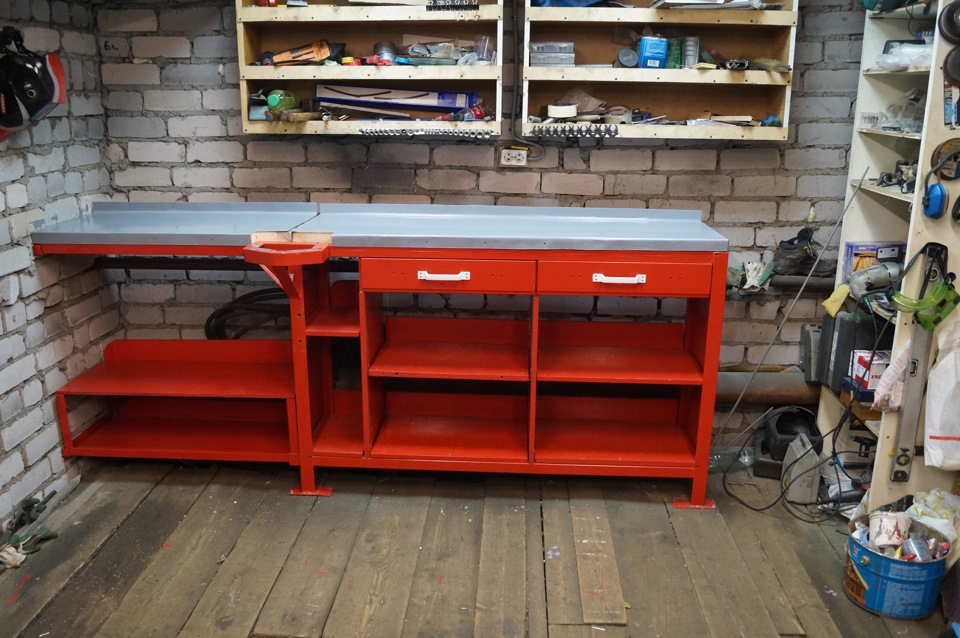
When the tabletop is completely ready, begin building the supports. Metal pipes are usually used for durable table legs. Using a grinder, they are cut at waist level and attached by welding to the four corners of the made platform. To ensure that the supports do not move apart under heavy loads different sides, they are fastened together with a profile corner or channel. Then the table is turned over and pushed tightly against the most convenient wall of the garage. The workbench is ready and repairs can begin. But the construction does not end there, but continues to equip additional equipment- vices, sandpaper and other devices.
During hammer blows and machine operation, vibration occurs on the workbench. At this time, all the tools and repair parts begin to move and fall off the table. You have to spend a lot of time searching, which is especially annoying for every car enthusiast. This drawback is dealt with very simply: along the edge of the entire perimeter of the tabletop, a small edge made from a corner or metal strip is attached by welding.
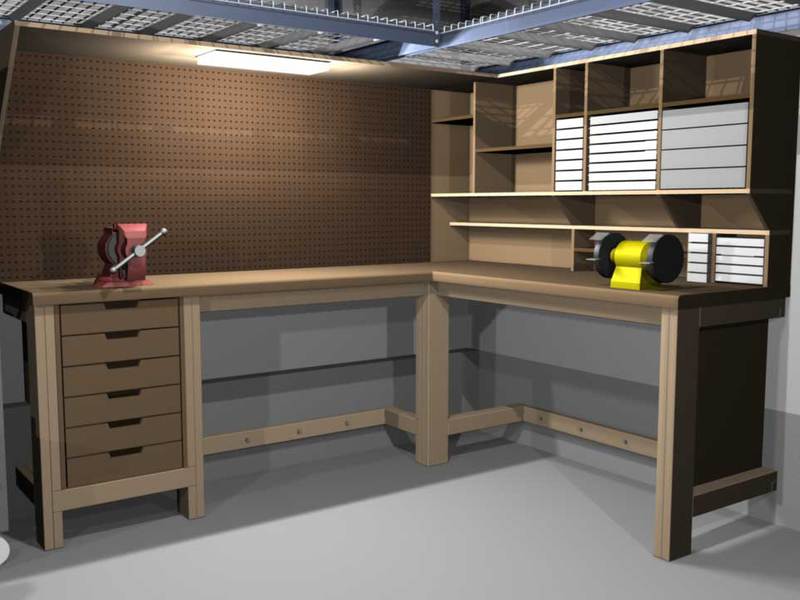
 To ensure that the workbench is always in order, it is necessary to equip a place where all the tools and remaining parts from the repair will be stored. The best way removing unnecessary tools means putting up a shelving unit. It should be mounted on the wall directly above the table. Usually the rack is made of a sheet of metal, and shelves are installed on it. It is also advisable to make hooks on which the tools will hang. It is very convenient when they are in front of your eyes and do not interfere with your work.
Often, drawers are made to store car repair parts and various fasteners. They can also easily accommodate large tools that take up a lot of space on the shelf. To do this, install additional racks and guide runners at the bottom of the table. metal corner. The boxes themselves are made of sheet iron in the form of boxes with one handle. After installing the shelving and drawers, you will be able to deal with the clutter that interferes with convenient work.
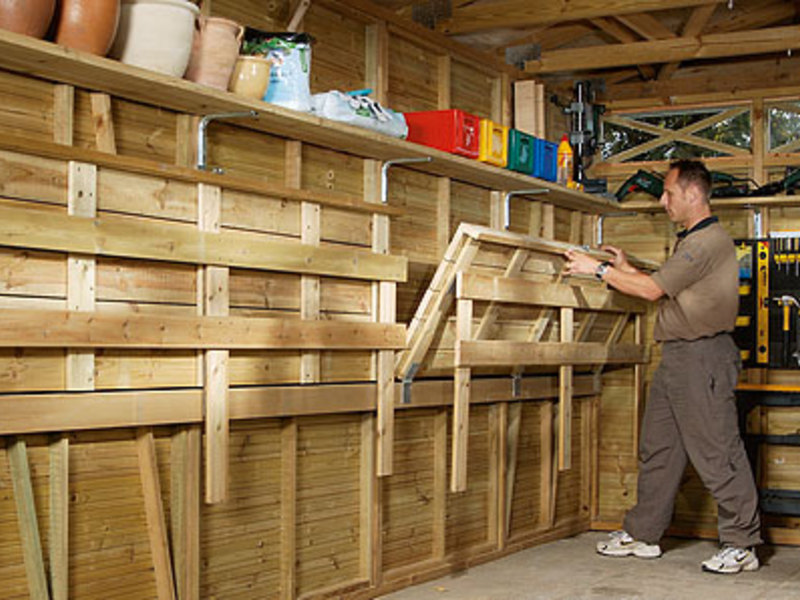
 There are times when the garage space does not allow you to make a good workbench. In this case, it is best to choose a folding option that does not need large space. In the free space, you just need to weld a simple box from metal in the form of a chest, and attach the wings to it on hinges. It will always be easy to open them as needed, which will significantly increase the table area.
Before starting construction, you need to cut 12 identical corners with a grinder according to the size of the free space. Then, using boiling, assemble the frame in the form of a cube and attach an even sheet of tin or sheet steel to the top. It will work out small table, which is perfect for small repair work. To make it longer, additional metal wings must be made. Their dimensions must coincide with one of the sides of the frame.
First, you will need to cut off 4 corners with a grinder, which will correspond to the edges of the table. Then fold them into a square shape and fasten them together using ordinary electric welding. A sheet of iron should be placed on the resulting frame, and then the edges should be trimmed evenly. Next, drill through holes along the entire perimeter, insert bolts there and tighten with nuts. To make the wing rise and fall easily, you need to attach 2 hinges.
Using a welding machine this is done very simply. One edge of the hinges connects to the wing, and the other to the main frame. It is not difficult to fix the moving plane in a horizontal position. You just have to make it metal pipes two legs and attach them to the free corners of the wing on hinges.
It often happens that the increased table area is sorely lacking. In this case, it will not be difficult to make another duplicate and attach it to the opposite side of the frame. In this case, you will get a long desktop. If you attach an additional wing to the side, then this design will fit perfectly in the corner of the garage. The advantage of a folding metal workbench lies in the fact that its configuration can always be changed at the request of each car enthusiast.
The functions of a garage often go beyond the banal parking of a car. At the same time it serves as a workshop. Repair or creative work requires a place equipped with tools and equipment. Let's look at how to make a workbench in the garage in a similar way.
The workbench vaguely resembles desk, only large sizes. All structures are divided into two types - metalwork and carpentry. The main difference is in the material used to make the countertop. If it is wooden, the workbench in the garage belongs to the carpentry structure; the metal surface automatically moves it to the group of metalworking equipment.
The wooden surface of the workbench is not intended for working with metal parts. Chips or sharp edges of objects will regularly scratch the wood, and machine oil will leave stains that cannot be removed. As a result, the tabletop carpentry workbench will quickly become unusable.
It is much more practical to make a metalwork structure in the garage, which is considered universal and suitable for all types of work. On it you can:
The metal workbench frame is more durable and convenient when working with heavy objects. The design is more stable and will not sag under strong pressure on the tabletop. If the garage serves as the main place for spending time and there is enough free space, you can make two structures for work - metalwork and carpentry.
Comment! In the immediate vicinity of the workbench in the garage, shelves are usually equipped where numerous tools and other equipment for repairs or loved ones are stored. creative activity.

The functionality of a garage workbench depends on its design. For convenience, it is equipped additional elements. Depending on the type of occupation, a workplace in the garage includes:
Additional shelf.
Located on the wall in front of the workbench, its function is also to store available tools.
Comment! High-quality lighting of the workplace is an indispensable condition when setting up a workbench in the garage. For work, it is better to choose a table or wall lamp with the ability to adjust the direction of light. There must be an outlet near the desktop, which is designed not only to provide lighting, but also to operate all power tools. The idea of making a folding workbench in the garage with your own hands is not very practical. primary goal
on two legs - to save free space in the garage. In this case, the tabletop will be attached to the wall and will be in a raised state when it is not needed. But the essence of a workbench is a well-equipped workplace, when everything you need is at hand. And with a folding tabletop, the space under it should be free; there can be no talk of any bedside tables or shelves. This option is acceptable for garage owners who have limited space and who rarely need a workbench.
Each method has its own strengths and weaknesses. Let's look at the characteristics individual models, and the garage owner will independently decide which option is best for him:
As a conclusion - combine wooden structure with a metal sheet that will perfectly cope with the protective function of the table surface.

After determining the material of manufacture and the installation location, they proceed to drawing up a drawing of the workbench, which will become the basis for arranging a functional workplace in the garage. To begin with, determine the dimensions:
A pose with your elbows bent will help you navigate the height of your work table in the garage. Mentally leaning on the future workbench, measure the distance between the floor and elbows.
Advice! In case the design is designed for a standing position, and sometimes you have to sit, stock up on a comfortable wooden stand on which you can place a chair. A low wooden rack will be needed in cold weather to prevent your feet from freezing from the concrete floor of the garage.
One side of the workbench is intended for installing an electrical cutting tool. For easy fixation of a jigsaw or circular saw the edge of the tabletop should protrude beyond the frame by 0.2-0.3 m.
The set of materials and tools for making a workbench for the garage with your own hands depends on the chosen design. It is optimal to choose a sheet for the tabletop from stainless steel with a thickness of 1.5-2.0 mm. If this seems expensive for the garage owner, you can get by with 1.5 mm steel.
If you lack experience, it is better to choose a model of a wooden workbench for your garage to make with your own hands. Making a structure from timber using a drill and a jigsaw is much easier than welding a steel corner.
To assemble a wooden workbench for the garage you will need:
To get straight lines of workpieces after cutting, use a circular cutter stationary saw, as a last resort, turn to the manual analogue. The edges of the boards or timber are cut with a jigsaw.
First you need to make a frame for a desktop in the garage, taking into account the dimensions included in the drawing. The timber is cut into pieces, it should look like this:
If the length of the workbench in the garage is no more than 2 m, for suitable for work timber with 7 cm edges. As a result of cutting the vertical posts, you should get 2 blanks of 0.9 m each and 2 parts of 1.5 m each, which will be located near the wall of the garage. The difference of 0.6 m is intended for further fixation to the plywood screen supports for storing tools.
Horizontal beams connect the legs of a workbench in a garage. For fastening the support posts in the lower part, the length is 1.5 m. The tabletop is fixed with a beam 2.0 m long (according to the size of the workbench indicated in the drawing). Spacers 0.6 m long are prepared from the remaining timber. All parts are connected with steel angles and self-tapping screws.
When the frame of the desktop for the garage is ready, we begin to design the tabletop. For a carpentry-type workbench, it is assembled from boards and plywood sheets. The aligned and adjusted canvas is coated with wood glue, the two workpieces are clamped with clamps and held until the glue is completely dry and the canvas gains strength. Finally, the tabletop is fixed along the contour with self-tapping screws.

The wooden canvas is connected to the workbench frame with self-tapping screws, the surface is sanded using an electric drill equipped with an emery attachment. On final stage install the screen and treat the structure with varnish. High humidity in the garage - an everyday occurrence, protective film varnish will prevent deformation of the wooden structure.
Comment! Fixing the rear posts to the garage walls using anchor bolts will help add additional rigidity to the desktop.
The design of a metal structure in a garage is done using a steel corner. The main assistants are a welding machine and a grinder.
Main process steps:


The corner guides need careful sanding or plastic strips. Such protection measures will prevent damage to the workbench drawers in the garage. Otherwise, after a short period of time, simple extension actions will require significant effort.
At the end of the work, the welds are thoroughly cleaned and coated with a phosphate primer. Then the metal structure of the garage workbench is primed and painted. The working surface of the tabletop does not need to be painted; if desired, it can be treated with an acid stain or polished.
Making a convenient workbench for your garage is a doable task. Even if you purchase all the materials, its final cost will cost significantly less than installing a finished copy. Undeniable dignity DIY design - the ability to choose the optimal dimensions in accordance with the size of the garage and your own height.


