Good afternoon, dear readers of the site. Today I will tell you how to make a balcony floor with your own hands using sandwich technology. I will accompany each step with a photo with detailed description, but if you still have questions, then I will be ready to answer them in the comments, so write, don’t be shy.
In cold countries such as Iceland, Norway, Denmark, Sweden, Canada and Finland, great attention is paid to warmth. It is not for nothing that the so-called Finnish houses and houses built using Canadian sandwich technology. But, if many people have heard about houses and walls made of sandwich panels, then much fewer people know about sandwich floors. But it is sandwich floors that are extremely popular in Canada and the countries of the Scandinavian Peninsula.
Sandwich floors on balconies are becoming popular due to their heat-saving properties, ease of installation and cost, which is much lower than any other flooring. That is why we decided to make and insulate the floor on our balcony using this technology.
In this article we will teach you how to make/insulate with your own hands. For convenience, the entire process will be shown step by step.
First, we need to prepare all the tools and purchase all the materials necessary for the work. To do this, we have prepared for you a list of everything you need.
 Group necessary tools 1: jigsaw, drill, hammer, screwdriver
  Tool group 2: drill, caulk gun, accessories, cement
  Group necessary materials 3: polystyrene foam, plywood, insulation, timber
 After all materials and tools are prepared, we proceed directly to the installation and laying of the floor.

Any repair and construction always begins with taking measurements. So we, armed with a tape measure, measure the working area on which we will have to work. In our case, the working area is the balcony. Its length is 1 m and its width is 3 m.

ATTENTION! Companies that produce floor screeds in their operating instructions very often indicate a hardening time for the level of three to five hours. But very often it is far from reality. Based on experience, we recommend waiting at least 24 hours, that is, one day, after pouring the floor screed.
After the screed on the floor has hardened and become solid, we move on to creating the formwork. In our case, it will serve as a kind of barrier, since in the polyurethane foam, under the influence of various natural phenomena(water from rain, direct hit sun rays, wind) over time, cracks and micro-cracks form through which air can blow in.
The formwork is assembled from wooden slats. To begin with, the plank is placed along the length of the balcony (let me remind you, ours is 3 meters) at a distance of 3-5 cm from the balcony frame. Next, using a tape measure, we can find out the size of the wooden slats that we will use to construct the width of the formwork.
 A sample of a batten that is suitable for creating formwork on a balcony
 Having received the size of the slats we need, we transfer all measurements to the “wooden” area. For this we use a construction marker or graphite pencil.

After the strip is cut, we put it in place for fastening. Now the impact drill comes into action. With its help, we drill through holes in the rail in increments of 30-40 cm.

After we made the holes in the plank, it should look something like this.

Now, by sliding wooden slats to the side, in the floor we should see the remaining traces of the through holes that we made using an impact drill.
 Making holes in concrete using an impact drill or hammer drill
 Now we insert the dowels into the holes that were made in the wooden slats. We put a wooden strip with dowels inserted into it in its place.
Now the hammer comes into action. With its help we hammer the dowels into the floor.
After the wooden joist is attached to the floor with plastic dowels, we use a hammer to drive the screws into them. Once all the screws are driven in and the plank is secured in place, it should look something like this.

After the width of the plank is secured, we move on to the plank, which is attached in length. We fasten it in the same way as the first plank.


The only difference is in the step of fastening the rail. If we fastened the width of the rail in increments of 30-40 centimeters, then in length we adhere to increments of 50-60 centimeters. We also attach the next plank in length, observing a step of 7-8 centimeters. The bar is attached to dowels. Next, with a distance of 6-7 cm, we attach the next lag using dowels.

Once the planks have been secured, you should end up with something like this.
 The formwork on the balcony is installed
 ATTENTION! When drilling holes for dowels in the floor, the drills often break. Based on this, we strongly recommend keeping three or four spare drills in stock.

After the logs are laid in length, the next stage is. To do this, we cut the foam into equal strips of 7-8 cm in length. It is best to cut polystyrene foam using a regular construction knife. After the foam is cut, we lay it between the wooden joists as shown in the photo. When the foam strips are completely laid, the floor will look like this (photo below).

Our next step will be to mount the second layer. Using a tape measure, we measure the width of the log we need.

After we have measured the size of the slats we need, we transfer it to a wooden plane. Next, the jigsaw comes into play. With its help, we saw off the timber of the size we need. Now it's time for the screwdriver. We try on the strip and places for attaching screws. By the way, for fastening we use wood screws measuring 3.5 x 35 mm.

Now we attach the joist to self-tapping screws.

The log, secured with a screwdriver and self-tapping screws, looks like this.
The next lath, which we will fasten in length, is part of the formwork. It needs to be fixed slightly “overlapping”, that is, with a protrusion closer to the balcony frame. It is attached with self-tapping screws.

After we have secured the second layer of formwork, we move on to the stage of pouring the formwork. To do this, prepare a solution of frost-resistant tile adhesive or Portland-M500 cement. When the solution is ready, apply it with a spatula to the inside of the formwork. The solution is applied to the inside along the entire perimeter of the formwork.
 The process of pouring formwork with cement
 When the entire internal part of the formwork is completely filled, we proceed to the stage of mounting the slats in width.

We fasten the logs using self-tapping screws and a screwdriver. We screw in the screws using the “board to board” method (as shown in the photo). In the same way we install all the other logs, which we lay in width. In this case, it is important to maintain a 15 cm step between the slats.
When the next layer of slats is installed, we move on to filling all the remaining cracks. We fill the cracks with a solution of frost-resistant tile adhesive. After all the cracks have been processed and sealed, we leave the solution to harden. This usually takes one day. After 24 hours, the solution should completely harden and harden. In this case, the formwork should look like in the photograph.

We check the formwork for strength. To do this, just try it with your fingers, if everything is dry and hard, then everything is in order, you can safely move on to the next step.
The sequence of actions is as follows:

Insulation
ATTENTION! We laid the insulation with the reflective surface facing up.

We put a log on top of the insulation and try it on in length. After the joist is laid out, we fasten it with screws. To do this we use a screwdriver.


In our example, the floor will not be sheathed, but with special slats, because This layer will not be final yet. But if you want to finish the floor at this step, it will also be a very warm structure, but we continue further.
So the technology for installing wooden slats:
Also in the photo you can see that our balcony frame is reinforced with a connector, which, in turn, gives rigidity to the balcony frame. The photo also shows that the amplifier protrudes slightly. Let me remind you that we need all the slats to fit closely to the walls and balcony frame. To do this, we need to use a jigsaw to cut a notch in a wooden strip.


ATTENTION! When laying the floor, do not forget to use a level. Everything should be smooth.
We proceed to laying the second reinforcing layer. To do this, using a screwdriver and self-tapping screws, we fasten the planks end to end.


After the second reinforcing layer is laid, you should see something like this.
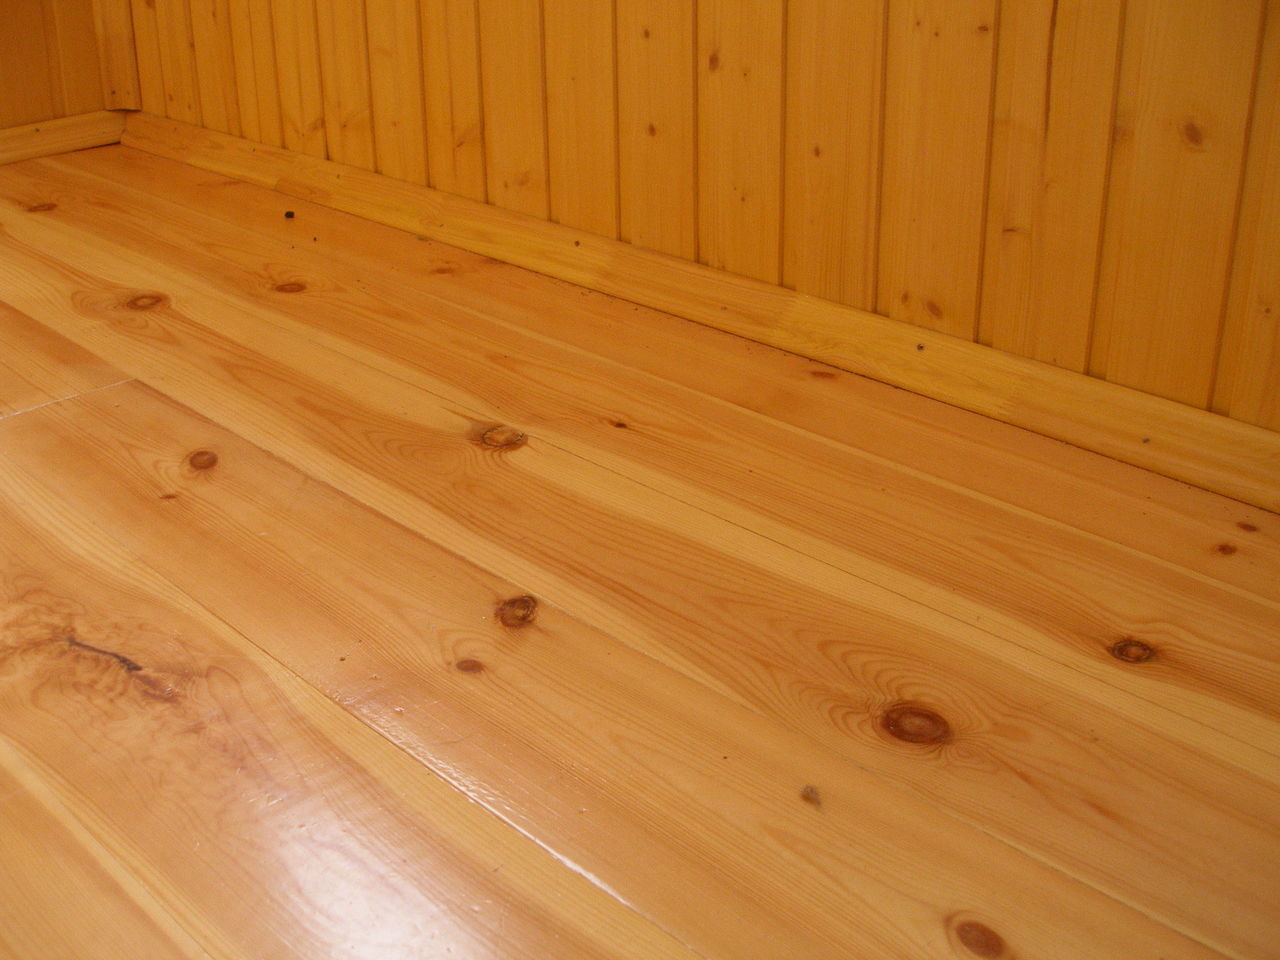
After we have completed the installation of the third reinforcing layer, we already have a picture of our future floor emerging.

 Laying fiberboard sheets on the floor
ATTENTION! The sealant must be applied in a thin layer. Also, it should not protrude, otherwise the fiberboard will not adhere tightly to the floor. If suddenly the sealant lays down too thickly, it doesn’t matter, it can be easily removed with a damp cloth or napkin.
Well, now that we have “blown out” all the cracks using sealant, we move on to the final stage - laying the fiberboard.


Fiberboards (fibreboard, MDF, HDF)
OK it's all over Now. All work on installing heated floors on the balcony of a multi-storey building has been completed. In this article, we looked at step-by-step instructions on how to install a floor on a balcony with your own hands using sandwich technology. Good luck with your renovation!
Floor coverings made of wooden boards They are popular not only when installing floors in residential premises, but also when making surfaces on a balcony, loggia or terrace. The wooden floor on the balcony is beautiful and warm. Moreover, the comfort of the surface is ensured not only by the possibility of laying insulation under the plank floor, but also by the characteristics of the material. Provided that the installation technology is followed, the balcony decking will serve you for decades. If you don’t know how to make a wooden floor on a balcony with your own hands, step-by-step instructions from our article will help you with your work.
Before making a wooden floor on the balcony, let's consider the main pros and cons of such a covering. Wooden floorboards are a natural material that is traditionally used for flooring. Wood has low thermal conductivity, so the floor on the balcony made of boards is the best option for creating a comfortable and warm covering in a room without heating.
The advantages of such flooring include the following:
Wooden flooring on a loggia or balcony has its disadvantages:
Important! All wood defects are minimized if the elements are treated with antiseptics to protect against rotting and fire retardants to prevent fire. To ensure that the coating does not absorb moisture so quickly, the floors are painted and varnished.
It is best to cover the floor with boards on a glazed balcony, so the operating conditions will be as close as possible to a living space. If you decide to cover an unglazed balcony with a plank floor, then carefully choose the wood. Give preference to moisture-resistant species, such as larch, and get ready for more thorough surface care.

If you make wooden floors on the balcony with your own hands, then Special attention pay attention to preparing the base. If the concrete slab is strong enough and in good condition, then the preparatory work is as follows:
If the concrete slab is old and has many defects, make a new screed:

When making a wooden floor on a loggia with your own hands, do not neglect waterproofing the base. It will protect the floor from dampness, mold and mildew. For this purpose, the surface can be treated with impregnation, paint, waterproof plaster, rubber, liquid glass and cover with roll materials.
When performing waterproofing, pay attention to the following recommendations:
Floor on the balcony wooden house It is often located below the floor level in the room, so when walking you have to overcome a step, which is not very convenient. Thanks to the arrangement of the floor along the joists, it will be possible to smooth out the difference in heights and bring the surface to the same level as the floor in the apartment.

To make the frame, dried timber is used. Its cross-section is determined from the height to which the surface is raised, minus the thickness of the boardwalk.
We carry out the work in this order:
Important! Received wooden frame fix with dowels to concrete base.
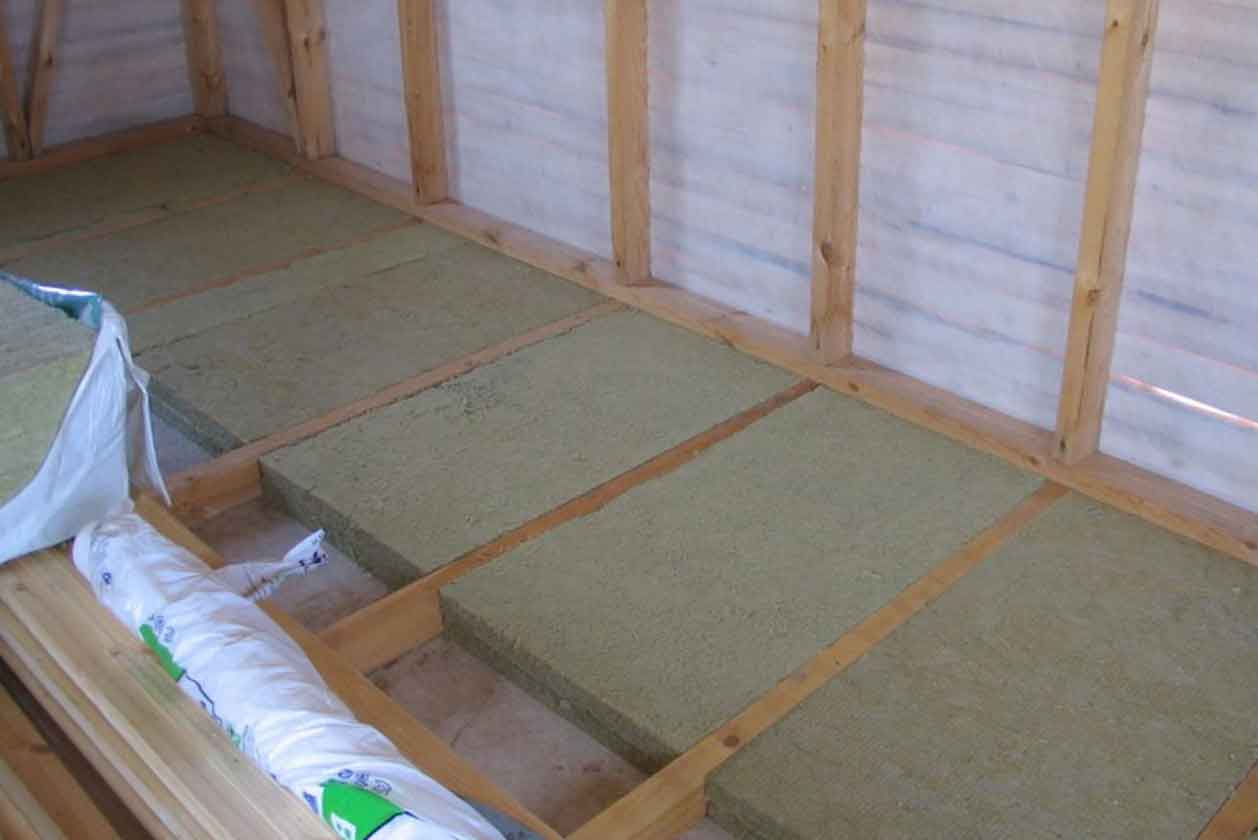
Despite the low thermal conductivity of wood, the structure needs to be additionally insulated. This is simply necessary if there is an unglazed balcony or open space below. Rigid materials are used for insulation slab materials And roll insulation based on mineral wool:
The insulation is cut into rectangles suitable size and is laid between the joists. For dense installation, the dimensions of the insulation are taken a couple of centimeters larger than the gap between the structures.
Important! A balcony without glazing is not insulated due to the lack of such a need and due to the possible accumulation of moisture in the thermal insulation material.
It is also allowed to use as insulation bulk materials. Expanded clay, sawdust, granulated polystyrene foam, ecowool, and vermiculite are suitable for filling the voids between the joists. The selected insulation is poured into the space and lightly compacted. If necessary, add more material.

It is better to use boards with interlocking joints as flooring. We impregnate all elements with antiseptics before installation. This is done especially carefully on the back side and at the ends, because after installation it will not be possible to get to these places.
We carry out installation in the following sequence:
The arrangement of the balcony space also includes the creation of a new floor. It doesn’t matter at all whether it is glazed or not, the nature of its use and other features. A high-quality floor is necessary in all these cases. It will not only increase the comfort of using the loggia, but also protect the balcony slab from destruction. To make a balcony floor with your own hands, you need to perform a number of works.
Rice. 1 Self-leveling floor on the balcony
Create a loggia floor with your own hands in the following way. First, the loggia is cleared of all the things there. Remove the covering, if any, from the floor surface and remove debris.
When considering how to make a floor on a balcony with your own hands, find out the evenness of the base using a level. You can pour some water on the floor. It will be immediately noticeable where it flows and where it collects in the form of puddles. If this happens, the surface needs to be leveled.

Rice. 2 Repairing the floor on the balcony - pouring screed
The arrangement process begins with the creation of a screed. It is poured along the beacons, which are leveled using a level.
If balcony design open, then the screed is laid with an outward slope. This will allow water that gets on the surface of the slab to flow out without problems. Precipitation will not accumulate on the floor.
The screed can be made from ordinary cement mortar or self-leveling. For the second option, a frame is made so that the liquid solution does not leak outside the balcony space. It is required in cases where a self-leveling screed is made on an open balcony with a metal fence.
The choice of materials for the floor on the balcony is very important process. The durability of the structure, ease of use and maintenance depend on this.
The material for the balcony floor must meet a number of requirements. It must be reliable and durable. If the balcony space is not heated, then important characteristic is frost resistance. Many outdoor structures suffer from high humidity. The flooring material must be resistant to moisture.

Rice. 3 How to finish the floor on the balcony - wooden board
When choosing materials, they also take into account the fact whether the loggia is open or closed. For installing a floor on a balcony closed type less sustainable options can be used. For open loggias, it is necessary to use materials that can withstand temperature changes and water ingress. These options include ceramic tiles. It is this material that is most often used for finishing the floors of unglazed balcony structures.

Rice. 4 Carpet on the balcony
Arranging a floor on an open structure has its own characteristics. It requires a floor covering that is not afraid of low and high temperatures, rain and snow, sun rays.
Preliminary waterproofing is very important balcony slab. Water should not soak into the slab or penetrate through the smallest cracks. Waterproof the slab roll material, primers or moisture-resistant mixtures. At the same time, a slight slope outward must be maintained so that precipitation water drains from the surface of the structure.

Rice. 5 Self-leveling waterproofing for balcony floors
For open loggias they are most often used the following types floor coverings.
This material meets all requirements for coating used outdoors. The tiles must be intended for outdoor surfaces and have a rough, non-slip surface so that the floor on the open balcony is safe.

Rice. 6 What to make the floor on the balcony from - ceramic tile
Since ceramic tiles are a heavy material, the structure must cope with increasing loads. This material perfectly resists moisture. To ensure high waterproofing, you need to choose the right adhesive and moisture-resistant grout. Additionally, the seams are treated with a water repellent substance.
The flat and smooth surface of the balcony slab does not need to be tiled or covered with anything else. flooring material. There are other floor finishes open balconies. Painting will create a matte or glossy surface the desired color shade. The paint coating will protect the concrete slab from moisture and destruction.
For concrete floors, acrylic, epoxy and polyurethane paints. The abrasive loads are small, so the coating will serve for a long time and effectively. Updating it is also not difficult.
This material is used as flooring for balconies, but it is not designed for use in such conditions. Many linoleum options lose elasticity and crack at sub-zero temperatures. The material changes dimensions with temperature changes, which also affects the quality of the loggia covering.
The downside is low moisture resistance. However low price allows you to use such a coating in an open loggia, periodically replacing it after a few years.

Rice. 7 Appearance linoleum floor coverings for balconies

Rice. 8 Which floor is best for balconies open type– decking
Decking or artificial decking board is intended for use under open air. From it you can assemble a high-quality floor that will look like wood. The decking's weight is small, so it can be used on any structure. The coating is made from a wood-polymer composite.

Rice. 9 Installation of a floor on a loggia made of composite material
Considering how to make a floor on a loggia, it can be noted that the requirements for the floor of a glazed structure are no longer so high. For furnishing, you can use almost any floor covering, from laminate to carpet. Of course, it is worth taking into account other characteristics of the room. If on the loggia high humidity, then the carpet is not the best good option, it will collect and retain moisture. If the balcony structure is insulated and heated, then there will be no restrictions.

Rice. 10 Laminate balcony floor
When installing the floor on a glazed and insulated balcony, installation is carried out on logs. A flooring is created, the surface of which is the floor. Between the joists there is space for insulation. To make a wooden floor on a balcony with your own hands, you need to follow the following steps.
To ensure that a wooden floor lasts a long time, all its parts are treated with an antiseptic and dried, and then the process is repeated.
We make a wooden floor directly on a concrete base, so the old coating is first removed. The slab is cleaned, cracks and cracks are sealed.
In order for the thermal insulation of the balcony to be effective, place a heat-reflecting sheet with the foil side inward. The laying material should not only cover the surface of the slab, but also extend onto the walls by approximately twenty centimeters on each side.

Rice. 11 Arrangement of the floor on the balcony - laying reflective material
Transverse logs are laid along the entire length of the balcony in increments of about half a meter. They are attached directly to the concrete base. Fastening is carried out in increments of six centimeters. The beam should not rest against the walls. Expansion gaps of approximately a centimeter on each side are required.

Rice. 12 The process of installing the floor on the balcony - laying transverse and longitudinal joists
The main, thicker and more massive beams are placed on top of the transverse logs. They are laid along the entire length of the balcony. The distance between these logs is about half a meter. For a standard, narrow balcony, three longitudinal logs are enough. The outer ones should not be laid close to the walls. All logs must be located at the same level. Insulation can be placed between the elements.
The board is laid across the balcony, cut to size. The flooring is created. It shouldn't hit walls.

Rice. 13 Solid board for balconies
A tenon is cut off from the first board, all the rest are laid out sequentially and fastened with lock connection. We lay the boards and fasten them to the joists with self-tapping screws. The screws are screwed into the groove at an angle of forty-five degrees.
If you lay massive board without coating, the floor can be covered with varnish or wood paint. Watch the video on how to lay a plank floor on a balcony.
The floor on a balcony or loggia, as a rule, is of two types: either concrete with flooring, or wooden. The first option is colder and less comfortable, although it has a longer service life.
A wooden floor, if properly installed, can also last a long time, but due to its natural origin and the properties of wood, it is much warmer. This article will look at how you can arrange a wooden floor on a balcony or loggia.
With proper arrangement of a structure of this type, you can get natural coating, which has low thermal conductivity. To achieve maximum effect and durability, be sure to protect the wood from exposure to temperature and humidity.
To ensure that the floor surface is level, during the installation process all logs should be leveled and securely fixed to the balcony slab. It is the logs that will bear all the loads from the boards laid on top of them.
The advantages of a floor made of boards laid on joists include the following indicators:
— long period of trouble-free operation;
— minimum load on a balcony slab (compared to installing a concrete floor);
- natural beauty of wood;
- absence negative impact on the human body due to the natural origin of the material;
— the ability to level the floor by raising its level relative to the concrete slab.

As when arranging any structure, the first thing you should pay attention to is, of course, the choice of quality material. All wooden crafts should be treated with impregnation designed to protect them from the negative effects of moisture, which can cause the formation of rot.
There are two ways to cope with this problem:
1) independently treat purchased wooden building materials with impregnation;
2) or buy already impregnated logs and boards.
In the first case, the cost of funds will be less significant, but the inconvenience will be that you will have to do all the work of applying the impregnation yourself, and at the same time spend the time necessary to completely dry the wood.
Read also: Do-it-yourself wooden arch: types of arches, installation procedure
In the second, you can begin installation work immediately after purchasing the materials. The only drawback is the higher price.
 Which of the two options is more suitable is a matter of personal preference.
Separately, it is worth noting that if you purchase products made from raw wood, you must keep them in the apartment for some time so that they dry out. If some products become crooked after drying, they should not be used for installation work, as this will create a lot of difficulties. To avoid additional problems, it is better to immediately purchase all wooden materials that have been dried and treated with impregnation.
The essence of this stage of work is the sequential implementation of such actions as:
1) dismantling the old floor;
2) dry and subsequent wet cleaning from construction waste and dust;
3) drying;
4) arrangement of rough concrete screed(in case of significant unevenness of the balcony slab).

For quality arrangement For a wooden floor on a loggia, you should purchase the following materials:
- oak timber (logs are formed from it);
— batten(already treated with impregnation and calibrated in thickness);
— polyurethane foam for closing cracks;
— waterproofing in the form of a film;
— expanded polystyrene or mineral wool for thermal insulation (or other material with similar characteristics).

The list of tools required to perform installation work includes:
- a pry bar and a hammer (for dismantling an old wooden floor);
- a broom or vacuum cleaner for dry cleaning, and a rag with water for wet cleaning;
- roulette;
- jigsaw or wood saw;
- electric drill;
- professional stapler;
- small building level(so that you can conveniently work with it on the balcony);
— a stationery knife (for separating sheets of insulation).

In order to properly install a wooden floor on a loggia the first time, it is necessary to consistently carry out each stage of work. Let's look at them in detail.
Since the balcony is in direct contact with environment and is subject to the influence of moisture from all kinds of precipitation, to perform waterproofing works should be approached very carefully. To do this, it is necessary to ensure high-quality sealing of all cracks using special plaster or polyurethane foam. Then a layer of film waterproofing is laid. If it is made of pieces, then at the junction points it is necessary to place two sheets with an overlap of about 15–20 cm and connect them together with aluminum tape.
Read also: Soundproofing walls: how and with what you can make your own soundproofing in an apartment

There are two options:
1) use only longitudinal logs (less expensive option);
2) install first cross beams, and on top of them - longitudinal ones.
Since the balcony area is small, in most cases it will be enough to lay only 3 longitudinal products. The first of them is located directly next to the wall of the building, the second - in the center, and the third - near the edge of the balcony. All of them must be parallel with respect to load-bearing wall.
 Fixing the log to concrete slab the balcony can be done in two ways:
1) using anchors of a suitable size;
2) or use dowels and quick-installation screws.
Although, at first glance, there is nothing special about performing this stage of work, this is far from the case. The point is that it is from correct installation The lag depends on whether the surface of the wooden floor is level or not. Therefore, in order to avoid mistakes, you should approach installation work very responsibly.
To create an ideal flat surface, it is necessary that all joists made of wooden beam, were horizontal in level. As a rule, in some places you will have to lift the wooden beam relative to the balcony slab and install wooden inserts in the resulting gap, fixing them with self-tapping screws (connect them into a single unit with the beam).
 If we're talking about about the loggia, it is best to use the second option. In this case, first, transverse logs are installed at a distance of 400 to 500 mm from each other (they are fixed to the concrete slab in the same way as described above), and longitudinal logs are laid on top of them. To connect the latter to the former, long wood screws are used, deepening their heads into the wood by approximately 15–20 mm.
Be sure to install all the joists in such a way that none of them comes into contact with the wall.
Advice: Before installation work The height of all materials intended to form the floor should be calculated. Their finishing height should be less than or equal to the height of the threshold of the balcony or loggia.
In the space between the joists it is necessary to lay insulation, which can be mineral wool or polystyrene foam (or other material with similar functions). If there is a small space in height between the insulation and the floorboard, this will not create any problems. On the contrary, it will contribute to better thermal insulation.
Turn them into full-fledged living rooms or arrange recreation areas in open spaces. This is not surprising: in small apartments, every square centimeter counts. High quality glazing and good finish necessary, but this will clearly not be enough. You need to start with the subfloor on the balcony: what to make it from, how to organize the work correctly, we will tell you today.
Initially, you need to determine what kind of design you want to get as a result. She may be:
In conditions of high-quality glazing, heating. You can realize your idea different ways. Practice shows that such options are most often chosen.

To begin with, we completely free up the space, take out the furniture and all the interfering objects. We clean the freed base from debris and dust. We examine it carefully. All cracks and cracks found must be carefully repaired. The gaps between the wall and the slab are especially carefully filled. To do this, you can use a repair solution, but it’s easier to use either acrylic sealant.
All voids are filled efficiently, after which the mixture should completely harden. Then proceed to waterproofing. It is necessary in any arrangement. The moisture that the slab inevitably “pulls” through the capillaries will reach the screed. Here it will accumulate, gradually destroying the concrete. Therefore, a layer of insulation is laid. It may be different. The easiest way is to lay the film. This can be a special fabric or ordinary dense polyethylene.
They lay waterproofing with a slight overlap on the walls, forming a kind of “trough”. The strips are overlapped and secured with tape. If it is intended to insulate the structure, then it is carried out after insulation. Expanded clay is poured or another heat insulator is laid. A reinforcing mesh is laid on top. It is made of steel wire with a cross section of 3 mm. The cell sizes are 100x100 or 50x50. The reinforcing mesh will significantly increase the strength of the screed and extend its service life. Before installation, remove debris and dirt from the heat-insulating layer. The reinforcement is pressed tightly to the base and overlapped in 1-2 cells. Next, we begin to install the beacons. This is what builders call the landmarks along which the mortar will be laid. Metal guides are usually installed as beacons.
Each part is set exactly at the level, firmly securing it to the solution. The longer the beacon, the more attachment points it should have. Otherwise, during the pouring process, the part will move, which will affect the quality of the work. Get flat surface It is possible only when all the landmarks are set strictly in the same plane.
Filling begins by mixing the working solution. You can purchase a ready-made mixture and just dilute it with water or mix the ingredients yourself. An important point: for the so-called semi-dry system, less water is taken. It dries much faster, but is prone to cracking. To avoid cracking, it must be additionally rubbed the next day after installation. Filling is carried out as follows:
So we gradually fill the entire area. To prevent the floor screed on the balcony from cracking, it must dry evenly. Therefore, in too dry or hot weather The poured structure is covered with damp burlap or film. When the mixture has hardened sufficiently, after a day or two, remove the beacons if necessary. The resulting irregularities are smoothed out. If the guides are made of high quality metal, they can be left in concrete.
It remains to wait until the composition is completely cured. This may take up to 3-4 weeks.
Much depends on the type of screed, air temperature, humidity, etc. There's no need to rush. Concrete that has not gained strength will not last long. Any covering is laid on a completely dry base: linoleum, laminate, tile, etc.
With all its advantages cement-sand mixture puts too much load on the base. And it can be difficult to lay it with your own hands without experience in such work. Therefore, many people choose wood construction. It's very simple. It consists of strong logs made of timber on which the flooring is placed. This can be a board or wood boards. If necessary, a decorative coating is laid on top. Many people believe that heating systems cannot be installed in this way. But that's not true. Infrared film Fits on any flat surface. A good option will OSB boards or something similar. Water heating is also possible. The pipes are placed in special cells and laid on top wood covering. In any case, it is very important to treat the lumber before installation.
The wood must be coated with an antiseptic and dried well. Without such treatment, the tree will not last long. This step can be skipped if you buy already processed material. True, its price will be higher.
We sorted it out important points balcony devices. Possible options there is a lot more to come. The owner can easily choose the one that is most suitable for himself. In any case, you can do the work yourself and save on the services of professionals. The technology is simple, but amateur performance is unacceptable. In order for you to be pleased with the result, you will need to be careful, patient and follow the instructions exactly.


