Polycarbonate canopies over the porch are a small canopy, one side tightly adjacent to the facade of the house. It performs both purely practical and decorative functions, adding presentability to the house; without it, the entrance lobby would look quite dull. With a canopy, the porch looks like a complete and integral architectural composition.
The main function of the canopy over the porch is to protect the entrance and porch from rain, snow, hail and sun rays. A simple example - no matter how reliable and well protected and lined Entrance door, under the influence of the sun, wind and moisture, it will begin to lose its original presentability. Over time, stains will appear on it, paint will begin to peel off, and rust will appear. Of course, all this can be eliminated, but it will require time and money. In addition, moisture that gets into the lock in winter can cause jamming (sometimes complete damage) of the mechanism - you simply cannot open it because it is frozen - a situation that, unfortunately, is quite familiar to many motorists.
Another point is water drainage. Firstly, the visor allows you to leave the house and calmly open the umbrella. Or, on the contrary, when you come home, close your umbrella, and, without fussing or dodging the unpleasant rain, take out the keys, open the door and go into the house. And, by the way, wipe your feet on a dry mat. Secondly, water, including water flowing from the roof, is removed from porch, which reduces the negative impact of natural factors on it. In addition, you don’t have to worry that when you leave the house in winter, you’ll have to balance on slippery frozen steps, which is especially dangerous if the porch is high.
The polycarbonate canopy above the entrance reflects the sun's rays quite effectively. This helps reduce thermal load on the walls, as a result in the summer the house will be a little cooler, which, in turn, will save energy - the air conditioner will work less.
Structural rigidity. The canopy will have to withstand quite significant loads - water flow, snowfall (the load created by accumulating snow is quite large, so it is important to choose the right shape in which the snow will “slide” off the canopy), strong wind(the visor should not be torn off). Therefore, in order to provide sufficient stability to the structure, a truss (base) is required, for which various materials can be used:
Visor area. The ideal size is when the canopy completely covers the front door and the entire area of the porch plus 30-40 cm around it. However, the canopy can be extended to the driveway - then, when you get out of the car, you won’t have to run across in the rain. Or, by expanding the canopy over the porch, you can get a canopy over the terrace. True, in this case you will have to install additional supports - this option is simpler and more effective than increasing the thickness load-bearing beams designs.
Advice! When designing, it is necessary to provide for installation on a visor lantern, which will illuminate the approaches to the house. And so that the light does not burn in vain, equip this lantern with a motion sensor - it will go off when someone approaches the porch
When there is no roof over the porch, it is constantly exposed to precipitation and sunlight. If you can somehow put up with the sun, then a door constantly covered with snow is a serious problem. Therefore, in order not to fight the elements, we recommend building a durable metal roofing. We will tell you about all the nuances of its manufacture below.
First, you need to decide what type of roof you need for your porch. Depending on the design of the frame, the roof comes in two types:
Canopies are suitable for small porches, since their length rarely exceeds 50-60 cm. It is not worth making them longer, since in addition to its own weight, it will have to withstand snow load. If you need a roof for a large porch or, for example, a terrace, you need to make a canopy. Therefore, to determine the type of construction, we measure the size of the porch itself. Keep in mind that the roof over the front door really protects the porch from precipitation only if its dimensions are slightly larger than the dimensions of the porch, i.e. it is necessary to provide a kind of overhang on each side of at least 25 centimeters.
Having decided on the dimensions of the future canopy or canopy, we select the type of roof structure, which can be:
Most often, canopies and awnings are made pitched or arched. In the first case, the frame consists of several interconnected triangle-brackets on which the roofing material is laid. If the canopy is arched, we make almost the same frame, but with an arched rafter system. The choice of roof shape depends solely on your preferences and, of course, the design of the house. If, for example, the house is decorated in classic style, and the porch is decorated with balustrades, the arched version covered with polycarbonate will look out of place. But a lean-to canopy can further decorate the entrance to such a house.

But regardless of the design option you decide to make, be sure to draw it on paper and indicate the dimensions of all elements. A simple drawing can be “sketched” even by hand. Having it in front of your eyes will greatly simplify your work.
As we said above, we will make the visor from metal. To make it we will need the following materials:
As roofing material It is advisable to use the same coating that is used for the home. For example, if the main roof is covered with metal tiles, then exactly the same metal tiles should be used for the canopy. As a result, it will look most harmonious. The exception is polycarbonate, which can be used regardless of what material the main roof is covered with. The only thing, as we have already said, polycarbonate is not suitable for all types of houses.
If you don't have welding machine, you can make the frame of the visor using special clamps for profiles and bolts.

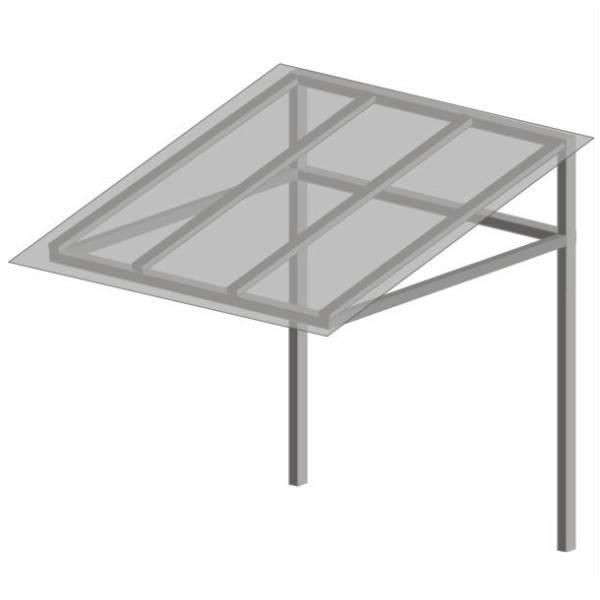
Before we start building a porch canopy, we mark out construction site around the entrance to the house. We are interested in the outer corners of the site - here we dig holes 70-100 cm deep. We fill the bottom of the holes with crushed stone or gravel 15-20 centimeters deep. Then we install the pillars in the holes, align them vertically and fill them with M200 concrete. In this position, we must fix the supports with braces or supports until the concrete hardens. If the width of the structure exceeds 2 meters, we install additional intermediate supports.
While the concrete is hardening, which takes 28 days under normal conditions weather conditions, let's move on to making the brackets. First, we weld the corners from two pieces of pipe at an angle of 90 degrees. The length of one pipe should be equal to the length (depth) of the canopy, and the length of the second pipe should be 25-30 centimeters. We connect both ends of the resulting corner with another piece of pipe, which will serve as a rafter, and as a result we get a rectangle. We make several such brackets, taking into account the fact that they will be located in increments of 50-60 cm.

We connect the installed pillars with a jumper. Further opposite the jumper, i.e. in one horizontal plane, draw on the wall the level at which the frame will be located. We align the brackets along the marked line and fasten them to the wall. To do this, first drill holes in the bracket post. Then we attach the bracket to the wall with our own hands, align it vertically and relative to the intended line, and then make marks through the mounting holes. Next, remove the bracket to the side and drill holes according to the marks. After this, we attach the bracket to the wall so that the holes match, and fix it with dowels or anchors.
All installed brackets must be connected with horizontal beams, which are welded above and below the bracket post, as shown in the diagram above. The top beam should be flush with the rafter. This point must be taken into account when making brackets. Beams must also be secured to the wall with dowels or self-tapping screws. We weld the outer edge of the brackets to the jumper located between the supports.
This completes our canopy frame. Now you need to do the sheathing. To do this, we fasten the boards or bars to the rafters with bolts or metal screws, having previously drilled holes in the rafters. The pitch of the slats should be 200-300 mm.
If you want to cover the roof with flexible tiles, sheets of moisture-resistant plywood or OSB should be secured to the frame.
To complete the work, we attach the roofing material to the sheathing with self-tapping screws or nails. This procedure is simple and is carried out according to standard scheme, therefore does not require any explanation. The only thing is to ensure a sealed joint between the roofing material and the wall. We use a special corner strip adjacencies. To attach it, we make a small groove into which we insert the upper side of the plank. We attach the plank itself to the wall with dowels, and fill the groove with construction sealant. The strip is attached to the roofing material with self-tapping screws.

We fill the space between the plank and the roofing material with a special sealant. It is advisable to select the latter individually for the profile of corrugated sheets, metal tiles or other roofing. If it was not possible to select a seal profile, you should use a universal sealing tape.
You can do the same thing wooden canopy from timber. The only thing is that it is better not to concrete the wooden supports, but to fix them on top of the concrete, i.e. on the surface of the earth using special glasses or other embedded fasteners.
If the roof is small, as we have already said, you can make it according to the same scheme, but without two supports. As a result, we will get a visor. Upon completion of the work, be sure to paint all metal parts of the structure with metal paint. Beforehand, all welded seams are carefully processed with a file so that the product looks neat.

If you want the canopy over the porch to look unusual. At the same time, it was “light”, “airy”, make it arched and cover it with polycarbonate - it’s translucent sheet material, which bends well. The construction is quite simple to make - as in the previous case, we mark the site and install two supports at the corners.

Then we make a U-shaped frame from profiled pipes. The length of the lintel of the structure should be equal to the width of the canopy, and two parallel strips should be equal to the length of the roof (depth). We attach the lintel to the wall with anchors or dowels. In this case, we weld the edges of the parallel strips to the supports, as a result the U-shaped frame must be installed horizontally. If you are making a canopy, you need to weld two posts at least 30-40 cm long to the lintel along the edges and secure them to the wall. They will raise bearing capacity designs.
As a result, we have a frame to which we need to weld an arched rafter system. To make it, we need to make two arcs from pipe sections, the length of which must exceed the width of the canopy. The longer these segments are, the smaller the bend radius will be. You can bend the pipes using a pipe bender. If you don’t have such a tool, you can make a pipe bender yourself. For this we need large leaf plywood or OSB. On it we draw an arc of the required diameter and attach hooks along the markings. We make a lock near the outer hook - we simply turn the same hook over and fasten it upside down. Then we insert the pipe into the clamp and bend it along the hooks.

To make it easier to bend the profile, it should be thoroughly heated.
There is another option for obtaining arcs, which does not even require a pipe bender - we take a pipe and make cuts. The smaller the bend diameter, the more frequent the cuts should be. Then we bend the pipe with our hands and weld the cuts. We attach the resulting arcs to the frame - one between the pillars, and the second against the wall. We attach jumpers between the arcs in increments of 20-30 centimeters. We fix a polycarbonate sheet on these jumpers, which will give the structure an “airy” appearance. To install the coating we use self-tapping screws.

This completes the construction. The only thing to decorate the structure is to make patterns from a metal rod and weld them to outer pipe, as in the photo above. At the end of the work we paint metal carcass. It is advisable to do painting before installing the polycarbonate.

It must be said that there is another option for making an arched canopy. Its principle is similar to the construction of a lean-to canopy, the only thing is the rafters, i.e. The hypotenuse of the rectangular brackets is not flat, but arched.
The visor is important element decoration of the porch, completing its appearance, but most importantly, it provides much-needed protection from the weather. Let's look at how to choose it, what to pay attention to, and finally, how to make a canopy over the porch with your own hands.

In order for the visor to serve for more than one season and adequately perform its functions, it must meet the following requirements:
You can make a canopy over the porch with your own hands in a fairly short time. The main thing is to calculate your strength and choose a frame shape that is easy to make yourself. Distinguish the following types visors:
1. Single-pitch canopy. Most affordable option, is a structure made at an angle for unimpeded drainage of snow and water. A single-pitch canopy can be straight, concave or with a valance.

2. Gable canopy. Simple and reliable option with two inclined planes.

3. Arch. Visor with a semicircular design. It is easy to implement and has an attractive appearance. 
4. Tent. Other types of ball visor: awning and dome. Quite difficult to work with many curved parts.

The following materials can be used for the visor, each of which has its own advantages and disadvantages.
Note! For external works it is necessary to purchase sheets with a special protective film against ultraviolet rays. Such material will not lose its characteristics for a very long time. An uncoated sheet can only be used indoors; outside it will last no more than 3-4 years.

An excellent option for a canopy, which is comparable in popularity to polycarbonate due to the following positive properties:
double-sided polymer layer that protects against moisture and corrosion;
The disadvantages of the material include:

A canopy made of metal tiles is aesthetically pleasing and highly durable. Such a canopy looks especially organic in combination with the same roof of the building. In this case, the trim left over from the construction of the roof will be suitable for arranging the canopy.
The main advantages of metal tiles include:
The disadvantage of metal tiles is that they generate a lot of noise during hail or rain. Instead of metal tiles, you can use flexible or bitumen shingles– it has high aesthetic parameters and well muffles the sounds of precipitation.


Work on installing a canopy over the porch begins with the creation of a schematic drawing indicating the dimensions of the structure.
The diagram specifies the following parameters:
Important! For best protection The porch and door canopy should be made with a margin of length and width. The angle of the roof slope should be arranged so that snow and rain flow freely and do not linger on the canopy.


When attaching polycarbonate, the following nuances should be taken into account:

There are many options for arranging a canopy over the porch; the method using polycarbonate is the most affordable and can be easily done with your own hands.


That's all, we hope this article - a canopy over the porch with your own hands, was useful to you.
What is the secret of the popularity of polycarbonate canopies? Why is this material chosen more often than others? Is it really all about the low cost, or are there other features that are worth knowing about? How not to make a mistake when choosing a canopy for your home for the first time? What might this design look like, and why is it needed at all? We have prepared everything for you necessary information about canopies and canopies made of polycarbonate, and also selected the 50 best photo examples!

There are promotional carport prices - turnkey carport 3.6 x 6.3 = 63,000 rubles!!!
turnkey carport for 2 cars 5.7 x 6.3 = 128,000 rubles!!!
The necessary welding is performed during production using shielding gas, ensuring high quality welded joints.
Painting is also carried out at the factory. High-temperature drying of the painted layer ensures high strength and quality of the protective street coating.
The strength of our structures is ensured by correct load calculations (all calculations comply with the current standard).
Production and delivery times for ordered structures are within 2 weeks. Installation of the structure takes one to two days.
| Canopy No. | roof canopy size, w*d | size according to outer pillars, w*d | 3d sketch with dimensions | covered area | canopy price, including installation and delivery (turnkey) | |
| the width of the canopies is 3.4 m. | ||||||
| 3 | 3,4 * 5,3 | 3,0 * 5,0 | 18 | 61 490 | ||
| 4 | 3,4 * 6,3 | 3,0 * 6,0 | 21,6 | 69 190 | ||
| 5 | 3,4 * 7,4 | 3,0 * 7,1 | 25,2 | 77 990 | ||
| 6 | 3,4 * 8,5 | 3,0 * 8,2 | 28,8 | 82 390 | ||
| 7 | 3,4 * 9,5 | 3,0 * 9,0 | 32,5 | 92 290 | ||
| the width of the canopies is 4.4 m. | ||||||
| 16 | 4,4 * 3,2 | 4,0 * 2,9 | 14 | 46 090 | ||
| 17 | 4,4 * 4,2 | 4,0 * 3,9 | 18,5 | 60 390 | ||
| 18 | 4,4 * 5,3 | 4,0 * 5,0 | 23,2 | 71 390 | ||
| 19 | 4,4 * 6,3 | 4,0 * 6,0 | 27,7 | 80 190 | ||
| 20 | 4,4 * 7,4 | 4,0 * 7,1 | 32,4 | 92 290 | ||
| 21 | 4,4 * 8,5 | 4,0 * 8,2 | 37 | 104 390 | ||
| 22 | 4,4 * 9,5 | 4,0 * 9,0 | 41,7 | 115 390 | ||
| 23 | 4,4 * 10,6 | 4,0 * 10,0 | 46,3 | 120 890 | ||
Let's figure out what this material is. Polycarbonate is a hard polymer plastic. It is widely used not only in construction, but also for the production of lenses, compact discs, and computer parts.

May be:
Cellular polycarbonate is several thin plates connected to each other by jumpers. In cross section, the sheet is divided into cells, and the air contained in them provides good thermal insulation properties of the material.

Monolithic polycarbonate is a continuous sheet of polymer without voids or cells. It's universal construction material, which has excellent light transmittance and can replace ordinary glass.
Among the advantages of the material it is worth highlighting:


It is not surprising that with such a quantity beneficial properties, polycarbonate is so popular as a material for building sheds. Let's figure out what a canopy for a house can be like?


The canopy above the entrance serves to protect the porch from rain, snow and other unfavorable factors. It can be attached to the building on suspensions or installed on additional supports. The frame material is wood, steel or aluminum.

Polycarbonate canopies on a forged frame look very beautiful and interesting. Floral motifs, complex geometric shapes forged elements are attached appearance visor of luxury and chic. Such designs fit well into the style of ancient buildings and classic private houses.

A polycarbonate canopy over the entrance not only perfectly fulfills its main function, but also serves as a harmonious addition to the exterior, and in some cases - bright accent which can completely change visual perception exterior of the house. Thanks to the variety of colors, the material can be perfectly matched to the color of the building.


The advantages of building a carport for a house are obvious:

When designing such a structure, the dimensions of your car are taken into account, and a part of the building is selected that is convenient to drive up to.


A common option for installing a polycarbonate canopy to a house is to create a terrace for summer holiday. It can be placed directly in front of the main entrance or on the side of the building. Tables and chairs are installed, the high fire safety of the material allows you to place a barbecue on such a terrace.

And this is another example of how a variety of colors allows you to make perfect design to your taste. It is very pleasant to be under a completely transparent roof during warm summer rain. They say that you can watch the flowing drops of water endlessly. The tinted coating will protect from bright sunlight and ultraviolet radiation. Creates an interesting lighting effect bright sheets colored polycarbonate.


Wood is environmentally friendly natural material which has a pleasant smell
There are people who do not trust masters in anything, believing that doing it yourself is easier and cheaper. But this option is only good for those who are professional in construction, clearly know all the technology of the process, and besides, can buy materials from friends cheaper than in hardware store or on the market. What are others at risk:

This is why you should trust professionals! The company Canopy Master has been engaged in canopies, canopies, gazebos and greenhouses for 12 years. Our arsenal includes hundreds of successfully completed projects, the quality of which is confirmed by their service life.
The best craftsmen, who not only know and love their work, but also treat it with the utmost responsibility, will make you a canopy according to individual order in just 2-4 weeks. You will be pleasantly surprised by the daily help of a competent person who will answer all your questions.
Don't waste your time and energy. By ordering the product today, you can enjoy great holiday in the near future.

Message
sent.
An integral element of each entrance is a visor. Without it, the front door to a private house looks unfinished. In addition, it has an important practical purpose, which is its protective function. The article will discuss the types of designs, as well as an option for self-made canopy over the porch.
The visor must be not only practical, but also safe, so there are a number of requirements that the design of the visor must meet:

One of the main functions of the visor is protective. In this case, we are talking about both the residents and guests who will enter the house, and about the front door. A good canopy is sealed, that is, rain or melt water does not leak through the cracks in its covering. This extends the life of the material from which the door is made. In addition, the canopy casts a shadow on the porch, which prevents rapid fading paint coating, which is applied to the trim and the door.

The design of the visor must be strong enough. This means that without any particular difficulties it must withstand both its own weight and the wind load, which in some cases can be several times greater than the weight of the canopy structure. In addition, in winter, with heavy snowfalls, some of the precipitation will be retained on the canopy. Its strength should be sufficient for the weight of the snow cover.

The visor is not a module that is made just to be. It should be attractive and set the overall mood. At the same time, the design of the canopy should not contradict the exterior of the building. This is expressed both in the lines of the frame and in the colors. The width of the visor should be such that the projection on each side of the door is at least 50 cm. Only in this case can we speak of a sufficient protective function.

The classification of canopies is most often made according to the method of design of the roofing decking, and the names correspond to the name of a roof of a similar design. It follows that they can be:
The first option requires the least amount of material for manufacturing and is light in weight. You can assemble such a structure without special effort with your own hands. It consists of one plane, which is fixed to the wall at the required slope. This design has certain restrictions on inclination, so when long length Snow may accumulate on the canopy. The visor with two slopes resembles a triangle. To make such a structure, you will need twice as much material as for a lean-to structure. In this case, the angle of each slope can be increased. This will make it possible to speed up the removal of precipitation from above.

Multi-pitched canopies look great if they are installed on the porch of a house that has a hip or other complex-shaped roof. It is quite difficult to make such a visor, so you will need to draw up a high-quality and thoughtful drawing, as well as the help of a specialist. Arched canopies are a semicircular structure. It is worth choosing if the house design has rounded shapes with which the canopy will be combined. Otherwise, it is better not to take risks with experiments. This also applies to dome visors. They are to a certain extent similar to arched ones, but have an additional bend in the front part of the structure.
Note! Concave structures are a type of single-pitch canopy. Their disadvantage is poor sediment drainage, although in appearance they can be quite attractive.

The choice of roof decking is an important step when designing the structure of the canopy over the entrance. All materials that are suitable for these purposes can be divided into two large groups:
From the first group, they most often choose cellular polycarbonate. It's really good material, which has the following advantages:

Polycarbonate is capable of partially transmitting light, which can be useful for a visor. Before purchasing polycarbonate, you need to make sure that it has protective film, which minimizes exposure to ultraviolet rays. If there is no such film, then the material will quickly dry out and crack. Among the disadvantages of polycarbonate, its fragility may be critical. If hail is not uncommon in the area where you plan to install the canopy, then it is better to choose a different type of flooring, since the first precipitation will cause the polycarbonate to be completely damaged.

The most common metal roofing sheets are corrugated sheet metal and metal tiles. They have similar properties, but metal tiles look more attractive. From positive qualities These materials are worth highlighting:

By mechanical strength metal decking is superior to polycarbonate. They can also be bent to a certain radius to obtain the desired shape of the visor. Metal tiles and corrugated sheets are more resistant to wind loads. Heavy hail can leave dents but will not penetrate sheet metal. One of the disadvantages of the material is its noise. Even a little rain will drum well on the visor.
Any work begins with planning. It will help to correctly calculate forces, means and take into account possible difficulties upon reaching the goal. This is also true when making a visor, so the first step will be its design.


To make the design process easier for yourself, it is better to take a photo of the entrance first. In the photograph it is easier to select the required dimensions and shape of the future structure. This can be done either manually or in a graphic editor. When drawing up a drawing, you need to consider several points:

It was already said above that the canopy should be 50 cm wider than the entrance on each side, but this rule is not valid if there is a porch with large sizes. In this case, you need to make sure that the canopy covers the sides of the porch. The length of the stem can be adjusted depending on your wishes. If the visor is too long, then additional supports are simply installed. The number of supports will depend on the complexity of the structure and its weight. Usually a wall mount and two supports are sufficient. The angle of inclination is selected in the same way as for the roof that is on the house.

The preparatory process consists of purchasing necessary materials and missing tools. Materials you will need:
You can't do without a tool:
Do not forget about personal protective equipment, such as glasses, gloves and clothing made from natural fibers.

The first step is to prepare the frame of the future structure from a 40×20 mm profile pipe. Depending on the selected dimensions, blanks are cut. Two of them must correspond to the height of the porch, the other two must correspond to its length. The size of two more blanks is selected in the process. From these components you should get right triangle. First of all, parts whose dimensions are known are welded together in pairs. They should be located at right angles.
This can be achieved with a special clamp or vice. The entire seam should not be welded in one pass, as the angle will be broken. It is better to make small tacks, level the workpiece, and then completely boil it. When everything is ready, you can measure the length of the hypotenuse. Two more elements are cut out with a grinder, and they are welded into place. Now you need to combine the triangles into the overall design of the visor. To do this, they are connected by strips at the corners. To increase the rigidity of the canopy frame in the resulting rectangle, which will be adjacent to the wall, it is necessary to weld several transverse strips.

The next step is to install metal elements under the sheathing on which the porch roofing will be attached. Once the porch frame is ready, it can be installed on the wall. This will make it easier to secure it. Several holes are drilled in the legs of the triangle that will be adjacent to the wall. They must match in diameter the diameter of the anchor with which the fastening will be made. The porch frame is leaned against the installation site and the location of the holes is transferred to the wall. Holes are drilled in the wall using a hammer drill.

Now you can strip the porch frame. All rust must be removed from it. The easiest way to do this is grinder or a grinder with an appropriate attachment. After this, the porch frame is painted. When it dries, you can install the roofing material. If it is corrugated sheeting or metal tiles, then they should be secured with roofing screws with rubber seals. Polycarbonate can also be secured with them, but you shouldn't overdo it with polycarbonate. If you tighten the screws too much, they will simply crush the flooring. Next, the visor rises and locks in place.

After installation, it is necessary to seal the junction of the canopy to the wall. This can be done using various mastics or a piece of roofing material. If the visor extends too far, racks are mounted. They must first be welded to the frame. Two holes 50 cm deep are dug under them. The part of the canopy posts that will be in the ground is covered bitumen mastic which will protect them from rusting. The racks are lowered into place and the space around them is filled concrete mortar. Another visor option for self-assembly is in the video.
As you can see, make simplest option installation of a single-pitch canopy will not pose any problems even for an inexperienced craftsman. The main requirement is to have the ability to work with various power tools.


