On modern market presents a huge range of construction and finishing materials, including for roofing. Primitive finishing such as slate and bitumen is gradually becoming a thing of history, being replaced by more presentable and high-quality materials that fully meet the requirements of modern housing construction.
Corrugated sheeting is one of these high-quality and aesthetic materials. You can cover the roof with corrugated sheets yourself. Here is a guide to arrangement. flat roofs Similar roofing structures

very often they are erected on various outbuildings such as sheds and gazebos, and sometimes above residential buildings. An inexperienced person may decide that corrugated sheeting is not best suited for roofing and can only be used for cladding gates and fences. However, this opinion is absolutely wrong. Modern profiled sheets have excellent protective properties, excellent appearance and are available in the widest range.
color scheme Add to all the advantages the ease of installation and fastening of sheets, as well as an affordable cost, and you get almost perfect material
for roof roofing. It is precisely for the ease of installation that private and thrifty developers are so fond of profiled metal sheets. However, you should not think that covering the roof with the material in question with your own hands is very easy. Here, as in any other work, there are a number of important nuances

The nuances of using corrugated sheets when working with a flat roof
To cover a flat roof, use a single sheet, without joints. Any joints increase the risk of moisture penetration into the space under the roof. If it is not possible to equip the roof with one sheet, the joints must be sealed with special silicone agents.
It is precisely because of the features mentioned above that corrugated sheeting is very rarely used for roofing flat roofs. Better suited for such structures roll materials, however, if you really want to, you can successfully lay corrugated sheets.

In accordance with the technology, profiled sheets must be laid at a certain angle necessary to obtain the highest quality and reliable coating. If you have at least once had to install a roofing covering with your own hands, you already know that the mounting angle finishing material determined by the angle of inclination of the roof slope.
In the case of a flat roof, certain difficulties may arise at this point. Profiled sheets are laid at a ten-degree angle. With a lower slope, atmospheric moisture will not be able to drain normally from the roof and will penetrate under the roofing material, especially if the sheets are laid overlapping. Solve the problem of creating the required slope in the case of flat roof in most cases, lathing helps.

In addition to the slope of the slope, it is necessary to take into account its length. As a rule, profiled sheets have a standard length of 12 m. This sheet size is very convenient - in most cases, the entire roof slope can be covered with one sheet, avoiding seams and any kind of joints.
If necessary, the corrugated sheet can be easily cut using ordinary metal scissors. It is strongly not recommended to use a grinder for cutting roofing sheets. During the operation of this tool, a large amount of heat is generated, under the influence of which the protective coating of the corrugated sheet is destroyed, due to which the performance properties of the material noticeably deteriorate.
You can handle the installation of corrugated sheets on the flat roof of a barn, gazebo and any other building with your own hands. The technology for doing the work remains almost the same for most cases.
Prepare the following equipment for work:

Second stage - lathing
Start assembling the sheathing. To arrange this element, it is most convenient to use boards. Lay the boards on the rafters and secure them with galvanized screws or nails every 50-100 cm.
Select the specific pitch of the sheathing in accordance with the characteristics of the profiled sheet used. For example, for installation of C35 profiled sheets, the optimal lathing pitch will be 0.5 m, and for C44 grade sheets, the board fastening pitch should be increased to 70-75 cm.
If the length of the roof slope exceeds the length of the profiled sheet, lay additional boards at the future joints of the sheets.

The third stage - moisture insulation The basis of profiled sheets is metal. Condensation inevitably settles on metal surfaces. Moisture sooner or later leads to irreversible damage to any building materials, so it must be neutralized.

There are 2 main options for neutralizing the harmful effects of moisture, namely:
After completing the moisture-proofing work, you can begin to prepare directly for the installation of the roof. To make it more convenient to lift sheets onto the roof, you can make a simple device in the form of two long slats laid from the ground to the roof at a slight angle.

The fourth stage - laying sheets First of all, select suitable option

installation of profiled sheets. There are two main mounting options, namely: Corrugated sheeting can only be fixed using special galvanized self-tapping screws with seals. The seal must be made of neoprene rubber. This material tolerates contact with moisture and temperature changes well. Optimal diameter
self-tapping screw for attaching corrugated sheets – 4.8 mm.

Self-tapping screws are screwed into the depressions of the sheets, where the material is adjacent to the sheathing. On square meter coating, about 6-8 self-tapping screws are consumed. Try to place fasteners at the same distance. The sheets must be attached to the outer battens in all waves, because these places will be subject to the strongest wind loads. The sheets can be fixed to the remaining elements of the sheathing through one wave.

It is better to prepare mounting holes in sheets in advance. When working with thin profiled sheets, holes can be made using a self-tapping screw, but if the sheets are quite thick, make holes with a drill.

Self-tapping screws with multi-colored caps are currently available for sale. Without any problems, you can choose fasteners that exactly match the color of your profiled roofing sheets.

Lay adjacent sheets of covering with an overlap in 1 wave.
Cover the entire main surface with corrugated sheets, and then install additional accessories if necessary.

Thus, there is nothing complicated about covering the roof with corrugated sheets yourself. You just need to follow the instructions and take precautions that are relevant for any roofing work.
Good luck!
The profiled sheet is actually universal building material. It is widely used to implement the most different ideas. Nowadays, it is very common to find attractive and elegant roofs that are covered with bright profiled sheeting.
In most cases, you can see plain ceilings. However, geometric patterns in the form of rectangles and stripes are also found. Thanks to this, the roofs of houses have their own special style. Some homeowners are wondering: how to cover a roof with corrugated sheets with your own hands? In addition, many do not know how to care for it. IN in this case It is recommended that you familiarize yourself with all the nuances inherent in this material. After this, you will be able to work with it yourself.
Laying corrugated sheets on the roof has its own characteristics. Before installing it, you should familiarize yourself with the advantages of this material. Many people would like to do all the work themselves. This is not surprising, since currently hiring a professional team of workers is quite expensive. In this case, you can do without it. laid, is a completely doable task. This is the main advantage of this material.
The length of the bar is about two meters. The recommended overlap of the material is 50-100 mm. The installation itself should begin from the plumb side. Next you need to move towards the ridge of the roof. Near it you need to cut off the excess. The entire end strip must be covered (at least one wave of corrugated sheeting). Next, it will be necessary to attach it to the corresponding board, as well as to the comb. The recommended step is 1 meter.

In this case, specialized smooth elements are used. According to the recommendations of experts, sealants should be placed under the corrugated sheet. They should be finely corrugated or follow the profile of the roof itself. The recommended overlap length is from 100 mm. On the side of the sheet you need to secure the strip using self-tapping screws. The recommended pitch is 400 mm. Each fastening made independently must be under the casing or in the groove. In this case, the ridge seal is used for protection. The lateral connection is arranged somewhat differently. For these purposes, a longitudinal seal will be required. It can not be used on steep slopes.
Each outlet pipe consists of two parts: upper and lower. The latter is selected in accordance with the roof profile. It is recommended to install the snow plow immediately. The recommended pipe diameter is 100 mm. Ventilation elements need insulation. Here's how to cover a roof with corrugated sheets.

In principle, this process is also not particularly complicated. In order for such a roof to be cleaned, ordinary rain will be quite enough. However, water is unable to carry away branches, leaves and other debris. For this reason, regular cleaning of the surface is recommended. This must be done every year. Gutter systems also need regular cleaning. This also applies to grooves. Heavily polluted areas are common. They can be washed with a soft brush. This can also be done with water from a hose. Recommended pressure is up to 50 bar. It happens that dirt eats deep into the roof. In this case you need to apply special means, which are intended for cleaning painted surfaces. There is a simple algorithm of actions. First you need to apply the product to the surface. It will take a few minutes for the best effect. Next, the product is washed off using clean water. Difficult spots must be cleaned with a rag. It is pre-soaked in a solvent. Then the roof must be rinsed with water. It is highly not recommended to clean the roof with means that are not intended for this purpose. The fact is that such exposure may damage the sheet or surface of the polymer. Ice and snow are removed independently. To do this, you can use wooden or plastic spatulas. In this matter, you need to be careful. Otherwise, scratches cannot be avoided.
The roof is an important component of any home. It must be resistant to bad weather, damage of any type, and temperature changes. The aesthetic side of the issue also plays a big role. All these requirements are met by corrugated sheeting, which is a universal material with an impressive amount positive characteristics. A logical question arises: how to properly cover a roof with corrugated sheets with your own hands.
Many people today decide to cover their roof with corrugated sheets with their own hands. The product is not difficult to install and has a low cost. Corrugated sheeting covers buildings with pitched roofs, gazebos and terraces, utility facilities of any significance.
The corrugated sheet is made of steel. In this case, the cold profiling technique is used. This allows you to achieve high level strength and resistance to damage. The configuration of the corrugated sheet, represented by stiffening ribs, plays a huge role. Low price and variety of colors - additional advantages, allowing you to worry about the attractive appearance of the house. You can cover the roof with a corrugated sheet yourself if you adhere to the specifications technological map and instructions. Correct execution is also responsible for durability. roofing pie.
Roofing design rafter system must be done correctly. Initially, you should take into account a number of characteristics of the profiled sheet itself. Firstly, it is quite small. As a result, there is no need to strengthen the rafter system. 
Second important characteristic- tilt angle. She plays more aesthetic role, so you can rely on your own preferences and wishes. Most the best option the tilt angle will be 12 degrees. If a lower roof slope is chosen, additional work becomes necessary. These include sealant treatment of all horizontal and vertical overlaps. In this case, the vertical overlap is mounted so that it represents two waves.
To cover the roof yourself with corrugated sheeting, you must use an additional wall (load-bearing corrugated sheet). When arranging a roof with an impressive angle, you can use certain brands, including the following S-44, NS-20, NS-35. With a slight roof slope of 5-8 degrees, you can use self-supporting products of the N-75, N-60 brands.
In order to properly cover the roof with corrugated sheeting, it is important to use timber with a cross-section of 30x100 mm to create the sheathing and install the rafters, the average step is 1 meter. It is necessary to use a larger section if the step is more than one meter, and the minimum value for the step is 30 cm. The best material for creation is an unedged board. 
An important point is the humidity regime of the roof pie. To organize it you need to create quality roofing. To do this, waterproofing is placed on the rafters and a counter-lattice is secured to achieve optimal air gap between waterproofing and finishing metal coating. It should be remembered that before covering the roof, all wooden components should be treated with bioprotective and fire retardant compounds. 
To cover a roof with corrugated sheets with your own hands, you should prepare a number of tools. No complex equipment is needed, but the list includes the following:
It is important to understand that corrugated sheeting is not resistant to increased temperature changes. Welding is not recommended. You can choose metal scissors, an electric jigsaw, or a fine-toothed hacksaw. Cold installation technology is also suitable. 
In order to properly cover the roof with corrugated sheeting, preference should be given to fasteners of the proper quality. Choose those that are made of steel that is galvanized and high-quality hardened. The element additionally has a neoprene rubber gasket to ensure sealing of the fastening.
Self-tapping screws are selected in accordance with a specific technical characteristics. Among them, the most important are the following:
Experts advise covering the roof with corrugated sheeting and securing it with self-tapping screws that match the color scheme. Today, choosing the details of the required shade is not difficult. 
In this case, the roof is covered with corrugated sheeting using sealants. Their material is polyurethane foam or polyethylene foam. The parts are laid between the corrugated sheet and the sheathing. Universal option It has rectangular section, but it is best if products are used that replicate the shape of the corrugated sheet.
Covering the roof with corrugated sheets using sealants becomes current solution. As a result, they increase thermal insulation characteristics roof pie, increases the service life of the ceiling. Seals for corrugated sheets are extremely easy to install due to the presence of glue.
Covering the roof with corrugated sheeting using sealants will also be relevant when there is a need to eliminate gaps. In most cases, they occur when the corrugated sheeting adheres to the roof plane. If you don't close the gaps, cold air, birds and insects will get inside. The advantages of the material include durability, resistance to biofactors and moisture. 
To properly cover a roof with corrugated sheets with your own hands, you should learn how to correctly fasten the corrugated sheets. To do this, use a screwdriver and screw the fasteners into the lower wave. On average, one sheet of corrugated board requires 7-8 self-tapping screws. The corrugated sheet is laid overlapping in accordance with the diagram. Adjacent profiled sheets reach more than one wave in size. Specific parameters depend on the roof slope and usually reach 100-300 mm.
The technology of covering a roof with corrugated sheeting involves determining the place where the installation will begin. For a rectangular roof there are no particular difficulties; you can start attaching corrugated sheeting at any end, focusing on the eaves line. 
For trapezoidal or triangular shape The layout needs to be carefully considered. The main recommendation is to start laying along the center line of the cornice, installing the corrugated sheets in two directions symmetrically. 
It is also necessary to take into account the overhang of the corrugated sheet. Along the eaves line it should reach 60 mm if drainage is planned. If there is no need for drainage system, then the overhang is increased, focusing on . For grade S-44 or NS-35, the overhang should reach 200-300 mm, and for grade NS-20, an overhang of about 100 mm will be sufficient. 
The first corrugated sheet is aligned along the eaves and the end of the roof, then it is fixed at the top. Then the corrugated sheeting is leveled along the eaves and secured along the longitudinal side, fastening it to the sheathing. The following rows are installed in the same way. Laying is carried out so that the front overhang in width reaches 70 mm. Optimal step fastenings - 100 cm. If we talk about the roof gable, here the pitch is reduced to 50-60 cm, and at the eaves to 30-40 cm.
Roofing were valued at all times of construction. Thanks to this, we now have high-quality protection from bad weather above our heads. Over time, all roofing materials have changed, their production formulas have become more complex, and therefore their quality has increased. Today one of the most popular roofing materials highlight corrugated sheets. This article will talk about how to cover a roof with corrugated sheets with your own hands, and at the end you will be presented with a video so that you can be guided in practice.
Profiled metal sheets are a very effective and durable product. They are made from high quality rolled steel with some protective layers. If the material is expensive, then it can be equipped with zinc and polymer protection. They do not allow moisture to affect the base metal, however, we will talk about this a little later.
The length of the sheet depends on the manufacturer. The maximum possible value is 12 meters. Such sheets are purchased on the markets quite rarely, so the factories decided to discontinue production of this length and focus on the most purchased copies. However, if you need exactly this length, you can order it from the manufacturer directly. As for the width, it almost always comes with a fixed value of 1180 millimeters, but again, all indicators depend on the manufacturer’s equipment.
The basis of the profiled sheet metal is steel. This material is durable and has its own resistance to corrosion, but prolonged exposure to moisture on any surface will somehow cause it to collapse. To prevent the metal from corroding, it is coated with a thin layer of zinc. In addition, polymer films may be present on the sheet. They not only protect the metal sheet from corrosion, but also increase its aesthetic properties.
The strength of the material depends on the thickness of the base and its profile. The recesses of the corrugated sheet can be different, for example, trapezoidal or square. The greatest rigidity is observed in material with maximum thickness and square-shaped recesses.
Every developer should know how strong and weaknesses this or that product has. Not only successful construction, but also the duration of operation will depend on these data. By studying the positive and negative facts about roofing, you can immediately see whether it suits you or not.
The advantages of profiled metal sheet are as follows.

Due to the smooth surface of the corrugated sheet, sediment is removed naturally. This can be attributed to both pros and cons. If a steeply sloping surface is taken as the base, then snow holders must be installed on it in order to control the melting of snow masses.
Well, where are there no minuses?
To cover a roof with corrugated sheeting you need to have enough big amount thermal insulation materials. Products that are not afraid of moisture are best suited for metal roofs, but most developers use ordinary mineral wool boards. The presence of a thick layer of thermal insulation solves two problems at once. Firstly, the thermal conductivity of the roof decreases, and secondly, the sound insulation properties increase.
Metal coatings have always stood out for their ability to accumulate condensation. There is no escape from this, so all that remains is to fight. For elimination high humidity V attic and the roofing pie is provided with natural ventilation. If you know that it will not be enough, then you can equip the roof with artificial ventilation elements.

As it turns out, many novice developers cannot determine the quality of the material by appearance. However, you can make a mistake even if you have a good understanding of roofing coverings. Let me point out that today underground production produces decent, but not very high-quality products.
To avoid purchasing low-quality profiled sheets, first of all pay attention to the following points:
You also need to be careful during loading and unloading procedures. If you do not know the seller, then it is better not to trust him. Some of my friends got burned at this very stage. They were present during loading and unloading, but did not inspect the goods individually. When they started removing the top sheets of metal from the stack, it turned out that almost everything there was defective.

To cover a roof with corrugated sheeting, you need not only to understand the material itself, but also to make quality foundation. Both wood and metal can be used as the main materials for assembling the frame and sheathing. It is worth understanding that last option expensive, but more durable. One way or another, the vast majority of developers prefer to use ordinary wood.
The tree is natural material, so it will be destroyed under the influence environment. To protect roofing elements, special antiseptics and fire retardants are used. They can be applied manually, using a spray bottle, or using the bath method. The first two methods save a lot of protective solution, but the impregnation does not penetrate into the wood. Bath method requires a lot of protective substance, but after impregnating the element once, you can forget about this procedure for many years.
All elements of the rafter system must be durable and of high quality. As a rule, hard wood is used for this.
You already know that profiled metal sheets are light in weight, so there is no need to make a skeleton from large-section lumber. The only thing that is really important is to protect the roofing pie from the harmful effects of moisture.
An ideal roofing pie for metal roofs will look something like this:

I think there is no need to describe the purpose of each of the points here, but I want to draw attention to the counter-lattice. This system creates air gap between the roof skeleton and the roofing pie. Thanks to this, the steam emanating from inside the premises will simply be blown away by the wind. This is very important, given such a disadvantage as accumulation large quantity condensate
Now, let's figure out how to properly cover a roof with corrugated sheeting.
Many developers ask the same question: “How to cover a roof with corrugated sheets with your own hands correctly?” It will not be possible to answer this question right away, because first you need to study the building area, the amount of precipitation, prevailing winds and other nuances that affect the roofing. It is worth noting that you can cover the roof with corrugated sheeting with your own hands, even if you do not understand construction, and this is a serious plus of this product.
On some sites I noticed the following expression: we cover the roof with corrugated sheeting only if the slope of the slope is more than 12 degrees. Minimum slope For metal roofs really is 12-14 degrees, but for some reason I haven’t found information anywhere on how to remove the restrictions. In order to cover a roof with a profiled sheet with a slope of less than 12 degrees, it is enough to use an additional waterproofing layer, the so-called lining, and high-quality sealant. It processes vertical and horizontal joints.
Let's consider a technology that will answer the question: how to properly cover a roof with corrugated sheeting with your own hands.
Preparatory work
At this stage, it is necessary to calculate the need for materials, purchase and deliver it to the site. In addition, get all necessary tools and uniforms. Be careful when working with metal sheets. If you do all the work yourself, I advise you to purchase special gloves. In appearance, they are somewhat reminiscent of chain mail armor, but when working in them you definitely won’t cut yourself or lose your fingers.
To cover the roof with corrugated sheets with your own hands, you need to acquire the necessary fasteners. Special screws with a rubber washer are suitable here. Thanks to the lining, all fastening areas will have a good connection with the base, therefore, the tightness of the roof will increase. 
If the installation process is carried out with negative temperatures, then special shoes and uniforms are selected. As for things, they simply should not hinder your movements, but special attention should be paid to shoes. It should not slide on the metal surface. If you do not have the opportunity to find all this, then it is better not to risk it and wait for suitable conditions.
Now, I’m ready to answer the main question: “how to properly cover a roof with corrugated sheeting?”
Installation work
After laying the Mauerlat and placing rafter beams In your places you can begin laying a vapor barrier layer. Here it is best to use a membrane that allows steam to pass through without problems. This will significantly reduce the amount of condensation that accumulates in the attic. It is very important not to stretch the vapor barrier fabric, otherwise there is a risk of it breaking. Release the tension and let it sag a little.
The installation of counter-lattice on metal roofs is simply necessary. Again, it's all about condensation. Thanks to the counter-lattice, an additional path is created for the inflow and outflow of air, which allows you to draw out excess moisture from the attic.
Next comes the installation of the sheathing. Profiled metal sheets have sufficient rigidity to be laid on a discharged surface. The optimal pitch of the sheathing elements is 40-60 centimeters. However, if necessary, you can reduce or, conversely, increase these values.
After installing the sheathing, we look at the functional purpose of the building. If this is a residential building, then we lay out the lining carpet. Otherwise, we immediately cover the roof with corrugated sheeting. If you plan to do all the work yourself, then look at roof slope. On steeply sloped roofs, the lining can be laid locally, only in places of high humidity, but if thermal insulation material does not repel water, you will have to cover the entire surface.
Small blocks can be laid on top of the insulating boards. They will lift the insulating layer from above and allow air to dry the insides of the roofing cake. Top waterproofing should be chosen from those products that block moisture in only one direction. The same membranes are ideal for this role. 
You can start laying the roof covering itself from any side of the roof. It is ideal if you select sheets of equal size to the slope. This way you can achieve a minimum number of seams, and with this the efficiency of the entire roofing area. The fastening elements should be located at the bottom of the wave, and if the sheets are joined together, then at the top.
The installation of the roofing part of the buildings will be completed with the installation of auxiliary elements in the form of fittings for ventilation and chimney pipes.
As you can see, even an inexperienced developer can cover a roof, but the nuances must not be overlooked.
I often hear similar expressions from developers: “we cover the roof with corrugated sheets with our own hands, but we can’t achieve the quality that roofing crews offer, why?” The answer is quite simple, although it requires some research.
Before properly covering the roof, you need to plan everything in advance. Experienced roofers already have a list of approximate actions, and they follow them without hesitation. An example would be material inspection. Taking a sheet of metal in their hands, they can easily identify its quality by color, weight and layers. Today on construction market there are a lot of high-quality fakes, so there is no choice the required material beginners make mistakes quite often.
If you don’t understand how to properly cover a roof, I suggest watching this video:
The next reason lies in the developer’s unwillingness to carry out all the work at once. Let's look at this situation with an example. If you cover the roof with corrugated sheets with your own hands, then you can spend a lot of time on this procedure. You are not bothered by deadlines, and no one is forcing you to do this. Consequently, an unfinished building can stand for a very long time, as a result of which all roofing materials stored outdoors can be damaged or lose a significant part of their positive properties.
By the way, a portable and inexpensive wood moisture meter is available for sale. Such a device will allow you to determine whether it is possible to install lumber or not.
IMPORTANT: Almost every person can properly cover a roof with corrugated sheets, the main thing is that all actions are clearly planned and the entire process of laying the roofing sheet does not take more than two weeks.
The developer undertakes part of the work. Roofing work is responsible, but not difficult. Covering a roof with corrugated sheets with your own hands is a feasible task for a craftsman. You just need to follow the sequence of actions and follow simple rules.
 Corrugated sheeting is durable and easy to use. Suitable for flat, steep slopes, roofs of complex shapes. Sheets 1.5–12 m long with a gradation of sizes every 0.5 m and a working width of 0.8–1.2 m are molded with depressions in the shape of a trapezoid or wave. Manufacturers rely on the GOST 24045-2010 regulations on profile sheet products with trapezoidal corrugations.
The purpose of the material is determined technical properties by letter indexing:
The choice of roofing of this type is stimulated by the following advantages:
Among the disadvantages, the drum effect is recognized as significant - transmission of the sound of falling drops with possible amplification. Laying a layer of insulation eliminates the resonance defect.
 We choose a corrugated sheet, the reference point is the steepness of the angle of the rafters. Do-it-yourself roofing with corrugated sheets gives you freedom in choosing the material. Used as roofing and wall profile with a corrugation height of at least 20 mm. And on the awnings over the porch, flat covering Smaller economic blocks are acceptable.
In order to reduce the cost of construction, a combination of roofing and wall profiled sheets with the same corrugation width is allowed. In areas with a change in geometry towards a decreasing angle, a discrepancy in the profile height is allowed. How to cover the roof is up to the developer to decide.
Scratches and other damage to the anti-corrosion coating are treated with a protective coating immediately during storage
The general requirement is to limit the angle reduction. For flat roofs of auxiliary buildings, the limit for reducing the angle is 8°, for residential ones - 10° with the installation of continuous board sheathing or OSB sheets.
The sheathing is discharged from exceeding an angle of 15°. Discharge step:
 The rafters rest securely on the Mauerlat, but installation will have to wait until the steam-conducting membrane is laid and glued. Moisture removal will extend the service life of the insulation, the film will not allow a draft to blow out fine fractions insulating cake made from .
A counter-lattice is attached to the nails on top of the membrane. The purpose of the 20–40x50 timber is to create a ventilation gap for ventilation of the insulation and roofing. In frost and heat, the breeze will reach the ridge. Condensation deposits on inside sheets will not happen. Metallic profile LSTK is not very common in private construction. The technology for carrying out the work is identical, so the type of material is not distinguished separately.
Wooden parts are nailed. Fastening OSB boards is permissible with self-tapping screws.
Based on the table dimensions, the frequency of laying the sheathing was determined; we nailed down unedged boards and slabs. The joints are arranged in the center of the counter-lattice beam. Mostly softwood lumber is purchased.
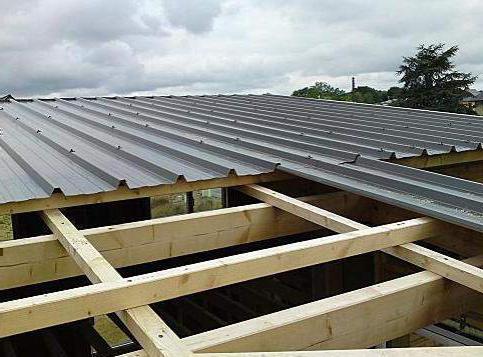
The installation of the 3 listed elements is carried out in stages from bottom to top, as shown in the photo. It is necessary to achieve the maximum flat surface without sudden changes in height at the joints.
Aspen is also rejected - one is short-lived and weak: it will break under your foot during installation, the other is subject to excessive warping and twisting.
 We are preparing the corrugated sheet fasteners. You will need anodized metal screws with a drill at the end and sharpened ones with fine threads. A rubber gasket is required under the cap. It is easier to apply force to the hex head. The Phillips slot is harder to hit.
Average consumption - 7.5 pcs per 1 m 2. You will need 4.8x30 screws for sheets and 4.8x50 (60) for additional elements. The tools you will need include two batteries and a bit, an angle grinder with a 1 mm thick disc for cutting to length, corners, and beading additional edges.
Experts argue: how to fix it? The self-tapping screw in the bottom shelf holds the corrugated sheet more securely. The top fastening is safe in terms of leaks into the under-roof space when melt water stagnates on a gentle slope. Combinations with fastening possible. Manufacturers insist on fastening in the first way: in a deflection.
For a vertically fixed self-tapping screw, the sealing gasket evenly protrudes from under the head by 1 mm in a circle.
On the ridge and cornice, self-tapping screws are placed through the wave, in the middle of the sheet - at intervals into each board of the sheathing. The joints of the sheets are fastened through 2 waves. Mark broken screws with beacons to fix the hole without much searching.
 It is up to the builder to decide how many vertical sheets are needed. Ordering a full-size sheet without subsequent joints is economically justified. But you will need to wait for delivery.
Sheets of standard length are laid in two ways:
The first sheets of corrugated sheets are attached to one self-tapping screw in the middle. An overhang of 4–5 cm beyond the lowest point of the rafter is necessary for optimization natural ventilation and installation of cornice. Then fix the set together after 0.5 m. After checking the evenness of the installation along the roof overhang, the profiled sheets are finally attached.
When the roof slope angle is less than 15° and the corrugation depth is less than 20 mm, the adjacent sheet is superimposed on 2 waves of the previous one. Increasing the angle allows you to overlap only 1 wave. If there is a drainage groove in the bottom shelf, it should be blocked.
The top row overlaps the previous one. The amount of overlap relative to the steepness of the roof:
Even in soft shoes you cannot step on the ridge of the corrugated sheet - it will bend.
 The connection of the corrugated sheet to the wall prevents moisture leakage and snow blowing under the corrugated sheet at the joint. The corner element is available with polymer coating 2 m long, galvanized 2.5 m.
The abutment strip for corrugated sheeting is fixed through the upper wave. This is where the long fastener will be needed. It is advisable to purchase full set components from the same manufacturer: at a minimum, there will be no difference in color.
 It is difficult to connect to a pipe on a corrugated roof for the first time. The wings of the chimney apron are adjusted to tightly cover the pipe. The upper edge is pressed by tightening the screws into the dowels.
The adjacent profiled sheet will have to be reinstalled - a forced manipulation in the name of preventing leaks. Without installing a porous seal that copies the profile, this action will turn out to be a half-measure. And the indispensable sealing of the vertical seam.
The location of the pipe at the bottom of the roof dictates the need to install a snow guard.
 Framing the lower overhang will prevent the wood from getting wet, fraying the insulation, and will give a strict appearance to the structure. We present a choice of 3 equivalent options for designing the overhang along the rafter legs.
Installation begins from the bottom on the wall side. In the first two options, the soffit as a frontal board is stiffer and is not limited by vertical dimensions. You won't need hexagon screws.
 For completeness, all that remains is to install an end strip to protect the outer rafters, extending beyond the ridge of the corrugated sheet. Fastening to the rafters is carried out along the lower edge with an indentation of 25 mm.
 The gap in the upper edge of the intersection of the roof slopes is covered with a ridge strip. The shape of the ridge causes air circulation to ventilate the under-roof space.
Sequence of installation operations:
 The roof, assembled from corrugated sheets with your own hands, took on the appearance of a single whole. Congratulations.


