The reasons why a printer, like other complex electronics, does not work can be caused by many factors. They may appear as a result improper use by the user, wear of various parts or disruption of operation stability (voltage drops, etc.)
IN this material We will look at the reasons why an HP printer or any other model does not work. Methods for troubleshooting many problems will also be given.
To date, several of the most common reasons have been identified that can cause the printer to stop working. Here is their list:
It is worth noting that these are only the most popular options for why a Samsung printer or any other model does not work. The reasons for any breakdown will be unique to each situation.
Attention! Although most problems can be resolved by the user within ten minutes, it is not worthwhile to self-repair if you are not sure own strength.
A fairly common and even banal error that leads to the printer stopping working. Sometimes users may connect the wires incorrectly. And sometimes they simply forget to plug the power cord into the outlet. At the same time, other errors related to working from the network may also be the culprits of the malfunction.
Are you not sure that the error may be related to the connection, and want to know why your HP Laserjet or another model printer is not working? First, just check all the wires:
Quite often among printing gadgets you can see several options. Even though you only have one. These instances are a virtual device and have virtually nothing to do with what you use to print documents.
It is the fact that the user sends the necessary file to the virtual device that is the answer to the question why the printer does not work if it is connected correctly.
To eliminate this unpleasant situation, simply set your own printer as the default printing device. Then the system will automatically use it for work. You can do it this way:
This should solve the problem of why the printer is not working or printing. However, keep in mind that if there are several devices for working with papers, you will still have to choose one of them each time.
Sometimes it may happen that even a new printer stops working. Here it is worth paying attention to the processes that were launched. Perhaps one of them is stuck. This led to an error in the print queue.
To fix this problem, you need to look at the queue itself and remove processes that interfere with work. You can do it this way:


Another reason for printer failure is drivers. If this is your first time connecting your device to the network, most likely they are completely missing. The same thing happens when setting up a device with a newly installed operating system.
Alternatively, the drivers could be quite outdated, and therefore ensuring stable operation of the printer is no longer possible.
There are two ways to update drivers for many devices: different ways. The first involves downloading them from the Internet, from the device manufacturer’s website. To perform the second, you need to use the device manager. Since it is more complex, let's look at it in more detail:


Let's now look at some of the printer components.
One of the main parts that may be the reason why the printer does not work. To prevent this from happening, cartridges must be changed regularly. This is determined by the deterioration in color quality during printing.
However, it also happens that almost immediately after replacing this element, the device stopped printing. Let's look further at why the printer cartridge does not work. And also what to do so that the error does not occur again.

At the moment, there are quite a few options for why the printing device does not work after changing or long-term use of cartridges. Here are some of them:
This is quite common. Occurs in situations where the printer has not been used for a long time. You can clean the outlet using a special utility that is installed on all modern models devices for printing. You can start the process through the toolbar in the printer application. Most often it can be found under the name “cartridge cleaning”.
During cleaning, a special pump is started. It pushes ink under pressure through the inlet of the cartridge. As a result, air or dried ink escapes.
If the device model is old enough, then this process will have to be performed manually.
If for any reason you had to remove the cartridges, then pay attention to how they were installed. You can also read the instructions that come with the kit. Although in general, this is not such a difficult process.
When installing, make sure the cartridge cover is tightly closed. Otherwise, printing will result in spots, streaks, or almost completely black pages.
Also make sure that after installing the part back into the housing, various small debris does not get there, which can lead to clogging of the inlet.
Here is a small list of consequences that arise when incorrect installation cartridges:
Another option for why the printer does not work after installing new cartridges. If, after changing the original part, a conditionally suitable one was installed, then such defects may appear as:
All this is a symptom of incompatibility between the printer itself and new cartridges. Most the best option- try to find original ones.
It also happens that the scanner in a completely new printer refuses to work. It is worth noting that this is a fairly common phenomenon that is quite easy to fix. Let's figure out why the scanner in the printer does not work.
The first thing you should pay attention to is the drivers. Decide this problem quite simple:


You can also find them on the website of your device manufacturer.
Below is a set of the most common options for why a scanner on a printer may not work. It is worth noting that many of them are also the reason for the lack of functionality of the printing device itself:
One of the most common reasons for this problem is trivial - chosen wrong printer in print settings. In this case, you just need to start printing again, but in the settings change printer to the one currently in use. A situation may arise in which your printer is not in the list of devices. In this case, you should first check connection devices to the computer.
All modern printers are connected for normal operation ByUSBinterface to the computer and ordinary network cable to source nutrition. Check the entire length of these two cables, along with any adapters, splitters, or extension cords if used. If everything looks fine, check the power source (outlet) and USB input.
To check the power supply, you can use a device that you are sure is working; if it does not work, simply connect printer to another location. The USB input can be checked in the same way as the power supply, but you will have to use a flash drive. If the printer is still not visible, try check drivers. Drivers must match your device model and be compatible with the installed operating system.
Even if you have updated the drivers, but the device is still not detected, the computer may be infected viruses. In this case, you should immediately begin treatment. But if printing is urgent, you can try starting the computer in safe mode. To do this, click F8 during system boot and select “ safe mode” or “safe mode”.
The next reason is also common, but fixing it is a little more difficult. The problem may be “ frozen” print queue. You just need reboot computer, but if this does not help, you will have to clear the print queue manually. This is done in the control panel, in the “ tab devices and printers” (for Windows 8 and above users, you need to open control Panel through the system settings to avoid confusion). 
Select your printer right click and find the “ view the print queue”.
In the window that opens, click on the “ tab Printer” and select “ clear print queue”.
Another way to fix this problem is starting the service print manager, because sometimes this service for some reason stops working or does not start automatically. To launch it manually, open the control panel and enter “ view local services”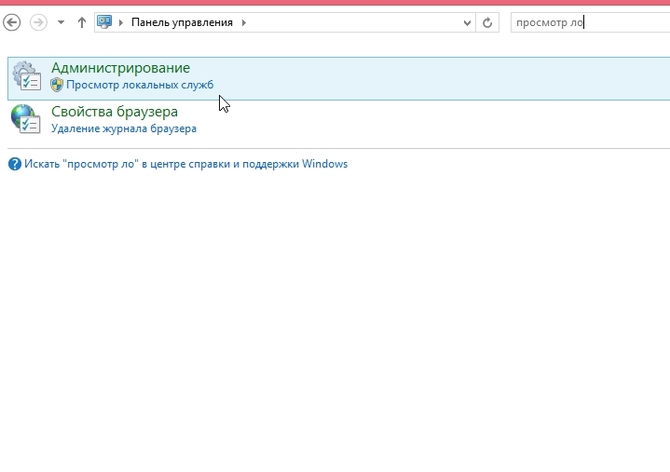
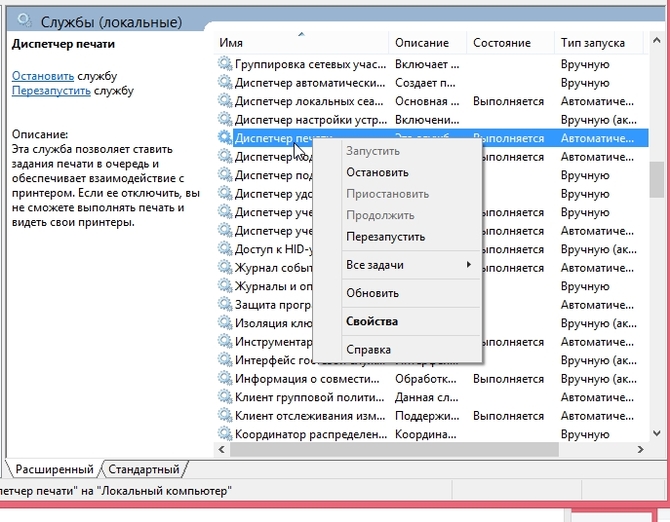
Find the print spooler service and in its properties select auto launch type.
Service Properties

Restarting the service
Missing or jammed paper can also become big problem. If everything is clear with the first case, then a paper jam to correct is not as simple as it seems. Try it first eliminate it, replacing the paper. If this does not help, then there may be a problem, either software parts, or in mechanism paper pickup. In this case, you should start with updates drivers.
If this does not help, then you will have to take the printer to a service center, because the problem is mechanical, and such things can be fixed “on the knee” it is forbidden. We also remind you: it is advisable to use only official services to avoid loss of warranty. Main mistake people who encountered this problem is that they underestimated its seriousness. After all, many people believe that only very inattentive people make such typing mistakes and, for some reason, do not count themselves among them.
 Even the most reliable printers are not perfect. Literally every one possible malfunction may be caused by old, uninstalled or unsuitable for the used configuration drivers.
Updating drivers should usually be done automatically. This can be done manually by downloading and installing drivers from the website manufacturer. At the same time, carefully select the device model and the configuration of your operating system, otherwise the installed drivers will not work incorrect or they won't work at all. Also, if you download drivers from an unofficial site, you can forget about the warranty for the printer.
Another source of problems is cartridge. It must be refilled as it is used up or a new one must be purchased (depending on the model). It happens that cartridges of different models look very different Seems like, but when installed in an unsupported model, they do not function, so you must always be careful when purchasing a cartridge to avoid wasting money and time.
It is possible that the cartridge breaks down. The printer itself will most likely inform you about this. In this case, you need to use the service service, or buy new cartridge. We remind you that if you use an unofficial service, you will lose the warranty on both the cartridge and the printer in which it will be used.
Despite the fact that in Lately Printers have become more reliable and durable devices; sooner or later they fail. As a result of this, users of such printing devices are faced with the following problem: the printer generates an error. You can find the cause of such a malfunction and eliminate it as a whole absolutely independently, but if you are unsure of your abilities or simply do not have enough time for this, then it is better to initially contact a service center for help.
So, if the printer is busy or an error has occurred, then first of all make sure that the appropriate driver is available and that it is in normal operating condition. The fact is that such software can often crash and in such situations they need to be reinstalled. Typically, drivers are supplied in the same package with the printing device itself. To make sure it is installed correctly, open Device Manager and go to the Printers and Scanners tab. The name of the installed driver must match or be similar to the name of your printer.
Alternatively, the printer error may be due to the print queue being busy. Typically, office equipment itself informs about this problem, but sometimes there are exceptions. The question arises, why does such a printing error happen? Most often, this problem occurs among network users who work with one shared printer. Consequently, one task in this case may include many parts. If it is too large, the software itself can divide it so as not to overload the printer memory. To make sure that this is why the printer is not printing, you will have to check the print queue manually.
It should also be added that every modern MFP, in addition to the driver, has a special software application. Sometimes it happens that this program does not work correctly or is completely removed. In such a situation, an error will be displayed stating that printing the document is impossible. You can solve the problem by reinstalling this software.
If your printer produces errors when printing and none of the reasons described above apply to your situation, then the printer software may have been infected with viruses. Check your PC for viruses and, if necessary, disinfect it. But if this does not help, and an error is constantly written on the screen, then reinstall the device software.
Often the problem that the printer produces a printing error is due to a driver conflict. Usually similar situation occurs when several printing devices are connected to one PC or when working with a number of printers via one local network.
In addition, be sure to check the settings of the operating system and the device itself. This is especially true if the device does not display any messages on the PC monitor. Therefore, check whether the OS installed on the computer sees the office equipment connected to it. For this purpose, open the task manager and select the one you need from the entire list of devices. Pay attention to what is next to it. If you notice a cross or Exclamation point, then this speaks of possible conflict or incorrect connection. It is also possible that the name or address of the PC to which the network printer is connected has changed. There may also be a problem with the device that acts as a connection when connecting via the network - it could be a router or router.
Pay attention to which printing device is selected by default - perhaps some other printer is selected. Often, the settings of office equipment have prohibited the output of a certain type of data. To check all this information, go to the Devices and Printers menu. There you can make your printer the main one for printing, and in its properties check that all settings are correct.
The second category of causes of a printing error is hardware, i.e. the problems in this case are related directly to the device itself. So, if the device reports an error and periodically turns off, then such a malfunction may be associated with the connecting cord or USB port. To find the cause of the problem, alternately connect the device to each port of the personal computer, and if the problem is not resolved, then the cord itself is probably “buggy.” Inspect it for damage or better yet, buy a new one right away.

In addition, a printing error can also occur due to a poorly installed cartridge. To solve the problem, carefully pull it out and then put it back until you hear a characteristic click. There is a possibility that the connecting chip of the consumable is contaminated with ink - in this situation, the printer will display a message indicating that the cartridge needs to be replaced.
Printing errors also occur due to jammed or out of paper, low ink/toner, or overheating of the machine. In general, most of the problems that are associated with non-working consumables devices begin to appear immediately after it is recharged. The fact is that many of them are equipped with special sensors, which represent a kind of protection for the manufacturer against possible refilling of consumables.
Thus, to answer the question of why the printer produces errors when printing, you should familiarize yourself with possible reasons and how to eliminate them. As a last resort, if you were unable to cope with the task on your own, then call a specialist at your home or personally take the printer to an office equipment repair center.
Any of us who have ever encountered a non-working printer probably knows how difficult it can be to determine the cause of the breakdown. Sometimes you have to sit for hours on ancient forums in the hope of finding a solution to a problem that may lie on the surface.
In this article, we will look at the most common reasons why the printer does not print from a computer. We will understand it using the example of an operating room. Windows systems 10.
Printer, how complicated technical device, must be powered from the mains and connected to the system unit for correct operation. Therefore, if you are sure that there is ink in the printer, but it does not respond to your actions, do the following in order:
If the printer is connected but does not respond, then the problem is something else, either in the driver or in the print service.
For proper operation printer, you need to install a driver on it that will allow you to correctly determine the device model and “turn on” all the functions necessary for printing, configuration and problem prevention. How to determine that there is no driver? Go to "Options"
Type “Device Manager” into the search bar and open it.
As you can see, the system was unable to install the printer on its own and marked it with a yellow triangle with an exclamation mark.
It is advisable that the driver be installed from the disk that usually comes with the device. If there is no disk, the Internet will help us out. Using the Canon i-sensys MF4450 MFP as an example, let's look at how to install the driver correctly:
Important! Drivers come in two types: x-32 (x-86) and x-64, for operating systems of different bits. Install only those drivers that suit your OS! Right-click the “This PC” icon and click “Properties.” Pay attention to the “System type” item. As you can see, x-64 is written here, which means the driver you need will be called “driver for Canon i-sensys MF4450 x-64”;
A common problem - the printer does not print Word documents. It is most likely that in this situation the wrong device is selected and print jobs go to waste. Open Microsoft Word and click on the round options box (or File, depending on your version of Microsoft Office).
To avoid the problem wrong choice in the future, go to “Devices and Printers” and right-click on the icon. Select "Set as default". Now all print jobs will be sent to this address.
Sometimes you need to quickly convert Word documents from doc or docx format to PDF files. Windows 10 comes with a virtual printer already installed, making this very easy. Under Printer, select Microsoft Print to PDF and click Print.
If this item is missing, then the FoxitReader program will help. It is completely free, you can download it from the official website https://www.foxitsoftware.com/ru/. After installation, it will automatically add a virtual printer, which will definitely not cause any problems.
Stopping this service can lead to several errors at once: the printer has stopped printing or a print error window appears. In order to fix this, go to “Settings” and type “View local services”.
The one we need is called “Print Manager”. On the right side there must be an inscription “In progress”. If it is missing, right-click on the service and select Start. Now restart your computer and all errors should disappear.
If a message is displayed that the printer is paused, you need to go to “Settings” - “Devices” - “Printers and scanners” - “Management”.
Select Troubleshoot. The “Disabled” status is removed here, using the same method. Windows 10 is smart enough to fix such problems on its own.
The printer may not work correctly with all paper, but only with the one it supports. If you have a laser printer and it starts printing black pages, check to see if you accidentally inserted fax paper. Due to heat, it turns black and becomes unsuitable for printing. It looks like plain paper.
If the paper is correct, open the printer and look inside. The sheet can wrap around the image drum and the machine will output black sheets. Carefully pull out the sheet and everything will be fine.
If you recently sent the printer for repair or refilling, then perhaps inexperienced specialists could expose the photoconductor to light. Wait a few hours and try printing again. The photosensitive layer should be restored. If this does not happen, then the photodrum needs to be changed.
Very known issue inkjet printers, especially those equipped with CISS (continuous ink supply system). If the printer prints white sheets, then the nozzles through which the ink passes are clogged. In the printer settings, you need to select “Cleaning nozzles” and the color will appear. Sometimes this operation must be repeated several times, if the nozzles are very clogged.
If you have a CISS and the printer still produces blank sheets when printing, then do the following:
It is better to do all work with gloves, because ink is very difficult to wash off your hands.
When a cartridge runs out of ink or toner, instead of buying a new one, it is much more profitable to take it to a refill. If the printer does not print after refilling the cartridge, there are several possible reasons:
A fairly rare case, it is usually associated with incorrect settings of Microsoft Office documents or incorrectly set print settings. If the printer does not see the paper when printing from Word, click “Print”, then “Properties”.
Make sure that the output format specified in the settings matches what you need (for example, A4). Sometimes the document contains damaged elements, try creating a new one and printing it. If printing is successful, then it is better to type the damaged file again without using copying, since it is not known which part of the document is damaged.
Office equipment users often face a problem related to the fact that the network printer does not work. To solve it you will need to consider two different cases. In the first case, you actually have a network device installed and connected, for example, via Ethernet, in the second, you have a regular printing MFP, which is connected via a USB cable and for which, in turn, the sharing settings have been made.
To ensure that your network printer starts working normally again, please carefully read the recommendations listed below. If they do not help, then it is worth calling a specialist to your home or a friend who is more experienced in matters relating to office equipment.
If your device is connected to a common network, but when you try to send certain documents for printing, an error constantly appears on the screen, then first of all you need to look at its current IP address in the settings of the printing device. You can find out more about how to do this in this article:.
The next step is to check the availability of this network address on the PC from which the printing process is not running. To do this, press the Win+R key combination, then enter “CMD” in the window that opens called “Run a program.” Press the enter key. In the black command line that appears, you need to enter “ping” followed by a space the IP address of the device, then press “Enter”. If you have “ping”, then continue the setup by moving on to the next steps described below. Otherwise, check the condition of the patch cord with which the device and PC are connected to the network. But the best way to get the seal working again is to create a new patch cord.
Check the settings of the office equipment that is connected to your PC if your ping continues to go.
If a regular printer does not print, although it is connected to the PC via a USB cable and configured as “shared”, then follow all of the following recommendations:
If the printer is still not visible to the computer, then try:


