The use of peat cups in gardening is still considered new technology. Some gardeners enthusiastically use them, others resolutely reject them. Everything new and progressive is always introduced into life with difficulty. There are advantages to using peat cups. There are also disadvantages, but they cause problems only for inexperienced gardeners.
Gardeners relatively recently began to use peat cups for growing seedlings. Just 20–25 years ago they were very rare. IN last years peat cups are now on sale different sizes and forms. They are small containers, most often in the shape of a truncated cone, but can be in the form of a cube or trapezoid, or connected into blocks of several pieces. Their sizes vary between 5–10 cm in diameter with a wall thickness of 1–1.5 mm.
The material from which the cups are made is a mixture: 50–70% peat, the rest is humus and cellulose. A thick aqueous solution of this composition is pressed into special forms
and obtain containers of various sizes and designs. The seedlings grown in them no longer need to be removed, disturbing root system
tender young plant. It is planted in the ground directly in a cup, placing it in the prepared hole. Then sprinkle with soil and water. The seedlings are planted!
Advantages and disadvantages U experienced gardeners
There are also disadvantages:
To avoid drying out, it is recommended to cover the tray with seedlings in peat cups with film and remove the covering from time to time to remove excess moisture and evaporation.
Vegetable growers often use homemade plastic and paper cups. Peat ones have several advantages over them:
Planting seeds in cups is a simple process.

If the peat cups become moldy, it means they are over-moistened. At the bottom of the pan in which they stand there is water that needs to be drained. Wipe the surface of the glass with alcohol, vinegar or soda solution. If the mold damage is significant, such containers should be disposed of. For prevention, regularly ventilate the room in which the seedlings are located, reduce the dose of watering, and carefully loosen upper layer soil in cups.
Mold should be removed and the glass should be wiped with alcohol, vinegar or soda solution.
To obtain good result, you must use quality materials. Beginners and inexperienced vegetable growers complain that seedlings often dry out, and plants planted in cups in the garden do not develop and die. This comes from the use of low-quality products. There should be at least 50–70% peat in them.
When choosing peat cups, give preference to dark, porous and soft to the touch, with a wall thickness of no more than 1.5 mm. Light, dense glasses are fake, with more cellulose than peat.
Peat cups should be purchased in specialized stores and only in branded packaging; it is advisable to require a quality certificate. Buying them at bazaars is fraught with undesirable consequences.
There is no need to be seduced by the miniature and original shape of some cups. Whether they are round or square, this does not affect the development of seedlings at all.. In small cups (5 cm across) the roots will be cramped. It is better to purchase large, 8–10 cm tall, pots. In such a root system of any seedling will grow fully functional.
Some craftsmen make peat cups with their own hands. Such a simple production can be organized in any rural yard or on summer cottage. The main thing in this matter is to prepare the mixture correctly:
Growing plants using the seedling method can significantly accelerate the maturation of garden and vegetable crops. This is especially true for late-ripening varieties, which, when planted with seeds in conditions middle zone do not always have time to mature. Medium and early date ripening can also reduce the time spent in open ground. To do this, they are grown through seedlings.
So that when transferring to open ground to protect seedlings from damage to roots and trunks, it is advisable to germinate seeds in separate containers, disposable or reusable. It's best if they are peat cups or pots.
Peat containers are made from more than just peat, that is, the remains of undecomposed bog moss. To maintain shape and strength, as well as to reduce the cost of the material, wood or cardboard is added to peat. When choosing, you need to pay attention to the ratio of peat and additives; the amount of the main substance should be at least 70%. Good disposable tableware for seedlings, the width of the walls is 1-1.5 mm. During the germination period, such walls will give the cups strength, and after planting in the ground they will undergo decomposition within one month.
Peat cups are sold both individually, individually, and in connected cassettes, 4-20 pieces each. Many gardeners believe that they should remain in such cassettes. In fact, while the sprouts are small, the cassettes could not be separated. But growing seedlings begin to need more light and air, so it is recommended to cut the cassettes from the very beginning, and as the seedlings grow, place them a little further apart.The data is:
Peat containers are filled with moistened nutrient soil: universal or intended for specific crops(for flowers, for vegetables). The soil is not poured to the edge, leaving 1-1.5 cm empty to the top, this will make it more convenient to water. Either 1 sprout after picking or 1-3 seeds of any crop are planted in a pot to a depth of 1 cm. If necessary, sprinkle with water. Place the cups tightly next to each other on a pallet, tray, or plastic wrap. The soil must be maintained at constant humidity, the air temperature must be kept at +23-27°C, and after seed germination +20-22°C. If several seeds sprout at once, then only one is left in the glass, the rest can be transplanted into other containers, and the weakest or extra sprouts can be disposed of.
Water the seedlings with settled warm water, having a temperature of +25-30°C. From cold water Tender young plants get sick, for example, with “blackleg” and may die. A week before the planned planting in open ground, the plants need to begin to be hardened off. You can open the vents or windows during the day, take the seedlings directly in trays into a glassed vestibule or veranda, but at night bring the plants back into the house.
The advantage of peat pots is the planting of rooted seedlings without transplanting and transferring directly into the ground, into prepared beds or holes. Before planting, the glass can be slightly torn to make it easier for the growing roots to grow through them. But this is not necessary; peat containers dug into the ground decompose in 3-5 weeks. The depth of the groove or hole should exceed the height of the glass by 1-2 cm, so that when backfilling the earth completely covers it.
The use of peat pots for seedlings has been practiced in our country for more than 20 years. This product has many advantages; its value is known not only to gardening fans, but also ordinary people from the countryside.
Self-disintegrating pots extend the growing season of plants that make up the assortment of vegetation in gardens and vegetable gardens.

In fact, the idea is extremely simple:
There, after some time, it disintegrates into microparticles (disposable, without the possibility of reusing it);
IMPORTANT. Do not try to “dig up” the pots after the plant has taken root in the ground. You may damage the root system. There is no need to worry about peat residues - after a few rains they will completely dissolve in the soil.
Natural materials for seedlings in such a situation are a fundamental solution. Obviously, the inventors solved the problem of protecting the soil from harmful chemicals. They succeeded. Moreover, the material itself is beneficial for the surrounding soils and additionally fertilizes them.
When it comes to making choices, the average person is always trying to weigh the pros and cons. The same thing happens with peat pots. The question is especially of interest to beginners who have recently begun to master the intricacies of gardening and vegetable gardening.
The advantages of peat containers include the following properties:
Are there any disadvantages? No matter how hard you try, finding them is not so easy. Here are some reasons to think:
IMPORTANT. Avoid buying goods from dubious stores. Counterfeits have appeared on the market. Use only the services of stores and specialized retail outlets. Give preference to reputable brands.
IMPORTANT. Buy products with wall thicknesses from 1 to 1.5 mm. It's optimal. It is quite durable at the growing stage, but decomposes quite quickly when placed in the ground.
Please note that stores sell products that have two main features:
IMPORTANT. The shape of the pots does not play a special role. There are products in the form of a truncated pyramid (ribbed sides), and others in the form of a truncated cone (round smooth sides). The differences are nothing more than the difference in stamping molds in production.
Basic Rules:

IMPORTANT. When the plants get stronger and increase in size, the pots should be moved apart from each other. This way you will improve aeration and give the green foliage more light.
As soon as the time comes to plant plants in the ground, your actions:
IMPORTANT. The depth of the groove should be no less than the height of the peat pot. Ideally, 1.5-2 cm deeper.
The instructions given in this article are only general in nature. In each case, there will be nuances that you have to record, analyze and take into account. Using peat pots is incomparably more profitable than unprofitable. Without risking anything, you have a chance to improve the results of your gardening work.
Experienced gardeners know that the summer season begins much earlier than the weather begins to warm up. Already at the end of January - beginning of February they begin work on growing seedlings. Many crops can only be grown through seedlings. And than - seedling method will increase the growing season and allow for early and high yields. The first days of a plant’s life are important for its further good development.
For growing seedlings A lot of different containers are used - boxes, bags, food cups. It should be noted right away - under no circumstances use containers for dairy products. It will not be possible to wash them perfectly; lactic acid tanks will definitely remain on the walls of such jars teria, which can at least cause disease in the roots of the seedlings, or even kill them.

What container is best to use for growing seedlings?
The best option is to use peat pots. Now we will list their advantages, and then take a closer look. What types of peat pots are there and what crops are they suitable for?.
Is it effective to use peat pots for growing seedlings?
Judge for yourself.

Accordingly, all of the above, guarantees 100% survival rate of seedlings. And the pot itself, decomposing in the ground, will become an excellent fertilizer.
Some plants have very delicate and vulnerable root systems. For example, cucumbers, eggplants, pumpkins or peppers are very difficult to transplant into open ground without damaging the roots. Using peat pots for growing seedlings such crops, this problem will not bother you.
Our store offers three types of peat pots.

We guarantee high quality peat pots, which can be purchased in our store with delivery throughout Ukraine and we wish you healthy and rich harvests.
Tomatoes are one of the most common vegetable crops, without which, perhaps, not a single garden can do. In addition to its taste, tomatoes also contain useful material necessary to the human body, and they are also perfect for winter preparations. Often, purchased seedlings may not live up to expectations, be weak and not correspond to the variety that would be needed. In this case, you can grow tomato seedlings yourself at home.
Growing tomato seedlings in tablets has appeared quite recently and is actively used by amateur gardeners. Indeed, as the summer season approaches, gardeners energetically begin to sort through old stocks of seeds, updating their collection with something new. And also certainly thinking about when and how to plant tomato seedlings in peat tablets and, finally, what container to choose for this. The use of discs greatly simplifies the procedure, not only for growing tomato seedlings in peat tablets, but also for transplanting them into open ground. Therefore, we will consider in more detail how to plant tomato seedlings in peat tablets below.
Advice! Peat tablets have a long shelf life and at the same time do not lose their useful properties, so if all the disks are not used for the season, they can be postponed until next year.
A peat tablet is a specially prepared base containing necessary set organomineral additives and intended for growing seedlings at home.
Gardening stores offer a huge range of peat tablets, which come in various sizes from 2 to 7 cm in width and 1-1.5 cm in height. For growing tomato seedlings, tablets from 4 cm are suitable, and 7 cm is best recommended.

There are many positive aspects of growing tomato seedlings in peat tablets, and the most basic and valuable are:
So, if you suddenly decide that growing tomato seedlings can be entrusted to peat-based tablets, then they should be prepared. To do this you need:

Check the germination of seedlings daily and, if they germinate, move them to a window for further growth. When several leaves appear, it is necessary to pick the tomato seedlings, since there may not be enough room for them in the previous container. further development and growth.

When watering tomato seedlings in tablets, you need to be extremely careful and not allow the root system to become waterlogged, which, with frequent watering, prevents the roots from absorbing nutrients. Top part The tablets must have time to dry between waterings, otherwise mold may appear, which, although it does not pose any particular danger to the plant, can still progress to another stage of the disease, a more serious one.
Tomato seedlings in peat tablets video:
Important! When planting tomato seedlings in peat tablets, the discs themselves should be placed no closer than 1 cm from each other, since during the germination of the root system, intertwining of the roots may occur, which can lead to inconvenience in the future when picking.
You can plant tomato seeds soaked or dry. Fresh seeds most often do not require any preliminary preparation, but in the case of last year’s seeds, it is best to carry out preliminary preparation and processing.
Stages of seed preparation:

In addition to peat tablets, today, cups or also called peat-based pots for growing any seedlings, including tomatoes, are in great demand. The cups themselves are a mixture of peat with wood pulp or humus, dried and made in the form of pots.
The shape of the cups can be either round or square. For tomatoes, there are no fundamental recommendations when choosing one shape or another, but the size should be chosen large enough.

The main advantages of a peat pot for seedlings:

But, in addition to the advantages, pots also have negative side. Disadvantages when growing tomato seedlings:
If you suddenly decide to grow tomato seedlings in peat pots and the listed disadvantages do not discourage you from the idea, then in the case of tomatoes, the classic instructions for their use apply.

When choosing a planting potency in a store, you should pay attention to the composition of this product, since cardboard pots are often sold as peat products. Therefore, a person who does not have experience and knowledge should be extremely careful and attentive.
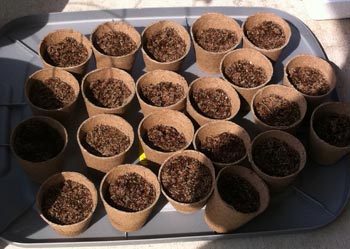
Place peat cups in a tray and fill with soil. Moisten the soil.
Pre-prepared tomato seeds, deepen cups of 2-3 seeds into the soil.
Advice! If it so happens that several tomato seedlings have sprouted in one pot, then only one of the strongest and most developed sprouts should be left, and the rest should be pinched, since pulling out excess sprouts can damage the root of the remaining plant.
Next, you only need to moisten the soil in cups, since drying out the soil not only leads to the complete death of the plant, but also the formation of salts, which greatly injure the already fragile tomato seedlings.

Based on what we have read above, we can say that the technology for growing tomato seedlings in pots is quite simple and logical not only in theory, but also in practice.
Tomato seedlings in peat pots, video:
Tomatoes are a crop that does not require special attention at the germination stage, but has some features that must be adhered to.

Tomato seedlings are quite unpretentious and undemanding to the soil; they can be either purchased or made independently. When purchasing soil, it is best to give preference to a peat substrate, but when preparing it yourself, you should take loamy soil with the addition of humus or compost. In order for the soil to be loose, sawdust or peat should be added to the mixture.
To summarize, we can say that before making a choice where to plant seedlings, either in peat tablets or pots (cups), you should weigh all the pros and cons of these two bases for growing seedlings. After all, not only the development of seedlings, but also the yield of tomatoes as a whole will depend on the choice.