How to turn your suburban area into a real paradise? Just. Need to create a nice place, pleasing to the eye. And where the soul rests, there the mood improves and vitality increases.
One of the brightest touches in landscape design can be decorative pond in the country, comfortably located among greenery.
Despite the fact that most summer cottages are limited in size to the standard six acres, and the owners do not have the opportunity to make a large pond, this is not a reason to deny themselves the pleasure of having an artificial pond on the site. The technical side of the issue will also not become an obstacle if there is a desire and competent instructions describing step by step how to make a pond with your own hands.
Before you start on a large scale construction works and to build an entire lake with your own hands, you need to think about what purpose the creation of a reservoir on the site serves.
In terms of functionality (goals), four types can be distinguished:
 Little pond.
This is a reservoir that is part of the landscape composition. Their purpose is to decorate a corner of the garden and please the eye. Active recreation near such a pond is not expected.
 Decorative pond.
Is a deeper body of water. As a rule, they are decorated with bridges, fountains, and lighting is installed. Such a pond is being built not far from country house, terraces or gazebos, benches, sun loungers and umbrellas (or canopies) are installed nearby. And the pond becomes the center of the recreation area for the inhabitants of a private house.
 .
.
A personal artificial lake in which fish swim is a dream not only for fishermen. Children, cats and other family members will enjoy watching colorful fish while relaxing in nature.
 .
.
They are also country ponds that, in addition to their aesthetic function, provide the opportunity to cool off or even swim, depending on the size.
Based on the goal and one’s own capabilities, the location of the pond, its parameters and geometry will be determined.
A garden pond can be made in two versions with an endless variety of different modifications:
 Formal (regular) body of water.
The name successfully reflects the essence of the pond; it is a structure that has a strictly defined shape.
The geometrically correct shape of the pond is more suitable for areas maintained in classic style or in modern, minimalist or hi-tech styles.
Along with rectangular shapes, round, square and broken (symmetrical or asymmetrical) also belong to the formal type of pond.
 Landscape pond on the site.
A more popular option among users because it has an irregular coastline, a natural appearance, creates the effect of being close to nature and does not limit the flight of imagination of the creators.
Tip: The outline of the pond is determined by the preferences of the owners, but the more complex the shore line, the harder it is to lay the film.
An important aspect that you need to pay attention to when choosing the style of a reservoir on your site is the terrain. Smooth surface makes it possible to arrange a pond of any configuration. Changes and unevenness require increased attention, but they allow you to create a reservoir with a waterfall or a cascade of ponds. A bridge or an artificial slide will look natural on such a terrain.
 You can also raise the pond above ground level yourself. The only difference in the technology of performing the work will be the construction of the foundation, which allows to avoid distortion of the concrete bowl of the artificial lake.
 A high pond minimizes excavation work, is easier to maintain and is suitable for families with small children (the edge is equipped with a fence with railings). Such a pond can be built near a covered terrace, making it not only an element of landscape design, but also a place of relaxation.
 Tip: If you are planning to make a pond with a fountain, give preference to a tall pond.
Creating a pond on a property for the sake of a pond is illogical. It is much more pleasant if the pond adds zest, a decorative accent to the color of the landscape of the site. This means you need to place it in a good place. The location will allow you to admire artificial lake from anywhere.
How to choose the right place for a pond in your country house?
To do this, you need to take into account a number of factors:
Tip: The deeper the pond, the more illuminated the place it can be located.
A pond intended for fish all the more needs thoughtful placement, because in highly heated water the oxygen level decreases.
Tip: you can provide a sufficient amount of greenery near the pond by decorating it with plants in tubs (barrels).
Advice: it is better to supply electricity at the development stage and lay the wires in a protected and durable corrugation underground, and equip the connection points with a hatch for easy access.
Advice: it is better to start building a pond at your dacha with your own hands at the beginning of the warm season - in the spring. This way, there will be time for the device and the pond will have time to fit into the design (“take root”).
It cannot be said unequivocally that a large pond is a luxury, and a small one is a budget option or an opportunity to save money. A small pond does not always mean cheap, sometimes even the opposite. Each type has its own advantages. Therefore, let's focus on the key points:
Tip: the aspect ratio will determine the harmony of the pond.
- coastal zone(100-400 mm). Designed for planting plants and entering the pond;
- shallow (400-1000 mm). For plants growing deeper. Tip: Nymphea or winter-hardy water lily grows well at this depth;
- deep-sea (over 1 m). Necessary in those ponds where it is planned to breed fish. The area of the deep-water zone depends on the type and quantity of fish, but should be at least 20% of the pond area.
Tip: The lowest point of reservoirs should be below the freezing level of the soil. This is especially important for those ponds in which fish live. Thus, she can safely spend the winter in an ice-free pond.
Tip: plants should not occupy more than 50% of the pond area.
Ponds - from small to large
Moving forward in the field of studying dacha reservoirs, we gradually reached one of key issues how to make a pond with your own hands. Any construction begins with the choice of material.
The market offers a lot building materials to create a pond. And craftsmen advise making a pond from scrap materials; this will allow you to build a small pond in your dacha without any special financial costs.
Let's consider all the materials suitable for building a garden pond.
 Concrete pond.
An expensive option that allows you to operate the pond for a long time. Pouring a pond with concrete (constructing a concrete bowl) is a method that is more suitable for constructing a swimming pool.
 Plastic bowl (container).
 More suitable option. Made of PVC (polyvinyl chloride) or fiberglass, the form allows you to quickly complete all arrangement work and operate the pond from 5 to 30 years, depending on the quality of the bowl.
The purchased form allows you to make a pond in 3 stages: dig a pit, install a bowl and fill the voids with sand.

The plastic bowl for the pond is characterized by ease of installation, durability and frost resistance.
Their minus is high cost, difficulty of transportation (with a large volume) and the need to have basic installation skills. Otherwise, the bowl is very easy to damage. Please note that plastic bowls are destroyed under the influence of ultraviolet radiation.
Tip: the clear shape of the plastic bowl limits the possibility of creating a landscape pond on the site (subjective opinion).
 In this subgroup, the best option is a bowl (shape) for a pond made of fiberglass, reinforced with a rubber base. The undoubted advantage of fiberglass is reliability and maintainability.
 Polymer film.
 Provides unlimited possibilities in terms of choosing the shape of the reservoir. The simplest and most affordable material in this category is polyethylene film. It is available and cheap, but will not last long.
 PVC film has a longer life. At correct installation and with proper care it will last more than 10 years.
  Tip: instead of PVC film, you can use advertising banners (transparencies). They are trying to get rid of used banners and they can be bought inexpensively.
  Butyl rubber pond film. The most reliable material (rubber) for waterproofing a reservoir. Experts recommend butyl rubber membrane (EPDM) for those who have a rocky bottom, a lot of roots, or a significant pool depth. The service life of butyl rubber is 50 years. It can withstand repeated freezing.
  Bath pond
An old bathtub is an ideal container, specifically designed to hold water. It can be painted in a bright color and installed in a beautiful corner of the garden. Or you can dig deep into the soil and get a small country pond even with a fountain.
 Pond from a tire (pond from a tire or from a wheel)
 Another simple way to make a mini pond in the garden.
How to make a pond from a tire with your own hands is shown in the photo.

 Pond from a basin
The method is so simple that its construction is often done by women or even children. The basin holds water easily. Like a bathtub, it can be installed on the ground or deepened. The main thing in arranging a pond from a basin is the decor. And then, the garden mini-pond will decorate the area no worse than a full-fledged reservoir.
 Decorative pond from plastic bottles.
Suitable for those who want to combine two in one: create a decorative pond and eliminate the buzzing of mosquitoes.
Material prepared for the website www.site
Please note that the choice of material for the pond has a direct impact on the arrangement, appearance and its service life.
Tip: when choosing material for a pond, make sure that it is environmentally friendly.
To make a simple pond at the dacha, you need to prepare a level, a cord (for marking), pegs, a hose for watering, a shovel and a cart for removing soil.
For a more technologically advanced (capital) reservoir, pond equipment will be required:
As you can see, there are more than enough materials to create a pond on your own. We will focus on how to make a pond at the dacha from PVC film. The choice is due to the fact that the film takes shape better, it is quite affordable, working with it does not require special skills, and the film can be repaired.
Advice: to prevent the film from tearing in winter, you need to provide a deep-water part (below the depth of soil freezing), which will serve as a kind of compensator.
PVC film colors:
When choosing a film, pay attention to:
Tip: The deeper the pond and the more complex its shoreline, the stronger and thicker the film should be. The presence of stones or tree roots is also a reason to choose a stronger film.
Advice: For pond depths greater than 1.5 m. the best solution will use butyl rubber (EPDM or synthetic rubber, as it is also called). The rubber film is stretchable, resistant to UV and mechanical damage. Withstands from 40 to 80 °C.
Pond film calculation
How and with what to glue PVC film for a pond
The film for the pond is glued with a special glue (for example, Tangit (Tangit) PVC-U) or with adhesive tape, for example, Quick Seam 3.
Advice: it is better to immediately adjust the geometry of the pond to the size of the film.
Before you start digging a pit for a pond, you need to draw a sketch on paper and also transfer it to the surface of the ground. It is advisable to indicate the depth and width of shelves for plants or steps. This technique will allow you to avoid problems during the construction of the pond. It is convenient to apply markings with a garden hose (it is flexible, bright, and easy to adjust) or sand.

Tip: after marking the ground, cover the resulting area with a light film and look at it from different corners of the area. You may actually have to make adjustments to the future pond.


The pit structure includes:
Advice: since the excavated soil needs to be put somewhere, you can arrange alpine slide or level the surface of the area where there are depressions.
During excavation work, you must constantly ensure that the banks are on the same line. If you are planning a waterfall, then you need to maintain the required height difference.

Advice. If required building level(level) of great length, then you can make it yourself. To do this, you need to lay a regular building level 500 mm long on a long board.
After the pit is dug, its bottom and walls are well compacted (this is necessary to give it shape) and proceed to waterproofing. Waterproofing for a pond is needed to prevent water from escaping into the soil.
Tip: Some users prefer to do without isolation. In practice, this results in water levels that are inconsistent.
There are several ways to form a substrate:
Proper laying of the film does not exclude the installation of a sand cushion at the bottom of the future pond. According to professionals, such a pillow eliminates the possibility of damage to the film by roots or stones.
Advice. It is better to lay the film on a hot day. As it heats up, it will become more pliable.
Considering the topography of the bottom and banks of the reservoir, everyone will be faced with the fact that the film will be laid in folds. At the same time, users advise making one large fold, rather than many small ones. The formed fold can be pressed down with stones or glued to the main part of the film.
 It is important that the laid film lies on the surface of the pit freely, without tension. Otherwise, after filling the pond with water, it may stretch even more and tear.
In order to secure the film, it is enough to dig an auxiliary trench. Having laid the film, you can secure it with rods and fill the trench with crushed stone.
After the film is laid, the pit is filled with stones.
Tip: choose a large stone for the bottom. The flat bottom of the stone will prevent the film from tearing. For walls, it is better to use rounded stones, since flat ones slide.
Upon completion of the work, the pit is filled with water. Moreover, it must be supplied without pressure to the middle of the pit.
Only after the water in the pit has stood for 1-2 days can the film be cut off.
A homemade pond in the garden will look well-groomed and reliable only when there are beautiful and durable banks.
Depending on the type of soil, the shore of the pond should have a slope:
Practical users believe that the optimal slope for the shore of a reservoir is 45°. This angle will prevent the shore from crumbling and prevent ice from bulging during freezing/thawing.
When finishing and decorating the banks of the pond, take into account the plants that will be planted on them. Since they all grow at different depths, care should be taken to ensure that planting shelves are formed at a certain depth.
In the process of digging a pit, every owner will inevitably face the question of how to strengthen the shore of the pond.
The following engineering methods are suitable for strengthening the shore:
For a flat coast:

Craftsmen advise using a more conventional chain-link mesh, the cells of which are filled with earth with clover seeds (or other perennial grasses) or strengthening the shore of the pond with plants and bushes.
For a steep bank:

Biological methods can strengthen the shore just as well. The photo shows plants that can not only strengthen the shore, but also decorate an artificial pond.

Advice. For greater reliability, it is better to combine engineering and biological methods strengthening the shore of the reservoir.
 The pond at the dacha will become a full-fledged design element garden decor only upon its final finishing.
To make a country pond look natural or decoratively decorate a shaped pond, you can use:
Advice: it is better to alternate the laying of large stones with the laying of smaller ones, thus avoiding uniformity in the design of the bank.
Tip: gravel paths require more maintenance because... they are washed away by rain and grass grows through them.


Tip: You can clean your pond quickly and effectively in winter. To do this, it is enough to split the ice and transport it along with the silt outside the pond.
A pond based on a special plastic bowl can survive the winter, because the bowl can withstand significant temperature changes. And to prevent it from deforming from the pressure created by ice, it is enough to place several empty plastic bottles in the container. The bottles must first be tightly closed with lids. To prevent the bowl from collapsing, 1 bottle per 1 bottle is enough. square meter containers.
But what about those who have a film pond - will the film crack from frost? If the depth of the pond exceeds the freezing depth of the soil, there is no need to worry. To protect smaller bodies of water, you can also use empty bottles.
Important! All equipment and plants must be covered for the winter.
Conclusion
In this article we covered all the key points of creating a pond with your own hands, from the idea to the care. We hope that we have dispelled doubts and given confidence in our abilities. Go for it! And by the beginning of the season you will have a wonderful water corner in your suburban area.
A decorative pond is not only one of the most beautiful elements of landscape design, but also ideal place for relaxation - water soothes, relaxes, saturates the air with freshness and coolness. Making and equipping a pond is not easy, but with desire and perseverance, you can easily overcome any difficulties.
Having a beautiful pond in the garden is the dream of any summer resident. In order for the reservoir to be original and easy to maintain, it is necessary to think through all the details: choose a location, select materials, select residents and plants, and then begin construction.
On initial stage, often due to their inexperience and ignorance, gardeners make mistakes that can cause many problems in the future. Only correctly selected terrain, size and shape ideally suited to the area of the site is the key to successful construction. That is why, before carrying out such work, a diagram is drawn up and planning of landscape design objects and buildings in the garden is carried out.
The laws of landscape design state that for a small palisade in a natural style, the optimal solution is a winding, intricate shape. As practice shows, placing such a pond in a small area is quite problematic, and it will look comical.
But this is not a reason to abandon the reservoir; you can make a waterfall with a height difference or a small semi-fountain. With proper decoration, even the simplest geometric model will fit into all kinds of plantings without disturbing the landscape.
If the palisade is designed in a certain style, then the pond should correspond to it. Yes, for English style a round pond is suitable, for a classic one - with strictly defined corners, and an oriental design will allow you to choose a completely arbitrary shape.
It is not necessary to make a pond in the garden large, even if the area allows it. A properly placed small pond will look much more impressive than a lake in the middle of the lawn. Although the larger ones are easier to care for, easier to decorate and can be used for swimming or fishing.
The optimal depth of the pond is from 30 to 50 cm; under such a thickness of water both vegetation and living creatures will be comfortable. But it is worth considering that such a reservoir will freeze, and fish and plants will have to be relocated for the winter. It is much easier to install and design a shallow reservoir with gently sloping banks.
Garden ponds are installed from a wide variety of materials: plastic, concrete, stone, film, geotextiles. You can also buy a ready-made base - it is relatively easy to install, it is suitable for wintering aquatic plants and has a fairly long service life.
The purpose of a pond can be different:
Using a specially designed container made of polyethylene or fiberglass, creating a small mini-pond with standing water is quite simple. They come in a variety of shapes and types and are sold in specialty stores and at themed landscape design exhibitions.
Often the main determining factor when choosing one of the decorative pond options is financial side. We offer several very original and relatively inexpensive ways build the treasured water feature.
Old barrels located in a secluded place will serve as an excellent habitat for aquatic plants. The principle of laying such a mini-pond is the same as in the previous method. Wooden barrels It is better to use oak, the main thing is that they are not dry. But with metal containers you will have to tinker a little: wash, outer surface cover with bitumen, and paint the inside with black oil paint to give visual depth.
What could be more charming than a small lake next to a country house? You will need plastic film, which can be used to cover 3 by 3 meter pieces of cardboard and plywood or similar pieces of plastic (5 pieces).
You'll have to work hard:
As a result, your creation will delight the eye for many years.
If garden area It’s quite small, this is not a reason to deprive yourself of the pleasure of admiring the water composition. The basis can be the usual old bath, the sides of which will be successfully disguised by wood or stone. This design is not recommended for breeding fish, but it is ideal for aquatic plants and snails.
For ease of pond cleaning and masking of enamel white use black film, securing its edges decorative stones so that the bathtub is not visible at all.
Without a doubt, a pond made with your own hands is a great achievement, but in order for the pond to attract the eye and invite you to relax, you should choose the right vegetation.
The key place in every garden pond is occupied by the well-known water lily or nymphea (lat. Nymphaea). Many small-flowered and large-flowered varieties allow you to beautifully decorate a pond of any size.
For example, for a small pond, the most suitable are dwarf water lilies (Pygmaea Alba, N. tetragona, Marliacea Rosea), as they can visually increase the area. It is not advisable to plant other floating plants next to the nymph, or to erect a rockery or fountain (splashes can damage the leaves).
Marsh buttercup (Hottonia palustris) and water buttercup (Ranunculus aquatilis) will look very impressive on the water. These species are unpretentious; a piece of shoot is enough for their reproduction, but they are completely unsuited to wintering under thick ice, so during the cold period the plants should be moved to the basement.
The peculiarities of the root system of amphibian crops make them most suitable for landscaping ornamental swamps, reservoirs located in low areas, as well as shallow waters. This group includes: iris, marsh marigold, manna, arrowhead.
The selection of plants for edging the pond depends on the level of soil drainage and the depth of the pond. groundwater. Heuchera, daylilies (Hemerocallis), bathwort (Tróllius), Siberian iris (Íris sibírica), and cornflower (Thalictrum) will take root on a gently sloping, damp bank. Numerous varieties and the most unusual color schemes allow you to combine these aquatic plants advantageously.
The coastal zone, framed by rocky hills, involves planting drought-resistant, light-loving plants, such as saxifrage (Saxifraga) and young (Sempervivum), as well as low-growing bells and cereals, edelweiss and phlox. When planting crops, it is necessary to regulate the layering of plantings: plant low-growing perennials at the top, in a kind of water plateau, and tall ones - several levels lower.
A garden pond is not just a water feature - it is a real architectural structure, the erection and arrangement of which will require a lot of effort and time. But thanks to our practical advice and instructions, the creative process of constructing and landscaping a pond will bring a lot of pleasure.
One of the brightest tools in landscape design is a decorative pond. Of course, most suburban areas are limited to the traditional six hundred square meters, and the owners simply cannot build a large pond, but because of this you should not give up the dream of acquiring an artificial pond. As for the technical part, it will not be an obstacle, but only if you have good instructions and desire. So, today we will find out how to make a pond at the dacha with our own hands step by step.
First you should find out what purpose the construction of a pond on the site will serve. From this point of view, reservoirs can be divided into four large groups.
Table No. 1. Classification of artificial reservoirs by functionality
| Group name | Short description |
|---|---|
| They are an element of the landscape composition and are intended, first of all, to decorate a particular area of the garden. Near such bodies of water leisure not provided. |
| They are deeper and are often decorated with fountains, bridges, and sometimes equipped with lighting. Such ponds are built near a house or gazebo, and benches with canopies are placed nearby. Therefore, it is quite obvious that such reservoirs are the heart of the recreation area for the residents of the house. |
| This option is suitable not only for avid fishermen, but also for families with children - the latter will enjoy watching colorful fish while relaxing in nature. |
| They also belong to artificial country ponds and not only perform an aesthetic function, but also provide an opportunity to freshen up or even swim (it all depends on the size). |
Then, based on the goal and our capabilities, we proceed to choosing the style, location, dimensions and shape.
An artificial pond can be made in one of two possible options, and each of them also has a great variety of modifications.
Table No. 2. Artificial pond styles
| Name | Short description |
|---|---|
| This name exactly reflects the essence - these are structures that are distinguished by clearly defined outlines. The correct shape of the pond in terms of geometry is suitable for those areas that are decorated in the style of minimalism, high-tech, modern or classic. But, characteristically, the shape can be not only rectangular, but also square, round, oval, and broken. |
| They are more popular because they are characterized by naturalness and irregular contours of the banks, which means they bring people closer to nature. The shape of the reservoir here depends only on personal preferences, but the more complex it is, the more difficult it will be to lay the film (more on this later). |
The topography of the site also plays a big role when choosing a style. So, if the surface is fairly flat, then the shape of the pond can be any. If there are unevenness and drops on the site, then they need to be given special attention, but they make it possible to additionally arrange a cascade or waterfall. In addition, against the backdrop of all this, say, an artificial slide will look great.
Also, the reservoir can be raised slightly above the ground. In this case, the construction technology will differ only in the arrangement of the foundation, which will prevent possible distortions of the bowl.

When creating such a reservoir, excavation work is minimized, and caring for it will be much easier.

Note! If the reservoir is built with a fountain, then preference should be given to a tall structure.
Let's start with the fact that we place the reservoir in the most favorable place, so that you can admire your creation from anywhere on the site. That is why we take into account several important factors when choosing.
Note! The greater the depth of the pond, the more illuminated place it should be located. If the reservoir is intended for fish, then we take the location even more seriously, since the oxygen content in highly heated water decreases.
We begin work in the spring - this way we will have enough time for the reservoir to “take root” on the site.

It’s hard to say that a large pond will cost more than a small one, since there are a lot of nuances here. Therefore, let's look at the key points.
1. Dimensions. They depend on the location of the reservoir. Many say that the pond should account for an average of 3-10% of the total area of the site, although there cannot be any clear recommendations in this case. As for the specific length and width, they depend not only on the area land plot, but also from our capabilities. After all, we will dig a hole under the pond manually.

2. Depth. It depends on the purpose of creating the reservoir, as well as its size.
3. Difficulty of content. The larger the pond, the easier (no matter how paradoxical it may sound) to care for it.

4. Zoning. The reservoir is divided into the following zones:

5. Biological balance. In any case, living creatures will inhabit the pond, which means that conditions must be provided so that it can clean itself. No oxygenation or chlorination of water is provided here. It is worth remembering: no more than ½ of the entire area can be allocated for plants.
Note! The lowest point should be lowered below the soil freezing line, especially if you plan to breed fish - this way they can survive the winter in non-freezing water.
The next issue that needs to be dealt with is the choice of consumables. There are many options on the modern market that can be used to create an artificial reservoir. Let's look at them.

The most expensive option, which, nevertheless, allows you to operate the reservoir for quite a long time. Although concrete pouring is more suitable for arranging a swimming pool.

This option is more suitable. The mold, made of fiberglass or PVC, allows you to build a pond in record time and use it for up to 30 years (the specific period depends on the quality of the container).
The procedure itself will consist of only four steps:

The disadvantage of this method is the difficulty of transportation (if the volume is large) and the need for basic installation knowledge (otherwise the bowl may be damaged). Moreover, plastic containers deteriorate over time under the influence of UV radiation.
Note! It is preferable to use a fiberglass bowl that is reinforced with rubber - this design is more reliable and repairable.

In terms of pond shape, this option provides simply unlimited possibilities. The most affordable material is polyethylene film, although it will not last long.

PVC film has a longer service life; with proper installation, it can last up to ten years.

Perhaps the most reliable option. For ponds with a rocky bottom and great depth, it is recommended to use a butyl rubber membrane (EPDM), which has a service life of up to 50 years. In addition, this material can withstand repeated frosts.

There are a few folk ways making a reservoir using available materials. Let's take a look at the most popular of these methods.

Great option, because a bathtub is a container that was originally intended to hold liquid. The bathtub can be painted in bright colors and placed in a picturesque corner of the site or, alternatively, buried in the ground.
A simple way to create a mini-reservoir on your site. The manufacturing procedure is shown in the photo below.

An even simpler way. The basin is able to hold water well, so it can be installed in the same way as a bathtub. With proper decoration, such a mini-pond will become an excellent decoration for the yard.

Note! Not only the aesthetic characteristics of the pond, but also its service life depend on the choice of material. It is desirable that the selected material is environmentally friendly.
To create a simple artificial pond, we will need a level, a cart with a shovel, a cord, a hose that is used for watering, and pegs.
If the pond is more technologically advanced, then the following equipment will be needed:

There are plenty of materials that can be used to create a pond, but we will focus on polyvinyl chloride film. The fact is that it is cheaper, takes the desired shape better, can be repaired, and does not require specific knowledge or skills to operate.
Step 1. First, choose the color of the film. There are several possible options here.

Also, when choosing a film, pay attention to the composition (PVC is more durable than PE) and thickness (for a pond you will need material thicker than 0.5 mm). Moreover, the greater the depth of the reservoir, the greater the film thickness should be. Equally important is resistance to UV radiation and mechanical damage.
Note! If the depth of the pond exceeds 1.5 m, then we use butyl rubber. This film is resistant to stretching, deformation and UV, moreover, it can withstand temperatures of 40-80°C.
For gluing we will use special glue (for example, “Tagnit”) or adhesive tape (Quick Seam 3).

Step 3. The next step is to create a diagram.

First, we draw it on paper, and then transfer it to the ground. We indicate the sizes of steps or “shelves” for plants - this will avoid possible problems. To apply markings, use sand or a flexible garden hose (preferably in a bright color).

After this, we cover the marked area with a piece of light film and examine it from different angles. We make adjustments if necessary.
Step 4. Digging a pit. To do this, perform the following steps.

When carrying out excavation work, we pay attention to ensuring that the banks of the future pond are located on the same line. If a waterfall is created, then we maintain the required height difference.
Note! If a large level is required, we can make it ourselves. To do this, place a regular level on a long, flat board.
Step 5. We lay the substrate. We carefully compact the bottom of the finished pit, after which we proceed to the waterproofing layer, which will prevent water from penetrating into the soil.
The substrate can be made in several ways:
Step 6. Next, we lay the film, preferably on a sandy “cushion” (the latter will prevent damage from stones and other dangerous objects). It is advisable to install on a hot day - as the film heats up, it becomes more pliable.

This may cause difficulty in forming folds. We try to make one large fold, rather than a large number of small ones, and then glue it or press it down with stones. The film should be loose and loose.
To secure it with a swarm there is an additional trench around the perimeter. We lay the film there, and then fill it with crushed stone. Next, fill the trench with large stones with a flat bottom (so that the film does not tear). We lay the walls with round stones (flat ones will slide). At the end, we fill the pond with water - we supply it without pressure, directing it to the center of the pit. After two days, cut off the excess film.
Step 7. We strengthen the banks. Their slope depends on the type of soil: if it is sandy, then the walls should be sloped, if we're talking about about clay or black soil, then vertical. The optimal slope angle should be approximately 45°.
The strengthening itself depends on the type of banks.
If they are flat, then you can use:

You can also use a regular chain-link mesh, filling its cells with soil with seeds of perennial grass (for example, clover). There is another option - to strengthen the banks with shrubs or plants.
If the coast is steep, then we can use:

It can also be effectively strengthened using biological methods (planting). Ideally, biological enhancement methods should be combined with engineering ones.

There are several ways to decorate a pond. To make it a full-fledged design element, we use one or more of the methods below.

Finally, a few words about further care behind an artificial pond.

I really want to relax after the summer heat and physical labor near a picturesque place. Perhaps the first thing that comes to mind is water. Unfortunately, not all plot owners are lucky enough to have a pond in their dacha. Therefore, many summer residents set up a mini pond in their country house with their own hands. We will talk about this in this article.
Perhaps at first you will have questions: how to do it? what material? where to place it? But believe me, you can build a pond with your own hands. Moreover, we are talking about a small pond in the country - mini copies of reservoirs from 0.5 to 1.5 m3.
Thanks to today's technologies, the owner can build a pond of any complexity. For example, there are three possible options for small pond: cover the hole in the ground with film and fill it with water; use a ready-made container that may be right at hand; Fill the walls of the hole in the ground with concrete and fill with water.
To begin, create a design for your future pond on paper. Consider the width, depth and thresholds for planting. Start drawing outlines on the ground. This can be done with paint or sand.
 If you plan to have several tiers in the pond, then mark them and dig them out one by one.
 Purchase a film for your pond with a calculation of +0.5 m on the sides on each side of the pit bowl. You will also need to purchase: geofabric - a material that is laid on the bottom and walls of the bowl to protect the film from damage. Although you can use something from the bins: unnecessary carpet, old linoleum.
 Geotextile for ponds
 You can secure the film with crushed stone by placing it in trenches dug along the edges of the thresholds. Fill the pond with water gradually, taking breaks. Line the shoreline with stones and fill the bottom of the pond with small pebbles.
First, decide on the shape of the container in which the water will be. Then dig a pit under it, stepping back 30 cm from the sides. Compact the bottom so that it is level. If you have chosen a multi-tiered plastic mold, then pour in the water gradually, and fill the space between the mold and the pit bowl with sand.
There are many more options for a small pond in the country. Can be used:
 Pond from the bathroom
 And also tires, a barrel, a boat or even old wardrobe! Conveniently, some of these containers can be brought into the house for the winter. Indeed, making a pond with your own hands is not difficult!
I think many will agree that to build a pond according to the third option, you need some, at least basic, builder skills. But at the same time, don’t let this scare you, because any summer resident or owner of a plot in the private sector is already a bit of a builder. And as a reward for your efforts you will have an almost eternal paradise in your yard.
Take your choice of pond location seriously, because it will no longer be possible to move it. Now we can begin.
If you decide to make a pond without thresholds, this will greatly simplify the task. Dig a pit with slopes of 45 degrees. Compact the hole and fill it with sand.
Place PET or PVC film on the bottom without stretching it too much. Start pouring concrete from the walls, and then move to the bottom.
Try to complete this part of the work in one day to avoid cracks at the joints.
Press in reinforced mesh. Pour the second layer of concrete as soon as the first one dries. Constantly check the horizon level. Add water when the concrete has completely hardened.
 Concrete pond
 Before deciding on an option for building a pond, decide which design idea will look especially natural on your site. If the house, paths and flower beds are designed in a strict style, feel free to create a pond of clear shapes. If you like everything natural, then any arbitrary shape will do.
How to make all the inhabitants of the pond feel comfortable? If you have a large plot of land, then carefully study the area so as not to make a mistake with your choice. There are several secrets that we will share with you.
 Mini pond for the garden
 If you want fish to live in your pond and flowers to bloom, then several rules from this section will help you.
Decorative flowers in a pond do not suffer from temperature changes and can even withstand frost (of course, except for southern varieties of plants, which will need to be hidden for the winter). But still make sure that the water in the pond will be heated by the sun for at least five hours during the day.
How less light, the faster the mini pond at the dacha will turn into a small swamp. Then it will look completely unattractive, a characteristic smell and flowering will appear.
In nature, an amazing process of self-purification has been launched, and at home, the owner must take care of the cleanliness of the reservoir.
As in a natural reservoir, plants in home pond are divided into the following types:
Although the humidity on the shore along the pond will be higher than in other places, simple garden plants will be able to take root there. But still, make sure that they do not look awkward or random next to other inhabitants of the pond. Begonias, aquilegias, impatiens and many other perennial plants that are used to decorate landscapes will be harmoniously combined.
An area with constant humidity, but without stagnant water is the best place for those who love moisture perennial plants. Among such stars are meadowsweet (meadowsweet), lysichiton, darmera, iris and many others.
 Irises also thrive in shallow water. They compete with susak, pontederia, shank
 The water lily can rightfully be called the deep-sea queen. She calmly copes with harsh winters. Water lilies are not only beautiful, but also useful. They are the ones who can create the shade necessary for the pond. Among other deep-sea beauties is the lotus (however, it needs to be dug up for the winter, because in most of the territory former USSR for almost 8 months the water does not warm up, as needed for the flowering of such varieties), watercolor, oronium, water chestnut and many other bizarre inhabitants of the depths.
Rivals for deep-sea plants are algae, which saturate the pond water with oxygen and support the vital activity of other organisms. Among them are swampweed, hornwort, etc.
Insects, microorganisms and simple plants will grow in your pond on their own. You will have to take care of the fish yourself.
 Fishes in a pond at the dacha
 But don’t think that you can’t get them. In fact, there is nothing supernatural here. Check the depth of your pond - it should be at least 90 cm deep. This is necessary for the fish, because this way they can survive the winter. And in summer the water does not warm up too much. Ponds of shallower depth are only suitable for growing ornamental plants.
By the way, in ponds with fish, a third of the water surface should be covered with greenery.
In the process of creating a pond at your own dacha, many questions arise, general recommendations not enough. Let's consider these questions.
First, let's define what is meant by this phrase:


A properly made pond occupies at least 10th of the site. Deep - it warms up poorly and is simply dangerous, shallow - it blooms. On the forums, summer residents are recommended optimal size reservoir 2.5 - 3 m in diameter, 1.5 deep. The hole is dug manually or using machinery. Next, waterproofing is done.
Ecopond - involves natural waterproofing, called clay castle. Only this natural material contributes to the functioning of a living ecological system. This is a good way to make a pond without film:

There are several simple ways to arrange miniature ponds on your site. 

Since the shape is a wave-like configuration, transitions during burial are taken into account. Special steps are made, one wider than the other. After installation, the voids are filled with earth.
The form is set slightly above ground level, a layer of sand of approximately 20-30 cm is poured under it, but first markings are made on the ground. Then you can start digging a pit. How to do this can be clearly seen in the pictures below.

Important! Three zones are provided in the pit bowl: deep, 1.8-2.0 meters (below the freezing level of the ground). She is being prepared so that she can successfully winter. Medium – for plants. Small – in summer such places warm up well, fry and living creatures accumulate here, and microflora multiplies.
If you are digging a pond for swimming, you do not need to deepen the bottom, it is made smooth.
The Landscape Constructions company recommends first filling the bottom with sand and laying it on top. geotextiles. 
Among the existing options for waterproof coatings, they usually choose butyl rubber film. Main argument– durability. It lasts up to 20 years.


For your information! In specialized stores you can buy a ready-made plastic mold for a reservoir of 1000 liters or more.
A pit is not necessary for a pond; it is enough to make a dam using a stream or a drainage area where water flows. Running water constantly fills the reservoir. They block it in the narrowest place. First, a ditch is dug, the bottom is lined with rich clay, and compacted. Then a clay wall is erected and buried into the bottom and edges of the ravine. The dam crest is raised one meter above the future water level, and the rapids are made steep. 
Dams are built from natural materials: stone, gravel, logs, sometimes concrete. The base is supposed to be wide so that the structure can withstand water pressure.
When constructing such structures, remember about floods and consider water drainage in extreme situations.
The embankment is filled with a width of half a meter to 4 meters, a height of at least 0.5 m. The dam is filled only after the dam has settled.
Concrete dam. It is reinforced with rods, angle iron, and steel mesh. For concreting, waterproof cement is used, liquid glass and PVA glue are added. 
A ravine next to an area along the bottom of which a stream flows and overflows during floods can be turned from a potential enemy into a friend and helper. The ravine is blocked from bank to bank by an embankment. Rain, spring, or river water gradually accumulates in front of it, forming a water surface.
We present such a positive experience step by step:
Such a water oasis requires virtually no costs, will avert the threat of flooding, and will decorate a vacation spot. 
In autumn, especially tender and valuable plants are removed from the pond, and ornamental fish are moved to the aquarium. The pond will freeze at low temperatures, it is impossible to counteract nature, but it is possible to make it easier for fish to winter in the reservoir and ensure an influx of oxygen. 
Used here floating aerator, however, its effect is effective only at low subzero temperatures. 

Such bodies of water are called quarry ponds or gravel pits. Usually these are old neglected quarries in which peat or stone was mined. The water in them stagnates, and the fish are mostly small fish. Used for fish breeding when it is possible to provide a constant flow of water. Specialized farms on quarry ponds produce up to 2 quintals of fish per hectare. Such reservoirs are of interest to entrepreneurs. 
The easiest way to feed a reservoir is from a well. The owner of such a pond shared this scheme, with the help of which a good idea was realized, on a dacha forum. Water circulates and its consumption is small.

Straight, curved, hanging over the surface of the water - the bridge can be anything. Wood, concrete, stone, metal and their combinations are suitable for structures. Even the smallest bridge will enliven the area, become a continuation of the path, and add an unusual line to the landscape. 
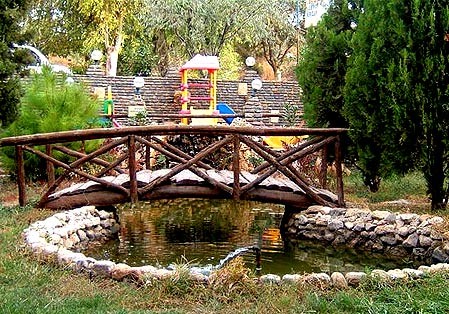
A simple bridge is easy to make:

Alexander Pisanets talks about how to make a filter for a pond in the video below.


