The phrase “hanging garden” refers us to the first tourist rating in European media - a shortlist of seven “wonders of the world”, which was compiled by Herodotus in his “History”. One of these wonders (which are worth a look at for an inquisitive person, and the ancient Greeks were very inquisitive people) were the Hanging Gardens of Babylon. As Herodotus was told, they were built in order to console the king’s wife, who was yearning among the Iraqi sands for her distant, flourishing homeland - mountainous Media. Of course, what can be arranged on a country plot will be many times inferior in scale to the splendor of the Middle East, but every summer resident is quite capable of creating his own miracle.
The main investment that hanging gardens require is time. However, you don’t need much more of it than when caring for potted plants. The list of necessary measures is standard: fertilizing, treatment against diseases and pests, removal of faded flowers and daily watering.

The main advantage of hanging gardens is space saving. Any of these are suitable for placement. vertical surfaces, to which you can attach ampelous (hanging) plants: house walls, fencing of terraces and gazebos, fences, pergolas and even lamp posts. In some cases, metal frames and grilles are additionally installed. This type of landscaping, among other things, can serve as an effective and ingenious means of camouflage, hiding construction or finishing defects. At the same time, it is important to correlate the strength of the fasteners and the weight of the flower containers, especially if multi-tiered structures are intended to be installed. Ordinary garden soil due to its density it is unsuitable here. It is recommended to use light substrates, consisting mostly of peat, turf soil, sand, agroperlite, vermiculite and fine expanded clay. Such a mixture most effectively ensures plant hydration and absorption nutrients. It is also worth paying attention to hydrogel as a source of moisture. As for containers for flowers, today, as a rule, lightweight ones are used. plastic containers and flowerpots. But for powerful flyers, baskets and cones are purchased from metal mesh. To place vertical flower arrangements, the most illuminated and well-sheltered areas from the wind are selected.

The undoubted advantage of hanging gardens is their mobility. In fact, this is a modular landscape constructor, from the elements of which you can form any composition. Vertical gardening leaves a lot of room for experimentation. Subject to certain rules, even a novice summer resident has access to a huge variety of options, which is determined by the types of flowers, their combinations in hanging flower beds, the distance between the ampels, cascading, linear or single (“flower clouds”) types of placement, etc. It is quite acceptable to make substitutions, create color and texture accents, and change the geometric order. However, we should not forget that hanging gardens are ceremonial elements landscape design and directly affect the appearance of the entire site. This means that they must correspond to the overall stylistic context. If horizontal flower beds and potted plants may represent separate groups, then hanging flower beds strictly obey the initially specified design guidelines.

The range of annuals for vertical gardens and flower beds is very significant. For example, it is enough to name the ampelous varieties of fuchsia, petunia, diascia, nemesia, balsam, lavatera, pelargonium, marigold, ageratum. At the same time, traditional garden vines - morning glory, kobea, sweet pea, thunbergia - are clearly not suitable for hanging containers, since they need supports (otherwise they will not be able to give the expected visual effect). Herbaceous ornamental plants They will also not be able to play their role properly, lost among the bright floral waves of their lushly blooming neighbors.

Having studied the generally simple and few recommendations on how to make a hanging garden with your own hands, you can bring a whole carnival of amazing natural colors to the appearance of your suburban area. Which landscaping model to choose—luxurious floral carpets or individual “cloud” baskets, elegant potted collections or multi-stage flower beds reminiscent of waterfalls—depends on the chosen style and personal preferences. In addition, working with hanging gardens will be an excellent school for an amateur gardener. It will allow you to better understand the properties of various plants, show how to create advantageous contrasts and combine bushy and climbing species. This experience will be extremely useful when arranging horizontal flower beds and flower beds.
Even more useful information from the world of real estate on our
It is hardly possible to meet a person who would not feel the desire to settle down in comfortable chair and feel the smooth rocking movements suspended structure. Comfortable swings have always been very popular. Today, the range of suspended seats has been significantly expanded: hanging sofas and many chairs are decorated suburban areas, easily fitting into landscape design.
The basis for the manufacture of hanging seats was ordinary rocking chairs. Wicker structures made of rattan or wicker have become the most promising for furniture experiments, because they weigh quite little, but at the same time have excellent strength.

As a result of such furniture experiments, designers created hanging chairs resembling half a ball in shape.
Semicircular structures are attractive because they allow the entire load to be evenly distributed. In addition, they are convenient to hang, installing the device at the highest point.
The frame of hanging chairs can have several options.
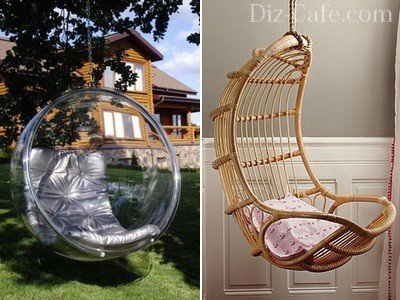
Wicker chairs made of wicker, rattan, transparent acrylic or plastic have a rigid body. For convenience, they are supplemented decorative pillows and soft mattresses

The hammock chair is more soft version suspended structure. On the rocking soft pillows you can always pamper yourself in moments of relaxation

A cocoon chair covered on three sides with wicker walls is ideal for privacy and abstraction from the bustle of the outside world.
Instead of traditional rattan or wicker, synthetic materials are increasingly being used when designing hanging chairs, making the structures lighter, more flexible and quieter.
As you can see, there are many options. We will specifically look at 2 examples.
It is not difficult to build such a chair. You just need to master the basic technique of weaving macrame.
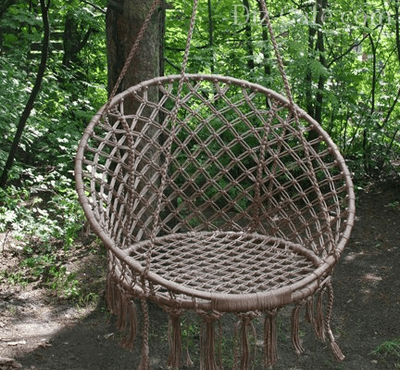
Such a hanging chair will create a special atmosphere on the site, conducive to peace and quiet.
To make a chair we will need:
To decorate the chair, it is better to use hoops made from metal-plastic pipes with a cross-section of 35 mm. Metal-plastic pipes of this thickness have a metal braid inside and are able to provide sufficient strength to the suspended structure.
To make a hoop from a pipe, first determine the length of the segment using the formula S = 3.14xD, where S is the length of the pipe, D is the required diameter of the hoop. For example: to make a hoop D = 110 cm, you need to measure 110x3.14 = 345 cm of pipe.

Wooden or plastic internal inserts of the appropriate diameter are ideal for connecting the ends of pipes; they can be secured with ordinary screws.
For weaving, a polyamide cord with a 4 mm thick polypropylene core, which can be purchased at a hardware store, is ideal. It is good because it has a soft surface, but unlike cotton fibers, when knitting it is able to create denser knots that will not “creep” during use. To avoid discrepancies in the color and texture of the material, it is advisable to purchase the entire volume of cord at once.
Our task is to completely cover the metal surface of the hoops. To decorate 1 meter of hoop with tight turns it takes about 40 meters of cord. We make the turns slowly with good tension, laying the cord evenly and neatly.
To make the winding more dense, tighten it every 20 turns, twisting them forcefully in the direction of the winding until it stops. As a result, we should get a smooth and dense surface of the braid. And yes, to protect your hands from calluses, it is better to carry out this work with gloves.
When creating a grid, you can use any macrame pattern you like. The easiest way is to take a “chess” with flat knots as a basis.

We weave the mesh with double polyamide cord, attaching it to the braided hoop with double knots
While weaving, monitor the tension of the cord. The elasticity of the finished mesh will depend on this. The free ends of the knots should not be cut off yet. You can use them to form a fringe.
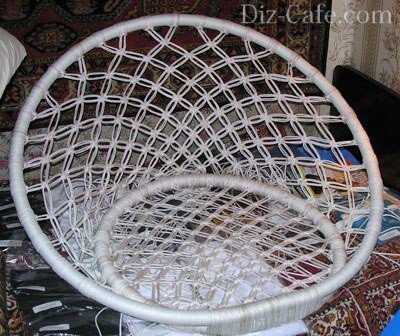
We collect braided hoops into single design. To do this, we fasten them at one edge, wrapping them together with one cord.

From the opposite edge of the winding we place two wooden rods vertically, which will serve as support for the back of the structure
The length of the support rods can be any and is determined only by the selected backrest height. To prevent the hoops from slipping, we make shallow cuts at the four ends of the wooden rods.
The weaving pattern for the back can also be any. Weaving begins from the upper part of the back. Gradually lowering yourself to a seat.
We tighten the free ends of the cords on the lower ring, collecting their hanging edges into loose tassels
When the pattern is braided, we fix the ends of the threads in the lower part of the back and decorate them with fringe. The structure will be strengthened by two thick cords that connect the backrest to the seat. An elegant hanging chair is ready. All that remains is to attach the slings and hang the chair in the chosen place.
If you don’t want to weave, or for some other reason the first option didn’t suit you, then this one might be suitable.

A cozy, gently rocking nest - perfect place where you can relax, forgetting about your problems, or just take a nap
To make such a hanging chair, we will need:
You can make a hoop from metal-plastic pipe, which is sold as a rolled coil, or from bent wood. But when using wood, you should be prepared for the fact that under the influence of temperature changes, the hoop can quickly dry out and become deformed.
From a three-meter cut we cut two equal squares, each measuring 1.5 x 1.5 meters. We separately fold each of the squares four times. To make a circle out of it, draw a circle from the central corner with a radius of 65 cm and cut it out. Using the same principle, we make and cut out a circle from another square. On each of the resulting circles, stepping back from the edges by 4 cm, we outline the inner contour with a dashed line.
We mark the holes for the slings: fold the circle in four and iron it so that the folds are guidelines. The first pair of lines will be located relative to the bend at an angle of 45 0, the second - 30 0. Having marked the corners for the slots for the slings, we lay out both circles again and iron them.

We make rectangular slits measuring 15x10 cm along the designated four axes. We make the slits along the contour of the Y-shaped markings made inside the rectangles
To make identical slits on both circles, we connect the pieces of fabric and pin them together. Along the contour of the finished cuts of the first circle, we make slits on the second piece of fabric.

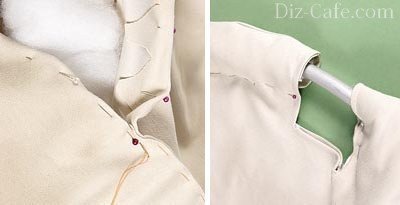
We bend the petals of the slots inside out, gluing the edges with non-woven material. Only after this we make a full slit, stitching it along the edge, retreating 3 cm
Sew both circles together along the previously marked dashed line, leaving a hole for inserting a hoop. We cut out the free allowance using cloves. We turn the finished cover inside out and iron it.

From the filling material we cut out strips 6-8 cm wide, with which we cover the hoop. The sheathed frame is inserted into the case
Having retreated 5-7 cm from the edge, we sweep both sides together. Turn the edges of the hole left for inserting the hoop inside out.
We pin off the unstitched allowances from the front side, and sew the edges, stepping back from the edge by 2-3 cm. Using the same technology, we process the entire edge of the cover
We fill the case with padding polyester, stretching strips of filler and fixing their edges with a hidden seam. To strengthen the cover on the hoop, we quilt the fabric in several places.
Sling mode for four sections 2 meters long. To prevent the threads from unraveling, we melt the edges of the slings.

We pull the melted ends of the slings through the slots, form loops from them and stitch them 2-3 times
To be able to adjust the height and angle of inclination hanging chair, we put buckles on the free ends of the slings. We collect all the slings into one suspension, securing them to a metal ring.
This chair can be placed in the garden, hanging from a thick branch of a spreading tree. If you plan to make a hanging chair a functional decoration for a veranda or gazebo, you will need to build a hanging structure.
The suspension system must support not only the weight of the chair itself, but also the weight of the person sitting on it.

To secure a simple hanging chair, the weight of which, together with the person sitting in it, is no more than 100 kilograms, it is enough to install a simple anchor bolt
With this method of fastening, one should take into account the maximum load on the ceiling, which is measured in kg/m2, because the entire suspension system will act on this area. If the permissible load is less than the weight obtained in the calculation, it is necessary to distribute the load across the ceiling by constructing a load-bearing frame combining several anchor bolts.
Make such a chair, and you will get an excellent opportunity to relax at any time, enjoying pleasant rocking movements, while gaining peace and a philosophical attitude towards all troubles.
Suspended ceilings are the most common in the world. This is explained by both their diversity and ease of use: the space between the main and decorative ceilings is used for invisible laying of any necessary comfortable life communications. Therefore, many are interested in how to do suspended ceiling with your own hands.
All suspended ceilings are structures consisting of suspensions, a supporting frame and cladding elements. Therefore, they are all installed using the same technology with minor differences.
We’ll talk about how to properly make a suspended ceiling in this article.
The difference between some suspension systems and others is determined, first of all, by the shape of the cladding modules. These can be tiles, panels, slats, cassettes, gratings, which give the name to the entire structure. What the suspended ceilings are made from also matters.
The most striking representative is, whose facing tiles are made of mineral fiber. This type of suspended ceiling decoration is most often used in public buildings, as it looks quite cold and formal.
But using the same principle, you can mount the ceiling with your own hands with other facing slabs, cutting them from plasterboard, MDF, glass, mirror or even foam.
Most often you can find do-it-yourself ones - plastic or MDF panels. Sometimes wooden lining is used instead.

The principle of connecting all panels to each other is the same: one panel with its thinner edge is inserted into the groove of the other. After which a continuous surface is formed without cracks or visible joints.
Laths are long steel or aluminum panels. If you are deciding how to make it yourself, then this is the most affordable option for beginners. The frame for such a ceiling consists only of longitudinal support rails, and the slats are attached to them by snapping onto the protrusions of the profile. That is, without the use of any fastening hardware.

Slat ceiling
The main elements of cassette ceilings are metal cassettes (modules) made of steel or aluminum. If you already know how to make a suspended ceiling from tiles with your own hands, then you can easily cope with the installation of cassette hanging systems.
In cellular (lattice) ceilings, the facing modules are square lattices made of aluminum profiles.

For reference. Plasterboard ceilings are also considered suspended, since sheets of plasterboard are attached to a frame suspended from the ceiling. But their design does not end there: the mounted surface also requires decorative finishing. Therefore, in this article we will only talk about how suspended ceilings are made, which can be used immediately after installation.
If you have already decided which of these options suits you best than the others, it’s time to find out how to make a suspended ceiling with your own hands. Our improvised repair school will help you with this. A few lessons and you can confidently begin to act.
Let's divide the whole process into several main stages, and tell you about each of them in detail.
At this stage you need to resolve the following issues:

Before making suspended ceilings, sketch (or print) finished project to scale. The drawing will help you to determine the required quantity of all materials.
Regardless of what type of finishing you choose, first mark the level of the new ceiling around the perimeter of the room (along the walls). How are markings made?

Important! If you did everything correctly, the resulting line should go along all the walls and close on the mark.
Installation begins with the installation of guide profiles, which are applied to the intended horizon line with the lower edge and attached to the walls with dowels, anchors or ordinary self-tapping screws. It depends on the material of the walls.

Attention! Installation of panel suspended ceilings does not require the installation of guides.
How are tags made? A tape measure is stretched along the guide profile, and vertical lines are made under it at a given distance from each other. The same should be repeated on the opposite wall.
The distance between the supporting profiles depends on the type of ceiling covering.
Attention! For installation of lining or panels MDF frame better not to do it metal profile, but from wooden slats.

Now about how to make suspended ceilings so that they do not sag. To do this, the frame must be rigidly connected to the base ceiling using adjustable hangers. They are attached to the ceilings using anchors or dowels exactly along the line of the load-bearing profiles.
Then the profile is connected to the hangers through special holes, and the latter are adjusted in length so that the entire frame is maintained in a horizontal plane.

Advice. If the distance between the base and decorative surfaces is less than 10 cm, then direct hangers can be used.
If the ceiling design provides for the installation of transverse profiles, then they are attached to the longitudinal ones after their installation. Most modern suspension systems have special locking connections for extending the profile along the length and connecting it with transverse inserts. Therefore, there should be no problems with this.
Before you make your own suspended ceiling, or rather, before covering it, you need to once again make sure that the technological distances between the load-bearing profiles are maintained, and that the entire frame is located in the same plane.
This is the easiest step if the frame is mounted correctly.

This article provides only general description how to make a false ceiling. You will find more detailed information on each type of ceiling in other materials on the site.
Good day. If you've never seen a kokedama, the Japanese moss ball, let me introduce you to beautiful garden for a small space. Floating in the air, these plants do not take up surface space or even wall space.
Plus, you don't have to shell out money for cute pots and planters, as each plant is contained in its own moss container and hung from the ceiling using inexpensive twine.
If you are also convinced that you want this gardening solution that is essential for small houses, follow these steps to make your own hanging garden.
What you will need
The right plants for landing
Soil for Bonsai plants
Peat moss
Clay (such as bentonite clay, which is needed as a binder)
Leaf moss
Leg-split
Instructions.
1. Mix the bonsai soil, peat moss and clay into a ball, following the approximate ratio of 70% bonsai soil to 30% peat moss and clay mixture. Moisten the mixture with water so that all elements bond with each other. Creating soil that won't disintegrate but isn't so dense that plant roots can't breathe is important to keep your kokedama thriving.

2. Using your thumbs, dig a small hole in the center of the soil ball. Shake it off excess soil from the roots of the plant before tucking them into the hole and forming the soil around the roots.

3. Cover the ball with leaf moss, gently pressing sections of moss into the soil. Don't worry if it doesn't stay in place at this point, wrapping it with twine (step 4) will help.

4. Wrap the ball with twine, making sure all sides are covered, including the bottom, before tying the knot. To hang the kokedama, cut another long piece of twine and tie it to either side of the ball.

5. Hang the kokedama in a slightly shady place and provide daily misting with water. When the time comes to water the plant, to do this, immerse the moss ball in a bucket of water, place it so that the plant is at the top and let it absorb the water for 5-10 minutes.

The best plants for kokedama.
Choosing a plant for your hanging garden, it is necessary to select ones that do not require sun, because moss prefers shade and damp environment. It is best to use a plant with a small root system. Here are a few varieties that will grow in the shade.
Many varieties of fern, including the hair of Venus fern.
Staghorn fern
Pothos
Philodendron
Begonia
Succulent
spider plant
In an effort to comfortably arrange their living space, many people prefer non-standard design solutions. They are able to bring originality to a familiar interior and provide additional comfort. These items include hanging chairs that you can make yourself.
Among the variety of hanging chairs, there are models that you can make yourself. Such options will become the highlight of your interior. Besides, self-production allows you to bring to life an individual plan, which is based on proven and reliable designs.
Unusual swing chairs are made from various materials. The peculiarity of such structures is their elegance, simplicity and the ability to use both hard and soft frames. These chairs can become stylish decoration country house, an unusual addition to the interior of a bedroom, living room, children's room or veranda.
No less popular is the cocoon chair or egg chair. A special feature of the model is the presence of walls that hide inner space about 2/3. These chairs allow you to enjoy privacy; they are most popular among children due to their resemblance to a hanging house suitable for games. Usually cocoons are made from natural materials, intended for weaving.
As the most popular homemade model protrudes a nest chair made on the basis of a hoop frame. This model can be equipped with many decorative elements, and its shape fits harmoniously into the living space modern apartments. A variety of weaving techniques are used to make a nesting chair.
When choosing the materials needed to make hanging chairs, first of all take into account the features of the model you are interested in.
To create the seats of hanging chairs, craftsmen use various techniques:
Remember that the materials chosen must be able to withstand certain weight loads. Fabric that is too thin or lace can tear under the weight of a large person. Special attention and fastening elements also deserve testing for strength: chains, ropes, braid on which the structure is suspended.
A hanging swing chair made of fabric is a convenient addition to a country house  Children will love this cocoon chair made of thick fabric.
  Rattan hanging cocoon chair is strong and durable
  A hanging nest chair made of thick fabric is suitable for relaxing in a summer cottage
  A simple model of a swing chair is easy to make with your own hands
  An original handmade hanging chair will become a source of pride for its owners.
  A hanging swing chair woven using macrame technique adds coziness and comfort.
  An openwork seat for a hanging chair can be woven from thick cord
  Hanging chairs can be used as a cradle for a baby
The swing chair can rightfully be called one of the most simple models that you can do yourself. To create it you will need:
Having prepared everything you need, you can start making an unusual interior detail.
The resulting hanging swing chair can be additionally equipped with soft pillows, providing comfort.
For the manufacture of original model hanging chair you will need:
It will be useful for beginners ready-made diagram cocoon, which allows you to correctly calculate the dimensions of the future chair.
When manufacturing, follow the instructions.
To give additional comfort to the seat of such a chair, you can use a thick pillow.
You can braid the frame different ways. Beginners can use simple techniques that provide a firm base for sitting.
 Even beginners can cope with such weaving
  Various schemes weaving can be used to make hanging rocking chairs
  Using twig weaving you can create a dense base for a chair
To create a nest chair that will become an exquisite decoration for your apartment or garden, you need to prepare the following materials:
Wrap the hoop used as a base with strong twine, securing every tenth turn with a knot; this will prevent the cord from unraveling.
To create the bottom, you can use a variety of crochet techniques. To make such a seat you will need from 120 to 160 m of cord. The exact quantity depends on the knitting pattern chosen.
For this version of a hanging chair you will need:
Having prepared the cords of the required length, proceed to attach them to the hoop.
If it is necessary to create a fringe, the length of the threads should be increased by about a meter and, at the end of the work, do not cut the remaining cord.
Additionally, equip the resulting structure with reliable slings and a soft cushion.
Attaching a hanging chair can be done in different ways. One of the options - ceiling mount on the hook. The finished product, hung in this way, can swing in different sides, however, moving it to another part of the room is very problematic.
This method can only be used if there is high-quality concrete floor or when coffered ceilings allowing fastening directly to the beams.
No less popular is mounting to a stand, which can be purchased in specialized stores. This design is equipped with circular platforms that provide stability. The chair on the stand can be easily moved around the apartment and even taken outside.
Another option is axial fastening, which allows you to fix the structure between the ceiling and the floor. This method is suitable for decorating children's rooms.
If the ceiling in your home is not reliable enough and is hollow, you can install a hanging chair using a chemical anchor. This method involves injecting a polymer paste into the ceiling cavity from a syringe, after which the product is installed.
Simple options for making a hanging chair at home are available even to novice craftsmen. Unusual designs decorate the interior, give the room originality and comfort. Good luck with your work and have fun creating!


