How to hide heating radiators in a private house. How to hide a battery - easy and simple! Selecting screens. Make a seating area above the radiator
Transform the radiator by making it into a false fireplace, sleeping area. Battery decoupage, decorative screen will turn this heating device into a work of art.
DIY decorative radiators

There are several ways to transform this
heating device, This:
- decoupage;
- painting;
- decorative screens;
- pasting;
- camouflage behind a false wall.
Painting a battery is one of the most
simple ways to update it. Moreover, now there are new methods that will allow you to achieve interesting effects.

With such an interesting bronze tint, it will end up looking like an object made of a noble metal. Before you begin the conversion work, you need to prepare:
- gauze;
- latex gloves;
- acetone;
- black and red paint in a can or gold paint in a spray can.
If the battery has not been painted before, it must first be treated with an alkyd primer. If there is rust on the heating device, it must be removed.

Next, the surface to be treated is degreased with acetone; you can also use
blowtorch. If you want to paint the battery so that the paint goes on in a thin layer and evenly, take a rectangle of fur, fold it in half, and stitch the two sides. You will get something like a bag. Put it on your hand and have fun painting the battery.
To get a beautiful bronze color, you need to mix black and red paint. If you wish, when decorating the battery, use spray paint.
If you have artistic abilities, then transform this heating device by drawing something suitable here. Look how nice these pencils look, each of them is made on a specific section of the battery.

If you have a modern radiator, turn it into a small piano by drawing the keys here.

If you want to cheer yourself up, then use paint in several colors. To create smooth transitions, you can mix color additives with white paint and change the consistency. So you will get lighter and more
dark shades the same color.

This option and the other are suitable for those who are not confident in their artistic abilities. Draw white and black stripes on the protruding parts. Cut out a tail from cardboard, paint it, stick it in place and you have a zebra. If you want to go even further, make the head of this animal out of cardboard or plastic, decorate it, and attach it to the side of the battery opposite the tail.

If you have
modern battery, which is time to update, then take:
- acetone;
- stickers;
- scissors;
- soft cloth.
Degrease the surface of the washed and dried battery with acetone, then attach the selected sticker to it. If it is large enough and matches your idea, then use the entire sticker.

This is how the heating radiator is decorated. You can turn it not only into
blooming oasis, but also into a cozy fireplace.

Perhaps for some the radiator will become an imaginary cellar for storing wine.

This way you can decorate the battery in the nursery using large or small stickers.

But if your heating radiator is made of cast iron, this method of transforming it may not be suitable, since the surface is uneven and voluminous. In this case, it is better to repeat the following idea.
You can use stickers that will turn the battery into musical instrument. If you have an unnecessary button accordion whose bellows are torn, you can make another creative idea, glue one and the second part of the keyboard to the radiator.

Battery decor using decoupage technique
This option is also suitable for those who have long-lasting cast iron batteries. Here's how to do decoupage in in this case. Take:
- decoupage cards;
- acrylic paints;
- sandpaper;
- decoupage varnish;
- PVA glue;
- brush;
- light enamel.
With help
sandpaper Level the surface of the battery, but do not try to remove the entire layer of paint. Now you need to wash the radiator and wipe it dry. The next step is to paint it with white enamel.

Enamel has a strong specific odor, so work in a ventilated area. It's even better if you cover your breathing organs with a respirator.
While the enamel is drying, open up the decoupage cards so that each piece covers part of the radiator. After the paint has dried, glue the prepared parts using PVA mixed with water.

If you want, leave the painted fragments (not decorated with a blend) light, cover them with white
acrylic paint. You can use the same shade as in the picture; in this case, blue acrylic paint was used. Once any of these solutions are completely dry, coat the radiator with 2-3 coats of varnish, allowing each coat to dry.

You can use napkins for blending and decorate a heating device with them.

For this purpose it is taken only
upper layer with a pattern, glued to a pre-painted, dried battery. After the glue has dried, to secure the decoupage, you need to cover the radiator with a couple of layers of varnish. But you need to choose one that can withstand the intense heat of the heating device.

If you want to give the batteries a chic look so that they look like antique ones, then use a self-hardening mass and a stencil to apply a design. Then cover with paint. Such stucco molding will adhere firmly to the battery, as it adheres well to similar metal surfaces.

The next type of radiator decoration is making a screen for it. Moreover
decorative panel you can buy, there are some that are inexpensive, and make a box for it with your own hands.
Making a screen for decorating a battery
Before you start making it, prepare:
- waterproof plywood 2 cm 2 mm thick;
- paint;
- a slab of painted plywood, fine wood chips or edged boards;
- connecting elements measuring 50x32 mm made of pine;
- brackets;
- wood glue;
- screws;
- wooden corks dowels.
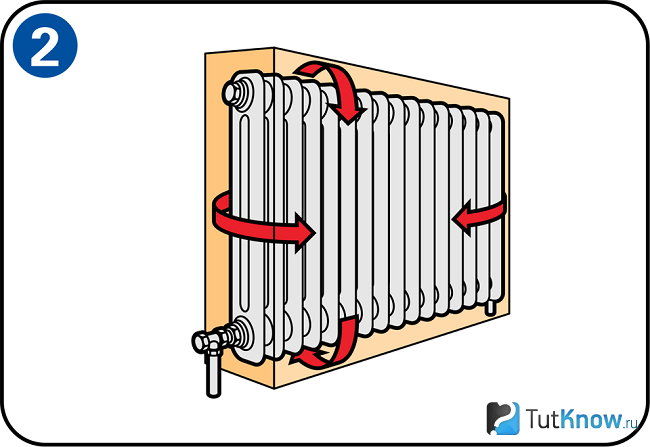
First, determine the dimensions of the battery by knowing its height, width and depth.
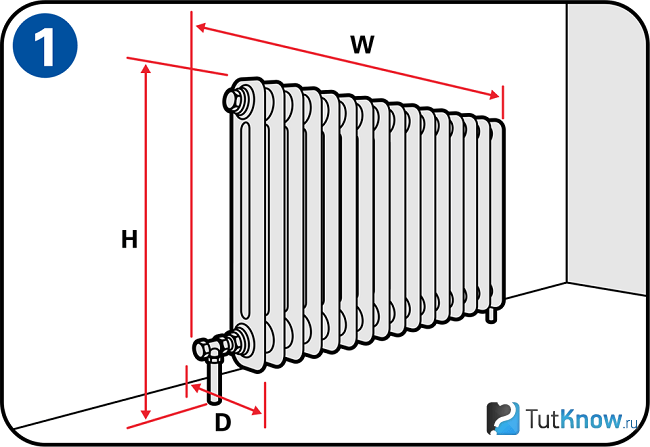
To prevent the room from becoming cool during the heating season, when installing a screen, it is necessary to ensure that warm air circulates unhindered. To do this, space must be left between the battery and the screen.
Determine the size of the panels. You already know the width of the radiator, and if its height, as in the figure, is 72 cm, you need to add 8 cm for air circulation, so the height of the vertical panel will be 80 cm.

If the radiator has a temperature control, or a pipe fits here, then you need to determine where these components are located in order to then make cutouts in the screen edging at this place.

Now you need to attach connecting elements, which act as bars, to the vertical wooden sides using wood glue and wooden plugs or screws.

Attach the top panel to the sides.
If you make the front panel yourself, then use a horizontal strip 18 cm wide and two vertical strips, each 12 cm wide. They are attached to each other using holes and dowels.

Look in more detail at how panels need to be prepared for this. First, mark with a pencil where the end holes will be located. In another board you need to do them at the same level. Pour wood glue here, insert wooden plugs into the holes on one side first, then attach the second board. To ensure the attachment point is secure, carefully pull the two boards together by lightly tapping first one, then the other with a rubber mallet.

In the same way, you will attach the four horizontal crossbars using dowels and holes. Please note that 60mm wide gaps are left between the cross members for air circulation. You can make adjustments to these parameters or make the screen for the battery more elaborate, for example, by stuffing slats here in the form of a sheathing.

You have determined in advance where you need to make cutouts in the sidewalls. Using a drill attachment, complete this part of the job. To make the hole more even, after cutting it with a hole saw, you need to process it with a hacksaw.

To install the battery screen, you need to provide it with support bars. First, they are fixed inside the screen at the top. Then you need to determine the location of the support strips on the wall, above the battery.

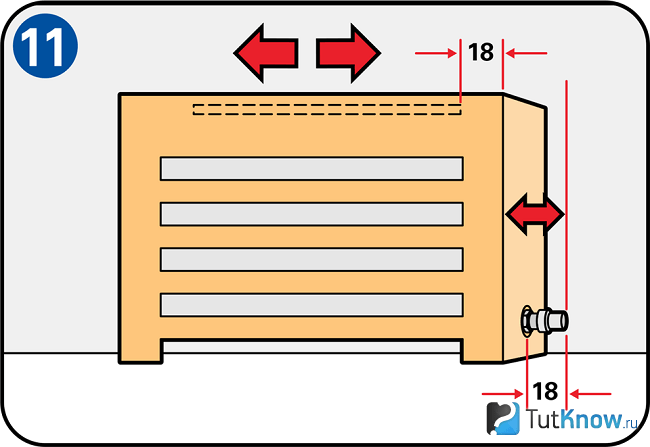
Determine the length of the support bar, do not forget to leave room for the tap that regulates the temperature. If it is located on the side, then leave a distance of at least 18 cm so that the support bar can move freely. If you wish, you can use a magnetic one instead of such a mount.
If you assemble the box yourself, and you already have a decorative panel, then the screen for the radiator may look like this.

Should I buy a false fireplace or make it myself?
This question invariably arises among those who want to create an atmosphere in a city apartment country house. At the same time, you can “kill” two birds with one stone, not only create such a piece of furniture, but also hide an unsightly battery. Not everyone has it under the windowsill; for some, this heating item is mounted almost in the most visible place in the room.

See how such an unsightly sight can be turned into a cozy, almost fairy-tale corner. To do this you will need some materials, these are:
- plywood 9 mm thick;
- wooden layout;
- bars with a cross section of 50 mm;
- self-tapping screws;
- fragment of a garden fence;
- construction glue gun;
- decorative plastic panel, where brickwork is shown;
- furniture stapler;
- stain;
- polyurethane skirting boards;
- putty;
- fine sandpaper;
- acrylic paint;
- brush;
- long lamp;
- bath stones.
All this will really help
magical transformation, because very soon instead of an unsightly radiator you will have an imitation fireplace.

Mark the location of the front part of the fireplace. Cut a rectangular hole in the center of the plywood.

Using a furniture stapler, attach a decorative panel to the center of the portal, trim it with a wooden layout, attaching these elements to a glue gun.

Paint
furniture board stain, when it dries, attach it with self-tapping screws as a shelf on. Glue the polyurethane baseboard to where the plywood meets the floor and to the top. If they do not hold well here, then additionally secure them with self-tapping screws. You will cover these places with putty; when it dries, carefully go over it with fine sandpaper.
If it happens that there is no putty on the farm, you can replace it with sealant or liquid nails. After these dry soft materials, you need to make the surface even with sandpaper.

Now paint the fireplace portal with the first layer of white acrylic paint, when it dries, apply the second.

To simulate a fire, place a long lamp in the firebox so that you can plug it into an outlet. Nearby, closer to the viewer, you need to put stones for the bath. All that remains is to attach one more element - this is part of a decorative garden fence, in this case, it will serve as a metal lattice. In this case, you can even use a plastic fence, covering it with metallic or golden paint.
This is how unusual and very stylish a DIY battery decor can be.
This option is suitable for those who have a lot of heat in winter. It will not be cold in such a room, the radiator is closed, but warm air will escape through the rear side openings. But if the boiler room does not work at 100%, in the cold season without hot battery there is no way around it, then don’t close it almost completely, as in the option presented above. The following idea will suit you.
To implement it you will use:
- drywall;
- metallic profile;
- self-tapping screws;
- drywall knife;
- putty;
- acrylic paint white and golden;
- sealant in a tube;
- construction gun;
- polyurethane skirting boards and glue for them.
Manufacturing instructions:
- As in the first case, cut a hole in the drywall sheet. Make a base from a metal profile, attach a plasterboard blank to it using self-tapping screws. From the same material, make a rectangular shelf that will become the top of the false fireplace.
- In this part you need to connect the front and top elements by gluing here polyurethane skirting boards in front and two small ones on the sides. These same parts need to be attached between the floor and the sheet of drywall below.
- Put the sealant in the construction gun, feel like a real sculptor, as now you will make various monograms on the top of the fireplace. If something doesn’t work out, remove the excess before the composition hardens. The end of the extruded strip will be straight if you simply trim it with scissors.
- Allow the sealant to dry thoroughly. Now paint the fireplace portal with white acrylic paint in two layers. When it dries, take a thin brush and use it to paint the monograms with golden paint. If you want to decorate the top of the fireplace, you can use a laminate board for this.
- Of course, the battery must also be painted in a suitable color.

By making a fireplace portal from plasterboard, you can show your imagination. The inner hole does not have to be cut rectangular; it can be of a slightly different shape.

If desired, you can not only decorate the battery, but at the same time turn this part of the room into
comfortable table or a cat bed. After all, these animals love to take a nap in the warmth and lie on the windowsill.

To implement this radiator decoration option, take:
- thick sheet of foam rubber;
- thick fabric;
- drywall;
- polyurethane ceiling plinth;
- drywall saw;
- acrylic paints;
- metallic profile;
- self-tapping screws
Next follow these instructions:
- Assemble from a metal profile rectangular base, using self-tapping screws, attach it on the sides to the wall, on top to the window sill, and on the bottom to the floor.
- Now, again using self-tapping screws, you need to attach a sheet of drywall to this metal base, of course, you first need to cut out windows of this size or smaller ones in it. On top part drywall, you need to glue the baseboard, and then paint this decorative element with white acrylic paint.
- Cut a sheet of foam rubber to the size of the window sill, sew a cover on it from thick fabric. Insert a zipper on one side so that this part of the mattress can be removed and washed. You can also make rollers from foam rubber. To do this, you need to connect the small edges of the rectangle and roll it up. A pre-sewn cover is placed on top.
This area of the room can also be turned into a table.

If you attach shelves made of wooden planks to the side, then you can store newspapers, magazines and other small things here.

Here's how, if you wish, you can decorate the battery, turning this not always attractive element into an object of your joy and pride.
If you want to see a few examples of converting a radiator and window sill into a sleeping place, bench, table, then watch the following video collection.
If you want to carefully study how to decoupage a battery, then the next review is especially for you.

No matter how modern the batteries are, they rarely fit perfectly into the interior, which does not benefit the appearance of the apartment. Let's figure out how you can decorate or hide the battery to improve the situation.
Hide behind the screen
The easiest way is to hide the battery behind a special screen, which can be made of different materials(wood, metal, plastic and even glass) and is made in different styles. Glass screens can be decorated with photo printing, which will further integrate the battery with the interior of the room. The main condition is that the surface of the screen must be completely perforated or at least have large holes on the top, bottom and sides, allowing warm air to circulate freely.


The screen covers only the battery itself or the niche with the battery completely, which is typical for old houses; it's possible do it yourself by purchasing from hardware store any grill or panel with holes of suitable size.
Photos: grishaenkova.ru, pricedv.ru, jacekpartyka.com, home-designing.com, bertibarbera.com, furnirior.com, pinterest.com, ofdesign.net
How to beautifully close the battery in a room with your own hands? In this article I will share with you tips on how to do it correctly and beautifully. What are the options and which is the most suitable? We will consider all the materials for casing the battery and the tools required for this. I will tell you about the stages of work, what needs to be done. After reading this material, you can easily close your radiator, which will make the room even more beautiful and modern. The article also contains useful videos materials.
Very often, when completing renovations, people are faced with a situation where the appearance of the room is spoiled by a battery. However, many are afraid that closing it will lead to loss of heat in the house and therefore leave everything as it is.
However, there are technologies and materials that will help not only avoid heat loss, but also give the room completeness and beauty.
Selecting material for battery casing
Today there are the most various options and materials to Beautiful sew up the battery.
According to the features of the closing structure, experts identify the following: decorative finishing groups:
- hinged screens with a lid. You can beautifully close cast iron batteries;
- hanging screens without a cover. With their help it is also possible finishing cast iron batteries;
- flat screens. They can be used to cover modern radiators. In such a situation, the radiator is located deep in the niche;
- side box With its help, you can completely hide not only the heating device itself, but also the place where it is mounted.
Radiators can be finished with the following materials:
- metal;
- plastic;
- glass;
- tree;
- drywall.
Because everything larger number Since people prefer to use drywall for repairs, it is also used quite often for covering batteries. Moreover, you can sew up the battery with plasterboard yourself.

Drywall in terms of finishing heating devices has gained such popularity due to its advantages:
- environmental friendliness of the material. Finishing interior space this material is completely safe;
- plasterboard sheets have excellent physical and mechanical properties, so they can be used both in the room and in the bathroom or kitchen;
- low price;
- ease of installation. You can easily make a screen with your own hands;
- the opportunity to realize any fantasies for interior decoration.
When working with drywall, the following options for closing radiators are possible:
- box The fastest and easy way. The finishing of the battery in this case exceeds its dimensions on each side by 12-29 cm;
- building a plasterboard wall in front of a heating device. A more expensive and time-consuming method.
The choice of design designed to beautifully close the battery should be made based on your own capabilities and desires.
Tools and materials required for work
To make a plasterboard box yourself, you need to have the following tools with you:
- building level;
- drill with screwdriver attachment;
- screws and dowels;
- metal knife;
- perforator;
- pliers;
- tape measure and pencil;
- ruler-corner.

In addition, to beautifully close the radiator you will need the following materials:
- plasterboard sheets. Can be used both ceiling and wall;
- metal profiles having a U-shaped section;
- putty.
Once the material and design option have been selected, the work itself should begin. First of all, you need to do the final preparation of the battery, which consists of painting it. Since after the finishing is completed, this procedure will be impossible to carry out.
When the paint has dried, you can begin marking. Let's look at this procedure using an example plasterboard box. To do this you need:
- measure all parameters of the device. Measurement accuracy is up to a centimeter. The exception is for projects that require precision down to millimeters;
- Since the box is small, its depth and width are determined by the dimensions of the radiator. Remember that you need to make a minimum distance of 10 cm from the edges of the device;
- taking into account the position of the box, you need to draw a horizontal line;

Note! All markings should be made using a level. Otherwise, create an even and correct design it will be very problematic.
- if the box will stand on the floor in a room or kitchen, then you need to draw three lines: two on the sides (depth) and one that will connect them (the front edge of the structure);
- A square should be placed on the bottom edge of the device and vertical lines should be drawn along the wall at right angles. They should be brought up using a level;
- Above the battery, these lines must be connected with a horizontal segment.
If everything was done correctly, then at the end of the marking you will get a rectangle or square (depending on the length of the radiator). If the box will be on the floor, for example in the kitchen, then the markings on it should reflect its base.

When making a decision beautifully close radiator plasterboard wall in order to hide the pipe, markings are made in the following way:
- The markings are drawn from the floor to the ceiling. Vertical lines are marked on the wall. The distance between them is half a meter or a whole meter. Don't forget to use a level;
- The vertical line is extended to the floor using a corner. The distance between them depends on the planned distance from the battery;
- similar markings are made on the wall. Lines are drawn strictly opposite to the floor lines and parallel to them;
- then we draw two lines above and below the radiator. In this case, you need to retreat 10 cm;
- Lines for the profile are also drawn on the right and left sides of the heating device.
Stages of installation work
Finishing the battery with plasterboard (or any other finishing material) with your own hands is possible only after finishing preparatory work. When the markings are ready, you can begin mounting the profile frame. To do this you need:
- first you should attach the profiles, which should be located on the walls;
- Marks are made in the wall with a screwdriver, and the required holes are drilled along the entire length of the profile using a hammer drill. Dowels are inserted into them;
- The profiles are pressed to the holes and screwed with screws. Fasteners must be installed every 15-25 cm;
- Then, by analogy, you should attach the guides that are adjacent to the wall;
- after this you need to install the profiles into the depth of the structure. To do this, they should be cut into suitable lengths and attached to long guides that run vertically;
- We connect the profiles at the top and bottom with long segments.

After creating the frame, you can begin attaching the material. Finishing with plasterboard sheets involves the following actions:
- we apply the sheets to the profiles and make marks in the places of the cuts;
- cut the sheets into the required pieces;
- We attach them to the frame with screws. The interval between them should be 10-15 cm;
- To create smooth and neat corners, you should use an aluminum corner and putty.
Upon completion installation work plasterboard box is ready for final finishing. It can be painted, wallpapered or tiled.
Installation of a plasterboard wall frame involves the use of longer profiles that will run vertically. In all other respects, installation work is carried out in a similar way.
You can sew up any heating device using drywall yourself. To do this, you just need to correctly mark and install. Thanks to this, your battery will be hidden from view, while it will continue to heat the room as before.
source: https://gipsportal.ru/montazh-i-svojstva/chem-zakryt-batareyu-v-komnate.html
Closing the gypsum board battery quickly and securely
Sewing a battery with plasterboard is actually as easy as shelling pears; a simple process will take 4 hours at most. By giving preference to gypsum boards, you get their main advantage. Drywall is an incredibly convenient material; it is easy to install and bends easily. Therefore, making a box of the desired shape for the radiator will not be difficult. Below is a simple method describing how to cover a battery with plasterboard.

You can cope with this task yourself, the main thing is to have it on hand necessary tools and materials, then the installation process will not take much time.
Preparatory work
So, in order to cover a radiator with plasterboard, you need to correctly mount the frame from the profile. To do this you will need the following Consumables:
- metal profiles UD and CD (the differences between these profiles are that one of them is used as a guide, and the other as a stand);
- dowels;
- self-tapping screws;
- screwdriver;
- putty knife;
- putty;
- metal scissors;
- decorative lattice;
- level;
- roulette;
- pencil;
- directly the gypsum board itself.
You can use a wall sheet of plasterboard or use the ceiling sheet left after renovation, it all depends on the size of the structure itself, as well as on your personal preference.

Stages of work performed
Structure of a plasterboard sheet:
- First, make markings on the floor, so you will determine the location of the UD profile. You will need to step back 40 mm from the wall, because the thickness of the plasterboard is 12.5 mm, and the width of the profile is 27 mm.
- According to the markings, it is necessary to sew a guide profile along the entire perimeter of the opening, this way we will get a finished frame for the future design. Professionals advise fastening with self-tapping screws and dowels, maintaining an interval of 15 cm.
- CD profiles are vertically inserted into the frame on both sides of the radiator, which must first be cut with metal scissors in accordance with the required height from the floor to the window sill. Make sure that the profiles are located strictly at the specified level. Fastening to the frame is best done with self-tapping screws of the “seed” type.
- If the distance from the installed CD type profiles exceeds the distance to the wall by more than 60 cm, then you will need to install additional vertical guides.
- Next, you will need to install guide profiles horizontally above and below the batteries. This way you will have a finished frame around the entire perimeter of the radiator, which can be safely sheathed with plasterboard.
- After the frame is completely covered with gypsum plasterboard sheathing, feel free to proceed to the final stage of installation work - puttying and painting the surface.
- Install a decorative grille that masks the radiator.

Helpful tips when working with drywall:
- When purchasing gypsum boards in a store, it is best to choose waterproof drywall. Remember that you have to finish the area in the apartment that is most at risk of flooding.
- If after repair you have a sufficient amount left wooden slats, they may well become a worthy replacement for a metal profile during frame installation.
- Do not under any circumstances allow the window sill board to protrude from under plasterboard construction, otherwise this may lead to disruption of air convection, that is, to blowing warm air and to unpleasant appearance condensation on the windows. Moreover, if the window sill board overlaps the battery by more than 50%, this leads to an increase in the likelihood of condensation on the windows.
- Material for decoration heating radiators can be more than just a decorative grille. Here everything depends on the personal preferences of the owners themselves. So, for example, in addition to the well-known wooden fences in Lately began to be used metal constructions made of chrome and of stainless steel. These designs are perfect for a high-tech interior.
- If you want the drywall seams not to be noticeable, then chamfer along the entire edge of the gypsum board being installed. Their size will depend on the way you putty the seams. If you use reinforcing tape, then the chamfer is removed at an angle of 45 degrees. If you plan to putty without using serpyanka, then the chamfer angle is 20-25 degrees. A special edge plane will help you easily remove the chamfer.
- Before you start puttingty, use a primer; it will allow you to get better adhesion between the gypsum board and the putty mixture. Do not forget also about the places where the screws were screwed in and the corners.

And choosing paint for finishing finished design, it is also best to purchase heat-resistant. Since the heating season is long, paints may lose their brightness or, even worse, crack.
source: //www.vashgipsokarton.ru/konstrukcii/zashit-batareyu.html
Many, during repairs, strive to beautifully cover the battery with plasterboard. This is primarily due to the unaesthetic appearance of the batteries. It is very difficult to come up with and implement a successful design solution that could make the part of the room in which this element is located attractive. That is why owners are increasingly deciding to cover the radiator with plasterboard. This solution obscures the radiator from view and does not harm the heating system in any way.
In order to cover the battery with plasterboard, you will have to build a special plasterboard box. Anyone can make a plasterboard box for a battery on their own. This solution will not only cover unsightly heating pipes, but will also decorate the room if you choose the right design.
What will be required during the work process?
In order to create a box for a plasterboard battery, you will need the following:
- Screwdriver;
- Hammer drill (as well as a six-centimeter drill);
- Scissors cutting metal;
- Roulette;
- Level;
- Pencil;
- Stapler;
- Knife (stationery and preferably with replaceable blades).

How to sew up a battery with plasterboard without materials? That's right, no way! You will need the following:
- Twelve-millimeter plasterboard sheets;
- Metal profiles;
- Serpyanka;
- Perforated corner;
- Self-tapping screws for metal;
- Self-tapping screws for drywall;
- Dowels.
And also, you probably want to decorate the structure after hanging the battery on the drywall. For decoration, of course, additional materials will be required.
Let's get started
The first condition for installing a plasterboard box is that the window sill should be three centimeters or more away from the battery. If the distance is too small, the window sill will have to be repositioned to achieve the desired distance. If this becomes necessary, cut out the window sill the right size, insert it under the window frame and fill it with foam from the base to the window sill. Place a weight on top for three hours. After this, you can begin installing the box.

Wall marking
Before proceeding with installation, it is necessary to carry out preliminary markings. It is worth remembering that a plasterboard box is a small structure and should not occupy half the room. Its parameters depend only on how large your battery is installed. Minimum distance from the edge of the battery to the edge of the box should not exceed ten centimeters. This is the shortest distance that allows you to install a removable screen on the front of the box.
What is markup for? Many people do without it, however, the markings will allow you to more accurately install the frame. Drawing markup is divided into three main stages:
- Draw a horizontal line starting from the position of the future structure. If the bottom of the box does not reach the floor, retreat the required distance and use a level to draw this line. If the bottom of the box is in contact with the floor, then you will need to draw three lines. Two of them will be located on the sides and indicate the depth. The third connects the first two and points to the edge of the structure.
- Using a square, draw vertical lines on the wall. Place the tool on the bottom edge and draw lines along the wall at right angles. To bring the lines to required size, you will have to use a level.
- Draw a horizontal line that will connect the vertical lines. You need to run this section directly above the battery along the wall.
After finishing the marking, you will see that you have formed a square or rectangle, depending on what shape your battery. If the structure touches the floor, then you need to draw the base of the box.

Installation
After the necessary preparatory work, you need to start creating a frame from metal profiles. You need to install profiles on the wall, floor and window sill. To secure the profile, press it against the wall with your hand and use a hammer drill to drill a hole in the profile and in the wall at the same time. You need to install a dowel in the resulting hole and secure the structure with a screwdriver.
You also need to install a profile under the window sill, but now you will have to use metal screws. The length of each screw should not exceed the thickness of the window sill. When you have installed the profile to the base and under the window sill, install the jumpers.
As a rule, by covering the battery with plasterboard, a screen is installed - a kind of decorative grille. Decide where the future screen will be placed and frame it with a size slightly smaller than the lattice parameters.
After finishing work with the frame, you can proceed directly to plasterboard covering. Drywall is a material that is very easy to process. And in such work, this parameter is simply necessary. An ordinary stationery knife is enough to cut a plasterboard sheet and cut out a shape of the desired size. This is done quite easily, but after cutting there is a lot of dust left. Therefore, you should not cut plasterboard sheets next to expensive furniture.
Drywall pieces can only be screwed to the structure with a screwdriver and nothing else. Theoretically, you can do without a screwdriver if you put a Phillips bit on the drill. However, this is terribly inconvenient, so if you do not have a screwdriver, it is recommended that you purchase one before starting to work with drywall. Even after the renovation is completed, it is unlikely to be found master, which will not need a good unit, so you don’t have to spare money on tools.
After you finish the box itself, you need to start installing the perforated corners. Secure them at the corners of the structure. There are two ways to make the mount. You can simply attach the corners with a stapler, or you can directly glue them using gypsum plaster. Which method suits you best, decide for yourself.
You will find that there are many seams left on the structure, which will significantly interfere with further design processing of the box. Apply sickle tape to each seam and then use gypsum plaster again to seal the seams.
After this, you can start designer finishing boxes But before you begin this step, you need to do some preparation. The entire plasterboard box must be puttied, treated with sandpaper and a deep penetration primer.
Decor
Plasterboard sheets form a surface that is very easy to finish with any material. They are smooth, which allows you to glue wallpaper or paint the box without any problems. Simple painting- This is the most popular method of finishing plasterboard boxes.
Often two or more colors are used for painting. The choice of paint completely depends on the interior and design of the rest of the room. It is extremely important that the box does not stand out from the overall style.
Various patterns applied on top of already painted drywall look very interesting. It all depends only on your imagination. If you wish, you can even disguise the battery as a cabinet.
Even if you didn't find any original design solutions, which could beautifully fit a plasterboard box into the interior of the room, you can always simply hide the structure by connecting it to the window sill. The box will simply look like part solid wall, without standing out at all.
When an unsightly heating radiator spoils the interior, there are several ways to solve the problem: replace it with a designer or in-floor model, or simply cover it with a screen/box. The latter method provides several advantages:
- A screen or box not only hides a bulky structure, but often decorates the room.
- The screen/box can be used to build an additional console, a shelf for decoration, a bench, a rack, or a desktop.
- A closed battery is safer for children - there is no risk of burns or accidental impacts. However, one can argue with this argument, because it is in the children's room that heat loss is least needed.
In a children's room, the radiator should be covered with a nice grille with big amount holes, for example, carved as in this photo
- If the house is too hot and dry, then closing the radiator will help create a comfortable microclimate for household members, their pets and plants.
- The screen prevents dust from settling in the inside of the radiator and thus simplifies cleaning.
There are also disadvantages:
- The heat transfer of a closed battery decreases on average by 10-15% or more (depending on the degree of closure);
- Screens and boxes often make it difficult to service radiators, and sometimes even block access to them.
- Often, improperly closed batteries lead to fogging of windows, and then to the appearance of harmful mold on slopes and walls.
- The screen or box, at least a little, “eats up” the space around the radiator. After all, any elements should be installed at a distance of 5-10 cm from the battery.
- Battery fencing requires additional expense and hassle.
How to cover radiators - 11 ways from a plasterboard box to a fabric screen
1. Decorative screen/box made of HDF
This option is one of the most popular due to average price and beautiful appearance.

What is the difference between a box and a screen? The screen is designed for a battery located in a niche or under a window sill (pictured above), therefore, it covers only its front part. The box completely covers the radiator on the wall from all sides.

The screen, like the box panel, is made of perforated HDF sheet (high-density fiberboard 3 mm thick), but the box profiles are made of MDF. Both materials are quite strong, durable and non-toxic when heated.
Advantages:
- Due to the original perforation, HDF screens/boxes look beautiful and fit into any interior, especially to classic .
- Heat resistance (the structure does not dry out like natural wood and does not turn yellow like plastic).
- Easy to assemble and install without the help of specialists.
- Ready-made HDF screens/boxes can be white or imitate wood (wenge, beech, oak), and custom-made ones can be painted in any color, laminated, veneered natural wood. True, the complexity of the design always affects the price of the screen.
Flaws:
- MDF and HDF do not tolerate prolonged contact with water. If the battery leaks or a pipe breaks, the elements of the box/screen may swell. Therefore, any emergency situations must be resolved immediately.
- Perforated panels, despite their thinness, are quite durable due to the high density of fiberboard. However, they must be protected from impacts and sharp objects.
- Perforation sections in factory screens are not painted and are therefore visible.
Price: from 1500 rubles for a finished model and from 2300 rubles for an individual order.
Selection tips:
- The size of the radiator niche must correspond to the size inside screen.
- Screens and boxes for batteries can be either ready-made (assembled like a kit) or manufactured according to custom sizes and design (you can choose a perforation pattern).
Here is a small selection of photos of closed batteries.

Closed battery in the interior of a small kitchen in Khrushchev


2. A plasterboard box
How to cover a battery with drywall? Using this material, you can cover the radiator with a box or create a niche for it in a false wall.


Advantages:
- Environmental friendliness;
- Can be used in damp areas;
- Material available;
- With a false wall you can cover the pipes and expand the window sill;
- You can close the battery with a plasterboard box with your own hands without special skills in a few hours of work;
- You can think through the configuration of the box and false wall yourself, if you wish, equip it with shelves and niches, and additionally cover the pipes connected to the battery. Next, you can look at a photo of a closed battery in a plasterboard false wall with an enlarged window sill-bench and a built-in niche for books.


Flaws:
- The main disadvantage of a plasterboard box is that this material is afraid of shocks and leaks. If something goes wrong, you will have to completely change the battery casing along with the finishing.
- A false plasterboard wall for the radiator and pipes “eats up” the space, as it is placed 30-35 mm forward from the extreme point of the radiator.

- As a rule, a frame made of HA must be made at the renovation stage, because its finishing must coincide with the finishing of the walls.
On the following photos can see finished interior kitchens with closed battery and a plasterboard box in the process of renovation.


Design and Manufacturing Tips:
- Before covering the radiator with a plasterboard box, be sure to put it in order: blow it out, wash it (this is done at the end of the heating season) and paint it. In the future, doing this without dismantling the box will be difficult or even impossible.
- The box can be installed on the floor or “hang” on the wall.
- When designing the box, keep in mind that the window sill canopy must protrude above the front of the box by at least 30 mm. If necessary old window sill should be replaced with a wider one.
Visual instructions on how to cover the battery and pipes with a false plasterboard wall are presented in the video below.
And here is a video tutorial on how to cover a radiator with a box.
3. Furniture
In the kitchen, the battery along with the window sill can be built into a set or bar counter, and in the living room, bedroom and hallway - into a bench, console or shelving unit.


This slider presents a selection of photos of closed radiators under the bench.

- The main condition: in the window sill/lid above the battery you need to provide enough holes for air circulation, and the facade (if there is one) covering the battery must be equipped with a grille (see photo below). Otherwise, there is a risk of windows fogging up and cold in the room.


Sometimes, to hide a heating radiator, it is enough to rearrange the furniture and cover the device, say, with a sofa, armchair or console. In order not to disturb the air circulation, it is better to place the piece of furniture away from the radiator (at least 10 cm), it is also advisable that it stands on legs - this way convective flows will not be blocked.

4. Fabric curtain
This method of disguise is good for rented housing or when you need to solve the problem of ugly batteries with minimal costs. The advantages of the curtain are obvious: a piece of fabric is inexpensive, and the choice of colors is very large (you can change the “screens” according to your mood), while the battery always remains available for repair and inspection.


5. Natural wood screen
Advantages:
- Beautiful and expensive appearance even in the simplest version;
- Environmental friendliness;
- Good heat dissipation and ability to accumulate heat.
Flaws:
- Wood is capricious - poorly prepared wood can swell from a leak or warp from heat;
- A wooden screen requires special care;
- High price.
Prices: from 3,000 rubles for the simplest models and from 10 thousand rubles for premium wooden screens.
Here are some photos of beautifully sealed batteries.


6. Glass screen
A glass screen is an excellent decorative solution, but from a thermal engineering point of view it is very controversial.


Advantages:
- Design for every taste - the glass panel can be transparent and colored, matte and shiny, with or without a sandblasted pattern, with beveled or polished edges;
- Glass can look neutral or very bright;
- Glass visually looks light and adds airiness to the interior;
- Ease of care;
- Strength;
- Durability;
- Heat resistance;
- Moisture resistance;
- Absolutely environmentally friendly.
Flaws:
- More suitable for modern rather than classic interiors;
- “Eats” up to 40-50% of heat (infrared radiation);
- High price;
- Fingerprints may remain on the glass;
- The panel does not cover the ends of the battery;
- Screen installation most often requires the help of a specialist.
- The battery shield must only be made from tempered glass. This is the only way it will be absolutely safe and shockproof.
- Glass screens are good for use in rooms with excess heat.

7. Metal box
Advantages:
- Practically do not interfere with heat transfer;
- Low price;
- Easy care;
- Absolute moisture and heat resistance.
Flaws:
- “Office” appearance that will not fit into every interior.

Selection tips:
- A metal screen for a battery can look very nice if you order its production from a company specializing in laser cutting metal or forging.

8. A rattan box or screen
Most often, rattan fabric means a mesh made of artificial rattan woven from cellulose-based fibers reinforced with nylon thread. Artificial rattan is very similar to natural rattan, but unlike it, it is more practical and can be painted in any color. Screens made from natural rattan have natural beauty and durability, but they cost twice as much and are much more difficult to find on sale.

Advantages of a rattan screen:
- Environmental friendliness;
- Beautiful view;
- Strength;
- Elasticity;
- Good heat dissipation.

Flaws:
- The weaving of artificial rattan is quite dense, which can affect heat transfer;
- The screen must be protected from water.
Prices: from 1,700 rubles (artificial rattan screen).
Rattan fabric (both artificial and natural) can be used to make a battery screen with your own hands. To do this, you need to assemble the box with the frame at the corners, attach the mesh to the inside of the frame, then install the box on the radiator using brackets.
9. Hinged metal screen
The metal structure consists of a cover and a screen and is hung on top of the battery without fixation.

Advantages:
- Easy installation;
- Simple dismantling, which facilitates radiator maintenance;
- Profitable price;
- Durability;
- Does not reduce battery efficiency.

Flaws:
- The ends of the battery remain visible;
- Almost always, suspended screens are grilles without any decoration.
- There must be high-quality enamel that does not scratch;
- It should hold tightly and be easily removed;
- The screen metal must not be subject to corrosion.
10. Curtains to the floor
Masking the radiator with curtains – great idea, approved by both heating engineers and decorators. The only problem is that it won’t be possible to hide the battery under the window behind a curtain without shading the room. Unless you hang very light tulle like in this photo.

Ability to independently change the panel size;
Suitable for kitchens, bathrooms and toilets, that is, rooms with high humidity;
Affordable price.

Flaws:
- It looks simple, no frills;
- Over time, the plastic may turn yellow;
- When heated, low-quality plastic can release toxic substances, such as formaldehyde.
Prices: from 300 rubles.
Selection tips:
- Plastic battery screens are available in basic colors: white, gray, brown, beige. If desired, the screen can be painted in the desired color with alkyd spray paint for plastic;
- When choosing a plastic screen for a battery, make sure it is heat-resistant and non-toxic.
How to close batteries correctly - technical rules and tips
Before closing the radiator, you need to take into account several technical nuances:
- Keep in mind that heat transfer closed radiator is reduced in any case, no matter what method of masking you choose. The main thing is that the change is not significant. Ideally, the decrease in air temperature in the room should be about 1-1.5 degrees.
- Before closing the battery, put it in order: blow it out, wash it (this is done at the end of the heating season) and paint it.
- Keep in mind that the denser the grille weave, the better it masks the radiator, but the worse it conducts heat. Therefore, when choosing a screen for a battery, try to look for a middle ground or rely on heat saving.
- To minimize heat loss, the screen can be placed on legs and a groove can be cut in the center.

- When closing the battery, it is very important not to block convective air flows, otherwise it will blow in the room and the windows will begin to fog up, which will ultimately lead to the appearance of mold on the walls. Ideally, the window sill visor should protrude no more than 30 mm above the radiator; the top and bottom of the radiator should be as open as possible.
- There should be a distance of at least 35-50 mm between the battery and the screen. There should be a gap of about 60-70 mm from the radiator to the floor and to the window sill.
- For solutions emergency situations It is necessary to provide free access to the radiator. For example, the box grille can be removable, folding (see photo), opening on hinges or sliding out on profiles.

At a minimum, for trouble-free maintenance the following must remain in good accessibility: pipe connections, valves, thermal head and threaded connections.
- You can increase heat transfer by 20-25% by placing a heat-reflecting screen, for example, fumisol, on the wall behind the radiator. Often this is quite enough to completely compensate for the heat loss of a closed battery.
It may leak and will have to be replaced or repaired. Therefore, it is better to choose designs that are easily removable. It is advisable that they do not have a fixed mount. Overlays with a folding door and a retractable mechanism are suitable. At a minimum, valves, pipe connections, thermal head and threaded connections should remain accessible in case of breakdown.
Second important point associated with the amount of heat entering the house. Any box reduces it. Especially if it is deaf, completely closed at the top or has a tight weave. It is better to choose something more open and not place the heater too deep. To do this, you can put a solid screen on the legs and cut a groove in the middle.
Another way to compensate for heat loss is to install a heat-reflecting screen behind the battery. For example, polyethylene foam.
- Before closing, prepare it: wash it, blow it out.
- The distance between the masking structure and the heating device should be 35-50 mm.
- The minimum gap between it and the floor is 60-70 mm.
The preparatory stage consists of cleaning and purging the heating device, as well as collecting tools. List of what you will need for work:
- GKL sheets 12 mm thick.
- Pencil.
- Tape measure, ruler, level, corner.
- Liquid nails, screws, dowels.
- Metal profiles in 2 sizes: 27*28 and 60*27.
- Screwdriver, hammer drill, screwdriver.
- Construction mesh with self-adhesive surface.
You can mask the entire wall or just the part under the window sill. The box is installed in the floor or leaving a gap above and below it. When marking, you need to take into account that the edges of the structure must protrude beyond the battery by at least 10 cm.
- Make markings on the wall.
- Attach the profile to the lines, make marks for the holes in increments of 15-25 cm.
- Drill holes and attach the 27*28 profile, and then the 60*27 jumpers.
- Mark the drywall and cut it stationery knife, attach it to the frame with self-tapping screws.
- The seams between the sheets are filled with putty and mesh. and paint.
- To reduce heat loss, craftsmen recommend drilling as many holes in the surface as possible.
Another, visual instruction for covering gypsum boards in the video.
Painting
One of the simplest ways to design a radiator. Suitable for cast iron and steel panel structures. Modern models Aluminum will be difficult to paint. You will have to apply many layers, and the result will be unattractive. You can make them monochromatic, choosing a shade to match the interior, contrasting, or create beautiful drawing. In this case, stencils from art stores and decoupage techniques will help.
Water-dispersed, acrylic and alkyd are suitable for work. All of them are resistant to high temperatures. Acrylics dry faster and hardly emit unpleasant odor. Alkyds, on the contrary, are distinguished by caustic fumes. Water-dispersed compositions do not have this drawback, but they are less durable, wear out quickly, and scratches appear on them.
There are hammer paints for metal. They create a heterogeneous texture with a chasing effect. This good option, if you need to hide various defects old surface: chips, cracks.
You need to start painting with preparatory stage:
- Clean the surface from dirt. Dust settled inside is washed off with a brush and a spray bottle.
- Remove previously applied paint. This is done with a washing solution, a drill with a brush attachment, or construction hairdryer- it melts the layer and can be removed with a spatula.
- Buy two small brushes: straight and curved for the inside of the heating device or foam roller for panel radiator.
- Almost does not reduce heat transfer.
- It can be changed frequently depending on your mood or new renovation.
- Eat fast access for heating in case of an emergency.
The last plus is that lightweight fabric does not look as bulky as drywall, metal, wood, or MDF. The only negative is that this design is not suitable for apartments in a minimalist, high-tech or classic style.


.jpg)


