Plastic bottles are waste that regularly appears in homes. Food and cosmetic bottles from bathrooms go into trash bins in large quantities. However, with imagination and free time, you can make decorations for your home and garden from discarded items. Crafts from plastic bottles- a simple, cheap method to diversify the look of your home or summer cottage.
At first glance, there is no connection between crafts made from waste materials and the environment. But many people know that plastic takes about two hundred years to decompose in the ground, and greatly pollutes the environment. It requires special processing.
Unfortunately, a small number of Russian houses have introduced a separate waste collection system, therefore, few people have the opportunity to sort household waste. Using plastic bottles as a creative material reduces local environmental damage. Garbage that would otherwise take hundreds of years to decompose and pollute the soil can, in the right hands, be transformed into beautiful or functional objects, such as plant greenhouses, gazebos or garden furniture.
The volume, shape and color of PET bottles depend solely on what kind of craft they are going to make from it.

Sculptures made from plastic bottles in the shape of animals can serve as a beautiful decoration for a garden or playground. Crafts in the shape of animals are easy to make; the choice of animal depends only on the imagination of the creator.
Creating the body of animals is practically the same in technique. The methods for creating other parts of the body (ears, tails, paws) change, which allows the author of the craft to show ingenuity.
The volume depends on the size of the animal. Using the example of a craft in the form of a pig, you can analyze the technique of creating any garden animals.

To make a pig for garden plot, you will need the following materials:
Description of the stages of creating a craft step by step:
Additionally, you can attach legs to the pig from necks, glue or draw eyes and a snout.
Other animals are made in a similar way. plastic canisters and bottles. If you wish, you can create a whole menagerie in the garden.

Plastic is a malleable and easy-to-handle material; various toys, decorations, and useful things can be made from it. You can find it on the Internet a large number of creative ways to use it, many of which you can repeat yourself. This doesn't require any special creative skills.
Liter plastic bottles make a good base for children's toys. Crafts can be made in the simplest way, simply by painting the bottle with paints or camouflaging it with clothes and decorative details.

Crafts in the form of such dolls are made from the neck of a bottle and old clothes. The neck is trimmed evenly and the edges are lightly scorched so that they become even and smooth.
The head and arms of the doll are made from a white piece of cloth stuffed with cotton wool or foam rubber. For the hair you need floss threads, which are carefully sewn into the base of the head.
A dress is sewn from unnecessary things and placed on a plastic base. The head and arms are attached to the dress.
Details of the face are painted on fabric, embroidered with satin stitch or other decorative elements (beads, beads) are used.

Palm trees are an exotic decoration for Russian summer cottages. They will become a spectacular addition to the landscape. To make a palm tree craft, you need a very large amount of brown and green containers. If they are not in the required volume, then you can paint transparent plastic blanks.
When there are many empty bottles of the same size, you can build a greenhouse or gazebo on your summer cottage.
The advantage of a plastic greenhouse is that it fulfills its main functions: it retains heat well and does not allow seedlings to freeze.
First they line up wooden frame, and then the bottles are placed on thin poles so that they fit tightly to each other and do not allow cold and moisture to pass through.

A gazebo is built in the same way, in which recyclable materials are used for the walls, roof and decorative elements.
A good New Year's craft would be a lantern made from a plastic bottle. They can be made in a variety of colors, shapes and sizes, and all you need to create is a base, paint and a safe candle. Such lanterns will create a festive atmosphere in the apartment.
Using real candles in plastic lanterns will create a fire hazard.

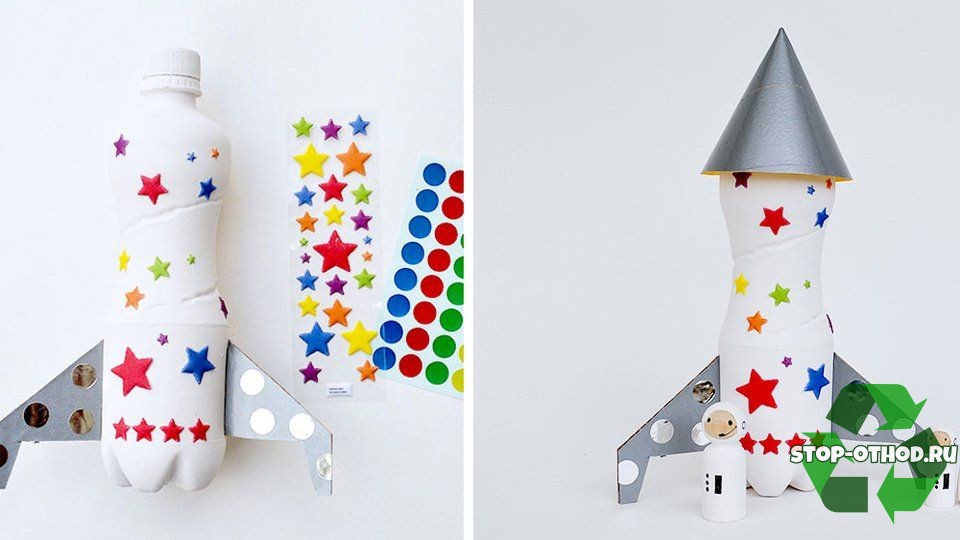
Many children dream of becoming astronauts, so you can invite them to make a rocket out of a plastic bottle with their own hands.
The process of making the craft is simple. The base is a whole bottle of milk or yogurt. You can paint it, wrap it in foil, decorate it with stickers, add supports and a top made of thick colored cardboard.
Crafts on the theme fire safety often asked to bring younger children school age as homework on life safety. You can make a fire extinguisher from a plastic bottle.
You will need a two-liter container, red paint, a sprayer and a piece of hose.
The cover is replaced with a sprayer and the product is painted red. The hose is attached to the sprayer.
When the paint has dried, for realism, you can stick the instructions for use on double-sided tape, which can be found on the Internet.

Cones made from plastic bottles will become beautiful decoration for a street Christmas tree or apartment in winter.
For one bud you need one two-liter bottle of brown or dark green color.
The plastic center is cut along the seam and placed under a press overnight so that it does not bend into the pipe.
On the straightened plastic sheet draw “layers” of the cone. They are shaped like flowers with five rounded petals. In each layer, a hole is made in the center with a hot awl, and in the smallest layer - two.
Taking the layer with pliers, you need to hold it over the fire for several seconds until the plastic begins to bend inward. The sections must be melted in the same way.
Starting with the largest one, the layers are strung on a wire, a bead is secured on top and pulled back. Beads are strung on the ends of the wire dark brown and fasten it into a loop.

Foreigners love to buy nesting dolls as souvenirs when leaving Russia. You can make crafts with your own hands from plastic flasks and bottles. The most important thing in the process is not the shape of the material, but the subsequent painting of the plastic base in the traditional style.

Another easy-to-make decoration is an angel. The figures look light, airy and create a Christmas atmosphere. For this craft you will need transparent plastic bottles, scissors and markers.
The plastic base is folded in half, the outline is drawn only on one half. The figure is cut out along the contour and straightened. The angel becomes symmetrical and stable.
All edges are carefully burned with a candle so that they become smooth, without burrs.

Crafts in the shape of butterflies are made using similar technology. By creating butterflies from plastic bottles, you can endlessly experiment with the shape of the wings and color.

The helicopter is assembled from a small bottle, several plastic straws and a ping pong ball. You can assemble such a craft from waste material very quickly, and then paint it at your discretion. The blades are glued together, and the runners are attached to a stapler.

Large bottles wrapped in gift paper make beautiful Christmas tree decorations. No skill is required in making such crafts; you just need to wrap the bottle in paper and tie it at both ends.

IN Everyday life there are many things that can become excellent materials for creativity. If you have a pile of unused plastic bottles, don’t rush to throw them away. With their help, you can create amazingly beautiful things that will become a wonderful element of home decor, decoration of a cottage or yard. DIY crafts made from plastic bottles will help you have a fun time; small children will especially enjoy this activity. See below for master classes with photos that will show you step by step the creation of such original things.
It's amazing how many products you can create using ordinary plastic bottles. Together with your child you can make fairy-tale heroes– Cheburashka, Crocodile Gena, Winnie the Pooh, Piglet, Frog Princess. The figurines of birds look original - storks, wood grouse, pigeons, swans. Crafts from domestic animals and wild animals, such as a cat, a dog, a parrot, a penguin, a donkey, a squirrel, and a pig, look great.
You can place these things in the kitchen or in the nursery, or decorate the yard outside. Not only decorative, but also functional crafts can be used to decorate your home. For example, a beautiful plastic vase will be useful for storing bouquets - dry or live, and you can plant them in an original pot houseplants. For your summer cottage, you can make figurines of animals and plants, cars, rockets, and a lake made of bottles will surprise guests at home and become a true work of art. Read on to learn how to make crafts from plastic bottles with your own hands.
Plastic bottles are an unusual and a budget option, which will help summer residents decorate their plots. The original exterior will definitely be appreciated by loved ones who come to visit and neighbors. Looks beautiful and stylish tall palm tree, for which you will need ordinary brown and green containers. What materials are needed to make a southern tree:
How to do:
How to make an original palm tree, watch the video:
A child who goes to kindergarten enjoys his surroundings: beautiful places for games, new toys. Crafts made with plastic bottles can be a wonderful decoration for the interior of a kindergarten or street. If you want to surprise the kids, make a beautiful baby elephant. What materials will you need to create an interesting decoration:

How to do:
A beautiful swan will be a wonderful decoration for a children's playground or your own summer cottage. This bird, which is made using plastic bottles, looks beautiful and original. Children will definitely love this figurine, which serves decorative element. What materials will you need to create a beautiful white swan:

How to do:
A Christmas tree is a tree that is traditionally purchased before... big holiday. But if there are a lot of green plastic bottles left at home, there is nothing difficult in making a budget-friendly original version on one's own. In addition, this tree’s needles do not fall off and it can stand for a long time. What materials will be needed to make wood:

How to make:

A beautiful cat vase will be a great decoration room interior. You can use this element to store various small items or plant beautiful plants there. Cacti, ivy, and succulents look good in such a pot. Small children will love making this original cat. What tools are needed to create an interesting decoration:

How to make:
The beautiful peacock is a bird that symbolizes happiness, fulfillment of desires and nobility. Such a figurine, placed on a summer cottage, will bring good luck to its owner. A peacock requires painstaking and serious work, so it will take a lot of free time to make it. What materials are used when creating a wonderful bird:

How to create a craft:
Watch the video for more details:
Children will absolutely love the creation beautiful crafts- butterflies. An easy master class will help even the little ones create an original figurine. The craft can serve as an element of interior design or as part of a painting. You can make a lot of butterflies different shapes to decorate a child's room with them. What materials will you need for this master class:

How to make a craft:
For more details on how to create a craft, watch the video:
Decorative flowers will be a wonderful decoration for your home. You can create sunflowers, daisies, roses, and other plants. An easy master class with photographs will help you easily make original decoration. Decorate boxes, baskets, shelves with them or make unusual picture. What elements will be needed to make an original craft:

How to create a craft:
A flower bed using plastic containers is easy to create. This material will help you make budget and beautiful design For garden plants, fencing them off from the lawn. The craft will not take much time, and the result will delight you with its originality and beauty. What materials will you need to make a simple flowerbed for garden plants:

How to do:
See the video for options for such flower beds:
It can be difficult for beginning needlewomen to create original craft based on pictures alone. For this experienced craftsmen rent for free interesting videos, where they describe step by step the stages of creating a particular figurine. Illustrative examples will help you repeat all the actions of the presenter and make beautiful things using plastic bottles. In the following master classes you will learn how to make a hedgehog, a rag doll, daisy flowers, an autumn bird feeder, a crocodile, mushrooms, and how to decorate a dacha with corks. Watch interesting videos from detailed description all actions:
When creating crafts, it is important to get ideas that will help you make truly interesting and beautiful things. Many people make unusual products with plastic bottles, and then take pictures of them with a camera. A variety of decorations for your home, yard or cottage, made by craftsmen, will help you choose your own option or come up with something new. See many photos of crafts made from plastic bottles.
Useful tips


7. Lift the fabric and thread the string through it.


You can also make a good and very useful holder from a plastic bottle. mobile phone. You need it when you urgently need to charge your phone, you find an outlet, but there is nowhere to put the phone.
Prepare a 0.5 liter plastic bottle and pierce a hole with a knife to further cut off the unnecessary part of the bottle.
Using scissors or stationery knife cut a circle for the fork.

All that remains is to insert the cord from the charger and plug into the outlet.

You will need:
50 plastic bottles (volume 0.5 l)
Flower wire
Regular wire
Bulb
Spray paint
Glue (preferably a glue gun)
Scissors
Stationery knife
1. Prepare plastic bottles and remove labels from them.

2. Cut each bottle into the shape of a flower (see picture). To do this, use a stationery knife.

3. Spread the "petals" of the flowers.

4. Once you've completed steps 1-3 with all 50 bottles, it's time to paint them. Use spray paint, or you can take a little more time and paint each flower with acrylic paints. You can choose any color. You can also vary the colors by making some flowers one color and others another.

5. Make a circle out of regular wire. Wrap the jute and use a glue gun to glue it to the wire. You will have the base of the chandelier to which the flowers will be attached.

6. Using floral wire, attach each flower to the circle you made from the wire.

There are two ways to attach floral wire to a flower: wrap it around the neck, or glue it.

This is what the first layer looks like.

7. Repeat all steps to make several layers. In this example, 3 layers were made.
8. Use jute to attach the chandelier to the ceiling (see picture).

Simply make holes in the cap of a plastic bottle with an awl or nail.


1. Prepare a plastic bottle. Rinse it off hot water with soap and leave to dry.
2. From colored cardboard, cut out details such as ears, eyes, snout and nostrils.
3. Use glue or double tape to attach all the parts.
4. Wrap the bottle with patterned paper.
5. For the legs, you can use empty spools that need to be glued to the bottle.
6. Make a cut at the top for coins.

You will only need one 3-liter plastic bottle in which to store your plastic bags.
Simply cut off the bottom of the bottle so you can slide the bags in, and the neck so you can carefully remove one bag at a time.

You can sandpaper make the edges of the bottle smoother.


You will need:
Plastic bottle
Duct tape(the width of the bracelet depends on the width of the ribbon)
Double-sided tape
Felt (or other material)
Scissors
Stationery knife
Decorations
1. First, wrap some adhesive tape around the bottle. Make several "rings" as shown in the picture. Everything needs to be done carefully and evenly, since it is the tape that will determine how smoothly you can cut the bracelet out of the bottle.
2. Using a utility knife, carefully cut off each ring.


3. Carefully remove the adhesive tape.


4. Glue double-sided tape to the resulting plastic bracelet.
An important advantage of plastic bottles is their accessibility. As a rule, this ornamental material becomes household waste after use. But the imagination and ingenuity of the craftsmen allows them to use containers to create:

Availability of material, correct fastening bottles between each other make such buildings reliable. For construction you will need a lot of empty containers. Therefore, the only drawback is that the bottles are released different sizes and flowers, it will take time to assemble the required number of identical containers.

According to their own physical properties plastic is a soft material, it is easy to process and cut without the use of special tools.

In addition, if a large number of containers are required, the master is involved in the resolution environmental problem. After all, plastic must be disposed of; picnic fields, roadsides, parks and squares are contaminated with bottles.

Using this material you can make many crafts. All of them are divided into categories, depending on their purpose. In addition to building walls, bottles are used to make furniture, plant pots, animal figurines, country fences and much more. In general, the quantity is not limited, as long as you have enough imagination and perseverance.

To make furniture you will need a lot of the same container. Such furniture is not inferior in convenience to ordinary furniture. All that is required from the master is some tape and scissors.

The seat for the chair is made of bottles connected in layers with tape. The back and sides of the chair are made in the same way.

Several layers of bottles connected together will make an excellent pouf.

To make the furniture soft and comfortable, some of the air is released from several containers.

Another option is a table. Four bottles will serve as legs, and the tabletop can be made of plywood or fiberboard, which is covered with a tablecloth.

The interior decoration of the house can be complemented by making a plastic vase and flowers. To do this you need to cut correct form petals, the stem of the flower can be a wire covered with paper. To give the petals the desired shape, you can heat them and curl the corners using tweezers. The resulting bouquet is placed in a plastic vase. If you equip the bouquet with diode bulbs, you will get an excellent lamp for a children's room.

Fastening is carried out using glue, a stapler or bends.

Very often, large plastic containers are used to make pots for flowers and seedlings. IN in this case there is no limit to imagination. You can make a hanging pot or place it on the windowsill. The edges of the trimmed container are cut into small strips and subsequently curled.

Bottles are also used as containers for seedlings. This allows you to grow greens in the cold months of the year on balconies or greenhouses.

You can make a bird feeder from plastic containers. To do this, cut a hole above the bottom of the bottle so that the bird can get in and peck the food.

The plastic container also serves as a trap for small rodents. Having filled the container with poisoned grains, it is placed in the corner of outbuildings and at the roots of trees. And by filling the bottle with sweet water, the container will become a trap for wasps.

A country washbasin can be made in a very simple way. To do this, you need to completely or partially cut off the bottom of the container and hang it upside down in convenient location. The bottle cap will serve as a kind of tap.

To make a cosmetic bag, you need to connect two bottle bottoms with a zipper. This craft will be an excellent storage for women's accessories.

In addition, in the same way you can make a lot of things: piggy banks for money, a case for glasses, clasps, beads, etc.

Crafts for New Year's decoration Houses. You can make a lot of unsurpassed things from the material: from garlands to Christmas balls and figurines.

By cutting a strip of plastic container into several identical round strips, you can get a transparent ball. Fastening and decorating the ball is carried out:

You can make a snowman or Santa Claus from shaped bottles. The container is covered with paper or cloth, and eyes and mouth are painted with varnish or paint.

Curtains and drapes made from plastic bottles – unique look crafts made from this material. Such products will decorate the house, terraces and summer cottages.

There are several options:

Flower beds made of plastic are, of course, inferior to living plants. However, they make up for their lack in early spring and late autumn.

The master's ingenuity allows him to recreate lilies of the valley, tulips, roses, and daisies. For bouquets of such flowers you will also need suitable pots filled with sand or earth. You can often see an artificial flower flaunting on a bed of living plants. This solution is practical and decorates the site.

In addition to flowers, the interior of a summer cottage will be perfectly complemented by palm trees, artificial trees, and animal figurines.

The improvement of children's playgrounds is of great importance. And here there are no limits to the flight of imagination. Children are very fond of various kinds of fairy-tale characters, animals, as well as cars and motorcycles.

To make a bird you need:

Such an artificial bird can be located on a tree, among greenery on the ground.
All this will make the child’s time more cheerful.


Using plastic bottles to make crafts is a great solution. This material publicly available, easy to process, allows you to make unrivaled crafts that will delight the eyes of both children and adults. Skill, imagination and patience are the main factors that provide such a variety of shapes and purposes for products made from plastic containers.
From an ordinary plastic bottle you can form products that will be useful in playing with children, household, house interior. From simple material you can prepare a craft for kindergarten. Children can independently cope with basic manufacturing schemes with virtually no adult help. In addition to plastic bottles, you may need a glue gun, paints and scissors.
To make any craft from a plastic bottle, you need to prepare the necessary tools and materials:
Depending on the complexity and decorative finishes, they are selected Additional materials.
A craft made from a plastic bottle for home improvement is the best option in terms of price and quality. From raw materials you can make a variety of furniture, in particular an ottoman.
You will need the following tools and materials:
 DIY craft from plastic bottles: step by step production round ottoman
 Algorithm for creating an ottoman:
 DIY craft from plastic bottles: step-by-step production square ottoman
 Furniture of this type can be made in a few hours, it looks presentable, and the costs are minimal.
There are many options for creating flowers from plastic bottles.

The easiest way to create a three-dimensional flower:

Make a hole in the center of the bottom using a heated nail, awl or soldering iron. Thread a thick wire through it, which will become the stem of a plastic flower.
A craft made from a plastic bottle can become a strong, interesting and budget toy for a child of almost any age.
Several toy options:
| Apple-box | Octopus | piggy bank |
| Cut off the bottoms of two identical bottles. The height of each element must be the same and be more than 6 cm. Make a hole in the center of one of the parts with a hot nail. Cut a strip from the canvas of a green bottle, twist it into a tube - you get a stalk. Cut a leaf from the same strip.
Glue a leaf to the cutting and thread the tube into the hole in the bottom. Everything is fixed with a glue gun. If you insert one bottom into the other, you will get a full-fledged apple in which you can store small items. | Cut the bottle in half. Measure a distance of 5-8 cm from the cut. Divide the circle into parts, the thickness of each should be 1-2 cm. When cutting the plastic along the marks, strips are obtained. Tighten the elements using the blade of scissors.
Make eyes from the lids. Use a marker to draw the pupils, and then attach the blanks to the body of the octopus using a glue gun. Make a hole in the bottom and thread a thread through it. You will get a toy analogue of “Y-Yo”. | Choose a bottle with a wide bottom. Using a marker, draw nostrils on the lid and eyes on the bottle itself. Cut a narrow rectangular hole in the base of the body.
Make stable legs-stands from the lids, attaching the elements with a glue gun. Cut out ears from thick cardboard and glue to the base. |
You can make any toy from bottles by creating a mock-up of the product:
From plastic bottles you can create a house that will be a refuge for children in the yard, the basis of a sandbox.
You need to make preparations:
"Construction" algorithm:
The roof is made using the same principle. The ceiling can also be made flat using a wall manufacturing algorithm. By changing the direction of the “strings” on which the containers are strung, windows can be made.
A craft made from a plastic bottle can be a completely functional doll that you can play with.
List of tools and materials:
Manufacturing technique:

You can make a more complex doll model using other auxiliary materials.
It is easy to make a parrot or an owl from plastic containers, since the silhouette and manufacturing principle are identical.
Preparation:

Manufacturing algorithm:
The ovals are laid out in a specific pattern. When making an owl, the eye circles are first formed, then the rest of the head is filled in. A parrot's feathers are distributed evenly throughout its body - from top to bottom. The lids make eyes.
A two-tier flower bed made from plastic bottles is neat, compact and at the same time roomy.

Manufacturing technique:
The flowerbed is ready for planting. The structure can be further strengthened with natural stone, brick, and tiles.
To make a birdhouse, it is better to take a 5-liter plastic bottle. Additionally, you need to prepare scissors and a glue gun.

Manufacturing Features:
You will get a full-fledged house, the “entrance” to which is through a wide neck.
A craft made from a plastic bottle can be a bird feeder.

Simple manufacturing option:
Grain is poured into the bottom; birds can get inside the feeder through the windows.
For creating plastic palm tree you need to collect more than 100 brown and 100 green bottles, prepare a construction stapler.

Manufacturing technique:
At the end, the crown and trunk of the palm tree are assembled. The parts need to be connected tightly - it is advisable to use wire. In order for the barrel to stand, you need to thread the workpiece with a metal pin.
A child can make a toy or craft from plastic bottles preschool age, which is relevant for all kinds of competitions in kindergarten.
Worth choosing simple options and work patterns so that the child can do everything at once, minimizing help from adults.
Choose containers for yogurt or milk. It is desirable that the lid be orange and the container itself white. Cut the bottle in half. Divide the base of the top of the bottle into 8-10 equal parts.
Cut into strips up to the neck. Round the edges and twist a little with the blade of scissors. Bend each petal towards the bottom. Screw on the lid.

Make a hole in the center of the twist by burning the base with a hot nail. Thread the wire and you get a stem. Cut out leaves from green plastic and glue to metal base glue.
Take 2 identical shaped bottles. Cut one in half - leave the part with the bottom. Cut off the larger half from the second, leaving only the lower part. Connect the blanks, fastening them with glue.

Paint the form with black paint, the bottom with any other paint. Use white paint to paint the base for the front part. Form the muzzle. Glue a thread pompom to the colored bottom. At the transition point, tie a ribbon that will act as a scarf.
2 green containers will come in handy. From the first, cut off only the bottom and the hard part of the neck. Glue the edges of the smaller cut. Cut off the dense part of the bottom and top from the second container. At the narrowing point, cut half the bottle lengthwise.


Cut out 20 triangles from white paper. Make eyes out of colored paper and fix on the base. Glue the elements along the cut. Connect the bottles together. At the bottom of the mold, glue 4 lids - these are paws.
Paint a small bottle yellow, form black stripes along the entire “body” of the bee. Glue decorative eyes to the lid. You can draw with a marker. Cut out a medium-sized oval (wings) from a transparent or brown bottle.

Attach the manufactured parts to the base of the container. Make legs from narrow strips cut from the same container as the wings. Make a hole between the wings through which you can thread a thread - such a detail will allow you to hang the insect.
Cut out the soft part from the plastic container, forming the canvas in the form of a rectangle. Select a butterfly stencil according to the size of the base. Place the plastic base on the stencil, secure the components at 4 points with clothespins or office clips. Trace the outlines with a marker, transferring the design onto the plastic.

Place the sketch on the board and cut out the shape using a stationery knife along the contour. Additionally, you can cut out some parts of the wing pattern. You can use nail polish to paint the product along the marked lines. To add shine, you can use sequins, beads and rhinestones.
Prepare 20-25 brown plastic containers. A transparent base will also work, which will then have to be painted over. Cut all parts in half. Make a fringe by cutting strips to a tight place in the neck area.

Assembling is done - insert the bottles into each other. On the first container draw the eyes of the animal. The plug represents the animal's nose. You can place an apple made from bottles on the “needles”.
Select a table tennis ball and a container whose diameter will be the same as that of a sports equipment. Additionally, you will need cocktail straws, glue, scissors, and a safety pin.

Procedure:
Glue a tail, which is made from cocktail straws, onto the lid. A model of this part of the helicopter can be made based on a real aircraft.
The matryoshka doll is made using two techniques - working with plastic containers and papier-mâché. Select the maximum shaped container. Glue pieces of white paper dipped in PVA glue onto the surface.

Cut off the tough throat. Seal the hole using the same principle as the base of the bottle. When the base is dry, smooth the surface with a damp brush. Paint the blank according to the sketch of the matryoshka doll. You can use gouache or acrylic paints for these purposes.
Prepare 2 containers – 2 liters and 0.5 liters. Cut off the bottom from the larger one and paint it with red paint. Make white dots. Treat the smaller container with white paint. Cut a rectangle out of paper and form a fringe on one side.

Glue to the middle of the white bottle. Fix the “cap” of the fly agaric on the white stem. You can make an additional fly agaric of smaller sizes and glue it to a larger element.
From a plastic bottle you can make not only jewelry or children's toys, but also functional products that are relevant in everyday life.
Item options:


The craft can be decorated decoratively by using paints, rhinestones, beads, glass stones, beads, and ribbons. Elements can be attached to a plastic bottle by using a construction stapler or a glue gun.
Article format: Natalie Podolskaya
DIY craft from a plastic bottle - video instructions for making:


