Cork flooring has become widespread relatively recently. However, the popularity of cork flooring is growing: manufacturers are developing and offering full-fledged, relatively inexpensive substitutes for solid natural cork veneer, and laying a cork floor with your own hands is accessible to a person who has basic home repair skills.
However, cork floors cannot be installed everywhere. Therefore, before purchasing material and getting to work, you should understand what a cork floor is, and, especially, what its advantages and disadvantages are. Otherwise, expensive material and painstaking work may go down the drain.
The cork floor has excellent springiness and is not slippery even with a protective coating. It handles the load well, including regular alternating loads. Provides excellent sound and heat insulation. Absolutely environmentally friendly and harmless: over the entire centuries-old history of using cork, no signs of its impact on health have been noted.
However, there are also significant disadvantages of cork floors. In addition to the high price, it is fragile and quite difficult to install with glue. Without skillful hands and an accurate eye, it is better not to take on an adhesive cork floor.
Further, the coefficient of thermal expansion is high, even for wood. In addition, the cork swells greatly if the water contains dissolved organic matter. As a result, the cork absorbs well and firmly holds the smell and color of impurities. Perhaps you have an old one lying around somewhere wine stopper– try to return it to its cylindrical shape, remove the color and smell from the part that was in the bottle.

As a consequence of the above, cork flooring is short-lived in any room with variable temperatures: the cork will soon begin to crumble due to thermal deformation. Therefore, the answer to the question whether it is possible to install cork flooring in the kitchen, balcony and hallway: only cork laminate with a protective coating, and even then it is not very desirable.
As for the toilet and bathroom - cork floor There is a clear “no” here. Even if you and your guests use the services absolutely carefully during the most riotous fun, all the same, from fluctuations in temperature and humidity, microcracks will soon form in the cork covering, through which moisture will pass, and then peeling, most often in hidden places: under the baseboard or under the bathtub where water vapor stagnates.
Cork does not have antiseptic properties; it is a biologically neutral material. Therefore, if you find and open such a “bump”, under it you will find disgusting-looking mucus, the contents of which, under a microscope, immediately cause a microbiologist who is not indifferent to his work to faint.
However, there are types of rooms where cork flooring is highly recommended, and others where it is completely acceptable:
Laying cork on the floor can be done not in two ways, as is often written, but in three different ways:
The technologies for laying floating cork flooring and adhesive flooring are fundamentally different. But the requirements for preparing the premises are the same. The tool used is also special.
It is necessary to lay a cork floor in the warm season, so that the temperature difference during delivery from the seller’s warehouse to the room does not exceed 5-7 degrees. It is also desirable that the air humidity in the room under the floor should not exceed 60%; humidity of 75% is no longer acceptable during installation.

To lay cork flooring, you will first need a rubber carpenter's hammer (mallet). Then - a hand-held circular saw or jigsaw with a circle or a “clean cut” file, very fine-toothed. From any hand saw the cork will crumble along the edge. For an adhesive floor you will need a rolling roller - similar to a paint roller, but metal, heavy, and small, 20-30 cm, but an accurate level.
Planks cork laminate for a floating floor you will have to correct and level it. Spacer wedges for this will need to be made from its own scraps - the wooden ones will crumble the cork. Also the rule for fitting is trimming cork board, which is rested against the adjusted one and adjusted by lightly tapping rubber mallet. You cannot use a hook clamp to tighten cork laminate.
From additional materials You will need a special plinth for the cork floor, which is attached to the wall. It is impossible to make cork floors in doorways, so special thresholds will be required. For an adhesive floor - special glue and also a special spatula for its application: wide, fine-toothed.
A small but important device for laying glued cork flooring is a can of canned vegetables or coffee with a quick but tightly closing lid. You will need to keep a rag moistened with solvent in it - a lot of small shreds. Use a rag to wipe off glue drips. Outside of a tightly closed container, it will dry quickly, but if it is abundantly moistened, it will ruin the coating.
Any cork floor must be laid on a flat, smooth and dry surface. A leveled concrete screed is not enough - it is rough. The traffic jam “plays” when you walk on it or roll a chair. Concrete in this case acts as an abrasive; Cork, on the other hand, is a soft material and can be quickly wiped clean even on an adhesive layer.
Cork flooring especially does not like wet underlying surfaces. The point here is not only and not so much that the adhesive connection will be weak, but that the cork will swell. Because of this, a “bump” is formed somewhere, described in the section on the bathroom, and with the same contents. Therefore, before laying the cork floor, the base must be leveled and dried.
Concrete floors need to be checked for moisture before installation. To do this, the room or part of it, but not less than 2 sq.m., is covered for a day plastic film, approximately a rectangular piece, not a strip. If after a day no moisture has settled on the underside of the film, you can begin final leveling. If not, you need to dry it some more. Numerous complaints that a solid floor at 60-80 euros per square week became stained and swelled after a week can be explained by the base being too wet.
Note: moisture can pass from neighbors below. Therefore, immediately inspect the “bare” floor carefully and seal all the cracks; especially near heating risers.
The base floor under the cork is leveled with a liquid leveler. Dry leveler (layered composite of soft material between two layers of plastic film) is not suitable: cork is harder and more fragile. A stiletto heel or chair leg can cause a cork floor on such a base to crack.
(More about wet screed for leveling the floor)
Even the cheapest cork floor is not a cheap pleasure, and its reliability and durability greatly depend on the base. Therefore, we can recommend before the traffic jam, the cheapest, even substandard:
If linoleum, laminate or are already laid on the floor, then it is better not to touch them, and lay the cork on top.

A floating cork floor can be inlaid with whole piece veneer or large parts thereof, and cork laminate. The first two options are the prerogative of a team of at least two well-working professionals. Independent attempts of this kind end in the breakdown of the expensive coating: the price of cork veneer increases rapidly as the size of the piece increases.
Laying a floating cork laminate floor is done as follows:
How good an adhesive cork floor will be depends largely on the adhesive. Coating manufacturers each recommend their own, but the best must be recognized as adhesives without volatile aggressive solvents - “Cascoflex” and the like. They are non-toxic and take the longest to dry (5-10 minutes); this is enough to fit the tile or board. But such adhesives are expensive, so the question is often asked: Is it possible to lay cork flooring on PVA?
You cannot lay a cork floor on liquid PVA: this glue is water-based, which is contraindicated for cork. You can let the PVA dry until it is tacky with pressure (15-25 minutes) so that all the water evaporates from it. But then each tile will have to be placed exactly in its place: it will not be possible to move it; it will immediately grab tightly. And liquid PVA can only be applied to one surface - the base floor, and this is a violation of gluing technology. And the air humidity will increase during operation. So, unfortunately, it is impossible to recommend laying a cork floor on cheap PVA.
Lay the adhesive cork floor like this:
Most cheap material for cork flooring – HDF (high density fiberboard), covered with pressed cork chips. But behind the “smart” foreign abbreviation lies the familiar fiberboard, which does not have the same properties as cork and “chemical” impregnation. Therefore, you can recommend HDF cork for flooring only in one case: if you want to cheaply tell your friends that you have a cork floor.
Cork flooring can be very good and useful, or very bad and harmful. It depends on whether it is laid in a suitable room for it. And only its decorative qualities depend on the price category of the material and the installation method.
Considering that the purchase natural material costs a pretty penny, laying a cork floor with your own hands will help reduce repair costs. Moreover, there is nothing complicated in the process if you follow the instructions. How to do it correctly - our article will help
Considering that buying natural material costs a pretty penny, laying a cork floor with your own hands will help reduce repair costs. Moreover, there is nothing complicated in the process if you follow the instructions. Our article will help you on how to do this correctly.
Before laying a cork floor yourself, familiarize yourself with the installation methods depending on the format of the covering. They are varied:
1. Solid fabric big size. Used in living rooms and halls. Thanks to its flexibility, solid cork veneer is easy to lay and secure. It is considered the most premium class, hence the price. Installed with glue.
2. Boards or floorboards with locking connections.  They use the “floating floor” technology. The base is not tightly attached to the bottom layer, which is why this option has good maintainability - even after dismantling most of the floor, the damaged floorboard is replaced and the covering is reassembled.
3. Tiles.  This form is placed on glue and can be used for any surface - floors, walls, ceilings. Small form Convenient for DIY installation. This is the cheapest coating due to its small thickness. Installation should take place in rooms with guaranteed low activity.
Depending on the characteristics of the room and your own budget, you choose the shape of the cork floor and the method of its installation. If hope for own strength– no, professional services are always offered. This is a guarantee of quality.
To flooring material served the owners for the stated period, it is necessary to comply with the requirements for the floor under cork covering. More details:
1. The rough base must be perfectly level. A difference is allowed for each square. m no more than 2 mm.
2. It is important to waterproof the cork floor underneath with a special material with perforations to drain condensate.
3. Do not lay the plug on an unpolished concrete base. Due to the pressure from above, the screed will rub the cork from below like sandpaper. A substrate is required.
Leveling the floor is not difficult - it is similar for laying all types of flooring.
So, the flooring has been purchased. Laying a cork floor with your own hands, the video tutorial below, should be performed in the following steps:
For quality work, you will need to purchase additional components and tools:
1. Substrate. Its types are numerous. 

 Based on the characteristics of the room, choose your own option.
2. Glue. Only specialized formulations offered for the material in the store.
3. Leveling mixtures for rough screed. If the floor is wooden, you need to peel it off and lay a layer of moisture-resistant plywood.
4. Tools for carrying out cement works: mixer, beacons, rule, level, reinforcing mesh.
5. Tools for laying cork: rollers, mallet, wide spatula, scissors or knife.
6. Measuring instruments – ruler, tape measure, square.
The main job is dirty. You need cleaning products and a lot of rags.
The old coating is removed. You can lay cork on existing linoleum or wooden floors, but over time they will not differ perfect condition. Therefore, they are torn off and the condition of the concrete screed is assessed.  Potholes and cracks, if they are small quantity You can seal it with mortar and then sand the areas. But if the damage is more than 10% of the entire area, this is a reason to prepare a new screed.
First, the entire surface is cleaned with a vacuum cleaner and moistened. Next, I prime for better adhesion with the new screed.
They select the selected height, set the beacons and place a reinforcing mesh on them. You can pour the solution prepared and matured for half an hour.  It is important to fill small areas and finish the job in one go so that there is no delamination.
The finished screed is left until it sets completely. It can be used after 2–3 weeks, after being pre-primed.
Before installation, it is important that the cork acclimatizes to the room. To do this, it is laid out in the room for a day, freed from packaging. Depending on the chosen shape and type of plug, installation work begins:
1. Lay the substrate. The sheets are overlapped and secured with construction tape.  The substrate is placed on the edges of the walls to compensate for the linear expansion of the material.
2. Mix the adhesive composition according to the recipe on the package and leave to mature. It's better to make a solution in small portions without allowing it to seize.
3. Work with a floating floor is carried out from the far corner of the room, laying boards in the same way as installing laminate flooring. Each floorboard is inserted one into the other, carefully tapped with a mallet.  Elements of adjacent rows are shifted relative to each other by 1/3 or half the length. That is, laying a cork floor - the video illustrates this well - proceeds like brickwork.
4. Working with canvas is different. First, the glue is smoothed with a notched trowel over the surface of the base. Then lay down a whole sheet, tapping the corners and middle with a mallet. Then smooth it with a roller.  The joints between the sheets are immediately wiped of glue - it can change the color of the canvas.
5. The tiles are glued in the same way as the canvas, with the only difference being that installation begins from the middle of the room, in a spiral.  You should always have a level at hand to correct the position of the next unit.
Complete setting of the finished surface occurs according to the adhesive instructions. Previously, it is prohibited to use the cork surface. If the experiment was a success, then carefully consider laying cork tiles on the walls - it is beautiful and unusual for the interior.
After the cork coating has set, a layer of varnish is applied to the surface several times.  It's all about the porous structure - it will absorb one layer of varnish like a sponge. The composition can be glossy, emphasizing the beauty of the patterns, or matte, making the cork warmer and more comfortable. Cork floors are often waxed, but then maintaining them is more labor-intensive.
Do not subject the surface to deformation. Wrap furniture legs in felt, introduce a ban on heels and street shoes, indicate a place for pets.
Take care of your cork every day. This way, it will get fewer defects and old stains in the future.
Periodically restore the canvas and boards - replace or sand the surface in a timely manner with mandatory varnishing at the end of the work.
Independent work saves the budget. This is an indisputable fact. If free time allows and you have the skill to handle the tool, go for it.
If you find an error, please highlight a piece of text and click Ctrl+Enter.
Bark balsa wood provides great design opportunities.
Materials made from it differ in color and texture, are easy to install and are not afraid of water.
Cork floors look stylish and do not require thermal insulation.
Cork is divided into the following types:
Video - features of cork floors:
The following materials are used for laying cork flooring:
To lay the floor, prepare the following tools:

Compact the soil, then create a crushed stone cushion and a concrete screed on top of it. These works will allow you to evenly distribute the pressure over the area and avoid pushing through the soil. For a crushed stone cushion, use material of a 15-30 mm fraction, laying it in a layer of 5-7 cm. After leveling, compact the crushed stone with a vibrating plate. Approach this work responsibly, because insufficient compaction will lead to the formation of cracks in the screed and after 5-10 years the floor will shrink.
For the screed, prepare a reinforced frame made of steel or fiberglass reinforcement with a diameter of 10-15 mm. Place the rods along and across the room. The distance between adjacent rods is 10-15 cm. To increase the strength of the screed, use double reinforcement: the first mesh is 2-3 cm above the surface of the crushed stone, the upper one is at the same distance from the top of the screed.
Fasten both grids with reinforcement bars of sufficient height to connect both grids and be supported on crushed stone. For pouring, use concrete made from cement grade 400 or 500. The ratio of cement and sand is 1:3, sand and crushed stone fraction 5-10 mm is 1:2. The time for complete hardening of the screed is 28 days. When pouring concrete, use pre-installed level markers. The thickness of the screed is 10-15 cm. After it has completely set, install a plywood backing on it or fill it with a liquid floor. Plywood underlayment is cheaper, liquid flooring is 10-20 times smoother.

Clean the screed from paint, traces of glue and mastic. Remove loose areas. It is advisable to treat the screed grinder for concrete - this procedure will avoid pouring an additional layer of concrete. Install beacons - wooden blocks or a metal corner or a hollow square. Beacons are needed for pouring a new screed. They are set at a level of at least two meters in length. A difference in height of the finished screed of more than 2 mm per 3 meters is unacceptable. Then pour a new screed 5-7 cm thick. This procedure is necessary to prepare the base for laying the cork.
Instead of screed, you can cover the concrete surface with plywood at least 20 mm thick. Before laying the underlay, clean the concrete from any adhesive residue, loose or damaged areas. Fill holes with a diameter of more than 5 cm and a depth of more than 1 cm with mortar, not allowing them to protrude above the floor level. Otherwise, you will have to clean off the excess solution after drying. grinder. Having prepared the concrete, bring in the plywood and lay it on the floor, adjusting it to the geometry of the room.
Gaps between sheets should not exceed 5 mm. The plywood should lie tightly. If one of the sheets moves, lift it and eliminate the cause. Most often, plywood falls due to uneven floors. Make sure that all sheets lie on the same level, without protruding even 0.5 mm - after laying and varnishing the cork, reflections of the varnish will be noticeable. The plywood is secured with anchor dowels 60 mm longer than the thickness of the plywood. Having drilled the holes for fastening, drill them to the diameter of the dowel head to a depth of 5 mm so that the heads do not interfere with grinding. Then install the dowels and press them in with a hammer so that they just touch the plywood without pressing it to the concrete.
The best substrate for cork flooring is a self-leveling floor. It forms flat surface, which has a positive effect on the appearance of the floor.
The preparatory steps are the same as for laying screed or plywood - cleaning from traces of glue and loose areas, sealing cracks and holes. After this, the material is poured. Liquid flooring is sold both dry and ready-to-use.
After removing laminate, hardwood or hardwood flooring, remove all backing plywood. After this, prepare the base for laying a new substrate - plywood or liquid flooring. The process of preparing the base does not differ from similar processes when laying on a concrete screed.
Cork allows you to lay out compositions and drawings. In order for the drawing to fit harmoniously into the interior of the room, start marking either from the far corner (if viewed from front door) or from the center of the room. The covering laid according to such markings will create the illusion of an even rectangular room. If you start marking from the far corner of the opposite wall, when you look at the floor it will seem that it is laid crookedly. Installing a cork floor without markings will result in beautiful drawing the result will be something consisting of cork and holes.
Apply markings with a pencil or marker. When marking, calculate the location of inserts that compensate for geometric errors in the room. This will allow you to prepare the cork in advance by cutting the material as needed. Each row should be shifted relative to the adjacent one by half the width of the tile.

After marking, lay the coating and evaluate the result. If you notice a defect, eliminate its causes. After sticking or installing the coating, it is impossible to correct the defect. Mark the reverse side of each sheet to avoid confusion during installation.
For this installation you will need to prepare a substrate. To do this, sand it with a grinding machine, which is sold in construction stores. Any sudden change in height will lead to the fact that the glue in this place will hold much worse and after a few months the backing will peel off. After sanding, vacuum up the dust. When sanding, check the surface with a 2 meter long level. The permissible height difference at this length is 2 mm. It is advisable to fill the floor with liquid after sanding, because it best substrate under a cork floor, because neither sanded screed or plywood provide such evenness.
When working with a sander, use safety glasses, a respirator and headphones. When working with glue, wear rubber gloves, this will help you stay healthy from exposure. negative factors And harmful substances– wood dust and glue containing toxic substances.

You can improve the quality of the adhesive joint by priming the substrate with glue. When using ready-made glue, dilute it with the recommended solvent in a ratio of 10 parts glue and 1 solvent. Apply the resulting primer with a brush, making sure that the glue only covers the surface of the plywood. If the glue is sold in the form of a powder that is diluted with water, make one part liquid by pouring two or three times more water than what is written on the package. Then paint the plywood, concrete or liquid floor with the resulting primer and let it sit. The setting time of the glue is written on the packaging. The primer will increase the adhesive strength by 40-60 percent.
After the primer has dried, lay down the cork to assemble the design. Number each element on the reverse side to avoid confusion during installation. It is advisable to use water-soluble adhesives. They are easier to use and allow you to correct the position of the finishing material.
Apply adhesive to the primed substrate using a notched trowel. Layer thickness 2-5 mm. If you are using liquid polymer adhesive, apply it with a brush or roller. The area of application of glue is the area of laying 4-5 tiles. After this, apply the adhesive to the tiles with a brush. Let the glue dry for 5-20 minutes (depending on the brand of glue, indicated on the packaging or in the instructions for use). Attach the cork tile to the area marked by the markings, making sure not to deviate even by a millimeter. Press the cork in the center, then smoothly smooth it out to the edges. This is necessary to remove air bubbles.
Video - laying cork floors with glue:
Glue the tiles starting from the center of the room. Don't deviate from the markings. After gluing the sheet, immediately remove any remaining glue. The adhesive squeezed out from under the tiles cannot be reused. After pressing the tile and squeezing out excess glue, tap it with a rubber mallet. This will improve the strength of the adhesive joint. Complete polymerization of the glue will occur in 2-4 days, depending on the brand.
The term floating cork floor refers to a covering that does not have adhesive fastening, and therefore has relative mobility. Some craftsmen make a floating floor without any fixation at all. The reliability of such a floor is 3-4 times lower than that fixed with a stapler, and 7-10 times inferior to glued ones.
Cork is not afraid of moisture. The base of the tile, made of plywood or fiberboard, swells from water. If water is spilled on such a floor, the base will swell and the entire system of tiles will move relative to the markings. Then the floor will dry, the base will return to its original dimensions, but the gaps in the coating will remain. If you are sure that the cork floor will not flood, you can refuse to fix the tiles.
Video - instructions for laying cork floors:
This will save you several hundred rubles, but will weaken the overall strength and reliability of the floor and will not allow you to place heavy things on it. For a floating floor, cork is used, made in the form of long strips of various sizes.
The tile is laid in place, after which a staple is driven into the lower part of the tongue-and-groove lock with a stapler. The length of the bracket is 12-15 mm. Brackets are placed every 10 cm. Then you need to run your finger along them. A well driven staple feels like a thin thread. If your finger feels a difference in height, you pressed the stapler poorly or unevenly.
Finish off the bracket using a heavy-duty flathead screwdriver by placing the blade against the bracket and hitting the handle wooden block. Then install and secure the next slab according to the markings.

Cork flooring is warm and comfortable to walk on and looks beautiful. Compositions and drawings are made from it. Errors in laying or preparing the base will deprive it of these qualities. The cost of preparing the base and laying the floor is comparable to the price of materials. Therefore, it’s up to you to decide whether to do the work yourself, relying on your construction skills, or turn to professionals.
A floating floor is easier to install, but unreliable in operation. Even with fastening using a stapler. Laying with glue is more difficult and more expensive, but two to three times more reliable. Trying to save on the price of liquid flooring will reduce reliability by 3-4 times. Don't skimp on beauty and reliability.
The growing popularity of cork floors is explained quite simply. Good sound and heat insulating qualities, impact resistance, quick installation with their own hands they make the coating very attractive in the eyes of homeowners.
But it should also be taken into account that the installation of an adhesive cork floor is more complicated than a conventional one, which is installed using the floating method (tongue-and-groove locking system).

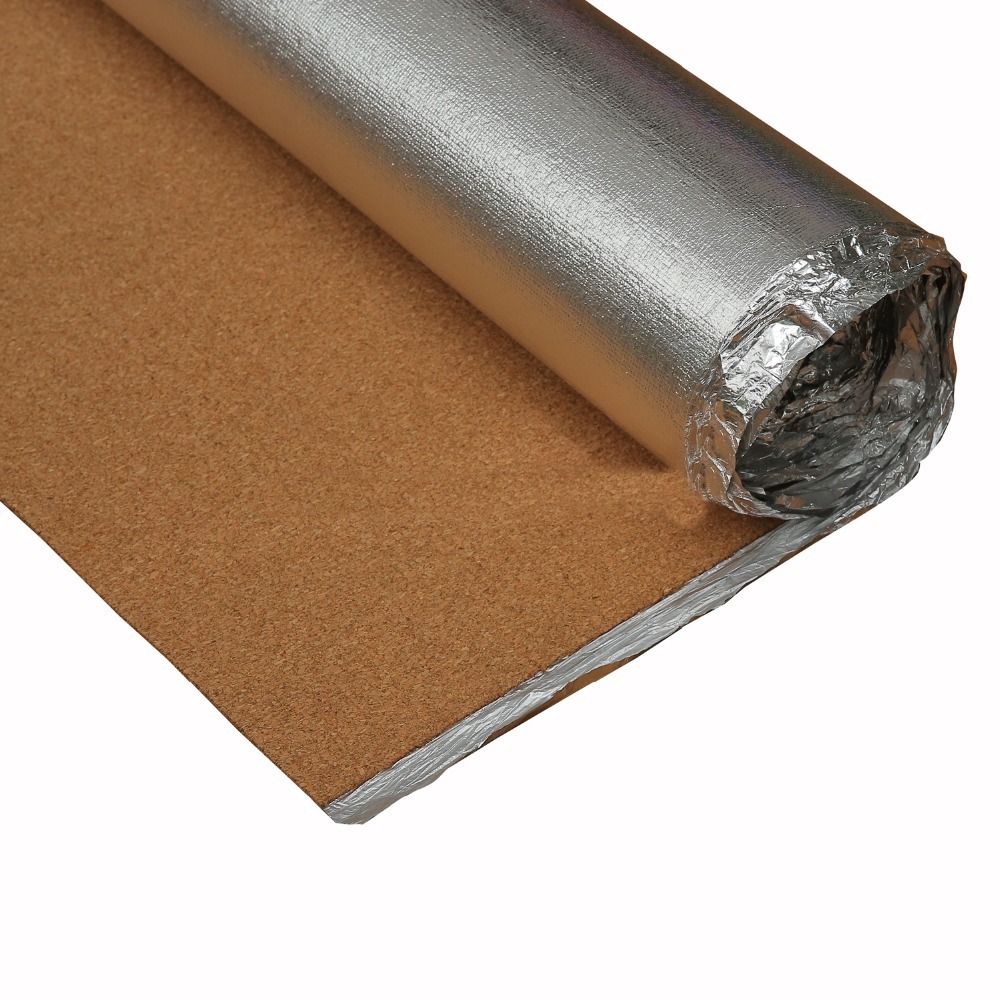
Adhesive cork floor coverings are plates with a cross section from 4 to 8 mm and dimensions of 30x60, 15x45 or 15x60 cm. They are made from a mixture of granulated cork oak bark and thermosetting resins.
Often, to emphasize the beauty and create beautiful panels, manufacturers produce multi-layer products, which are based on a slab of fine-grained cork or PVC base, with a cork veneer glued on top, coated with durable varnish (polyurethane or alkyd-urethane). Various decors - from natural wood to metal, stone. Veneer can repeat or imitate the texture of natural materials.
Before gluing cork floors, you need to stock up the right tool and choose the optimal glue for this job. Tools you will need:

When choosing an adhesive, you first need to focus on the quality of the cork tiles and the type of base. It would be a good idea to get advice at the place where you purchased the coverage. As a rule, manufacturers recommend that points of sale sell a certain type or brand of adhesive products that are ideal for cork. The same instructions are given in the instructions on the package insert or information brochures from the manufacturer.
Let's consider the most popular adhesive compositions from the point of view of companies that sell cork coverings:


Proper gluing of cork tiles requires compliance temperature regime– from +18 to +24 °C, as well as a certain humidity – from 30 to 60%. Under these same conditions, acclimatization of the finishing material occurs.
The basis for laying cork flooring can be concrete screed or wooden covering. The main requirement is a smooth, dry base without defects (pits, chips, potholes), oil and other stains.
If necessary, the concrete floor must be leveled using cement-sand screed(in case of large differences or damage to the base) or dry ready-made mixtures on a gypsum and gypsum-cement base (floor levelers and self-leveling subfloors).
The preparation period can last for a month, since this is exactly the period required for the screed to gain the required strength and dry completely. After the expiration date, it is recommended to treat the base with a primer deep penetration for strengthening and dust removal.

Wooden floors require no less attention. The floor needs to be sanded or sanded with coarse sandpaper using parquet sanding machines, the “humps” must be removed, and various defects must be eliminated. Weak strips should be re-glued or tightened to the base with self-tapping screws.
If desired, you can lay plywood or OSB, secure it with hardware in increments of 30-50 cm crosswise, and sand the surface with a surface grinder. Additionally, to protect against mold or bugs in the future, you can prime the floor with antiseptic compounds.
A day before installation, it is recommended to bring the adhesive cork flooring into the room and leave it unpacked for acclimatization. The floor covering is removed from packaging immediately before installation.
All tiles must be inspected for defects or different colors; it is advisable to make a preliminary layout on the floor. This will show both the design and ways to minimize waste. After the preparatory stage, the foundation is marked.

Installation starts from the center of the room. To do this, cords or fishing line are pulled diagonally from the corners and secured to rods or nails. The center is taken to be the place where they intersect. In addition, you will need guides (profiles) - two perpendiculars relative to the walls of the room.
You can begin a trial installation of beacon tiles. The process is carried out without applying glue. At this stage, the dimensions of the wall tiles that need to be cut are specified. Their width should be at least half of the solid plank.
For convenience, laying the cork floor with glue is done in two steps: first one half of the room, then the other. The cut tiles are laid in a final row along the outer wall.
It should be taken into account that when using two-component or water-dispersion adhesive compositions, the surfaces are bonded quite quickly, so adjustments must be made as soon as possible.
The actual laying of the adhesive cork floor begins with gluing 6-8 tiles in two directions at right angles. In this case, it is necessary to monitor the tight fit of the elements - gaps between them are unacceptable.
The glue is applied evenly to both the base and the back of the tiles. Less often - only on the basis. Area covered adhesive composition area of the main coating should be larger size laid tiles.
After allowing the adhesive mixture to dry a little, the tiles are firmly applied to the base and tapped with a rubber mallet to improve the fit. The surface of the tile along the edges is wiped with a damp sponge to remove any glue that has come out. Each subsequent row is pasted offset from the previous one, that is, in a checkerboard pattern. The last to be glued are the cut tiles.

Depending on the type of adhesive cork floor (varnished or uncoated), after drying it is coated with alkyd-urethane or polyurethane varnish. This significantly increases the wear resistance of the coating. Acrylic compounds It is not recommended to use them, as they wear out quickly.
Unlike floating interlocking floors, adhesive cork floors come away from the base much less frequently. The fact is that between the tiles mounted using the tongue-and-groove method and the base there remains air gap, under which moisture may get in. Plus, lock joints are not always perfectly tight.
If the installation is done poorly with adhesive, dampness can penetrate under the glued coating. In this case, there is a high risk of swelling of the cork floor and the appearance of mold and mildew. In this case, it is necessary to dismantle the affected area and treat it with special means.
You cannot glue old tiles; you will have to purchase new ones.
Also cork panels may come off due to the “warm floor” heating system. The recommended level is no more than +25 °C. Failure to comply with this condition leads to the glue drying out, the appearance of cracks between the tiles, and finally, to swelling and damage to the integrity of the cork sheet.
Correcting the situation is quite simple. You don’t even have to resort to the help of specialists. You need to remove the peeling panel, dry it, clean the base and glue the tile back. If the moment has already been missed and a fungus has grown under the plug, then the affected panel needs to be replaced.
Video about cork floor installation technology and the main mistakes:
Cork flooring is soft, environmentally friendly and comfortable. This flooring is appropriate in a children's room and bedroom. It has high sound insulation characteristics. But in order for the coating to last as long as possible, the installation of cork flooring is carried out in compliance with technology. You can lay cork tiles yourself if you know some installation nuances and the specifics of choosing materials. We will also tell you how much cork flooring costs.
Many useful and beautiful things are made from the bark of the cork tree, including finishing materials.
Floor adhesive plug has several varieties:
This type of cork is made from crushed material. It is then mixed with synthetic-based thermosetting resins and pressed. The result is blocks with a density of 450-800 kg/m³. The semi-finished product is cut into sheets up to 0.6 cm thick. Next, planks and tiles with a maximum width of 30 cm are cut out of these sheets on a machine. maximum length 1.2 m. Products are glued end-to-end because they have smooth edges.
Important! The cost of a cork floor made from agglomerated cork starts from $11.6 per square.
The agglomerated adhesive plug on the floor has following features:
These are thin slabs of veneered or traditional agglomerate. An adhesive layer is applied to the back side of the material. It is protected with paper on top to prevent the glue from drying out. Self-adhesive products are very convenient to lay on the floor, walls and ceiling.
Important! If you are interested in self-adhesive cork flooring, the price per meter starts at $13.3 per square.
This cork covering is produced mainly in the form of square tiles with a side of no more than 300 mm. Their thickness is in the range of 3.6-5 mm. Less common are adhesive-based planks with a width of no more than 180 mm and a length not exceeding 900 mm.
This adhesive cork flooring has the following features:
Attention! Craftsmen install adhesive plugs at a cost of $4.8 per square. This price does not include foundation preparation services.

Before laying cork flooring, you need to prepare necessary tools and materials:
Important! The material is laid after it has been left in the room where it will be installed for 1-2 days.
Work is carried out in compliance with following conditions in room:

The adhesive installation method involves choosing a suitable glue. Thus, cork coatings without a finishing layer can be glued using water-dispersion compounds. Tiles with a varnish or vinyl protective layer are fixed using solvent-based adhesive.
It's important to remember that everything adhesive mixtures Solvent-based products are flammable and slightly toxic, so work is carried out using protective equipment and in a ventilated area.
Important! Organic solvent adhesive is environmentally friendly and less toxic.
Water-based adhesives do not like contact with water, so if the room is flooded there is a risk that the tiles will come off. If work is carried out in the cold season, then it is better to buy glue that is resistant to cold and temperature changes.

If you use square tiles, then you can post them only in two ways:
Important! Elements of rectangular and square shapes are laid diagonally in the room or traditionally parallel to the walls.
As for rectangular elements, they are laid in several ways:
The step-by-step process of laying cork flooring begins with preparing the base. Since the elements are small in thickness, all defects in the base will be visible after they are laid. That is why the beauty of the floor depends on the quality of preparation of the base.

Requirements for the rough foundation:
Mineral screed or sheets are suitable for leveling the base. wood materials with bridging edges. To fill the seams between the sheets, acrylic sealants or a mixture of PVA and sawdust are used.
To improve the characteristics of the base, deep penetrating and strengthening primers are used. If you need to increase adhesion to the base and make the absorbency of the floor more uniform, use an adhesive primer.
After this, begin marking the surface:


