If a concrete staircase is built in your residential building, then in order for it to look attractive, it must be faced. There are a great many ways to do this. The tastes of the owner can easily be judged by how the staircase in his home looks like.
Everyone wants to create best project his stairs without gross errors.
Compliance with these simple rules will help you avoid difficulties in finishing concrete stairs tree.
Stair formwork can be done by the most various materials such as wood, marble, laminate or ceramic tiles.
You may need:
When working with tools, be extremely careful! Improper use may result in injury.
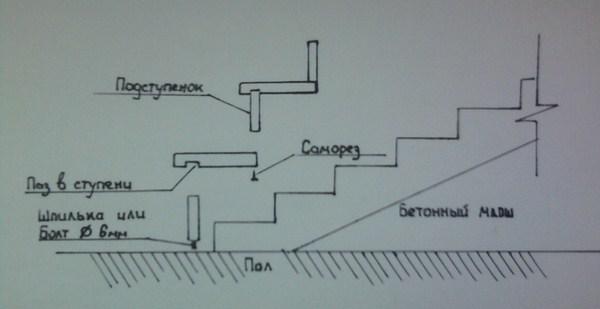
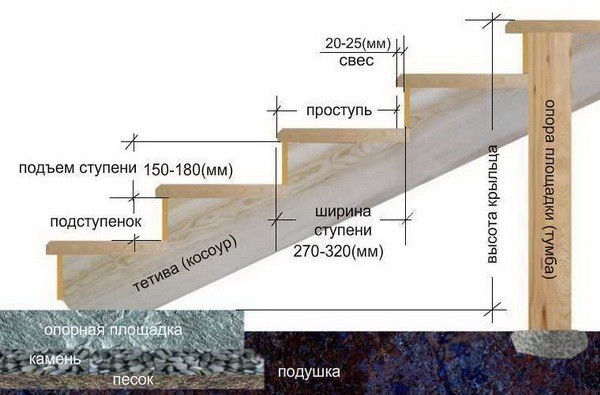
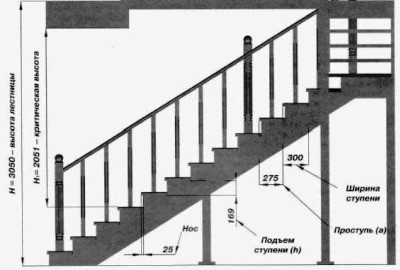
Scheme-drawing
No matter how hard you try, gaps remain on the side of the steps, they need to be filled with foam or putty.
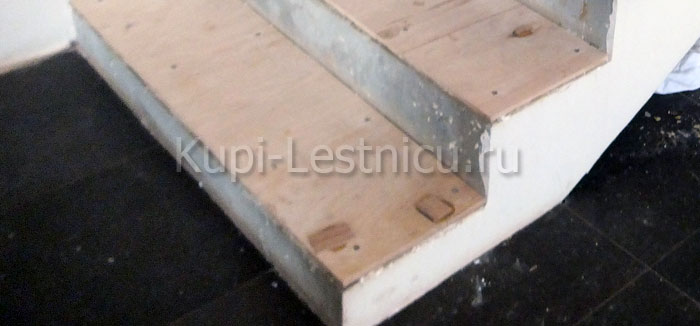
Do not lay wood on bare concrete, be sure to use plywood!

Railing installation scheme
You can learn how to do it right from this article.
To clarify the details of finishing a concrete staircase with wood, pay attention to the photo "Railing Installation Scheme"
Wood is the most popular formwork material for stairs.. This coating can last for many years, subject to all the subtleties of the cladding.
In order to understand what kind of finish to do best, you can see. It is in such wood products that the best finish is found.
For the formwork of stairs, it is better to use hardwoods, for example, oak (the “king” of cladding), ash, pine, larch or beech.
Oak and ash give the staircase a very rich appearance. Pine visually reduces its size due to its light shade.
The most durable cladding that will serve you for decades will be made of valuable types of elite wood (wenge, doussier, etc.)

Oak staircase for home
Facing the stairs with laminate at a price will be much cheaper.
By saving on materials, you make the stairs unsafe. Laminate is a very slippery material that can cause injury during operation.
Wood is not a cheap material for cladding, it will only be possible to save on the thickness of the steps.
By itself, the cost of a concrete staircase is very high, it is twice as expensive as that of a conventional wooden one.
You can save money and sheathe the stairs with glued wood.
The approximate price of beech sheathing of stairs in 13 steps and the installation of chrome-plated metal balusters is 30,000 rubles. (excluding the work of specialists).
When sheathed in oak with balusters made of of stainless steel the cost of a two-flight staircase with a platform will be about 160,000 rubles.
In general, for good finish stairs with wood request an average of 240 to 290,000 rubles.
We invite you to watch a video instruction for sheathing a concrete staircase with wood from a specialist:
A concrete staircase in itself is a carrier of excellent characteristics, however, it looks unaesthetic without sheathing. If you want everything in your house to be brand new, you should carefully think about how to line the stairs and with what materials. The greatest sophistication will give just wood paneling. due to the variety of breeds and textured patterns. You will be satisfied with your work.
Properly made concrete staircase design will help to avoid blunders and increase safety.
To do this, it is enough to comply with building codes and fire safety requirements.
Common mistakes when designing concrete stairs?
This gross mistake but it is quite common.
The distance between marches is regulated:
Building codes and rules SNiP 21-01-97 * " Fire safety buildings and structures" (adopted by the Decree of the Ministry of Construction of the Russian Federation of February 13, 1997 N 18-7) (as amended on June 3, 1999, July 19, 2002)
"8.9 Between the flights of stairs and between the handrails of the railings of flights of stairs, a gap should be provided for a clear width of at least 75 mm."
The gap between the marches in case of fire is used to lay the fire hose so that it does not jam in an emergency.
Now there are already fire hoses ⌀ 100 mm, so for comfortable laying it is better to leave more than 100 mm.
This error is the most common, sometimes the difference can be more than 50 mm or 5 cm! It's a master's nightmare.
Master's opinion: Igor Klanovets
“If you cast a concrete staircase with uneven rises and step widths, then it is very difficult to align them later. You increase the width of one step - narrow the other. Raise the surface of one tread - increase the previous rise. Sometimes builders try to level surfaces concrete steps with the help of plaster and putty mixtures. Such spells are meaningless. A step glued to such a coating will easily come off along with the leveling layer. If we even align such marches, then with the help of high-strength concrete mix with additional reinforcement. Well, the concrete layer should be sufficient. So, you will increase the rise of the first stage and decrease the last rise. To make them acceptable sometimes you have to raise the level of the entire floor.
A step-by-step description of the work on wood finishing concrete steps.
|
Photo stages of work |
Description of works |
|
|
1. The base of the stairs is cleared of build-up of plaster and concrete. 2. Steps and platforms are blown with a compressor, dust is collected with a vacuum cleaner. |
|
|
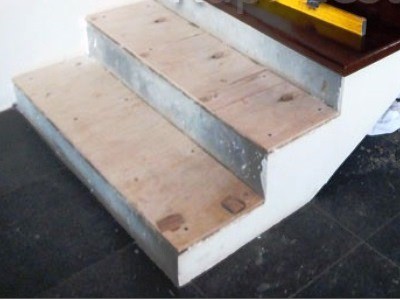
3. On concrete base stairs, plywood is laid on the glue, plywood is nailed to the steps with dowel nails. |
|
|
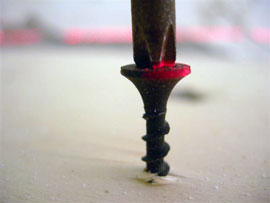
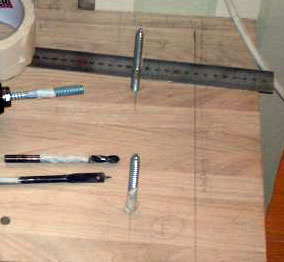
4. I screw the heads of the screws into the level at the corners of the first and penultimate steps of the march. |
|
|
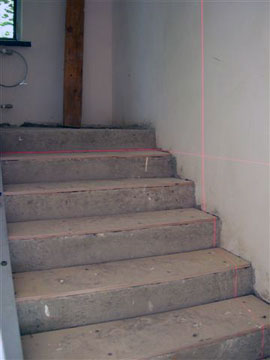
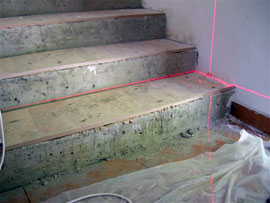
5. The upper and lower boundaries of the steps are beaten off by the laser on the wall (a segment is obtained). The segment is divided into the number of steps and appropriate marks are made on the existing segment. |
|
|
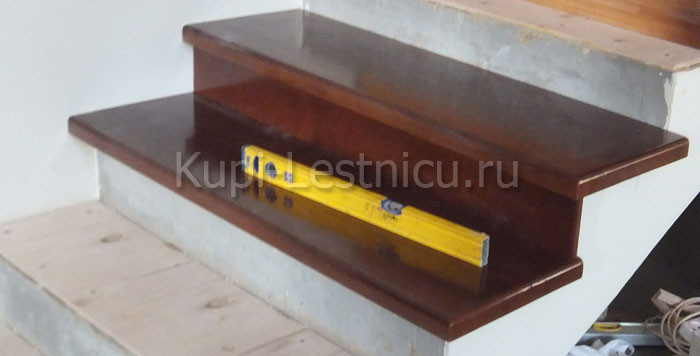
6. By tags laser level and a screwdriver set the level on each of the steps mm to mm with screws. Finally corrected by the usual spirit level manually. |
|
|
Video showing how to glue the tread and riser onto plywood. |
Galoshnitsa (galoshnitsa) - a false panel running along the edge of the flight of stairs adjacent to the wall.
There are many options for execution, we give two examples.
|
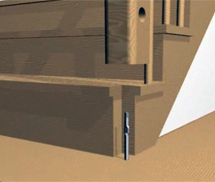
Photo and video of stair post installation |
Description |
|
|
A hole is drilled in the concrete for a cork into which the anchor is screwed. |
|
|
A pole is put on the anchor. |
|
|
The column is fixed with a coupling. For these purposes, well suited: |
|
|
The video shows how the pole is installed on the Zipbolt 14.100 |
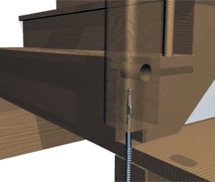
By analogy with installing a pole, an anchor or stud is used. Which is fastened with a long end through a tread into concrete, and a baluster is wound on a short end.
|
Photo installation of balusters |
Description |
|
|
The end of the hairpin, which is twisted into a step, is "planted" on the glue. |
|
|
It is more convenient to use an electric drill to tighten the anchor. |
|
|
A baluster is screwed onto the short end of the hairpin |
Before painting or varnishing, the stairs must be disassembled, having previously numbered all the elements.
Master of stairs Pavel Shafurin
 “The customer needs to understand that a concrete staircase is an expensive pleasure. Its cost is twice that of an ordinary wooden staircase. In fact, the customer of the concrete staircase pays for two stairs - one in concrete, the second in wood. IN wooden stairs no only load-bearing elements: kosour or bowstring, but otherwise it is a full-fledged wooden staircase.
Plus concrete stairs in its strength and durability. Therefore, in public buildings they put mainly concrete stairs, for summer cottages, country houses and cottages, I would recommend to put only wooden.
Laying treads on a concrete base.
In modern construction repair, there are many ways to self-finish stairs. One of them is the facing of a concrete staircase with wood.
This method is ideal for stairwells, which during the operational period have lost their external aesthetics. During restoration work, it is recommended to finish and clad the handrails.
Finishing work can be done by hand.
For this type of work, as concrete stairs, it is recommended to use different types materials, each of which is good in its own way and has a number of features.
Consider the materials with which concrete stairs are sheathed, in addition to wood:
Advice. The price of finishing stairs with laminate is much lower than with wood, so many people choose this material.
And finally, a concrete staircase, wood cladding. This is a popular and durable way.
If you follow the finishing technology, the tree will serve for decades.
Before being made by a tree with your own hands, you will need to produce a series preparatory work. It is especially important to eliminate a number of especially pronounced shortcomings and defects.
Advice. In order to inexpensively eliminate all existing shortcomings, you can use a solution of cement and sand grade M150.
Instructions for use:
To finish the flight of stairs with wood, you will need the following tools:
After carrying out the necessary preparatory work, you can begin to finish.
In order for the panels of flights of stairs to be located on the same level, it is necessary to make markings using a construction plumb line. Marking is done in the lower, upper and middle parts of the march.
Carrying out work:
Advice. You can not waste time until the mortar with which the irregularities were sealed will harden, but install the risers and treads.
What wood is used for finishing stairs:
Note. Is not standard sizes, it all depends on the design of the march. Self-tapping screws are used as fasteners.
Installation is carried out according to a certain technology:
Note. The depth of the groove should be 1.4 cm and the width 2.5 cm. For the evenness of the groove, a flat rail or side stop is used.
For insulation work:
Collection of each separately harvested unit:
Attention. It is important to observe correct location groove and evenness of installation, after which the structure is fixed with self-tapping screws.
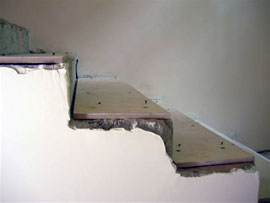
After assembling the entire structure, it is necessary to correctly install the last riser to flight of stairs. You can connect with a corner or close the top with a wooden board.
Finishing handrails for concrete stairs is made from hardwood boards. Before starting work, it is necessary to determine the shape and style of the future railing.
Let's take a closer look:
Note. Work must be carried out at the installation site.
Upon completion of all work, the structure is varnished or painted.
The most important and important thing when facing concrete marches with wood is the observance of precise technology, otherwise, the durability of the structure will be significantly reduced and lose its attractiveness.
Let's take a closer look:
Advice. If the discrepancy provides for more than 4 cm, then it is recommended to make formwork using plywood and the steps are poured.
Also, if desired, you can use a laminate instead of wood, but it should be remembered that the technology for installing the laminate will be slightly violated. Marble, stone and tile are also used to finish concrete staircases.
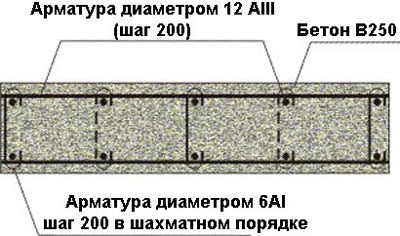
Despite their reliability and durability, concrete stairs have a huge drawback in terms of aesthetics - outwardly, unfortunately, they are not attractive. Concrete is not afraid of moisture and cold, is fire resistant, and the strength of the structure provides metal carcass, thoroughly hidden from the impact environment inside reinforced concrete product. To give the design individuality and originality will help decorative trim concrete stairs. Its options depend on the installation location, the style of the room and the flight of fancy.
Also, the finishing of concrete stairs is made of glass, rubberized materials, carpet, metal, cork, linoleum, etc. You can often find combined options, which look great in various interiors.

It should be noted that concrete cladding is laborious process, in particular because monolithic structures difficult to make the same with the ideal flat surface. Therefore, there is no need to think that a staircase with wood finishing steps will cost less than a massive wooden structure, and it will take more time to finish the cladding.
Concerning stair railings, then their style should be combined with the material of the steps. Most often, balusters and railings are made of forged, metal elements, wooden or plastic.
It is important to know that the finishing of the steps of a concrete staircase should be carried out after 2-3 months after its casting, since the concrete, even after hardening, continues to give off excess moisture. If this condition is neglected, then the steps may deform over time, the concrete may crumble, and when faced with wood, the elements will first absorb moisture, swell, and when dried, most likely dry out. Best Option will withstand the stairs "without clothes" for one heating season.
The choice of finishing for the stairs should be at the design stage, since the calculation of the size of the steps must be made taking into account the thickness of the finishing material.
Formwork installation should most closely match the estimated dimensions of the stairs. The height of the steps should not differ from each other by more than 9 mm. Otherwise, the cost of their adjustment will increase.
For formwork, it is better to use moisture-resistant plywood, which has a smooth surface, and not boards, which leave a lot of irregularities on the concrete surface after removal.
By adhering to these simple tips, you can greatly facilitate the work of facing the staircase.

Let us consider in more detail the option of facing the degrees with an array of wood.
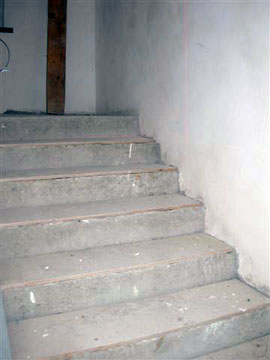
The finishing of concrete stairs begins with the alignment of the steps. After pouring and drying, they almost never have the same height. But the building codes state that within the same march or interfloor rise, steps should not have different height. To ensure this requirement, it is necessary to measure all the steps and choose the highest of them as a basis. Then all other steps are adjusted to its size using a self-leveling mixture.
With a small difference, the composition is simply poured from above, and with a large difference, formwork is made of moisture-resistant plywood. Its upper edge should be flush with the intended surface of the tread. It is recommended to fasten plywood to concrete with dowels to a vertical plane.
Do not forget that the steps before pouring must be thoroughly cleaned of debris and construction dust, and the surface primed to improve adhesion.

The next stage of the preparatory work is the laying of plywood. In the design, it will serve as a moisture insulating gasket. Necessary:
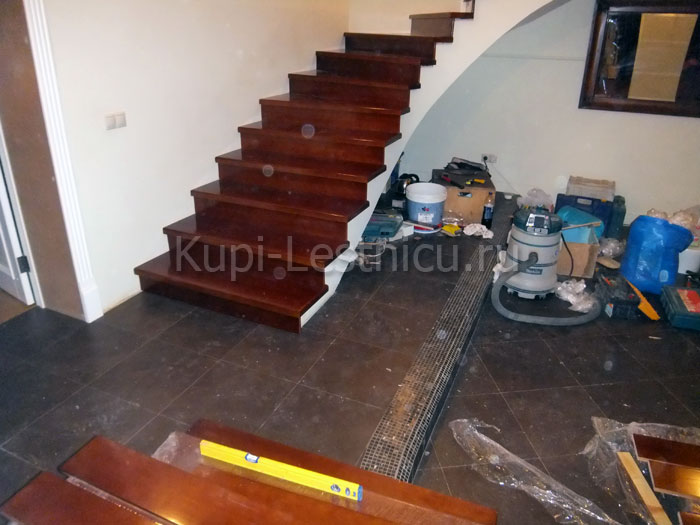
The steps are finished with solid woods, which ensures their long service life. To begin with, risers and treads are made from solid wood. required size. Finishing work starts from the bottom step, gradually rising up.

Three long bolts with a diameter of 6 mm are screwed into the lower end of the first riser so that their ends protrude by 6-8 cm. In the design, they play the role of anchors. Hats must be cut off or “bite off”. Then the riser is substituted to the end of the first step and the places where the anchors rest are marked on the floor. Holes are drilled along the marks and epoxy resin is poured into them.
The plywood on the riser is coated with liquid nails glue, and the prepared element is applied to it, inserting the screwed anchors into the holes on the floor.
To mount the tread, a groove of the appropriate depth is cut out in it at the junction with the upper end of the installed riser. From the other end, a second riser is attached to the first tread with screws. Next, the plywood and the groove are coated with glue, after which the first step is installed. It is recommended to temporarily place a load on top of the step. Thus, the whole structure is assembled.

The work on finishing steps requires care and patience. Only in this case the result will be predictable!