The standard cost of work on a is half the amount spent on purchasing a plumbing fixture. Considering such prices, it is quite understandable to want to save money and do the installation yourself. Use the training videos and follow the instructions when.
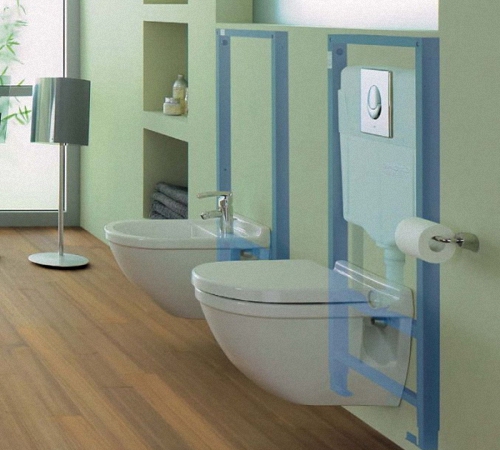
Let's look at the design of the installation to understand how it is installed. Essentially, it is a steel frame that is attached to the ceiling and the wall or only to the wall. After installation, communications and plumbing are supplied to the module. Then the frame is covered with dry plaster and tiled. Let's look at the differences between the systems.

Advice. Hanging plumbing only visually reduces space; installation requires the same amount of space as for a conventional model.
Models of installation modules may differ, so before starting installation, carefully read the instructions for your model. Start creating markup:

Markings for fastening the frame
Using a hammer drill, make holes for the fasteners and put the installation in place. Attach the frame to the anchors and adjust the height. Secure the system using a level. The frame must stand rigidly and evenly.
Advice. Purchase the toilet together with the installation module to avoid surprises during installation with mismatched connection connectors.
First of all, we supply water to the tank. Modern tanks have two types of connection to choose from: top or side. The pipe must be plastic, because... Flexible hoses have a limited service life. To replace such a hose in the future, you will have to dismantle the false panel with the lining. Agree, this is too expensive to replace one tube.

Tank installation
Having installed the tank, we begin to install the sewer pipes. The toilet outlet is connected to the sewer outlet through a corrugation. It is very rare when it is possible to make a connection directly. Install the tank button.
It is necessary to check the tightness of the system. The toilet bowl is hung on the frame and a test flush is performed. Then the toilet is dismantled and finally installed after completion finishing works. The toilet is placed on the floor with the bowl down, fasteners are attached and fixed to the frame. It is worth placing a soft stand under the bowl for safety.

Connection to sewerage
Advice. The studs securing the toilet bowl must be screwed in before finishing work begins.
The installation frame is covered with moisture-resistant plasterboard sheets, which are mounted directly to the frame or to a profile box. The instructions usually contain detailed map cutting taking into account the slots for the holes for the drain button. The entire wall or just a niche is covered with plasterboard. A shelf for accessories is often made in a niche. The partition is lined with any finishing material or plaster.

Facing the installation module
After the lining has dried, the toilet bowl is finally installed.
Advice. The tank drain button looks good if it is located in the center of the facing tile or in the center of the tile seam. Therefore, it is recommended to lay the tiles away from the button.
It is possible to replace an expensive installation system homemade alternative made of concrete. The cistern in this design can be installed in two ways:
This variation is quite economical, but installing the base will take more time compared to installing a store installation, since you will have to wait for the concrete to gain strength. You will need the following materials for the work:

Concrete base
They start by drilling holes for metal rods in the wall. The depth of the hole is 15 cm. The hole is cleaned and glue (chemical anchor) is poured inside. Insert the rod. The formwork is mounted on self-tapping screws, and a hole is pre-drilled in the front board to release the rods. To ensure stability of the formwork, nuts are screwed onto the pins. The vertical level is checked using the building level. Install the coupling. Before concrete works try on the final version: align the outlet hole of the toilet bowl with the coupling, and the rods should fit into the mounting holes. The drain hole of the coupling is covered with foam and pressed. Poured concrete mixture into the formwork. Check the level again. After three weeks, the formwork can be removed and the installation of plumbing can begin. Gaskets are installed on the toilet and placed on the pins. Check stability and performance.
Advice. Appearance Some people may not trust the installation, but such a frame can withstand power load at 400 kg.
Before sewing up the entire structure with a false panel, you need to make sure that there are no leaks and that the system as a whole is working. To check, open the water supply tap. After the tank is full, the water is drained. You need to do this several times.

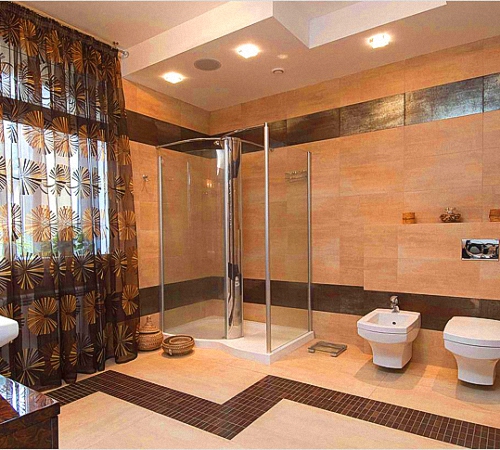
A toilet with installation looks neat and is suitable for most interior styles
If problems occur, possible causes may be:
Installation wall hung toilet technologically more complex than the installation of its classic counterpart. However, if you own construction tool, then if you have the desire, installing the installation yourself will not cause any difficulties.


Despite the fact that toilets with installation appeared in the late 80s of the last century, in Russia and neighboring countries this wall-hung plumbing equipment is just beginning to gain popularity. The emergence of any innovation is almost always accompanied by a lot of speculation, most of which have no basis. The reason for this is lack of information. To dispel all doubts, we have made a selection of materials that will provide answers to most questions related to hanging plumbing.
This type is mounting structure, used to secure the toilet bowl, bidet or other included equipment. The system is installed on a wall or a cavity made in it. In this case, the tank, supply pipes and other engineering Communication remain hidden behind false panels. The drain button, as well as other controls, remain on the surface.
To gain access to servicing the system, simply remove the false panel. The statement that this requires dismantling the wall covering is, to put it mildly, incorrect (provided that the installation was carried out correctly).
Installation systems require supports, depending on the mounting method, they can be:

The main disadvantage of this scheme is that in the case of installing suspended equipment, the entire load falls on the main wall. The advantages include the prostate installation and relatively not high cost solutions.

Designations:
The presented design is designed for a load of up to 400-450 kg, this refutes the unfounded claim that wall-hung toilets can only be used by children.
Depending on the design, frame supports can be:

In addition, many manufacturers (for example, Gustavsberg, Delafon, Cersanit, etc.) produce universal models for different kinds plumbing equipment. This is achieved due to the ability to adjust the height of its installation and additional mounting kits.
To carry out installation work on installing suspended equipment, it is important to know its dimensions. Most manufacturers adhere to the following standard sizes:
– Width – 50.0 cm.
– Height – 100.0 cm.
– Depth – 10.0-15.0 cm.
– Width – 50.0-60.0 cm.
– Height – 80.0-140.0 cm.
– Depth – 15.0-30.0 cm.
Such a significant variation in height among the latter makes it possible to select equipment for certain conditions of the installation site. For example, to place it under a window, you need to choose a compact model with a short frame. As for the dimensions of hanging equipment, in particular, toilet bowls, their dimensions correspond to classic floor structures:
Before installing hanging plumbing, you need to make an objective decision. To do this you need to know all the features of this equipment Let's start with the advantages:
Of course, such a solution also has its own negative sides, namely:
We offer some tips to help when choosing equipment:


Below is a table that contains the best manufacturers taking into account various criteria.

We hope this table will answer the question of which manufacturer is better. It should be taken into account that new models are entering the market, therefore, the objectivity and relevance of the sample may not be reliable.
Before attempting the installation yourself, please be aware that this may void your warranty. Many manufacturers set a condition under which warranty obligations are recognized only if installation work is performed by specialists from certified centers.
The algorithm of actions given below assumes that the necessary communications have been laid to the installation site, and the installation module has been assembled in accordance with the instructions (the tank is secured, an outlet is connected to it, etc.). It makes no sense to give the order of assembly due to the wide variety of models and their design features. This installation process must be done independently, checking the instructions. The most we can help is to give a few recommendations:
Algorithm of actions:
Not long ago, interesting alternatives to simple floor-standing toilets appeared on the market - wall-hung installations. Today many consumers choose them, noting interesting design such products. But not all users know how to properly install such plumbing items. The article will discuss how to install simple and suspended installations.
The installation is a special system, which is a well-thought-out design that allows you to secure the toilet and other plumbing fixtures as securely and firmly as possible. In addition, such elements are necessary to hide plumbing connections.


According to consumers and experts, modern wall-mounted and floor-mounted installations are very convenient. Using such an interesting system, you can place the toilet so that its tank is securely hidden behind the wall. At the same time, it is additionally protected by heat-insulating material, which ensures sound insulation of the plumbing during its use.
When installing the installation, only the toilet bowl itself is always noticeable. Thanks to this feature, the room in the bathroom or toilet will seem much more spacious, even if in fact its area is modest.


Professionals say that the installation of such systems can be done with your own hands. To do this, you just need to stock up on everything necessary tools and strictly adhere to step by step instructions. Of course, if you are not very sure about own strength or are afraid to take on such work, then you better call experienced craftsmen,

If you decide to install a floor or suspended installation in your home, then you should familiarize yourself with the advantages and disadvantages characteristic of such systems. First, let's look at their advantages.


Installations also have their weaknesses; let’s look at them in more detail.


There are several types of suspended and floor installations. Let's get to know them better.
Block installations have support posts and fasteners. Such structures can be used when installing both floor and suspended products. Block systems are reliable, strong and durable. Their installation is considered quite simple.


However, block installations have one serious drawback - they require the presence of a solid wall in the room.
The frame (or frame) system is no less reliable, strong and durable. These structures can easily withstand loads of up to 400 kg.
Frame options can be mounted on four points on the wall or two points on the floor and two on the ceiling. Sometimes such structures are installed directly on the floor.


Frame structures do not require a permanent wall, like block options. Such systems can be mounted not only on concrete and brick, but even on gypsum plasterboard partitions.
These structures are based on a durable steel frame. You can install not only a toilet on it, but also other additional elements. For example, this could be a sink or a bidet. The frame system can be installed not only near a straight wall, but also in a corner.
If you want to choose an original and fashionable design, far from the usual standards, then you should pay attention to corner installations. However, it should be taken into account that such a structure can only be installed if there are right angles of 90 degrees in the room.


Installation of corner products is more complex. In addition, such installations are more expensive than other options.
Contrary to popular belief, toilets can be different. They differ in the shape of the bowl, flushing method, release into the sewer system and material of manufacture.
Toilets are equipped with bowls of different shapes.


Toilets also vary in how they flush. This parameter depends on the direction of water flow. Modern manufacturers They produce toilets with direct and circular flush.


Modern types of toilets also differ in the way they are discharged into the sewer system.


Floor-mounted and wall-mounted toilets are made from different raw materials. Each model has its own character traits And positive traits. Let's take a closer look at what materials modern toilets are made from.


Toilets made of materials such as earthenware cannot boast of high strength. They are also characterized by slight porosity, so cleaning such products is not an easy task. Currently, such raw materials are not used so often, since as a result they produce very fragile objects that are easily susceptible to chips, cracks and other mechanical damage.


Of course, in modern production are used special technologies, thanks to which earthenware plumbing becomes more reliable, however, earthenware is much inferior to other materials from which toilet bowls of various modifications are made.
Porcelain toilets are stronger and more durable. They are easy to clean. Such models can often be found in public institutions, as they can easily withstand impressive loads without breaking down.


As for the disadvantages of porcelain toilets, they include the high cost of such products. To reduce costs, more affordable ceramics have become widespread.
Metal plumbing is a classic. Metal toilets are most often found in in public places. Such products are distinguished by durability, strength and wear resistance. They are almost impossible to damage or scratch. Steel and cast iron structures can easily withstand heavy loads.


The disadvantages of such products include the relatively high cost. Cast iron toilets are considered the least popular, as they have an impressive weight and poor durability of the enamel coating.
Glass and stone toilets (natural or artificial) are classified as products from the “modern” category. Such plumbing items are expensive, but they have an elegant and attractive appearance.


Glass models cannot boast of excellent strength characteristics. However, there are many analogues of glass and stone, from which no less beautiful toilets are made, which are more reliable, but are inexpensive.
Thanks to modern technologies On sale you can find toilets made of materials such as reinforced acrylic. Many consumers mistakenly believe that such products are not durable. Actually this is not true. Acrylic models have a long service life. In addition, such products are quite practical - they have almost no porous surfaces, so they are easy to clean from any contaminants.


The disadvantage of such plumbing is its susceptibility to deformation, which can be caused by mechanical stress or too high temperatures.
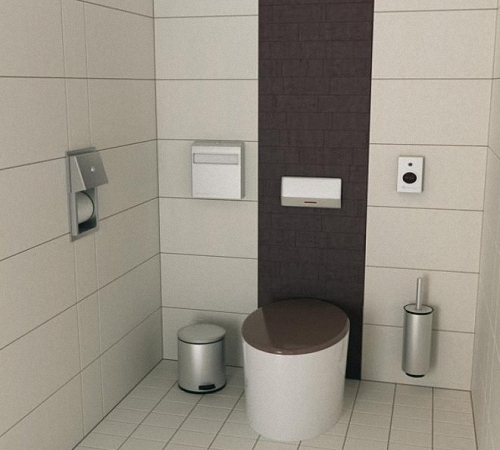
Special buttons are produced for modern installations. As a rule, they have quite big size, since it is through them that you can get to the hidden tank.
If necessary, the button can be easily removed from the special latches using a simple thin screwdriver. After that it unscrews decorative panel that surrounds the button. Other similar structures are dismantled in a similar way.


If you have a pneumatic stop-drain button installed, then the causes of problems with such structures may be:
To repair a pneumatic button, you need to have special knowledge. If you have not worked with such elements before, then you should call a specialist.


There are also touch buttons. Such details look interesting and are convenient to use. It is worth considering that the lion's share of breakdowns of touch buttons occurs due to violations of the integrity of the power cable. Only an experienced person should repair such mechanisms.
Regardless of which installation you have chosen, you must begin installation work with a competent choice of location for the toilet. In city apartments with a standard layout, you can allocate a truly suitable space - a niche in which there are risers for water supply and sewerage.
To install the installation, you will need to slightly alter the niche by placing risers in the corners. If they are made of metal, it is recommended to replace them with plastic ones.


Before proceeding with installation work, it is necessary to apply the correct markings. To do this you need to know exact dimensions installations.
Currently, toilets and installations are sold in stores various sizes. However, standard dimensions floor models are 520x340 cm. The seat height in such options is 400 mm. There are toilet models that have an increased length of 7-10 cm (such models are especially popular in America).


Hanging specimens have other parameters:


The set of floor and suspended installations includes the following components:


Many owners believe that installing the installation is very difficult, and they cannot cope with such work themselves. Actually this is not true. Let's take a step-by-step look at how to properly install such a system with your own hands.

To install a floor or hanging installation yourself, you will need the following tools:


Installations require the presence of a separate niche in the room in which the frame will be located. It is worth considering that the walls in the room must be quite reliable and strong.
The niche in the room should have the following parameters:


There are times when depth requirements are quite difficult to meet. Then the niche needs to be made as deep as possible. In this case, its deficiency should be sheathed (covered) with plasterboard and covered with finishing material.
After preparing the niche, you can proceed to installation of the installation.


Such structures should be installed with all responsibility. All parts of the box must be secured as evenly, securely and firmly as possible. Otherwise, the system may fail.
After fixing the toilet, you need to supply water to the tank. For this you can use a flexible or rigid system. Most specialists use a rigid connection because it is more reliable, durable and durable. Of course, it is permissible to install flexible hoses, but if they become damaged or deformed, they will not be easily accessible or quickly removed. During installation of the liner, the tank valve, as well as the drain, must be closed.

After connecting all the necessary elements, you need to check the reliability and quality of the fastenings. To do this, turn on the water in the tap and fill the tank. If you notice a leak, it must be fixed. In this case, water may remain in the tank.
Next you need to connect the toilet to the sewer. To do this, the drain hole of the plumbing fixture must be inserted into the sewer pipe outlet using a suitable corrugation. There are also models that can be assembled without using it.

After completing all work, you should make sure that the installed system is sufficiently tight. To do this, you need to temporarily screw the bowl to the frame. After this, it will need to be removed again. This part can only be installed at the end of all installation work.
Please note that the sewer pipe wiring must be connected before installing the installation itself. Its diameter should be 100 mm (norm). It must be laid with a special slope.
After installation of all components, it is necessary to close the structures plasterboard sheet. Functional elements must be covered with similar sheets/panels. For the bathroom you should only buy moisture resistant drywall, which is more durable and wear-resistant than simple material.

Sheathing can be done in two ways:


The second finishing method involves the formation of a small shelf located directly above the bowl. It can be used to place items needed by the owners. After this, the closed barrier needs to be finished with tiles or PVC panels - it all depends on how the rest of the partitions in the room are decorated.
As you can see, self-installation mounted or floor installation It is quite possible to do it yourself. It is worth listening to some advice and recommendations from experts to make the design more reliable and of higher quality.


An excellent decoration and an extraordinary detail in the design of a bathroom would be the purchase of a wall-hung toilet. This device does not take up much space, and when the right approach to installation, will last quite a long time. We’ll talk about how to choose a wall-hung toilet and how to install this device.
A wall-hung toilet is a structure consisting of a bowl and a cistern, which are placed in a suspended state.

The bowl is a vessel made of porcelain. The only difference between a wall-hung toilet and a floor-mounted one is the type of fastening, which is done from the side.
Wall-hung toilets come with standard equipment. Wall-hung toilet dimensions:
The system of wall-hung toilets is characterized by the presence hidden system drain, which consists of a cistern. It is located behind the partition and has the following features:
The standard tank volume is 8-10 liters. To install a cistern, you must have pipes, components, a side flush button and a flush panel.
Some toilets require the installation of a flush, which is carried out thanks to the presence of high pressure into streams of water. This system consists of a special button that is connected to the water supply system.
Wall-hung toilet photo:

1. A wall-hung toilet allows you to save space in the bathroom, as it has a built-in tank and does not require a large distance from the wall for installation.
2. The high strength of the toilet will not allow the bowl to break even when suspended.
3. Due to the fact that the toilet is suspended, the floor under the toilet is easy to clean.
4. A variety of types will allow you to choose a toilet in relation to material and individual preferences.
5. Reviews about the wall-hung toilet characterize this device as a convenient, reliable and durable item.
6. Wall-hung toilets fully comply with sanitary and hygienic standards.

Depending on the size, wall-hung toilets are divided into:
In relation to the design, toilets are distinguished:
Depending on the shape, toilets are distinguished:

There are two ways to attach a wall-hung toilet:
The first option is more expensive, but less complex. Ready system The installation consists of a steel frame that is attached to the wall and to the floor. To fix the frame, four points are used: two are located on the wall, and two are on the floor.
More expensive systems offer a choice of the width of the dots and their adjustment.
This installation is installed at a distance of 15-18 cm from the wall. The set includes:
To install the toilet yourself, without using ready-made fasteners, you must have:
To connect a wall-hung toilet you need:
Instructions for implementation preparatory work before installing a wall-hung toilet:
1. Begin installation work by installing the drain coupling. This process will help determine the height of the toilet.
2. If the height is too high, the coupling may be cut off. If the height is insufficient, a section of sewer pipe is added.
3. Measure the distance of the panels for constructing the formwork. Increase the distance by a few centimeters for extra space.
4. Using a tape measure, you should measure the interval between the place where the fasteners are attached. The standard distance is 20 cm.

5. After taking measurements, transfer the data onto plywood sheets to make the formwork panel. Chipboard, plywood or other boards are suitable as materials for the shield.
6. Check again that the measurements taken are correct.
7. Cut off the threaded rods. The length of the rods is the distance between the end point of penetration into the wall, the interval between the wall and the toilet, the installation length of the toilet and the end for screwing on the nuts.
8. There are two ways to attach the rods:
9. After the formwork is assembled, a structure consisting of three panels is obtained, which has holes for installing rods.
Tip: Before fixing the formwork panels, the coupling outlet should be closed with a plastic bag to prevent concrete and dirt from entering the drainage system.
10. The correct assembly of wooden panels is checked building level. To make the formwork more stable, install the rods and tighten the nuts.
11. Try on the toilet bowl, installing it in its future location after completing the formwork. If there are any shortcomings, it is not too late to correct them.
Tip: In order to ensure that after pouring the formwork with concrete there is still space for connecting the toilet, you should attach a small rectangular piece of foam plastic to the rod.
12. After completing the preparatory work, begin pouring concrete. To prepare concrete mortar for one part cement, take two parts sand, three parts crushed stone and a seventh part water.
Tip: To make the concrete lay easily on the surface, it is recommended to add a little liquid soap to the water.
13. To lay concrete, use a trowel and place in small portions. Gradually leveling the surface.
14. The rods for installing the toilet should also be covered with polyethylene to prevent concrete from getting on them.
15. To compact the concrete, use a long rod, which gradually pierces the poured surface, paying attention to the corner places.
16. After pouring the formwork, 7-10 days must pass before it is removed.
17. To connect the cistern, use flexible PVC corrugation. Insert it into the toilet hole and secure it with sealant.
18. Secure the pipe in this position and leave for 24 hours for the silicone to dry completely.
1. To reliably seal the joint between the toilet bowl and the rubber ring, apply silicone around the entire perimeter of these devices.
2. Place the toilet on the rods and tighten the nuts.
3. Wait 12 hours for the sealant to cure.
4. Connect the toilet to the sewer drain.

5. Install the toilet lid.
6. For finishing finishing work concrete base use any moisture-resistant materials.
Most frames for wall-hung toilets allow height adjustment. Before installation, you should take measurements and make markings. Before installation, it is recommended to study the instructions, which usually indicate the interval between the cistern and the floor. The average value of this distance is one meter.
Before starting installation work, take care of the outlet of the sewer and water pipes. The frame is fastened using anchor bolts. They are able to fix it in one position and ensure the immobility of the structure.
When installing the frame on a wooden floor, you should use the most powerful wood screws.
Before fixing the installation, you should once again measure the evenness of the structure. Use a regular level to level the frame. Measure front, back, top and bottom. For fixation correct settings use studs and rods that can temporarily attach the frame to the wall.
The height of the bowl is selected in accordance with the individual parameters of the residents. The average height that is optimal for the average adult is 400 mm.
To connect the toilet, use a flexible hose; to connect to the water supply, use a metal hose to ensure the reliability and durability of the connection.
Tip: Close the valve on the cistern while connecting the toilet to the water supply.
For exterior finishing use any materials that must be waterproof.
Do not block access to the drain tank in order to carry out maintenance or repair work at any time.
Installation of a wall-hung toilet video:
Installing a simple toilet is not difficult. But if the toilet is wall-mounted, then the bathroom must be equipped with an additional connecting link - an installation. From this article you will learn how to carry outDIY toilet installation installation, as well as its connection to the sewer system.
While different brands of toilets may differ primarily in bowl shape or surface finish, the installation could be the cause of many toilet problems over the next 20 years. Indeed, the tank, frame and other elements will be hidden, making access to them difficult.
The modern plumbing market can offer two types of installations.

Important! If the bathroom is located in the center of the living space, far from the main walls, then only a frame installation can be installed in it.
Regarding manufacturers, Vega, Grohe and Geberit are considered the most reliable today. But here everything depends mainly on personal wishes. It is important that the model belongs famous brand, which has already proven itself. The installation will be more expensive, but in terms of operation it will quickly pay for itself.

To install the installation, you need to acquire the following tools:

Correctly selected tools are already half the success.

Installation must begin with the selection suitable place. If the layout is standard, then optimal place is a niche with risers located in it. The niche itself will have to be altered somewhat, “spreading” the risers to the sides.
Important! Metal risers must be replaced with plastic ones.

Step one. It all starts with the markup. If we're talking about For a small apartment, the toilet is installed in accordance with the axis of the room, since the area here is small. If the apartment is large enough, then the toilet is tied to the drain axis. This axis must be drawn with a marker.
Step two. The next step is to measure the height. Almost always it depends only on the design features of the frame. Points for installing dowels are marked.
Important! The dimensions for this should be taken only from the instructions supplied with the product, because they are different for different manufacturers.
It is also important to maintain the correct distance of the dowels from the center of the installation. For example, if its width is 60 cm, then 30 cm is retreated on both sides of the axis. Holes are made with a hammer drill, and dowels are hammered into them.

Step three. The drain tank is screwed on and the drain hole is twisted (both procedures are described in more detail in the instructions). The presence of all necessary gaskets is checked, after which the tank is connected to the water supply.
Step four. The pins that come with the plumbing fixtures are screwed into the pre-made holes. The distance by which they protrude outward depends solely on the size of the toilet. It is typical that the pins will be open until the installation is completed - only then is the bowl installed.
The last stage is fixing the drain hose with clamps (if provided for by the design).


Step one. First, the frame is assembled, after which the drain tank is attached to it. The position of the frame is adjusted using screws and brackets located on top. The frames are always sold separately - they are universal, so they are suitable for any toilet.

Upon completion of assembly, a structure with a height of 1.3-1.4 m comes out, while the width depends on the specific model. Maximum load that such frames can withstand reaches 450-490 kg.
Step two. When installing a drain tank, you must adhere to the following rules:
Typically the frame is attached in four places. There remains a small gap between it and the surface - at least 2 cm.
Step three. The assembled installation is installed, and clearly horizontally. To do this, use a plumb line to check the slope of the wall and, if found, a horizontal line is drawn at the point where the plumb line touches the floor. Then a second one is drawn from the line at the distance required for installation of the installation.
The frame is applied to the wall, fastening points are marked. Holes are made. The frame is screwed to the floor, its height is adjusted with screws, and its horizontalness is adjusted with a building level.
Step four. Supplied to the drain tank water pipe. This can be done from the side or from above, but in almost all modern models The connection location can be changed.

Important! It is not advisable to use a flexible hose when connecting a flush tank, since it will last much less than the toilet itself, and replacing it under a false wall, if necessary, will be quite difficult.
Therefore, for connection they are used plastic pipes. The tank itself is insulated with material that prevents moisture condensation. Everything that is required for installation is included in the kit, except that the panel with the drain button must be purchased separately.
Step five. The toilet outlet is connected to the riser. It is often impossible to insert the outlet directly, so corrugation is used. After this, all connections are checked for leaks.

Step six. Before assembling the plasterboard box, you need to do the following:
All technological holes are cut out in the drywall, after which it is fixed to the frame with self-tapping screws. Drywall is finished with tiles.

Step seven. You can begin installing the toilet no earlier than 10 days after laying the tiles. The outlet is adjusted to the sewer hole, and the place where the tiles come into contact with the toilet is covered silicone sealant. The toilet is placed on the shifters, the nuts are tightened.

After this, it is advisable to carry out a test drain of water in order to check the tightness.

Step one. The position of the knee is fixed using metal fasteners. The toilet outlet is treated with technical ointment, after which the device is placed at the installation site. Its outline is outlined with a marker, all mounting holes are indicated. Then the toilet is removed, and according to the markings made, the mounting angles included in the kit are installed. The toilet is put back, the outlet is pressed into the drain pipe.

Step two. The drain tank is installed according to the instructions. A connecting cuff is fixed at the toilet outlet, the bolts are tightened, and their caps are closed with special caps.
Step three. The drain button is inserted into the made technological hole.
Step four. Finished design checked for leaks.
Here, in fact, are all the nuances of installation. The main thing is to fulfill all the requirements, and at the end of each stage, check the tightness of the connections. All detected defects should be eliminated immediately, since it will be difficult to do this later, when the structure is hidden by drywall.


.jpg)


