If the issue of environmental friendliness is not an empty phrase for you, then you have probably already paid attention to MDF panels for walls. With their help, you can seriously decorate your interior, make it more expressive and modern, without completely emptying your precious property in the current economic conditions. family budget. In addition, the installation process does not have any prohibitive level of complexity and is quite accessible to a “mere mortal” to master. Therefore, feel free to arm yourself with a tool and hurry to purchase the material - today we will talk about how to attach MDF panels to the wall in such a way that you will experience well-deserved satisfaction when you see the result.


It is quite logical before the direct installation of this or that finishing material inquire about what positive and negative sides. Moreover, from the point of view of the appropriateness of using MDF panels, they are not such a clear-cut solution as plastic or plasterboard. You can read similar instructions, but for attaching drywall, in the article: “How to attach drywall to a wall: 2 installation methods.”
+


-

As you can see, MDF panels can only be attached to a wall surface in relatively dry rooms with favorable thermal conditions. Be sure to get rid of mold on the walls, if any. In this case, it is necessary to take into account the fact that this material is very afraid of any force and will inevitably crack with any active contact with it. Otherwise, all the negative aspects of use are successfully offset by its advantages. One of them is a wide selection of different textures and colors, allowing you to decorate the interior in full accordance with your aesthetic needs. 


In order to attach the panels, you do not need any specific tools. You need to keep on hand the same standard set that is used for installing any other finishing material.
Prepare consumables:


All that remains is to add the MDF panels themselves - and then you will have a complete set of everything necessary for high-quality and successful installation. In order to calculate their exact number, you need to make the correct markings. 


Probably the most tedious and tedious stage, which many masters (both beginners and already professionals) do not take entirely seriously. It’s a pity, because a lot depends on the quality of preparation of the base surface. Especially if you attach MDF panels directly to the base without creating a leveling frame. Therefore, it is better to think soberly and perform the necessary manipulations with the utmost quality and care:


All your further actions depend on how you decide to attach the panels to the wall - directly with glue or through an auxiliary frame device. Let's consider both types of installation, noting the features of their use, pros and cons, as well as the specifics of performing various stages. 


The main disadvantage of this option is the need to install a frame, which slightly lengthens the duration of the work. In addition, the frame takes up a certain number of centimeters of free space. Are you ready to put up with such “arbitrariness”? Very often you simply have no options, because achieving an ideal surface is not possible every time you need it. 
A very important point is to know how to attach MDF panels to the wall: vertical or horizontal. The nature of the design of the auxiliary frame directly depends on this.


As you can see, everything is quite simple - it’s unlikely to be confused! 


Some points to pay attention to:


The entire process of installing the frame is in the next video.
Video detailing key points operations below.


Surface preparation and marking when this method practically no different from the previous method we considered. The only difference is that you need to work hard primer in order to prevent the appearance of fungus or other destructive processes.
The rest is on my own algorithm of actions
looks like that:

As an excellent adhesive option for MDF panels, we recommend using liquid nails
- fast, reliable and very inexpensive. 


The following video will show you how to attach MDF panels to a wall surface using glue.
Information on how to properly attach MDF panels to walls of any type will definitely not be superfluous. In some cases, this material appears almost ideal solution for decoration of wall surfaces. In addition, it is quite lightweight and easy to install, so it is quite possible to handle it even alone. The main thing is to strictly follow the time-tested algorithm for attaching MDF panels and not be lazy to work hard on the base base, so as not to reproach yourself later for the appearance of fungus and other troubles. 
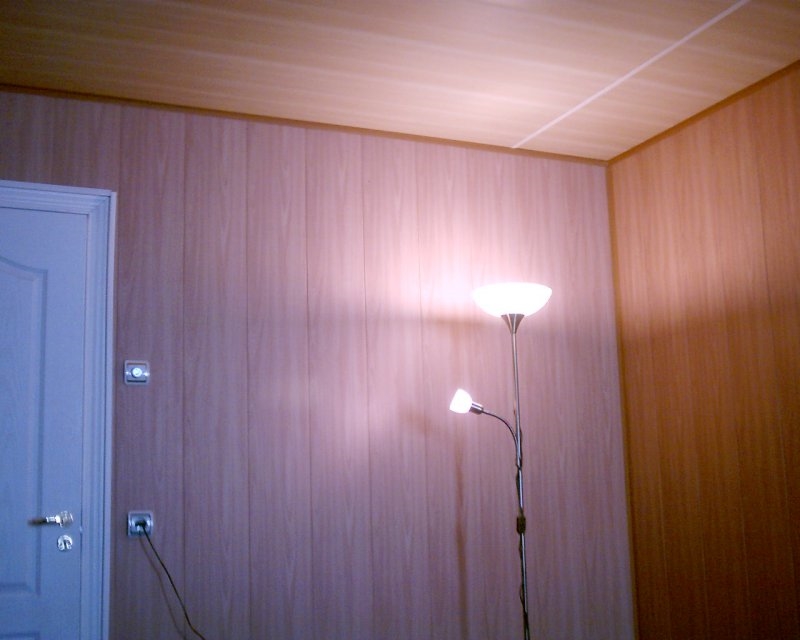


Photo: vk.com
IN modern world When it is necessary to quickly finish walls, MDF panels are widely used. This is primarily due to affordable price, as well as environmental friendliness. To perform installation wall panels Do it yourself MDF, you don’t need much experience. You just need to be careful and be precise in your calculations.
MDF panels are produced from wood processing waste. Do not confuse this material with similar ones: fiberboard and chipboard. MDF panels are made by dry hot pressing, where the wood is pressed without taking into account the binder component. The essence of the method is as follows: wood consists of fibers (lignin), which, under the influence of high temperature and pressure, become pliable and connect with each other. The structure of the MDF material is somewhat reminiscent of felt, but consists of wood fiber.
MDF panels are absolutely environmentally friendly material, therefore they are widely used for interior decoration. The principles of working with panels are similar to wood.
MDF wall panels are significantly inferior in price to lining, but if you compare this material with similar “brothers” - chipboard and fiberboard panels, then MDF will be more expensive.
Installation of MDF wall panels is attached to the frame or with glue for wooden products. Also, the “Liquid Nails” adhesive mass has been developed specifically for working with MDF panels. This is an adhesive containing a filler made of sawdust. This glue is convenient for working both with MDF panels and for filling cracks. When working with “liquid nails,” you need to take into account that MDF wall panels have color, so when purchasing glue, you need to ask the consultant to provide a sample of a frozen drop (usually available on the lid).
Every man has a standard set of tools at home, to which you need to add:

Fastening MDF wall panels is carried out in two ways:
Both methods are equally practical. For example, if you need to hide any communications, then use a frame method of fastening. If necessary to trim flat surface, then the installation of MDF wall panels is carried out using the adhesive method.
When attaching MDF wall panels, two frame methods are used:
The easiest way is to make a wooden sheathing, since for its assembly you will not need to install a large number of hardware. But wood sheathing is an expensive material. In addition, the wood must be pre-treated with agents that prevent the formation of fungus and mold.
You can attach the wooden sheathing to the wall using self-tapping screws or mounting nails (dowels).
It is undesirable to use such lathing in brick house and a damp room, because fungal spores and moisture can penetrate through the pores of the brick. In such a “cushion” between the wall and the MDF cladding, pests will rapidly develop.
To install a metal frame, you need to purchase a profile, special fasteners (“ears”) and connecting elements. It is advisable to purchase them if you plan to complete a large amount of work in a short time. If you plan to cover one or two rooms with wall panels, then you can completely do without them.
The metal sheathing is attached to the wall only with self-tapping screws. To attach a metal profile to concrete base, a self-tapping screw with a diameter of 4-6 millimeters is used. If the wall is strong, then the diameter of the fastener decreases. In addition, you need to know that each fastener (screw or dowel) is attached together with a plastic “socket”. Therefore, a hole in the wall is drilled according to the diameter of the “socket body”, and the protrusions are not taken into account.
The plastic base is hammered into the wall, and the fastener itself should go 30-40 millimeters into the wall. For example, if the layer of plaster is 12 millimeters, then for the lathing you need to use an MDF wall panel measuring 16 millimeters, and the length of the hardware should be about 68 millimeters. This figure is calculated by the formula: the thickness of the plaster plus the length of the fasteners plus the thickness of the MDF. Accordingly, fasteners can be purchased in lengths from 70 to 80 millimeters. The depth of the hole should be another plus 15-20 millimeters, which are allocated “to the dust”. The final figure is 100 millimeters.
If you are working with a long drill, then you must first put a restrictive tube on it. Try to drill shallowly into the wall, as its thickness may be slightly less than 200 millimeters.
Before finishing a room with wall panels, it is advisable to first insulate the walls. The sheathing cells are filled with sheet foam. It is very convenient to work with such material, especially to cut sheets to the required size. Additionally, foam insulation will protect voids from condensation and the appearance of wood pests. IN summer time, when the building heats up, the foam will protect the room from overheating. In addition, the heat flow into winter time will be significantly reduced.
Wooden sheathing begins to be installed from a vertical stand. Each rack is placed in a corner of the room so that it forms a corner. Then the racks are placed along the edge of the window and door opening, starting from the floor to the ceiling. Check the verticality of the racks with a plumb line.
Next, apply the stand and mark it on one side with a marker or pencil directly on the wall. Drill according to the marks with a drill in concrete wall holes for fastening. The hole spacing ranges from 500 to 700 millimeters. Then “sockets” for fasteners are inserted into the holes and their position is again marked with a pencil. The holes are drilled to two-thirds the diameter of the fastener and then it is inserted back. Experienced craftsmen They act differently: they drill holes in the racks in advance, and make markings directly through the racks.
The remaining logs are installed using the same principle. Along the top of the opening, as well as under the window sill, it is necessary to install logs, regardless of the “step”. In addition, the slopes window openings also “decorated” with slats: inside and outside.
When the wooden sheathing is ready, the ledges on the slats (their joints) are removed with a plane.

Lathing for MDF wall panels is installed according to the same principle as wooden lathing. First, the corner posts are attached to the wall, then the posts in the openings and the cross posts. Step metal sheathing– 500-700 millimeters. The racks are assembled from two types of profiles: “UD” (narrow) and “CD” (wide). The racks have a narrow profile, and wide profiles are inserted or pushed into them. Then, using a building level or tape measure, check the horizontalness and pitch. After that metal slats They are attached first to the racks and then to the wall. The sheathing parts are connected to each other and the wall with self-tapping screws. Remember! Dowel nails cannot be used, because the profile may “lead.”
If you connect segments metal profile among yourselves, do it in advance.

Installation of wall panels is very simple. After constructing the frame, they begin to install MDF panels. They are attached to the base using a special clamp - “kleimer”. It is inserted into the hole on the panel (groove). Working with such a fastening element is a pleasure, because the clamp ensures reliable fixation of the panel to the frame. In addition, they are designed so that the next panel can be easily inserted into the groove.

Attaching MDF wall panels with glue is much easier. Firstly, it saves time, since you do not need to pre-install the frame.
Which glue is best to work with? Ordinary glue will not work, so tips on choosing an adhesive will be useful for beginners:
Wall panels must be attached to glue according to the following rules:
When the wall dries, you can prepare the panels: cut them according to size. Then apply glue to the panel “dotwise” or in a “checkerboard pattern”. Try to keep the drops not scanty, but rather large. After applying the glue, press the panel against the wall, “tap” it well and tear it off. This is the gluing technology. Thus, when the panel is torn off from the wall, the glue is exposed. The glued panel under the pressure of its own weight will not peel off from the wall.
To save time, you can immediately apply glue to five to seven panels, glue them and, one by one, tear them off the wall. While the glue is weathering, you can take a short break, and after three to five minutes return to work and hook each panel. Now you need to tap thoroughly.

Sheet MDF wall panels, as well as laminated MDF wall panels and standard panels are easy to glue, but cutting them evenly and accurately is much more difficult. In this case, due attention must be paid to any obstacles, such as slopes.
When working with glue, you must remember that the final result will depend on the accuracy of the work.
You can see what MDF wall panels look like in the interior in the photo:


How to install MDF wall panels, watch the video:
Attaching MDF panels to the wall is a process that is not difficult if you know all the features of the technology. I'll tell you how to cope with working with minimal costs time and money, both options have been repeatedly tested by me in practice, which allows me to confidently say that fastening MDF is within the capabilities of any developer. It is important to follow all the recommendations outlined below and have a kit on hand necessary tools and devices.
Let's figure out what ways there are MDF fastenings panels to the wall, there are only two of them:
If you don’t know which option to choose, then you need to familiarize yourself with the advantages of each solution:


Let's figure out how to fix MDF panels to the wall using a special frame, which is made either from wood or from a profile. Let's start by considering a more budget-friendly and available option using a wooden block.
The workflow looks like this:

Important!
If the MDF panels are placed horizontally, then the sheathing should be vertical.
And vice versa - for the vertical arrangement of panels you need to make a horizontal frame.
You must know in advance how the finishing will be done.


As for the option with a metal frame, it is suitable for rooms with changes in humidity, since the galvanized profile perfectly withstands adverse influences and does not deform over time.
Let's figure out how to attach MDF wall panels to a structure made of metal profiles:


Fastening MDF panels to a wall without sheathing will become excellent option where the walls are smooth and the finish on them is reliable, because you will have to glue the elements, and if the base is weak, then they can simply fall off after a certain period of time.
Let's figure out how to do the work yourself; there is nothing complicated in the process, the main thing is to follow a few simple recommendations and use only high quality materials.
The sequence of operations is as follows:


Important!
Sometimes a combined method is used, when MDF panels are glued to a wooden sheathing.
This option is good when you need to insulate the surface or in cases where it may subsequently be necessary to dismantle the coating.

Naturally, you will need a certain set of tools, I will list what should be on hand without fail:
| Hacksaws | If you are gluing panels, you will only need a hacksaw with a fine tooth; a metal version will also work. But if you make a frame out of wood, then you need another hacksaw with larger teeth. |
| Measuring tool | First of all, you need to have a tape measure, a building level and a pencil on hand for marking. In order for the ends to be perfectly even, you need to additionally purchase a square, which will simplify the work and allow you to draw corners |
| Screwdriver and hammer drill | If you use self-tapping screws, then you cannot do without this power tool. And to fasten the dowels you need a more powerful option - a hammer drill with a drill of the required diameter |
| Glue gun | It is needed if you will be gluing elements. The device costs a little, but it’s much more convenient to work with. |

If you don’t have the same hammer drill or screwdriver, then there is no point in purchasing them for a couple of hours of work. Borrow an instrument from friends or rent, it will cost much less.
Cut corners from MDF is better not just a hacksaw, but a sharp one construction knife, this way the result will be much better, and the ends will be much neater and smoother, the main thing is that the blade is sharp and rigid and does not bend when pressed.
In my subjective opinion, the work of fixing MDF is one of the simplest and easiest; you only need to do it once in order to subsequently quickly and efficiently cladding both walls and ceilings. The video in this article will tell you Additional information on the topic, and will also clearly show some important points workflow. If you still have questions, ask them in the comments under the review.
It is possible to obtain an attractive wall design, provide comfort in the room and an environmentally friendly environment in it, using modern finishing material - MDF. It is produced in the form of panels. It gained fame extremely quickly due to its practicality and attractiveness; its use is allowed in rooms with extreme loads: kitchen, living room, hallway. MDF panels surprise with their variety of shades and textures; they can very accurately imitate natural wood materials, brickwork or tile. The cost of the material is low; if you install it yourself, you can get significant savings on finishing work; during operation, it will not require particularly complex care.
To begin with, we note that MDF panels are produced not from solid wood, but from waste, and no synthetic impurities or glue are used, technological process consists of heating wood chips to high temperatures and pressing it under high pressure. The strong connection of material fragments occurs due to the natural polymer compound released during heating - lignin.
Among the important advantages of MDF panels it should be noted:

The main disadvantages of the panels are:

Different finishing methods are used in the manufacture of panels front side, accordingly, the panels themselves are divided into two types:

The external finish of the panels can be shiny - glossy, or matte.

Although installing MDF panels is not a complicated process, it will nevertheless require preliminary preparation, purchasing the facing material and necessary components. To correctly calculate the number of panels, you should first take into account the width of the space to be finished. MDF panels have the following dimensions: their standard width is 148, 190, 240 mm. Determining the required number of panels is simple: it will be the quotient of dividing the width of the wall by the width of the panel. You should purchase a little more material than was received by calculation: there may be defects, some of it will be used for scraps, and losses may also occur as a result of errors.
For work you will need to stock:
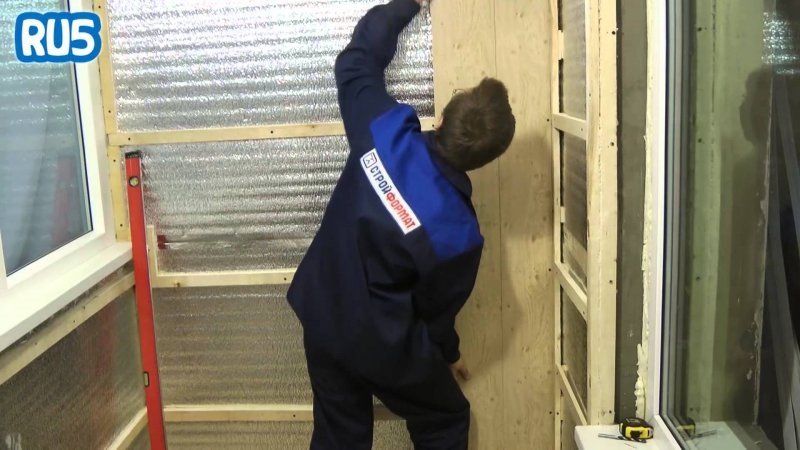
Preparing the walls will consist of cleaning them from remnants of old wallpaper. You will also have to remove the baseboards. The surface of the walls must be treated with an antifungal primer, especially for rooms with high air humidity. If necessary, the walls can be covered with insulating material, for example, foam foil A. It is attached with glue, end-to-end, with the foil side facing the room.

The use of finishing corners will greatly simplify installation. Consisting of strips located with a gap of 2 mm, they are intended for fastening strips; a film corresponding to the color of the panels is applied to their surface. The formed angle very simply bends outward or inward. This point is especially important if the geometry of the existing corners is far from ideal.
To build a frame for the cladding you will need slats, preferably 20x40 mm. There is no point in using slats with a large cross-section - the panels are light in weight. In addition, slats with this cross-section are constantly available for sale in construction stores. Fastening the slats can be done using plastic dowels and wood screws.
To fasten MDF panels to the frame bars, you will need clamps; most often they are sold complete with the panels. It will be convenient to glue the corners with liquid nails. We should especially talk about the quality of the glue - since the panels can change under the influence of moisture and temperature, the glue for them must have some plasticity. Such characteristics of the glue are usually indicated on its packaging. In addition, the glue must have a texture that allows it to be applied in a thicker or very thin layer, depending on the curvatures present on the walls. Liquid nails meet these requirements.
Installation of the sheathing should be carried out by checking the evenness of the structure, for which you can use a regular building level.

Before attaching MDF panels, you should definitely make sure the quality of the installation of the sheathing - this will ultimately determine general form walls To fasten the panels to the sheathing, clamps are used.
Those who decide to decorate MDF panels with their own hands should not neglect the following recommendations:
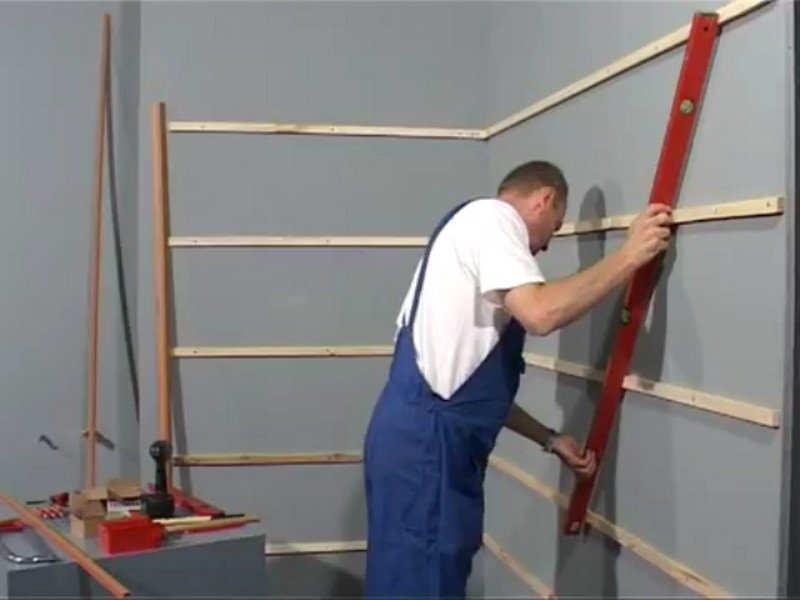
Installation of the sheathing begins from the most convex place on the wall. The bars are mounted in a horizontal direction, with a step of no more than 40 cm. Increasing the step can lead to distortion of the pattern.

You should start attaching the planks from the corner; it is advisable to make the calculation in such a way that last panel remained intact. Before starting installation work, you can repeat the calculations or even try on how the purchased material will fit on the wall. The tenon of the first panel should be in the corner.

Along the length of each panel you will need to use 5-6 fastening clamps. They are distributed evenly and secured to the slats using a screwdriver. The opposite end is fixed using self-tapping screws.

In order for the head of the screw to sink into the material, you must first drill a hole with a diameter of 8-10 mm in the strip. The next plank is fastened with a tenon into the groove of the previous one; this procedure is repeated until the last one is installed. Each of the joints at the joints, side and top edges are secured with corners using liquid nails.
If you choose the option of laying panels in a horizontal or diagonal direction, then you should change the direction of the sheathing - its strips should be located perpendicular to the panels of the facing material.
All significant depressions found on the walls should be filled with blocks or wedges.
From below, the joints of the slabs are covered with a regular plinth; it can be secured with nails or sealed with sealant. To make it easier to attach the plinth, the bottom batten of the sheathing is fixed at floor level. The joint under the ceiling can be made with a corner or plinth.

Methods of fastening MDF boards may be different, depending on the condition concrete surface on which installation is carried out. If it is leveled and clean, then the panels can be glued directly to the wall using adhesive sealant.

It is applied in a zigzag over the entire board, then it is pressed firmly against the wall for a couple of seconds. If excess glue comes out, carefully remove it with a spatula.
If a layer of insulation is laid under the MDF boards or numerous utility lines have to be hidden under it, then the best option The slabs will be installed on a metal frame.

If you need to hide noticeable wall irregularities, it is better to use a lathing made of wooden beams- it will be stronger and more stable. In places where sockets or switches are installed, holes of the required diameter should be made using an electric drill.

You can often find discussions about installing MDF panels in the kitchen. It is not easy to give a definite answer to this. MDF is an environmentally friendly material, it does not have unpleasant odor, therefore cannot cause any harm to people in the kitchen.
At the same time, the material is not moisture-resistant to the extent that would allow its unhindered installation in rooms with high levels of humidity - under the influence of water, the material may lose its attractive appearance. But it is still possible to improve areas remote from places where water is used, for example the dining area, using MDF boards. At the same time, it is recommended to mount the panels on a metal profile - wood in a humid environment can suffer from fungi and putrefactive processes. In addition, experts recommend paying attention to a relatively new version of panels with a special moisture-resistant coating.

The period of operation of the slabs will not cause much trouble. The surface of the slabs is very smooth, it is well laminated and covered with paints. Cleaning the material from contaminants is done with a moistened soft cloth; when cleaning, do not use substances containing abrasive particles.
If during operation peeling of the top coating of the film becomes noticeable, it can be removed using a fine-grained sandpaper. Any of the damaged slabs can be replaced quite easily with a new one.
Today the simplest and in a fast way To make the walls of your home beautiful and smooth, decorate them with MDF panels. This solution is, of course, not suitable for all rooms, but for corridors, stairwells, storage rooms and hallways, this material will be almost ideal. We will talk about it in this article, in which, together with the website, we will look at how to install MDF panels using frame and frameless methods with your own hands.
There are two ways to fix MDF panels on the walls - the so-called adhesive and frame. Both of these methods are good and are used depending on the circumstances. If finishing walls with MDF panels involves hiding any communications, then the frame method of attaching MDF is used. If we're talking about about finishing smooth walls, then the glue method is used.
Wall decoration with MDF panels photo
The very name of this method speaks for itself - to implement it you will need to build a frame, which in some way resembles the structure that is used for. The difference lies only in the position of the load-bearing ones - if they are installed vertically to fasten plasterboard sheets, then MDF provides for a horizontal arrangement of profiles. In this regard, the peculiarities of constructing such a frame arise.
In principle, at the first stage everything happens in a similar way - the plane of the future frame is hammered out, then guide profiles are attached along the perimeter of the wall, on the floor, ceiling and adjacent walls. This is where the differences begin. In a given plane, vertical load-bearing profiles cd are installed not after 600 mm, but after 3000 mm, which is the standard length of the load-bearing profile.

Installation of MDF panels: frame method
This is done in order to subsequently install horizontal load-bearing profiles cd between them, the pitch of which is 500 mm. They are connected to vertical profiles using crab CD connectors, and fixed to the wall with the same U-shaped brackets.
Installation of the frame is the main work in the process MDF installations panels. The mount itself is more easy process, which almost everyone can handle. MDF panels are attached to the frame using clamps (special clamps). Before fastening it to the frame, the clamp itself is inserted into a groove located at the end of the panel, thus ensuring their reliable fixation to the frame. The clamps are designed so that they do not interfere with inserting the next panel into the groove.

DIY installation of MDF panels photo
Installing MDF panels on walls using glue is much easier - the entire installation process is greatly simplified by the absence of metal or wooden frame, the construction of which takes quite a lot of time.

Installation of MDF wall panels photo
Before we begin directly attaching the panels, let’s first look at the glue that is used for these purposes. Or any glue will not work here - you need a composition that has certain qualities.

Liquid nails for mounting MDF panels photo
The installation of panels using glue itself looks quite simple - its technology is almost completely described on a tube of “Liquid Nails” glue. It is not recommended to violate it. To begin with, the walls covered with panels must be cleaned of dust and dirt - in principle, if you are going to seriously engage in self-repair, then the priming process, which is performed to clean the walls from dust and dirt, and at the same time to improve the adhesion of materials, should become a habit. They always prime everything, everywhere.

Priming walls before installing MDF panels photo
After the primer has dried, the actual gluing of the panels begins. While it dries, you can do other preparations - for example, cut several dozen panels to size.
The glue is applied directly to the panel itself in a dotted manner and in a checkerboard pattern - the glue drops should be large. Once the adhesive has been applied, the panel is pressed against the wall, tapped firmly and torn off. This is required by gluing technology - you need to tear off the panel so that the glue is weathered and the panel does not peel off from the wall under its own weight. To speed up the process and make installing MDF panels with your own hands faster, you can immediately, one after another, smear up to a dozen panels, attach them to the wall and tear them off. While the glue is weathering, you are allowed to take a smoke break - after five minutes, the panels can be hung on the wall again and thoroughly slammed down.

How to glue MDF panels to the wall photo
It is easy to glue the panels; it is much more difficult to trim them evenly and accurately. In this regard, special attention must be paid to slopes and similar obstacles encountered on the way to installing MDF panels. It should be understood that the even cutting of the panels completely depends appearance premises.

Installation of MDF panels on walls
Well, in conclusion, we will dwell on the main installation nuances that are typical for both methods of fastening MDF panels.
That's basically it. This is how MDF panels are installed. This process is neither complicated nor simple, like, in general, any finishing work, in which your attitude to little things plays an important role, which together have an impact on big picture repair. Simply put, there are no trifles in this matter.


