Trying to save money or realize their idea without turning to designers and planners, many people think about how to make a hallway with their own hands. This is quite an accessible matter, but it is important to take into account some principles and know all the subtleties.


Based on the appearance of the “entrance” room, all your guests and even just casual visitors will form an impression of the home as a whole. Carefully think through the concept, the main idea of the entire room. And then only start working when you are sure that the idea is practical, and its implementation will lead to the optimal result.
A hallway made with your own hands is, in any case, more unique than something made to order. But having freed yourself from the “tutelage” of designers and engineers of the furniture industry, you will have to independently understand all the nuances. The main types of these rooms are corner, open, compartment and hinged; depending on the specific type, the requirements for furniture differ.


IN corner room absolutely everything is subordinated to the idea of maximizing the use of space, or rather, an empty corner. Open shelves can be placed on the sides of the wardrobe; cabinets and hangers can be placed in other places. classic look. You can additionally save corridor space if the cabinet doors are mirrored.


The open type of hallway contains the bare minimum of furniture - there will obviously be no upholstered furniture, and sometimes there won’t even be a closet to be found. If there is one, it is relatively small; hooks and hangers are used for hanging clothes, visible to everyone. The opposite is a room in a compartment format, in which wardrobes of the same type are invariably placed. It easily accommodates the personal belongings of everyone who lives in the apartment; sometimes you don’t even have to look for a place for clothes for different seasons.

Among all materials, it is advisable to give preference to furniture panels - they are superior simple boards made from pine and other types of wood, do not contain synthetic resin or other artificial components. They have only one minus - it is a solid price.


The use of chipboard, plywood, and plasterboard is attractive in cases where cost-saving considerations come first for you. Do not be afraid, however, to make mistakes against the canons of style, design possibilities modern materials big enough.


If you can use MDF instead of chipboard or take finished parts from old furniture, this is exactly what you should do. This will allow you to perform the work more efficiently, get an aesthetically complete result, and the furniture will be better in terms of environmental parameters. Using improvised materials is much more convenient and easier than trying to use steel or aluminum pipes, because metal processing at home is quite complex.


Veneer finishing is not too heavy, but this material is expensive; When choosing between melamine and laminate, you should definitely give preference to the second, as it is stronger and longer lasting.


When the material is selected, you need to decide on the dimensions of the future structure (or several furniture designs).
Even if the size of the corridor is “mini”, try to place in it:


All these functions can be performed by combined pieces of furniture that help save space. If there is an acute lack of space, you should limit yourself to a compact floor or wall corner hanger connected to a shoe rack and a small soft seat. If you are installing a cabinet, its minimum depth should be 40 centimeters (it simply doesn’t make sense to do less). For corner cabinet optimal parameters there will be a length and width of 0.9 meters, a height of 2.5 meters, but provided that the ceiling height allows.


Painting the furniture in the hallway is very important point in its design; according to designers, it should be selected in harmony with:


Light colors always add not only space, but also a feeling of freshness; the room will look more modern. For narrow, long corridors, brown and other heavy paints are categorically unacceptable. They will create the impression of being in a strange, dark tunnel. If the area is large enough, then the white walls will evoke associations with a clinic or laboratory.


Conclusion: you should not paint furniture in the same colors as the walls.
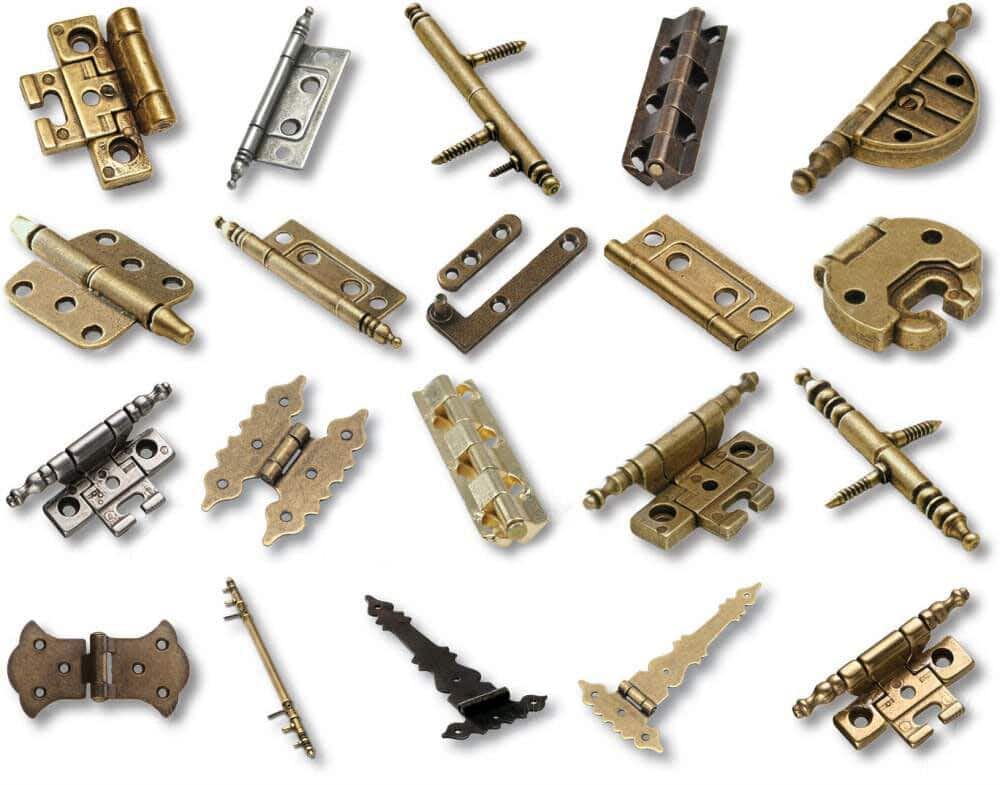
Door hinges and ties, handles, and mechanics for tilting doors are used. There are also rods for hanging hangers, holders for shelves and drawers, shoe cassettes and boxes made of metal mesh.
Swing doors are most often hung on four-hinged hinges, and if a more compact one is required door block, use furniture blinds made in Germany and Italy. It is not recommended to use corner ties; their appearance will not fit into any decent interior.


You will definitely need:
From Supplies You will need furniture screws, corners and door hinges.

It makes sense for both beginners and experienced home craftsmen to draw up drawings and diagrams, because even the most prepared can make a mistake, do something wrong or miss an important circumstance. Immediately decide on the dimensions and geometric configuration, and what types of furniture will be used. In a spacious room you can install a wardrobe, but if there is not enough space, you will have to draw a corner hallway.

At a level below 70 centimeters, it is advisable to secure not roll-out drawers, but baskets in the form of a grid (they are more convenient and do not collect dirt as much when storing shoes). Using modern brackets, you can place such a basket in a closet much wider than they themselves. Considering, again, the relatively small dimensions of the hallways, all furniture components in them should be smaller than those used in other rooms.

Format country attracts the attention of designers for good reason, because it brings a feeling of coziness and comfort to the room.
Scandinavian style is a combination of warm natural shades as accents and a general light background. The style of Art Nouveau, also known as Art Nouveau, is characterized by curved lines similar to plant stems. Modern hallway has no specific framework, it can take the best from all other styles, and at the same time the design cannot be reduced to one of them.
Provencal style is played out favorably and emotionally enhanced precisely due to the antique decor. But in a “Scandinavian” hallway, unnecessary decorative elements are inappropriate; there should be nothing there that is not absolutely necessary. On the contrary, it is very useful to introduce luxurious gilded details into an interior in the Art Nouveau spirit. If exquisite mirrors are placed, bright ones are made color accents, this will only be a plus.

photos
In the hallway of a Khrushchev apartment, it is advisable to use minimalist furniture. Avoid excessively small details, try to ensure that all elements of the headset are made uniformly. Closed systems storage is preferable to open ones; they do not create a feeling of overcrowding and bad taste. Only in the cramped rooms does it make sense to install an open hanger instead of a closet or drawer. Visual softening of corners and maximum smoothness of lines are other important requirements for the design of furniture for the corridor.


With all the beauty natural stone, relief panels and similar volumetric solutions, refuse them - absorption of space has too bad an effect on the feeling of it. Important: do not use large patterns, they only spoil the impression. When finishing both furniture and walls, use only high-quality materials and designs that will not lose their attractiveness for a long time. appearance.

If you decide to make the furnishings wooden, you will need furniture panels, boards with dimensions of 200x12x1.6 centimeters, a tongue and groove board 200x24x1.8 centimeters, three-meter slats, plywood, hinges and handles. Depending on the specific idea, other components may be required. It is recommended to start work by assembling a cabinet (dimensions, for example, 82x40x4 cm); the tops of the side walls in the corners are sawed off to narrow the lid compared to the main part. Self-tapping screws are used to connect the parts; corners for the baseboards must be cut out at the bottom. The face plate should be secured with dowels.

Then you need to make a simple door (dimensions 40 by 40), drill holes for the hinges and install the part. Runners are made for the roll-out drawer in the upper part of the bedside table, they are cut out of plywood and attached to the sides.

Next comes the turn of the cabinet lid (attached to dowels), you need to drive short furniture nails about two-thirds into the upper ends of the sidewalls. Place the cover and press on it, this will mark the holes. They are drilled, a cover is installed on the dowels and glue. To ensure better adhesion of the adhesive layer, place a heavy weight on top.

The next step is to make a cabinet, which should be different from the previous one, its dimensions are 82x49x40 centimeters. Whether to make internal shelves or not, and how exactly, is up to you to decide. The structure is fastened from the sides with self-tapping screws, and the upper segment of the middle partition will be held in place by dowels. The doors will need to be cut out, the hinges secured, the front trim and cuts for the baseboards prepared.
How to do DIY wardrobe in the hallway? The article contains valuable recommendations on self-assembly of a wardrobe in the hallway and photos.
Self-assembly instructions will tell you about the list necessary tools and materials.
The reader will also learn about simple tips, which will help simplify this process as much as possible, and graphic support in the form of pictures will clearly show how and what to do at each stage of assembling the wardrobe.
In contact with
Classmates

To assemble a wardrobe with your own hands, desire alone is not enough. To do this, you will need the skills of a carpenter and the appropriate power tools:
Every owner has the rest of the tool:
Sketch with wardrobe dimensions
To produce correct measurements, you first need to decide where the wardrobe will be located. For example, in the hallway wardrobes have rectangular shape. Drawings for such a cabinet are made simply: the width and height of the wall are measured. Next, the parameters of the wardrobe are adjusted to these dimensions.
The figure shows that the master sketched out the dimensions not only of the width and height of the cabinet, but also the depth and even the dimensions of the doors. It is worth noting that depth measurements require a small offset of 0.03 mm, which is exactly how much the cabinet doors occupy. In other cases, measurements are entered as shown by the tape measure.

Accessories for wardrobes
With the finished sketch, we head to the building materials store, where the sellers will help you calculate the quantity necessary materials. Order a service for sawing chipboard sheets of the required sizes so as not to waste a lot of time and effort on manual work.
In this way, blanks for doors, walls and the ceiling of a wardrobe are made. In the same store you can also choose accessories - rollers, rivets, fasteners and corners.
Steel materials are also purchased:
In the process of making a wardrobe, you will also need sandpaper and varnish.

The first step is to level the floor and walls. Special attention this process is given only if you plan to do corner cupboard-coupe. The floor can be leveled cement mortar(screed), and the walls in two ways, depending on their unevenness.
If the walls have large differences - from 2 cm or more, then plaster will be needed to level them; in other cases, putty is sufficient.
After the building materials have completely dried, the working surface is treated with antiseptic compounds. The plastered surface is additionally coated with a primer, and the putty surface is covered with water-based paint.
Helpful advice: The evenness of the walls and corner can be checked using a regular corner or a rule.

Assembling the frame for the wardrobe
The frame is assembled in strict sequence:
Take note: Never try to install the side panels yourself; it is better to do this with an assistant. One person holds the side panels, and the other hooks the corners from the bottom and top of the chipboard sheets. The evenness of the structure is checked by level.

Assembling shelves for a wardrobe
Installation internal elements- this is the most labor-intensive process. It can be roughly divided into two stages:
It is better to choose places for fasteners according to the scheme: 1 element for every 30 centimeters. Thus, even in a small meter-long wardrobe there will be three shelves. The holes for the clamps are made using a drill and a large drill.
It is important to know: In order not to damage a thin sheet of chipboard, stick electrical tape on the drill, measuring exactly 0.3 mm from its beginning, and begin to carefully drill holes to the mark.
Do not forget to measure the distance between the clamps, especially in height, they should be located at the same level. This way the shelves will stand straight and on the same level. All fasteners are attached to glue.
Installation of doors in wardrobes
At the second stage interior work fittings need to be installed. It is installed in two ways: without level checking and with checking. We think there is no need to say which method is better. So, first the fittings are mounted on the bottom sheet of chipboard, then on the side panels. The rollers are secured with special self-tapping screws included in the kit.
Expert advice: To make the screws easier to tighten, drill a small hole in the sheet with a drill. The exposed fittings are not screwed until the entire structure is checked with a level.
After installing the fittings, the doors are mounted as shown in the picture:
After installing the doors, you can begin to assemble the shelves. They are attached to pre-installed clamps. The screw caps can be covered with rubber plugs; they are sold at any hardware store.

Pull-out hanger for wardrobe
On finished design All that remains is to attach the hangers and the wardrobe can be used. It is recommended to install hangers at eye level.
Using a tape measure, the same distance is measured, the place is marked with a pencil directly on the chipboard sheet. Small holes are drilled in the marked places, where hangers are mounted using self-tapping screws.
The cabinet must be polished before painting. sandpaper. To paint the cabinet, it is better to use regular varnish and a brush. The cabinet is painted several times. Recommendation: paint the old coat of varnish only after it has completely dried (after 2-3 days). It is also recommended to open doors and windows after painting to ventilate the room.
Video on how to make a wardrobe with your own hands.
In contact with
See inaccuracies, incomplete or incorrect information? Do you know how to make an article better?
Would you like to suggest photos on the topic for publication?
Please help us make the site better! Leave a message and your contacts in the comments - we will contact you and together we will make the publication better!
The hallway is the first thing they see when entering the apartment. Often the selection in stores is the same, and choosing furniture for the hallway is not easy. And if it is not large, then the cabinet simply may not fit or will take up all the space. In this case, you can make furniture for the hallway yourself. In addition to saving money, you'll get a custom model that fits your space.
The main rule for furniture in the hallway is that it should be roomy, compact, and have a neat appearance. There is no need to decorate it excessively. In addition to decoration, it has the function of storing things. You should carefully consider the size, the presence of drawers and cabinets. It’s better if there are more of them, but you need to start from the area of the corridor; there’s no need to overload.
The hooks look nice unusual shape on the wall, plus a shoe rack.
Looks original if you have a large hallway, wooden bench, it will add zest to the interior. A win-win wardrobe option, it will fit into any interior. And a wardrobe, if space permits, is an ideal solution; it is comfortable and roomy.
For small sizes, it is worth using:

With the help of the right project, you can transform even a small area, and the hallway will look organic and spacious.
The design of this room should be combined with the interior of the entire apartment. It is permissible to pick different decor or the floor covering is different from other rooms, but stylistic direction must be united.

When choosing a model, you should pay attention to practicality. If you have a small hallway, you should stop at standard version and choose multifunctional furniture: compartments for things, shoes.
A compromise between capacity and external beauty is a corner cabinet. It looks small, but has great depth, so it is roomy.
In the presence of big family, it is necessary to think about a place for the belongings of each inhabitant of the apartment.
The hallway is a room into which dirt rushes from the street. Therefore, it should not be done in light colors, it will quickly get dirty. It is not advisable to carry things such as umbrellas, strollers, bicycles deep into the apartment; it is worth providing a storage system for them in the hallway.

Everything that is made with your own hands, including furniture, is always the embodiment of your ideas and desires. You can decorate the hallway to your taste and give it individuality. Such furniture will be one of a kind, and not mass-produced at the factory, and guests will be surprised by its exclusivity.

Having chosen a model and made a drawing, you should prepare everything that is needed for the work: material, fittings, tools.
Depending on the type of furniture, different fittings are needed:

You should stock up on the following tools:
This is a basic set that can be useful in making furniture.
The choice of material is important; you should not choose too expensive one. In addition, it should be easy to process and safe for health.
Suitable: plywood, chipboard, fibreboard, MDF, furniture board, edged board, wooden block, drywall - they have a long service life and good quality.

When developing the design of the hallway, you need to take into account the characteristics of the room and the number of household members. You should decide on the functional accessories of the hallway so that it is practical and comfortable. With a small area, the beauty of the wardrobe will not be visible and it will look bulky. It is better to choose a corner hallway option. In addition, there should be enough shelves and hooks for all family members.
Correct solution– install furniture along a long wall.
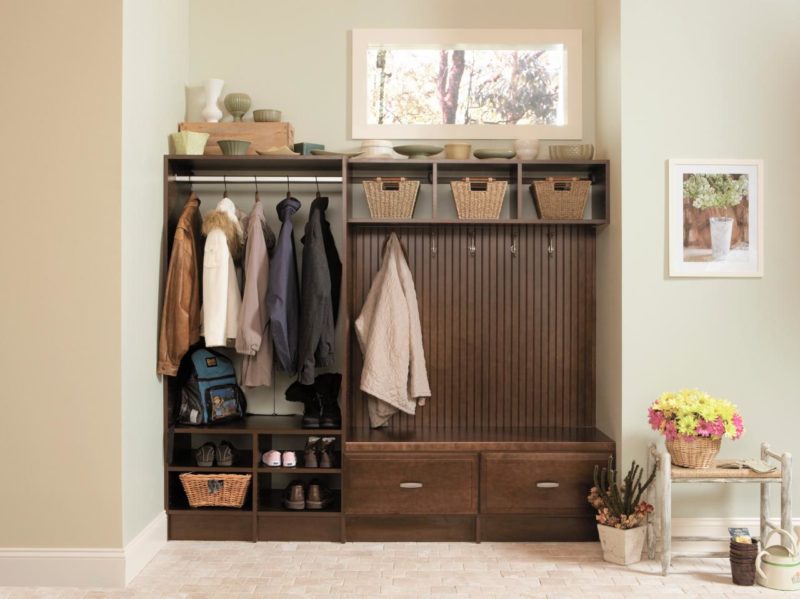
Do simple hallway It’s not difficult for yourself. It includes: a hanger, a shoe rack, a small pencil case or a chest of drawers with a mirror.
For this you will need:
The first thing you need to start with is a pencil case. To do this, planks of the required size, a cover for the top (with an overlap) and shelves are cut out of the shield. Assembly is not difficult - the strips are attached to the lid using self-tapping screws, and the shelves are installed in the same way. For structural strength, corners are cut out of plywood and fixed in the corners. A door is made from the shield, which is mounted on 3 hinges.

Now we make the cabinets. If desired, you can make only one cabinet. To make it, you need 2 sidewalls of the same size and a bottom that will connect them to each other. The lid should be made smaller than the bottom. All parts are fixed with glue and screws. Doors are cut out of the shield and attached to hinges. If you have a drawer, you will need runners. You can make them yourself from plywood, but it’s better to buy them (the box will roll out easily). The second cabinet is made according to the same principle as the first.
Now, the whole structure is assembled. The prepared boards are attached to the edge of the pencil case and to the cabinet - this will be the base of the hanger. The boards are connected at the top with a lath for strength. Hooks for clothes are attached to the slats, and a shelf for hats is screwed on top.
The final stage is the installation of handles and varnishing.

Corner hallway It’s easy to do with your own hands, but to make it stable, you need to use solid material: chipboard, plywood. The module consists of 2 parts that are connected at right angles. In addition, you should decide whether there will be a frame or the walls themselves will become the base. If the walls are smooth, then you can do without a frame; attach the shelves directly to the walls - this will be economical.
Manufacturing principle:
If necessary, you can attach a mirror to the door or make sliding doors, thereby creating a corner wardrobe.

If you have a non-standard corridor, into which the wardrobe or hallways sold in the store will not fit, you can resort to the original and simple solution. For example, the presence of a bedside table or shoe rack, plus a hanger and a mirror.
You should start with the bedside table. From furniture board 2 sidewalls of the same size, a base and a lid are cut out. If there are skirting boards, then the corners are cut off from the sides (on one side). The back wall is made of plywood. All parts are fastened with self-tapping screws. Runners for drawers and fastenings for shelves are made inside. The doors are screwed on hinges.
A hanger in the hallway is an element you can’t do without. It’s not difficult to make and you can give free rein to your imagination. For lovers of eco-style and everything natural, tree branches are suitable instead of a hanger. Those who prefer country style need a vintage option.

A sliding wardrobe is an excellent choice for a hallway, it can be built-in or separate. If there is a niche, shelves are mounted in it and it is equipped sliding system.
The process of making a cabinet with side walls:

You can make a wardrobe different sizes and models, depending on preferences and room area.
You can really make furniture for the hallway yourself. The models are quite simple and small in size. And if you have imagination, you can turn an ordinary hanger into a one-piece and unique thing.
The hallway will be incomplete if it does not have good quality spacious closet. There is no need to buy it at all, since the manufacturing process is quite simple.
Spacious closet in the hallway niche
The advantages of this option:
The main thing is that the furniture in the hallway is roomy, compact, neat, and not pretentious.
Details that need to be thought through when designing.

Furniture fittings for a closet in the hallway
To assemble a hallway cabinet with your own hands, prepare the following tools and accessories in advance:

DIY cabinet assembly tool
It is better to take inexpensive materials that are easy to process. For example, even experienced manufacturers will not undertake to make furniture from solid wood.

Chipboard cabinet with mirror door

Spacious eco-friendly plywood cabinet

Sliding wardrobe and cabinet made of MDF in the hallway

Fiberboard for the back wall of the closet in the hallway

Wooden beam for the frame of a homemade cabinet

Edged board (pine)

Homemade plasterboard cabinet in the hallway
You need to take the most responsible approach to taking measurements. If a miscalculation is made, all subsequent work will be difficult or nothing will work out at all. There are various ready-made options With suitable sizes. If the finished drawings are not suitable, and your drawing skills are weak, you need to hire a specialist for this stage who will think through the project with the right sizes. It is better to cut materials and make edging of end parts in the store where it is sold construction material. The store's services are inexpensive, but it saves a lot of time.
This model is built-in; it is easier to manufacture, since the parts do not need to be calculated and cut out. The complexity of this option is that it is necessary to take into account the features of the walls and floors.
The ideal solution for such furniture would be a niche with a sliding system, equipped with several shelves and a crossbar for hangers. The installation of the sashes in this case is the same as for interior doors(wall and floor involved).
Very often a wardrobe is made in the corner of a room. This model does not have one side or back wall (and in some cases, no floor or ceiling).
The base consists of wooden frame, which consists of a pair of frames (front and side), assembled with screws or nails. If the project provides for the arrangement of shelves and partitions, transverse slats must be secured to the frames in the designated places.
Mark the walls, floor, and ceiling in the places where the frame will be installed, drill holes for fasteners. It is recommended to also mark the locations of the paper clips.

We make markings for the shelves and install corners
Secure the front frame to the wall and ceiling using dowels. Check its verticality using a level.

We lay and fasten the shelves on the corners, install a vertical panel to the shelves inside the cabinet
Install the side frame.
In the resulting niche, wooden slats intended for shelves are attached to the walls (cut the shelves from plywood or chipboard). You don’t have to fasten the shelves by laying them on slats or fixing them with nails.

We lay a horizontal shelf on top of our structure.
The side is covered with plasterboard or laminated chipboard. Drywall is pasted over or painted. The side part in which the crossbar with hangers will be located must be durable (chipboard, plywood, but not drywall).

We prepare panels for front side cabinet

Attach the bottom and top panels
The final stage is the installation of sliding doors. The upper and lower guides are mounted on the ceiling and floor, respectively.

Installing door guides
It is very important to keep the dimensions exactly. First they try to install a mock-up of the future door. Take any part whose height is the same as that of the door and install it inside the top rail. Check the verticality value and mark the area where the lower guide will be attached. The door must first be inserted, slightly pressing on the upper rollers, and then into the lower tire. To correct the position door leaf adjusting screws are used. Right installed door moves smoothly, unhindered.

We insert the doors into the guides, snap the latches and adjust the mechanisms in the roller systems
The above example is suitable for a simple, small-sized design consisting of two halves. With a good hallway area, it is possible to manufacture a more spacious model. Then a frame made of bars will not work. It is better to make a base from chipboard, and “fasten” its elements using a common floor and ceiling. This method will allow you to place in a niche, in addition to shelves and a hanging rod, also boxes for small items and other parts.
Such a product will be assembled as a construction set for dowels and confirmations. For this fitting, you must first drill holes. All this must be done especially carefully and patiently. All fastenings for corners are kept in a clamp for 24 hours.

Built-in two-door wardrobe in the hallway
It will not be difficult to make a corner module with your own hands. For stability, modules are often made of durable solid materials (chipboard, plywood). Such products come in several forms:

Basic configurations of corner cabinets
The most suitable for a hallway is a five-wall one.

Built-in five-wall corner wardrobe

Detailed diagram of the corner cabinet assembly


Instructions for self-assembly corner cabinet

Convenient DIY shoe cabinet
This is the simplest process, because everything that is needed for the work is sold at the building materials store.

The design includes: an outer frame, several shelves with partitions. The width of the structure depends on the maximum shoe size, and the height depends on the number of shelves.

Addition of facades and gaps of shoe cabinets
A good solution would be to combine a shoe closet with elements of a chest of drawers. Or place it in a closet or corner closet that has open fronts.
There is a lot of different information on the Internet about how to make a cabinet in the hallway with your own hands. Therefore, by examining all available data, the most appropriate model can be successfully constructed.
A sliding wardrobe is furniture for storing clothes and other items, the doors of which have a sliding design.
Compared to classic swing doors, this provides ease of use in confined spaces.
At the same time, the design of the cabinet and the entire room does not suffer at all; filling and removing things is easy.
According to legend, such doors were invented in France in the Middle Ages. The ancient streets of ancient European cities were so narrow that it was often difficult to open the doors of traditional carriages. And the solution to the problem was coupe carriages equipped with sliding doors.
 Then this experience was adopted by railway workers - coupes and today they are extremely popular.
And subsequently the design was to the taste of furniture makers.
The Internet is full of photos of the most various models. But you don't have to go to the store to buy ready product. You can do it yourself.
 Craftsmen in Moscow offer many varieties, and in terms of variety of design, compartments are not inferior to ordinary wardrobes.
You can find a photo like classic design the facade of a sliding wardrobe with wood carvings, and photos of cabinets in the Art Nouveau style.


Based on the installation method, a distinction is made between built-in and cabinet cabinets. The former are mounted inside a niche, corner or screwed to the wall, ceiling and floor, the latter have their own full-fledged body.
 A cabinet wardrobe can be easily rearranged if necessary, but built-in ones are stronger, more reliable, and have less problems with distortions. It is easier to buy cabinet-mounted ones, because built-in ones require careful adjustment already inside the niche, at the installation site.
The most common are straight cabinet designs, in which the doors move along straight guides. There are also radius ones - convex and concave; the doors of such cabinets are curved and move along arched rails.
When installing it yourself, you shouldn’t take risks and it’s better to make simpler straight ones.
 It is also worth considering the materials from which sliding wardrobes can be made.
Most often this is:
Correct selection decorative elements for the cabinet facade you can create an original and stylish design. For load-bearing elements You can use wood or metal products inside the structure, it is best to buy ready-made fittings for wardrobes.
But ordinary wood is not suitable, because due to changes in humidity and temperature, it can dry out, swell or change its geometry.
 After all, it’s not uncommon for the humidity inside the closet to differ from the room.
And this will certainly lead to disruption of the mechanism and damage to the appearance. Metal in this sense is much more reliable, but it is difficult to process at home.
Medium and high density wood fiber boards can be considered the optimal balance between price, reliability and convenience.
 As decorative elements, you can buy a wide variety of materials quite inexpensively, including glass, plastic, non-ferrous metals, etc.
The design of the cabinet should be in harmony with the decoration inside the room, because it will take up significant space in it, because the area of the facade is calculated square meters. Designs are also distinguished by the type of door fittings. There are varieties where the supporting roller is the lower roller and the upper guide. There are designs with an upper load-bearing and lower guide.
The first type is cheaper and more reliable, it is easier to make, because support on the floor does not require special structural rigidity.
 But she often has problems with blockages inside the rails.
Debris gets into it, it is rolled away by a roller, pressed inside and turns into bumps.
As a result, after some time, the user notices problems with the movement of the doors - they begin to rumble, and sometimes jam. It won’t be difficult to find photos of dirty, non-functional rollers. Separately, it is worth mentioning the variety with a monorail suspension support. It is more difficult to make, but it is more reliable and in some cases allows you to eliminate the lower guide rails, which has a positive effect on the design of the structure.
 Sliding wardrobes are installed in the same place as ordinary ones - in the hallway, in the bedroom, in the living room, etc. where it is necessary to fill them with things.
But they have an advantage - thanks to the special design of the doors, they can be installed where there is little space.
For example, a closet can be made in a niche in a narrow corridor, in a hallway, a cramped room, in a loggia, in a bathroom, next to a door or other furniture or structure. You can even find a photo of such a cabinet in the toilet.
And a correctly selected design allows you to not only reduce, but even visually expand the space in a room with a closet.
 Built-in wardrobes are very convenient when installed in a niche.
They allow you to profitably use this inconvenient planning element, while sometimes you don’t have to make three walls for the cabinet itself - the back and the sides.
If there is no niche, then you can build Big cupboard the width of the entire wall. In this case, the furniture becomes an element of the layout, the owner gets a huge space to fill with things, without spoiling the design with a huge structure. When properly designed, the wardrobe is almost invisible in the room.
And with the help of mirrors you can even visually expand the space, this is often done when installing in a hallway, where a mirror is a mandatory attribute.
 Often a wardrobe is installed in a corner.
In this case, two walls are saved, you will have to buy more MDF to finish the cabinet, the room gets a broken shape, but with correct design it looks beautiful and comfortable.
Both a cabinet and a built-in wardrobe can be used as a partition - dividing the room into two parts. In this case, you can do sliding doors on both sides, then the design will be even more functional. But at the same time, costs will increase because you will have to buy twice as much door hardware.
The easiest way to make a cabinet in a niche with your own hands. Here we have three reliable surfaces, with minimal risk of making mistakes in calculations. This planning element just begs to be filled with shelves. The project will not cost much.
 The entire process of installing a wardrobe built into a niche can be divided into several successive stages:
Before you start taking measurements, you need to make sure that the floor and ceiling where the doors are located are strictly horizontal, and the walls are vertical.
The opening must have the exact shape of a rectangle; the diagonals can differ by a maximum of 2-3 mm with dimensions of about 2-2.5 meters.
If the niche does not meet these criteria, then it will first have to be leveled. Otherwise, you will have to put up with distortions, which are clearly visible both in the photo of the cabinet and with the naked eye.
 If the structure is placed in the hallway, it is important to make sure that it does not block the passage, does not interfere with turning around normally, and its dimensions allow it to be filled with outerwear and sometimes other large things.
A cord and flexible tape measure are not suitable for measurements inside a niche, because they do not provide adequate accuracy. Requires electronic or optical measuring device, in extreme cases, a rigid large ruler. Otherwise the doors will turn out crooked.
 The depth of the niche is also important; it determines the dimensions of the shelves and partitions of the cabinet, and the possibility of filling them with large objects.
But it is worth remembering that the shelves will have to be made approximately 100 mm less than the depth of the opening, since you will still need space for the doors.
Due attention should be paid to measuring the dimensions of the inside of the opening; in most cases they do not coincide with the dimensions of the outer rectangle.
You can do it the old fashioned way - prepare a drawing on a piece of paper. Or you can take advantage of the achievements of digital technology.

It is not necessary to be a qualified engineer and know all the accuracy of such programs in order to quickly and easily sketch a cabinet drawing in AutoCAD, Compass 3D or similar software systems.
It's worth starting with outer box cabinet, then to the partitions and shelves inside.
When making calculations, do not forget to indicate the thickness of the walls and partitions. MDF is usually used for the cabinet; you should not take boards less than 16 mm thick.

When choosing the location of the shelves, you need to take into account the purpose of the furniture and how it will be filled. In the hallway, a shelf for shoes and a section for outerwear, and in the bedroom - for bed linen. The photo shows one of the many sketch options.
At the same time, you should decide on the location of shelves, partitions and the number of cabinet door leaves.
Their size and number must be selected in such a way that there are no problems with filling the shelves and removing things. Often in a niche you can find a switch, junction box, and other communications or interior elements.
The drawing must be drawn up in such a way that all these elements remain freely accessible.

If there are ventilation holes, then they will have to be brought out to the door and the channel for air passage will be left free.
Another advantage of computer programs is that they allow you not only to prepare a drawing, but also to calculate the required amount of materials.
Cutting wood boards with the required precision with your own hands using a hacksaw is troublesome and time-consuming.
 Therefore, it is wiser to order a cutting service in the store where you intend to buy the material.
Almost everyone offers such a service today.
Previously in the already indicated computer programs You can arrange the workpieces in such a way as to minimize losses from scraps.
It is worth remembering that the ends of the cut slabs will need to be covered with decorative PVC tapes.
Trimming is also done at the place where the slabs are sold, but it is important to clarify the thickness of the decorative tape and take it into account in the calculations. It is necessary to trim not only those areas that will be visible after installation. The film is not only a design element, but also protects the slab from dampness.
 If the walls of the niche will not be covered with anything, then you first need to paint or paste them with your own hands so that they do not generate dust, stain your things, or spoil the view.
First they are attached internal partitions and shelves.
You can make a rigid stationary structure by screwing all the elements tightly to the walls with bolts and dowels. Or you can first attach guide profiles to the walls, and attach partitions and shelves to them with movable fasteners. In this case, it will be possible to change the internal layout of the cabinet.
The support rail, guide rails and side panels must be mounted very evenly. Therefore, you first need to outline their location.
 A straight line is drawn on the ceiling along which the rail will be attached.
Then strictly vertical lines are drawn from the edges along the walls, the ends of which are connected by a line on the floor. Before installing the rail, it is important not to forget to install the door clamps into it.
After installation, this will no longer be possible. The top rail fastening can be seen in the photo. Doors with screwed-on rollers are installed as follows - first they are inserted into the upper rail, then installed into the lower one. After this, they are adjusted using the key.
At the end, you can start designing - finishing the doors decorative film, mirror, etc. And don’t forget to put lighting in the closet, but not fire-hazardous incandescent lamps. It is better to buy 12 volt LED or halogen lamps with a converter.
That's it, you can start filling the shelves with things.


In Moscow, it is not difficult to buy inexpensive ready-made cabinets for the hallway or bedroom. Accordingly, the question arises: is it worth trying to make it yourself?
The answer largely depends on your specific case - how typical or original the project will be, how special design, what dimensions will be required.
Prices for components - wood panels, fittings for sliding wardrobes, etc. are shown in the table.
It is worth remembering that the prices shown are approximate. You can buy it cheaper, or you can buy it much more expensive. If you don’t assemble the cabinet yourself, then for a budget ready-made one measuring 2x1.5x0.5 m you will have to pay approximately 16,000 rubles. And you can buy it for much more.


