In woodworking, a slab is a side cut of a whole log along with the bark. It looks like this - one side is cut, the second part is the untouched surface of the trunk.
According to grade, the material is divided into 2 types:
Wood croaker  Unprocessed business croaker
 Processed business croaker
  Processed and sized business croaker
The first one goes for kindling, as is obvious from its name. But the second one can be used not only for fences, but also for formwork, manufacturing external cladding(mainly outbuildings), floors for attic spaces
Therefore, the fence is built from business slab.
The disadvantage is a lot of work. If you buy a slab for a fence, it must not only be dried and brought into decent condition, but then also covered with anti-rotting agents and painted.
Despite the complexity of installation, wooden fence made of slab is a candidate for the top three popular and most budget fences, along with corrugated sheeting and chain-link fencing.


Also a disadvantage compared to metal or concrete structures, can be considered fragility. A fence made from slab boards, even with constant touch-up and repair, has a service life of no more than 10 years.
Design advantages:
Such a valuable and accessible natural material as croaker cannot but interest those who are looking for a suitable inexpensive material for the construction of a fence. Moreover, you can build a fence from slabs with your own hands.
When choosing a croaker, you need to be aware that you will have to work a lot.
First of all, it needs to be pre-processed: 
After final drying, you can begin installation.
Video of the construction of a fence from slab:
Prepare materials and tools:
You need to build a slab fence at your dacha with your own hands in several stages:
Marking is necessary because without it it is impossible to build beautiful fence from a slab.
Having marked the boundaries of the site, the line of the fence is marked and the installation points of the support pillars are indicated.
When constructing this type of fence, the following principle is used: fastening boards to support pillars one by one.
You can install a fence in spans, that is, first knock down one completed span, and then attach it to the poles.
But this method is heavier - the span weighs more than tens of kilograms, so most builders prefer the first option.
Holes are dug in the marked area to allow the installation of support pillars. They are buried by a third (for a one and a half meter fence, a hole half a meter deep is drilled).
A wooden pole is installed in the hole. The base is covered with crushed stone and filled with cement mortar.
Knocking down a fence horizontally
There can be two options here - the boards are nailed vertically or horizontally:
Can be secured with nails or screws. You can nail the slab in a row or overlap.

Knocking down a fence vertically
The top part can be trimmed decoratively with a jigsaw or saw, cut into a pattern or geometric shapes, sharpen.
The finished fence may or may not be painted, but it must be processed. Especially if you didn’t pre-coat the boards with anything when preparing them.
Wood processing products
Antiseptic for wood, stain and any composition available to you that can protect your structure from dampness, mold, fungi, beetles and natural influences.
After processing, if you do not want to paint over the wood texture, coat the surface with varnish.
This will extend the life of the fence for several more years.
Horizontal installation
The fence has the function of protecting and decorating the house and cottage. Wood is one of the best materials for it. However, the cost of selected wooden material is quite high.
Since every owner wants to use environmentally friendly pure material and at the same time economically profitable, then one of the options that fits such parameters could be a fence made of slabs.
This type of wooden material, on the one hand, has a smooth side from the cut, and on the other, it is covered with bark. Price policy it is determined by the type of wood from which it is made, the processing method and the section obtained when cutting the log.
If the owner has free time, then making a fence from a slab with his own hands is easy, and at the same time he will receive a number of benefits:
Like every material, slab has its drawbacks. It needs processing and is not resistant to fire.
Scheme for obtaining material
Since croaker is an economical material, it requires additional processing, such as removing bark, knots, and various types of roughness.
First of all, you need to eliminate the bark in order to avoid subsequent damage from the insects living in it.
Using a grinding machine or an ax, the bark is removed. It is better to do this together or comfortable table. After processing, it is advisable to apply mastic to the boards and dry them outside.

Treatment of wooden poles in bitumen
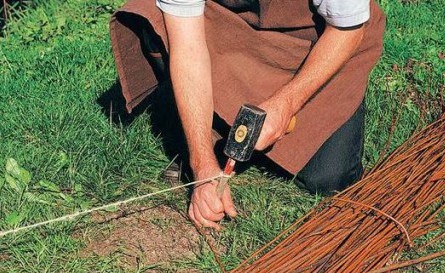
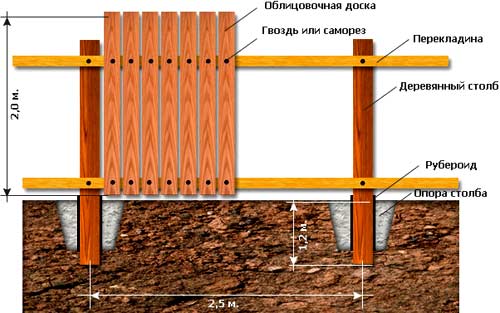
For the supporting part of the fence you will need pillars (wooden or metal). The number of posts depends on the length of the fence. They are placed at a distance of 2.5 m from each other. For marking, twine is used, which is placed from pillar to post.
You will also need sand, gravel, cement, a shovel, a saw, a hammer, nails, and screws. In addition, you need to remember protective coating wood, which will also give it a certain color.
Installation of the slab can be done in several variations:
At the owner's request, the slab fence can be made uneven on top. For example, with a sharp top, in the shape of a peak, concave or convex.
When installing a slab fence with an overlap, it should be no more than 20 mm. It's also better not to use wooden boards very wide. There is a high probability that cracks will form on them over time.

Step-by-step installation of support elements
The initial stage is to mark the location for installing the support pillars. For marking, wooden pegs and twine are used, which are pulled between the stakes. You should also consider a place for the gate.
For support pillars, recesses are drilled or dug, which will hide them by about a quarter. The supports are reinforced with metal or wooden spacers.
The recesses with pillars are filled with gravel and poured on top concrete mixture. All this will tighten the pillars tightly, and they will be resistant to various external influences.
Next, boards are mounted on the supports so that it is possible to attach the main covering to them. A saw and fasteners will be required for installation.
Wooden cladding is mounted to the frame horizontally or vertically.
IN horizontal version– a 50*30 mm beam is mounted to the post on both sides, and a slab is attached to it using nails or overlapping screws. It will not be possible to install it end-to-end due to its unevenness at the edges.
If nails are used as fasteners, it is advisable to pre-coat them with drying oil.
When installed vertically, the slab is secured to the support posts with the convex part inward. Next, after a distance of 40-50 mm, another layer is fixed, but with the convex part facing outward.

Processing of wooden material before fastening
A slab fence can be made not only practical, but also interesting in terms of design, it all depends on your ideas. The top of the fence can be made flat or shaped.
In order for the wooden fence to last longer, it is subjected to antiseptic treatment. For this purpose, a special composition (glaze) is used. It is decorative and protective at the same time, so that the material becomes resistant to moisture and insects. By color scheme the composition is chosen dark or reddish.
Slab fences will last for many years. They are beautiful, reliable and will delight their owner, and will become a reliable protection. Besides this wood material significantly saves money, which will be useful for improving the remaining territory of the house or cottage.
A fence made from slab is one of the most cost-effective and practical types wooden fencing. It can be made on our own without any special technological refinements, as well as without attracting hired specialists and paying for their services.
The material for such a fence can be obtained without any problems at any sawmill, if not for nothing, then for very little money. This type of fencing is reliable and durable, and with appropriate effort it can be given the necessary beauty and unusual appearance.


Croaker is nothing more than waste from sawing tree trunks in woodworking industries. When a log is sawn at a sawmill into boards of various thicknesses, the waste from this process is the side fragments of tree trunks. They have a rounded shape on one side. These side parts are called slabs. To this day they are purchased for firewood where there is no gas heating, due to their low cost.


Croaker should be distinguished from unedged boards. An unedged board is flat on both sides. It differs from an ordinary board in that it has raw edges. This variety wood material at a price significantly lower than semicircular slabs, sold at a low cost as wood processing waste.
The slab looks like a board, sawn only on one side. The other part of it remains unchanged natural look and the appearance of untreated wood. In the past, it was used only as fuel and as finishing material for temporary and rough fencing, buildings and other structures. Summer residents, appreciating the advantages of this timber, subsequently began to build reliable and original fences from it.


Its cost, as already mentioned, is very low, and all its options depend on the type of wood, the method of wood processing and the dimensions of the slab.
Croaker is chosen as a “fencing” material by owners of dachas and private households in rural areas, primarily because of its availability and low cost. Taking into account the fact that the fence is supposed to be built independently, its total cost will consist only of the costs of purchasing and delivering the material to the work site, plus a small amount for nails.


Fences made from it are easy to install, reliable and durable. These structures are very resistant to atmospheric factors, and with imagination and taste they can be given a rather aesthetic appearance. These fences, naturalistic and universal in their purpose, are distinguished by their originality and originality of the exterior.
Fences made from slab have a significant mass and a long service life. Given that correct processing material, such a product can last 15 – 20 years. The simplicity of their installation allows any owner of a summer house or private household to create such structures on their own, together with one or two assistants.


This should also include the environmental component. Natural material, from which such fences are made, simply cannot release anything toxic into environment. In addition, their natural appearance and pleasant smell of wood cannot but delight the owners and their environment.
Such fences are of no interest to vandals. The croaker cannot be scrapped or sold.
Even for the quick construction of temporary fences or sheds, it is difficult to find a more suitable timber material than slab.


Its advantages also depend on the type of wood that was cut at the sawmill. In terms of hardness and service life, primacy should be given to oak, beech and larch trunks, and then coniferous species tree and aspen. The most commonly used timber for construction is coniferous timber.
However, the croaker also has its drawbacks. Due to the unsightly appearance of this material, its refining requires significant time and labor costs, because each die must be processed and sanded. In addition, you should select the required number of dies with relatively straight sides, which also have approximately the same width.

The construction of a slab fence will require a large number of this material due to the necessity of its selection.
After installation, the croaker must be treated with antiseptics several times, otherwise its service life will be reduced to 3-5 years.
The entire process of preliminary preparation of slab strips is exclusively manual, that is, extremely labor-intensive.


Although this lumber is accessible and cheap, constructing a decent fence from it will require a lot of effort and time, but the result of such work will be so aesthetically pleasing and original fence, as far as it will be desirable for its owners.
This lumber is divided into two types - commercial and firewood.


There is not much difference in selection by breed, but it is better to abandon poplar, because it rots, and birch, since its wood is very hard and warps over time.
It must be taken into account that after the material has been delivered to the site, it must be sorted and processed in short term. This is done so that the bark beetle does not render the material unusable. It is also recommended to dry the dies.
The cheaper the slab is chosen, the more defects it will have in the form of unevenness, knots and the like.


If wet lumber is purchased, it should not be dried under direct sunlight, but in a shady place open to air, otherwise it will dry out intensively and its surface will become covered with deep cracks.
Croakers with a width of more than 20–25 cm should not be given priority. Over time, large horizontal cracks appear on such wood along the entire length of the block.
If you plan to nail the slab dies horizontally, then for this Do not select boards that are too narrow, otherwise the fence will lose its aesthetics.
You should know that after some time the croaker narrows by 1.5–2 cm due to drying of the wood. Therefore, it must be laid with an overlap.


If you are going to install a solid picket fence without gaps, then you need to take slabs for it that have a smooth edge, otherwise you will have to modify them with a plane or an ax.
A picket fence with gaps can also be made from uneven material. The main thing here is the correct layout of the boards.
Most the best option there will be thick and wide blocks of slabs. Some of them can produce quite normal timber for posts if you cut them to length.


It is better to refrain from purchasing lumber from trees that were cut down in warm time years and lay in the open air for a long time.
Under the layer of bark on the wood of such a slab, mold and pest beetles are often observed. But in winter, purchasing old wood will not cause problems, because the fungus and bark beetle are not active in the cold.
It is undesirable to purchase openly damp wood, since when it dries, it begins to warp and crack, which negatively affects appearance structures.
It is also undesirable to buy material that is too narrow and of small thickness. To create a picket fence, you will need a lot of narrow boards, and removing bark from thin fragments is inconvenient and labor-intensive.

When choosing timber at a woodworking enterprise, it is better to spend time on a piece-by-piece selection of slabs in order to select the most suitable specimens. This will significantly save time and labor costs when making the fence.
For support posts of temporary fencing, it is quite acceptable to nail together two slabs. If the structure is planned to be used for a long time, about 15-20 years, timber with a section of 10x10 cm or round timber ø 80-100 mm should be used for the pillars. You can use thick blanks for the crossbars or use timber with a section of 60x40 mm.


If you decide to build a more permanent fence with a height of up to 2.5 m, then the supports should be made of a metal pipe.


For a solid picket fence, the size of such a support is 40x60 mm, and for a lighter fence with gaps it will be 40x40 mm.
The most simple option for execution is a vertical fence or palisade. In this case, the frame is made in advance, and the slab dies are nailed vertically onto it.
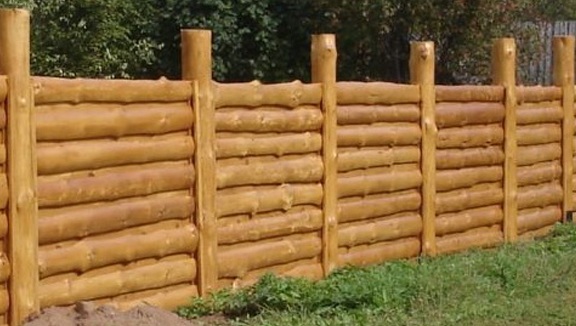
In the second case, this is horizontal fence devoid of crossbars. The slab is stuffed in a horizontal plane from one pillar to another, butting dies: with gaps between them or overlapping.


Another type is a double-sided fence. In it, the installation of unedged boards is carried out on both sides of the fence.
This option is the most expensive, as it requires twice as much more lumber.
Usually, owners of summer cottages and private households use slabs to build solid fences up to 2 m high to prevent anyone from looking into their territory. Vertical installation picket fence is the simplest option.
The length of the spans between the support pillars is taken equal to 2.5 m. For supports, a third of which are immersed in the ground, bars 3 m long are taken. The amount of lumber is calculated using the following algorithm.
The number of pillar supports is equal to total length fence, which must be divided by the distance between the posts. Posts for wickets and gates are also added here.
The total length of the horizontal jumpers is equal to twice the length of the fence. Here you need to add 10-15% for overlap, trimmings and waste. The amount of slab will depend on the size of these boards. It is calculated by dividing the available result by their length, adding a small margin.
The number of pickets for a solid fence can be calculated by dividing its length by the average width of the slabs.


It is better to purchase timber with a small reserve, since during the process of debarking, grinding and subsequent processing, part of the slab will be rejected.
This process begins with clearing the bark of the croaker and its antiseptic treatment. This is followed by laying a route for such a fence, marking places for installing poles, and installing them in the ground. The final step is to attach the transverse slats and picket fence boards.
It is better not to build a fence in winter, since there will be difficulties with drilling holes, and all the work will take much longer due to the cold.


Each of these stages will require a lot of time, so you need to plan to complete all the work several days in advance. The process can be speeded up by attracting several assistants who will perform separate operations in parallel.
Practice dating back more than one century shows that the most rational way to remove bark from the surface of wood is to remove it with a scraper. This tool is a steel strip sharpened on one side with two handles. Using them, the scraper is pulled along the trunk, scraping off the bark with it. This method allows you to keep the surface of the wood intact, unlike an axe, a sharpened shovel or a power tool, which significantly extends its service life.
For logs debarking using a sharpened shovel is quite acceptable, which makes it possible to quickly clear them of bark. This method is not suitable for lighter croakers, because they are pulled behind the tool.
The slab for this operation is placed vertically with support on any reliable object, for example, a wall or fence. Debarking is performed by moving the scraper from top to bottom. If necessary, the knots are cleared and the plank is leveled along the edges using an ax and a plane. After the bark has been completely removed from all wood surfaces, an antiseptic is applied to them with a brush, and the entire treated croaker is left to dry.


This preparatory stage is the most labor-intensive in the construction of a fence. The longer such a fence is, the greater the volume of material will have to be processed.
While the croaker, debarked and treated with an antiseptic, is drying, you should start marking the area. You need to start it by finding the corner points of this section, marking them by driving stakes there, between which the cord is then pulled.
The places where the supports will be installed are marked by walking along the cord with a tape measure. The standard value here is a distance of every 2.5 m. You can do it a little differently, alternating 2 m long intervals with 2.5 m sections along the entire length, if there is a risk of getting one short span at the end.

If the planned height of the fence should be 2.5 - 3 m, then you need to take into account the increase in its windage and the wind load on the fence. To do this, the distance between the support pillars must be reduced to 2 m, and the pillar in the ground must be installed at a depth of 1.2-1.4 m.
Fence posts can be installed by driving them into wells, installing them using backfilling, or concreting. If the installation of pillar supports in wells made with a gasoline drill is used, then their diameter should be slightly smaller than the cross-section of the beam itself.
The first two methods are more often used for installing wooden supports. Before installation, the lower parts of such supports are coated with resin or bitumen mastic , and then driven into the wells. After this, you need to pour soil around the pillar and compact it.


In the second case, a pillar support is placed in a dug hole, filled with stones on all sides and filled with liquid clay.
Concreting can be used to secure both steel and wooden supports. However Anchor parts are pre-welded to steel poles to securely fix the pipe in the thickness of concrete. They can be pieces of reinforcement or corners.
Applies also combined option when a steel tubular support is concreted into the ground, on which a wooden support is installed.
In any case, the work is carried out in a way where the bottom of the hole is filled with 5 cm of crushed stone and it is compacted. The stand is leveled strictly vertically and fixed with support rails. Concrete is mixed from 1 part cement, 4 parts sand, 6 volumes of crushed stone and water. The pit with the posts is filled to the top with this mixture. Subsequent work is carried out after the concrete has hardened.


Steel support posts can be installed using a method called concrete collar. Having a hole 0.5 m deep, the pipe is driven into it another 0.5 m below its bottom and filled with concrete.


In many Russian regions, there are often super-wet soils that swell due to frost. IN winter period they are capable of pushing to the surface any object that is in the soil freezing zone.
IN similar situation concrete is poured below this level, and from above near the support wet soil replaced with a mixture of crushed stone and sand.
At the final stage, they are installed cross beams, to which the pickets are attached.
The crossbars are nailed to the posts. If used as a lag wooden beams, then their position should be checked with a level. It is better to level the slab itself, so to speak, “by eye.” To do this, an assistant, standing several meters away, must adjust the position of each of the crossbars.
Adjacent crossbars can be nailed end-to-end, as well as by placing them one on top of the other vertically. It is permissible to overlap logs consisting of slabs.


The first picket fence is nailed after the vertical alignment is level. Two nails should be driven in at each location where the pickets are attached to the joists. The remaining pickets are attached by pressing against each other, with periodic checking of their vertical position.
If metal racks are used, the logs are fastened with bolts, for which through holes are drilled in the pipe. Another option uses self-tapping screws, which significantly increases the cost of the process.
To protect the upper ends of the fence slats from precipitation, it is best to put a canopy made from the same slab on top of them. This is the last operation in the construction of such a fence.


Thus, building a beautiful wooden fence from slabs is not a very difficult job, although it requires considerable labor costs. However, such serious labor intensity is successfully compensated by the low level of costs. For optimal use personal time, it is better to divide the entire process into stages, performing each of them as much as possible. This especially applies to owners of plots with large area, if necessary, fencing them on all sides.
Gorbyl - great option for economical, uncomplicated fencing on summer cottage. This material is easy to find, it is environmentally friendly, and you can even install it yourself.
A slab fence is an ideal compromise solution between the naturalness of the fence and its relative low cost.
Croaker is a sawmill waste product. On the one hand, it is a sawn board, on the other hand, it has the texture of a log. Most often, slab material is used in temporary construction, for example, in the form of temporary fencing at a construction site. But with a skillful approach, the croaker can become excellent material for your garden fence.
There are two types of croaker: there are business croaker and it happens - wood-burning. Wood slab is a cheaper type, this material is mainly used as fuel, because it can be too uneven. Often, wood slabs are made from unstable species, which also discourages people from using them in construction.

1. A fence made of slab - may not be the most impressive looking, but it is an environmentally friendly, inexpensive and simple fencing option suburban area. The construction and installation of a slab fence does not require any special knowledge.
2. Thanks to the low cost of the slab, this fencing option is available to everyone.

3. Wood perfectly protects the area from noise, wind and prying eyes, especially if the slab is installed by a blank impassable wall. This structure is quite reliable and stable, with correct installation and processing, it will last you a long time.
A slab fence is a fairly reliable structure; for it to last a long time, you will need:
1.strong support pillars
2.cross bars
3.tools (saw, hammer, axe)
4.screws with nails
Important to know - for manufacturing load-bearing pillars a material stronger than the slab itself is required. It can be metal pipes or, for example, wooden logs having treated edges with bitumen.
Stages of making a fence from slab:
Stage 1 - preparatory
2 stage - marking territories
3 stage - installation support pillars
4 stage - processing directly to each board.
Preparatory stage
At this stage, you need to prepare the material, so installation work should begin with debarking the slab. To ensure that the fence structure made from uncut boards lasts a long time, be sure to remove the bark. Otherwise, the fence may be affected by pests, for example, bark beetles, and this will naturally lead to rapid destruction of the fence.
To remove bark from a slab, use a carpenter's hatchet, as well as a scraper and a flat, sharpened shovel. A carpenter's scraper is an ideal tool for removing bark.
Removing the bark can be a fairly lengthy and tedious process, but be patient and considerate at this stage installation with full responsibility.

Choosing material for pillars
For a slab fence, you can use metal or wooden supports. Even pine is suitable for these purposes. For metal pole the best option is a pipe with a diameter of 76 mm with a wall thickness of 3.5 mm
An excellent material for your wooden supports would be larch or oak. In this case, that part of the pillar that is located in the ground must initially be treated with Kuzbass varnish.
Territory marking
Marking the territory is very important because it allows you to calculate the amount of material needed for collection. The strength of our future fence will depend on it. The smaller the distance between the support pillars, the stronger the structure will naturally be.
According to the standard for installing slab fences, the distance is usually about 2-2.5 meters. To save money, some people increase the distance to 3 meters, but this will be detrimental to saving! Such savings will significantly affect the overall strength of the fence and its durability.

Installation of poles for support
A fence made from slab material does not require laying a foundation. Nevertheless, it is necessary to concrete the pillars; without this, the structure will not be massive enough.
First, you need to dig holes according to the markings. Install the support post in the hole and fix it vertically. Use a level. Securely strengthen the pore with wooden spacers. Afterwards, fill the hole with concrete.
Installation of a slab fence
You can install a slab fence in two ways:
1 way. The dies are installed horizontally. Then there will be no need for purlins, the dies are nailed directly to the posts. It is most convenient to mount such a structure on wooden supports.
Method 2. The dies are installed vertically. In this option, you can allow small gaps or overlap the boards. At the same time, it is undesirable to do it end-to-end; this option looks bad due to the unevenness of the material.
The vertical method involves installing purlins onto which dies will be placed. You can make the top edge of the fence smooth or curly.
Painting
Painting a slab fence, like any wooden fence - important stage, because if the wood is not carefully treated, the fence will not last long. If you want to leave the natural color of the wood, it is recommended to process the material protective compounds, they will significantly extend the life of the fence.
We build the original and most cheap fence from a slab. How to make a fence from slab: photo, video. Options for slab fencing.
A fence made from slabs is the most cheap option construction of timber fencing. Croakers are waste (sides) that remain when cutting logs; they are practically not used in construction and can usually be purchased at sawmills for almost pennies.
You can buy croaker at any sawmill, the cost is pretty cheap. I do not recommend taking a slab made of poplar; it is not durable, breaks and rots quickly. If you take a slab from birch, it will be difficult to drive nails into hard wood.
Support posts.
Wooden posts with a diameter of 15–20 cm can be used as support posts. The length of the posts depends on the height of the future fence; it must be taken into account that approximately a third of the length of the post is buried in the ground.
Cross members.
If the direction of the slab boards is vertical, then you will need cross members to which they will be attached; boards or beams will do.
Tools (axe, hammer, level).
To begin with, the croaker itself must be cleared of the bark; if left with the bark, the wood will quickly rot, and the bark will still flake off and fall off. You can clear the bark from the croaker with an ax or a large cleaver.
How to quickly clear the bark from a croaker video.
We are standing a fence made of slabs.
To begin with, the croaker itself must be cleared of the bark; if left with the bark, the wood will quickly rot, and the bark will still flake off and fall off.
You can clear the bark from the croaker with an ax or a large cleaver.
Next, you need to install support posts under the fence, but first they need to be treated with an antiseptic, and the part that will be buried in the ground must be tarred or at least covered with used motor oil. If there is no resin or oil, you can do as our grandfathers did before, simply burn the lower parts of the pillars over a fire; the soot will prevent the wood from rotting for quite a long time.
But most effective way This is to cover the wood with bitumen, heat the bitumen in a bucket over a fire and use a brush to cover the part of the post that will be dug into the ground.
The pillars are dug into the ground, digging holes under the pillars with a shovel is enough labor-intensive process, it’s better to use a garden hand auger, things will go much faster.
The distance between the posts is no more than 2 - 2.5 meters, otherwise the fence may sag.
The slab can be attached horizontally directly to the posts. The boards can fit tightly together, or you can leave a gap. We level the boards and nail them to the posts.
If you place the slab boards vertically, you will need cross members to which they will be attached.
The crossbars are attached to the posts, then the slab is attached.


