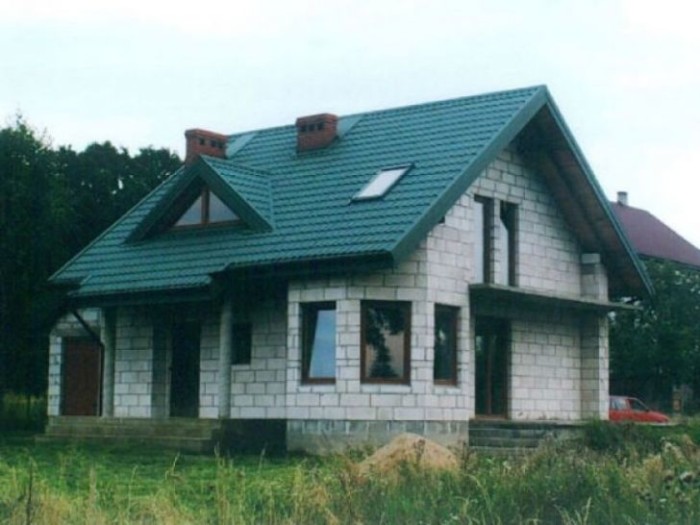
Comfortable, durable and reliable houses made of aerated concrete and gas silicate blocks are becoming increasingly popular today. The material is ideal for the construction of modern buildings.
If you decide to build a house from gas silicate blocks, you need to be prepared for some features unique to this building material.
Materials and tools for finishing aerated concrete surfaces
Since woodworkers are usually no thicker than 17 cm, the requirements of the thermal protection regulation are not met with internal lining and external cladding, unless they are buildings that are subject to a derogation from the thermal protection regulation. As a solution, it is recommended to create an external wall of the building with additional internal insulation.
Moisture and humidity protection
To compare moisture conditions with different building materials, volumetric volume is illustrative and meaningful. On the other hand, to evaluate the moisture conditions of a type of building material, Aerobic concrete with different bulk densities - mass-related moisture is physically more accurate and correct than volume-related moisture, and many others. When assessing moisture conditions, an indication of the practical moisture content is crucial. By this we mean a moisture content that does not exceed 90% of all cases in the study of sufficiently dry buildings that serve permanent place residence of people.
The properties of gas blocks include high vapor permeability and the ability to large quantities absorb water. The internal structure of aerated blocks is porous.
Modern construction technology makes it possible to build houses from aerated concrete or gas silicate blocks quickly and in the shortest possible time.
Based on older research results, recent studies and statistical evaluations of external monitoring values have shown that the practical moisture content that can be achieved in aerated concrete components can be stated as around 4.0% by mass. For comparison, the practical moisture content of wood is about 15% by weight.
Branches often deviate from rectangular shape for static or architectural reasons. Often they are also deformed by settlement or stress. Additionally, unlike windows and doors, woodworking machines are not standardized components. The entire structure of the frame is subject to constant shrinkage and swelling and resulting deformations.
In order to avoid reducing the thermal insulation properties of gas blocks, they should be protected from excessive moisture from below.
The familiar plastering of blocks is absolutely not suitable, because plaster significantly reduces the high vapor-permeable properties of gas blocks.
It is not advisable to use other types of paints, as they have film-forming properties.
For facing divisions, the most accurate planes are the most suitable. As stated above, the requirements of the thermal protection ordinance cannot be met with wall flashing installed externally and internally. In this case, the most simple solution is to strengthen the reinforcement inward and direct it behind the tree. As an alternative, multi-layer structures with additional internal thermal insulation.
Variations in the design of external walls with aerated concrete without and with additional internal thermal insulation. Three internally insulated structures meet the requirements of the thermal protection regulation. On the outside, the masonry should always be backed behind the wood by the thickness of the plaster. The connection to the wood is secured throughout with a triangular strip, which must be secured using corrosion-resistant nails. In case of inevitable cracks between the cladding and the wood, the strips improve the wind protection of external walls.

With a strong desire and some financial resources, it is quite possible to finish the facade of a house from aerated concrete yourself. True, not earlier than a few months after the construction of the walls.
They must dry completely and finally settle, otherwise the owner of the house will be in for an unpleasant surprise. Most likely, the cladding will become covered with microcracks.
Since aerated concrete can be processed similarly to wood, the groove required in the stones can be sawed easily. Lining wooden rafters with aerated concrete that was precisely cut to size using a stencil. Adaptation of porous concrete to existing ones frame structures carried out using simple means, but with great accuracy.
Unlike plastered, no cracks brickwork, in which the processes of water absorption and drying are mainly carried out in the area external wall, you can also dry out a room with half-timbered walls. Rain moisture can penetrate further inside through shrinkage gaps and can therefore also be partially discharged inside. The vapor barrier on the side of the room is an obstacle. Insulation layers with low water vapor permeability are also disadvantageous for the drying process. Capillary-porous substances made from diffuse resistors are comparable to capillary ones.

If the construction of a house takes place in winter, excess moisture that gets into the porous structure of aerated blocks can damage the external cladding of the walls over time. You should pay attention to this, so it is better to plan construction in winter.
According to the results of these studies, the obvious and time-traditional possibility of sealing shrinkage joints between wood and brick cladding is practically impossible. In some cases, saturated moisture will prevent drying and damage the wood in the long term. Even if the joints between the shed and the nests are carefully sealed, there are still “work joints” that cannot be sealed long term. They require constant monitoring and temporary repairs, which is unlikely to be feasible with many farms.
The most practical, generally accepted materials for exterior finishing walls made of aerated concrete blocks are. Wall cladding can be done using lining, decorative panels or siding.
In the future, a correctly selected and installed ventilated facade of the house will reliably protect the house from internal microcracks invisible to the eye.
This shows that the shed can be subjected to low impact loads. Exterior plaster with high water absorption capacity can reduce rain load on shrink joints between wood and underlayment. This is the result of research at the Institute of Building Physics named after. Fraunhofer in Holzkirchen. However, with regard to rain protection for cladding and to prevent frost damage, low water absorption of the plaster is preferred. Very water-repellent plasters are undesirable because they also significantly impede the transport of capillaries from the outside.
You can also use ordinary facing bricks with a ventilated gap of 30-50 cm (between aerated concrete and brick) for cladding aerated block walls. Looks good thin layer plaster with special mixtures for aerated concrete.
Therefore, external plasters for wooden trusses must be neither water-absorbent nor water-repellent. The thickness of the plaster must be at least 15 mm. Adhesives specifically designed and formulated for aerated concrete also meet the requirements. In the case of stone bricks with external chamfers, the cross section plaster in the joint area, which reduces the risk of cracking in the plaster. The increased surface area connecting the plaster to the wood also provides more protection from penetration of rainwater.
It is recommended to use putty or textured, vapor-permeable paint to grout the joints between the blocks.
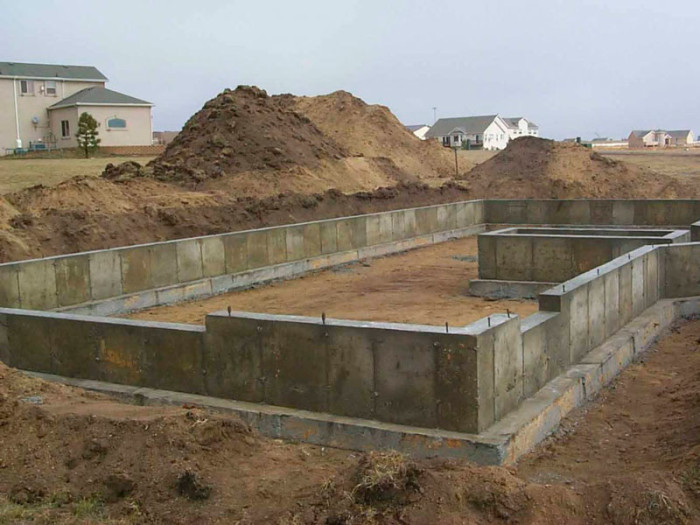
When laying the foundation of a future house made of aerated blocks, you should take care correct width foundation. The brick and block must rest on the foundation at the same time. Overhang recommended by experts facing masonry from a half-brick foundation no more than 30 cm.
It is important that external plaster and the frame surface - at least in the connection area - lay in the same plane. This allows you to quickly remove rainwater. If the body does start, the edges should be chamfered. Minimum slope should be 30°. Under no circumstances should plaster pass through wood.
The photograph shows a wall-to-wall structure with autoclaved aerated concrete during restoration. Together, your high quality, massive and energy efficient house individually designed according to your requirements - with good value price quality. From the first idea to completion, you will follow your competent partner on site. 
Various systems fit perfectly into each other - for the economical construction of high-quality, solid and residential buildings with better energy efficiency.
It is necessary to leave a gap of 30-50 cm. This is necessary to prevent possible condensation between the seams of the gas blocks.
To protect the gap from clogging during laying of the face layer, you can install an adjustable sheet of foam plastic; this is very simple and effective method. The width of the gap depends on the thickness of the sheet.
The advantage over conventional building materials is retained: projections and base plaster. To learn more. Alternatively, any other additional insulation such as e.g. . Geometry is the basis of the design, with simple and well-laid lines; its vibrant colors and patterns that are often repeated over and over again. Art Deco is also inspired by nature, which is why it inserts human and animal figures into the aforementioned geometric lines. The expansion of this style was made possible by the emergence of a new middle class that could purchase luxury goods at reasonable prices.

It is imperative to leave special vents for ventilation under the eaves at the level ground floor. For this purpose you do not need to fill out vertical seam using mortar between bricks.
You can do without gaps in houses not intended for habitation all year round. The brick cladding is attached to the blocks with ties (at least 4 ties per 1 sq. m. of wall).
This is where cement comes into play, relatively new material for that time, which began to be used to create large quantity architectural elements that were considered tasteful and even luxurious, but at a very affordable price. It should be emphasized that the colonies of Mexico City, in which this type of jewelry was worn for a long time, were Countess, Rome, Juarez and Polanco, among others, real works of art that today lend themselves to the changes required by modernity. Moldings for facades are important elements building structures, as they serve the aesthetic function of decorating and protecting the outside.
You can also secure it with the help of mortgages, which are specially left during the construction of the brickwork. Stainless steel bandage tape (19.1x 1.1 mm) is often used.
For bookmarks, you can also use a punched strip for electrical installation work. Dimensions 20x1.5 mm. The strip is nailed to the gas blocks with spiral nails (120 mm) or chopped rods with a diameter of 5-6 mm. This will significantly increase the strength of the fastening.
At the same time, they create contrast with flat areas, eliminating structural monotony. Many people choose to place quarry facades, a very expensive material that in no way compares to lightweight cellular concrete, which is 50% cheaper and faster to cut and install.
Without a doubt, “concrete has proven to be an extremely durable material that also allows for excellent finishing and manages reasonable costs for the public,” says the source, who points out that their main clients are architects and engineers, although Lately Houses building materials interested in the line of products we process.
Nails or rods are driven in at an angle of 45 degrees to each other in pairs. Some experts recommend using flexible basalt-plastic ties. To carrier and facing wall the flexible basalt connection must extend at least 90 cm.
It is best to finish it with special dry plaster for aerated concrete, which can be purchased at any hardware store. The dry, astringent, lime-cement mixture is very popular.
Walls made of gas silicate blocks are finished using exclusively vapor-permeable plaster. Under window openings, where local fracture of the facade of the house most often occurs, that is, in places where stress occurs, it is advisable to reinforce the plaster layer with iron mesh.
It is a fact, says a publication in the Caribbean, that decoration was prompted by a popular invention and numerous workshops dedicated to the production of prefabricated ornamental motifs that were purchased in units or linear meters. The report on the publication of the atmosphere at that time is extremely interesting: The type of production varied from one seminar to another. Some of them have combined development decorative items with the production of others structural elements, such as concrete blocks, mosaics, terrazz floors and others.
Do not allow the plaster to freeze or dry out while finishing walls made of gas silicate blocks. It is imperative to observe the temperature and humidity conditions. These are the basic requirements, without which it is impossible to properly finish the walls.
Only by fulfilling all the listed requirements and recommendations can you ensure that the façade of an aerated concrete house is plastered correctly.
Plaster and plaster elements were also made. Since concrete decorations are produced by an artisanal process, no expensive equipment or high technology. Thus, the costs are affordable for the public and the profits for the manufacturer are favorable. Meters and linear meters of tapes and moldings were sold in units of one meter and approximately 40 centimeters for decorating interiors, as well as all kinds of florons, garlands and, in general, an almost endless variety of elements that would be impossible to list.
A building made of aerated concrete can stand without external finishing without any damage to the integrity of the blocks (we are talking about autoclaved aerated silicate). But, over time, dust settles on the surface of the blocks, and the previously white outside surface, becomes an untidy gray color with streaks. So it doesn’t matter, sooner or later, but the question arises about the cladding or finishing of aerated concrete on the outside. Inside, the finishing of aerated concrete is done almost immediately after construction: the blocks do not look very attractive in the interior.
The customer is what they ask for Works carried out by workers of moldings and decorations, Roa is on the border of the artisan and the artistic, since many of them are distinguished by their beauty and, in addition, are unique and inimitable designs. We have a very wide catalog - says Moreno Chavez - because from time to time we add special parts that are ordered by customers. Our work is based on original design. to then become the plane that is given to the sculptor.
In this tutorial, we begin the production of a mold, which can be made from plaster, clay or plasticine, to ultimately perform casting in concrete, he reports. The volume we process is not very large; but in any case, we need advice to offer options to our clients. We may be the first to offer this type of lightweight part, which will allow us to differentiate ourselves from the competition,” he says.
Since aerated concrete has very high vapor permeability, there are certain nuances when carrying out finishing works. The fact is that almost all materials conduct vapors worse than gas silicate. This causes difficulties, since in order to ensure normal removal of water vapor from the room, the vapor permeability of the walls - from the room - to the outside must increase. Only special plaster mixtures for foam concrete. But subject to certain rules, the finishing can be anything.
First, let’s talk about how you can’t trim. You cannot insulate with polystyrene foam or expanded polystyrene, plaster the outside with ordinary sand-concrete plaster, or paint with covering film-forming paints. If necessary, you can use mineral wool as insulation and paint it with paints that do not block the pores for moisture to escape from the wall. Now let’s talk about how to finish a foam concrete façade.
When finishing with any materials that are mounted on the sheathing or guides, a gap remains between the finishing material and the wall. It is called ventilation, since in this gap, with the correct design, there is active movement of air from bottom to top. Correct device- this is the presence of holes in the finishing material at the bottom and top. This ensures the movement of air flow from bottom to top. This flow carries away moisture, which is removed from the room. This device solves the problem of condensation and also maintains normal wall humidity. Since when high humidity aerated concrete has lower strength characteristics; maintaining its normal humidity contributes to a longer “life” period. The dependence of the strength of aerated concrete on the percentage of moisture content is presented in the graph.

When exterior finishing of aerated concrete with a ventilated gap, most of the time it has a humidity in the range of 10-15%, i.e. is in the optimal zone. To create such a gap, a lath is placed over the entire area of the wall, ensuring a distance of 3-5 cm from the wall to the exterior finish.
![]()
For lathing use wooden beam(treated with antiseptics), metal guides - galvanized profiles for drywall or special ones for ventilation facades. The frequency of the sheathing is 40 cm. Using this principle, the aerated concrete façade is sheathed with clapboards and façade panels.
When attaching the sheathing to the wall, the question arises: with what, or rather, “what” to attach the sheathing to the gas silicate. You can simply use self-tapping screws (black ones, they are stronger), but in order for the sheathing to hold well, you will need a lot of length. This means that metal goes deep into the body of the block. In winter it is an excellent cold bridge. But this is not the worst. When exposed to wind loads, the frame vibrates, and the vibration is naturally transmitted to the fasteners. Under the influence of vibrations, foam concrete is crushed. As a result, the screw may fall out.
And that is not all. Due to the temperature difference - the relatively warm aerated concrete and the quickly cooling metal of the screw - condensation forms on the screw. When the temperature drops, it freezes, destroying the body of the block. In general, do not simply use self-tapping screws to attach the sheathing to aerated concrete from the outside.
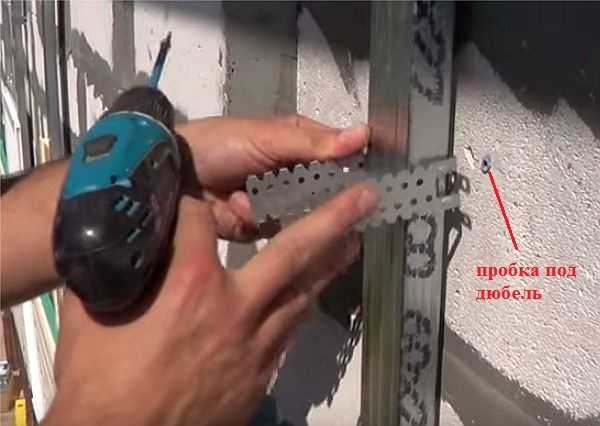
To avoid similar situation, plastic plugs are inserted into the wall and dowel-nails are used. Ordinary ones are of little use, although they are better than just self-tapping screws. If you use regular ones, the length plastic stopper must be at least 30 mm.
In general, it is better to attach it to special ones, which are called “for aerated concrete”. They are available in specialized stores that sell hardware. On normal construction market they may not be found. From ordinary ones they get wet large sizes plastic part, as well as more developed screw plates.
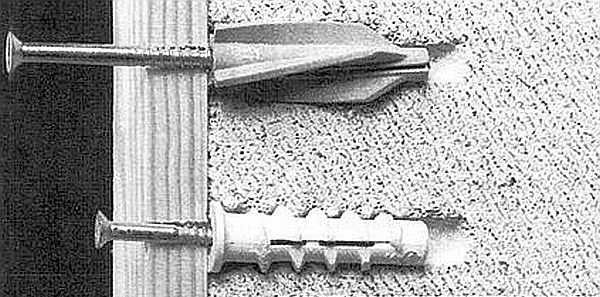
The installation method is standard. Under the dowel plug ( plastic part) a hole is drilled. Depending on the shape helical surface the plastic insert is driven in (in the photo, the upper dowel) or screwed in (the lower one). Then the screw is screwed in.

When using wooden blocks or galvanized profiles, they are attached to such dowels. The sheathing installation step is smaller than usual - it is about 40 cm. This is for a more uniform distribution of shock loads that arise when strong wind. An example of covering aerated concrete with siding can be seen in the video. There are many useful nuances.
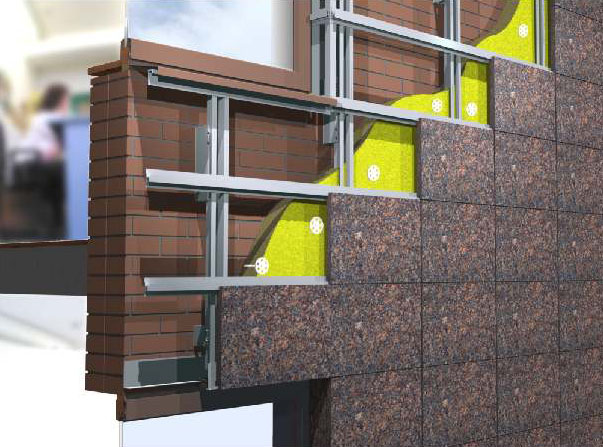
If you cover an aerated concrete façade with bricks correctly, it will stand for decades without problems. Required condition- between the wall finishing material and the wall made of aerated concrete should be ventilated. Its width is at least 30 mm. In order for it to work, when laying finishing bricks, vents are left in the lower part - small holes into which air will enter. To prevent animals from getting into them, they are covered with ventilation grilles.
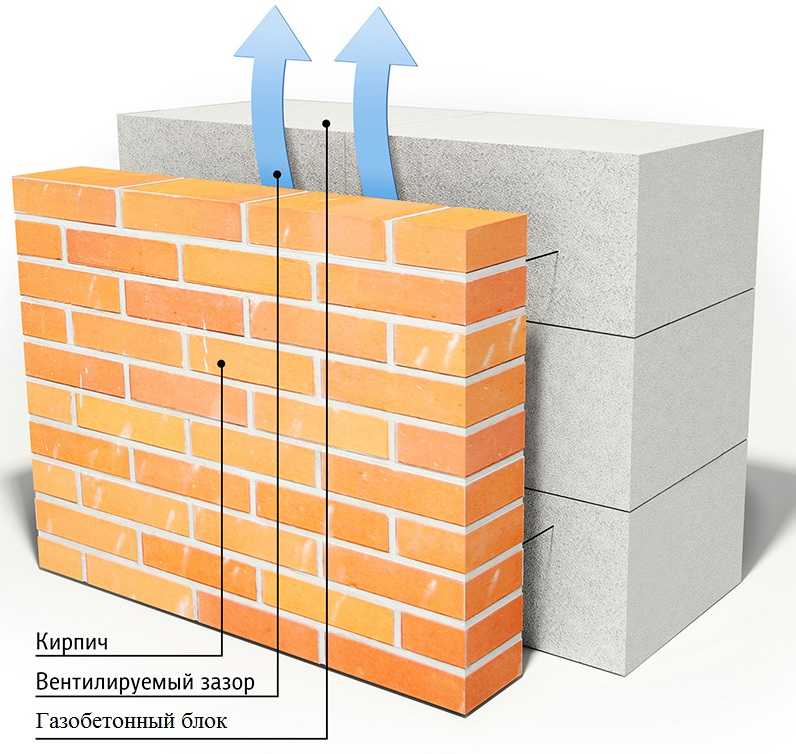
The principle of “operation” of the system with a wall made of finishing bricks spaced 3-5 cm
Only this type of finishing, unlike ventilated facades, should be taken into account when calculating the foundation. Firstly, the mass of brick finishing, even half a brick, is considerable, and it must be taken into account when calculating bearing capacity foundation. Secondly, the width of the finishing is taken into account when determining the width of the foundation: the overhang of the brick cannot be more than 3 cm, and a ventilation gap of 3 to 5 cm is also needed between the wall and the finishing.
But, if you simply place a brick wall at the required distance from the wall of the house, there is a very high probability that it will simply fall. Therefore, it is necessary to connect the walls of foam concrete and brick. To do this, even at the stage of laying foam concrete, thin plates called “flexible connections” are installed between the blocks. It's best if they are made of stainless steel. The medium in the solution in which these strips are embedded has alkaline reaction, and in an alkaline environment, metal, even galvanized metal, quickly deteriorates.
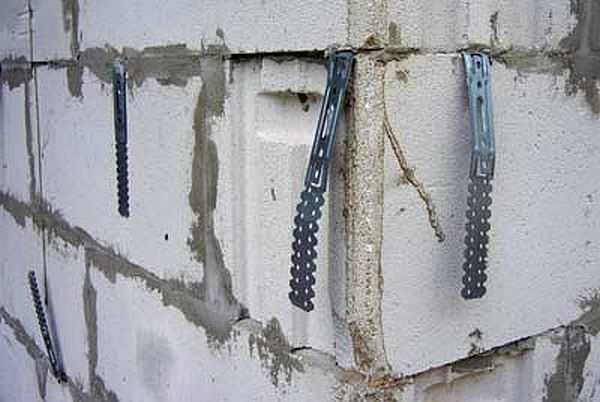
Inserted into seams mounting plates for connection with the brick finishing of foam concrete, but they are galvanized and after a few years the brick finishing may fall off
Plates on the wall surface are placed approximately 60 cm in every second row, maximum distance the height between two rows is 50 cm. The plates are arranged in a checkerboard pattern. In the area of corners, windows and doorways It’s worth placing them more often.

Sometimes when laying the plates they forget about them. In this case, a dowel is screwed into the wall, to which a metal perforated plate or also a special stainless steel pin is already attached. Another option: when laying bricks, a hole is made in the wall exactly opposite the seam into which a pin is driven. The pin should extend 10 cm into the concrete body and almost the entire width of the brick. But the pin is not flexible and can break both aerated concrete and brick finishing(half a brick - exactly). Therefore, it is better not to suffer from such “savings”. How to finish aerated concrete using finishing bricks with a ventazor - in the video.
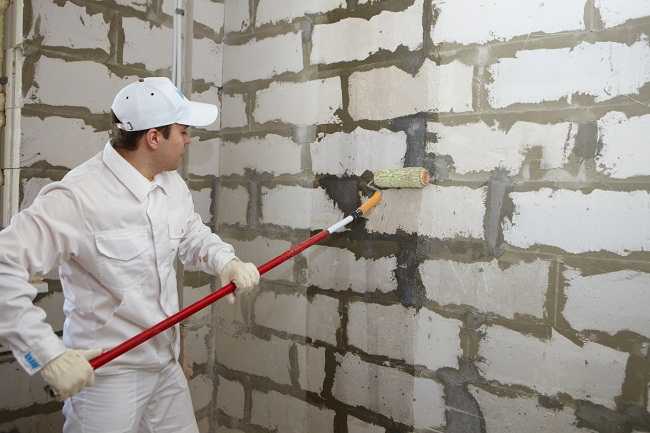
As already mentioned, plasters for aerated concrete can only be used with high vapor permeability. These plasters are expensive, but they are applied in a thin layer. Therefore, to obtain flat surface a number of preparatory measures are required.
You can start plastering work when the humidity of aerated concrete blocks is no higher than 27%. Before starting work, the surface is treated:
Minimum layer - up to 10 mm can not be reinforced. Due to the adhesive additives in the composition, it will adhere tightly to the surface. If the layer is 10-15 mm, reinforcement with a fiberglass mesh is necessary; with a thickness of 15-20 mm, a metal mesh is required. Exterior decoration aerated concrete with thicker plaster is impractical.
The mesh for outdoor use should have a mesh of about 3 mm. It must be resistant to alkaline environments (written on the packaging), otherwise after a couple of months it will lose strength and will no longer hold the plaster. As a result, the finishing layer will fall off.

Reinforcement is carried out over the applied layer of primer mixture. It is also used specially, has excellent adhesion to foam concrete, and creates the basis for applying decorative plaster. The composition is applied to the wall in a strip. Before it freezes, a mesh is rolled out over it. Using a notched trowel or grater, press the mesh into the solution. After it is completely immersed, take the usual wide spatula and level the surface, adding mortar if necessary. The leveled surface is left to dry. The period depends on the material used and is specified by the manufacturer. The average period is 7 days.
A primer is applied to the dried surface of the reinforcing layer. It performs several functions:
Apply the dried primer (in the description) finishing — decorative plaster. The technique for applying it depends on the type of composition.
With normal calculations and adherence to technology (laying with glue with a joint thickness of 1-2 mm) gas silicate walls do not need insulation. IN middle lane Russia sufficient thickness block 325 mm. If the need nevertheless arises, the insulation must be vapor-permeable. And these are mineral wool and foam glass. Foam glass has excellent characteristics, but a high price. Mineral wool- cheaper. The thickness of the insulation depends on how cold it is in the house, but usually 50 mm is used as a minimum.
When finishing with lathing, it is made from a wider board or profile, taking into account the fact that the thickness of the insulation is also added to the thickness of the ventilation gap. Sometimes a counter-lattice may be needed. These are additional strips, which, depending on the circumstances, are packed along or across the first sheathing. The thermal insulation is attached to the wall with special plastic dowels with a wide mushroom-shaped cap.
Finishing aerated concrete indoors has its own characteristics. Most often, such walls are still plastered. You can use the same expensive mixtures as for exterior finishing, but it is very expensive. There are ways to make walls normally using ordinary cement or gypsum plaster. But this requires additional measures: a preliminary relief is created using cheap tile adhesive. It has good adhesion (adhesion) even to a relatively flat surface of aerated concrete and creates an excellent basis for applying subsequent layers. plaster. The procedure is as follows:
You can apply plaster over the dried glue, or you can lay tiles. She definitely won’t go anywhere: she will hold on well. In wet areas - bathroom, kitchen - you can choose a film-forming primer, which reduces the vapor permeability of paints.
To learn how to properly prepare a gas silicate wall for plastering, watch the video. With its help, plastering aerated concrete walls with your own hands is clear: everything is laid out step by step and chewed.
Almost all options are acceptable for finishing aerated concrete walls inside:
Of all these processes, only painting requires some explanation. For this type of finishing, an aerated concrete wall does not need to be plastered. In general, the walls should be almost even. If there are chips, dents or protrusions, everything can be solved very simply. They are sealed with the same glue on which the blocks were placed. If the dents are large, you can add sawdust, which is formed when cutting the block, to the glue. The seams are rubbed with the same composition.

If there are protrusions, they are trimmed off with a special grater, but you can also sandpaper, fixed on a block. These products achieve a smooth surface that can be painted. The wall is cleaned with a brush attached to a holder to sweep away the dust. The dust-free wall is primed. The primer is selected compatible with the selected paint. They must be compatible. It is advisable to apply the primer twice. Then paint is applied to the completely dry primed surface.


