In magazines garden design Photos of alpine slides are very common. This is not surprising; this attribute is becoming increasingly popular.
The reason for this is its unusual shape and diversity color solutions. Such an “island” on the site helps to create an elegant and aristocratic atmosphere.
The creation of alpine slides is beginning to gain momentum. Along with them, rockeries, which are a continuation of rocky gardens, are gaining popularity. Such garden attributes look good with ponds, rivers, bridges, paths, lanterns, etc.

As a rule, plantings on such objects do not require special care.

The main advantage of such projects is that you can make an alpine slide with your own hands, and without much expense.

Depending on where the slide will be located, it can occupy a central place in the design or be an addition to any overall composition. This versatility allows this attribute to be used in any environment. The slides look quite organic and do not look alien.
Before you start creating a rock garden, you need to choose the right place for it. The best area will be one that is clearly visible from anywhere in the garden.

The slide will look good in an open area that will not be shaded by trees. This is especially important if there is a pond nearby; leaves from trees falling into it will quickly spoil the water. It is also important to choose a place where there will be no strong winds.

The configuration of the slide will need to be provided so that it accommodates the necessary plants that are suitable for general style plot.

Slides can be well combined with various styles of areas, which provide transitions from one zone to another in the form of paths, rocky paths with lanterns and bridges.
Before you make an alpine slide, you need to choose the right stones. We will need rocks:


You should not use porous rocks; they absorb moisture well and will begin to deteriorate over time due to watering of plants and precipitation.

The shape of the stones is also of great importance - there is no need to choose round or acute-angled stones. As a rule, stones of the same type that have different shapes look best.

Place the stones on the hill in the most chaotic manner. The largest and heaviest boulders should be at the base.

If there are defects on the stones, they can be masked using the soil on which the plants will be planted. The most important thing is to achieve natural look, so you should avoid industrially manufactured boulders.
Due to the fact that the hill will be located in an open place, the plants on it must be resistant to constant sun and aridity. As a rule, they plant on hills miniature trees, shrubs, herbs and unpretentious flowers.

Among the most popular crops are the following:


Plants can be planted in small groups and they will do well. Here are some of them:


In addition to flowers, you can plant conifers. They look beautiful all year round and harmonize well with bright and lush flowers:

The best option would be to plant ornamental, perennial plants. They are not particularly demanding to care for and look good throughout the year. By choosing the right types, the rock garden will look beautiful all season long:


It is also important to take into account the height of the plants. If some species shade others, this should not affect their development. They should do well in the shade.

Flowers with the brightest bloom should be placed at the front of the composition.

So, most important rules Creating a rock garden is a matter of choosing the right place, stones and plants. It can be placed in almost any area.

Even if you're not big suburban area, an alpine slide at the dacha will look great. It'll be neat decorative corner, which will easily surprise the neighbors.


A spectacular element in the landscape is a self-created alpine slide. A rock garden is a small area in the garden, designed as a natural area.
Many owners personal plots Are you interested in how to make an alpine slide with your own hands?

To create this corner wildlife on your site you need to familiarize yourself with the intricacies landscape design.

Usually this masterpiece is located in the most visible place. In addition, a rock garden requires a sunny place, so this corner is usually located in an open area.

Since an alpine slide has a calming effect on a person, it is best to place it near a place of rest.

The quality of the soil cover should not be discounted, since the most favorable soil for a rock garden is sandstone, but if the soil has a clay base, then it will be necessary to make drainage.
An alpine slide can be created at any time of the year except for winter, since in the winter cold it is impossible to plant plants or prepare the soil. However, experts consider autumn to be the most optimal time for creating a rock garden.

Because the natural shrinkage alpine hills can take several months, then, according to landscape designers, it is necessary to prepare for autumn planting in the spring.
Landscape designers, answering the question of how to make an alpine slide, offer universal schemes and projects for arranging this natural corner, taking into account all the subtleties and scope of work.

However, knowing the basic rules for creating a rock garden, you can organize it yourself.

The first thing you should pay attention to is the location. So, the rock garden should be clearly visible. Most best option is the creation of an alpine slide in the shape of a pyramid, in which maximum height concentrated in the center.

In addition, all elements of the rock garden should be positioned freely; symmetry is inappropriate here. If it is possible to organize a rock garden on a natural slope, then it is best to mark its elements at the same level.

In terms of parameters, the height of the alpine slide should be proportional to its size, that is, 1 meter of area corresponds to a height of 0.2 m, thus, a flowerbed measuring 4 m² in height will be 80 cm, as in the photo of the alpine slide.
Even the simplest alpine slide requires careful preparation. So, when creating a rock garden, you need to make drainage, the fact is that the use of stones causes the soil to sag, which means you can’t do without drainage.

Drainage material can be fine gravel, pieces of red or white brick, small pebbles or crushed stones.

Before laying the drainage, it is necessary to dig a hole 1 m deep for a flower bed with an area of 8-9 m². Then drainage is laid out and the soil is filled with water. Next, a layer of earth is poured.

As soil for a rock garden, it is best to use a soil composition consisting of ordinary earthen soil, peat and river sand. All soil components must be in equal proportions.

The basic element of any rock garden are stones. Usually these are large stones of an original shape.

Most often, pieces of granite, sandstone, limestone are used to create an alpine slide; you can also use wild stone, as well as tuff.

When decorating a rock garden with stones, you must follow the following rules:

You can arrange the stones according to your own taste, however experienced designers can offer you several suitable projects. IN Lately A popular scheme is when massive stones are scattered around the site, with small pebbles between them.

An alpine slide looks interesting when the most spectacular stone is installed in the center, especially if the rock garden is located on a slope.


When laying out stones, especially massive ones, you need to make sure that they are stable; for this, some of them can even be fixed with cement or dug in a little.

A properly organized alpine slide at the dacha can become a favorite vacation spot for the whole family.
2 months after preparatory work You can start planting green spaces. The most convenient plants for decorating a rock garden are low-growing spruce, thuja, mountain pine and juniper.

A small alpine hill is an excellent landscape solution for a small area. When creating such a rock garden, it is best to use low-growing, herbaceous plants, such as wild carnations, low marigolds, nasturtiums, pansies and bluebells.

If desired, an alpine slide can be combined with a small reservoir in the form of a small pond, but in this case the process of creating a rock garden will be even more labor-intensive, but it will be a real work of landscape art.


Every modern, well-appointed dacha must be decorated with either a garden or various kinds of flower beds. At the same time, the size of the dacha plot does not have to be huge at all in order to realize even the most daring ideas. Nothing prevents you from creating something beautiful, unusual and elegant in a small area. For example, a miniature alpine slide, which you can easily create with your own hands when using available materials even for beginner gardeners.
Such a compact rock garden has several advantages over a regular flower garden. Firstly, it looks much more original. Secondly, it takes up little space, and thirdly, it does not require complex care. For those who want to master the arrangement of alpine slides, creating a miniature version will be an excellent practice.
Anyone can build an alpine slide with their own hands, even small areaRock garden and rock garden are two different ways flowerbed designs that have a lot in common. Due to large quantities sometimes even gardeners with the same characteristics great experience are confused about these concepts. Both of them are a flower garden, for the arrangement of which flowers and stones are used. What is the main difference between them?
A rock garden is a garden made of stones. pure form. When creating it, only one type of stone is used. They are laid in two ways: chaotically, without observing any order, or in parallel rows. This helps create the visual effect of wildlife. The secondary elements of the composition are plants and flowers, which in this case serve only as a natural floral background.
It is the role of plants in the flower garden that is the main distinctive feature between an alpine hill and a rock garden. In this form stone garden, like a rock garden or mini rock garden, the main emphasis is on the plants. Its composition consists of various types of colorful, unusual flowers and their combinations, turning the flower garden into a small Magic world, from which it is impossible to take your eyes off.
 A rock garden differs from an alpine slide in its emphasis on the natural beauty of the stones; flowers in this case serve only as an addition
 When planning to create a small alpine slide with your own hands, it is important to choose the right place. For example, a one-sided mini-slide is best placed next to the wall of the house or near the fence, as an addition to the general flower garden or as separate element garden A round flower bed will look great in the center of the lawn. Thus, all its sides will be available for review. Ideal place for a mini rock garden in a flowerpot - a porch or terrace.

 Interesting idea: the roof of the cellar gradually turns into an alpine slide
 Also, when choosing a place for a rock garden, it is important to consider not only how it will look, but also pay attention to other points related to its placement:

 An open, well-lit clearing will become great place for the construction of a rock garden
 When starting to work on a miniature rock garden with your own hands, you need to think about the choice of style in which it will be decorated; it completely depends on the desires and imagination of its creator. Photos of the most spectacular and colorful mini-rock gardens can help you decide on a specific option, for example:
 A rock garden can be completely different - from a mini composition in a pot to a large slide with waterfalls and a fountain
 To create a small, simple alpine slide, even novice gardeners do not need a lot of skills or much effort. The main thing is to get in a creative mood. The process itself will not take much time, since a mini rock garden is a completely small and not labor-intensive project.

 Organic stone placement creates the impression of a natural landscape
 Once you decide to set up a small rock garden with your own hands, you will need very little material, which is definitely available at any dacha:
Sometimes even old sinks or leaky basins can act as scrap materials. They can also be transformed into a genuine floral masterpiece.
To make the composition more interesting and original even with a minimum of vegetation, preference should be given to stones with unusual shape and colors. It is advisable to surround cobblestones of a common gray color with gravel of other shades or bushes with bright flowering.
What plants will make up the composition of the mini-alpine slide is determined by the area that the latter will occupy. In the case of small areas, miniature plant species are also required. The most suitable are dwarf-sized conifers, as well as rocky species that grow slowly. Among them you can choose:
If we want to dilute the composition with bright colors, we should plant low growing plants, which have small flowering, for example:
In the case when the mini-garden made of stones will not remain for the winter, then it is permissible to include cacti and succulents, for example, crassula or agave, in its composition. With the arrival of autumn, a miniature rock garden in a flowerpot can be simply removed from the street into the room.

 Plants for the slide should be unpretentious to environmental conditions
 In various sources you can find a lot of diagrams and step by step instructions with photos on creating mini rock gardens. The simplest sequence of actions, which is easy to implement even for a beginner in gardening, is as follows:
When starting to arrange a flower garden, you should remove all weeds and roots from the area intended for it. This will save time and effort in the future.
Since the mini-rock garden occupies a small area, a pit about 50 cm deep will suffice. A similar hole should be dug in the place where most of the stones are planned to be placed and filled with drainage. The latter may be suitable for ordinary construction waste, which is not toxic. After compaction, it is covered with earth. It is important to carry out intermediate watering of the soil with water, which is added in layers. This measure promotes better compaction and will prevent subsidence of your creation in the future. To mark the tiers of the rock garden, twine and stakes are used.

 When placing stones, you can be guided by your own taste and general form resulting rock garden
 Quite often, one of the most impressive stones is placed in the middle of the flower bed. It is installed on a special substrate, which is buried in the ground until its base is level with the ground. A plaster bowl or a substrate made of cement mortar can serve as a support. First you need to install in in the right place support, drowning it in the ground, and then laying a stone on it. You can make the placement of the stone reliable by using cement mortar or gypsum.
Next, using a similar principle, you should start arranging and securing smaller stones. When creating an alpine mini-slide, the most commonly used materials are shell rock, dolomite and tuff. Samples with natural colors and structure look especially elegant, although modern methods landscape design allows for the coloring of stones, the appearance of which does not fit well with the overall composition. Usually, when designing miniature rock gardens, they try to use small samples of stones from one color range, but it is quite possible to use bright colors that create contrast to the main background. This will add gloss and elegance to the flower garden.
When installing stones, you must adhere to the descending rule, that is, arrange them in height that decreases downwards. The lower stones should act as a reliable and stable support for the upper ones. There is also an option for layering stones, which also looks very impressive.
Stones with smooth and flat shape, should be laid out in layers, round ones should be placed in addition one at a time or several together. The main thing is that the number of stones in the group is odd, and it is necessary to focus on one of them.
 Before planting plants on a hill, flowers can be placed directly in pots and look at the general appearance of the composition; planting can be done after all the amendments have been made
 In the process of placing and installing stones, it is important to leave space between them, which will later be occupied by the plants chosen for the mini-rock garden. These spaces between the stones must be filled with fertile soil. You can plant plants and flowers not only between, but also around the stones. The largest plants should be placed first. Concerning dwarf trees, which have quite a powerful root system, then they need to be planted when the first stones are still being laid. At the end, the middle and small plants. At the end of all the work, the flower garden should be watered. After this, all that remains is to apply the final design touches. To do this you will need sand, small pebbles and any elements of garden decor.
A miniature pond in the composition of a small rock garden will give it a special appeal. To create it, you will need a regular container designed for artificial reservoirs. You can buy such a device at any store specializing in garden supplies.
However, you can build such a container yourself from scrap materials, for example, an old basin. First you need to mix a cement solution with a consistency similar to thin sour cream, and add medium-sized crushed stone to it. The inverted basin should be covered evenly with the resulting mixture in a layer 1-2.5 cm thick.
 When creating a rock garden with a pond, it is not at all necessary to purchase expensive structures; you can use unnecessary containers, for example, a bathtub or basin
 It wouldn’t hurt to create additional decor. It may be a pattern scratched on the outside, or a mosaic laid out. Ceramic shards are suitable for mosaics, broken glass, shells and pieces of tile. Decoration should be done when cement mortar still remains damp. In this option, there is no need to add crushed stone to the solution.
Now you should prepare a place to install the dried container. To do this, a hole is dug, at the bottom of which expanded clay or gravel is poured as drainage, in a layer of 5-7 cm. The container itself is placed on top of the hole. You can beautifully lay small pebbles along the edge of the created pond.
We will send the material to you by e-mail
A do-it-yourself alpine slide will help you create an original landscape design on the site of a suburban building. Step-by-step photos, diagrams and drawings will help you complete a high-quality project even in a day. Such structures are made using wild stones and unusual flowering crops. Carry out qualitatively installation work Certain rules will help, compliance with which will prevent alteration and disassembly of the created composition.
When installing the slide you will need various stone blocks, sand mass, crushed stone and different variants perennial plants
First of all, you need to choose appropriate place for future alpine slides at the dacha with your own hands, photos of which can be viewed on the website. The best solution may be the choice of a site on the southwest or south side. A good option is a place on a slope where low-growing crops can be planted among the stones.
The basis for a small area can be a slope along the border of the territory or even along the edge. When choosing a space for a slide, it is worth considering the following factors:

Helpful information! When starting to build a structure, it is worth considering suitable style design. Various landscape solutions involve the use of rocky gardens, ponds or bridges, which should be combined with a slide.
The work performed to install the slide practically does not depend on the time of year. It is not recommended to start work in winter time. The best period is considered to be autumn, when there is time before cleaning the area for the winter. A rocky structure after installation requires time for a certain shrinkage. After this, you can only start planting plants. If the plants are planted in the fall, then the construction of the main structure can begin in the spring. A high-quality alpine slide is created with your own hands using step-by-step photos and diagrams.

A rock garden is a stylish decoration for a dacha area. To decorate it, perennial plants are selected that have different flowering periods.

When creating an alpine structure, you should follow the following tips:
For your information!Alpine slide is a small model of a real massif with undulating transitions from a rocky peak to flatter areas. It is important to respect the style of the structure, the size of its tiers, as well as the recreation of all conditions for mountain plants.

Related article:
Before starting work, landscape design is thought out. Do-it-yourself Alpine slides, photos of which can be seen in the photo gallery, require a special approach and a well-planned project. When choosing a suitable site for construction, the proximity of groundwater passage is important. If they are located close together, the strength and durability of the structure is threatened. The groundwater level is influenced by special drainage.

To make a beautiful alpine slide with your own hands, step-by-step photo instructions and diagrams will help with installation.


First of all, the drainage system is performed:
Stone laying can begin after the structure has settled. This may take about four months.
Helpful advice! You can add crushed stone to the garden soil, and clay soil It's worth mixing sand.

An alpine slide is made from stones with your own hands. Step-by-step photos, diagrams and drawings will help you choose best project registration Before laying the stones, it is worth preparing a special mixture. In this case, coarse sand, loam from the garden and compost are used. Crushed gravel is also used.

A similar composition can be distributed over the drainage. After this, the mixture is moistened and trampled. Large stones are installed first, and then smaller ones. When constructing, you should use the following recommendations:

The stones must be laid so that the soil between them does not erode during heavy rainfall. Sandstones, limestones and basalt with granite are used in the construction of this structure. Experts do not recommend using shell rock or tuff.
Helpful information! To retain moisture for plants, the surface of the rock garden can be sprinkled with gravel or stone chips.

Compacting the soil is a mandatory step before laying stones

Mountain structures can be used in various variations. Based on the photo you can choose the most interesting options:


Helpful information! The classic solution is a centric structure, in which bright flowers plants are combined with rocky elements. The basis is an area with natural elevation.
DIY Alpine slide: step by step photo, the diagrams of which are presented in this review, can be constructed using the following recommendations:


With the help of a pond you can decorate any rock garden. Compliance with all the rules will allow you to create a stylish and original structure that will last for many years.
Quick navigation through the material
A beautiful, well-groomed area is the calling card of any site. It’s good when, among all kinds of plantings in the garden, there is a central element that stands out from the general background.
This element can be a rock garden - a rocky elevation, decorated with flowers and plants and imitating a fragment of a mountain landscape.
Summer residents often confuse two similar concepts - rock garden and rock garden. In fact, they are not too mistaken, because rockery is the general name for rocky gardens, and alpine slide is one of its varieties. At the same time, many landscape designers We are used to defining a rock garden only as a flat composition.
Alpine slide in the background log houseA rock garden, unlike a rock garden, is an elevated composition, necessarily tiered, with slopes and a peak.
Compared to a rock garden, it is more difficult to make an alpine slide with your own hands, but it has a more pronounced relief, attracts more attention due to its height, and makes the landscape noticeably more picturesque not only in summer, but also in winter.
You can also use a rock garden to zone a summer cottage, for example, to visually separate work area from the front door. In addition, a rocky hill will beautifully cover embankments that are unsuitable for planting.
From this article you will learn how to make an alpine slide with your own hands and get landscape design ideas from 50 photos of rock gardens.
So, how to create a composition, how to select and arrange plants and stones? Complete answers to these questions will not fit into one article, but in short, here are a few main rules and principles that need to be followed:

When choosing the design of an alpine slide, be guided by a sense of proportion - the composition should look natural and fit organically into the landscape. Cliffs and rocks (see photo below) in summer cottages most often seem foreign. But simple imitations of a slope or mountain valley without a pronounced peak are appropriate everywhere.
 On a small summer cottage tall views rock gardens like in this photo are not very appropriate
 Now let's talk about choosing plants for an alpine hill. If you build a rock garden strictly according to the rules, then the flora for it must be selected strictly of alpine origin: miniature conifers, shrubs, ground cover, bulbous and herbaceous perennials.
However, real “Alpines” are not so easy to find and raise in middle lane, so you can choose any plants that are characterized by stockiness (height up to 60 cm), unpretentiousness and, of course, decorativeness. It is better to plant on the northern slope shade-tolerant plants: tenacious, periwinkle, fern, bergenia and others. Accordingly, they grow better on the southern slope light-loving plants: lavender, barberry, adonis, iris, acena and others. Evergreen plants such as mountain pine, Canadian spruce, juniper and others will fit very harmoniously into the “mountain ensemble”.
It is advisable that the plants of your rock garden remain decorative throughout the season, otherwise withered leaves will spoil the entire composition, and it is unlikely to be possible to hide them behind their blooming “neighbors.” For this reason, it is good to use flyers in the design of an alpine slide. Although they are not entirely “canonical”, they will decorate a rocky garden for a long time.

Having roughly imagined what our rock garden will be like, we can begin to create an alpine slide with our own hands.
The technology for creating an alpine slide consists of the following stages:
Now let's talk about each stage in more detail.
It is best to start creating even the simplest alpine slide with the development of a project. The simplest option is a schematic sketch, observing the approximate sizes of stones and plants relative to each other. For example, it could be something like this.
 1 – Mountain pine, 2 – Creeping thyme, 3 – Canadian Phlox, 4 – Evers’ sedum, 5 – Gray fescue, 6 – Rocky alyssum, 7 – Angustifolia lavender, 8 – Sedum, 9 – Fragrant rue, 10 – Steller’s wormwood. Note: the alpine hill diagram is shown without taking into account the flowering time of plants
 Ideally, a slide, especially a large and multi-tiered one, should be designed on a scale of, say, 1:50 or 1:25 (1 cm on paper corresponds to 50 or 25 “natural” centimeters) and with a grid with 2x2 cm cells (that is, with transferring the grid to nature, the cells will correspond to cells of 50x50 cm at a scale of 1:25).
Here are some tips for choosing a location for an alpine slide:
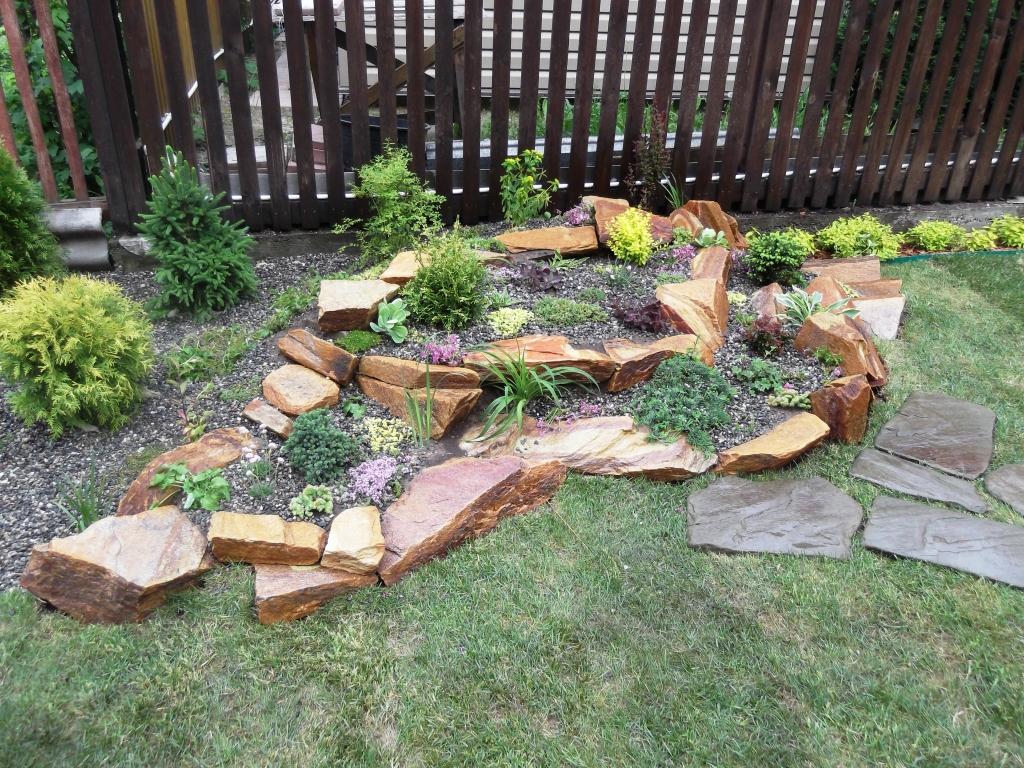
 An example of an alpine slide against the background of a fence. By the way, the rock garden here is designed to hide water communications
  This small alpine hill would look much better if the fence was entwined with vines or planted with shrubs
 Suitable places:


In accordance with the plan, we mark the outline of the future slide in the selected area: we drive in pegs and stretch a string through them.

Next, remove the turf to a depth of just over 30 cm and leave it aside for a while. Later, based on it, we will prepare a soil substrate. When doing land work, do not forget to remove weed rhizomes.

So, we have a “pit” for the rock garden. Now we need to fill it with a “sandwich” of drainage and soil. Broken bricks, pebbles, crushed stone or small gravel can be used as the first layer of drainage. We fill it with a thickness of 10-15 cm, depending on the size of the stones. Next, pour a layer of sand 5-10 cm thick, tamp it well and fill it with water to achieve maximum density.
When laying the drainage layer is completed, you can begin to prepare fertile soil. We will mix it from equal parts: previously dug turf, peat, humus and sand.

The construction of an alpine slide begins with laying the most beautiful and largest boulders along the perimeter of the future rock garden.

The stones should lie as stable as possible. To do this, they must, firstly, be placed on the ground with their largest side, and secondly, if necessary, place smaller support stones under them or add gravel or soil. The bottom row of boulders needs to be completely dug a third or two thirds into the ground - this way you will achieve not only stability, but also the desired natural effect.
Having folded the first row of large stones, we pour the prepared soil into the center of the composition and at the same time lay out the medium stones, forming the second tier.


Finally, small stones are placed at the top of the hill and on the slopes where voids need to be filled. At the top of the slide you can place one large or two medium stones. When erecting an alpine slide, do not forget to check your diagram and leave enough space for planting. Upon completion of the construction of the alpine slide, it needs to be watered generously and left for a couple of weeks to shrink.
Some experts recommend forming the core of the slide not from fertile soil, but from sand mixed with a small amount of crushed stone (the soil is poured only into the planting holes, and then the entire embankment is covered with it to hide the light sand). This way the elevation will be more reliable and durable. High slides require a core of three layers: gravel (or other rocky scattering), sand and soil (see diagram below).

When you are satisfied with the composition of stones, proceed to the most enjoyable stage - planting the flora. To do this, first arrange the pots of seedlings on the slopes according to your design, starting with the large ones and ending with the small ones. Planting should begin from the top, gradually going down. The depth of the planting holes depends on the size of the root systems specific types. Finally, the finished slide needs to be watered, washing away the soil from the stones.


Hurray, the alpine slide is ready! Now you can add filling (pebbles, gravel or crushed stone) to the slide where necessary, or install decor ( garden figures, lanterns, etc.)
Finally, we invite you to watch a visual master class on how to make a simple alpine slide with your own hands.
See also the gallery of ideas for rock gardens in the country.


