Stairs.  Entry group.  Materials.  Doors.  Locks.  Design

Stairs. Entry group. Materials. Doors. Locks. Design

» What is needed for an incubator. Do-it-yourself homemade incubator: diagram, drawings. How to make a homemade incubator? Manufacturing and installation of trays

What is needed for an incubator. Do-it-yourself homemade incubator: diagram, drawings. How to make a homemade incubator? Manufacturing and installation of trays

If you have certain materials, you can make an incubator yourself. However, successful incubation of eggs depends on a number of factors, and in order not to spoil them at the very first laying, it is important to anticipate all possible issues in the operation of the manufactured structure. Let's consider one of the popular options for creating such a device.

Characteristics of incubators with automatic egg turning

In addition to incubators with “manual” or semi-automatic egg turning, there are automatic incubators that minimize human intervention in the process of hatching chicks. According to the time set by the owner, the automation itself performs the required revolution, and the eggs do not lie in one place.

Such machines can be built at home, but first of all, it is important to take into account all its possible advantages and cons.

Advantages

  • The following features can be considered the undeniable advantages of a homemade device:
  • low cost compared to ready-made purchased models;
  • economical in terms of energy consumption;
  • independent selection of the required internal volume, depending on the personal needs of each farmer;
  • high maintainability (if any part fails, the technician can always replace it without outside help);
  • versatility (with proper assembly of the structure homemade incubator can be used not only for breeding chickens, but also for breeding chicks of other domestic or even exotic birds).

In addition, if the components for the future device can be found at home, then you will get the finished incubator completely free of charge.

Flaws

This group of characteristics mostly includes disadvantages associated with inaccurate calculations and the use of old materials.

  • Therefore, the possible disadvantages of homemade devices are as follows:
  • the possibility of failure of some part of the device (especially if the incubator is made of old technology);
  • independent increase in temperature or power outages, which leads to the death of embryos;
  • unattractive appearance;
  • lack of a warranty from the manufacturer that allows you to replace the device if it breaks.

Requirements for homemade automatic incubators

Without knowledge technical specifications incubation, not a single assembled incubator can provide good productivity, therefore, before getting down to work, it is worth considering some requirements for automatic designs:

  • incubation of eggs takes at least 21 days, which means that the incubator must work exactly that long (without interruption);
  • eggs should be placed inside the device at a distance of at least 1 cm from each other, which is important to consider when choosing a specific tray;
  • along with the change in the stage of embryo development, the temperature inside the incubator should also change;
  • automatic egg turning should be performed slowly, twice a day;
  • to maintain optimal levels of humidity and ventilation, in homemade mechanism A regulator of the necessary parameters must be provided (thermostat, as well as sensors scanning the temperature and humidity levels).

Important!To use a homemade breeding incubator different types For birds, it is useful to purchase a ready-made universal tray that ensures timely turning of their eggs.

How to make an automatic egg incubator with your own hands

If you are going to create an incubator yourself, then one of the good solutions is to use an old refrigerator. Of course, it will have to be completed and the consumables selected correctly.
To do this, you need to make sure that the finished structure:

  • had holes for ventilation and maintaining humidity at a level of 40–60% (drilled in the body, after which tubes are placed in them to protect against interaction of air with glass wool);
  • provided for the regulation and maintenance of temperature indicators;
  • ensured the ventilation speed of eggs was 5 m/s;
  • guaranteed timely egg turning.

However, all this will be calculated during the actual collection, and first you should correctly calculate the size of the device and select all consumables.

How to calculate the size?

The dimensions of the finished homemade incubator will directly affect the number of eggs for one laying, so if it is important for you to get as many chicks as possible at a time, then we suggest focusing on the following approximate values:

Concerning external dimensions devices, they depend on the chosen material, because, for example, foam plastic will be more voluminous than cardboard. In addition, when manufacturing structures with several floors, completely different technologies will be used, which means that calculations will be made taking into account the parameters of each tier.

The size of the incubator will also be affected by:

  • type of heating system;
  • placement of lamps;
  • placement of trays.

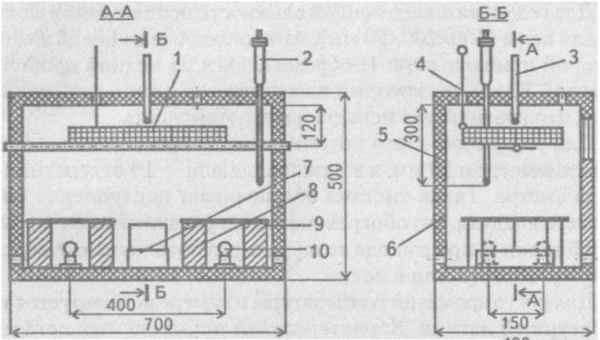
In order not to make mistakes in calculations when designing an incubator, it is important to adhere to a pre-designed diagram, which for a small device for 45 eggs can look like this:

Consumables and tools for work

The design of an incubator has much in common with the design of a refrigerator, which will make a good case: the walls refrigeration equipment They retain heat well, and you can use existing shelves as shelving.

Did you know? In Russia, the first mass production of incubators dates back to beginning of the 19th century centuries, and the volumes of such machines were very impressive: 16–24 thousand eggs could be placed in them at a time.

Main list necessary tools and materials will look like this:

  • old refrigerator(possibly the oldest model, but intact and working);
  • 25 W light bulbs (4 pcs.);
  • fan;
  • metal rod or chain with sprocket;
  • a drive that ensures the eggs are turned over (for example, a gearmotor from a car windshield wiper);
  • drill;
  • thermostat;
  • thermometer;
  • screwdriver and screws.

How to make an incubator with automatic tray turning with your own hands: video

Approximate diagram of the finished product:

Step-by-step manufacturing instructions

The entire process of making a home incubator from an old refrigerator will take only a few hours, as it consists of small quantity main stages:

  1. Development of drawings showing the clear location of every detail of the future incubator.
  2. Disassembling the refrigerator and removing all unnecessary parts: the freezer, trays on the doors and other elements of secondary importance.
  3. Organization of a ventilation system (you need to drill one hole in the ceiling of the refrigerator, and make three more in the lower part, closer to the bottom, inserting plastic tubes into them).
  4. Fastening sheets of polystyrene foam to the inner walls of the case (you can use double-sided mounting tape or small self-tapping screws).
  5. Installation of a heating system. The prepared 4 incandescent lamps must be secured at the bottom and top of the refrigerator body (two pieces each), and the lower lamps should not interfere with the placement of the water container (small self-tapping screws can be used for fastening).
  6. Installation of a purchased thermostat on the outer part of the door and its connection to the heating elements.
  7. Creating a turning mechanism using a car gearbox. To begin, use metal strips and self-tapping screws to secure this element to the bottom of the refrigerator. Then, inside the device, install wooden frame and attach the trays to it, only so that they can tilt 60°, first towards the door and then in the opposite direction. Attach a rod connected to the tray on the opposite side of the refrigerator to the gear motor (the motor will act on the rod, and it, in turn, will begin to tilt the tray and provide rotation).
  8. Installation of a viewing window. Cut a small hole on the outside of the refrigerator door and line it with glass or clear plastic. Reinforce all joints with tape or sealant.
  9. Installing a tray with water and attaching a thermometer inside the refrigerator, only so that it can be seen through the viewing window.

Finally, you should check the functionality of all mechanisms by turning on the device for several hours.

Laying eggs in the incubator

Before being placed in an incubator, all eggs must lie in the room for at least 8 hours, because if they were previously in cool conditions, then when placed in a warm incubator, condensation cannot be ruled out.
No less important stage preparation is the culling of unsuitable eggs.

So, the following specimens are not suitable for further incubation:

  • small size;
  • with cracks, growths or any other uncharacteristic features on the shell;
  • with freely moving yolk;
  • with a displaced air chamber (more than two millimeters).

The next stage is direct placement into the incubator, which also has its own characteristics:

  • on one tray it is advisable to place eggs close to each other in size, and preferably from the same type of bird;
  • first of all, the largest eggs should be laid out on the trays, followed by medium and small ones, taking into account the incubation period (on average, at least 4 hours should pass between the laying of each subsequent group);
  • if possible, it is worth moving the laying time to the evening hours, so that the chicks should appear in the morning;
  • It is advisable to place the incubator in a room with stable temperatures to make it easier for the device to maintain the indicators inside;
  • For complete control over the incubation process, get yourself a calendar in which you need to note the date of laying, the date and time of the turning, as well as the date of the control ovoscopy of the eggs.

The duration of incubation of different types of poultry has significant differences, which means turning the eggs should be done differently.
In addition, the conditions for embryo development will also vary:

  • For chicken eggs the temperature inside the device must be monitored every hour, maintaining it at +37.9 °C for the first 11 days, with a humidity of no more than 66%;
  • for duck eggs optimal performance- +38…+38.2 °C, with a humidity of 70%.

Did you know?Chickens are excellent at remembering faces and are able to retain up to a hundred images in their memory, not only human ones, but also animals.

Temperature conditions for different types of poultry

Suitable temperature is one of the most important conditions for incubation, without which hatching of chicks is simply impossible.

For each type of bird, these indicators are purely individual, so when laying eggs from chickens, ducks, geese or turkeys, you should focus on the following values:

In general, a homemade incubator - good decision both for those who are just trying themselves in poultry farming, and for experienced farmers who do not want to spend extra money on purchasing finished equipment. By equipping the structure with automatic egg turning, you can achieve 80–90% hatchability of chicks.

It turns out that anyone can hatch chicks poultry, you can do without not only the services of a hen hatching eggs, but also without an expensive factory-made incubator. For the home handyman It is quite possible to independently manufacture a device for incubating eggs, which allows you to successfully hatch chickens at minimum cost funds. Read below about how this can be done.

Requirements for a homemade incubator

The main requirement that any incubator must fulfill is its ability to maintain conditions as close as possible to the natural ones created by the bird hatching its eggs.

Important! The distance between eggs loaded into the incubator must be at least 1 cm.

And from here follow all other requirements for incubators:
  • the temperature within a 2-centimeter radius from each egg should be in the range from +37.3 to +38.6 ° C, in no case going beyond this range;
  • eggs loaded into the incubator must only be fresh, whose shelf life has not exceeded ten days;
  • the humidity in the device must be maintained within 40–60% for the entire period until the eggs are hatched, and after hatching it rises to 80% and remains at this level until the chicks are sampled, after which it decreases again;
  • Of great importance for the normal incubation of eggs is their position, which should be either the blunt end up or horizontal;
  • vertical arrangement involves tilting chicken eggs 45 degrees in any direction;
  • horizontal arrangement requires turning the eggs 180 degrees every hour with a minimum turning three times a day;
  • a couple of days before biting, the turning is completed;
  • Forced ventilation is desirable in the incubator.

How to make a simple foam incubator

Polystyrene foam is perfect for this purpose. This material being cheap, it is light both in weight and in processing, and has an excellent ability to retain heat, which is an indispensable quality when incubating eggs.

To make a small incubator for 15 chicken eggs out of polystyrene foam, you will need:

  • ten-liter foam thermobox with a wall thickness of 3 cm;
  • computer power supply;
  • fan;
  • light bulb with a power of 40 W and a voltage of 12 V;
  • light bulb socket;
  • metal pipe connector;
  • metal grid with cells 2x2 cm and rod cross-section 1.6 mm;
  • façade mesh;
  • plexiglass;
  • acrylic mounting adhesive;
  • temperature sensor;
  • humidity sensor;
  • sharp knife for cutting foam;
  • drill;
  • water tray;
  • furniture cable plug;
  • thermometer with moisture meter;
  • thermostat.

Process of creation

To assemble a home incubator based on a ten-liter thermobox, you need:

  1. Insert the fan into the pipe connector, first removing the ears there from the circumference of the fan housing.
  2. Approximately in the middle of the pipe connector, secure the socket for the paw so that the light bulb is directed in the direction opposite to the fan.
  3. Inside the thermal box, on one of its narrow sides, use four bolts, washers and nuts to secure a connector for pipes, for which four holes are drilled in the wall of the thermal box for the bolts and a fifth for bringing out the wires from the fan and light bulb. The pipe connector along with its contents is located almost at the bottom of the thermal box.
  4. At a distance of about 15 cm from the top edge of the thermal box, strengthen the inside of its walls along the perimeter with acrylic glue wooden corners.
  5. While the glue dries overnight, use a knife to cut out a small hole in the middle of the thermal box lid. rectangular hole, into which to insert a piece of plexiglass, resulting in an observation window.
  6. The mesh, cut so as to fit into the thermal box with its entire area, is installed on the glued wooden corners that have had time to strengthen.
  7. This mesh is covered on top with a façade mesh.
  8. Outside the thermal box, at the very edge, on the top side where the wires from the light bulb and fan come out, strengthen the thermal relay.
  9. Opposite the fan in its center, make a small hole for air flow, which is covered with a furniture cable plug, the width of the opening in which can be adjusted.
  10. On the same wall of the thermobox with outside install a thermometer with a moisture meter.
  11. Install temperature and humidity sensors on the mesh inside the thermobox, and lead their cables outside.
  12. Attach a connector to the wall of the incubator to which all the necessary wires are connected, including power from the computer unit.
  13. Place a small tray of water at the bottom of the incubator to maintain the required humidity.
  14. Make two small ventilation holes in the lid on the sides of the inspection window.

Important!For better preservation To prevent heat inside the foam incubator, it is recommended to cover it with thermal insulation covered with foil from the inside.

How to make a large refrigerator incubator with egg turning

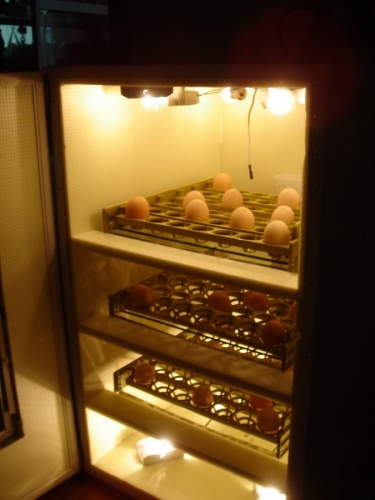
The most popular way homemade The incubator is the use of the body of an old refrigerator, i.e. the unit, once aimed at producing exclusively cold, turns into its opposite, now producing the heat necessary for the incubation process.

Moreover, the incubator turns out to be so “advanced” that it even contains a device that turns the eggs automatically.

To make this device, you can use:

  • the body of an old refrigerator;
  • glass or plexiglass;
  • a motor from a device with a gearbox (for example, from an automatic kebab maker);
  • metal gratings;
  • timers;
  • bicycle chain sprockets;
  • pin;
  • thermostat;
  • wooden or aluminum frame;
  • four hundred-watt electric lamps;
  • heat-reflecting material;
  • computer coolers;
  • construction tools;
  • sealant.

Choosing the right enclosure

This DIY home incubator design requires an old refrigerator with a separate freezer.

Then you need to do the following steps:


Creating a rotating mechanism

This is the most difficult and important part of the construction of this type of incubator. The turning mechanism must reliably turn the eggs in a given mode, doing this not only in a timely manner, but also accurately.

To install it you need:

  1. Install the motor on the floor of the chamber.
  2. Place the sprocket from the bicycle chain drive onto the motor shaft.
  3. Weld the second bicycle sprocket to the side of the lower grille.
  4. In the extreme position of the grid, install limit switches that regulate the operation of the motor, turning it off in time.
  5. The engine is turned on four times a day using two timers.

Video: mechanism for turning trays in an incubator from a refrigerator

In a market economy, each person is the master of his own wealth. Now anyone can lead decent life, because there are more than enough opportunities to earn money, for example, you can make an egg incubator yourself. This will allow you to create small farm, which will become a source of income in the future.

After you make an egg incubator with your own hands, you will have the opportunity not only to earn extra money, but also to provide for your own household. However, for this to become a reality, it is necessary to approach the creation of this device as responsibly as possible. After all, the success of the whole idea depends on how correctly it works.

The design of the egg incubator itself is not particularly complicated. If you have been breeding poultry for a long time, then you know that a chicken can hatch even under the light of a lamp. However, if you set the temperature too low, nothing will happen. Elevated temperature regime will also not lead to anything good.

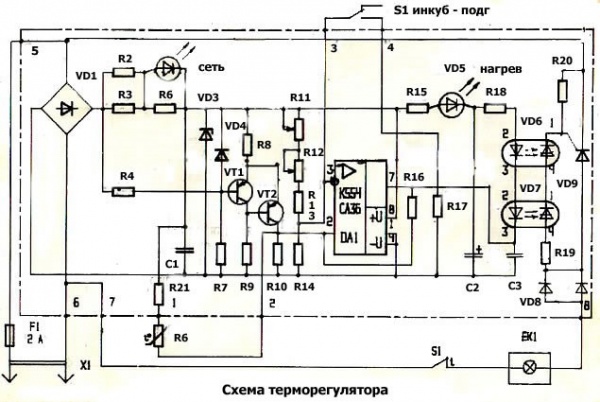
Therefore, before making an incubator yourself, it won’t hurt to thoroughly study all the drawings, and most importantly, understand how the thermostat works. After which you just have to select the appropriate mode and load the tray.

Of course, you can just buy an egg incubator, but the price of a device for such a simple design is really too high. It is much more practical and cheaper to do everything yourself.

Requirements for incubator design

There are many different drawings of an egg incubator that you can bring to life with your own hands. However, in order for everything to go as expected and the device you have built to adequately perform its functions, the following conditions must be met:

  1. You should focus not only on the temperature of the eggs, but also on the number of degrees around the future chicken. According to the agriculture According to standards, the temperature two centimeters from the egg should be in the range from 37.3 to 38.6.
  2. In order for the chicken to hatch, you cannot use eggs that have been stored for more than 10 days.
  3. It is important to monitor the humidity in the incubator. Before biting, it should be at least 40%. During the breeding process, this figure increases to 80%. If you do everything correctly, you will be able to breed healthy and strong chickens yourself. Immediately before hatching, the humidity will need to be reduced slightly.
  4. Eggs in an incubator that you make yourself should only be placed vertically. Moreover, the sharp end always points down.
  5. During incubation, all trays should be tilted to the left.
  6. Eggs need to be turned at least three times a day. They should not be touched before breeding.
  7. When you make your own incubator, take care of ventilation. It is necessary to ensure that air movement equalizes humidity and temperature. A speed of 5-6 meters will be more than enough for this task.

Before making an incubator with your own hands, watch the video below. Despite its apparent primitiveness, the incubator works great and allows you to hatch chickens at home.

Drawings for an incubator

To make a truly high-quality incubator yourself, you need to approach this matter with maximum responsibility. First, study the drawings, do it without them good project It definitely won't work.

IN project documentation there should be information including a thermal control diagram. This should indicate where the heating elements are located. Then you can make your own incubator, which will serve you for many years, allowing you to hatch chickens.

You yourself will have to study the mechanism for rotating the structure; you need to choose one that will simultaneously ensure stable operation and at the same time be quite simple to manufacture.

Important ! When you create the structure yourself, consider the possibility of laying eggs in the cells different sizes. This will allow you to expand your household in the future at minimal cost.

The fact is that the market is very flexible. At one time, chicken meat may be popular, but tomorrow everyone will start asking for goose meat. The day after tomorrow there will be a fashion for quail eggs again.

You must include temperature control mechanisms in your drawing. The fan should be installed exactly where it will benefit the most. In addition, it doesn’t hurt to think about an alternative light source. Even a short period of time without heating can cause improper development of chicks.

Based on all of the above, when choosing a drawing of a future design or making it yourself, it is best to focus on the following parameters:

  1. It is best to make the incubator capacity medium. Firstly, this will allow you to place about 100 eggs in it, and secondly, you can always fill more cells, a supply will not hurt.
  2. The optimal design is considered to be 108 cells. The size of each should be 45 mm (diameter). In this case, the height cannot be less than 65 mm. The design should also provide for the possibility of replacing the internal grille. Then you yourself can change it at any time, reorienting the device to other eggs.
  3. It is best to install 6 lamps as heating elements. Four of them should have a power of 100 W, and two should have a power of 60. It is better not to use new LED or fluorescent lighting elements that do not heat up. Serial connection diagram following 4 and 2.
  4. The temperature sensor must have a resistance of 1.8 K.

It is best to set the turning speed to one hour. This will allow you to achieve the greatest effect when operating the entire system.

Making an incubator with your own hands

Frame

In most cases, people who want to make an egg incubator with their own hands use a refrigerator as the initial preparation. The fact is that its design is ideal for this task. In addition, the financial costs with this option will be minimal.

So, if you're interested in how to make your own incubator at home, start by finding an old refrigerator. It is from this point that the implementation of this project will begin.

First of all, to make a high-quality and durable incubator yourself, get rid of the freezer. You will also need to get rid of all other built-in equipment. Fortunately, you can easily do all this yourself. To further implement the project, you will need a contactor-relay KR-6 and a thermometer with electrical contacts.

Attention ! The coil in the device must have a resistance that will limit the power to 1 W.

Once you select all these devices, you will be able to connect the power supply yourself without any difficulties. Power supply must be supplied from a network with a voltage of 220 V.

Operating mode

The first four lamps turn on first. Their task is to raise the temperature to 38 degrees. After this, you will need to close the contacts of the thermometer. As a result of this action, the KR coil will receive power. Additionally, contact KP2 opens. As soon as the temperature drops, the process is activated again.

As you can see, making a high-quality incubator yourself is quite simple. The main thing is to set the temperature correctly, take care of the turning system, and so on.

Uniform heating is provided by lamp L5. Moreover, it is needed to provide the necessary humidity. Moreover, its presence reduces the load on the relay contactor. So be sure to install it for her. Fortunately, you can easily do this yourself.

Attention ! After the air inside the incubator has heated to the required temperature, you will need to turn off 2 lamps. Without automation, you'll have to do it yourself.

The estimated power of the incubator that you need to make will be 40 W. This is if there is no ventilation and rotary mechanism. They can be excluded from the design for greater savings, but in order for the result to be satisfactory, care must first be taken to create natural circulation air inside. Hoods will help you with this.

If you want to abandon the rotating mechanism in the design of the incubator in which the eggs will be placed, you will have to rotate the cells yourself. This must be done at least 3-4 times and only daytime days. However, the rate of maturation with this approach will drop significantly.

Attention ! It is best to use ordinary trays as cells for eggs.

On the ninth day in the incubator you will need to lower the temperature yourself to 37.5 degrees Celsius, by 19 to 37. If you do not want to spend money on an uninterrupted power supply, then put several bottles with hot water. This should be more than enough to maintain the desired temperature.

We create an automatic temperature control system

The heating elements in an incubator that you make yourself can be placed not only above the tray, but also on the side, and even below it. Many experts agree that the best option will place the lamps around the entire perimeter yourself. This will ensure the most even heating.

Attention ! The distance between the bulbs cannot be less than 25 cm.

Some poultry farmers go to the tricks they buy nichrome wire. This is a fairly powerful heating element, which makes it possible to reduce the distance between heat sources to 10 cm.

There are three types of thermostats that ensure the correct temperature inside the incubator, which you will make from a former refrigerator with your own hands:

  • Electric contactor. In fact, it is an ordinary thermometer with mercury inside. Only a special electrode is soldered into the tube. When heated, mercury rises. As a result electrical circuit closes. After which the incubator turns off.
  • The bimetallic strip can also provide even heating when you are away. Unfortunately, after you make an egg incubator with your own hands using this device, the reliability of the system will decrease several times. The operating principle of the plate is quite simple. When a certain temperature is reached, it bends, touching the electrode. As a result, the circuit is closed.
  • Barometric sensor. Imagine a cylinder that is made of flexible metal, the container of which is filled with ether. When heated, excess pressure is formed inside, which closes the circuit.

If you are thinking about how to make your own egg incubator, consider an automatic thermostat. Of course, its installation will take more time, and you still need money to buy it. However, this will ensure almost complete autonomy.

What is an incubator for quail eggs?

It is worth recognizing that it is advisable to heat quail eggs in special conditions. First, you need to use a water tank as a heating element in an incubator that you make yourself. It will provide sufficient heating.

The tank is best made of iron. The wall thickness will be about 4 mm. Don't forget to solder the seams carefully. The height of the upper pipes should be 30 mm. The diameter of the pipes is at least 4 mm. They are welded into the top cover.

And now the most important thing. 100-watt lamps are lowered into the resulting structure. The flasks must be immersed in liquid up to the cartridges. Moreover, it is necessary to make sure that the two heating elements duplicate each other in the incubator for quail eggs, which you make yourself.

Results

As you can see, making an incubator yourself is more than possible. To do this, just find an old refrigerator and remove all the equipment from it. The average tray in the incubator is enough to hatch about a hundred chicks.

Of course, making an incubator for quail eggs will require a little more effort. But their price on the market fully justifies this step. The main thing is not to forget to include these costs in your business plan.

There is a great opportunity to save money - make an incubator yourself. It's not as difficult as it seems at first glance. From the article you will learn about the features of creating an incubator from available materials, what are the requirements for this process, and how to choose the right eggs for laying.

Description and types of homemade incubators

Incubators do various sizes according to the number of eggs that are used when laying. The location of the device also plays a role. But even the simplest incubator must be equipped with a thermometer to record the microclimate, ventilation, and egg trays.

Did you know? A day-old chick has the same skills and reflexes as a 3-year-old child.

pros

  • Among the advantages of such “hens” experienced poultry farmers name:
  • savings in energy consumption;
  • reliability;
  • the ability to lay large volumes of eggs;
  • versatility (equally suitable for all types of birds);
  • microclimate suitable for chick survival.

Minuses

  • A home incubator has certain disadvantages:
  • when creating it, it is important to take into account the requirements for such devices, otherwise the result will not be achieved;
  • the appearance of such a device is often inferior to purchased ones;
  • If you are assembling an incubator for the first time, then there is a possibility of making a mistake when assembling it.

For example, before you start assembling a device, you need to consider every little detail. It is possible to eliminate some shortcomings, since it is within the power of everyone who is going to create an incubator. Then you don’t have to think about purchasing a store-bought one.

Requirements for homemade devices

In order for a structure to perform its assigned functions effectively, it must meet the following requirements:

  • temperature. When assembling the incubator, remember that it will have to maintain a microclimate at +37°C...39°C;
  • humidity. During the entire period that the eggs are in the device, this parameter will need to be changed according to the phase of the process;
  • ventilation. The appliance must have a fan to ensure a constant flow of air. optimal ratio between heat and humidity.

Important! It is the complex of these three components that provides the eggs with the same conditions as under the wing of a hen.

General manufacturing rules

Today, home incubators are made from the most various materials and devices (there are examples of similar devices made even from a microwave oven).

However, their manufacture must always comply with a number of general rules:

  • it is necessary to work only with dry, clean materials;
  • When covering the frame, make sure that there are no cracks or holes for heat to escape (if necessary, use sealant);
  • at the planning stage, think about where you will place a container of water to maintain humidity in the device;
  • It is also important to remember about heating: to provide it, several 25 W lamps are used, one of which should be fixed at the bottom for uniform heat distribution;
  • do not forget to make several holes for exhaust ventilation;
  • You should definitely place a thermometer and an observation window with a light bulb (for example, 12 volts) on the lid to monitor the situation inside the incubator.

Did you know? U p A rooster has many functions in a chicken flock: it calls hens to food, protects them from small predators, and prevents conflict between birds.

How to make your own chicken egg incubator

Now in more detail about how to make homemade device for incubating chickens and other birds.

To assemble the device, you will need diagrams and drawings with dimensions, as well as a set of tools and various materials from which you plan to create an incubator.

With automatic revolution

If you don’t want to assemble a mechanism for automatic turning yourself (as described in the example above), then you can buy one already finished design: it is fixed in any homemade device.


The operating principle of the automatic turning mechanism is simple and effective. It not only performs the functions of a hen, but also allows you to maintain the temperature inside the device, because the lid is opened less often. Having such equipment, you do not have to worry about being able to turn the eggs in the device in a timely manner.

From the refrigerator

An equally popular option for a homemade incubator is making one from non-working refrigerators. For this, you can use both two-chamber and industrial devices, because their design provides for careful temperature preservation (which is extremely important for an incubator).


In addition to the refrigerator, to create the device you will need:

  • cardboard box;
  • wooden blocks to create a frame;
  • incandescent light bulbs (at the rate of 4 pieces per 100 eggs);
  • trays for eggs (wooden, plastic, metal);
  • fan;
  • thermometer;
  • thermostat;
  • gear motor;
  • bearings with clamps;
  • hygrometer (it is designed to measure humidity, so if the thermostat has such a function, then you can do without a separate device).

It is worth preparing a number of tools for work:

  • jigsaw;
  • pliers;
  • electrical tape.

Assembling a device from a non-working refrigerator involves several steps:

  1. First, holes are drilled at the top - for light bulbs and ventilation.
  2. For the same purpose, 3-4 openings with a diameter of up to 1.5 cm are made in the lower part of the refrigerator door.
  3. The walls of the device are insulated using cardboard.
  4. A container with liquid is installed at the bottom of the structure to maintain moisture in the device.
  5. The fan is secured and connected to electricity. The optimal operating speed for it is 5 m/s. Just do not direct the air flow onto the trays, otherwise the eggs may spoil.
  6. Insert wires for incandescent lamps into the holes made on top and secure the heating devices.
  7. It is necessary to equip the incubator with thermostats. In such a large device, 3 types are usually used: a bimetallic plate (it closes the electricity when a certain heating level is reached), an electric contactor (it turns off the heating at a given temperature) and a barometric sensor (it closes the circuit when there is excessive pressure).
  8. Make sure you have a mechanism for rotating the eggs. In nature, the hen turns them over 3-4 times a day, which means that the incubator must also have a special design. For it, install a gearbox at the bottom.
  9. Place a wooden frame for the trays on top so that they move 60° forward and backward.
  10. The gearbox and trays are connected by a rod.

Video: How to make an egg incubator from a refrigerator

From foam plastic

Polystyrene foam (or polystyrene foam) is considered one of the most cost-effective and suitable quality materials for creating a home incubator. It holds heat well, is lightweight and easy to work with.

Did you know? The chick embryo needs oxygen already on the 6th day of incubation.

To make an incubator from penoplex, you will need the following materials:

  • 2 sheets of foam plastic (penoplex);
  • a sheet of transparent plastic for the window;
  • 4-5 lamps and sockets for them;
  • thermostat;
  • glue;
  • trays (quantity - depending on wishes).


Also prepare your tools:

  • stationery knife / scissors for cutting penoplex;
  • soldering iron;
  • corner and ruler.

Let's start assembling the device:

  1. Cut the sheet into 4 equal parts, measuring everything with a ruler/square: these will be the sides of the body.
  2. Glue them together. This is the frame of the future structure.
  3. The sheet should be divided into 2 equal parts, one of which is additionally cut into pieces 60 cm wide (the cover of the device) and 40 cm (its bottom).
  4. The bottom layer is glued to the finished frame. Tighten the entire structure with tape, giving it rigidity.
  5. In the upper part, cut a square 12 x 12 cm. Cover it with plastic: this will be the window and ventilation of our incubator.

    Important!Some amateur poultry farmers also install a fan in the incubator to better circulate air. Only the air flow from it should be directed towards the lamps, and not the eggs: this will dry them out.

  6. From the remaining polystyrene foam, cut out 2 beams 6 cm high and 4 cm wide, then glue them to the bottom along the long sides (these will be the legs on which you will place the egg trays).
  7. On 40-centimeter walls, make 3 holes (1-2 cm in diameter) at the same distance at a level of 1 cm from the bottom.
  8. To prevent the material from fraying, you need to burn the edges with a soldering iron.
  9. We install the roof. To keep it more firmly on the frame, thin (for example, 2 x 2 cm) foam boards should be attached to it from the inside at a distance of 5 cm from the edge.
  10. Having finished with the design, it's time to start working on it interior arrangement: install lamp sockets in any order (as convenient for you).
  11. Secure the thermostat 1 cm above the tray. Choosing it is not difficult - just focus on the number of eggs in the planned set. Today there are devices on sale that can control devices for 20 eggs, 30 eggs, 1000 eggs. If possible, choose thermostats that simultaneously measure temperature and humidity.
  12. Place trays. A gap of at least 4-5 cm is needed between them and the side walls, otherwise there will be no high-quality ventilation.

Video: DIY foam incubator

Having assembled the incubator, you can begin selecting eggs for laying. Not all of them are suitable for poultry breeding.

Therefore, it is important to know how to choose the right ones:

  • pay attention to the shell: it should be without cracks, dents, tubercles or marbled coloring;
  • shine the eggs under the lamp and leave those in which the formed yolk is clearly visible on a transparent background without unnecessary inclusions or spots. When turning the egg, it should move slightly;
  • choose larger, regular-shaped eggs.

Important!If you plan to place eggs in one bookmark various types(chickens, geese, ducks), then use trays at different levels for this. Each bird has its own requirements for timing and temperature, and it is important to adhere to them for a successful result.

But it is important not only to choose the right planting material, but also prepare them for bookmarking:

  • Eggs must be stored in a cool place for no more than 7 days;
  • immediately before laying, you need to transfer them to a room with room temperature for 8-12 hours (otherwise condensation will form on them in a warm incubator, and this can lead to the development of mold and death of the embryo);
  • There are no exact recommendations regarding laying out chicken eggs in trays: place them vertically, horizontally. As for larger specimens, they can be placed with the pointed end down or even at an angle. Although most experienced poultry farmers claim that when placed horizontally, eggs warm up better.


After laying the eggs, periodically check their quality. Already 6-7 days after the start of the process, it is worth shining them through a lamp: they should already be visible blood vessels in the protein and a dark embryo.

Temperature conditions for different types of poultry

Temperature - the most important condition for hatching eggs. Lack of heat slows down the growth of embryos, and prolonged hypothermia leads to death. Overheating can lead to the same consequences. Even if the embryos survive, the chicks will end up with deformed body parts and organs.

Different bird species have their own parameters for a suitable microclimate:

  • for chickens, first you should keep the level at +38°C-+39°C, eventually dropping to +37.6°C;
  • ducklings will feel better at +37.8°C with a gradual decrease to +37.1°C;
  • goose eggs require no less than +38.4°C, and closer to the end of incubation the temperature can be lowered to +37.4°C;
  • for turkey the fluctuations are lower: in the first days it is worth heating to +37.6°C, gradually reducing the level to +37.1°C;
  • quails like the same temperature (+37.5°C) throughout the incubation process.

Did you know?Chickens cluck for a reason: they constantly exchange information about what is happening around them, including their own well-being.

So, making an incubator with your own hands is not so difficult and expensive. But you can create a device that is ideal for your conditions in terms of size and number of eggs for incubation. Before assembly, carefully study the rules and sanitary standards regarding such devices, otherwise the success of the enterprise will be in doubt.

If you often raise chickens, you know that you cannot do this without a good incubator. Either the hen did not arrive in time, or a breed of chickens with poorly developed brooding instincts (most laying hens), or the absence of adult chickens altogether. In this case, of course, you need to buy an incubator. But you can do it yourself. Let's try to figure out how to make an incubator with your own hands.

Peculiarities

This name will probably surprise many, at least. How can a refrigerator be an incubator? The answer is - maybe even so! But everything is in order. As for the homemade device, many of our domestic poultry farmers successfully raise chickens even in the simplest incubators. Such homemade apparatus can serve as a faithful assistant until the breeder acquires an automatic industrial production.

We also recommend that you familiarize yourself with incubators on aliexpress.

What does it take to make a homemade incubator?

  1. The first thing you need for a homemade incubator is a convenient suitable chamber, box or box. They can be either wooden or plastic. At the same time, if your box is cardboard, then it can also be easily adapted by covering it with plywood and thick paper. It is important to seal all cracks and openings with sealant to prevent heat leakage during container assembly.
  2. An important component is water baths. Make them the size of your incubator and place them in the bottom of the box.
  3. Trays are best made from planed boards, the height of the sides being 70 mm. We cover the lower part with a metal mesh with a 10x10 cell.
  4. Inside the box we attach guides from metal corners. Our design should resemble the appearance of a bookcase.
  5. For heating we use 4-5 light bulbs of 25 watts each. One of the lamps can be attached below so that the heat is evenly distributed throughout the entire structure.
  6. Don't forget about the thermometer, it should always be inside the incubator.
  7. We make exhaust holes at the bottom, about 16 holes of 25 mm each.
  8. Also be sure to provide a viewing window in the top wall. This is important for additional control of incubation during the “hatching” of the eggs.

Drawing of a simple incubator by A. Varvarova


Materials and tools

As materials and tools during work we will need:

  • cardboard or wooden box, sheets of plywood, plastic or foam.
  • sealant;
  • screws;
  • metal mesh and corners;
  • screwdriver;
  • light bulbs;
  • sharp knife;
  • paper or foil;
  • glass for viewing window;
  • egg trays.

Manufacturing instructions

Incubator from the refrigerator


So, if you have an old refrigerator, then don’t rush to throw it away. From its chamber it is easy to build a homemade incubator for home poultry farming. The fact is that the design of the refrigerator itself holds it well constant temperature inside, which is very convenient for our case. All you need is the former refrigerator itself, 100-watt light bulbs (about 4 pieces), a temperature controller, and a KR-6 contactor-relay. So let's get started.

  1. Remove the freezer compartment from the refrigerator, if there is one.
  2. Inside we attach lamp sockets, a temperature controller and a contactor-relay KR-6.
  3. We cut out a small viewing window on the front door.
  4. We equip grates for the supply of eggs and trays.
  5. Attach a thermometer.

For visual clarity, we suggest viewing a drawing of a homemade incubator.


Drawing of an incubator from a refrigerator

Automatic incubator from the refrigerator

A refrigerator incubator with automatic egg turning is very convenient and completely replaces a conventional industrial production device. However, in order to do it you will have to work a little. But as a result, depending on the brand of refrigerator, you will be able to warm up about 50 eggs at a time without any problems.

  1. Everything is the same as in the first case, we remove everything unnecessary, including the freezer.
  2. We cut out a window in the front door and glass it. We remove all cracks with sealant, and for a more accurate appearance We cover the edges of the window with a frame made from kitchen furniture skirting boards.
  3. The main control unit in this design is an automatic thermostat, an automatic tray turner Mechta 12 with a 12V power supply, and a humidity regulator.
  4. It is good to use two computer units as a power source (one for the Dream-12 + heating bundle, the second for turning over the trays).
  5. By the way, it is better to buy ready-made trays for automatic incubators.
  6. We attach two light bulbs at the top and four at the bottom. We make a series connection of 2 light bulbs.
  7. We check the operation of the lamps by making a positive wire through the Dream 12 thermostat relay and connecting the thermostat to the power supply.
  8. We fix the temperature sensors.
  9. For everything else, see photos, videos, and drawings in more detail.

Diagram of the device of S. Kozin’s homemade incubator: 1-temperature regulator sensor; 2-thermostat; 3-incandescent lamps; 4-fan; 5-knob for rotating trays; 6-trays; 7-plate; 8-bath with water.

The simplest incubator out of the box

For example, P. Yakimenko from Moscow offers us one simple design. He made a homemade incubator out of ordinary cardboard box size 56x47x58 cm. The inside of the cardboard is covered with paper or felt in two layers. A 12x10 cm viewing window is made in the upper wall. Small holes are also provided for wires. With their help, three 25 W light bulbs are installed inside.

Lamps for heat transfer should be installed at a height of 15 centimeters from the surface of the eggs themselves. It is important to seal the holes where the wiring is inserted with cotton wool to prevent heat leakage. Then they make wooden trays, a convenient door, and slats for the trays.


In such a simple homemade device, it is also important to maintain high temperature, so we attach a thermometer to a special bar. For high humidity Place a container of water inside the device. In the first 12 hours after laying the eggs, the temperature in the box should be approximately 41 degrees, in the subsequent hours it is reduced to 39 degrees.

It is important to install such a device yourself not on the floor, but not on small bars 15-20 centimeters high. There must be constant air circulation, both inside and outside the box.

Video “Example of a homemade incubator from a refrigerator”