In houses where people live for a long time, high-quality and functional heating devices must operate continuously. This will help ensure a comfortable and stable home. temperature regime, and around the clock.
 For this purpose, furnaces are usually used, differing optimal performance heat capacity. They release heat from occasional fires for as long as possible. In addition, a variety of boilers are widely used, which constantly heat the air or the coolant used. This applies to residential premises and buildings.
Those that belong to the non-residential category are heated a little differently. Due to the fact that heat is needed here only sometimes, it needs to be obtained as quickly as possible and with simultaneous small material costs. Such premises include objects such as greenhouses, various trailers, sheds, and small houses. For them the best option will efficient potbelly stove with a water circuit with your own hands, made independently and working on development
In terms of its design, this is the most primitive stove, which, at the same time, has long proven its ideal efficiency. It is for this reason that furnaces that operate during mining still remain in demand today. You can easily find a suitable drawing and make the design yourself.
Some manufacturers of modern heating equipment They are still producing high-quality factory-built models, but despite this, potbelly stoves using wood or for testing are quite often made with their own hands, based on a drawing. At the same time, their General characteristics sometimes much higher than standard factory options.
Below we will describe the main features of this heating device, which will help you decide what important details needs to be addressed Special attention, if you decided to make a stove with your own hands.
Before you make a stove of this type, based on a drawing or photo, you should be aware of some disadvantages. Due to its small heat capacity, such a stove warms up the room when the firebox itself is fired.
The wall of the device becomes very hot, so extreme caution is required when handling the oven.
According to its principles, a potbelly stove is practically no different from models of a special solid fuel device. This is a certain type of very simple stove in the fireplace category. There are also special models that are equipped with hobs and special bath devices.
Material used to make the stove
Often a potbelly stove is made of high-quality steel, but in some cases cast iron can be used. At different types metal, often used made of natural stone elements. If cast iron is used, then you should count on low heat capacity parameters; it is very difficult to find and it is not easy to cook. Many people prefer steel for this very reason; it is much easier to work with. Moreover, the thicker the material, the longer it will last.
If you plan to make a device for rare applications, for example, for emergency situations with a heating system, then make it from simple iron, whose thickness is 1 mm.
In the process of making a stove, all factory fittings may well be used. This applies to elements such as grates, the necessary doors, burners and valves. Many craftsmen make them with their own hands using steel.
Shape and material for the case
If you want to make a potbelly stove using drawings or photos, you must use the method of cutting a metal sheet.
 All this is required to make the furnace body rectangular shape. Due to the presence of special planes, the case will have ideal ergonomic properties. In other words, the potbelly stove will be as stable as possible, it will be easy to process and cover. The stove can be easily and simply docked with the most different designs, objects and details.
Various metal cabinets and boxes can be used as a base. Often these are cylindrical elements, for example, large diameter pipes, cans, gas cylinders.
In the process of making a stove with your own hands, you will definitely need to use welding. If the metal is not very thick, the oven can be made using bolts, screws and a drill.To make a durable potbelly stove for the garage, it is recommended to use detailed diagrams; photos will not help here. The drawing will help you independently complete a practical and very effective option oven that will ideal solution for heating a garage or other room. 
Manufacturing of the combustion chamber
It is worth noting that the larger the firebox in terms of its area, the better it will be, since the stove, which runs on oil, wood, and exhaust, transfers the function of efficient heat transfer. In addition, it is important to have a decent area of the bottom of the chamber, then it will be possible to lay firewood or other coolant well. It is for this reason that the shape of the stove should be cylindrical and laid on its side. All rectangular ovens must also be oriented strictly horizontally. A vertical arrangement is only possible if the oven is large in size.
Making an ash pit
The structural element This is not always done, since ash can be removed directly from the fuel chamber. To ensure air supply, you just have to drill small holes in the door. If you plan to make a stove for a garage with an ash pan, then it may look like a box. This design makes it possible not to take up the space of the combustion chamber. Metal in in this case You can use a fairly thin one, since there is no danger of burning. There is no need to weld it either, just screw everything in place.
Grate
If such an element is used, it effectively separates the chamber and the ash pan located in the housing. It is quite possible to use factory grates made of cast iron. The distance rule must be observed. The interval between the gratings should be 10 mm. For fastening, it is quite possible to use a special corner, which with its outer edge is turned into the fuel chamber.
Openings and doors
Such elements are usually made of metal, which is usually left over after cutting out the required parts. The doors are connected to the body by welding and steel canopies.
Openings deserve special attention, since here it is necessary to use standard sizes, which display drawings:
Pipes for this furnace should have a diameter of 100 to 150 mm. This element is directly involved in the process of heat transfer, therefore it is made of high-quality steel and is also not insulated. A part such as a pipe is usually located on the side, as well as at the very top of the furnace, with the first option being the most preferable.
Pipes in a room are usually not laid along the shortest lines, but strictly in one of the shortest remote points and simultaneous inclined and horizontal sections. This design significantly increases the amount of heat received.
The pipes with which the furnace is equipped, as the drawings show, must be equipped with valves - moving along a guide or rotating.
The need for such elements is based on the fact that it is possible to regulate the process of smoke removal as efficiently as possible and shut off the chimney for the time when the firebox is not being fired.
A valve on the pipes must be installed without fail, especially if various measures are taken to increase the overall heat capacity of the furnace.Parts to significantly increase combustion and heat capacity Pipes in the manufacture of a furnace operating on waste oil are not the only necessary element. It is important to ensure an optimal long-term combustion process. For a furnace that runs on waste oil, a special suspended weight is ideal. As the fuel burns, it will press the load against the grate by its gravity. A metal pancake with a hole can be used as such a load.

Stone can be used as elements that provide heat capacity.
Here you can note the following execution options:
This article described the main points for making stoves that run on oil. If you know all the main points of their manufacture, you can quickly make a potbelly stove yourself.
These are just the basics, but there are also numerous additional details, such as legs, handles for moving and protective screen. These details usually reflect the drawings, so everything will be as easy and simple as possible.
A potbelly stove is a compact iron stove with a chimney at the top. It consists of a chamber into which it is poured solid fuel, a grate in the form of a metal grate, a pipe - a chimney and an ash pan for collecting ash.
If you know how to handle a welding machine, the device is easy to make, and at the same time, it will serve faithfully in unheated room, in field conditions, in the absence of centralized heating, for decades.
Manufacturing options:
It is a metal box; you can independently weld the structure from steel sheets. For a rectangular potbelly stove, an old car tank or box will do just fine.

Typically, this form is chosen when it is necessary to cook food on the stove.
On the spacious platform you can place 2 large pans or containers for heating water at once.
The manufacturing principle is simple: doors are built to cover the ashpit and combustion chamber, a hole is made for the chimney, combustion products must leave the room in a timely manner, otherwise you can inhale carbon monoxide.
The most common type of potbelly stove. The cylinders have thick walls, making the stove durable, mobile, and fireproof.

First, a drawing is drawn and markings are made. The combustion chamber door will be located in the center of the cylinder. The blower is in the same plane, only 10–12 cm lower.
Instructions:
For cooking on the top of the stove, the design is slightly different:
When making a stove from a pipe, weld the bottom, as well as the part on top:
The option is distinguished by a specific odor that oil waste will emit during fuel combustion, even in the presence of an exhaust hood.
Instructions:
Before starting work, prepare the tools:
For the body you will need a pipe 30 cm in diameter, at least 5 mm thick. You can use sheet metal of the same thickness instead of a pipe.
For the chimney, you should select a pipe 12 cm in diameter, with a thickness of at least 3 - 4 mm. To prevent burnout, a metal box is suitable for the ash pan, so you need to choose durable sheet metal.
First you need to cut the metal, taking into account the thickness and length of the required blanks.

Remove the chamfers from the parts, touching the stove will be safer, and the welding seams will be stronger:
The structure is installed in the following sequence:
After all welding work, check the quality of the seams and tap them. If there are defects, correct them immediately. At the end of the work, weld top part devices.
To ensure that the potbelly stove radiates heat for as long as possible without adding another portion of firewood, and does not burn out quickly, the fuel will not burn, but will smolder, the heating process without adding firewood can be extended for several hours.

Manufacturing a furnace for long burning slightly different from the usual design.
The best cylinder for the stove is:

The undoubted advantages of a homemade stove are:
The disadvantages of the stove include:
Stoves were popular in the first half of the last century. They warmed the soldiers' dugouts, dugouts, and heated carriages.
Today the stoves are still heated garden houses, garages, warehouses, greenhouses, that is, where there is no gas pipeline, and electrical devices They are ineffective and burn a lot of electricity.
The material for the construction is cast iron or stainless steel. The stove consists of a container, an ash pan, a pipe, a chimney, and a combustion door.
They are distinguished by type:
Any homemade heating device is designed to heat the room, making it more comfortable, but at the same time, such devices are far from safe and are fraught with ignition and fire.

When installing the structure, it is very important to follow safety rules:
A potbelly stove made from a horizontal pipe is one of the simplest but most productive designs of homemade stoves that burn solid fuel. The simplicity of the design and low cost allow even novice home craftsmen to make such a stove.
Collapse
First, beginners need to understand how the stove works and what parts it consists of.
The operating principle of such a furnace is simple:
Before starting work, it is necessary to determine the size of the furnace and prepare the necessary materials, tools and welding equipment.
Drawing of a potbelly stove made from a horizontal pipe

Another version of the drawing
The simplest pipe stove runs on solid fuel and consists of several main parts:
A potbelly stove made of a pipe with an internal diameter of 500 mm is made according to the drawing, taking into account the main dimensions of the structure:
We will take the dimensions of the remaining parts and their installation locations from the drawing.
Let's look at the process of making a homemade stove.
Any pipe can be used. The most important thing is that it has not been previously used on gas supply pipelines and for sewerage. Such stoves, together with heat, will spread unpleasant odors throughout the room for a long time. In terms of size - it all depends on the needs and capabilities of the master.
For heating small garage It will be enough to make a stove with a diameter of 400-500 mm. For a large room, you can make a potbelly stove with a larger diameter or install several small ones. The main thing before work is to clean the walls from limescale, dirt or oil and only then start working.
To produce a potbelly stove we will need to prepare:
This is a list of basic materials; small parts will be made during the work process.
We will need:
Having prepared the entire set of tools and materials for work, we begin the process of making a potbelly stove from a pipe with our own hands:


The stove - potbelly stove made from a pipe is ready.
Look at a few more manufacturing options to reinforce your understanding:


When test-running a potbelly stove, it is better to open all doors and windows. We make sure there is traction and an open damper. Then, placing firewood through the door, we light the flame. We close the door and go outside. The potbelly stove will smoke a fair amount, but you should not be afraid of this, it will burn out oil and other debris.

Combustion process
After using the oven for the first time, it may be necessary to repair welding defects. And then enjoy the warmth in the garage or other room. The main thing is to remember the rules fire safety, periodically clean the chimney and remove ash, periodically replacing the sand in the potbelly stove.
Even a novice craftsman can easily make such a design on his own. The main thing is to want to make a reliable potbelly stove and carry out all the work carefully and responsibly, taking into account the step-by-step instructions given in the article.
←Previous article Next article →In Russia, then the USSR, potbelly stoves were used where there was no centralized heating: in front-line dugouts and dugouts of the Great Patriotic War, in government institutions of the same time, in heated cars. Look at the photo of a potbelly stove made by yourself on the website.
Many Russians are sure that this is only a simple Russian invention. And a few are wrong. In the USA, the same homemade products have been used for centuries, called “fat bellies”, in Japan - “daruma”.

The revival of potbelly stoves occurred in Russia in the second half of the 20th century due to the massive appearance of garages, garden plots, where they were the only means of heating thin-walled buildings.

After these mini-ovens were improved, they were also used for cooking: a pot or frying pan was placed on a stove attached on top.

Until they were replaced by a centralized supply of methane, gas-cylinder stoves or wood-burning brick stoves. They were also useful in the crisis years of the 90s due to interruptions in gas and other types of fuel. It’s good that at least there was plenty of firewood.

Its main feature is its simplicity of design. Even with many additions to it, the principle of operation of a metal stove remains the same: everything that is at hand burns and warms the summer residents.


Although in this case half of the thermal energy evaporates through the direct-flow pipe. But no one writes off even a heating source that has rusted over time as scrap.

Such a temporary stove can be easily made in a day or two. But first, make your own drawings of the potbelly stove. Much of what is stored in the closets of rural houses and dachas is used. These are milk and water metal (not duralumin) cans, barrels for diesel fuel, vegetable oils, pipes, boxes, corners.

Nothing expensive, including tools - in villages every owner has them at hand. High-quality assembly using gas or electric welding.

But neighbors who have units will help with this. Welding machines provides greater reliability and rigidity of the assembly. How to make a potbelly stove with your own hands, step-by-step instruction below.

Stock up on a hardened chisel, a hammer, a chimney, a piece of rod with a diameter of 0.6 - 1.0 cm. Prepare an electric drill with a drill one centimeter in diameter. If you have an angle grinder, you will speed up the assembly twice as much.


In one part of the cover, at the very bottom, drill 5 - 7 holes for future traction. Bend a long rod like a snake and with at least four legs. These will be the grates when you insert them into the can.

Straighten the snake inside so that it lies horizontally and firmly just above the holes. Wood will burn on this “grill”, and good air draft will flow through the holes and through the chimney. It will be a combustion catalyst.

For the chimney, use a piece of water pipe, even a used one, with a diameter of 7-8 inches. Near the bottom or at the very bottom, strictly perpendicular to the grates, cut a circle with a chisel or saw with a grinder.

Insert the pipe a few centimeters into it, and secure it firmly from the outside with a clamp on the bolts or weld it to the can. The can-stove is designed for a horizontal position.

Weld the legs to it and place it where the potbelly stove will heat the house or garage. This is a very flammable device, so place it on a metal sheet and at least half a meter away from wooden structures.


The disadvantage of the stove: you can’t even heat a kettle on it – there’s nothing to put it on. And yet it will be an effective potbelly stove with your own hands, and read about the improvements below.


It will correct the situation, and on this potbelly stove you can even cook borscht and fry cutlets. Not only an old barrel will do, but it’s better if it’s a discarded 50-liter gas cylinder.

Its walls are thicker, they will heat up a little longer, but they will also retain heat more. This is an ideal sauna stove. And if you cover it with sea or river pebbles or other strong stones, it will be easy to raise steam in the room.

It will stand vertically. There will also be enough space for the blower, and you can put a lot of firewood in the firebox above it. You can make the exhaust pipe not straight, but with elbows for greater release of thermal energy in the steam room.

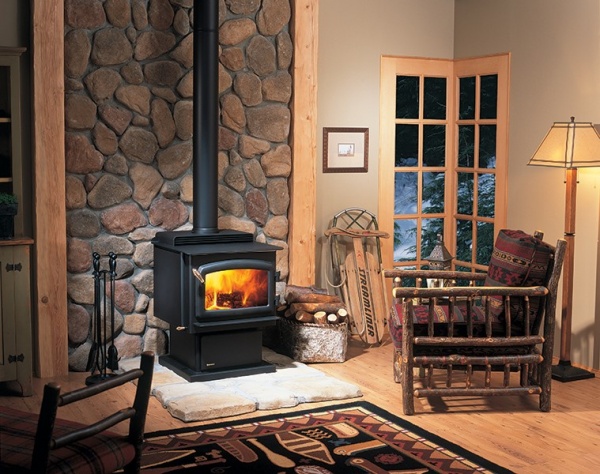
If a potbelly stove is needed for country house, then weld a metal platform on top, and you will cook food and tea on it.

To do this, it is necessary to cover two thirds of its parts with refractory bricks, placing them on horizontal ribs, leaving free access to the firebox and ash pit. This will be a heat shield that retains the generated energy much longer. Holes must be drilled in the bricks for better heat transfer.


Second option: potbelly stove plus water heater. Scald the gas cylinder from which the stove is made with sheet steel at least three millimeters thick.


So that the resulting container can hold at least 30 liters of water. Weld the water inlet and outlet pipes to it, connect the pipelines for heating the next room. For better convection, connect a small circulation pump.

The ideal stove - gas stove, made with your own hands. She doesn't need chimney, because no smoke is released when the gas burns. Its analogue is indoor gas stove with oven.

It’s not difficult to make - take... a ready-made potbelly stove, insert a steel pipeline into it with a nozzle from an old one gas stove. Connect it to a standard gas hose with a reducer from a household gas cylinder.

There is no exact cost for a potbelly stove; you can use a 4-burner stove as a guide. The capacity of a cylinder (50 liters) with 21 kg of propane-butane is enough for 34 hours of operation of such a stove.


The design of the potbelly stove, which became widespread back in the 19th century, has not lost its relevance today. At the dawn of the last century, it served as the main method of heating in residential areas where it was not possible to install a stationary stove. With the advent central heating The popularity of the potbelly stove has decreased, but during the war, and simply in army field conditions, the help of such a stove is irreplaceable.
The choice of the most suitable stove design depends on the location and purpose of its operation. Is your garage your second home and do you spend all your free time in it, regardless of the weather outside? The optimal solution would be to make a furnace that uses spent fuel. Have you decided to get a potbelly stove at your dacha? Then it is better to provide an option with the possibility of cooking. If you plan to use the stove outdoors, appearance does not matter much, but it is advisable to make a beautiful heating source for the house. Depending on their purpose, potbelly stoves can be classified into the following types:
Often, making a potbelly stove does not require significant financial outlays for the purchase of materials. Craftsmen suggest making a stove from the following available materials:
The standard elements of a potbelly stove include:
Individual potbelly stove designs may differ from the usual standards, be improved and supplemented with individual elements.
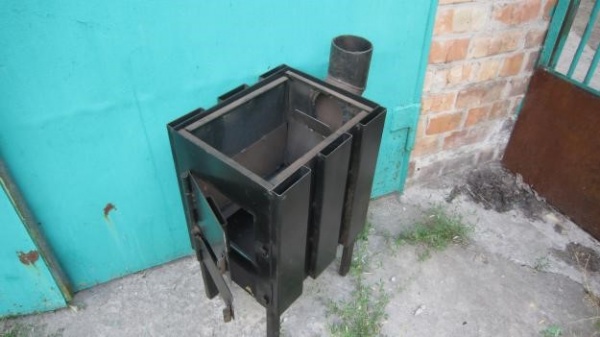
Making a potbelly stove for your garage with your own hands using spent fuel for heating is a double benefit. Receiving the desired heat, the owner of the stove simultaneously disposes of waste. A device of this design includes two tanks, a connecting pipe and a chimney. Reservoirs for potbelly stoves can be made cylindrical or rectangular. Any construction is preceded by preparatory stage, including the design of the future furnace.
Tank sizes vary depending on the intended fuel volume. It is necessary to make a connecting tube in compliance with certain proportions: 10 cm - minimum diameter, the length exceeds the diameter by 4 times. It is necessary to make 50 holes along the entire circumference and length of the connecting tube. It is located between two containers. The height of the stove chimney is at least 4 meters.
What else needs to be done for such a potbelly stove? The lower tank is equipped with a lid with two holes for supplying oil and air, and legs are mounted below. After which all parts of the furnace (2 tanks and a connecting tube) are carefully welded.
The principle of operation of a potbelly stove during mining is as follows:
If you make containers of sufficient size, the top one can be used to heat food or water.

Important ! The fuel level in the stove should not reach the tank lid; be sure to leave some free space.
Being the owner of a gas cylinder, making a potbelly stove out of it with your own hands is the most the right decision. Thick walls will allow you to make a mobile and durable structure. It is proposed to make a stove in two options - placing the cylinder horizontally or vertically. Let us consider in detail the second version of the potbelly stove. Manufacturing takes place in several stages:
If you consider yourself an aesthete and want to amaze your friends who come to visit for a light with your neatness, you can open the structure with heat-resistant paint.

This type of stove is suitable exclusively for heating purposes. If your tasks include heating or cooking food, then some adjustments will need to be made to the top of the oven. To do this, instead of the cut off top, rods are welded inside to be able to install the dishes. It is necessary to make a hole for the pipe, mandatory for any potbelly stove, on the side at the top of the device. At times when the potbelly stove is used only for heating, the grate for dishes is closed with a lid made from a cut-off part of the cylinder.
Advice ! Don't forget to equip the oven lid comfortable handles for ease of removal when the metal is heated and weld the hole where the valve was located.

For country houses Rectangular is more suitable. For efficient and long-term use, it is very important to make a heating device from metal sheets of the correct thickness. Unnecessarily thin material will quickly burn out and the potbelly stove will fail in as soon as possible, and if you make a stove from too thick sheets, long heating will significantly reduce its efficiency. Optimal thickness material for walls - from 4 mm. It is better to make partitions from metal with a thickness of more than 10 mm. For a rectangular potbelly stove you will also need a grate, a hood pipe and corners for a stand. Correct design will ensure economical fuel consumption and the ability to regulate air flow.

You can make a stove in the same way gas cylinder With vertical arrangement, but it is better to upgrade the device in order to increase efficiency. In this case, in addition to the body, it is necessary to make partitions from thicker metal intended for installation in the upper part of the fuel compartment. A small improvement creates a kind of labyrinth for the smoke, which slows down the cooling process of the potbelly stove. At the top, in addition to the hole for the chimney, it is recommended to make another hole to allow cooking.
Advice ! When welding the side walls of the potbelly stove to the bottom, use a level to ensure strict adherence to the vertical lines.
The internal space of the stove is divided into 3 parts - the ash pan, the firebox and the “labyrinth” for smoke. Between the first two, a grate is installed on which solid fuel is placed. If you want to make it yourself, make sure you have thick sheet steel. Strips with a width of 2.5-3 cm and a length corresponding to the size of the potbelly stove are welded to metal rods with a diameter of 1.5-2 cm at a distance of 5 cm from each other. Experts recommend making a removable grill so it can be cleaned or replaced. For fastening inside the potbelly stove, corners are first welded along the entire length.
The next stage is to make support strips welded to the side walls of the stove and you can proceed to making doors for the firebox and ash pan. Hinged hinges will help secure them to the main structure of the potbelly stove. Finally, you should make a chimney pipe.

Firewood in standard devices burns out quickly and requires regular addition. But craftsmen suggest making a long-burning potbelly stove, especially necessary for heating a dacha. Its design is radically different from the types described in the previous sections. For manufacturing, you will need a cylindrical container made of metal of suitable thickness. The process of creating a long-burning potbelly stove includes the following steps:
Note! A long-burning potbelly stove is intended exclusively for heating purposes and does not allow organizing the cooking process.

Fuel is initially loaded into the finished device. When the firewood is well lit, a disk with an exhaust pipe is placed on top, then the lid is closed. The operating principle of the stove design is based on an insufficient supply of oxygen, as a result of which the wood does not burn out quickly, but smolders slowly, providing heat for 8 hours.
To increase the efficiency of a potbelly stove, it is advisable to make an exhaust pipe that extends throughout the room as much as possible. The horizontal position of the hood in a certain area will allow the smoke to additionally provide heat rather than immediately escape outside.
Taking care of safety measures, experts recommend making a box around the potbelly stove to prevent the risk of burns. To do this, you will need to install additional plates at a distance of 5-10 cm from the stove. Air gap will not allow significant heating of the box and will provide a comfortable feeling when you are near the potbelly stove. It is better to make such protection for a rectangular oven; with a cylindrical shape, the design is impractical.
Some craftsmen adapt a potbelly stove for two types of fuel. Adding an infrared burner to the design allows you to make a universal stove that runs on wood and gas. Showing their imagination, some create models that serve original decoration cottages or capable of heating water in a tank located next to the stove.


Having studied the advantages and disadvantages of the design, we can conclude that it is necessary or not to make a potbelly stove with your own hands. The main advantages are as follows:
Negative aspects include the following:
Like any heating device, a potbelly stove has certain advantages and some disadvantages. Therefore, before you make a comfortable stove with your own hands, think about the design that is most suitable for your purposes, then the result will please you for a long time.