How to turn your suburban area to real heaven? Just. Need to create a nice place, pleasing to the eye. And where the soul rests, there the mood improves and vitality increases.
One of the brightest touches in landscape design can be a decorative pond in the country, comfortably located among the greenery.
Despite the fact that most summer cottages are limited in size to the standard six acres, and the owners do not have the opportunity to big pond, this is not a reason to deny yourself the pleasure of having an artificial pond on your site. The technical side of the issue will also not become an obstacle if there is a desire and competent instructions describing step by step how to make a pond with your own hands.
Before you start on a large scale construction works and to build an entire lake with your own hands, you need to think about what purpose the creation of a reservoir on the site serves.
In terms of functionality (goals), four types can be distinguished:
 Little pond.
This is a reservoir that is part of the landscape composition. Their purpose is to decorate a corner of the garden and please the eye. Leisure It is not expected near such a pond.
 Decorative pond.
Is a deeper body of water. As a rule, they are decorated with bridges, fountains, and lighting is installed. Such a pond is being built not far from country house, terraces or gazebos, benches, sun loungers and umbrellas (or canopies) are installed nearby. And the pond becomes the center of the recreation area for the inhabitants of a private house.
 .
.
A personal artificial lake in which fish swim is a dream not only for fishermen. Children, cats and other family members will enjoy watching colorful fish while relaxing in nature.
 .
.
They are also country ponds that, in addition to their aesthetic function, provide the opportunity to cool off or even swim, depending on the size.
Based on the goal and one’s own capabilities, the location of the pond, its parameters and geometry will be determined.
A garden pond can be made in two versions with an endless variety of different modifications:
 Formal (regular) body of water.
The name successfully reflects the essence of the pond; it is a structure that has a strictly defined shape.
The geometrically correct shape of the pond is more suitable for areas designed in a classical style or in modern, minimalist or high-tech styles.
Along with rectangular shapes, round, square and broken (symmetrical or asymmetrical) also belong to the formal type of pond.
 Landscape pond on the site.
A more popular option among users because it has an irregular coastline, a natural appearance, creates the effect of being close to nature and does not limit the flight of imagination of the creators.
Tip: The outline of the pond is determined by the preferences of the owners, but the more complex the shore line, the harder it is to lay the film.
An important aspect that you need to pay attention to when choosing the style of a reservoir on your site is the terrain. A flat surface makes it possible to arrange a pond of any configuration. Changes and unevenness require increased attention, but they allow you to create a reservoir with a waterfall or a cascade of ponds. A bridge or an artificial slide will look natural on such a terrain.
 You can also raise the pond above ground level yourself. The only difference in the technology of performing the work will be the construction of the foundation, which allows to avoid distortion of the concrete bowl of the artificial lake.
 A high pond minimizes excavation work, is easier to maintain and is suitable for families with small children (the edge is equipped with a fence with railings). Such a pond can be built near a covered terrace, making it not only an element landscape design, but also a place of rest.
 Tip: If you are planning to make a pond with a fountain, give preference to a tall pond.
Creating a pond on a property for the sake of a pond is illogical. It is much more pleasant if the pond adds zest, a decorative accent to the color of the landscape of the site. This means you need to place it in a good place. The location will allow you to admire artificial lake from anywhere.
How to choose the right place for a pond in your country house?
To do this, you need to take into account a number of factors:
Tip: The deeper the pond, the more illuminated the place it can be located.
A pond intended for fish all the more needs thoughtful placement, because in highly heated water the oxygen level decreases.
Tip: you can provide a sufficient amount of greenery near the pond by decorating it with plants in tubs (barrels).
Advice: it is better to supply electricity at the development stage and lay the wires in a protected and durable corrugation underground, and equip the connection points with a hatch for easy access.
Advice: it is better to start building a pond at your dacha with your own hands at the beginning of the warm season - in the spring. This way, there will be time for the device and the pond will have time to fit into the design (“take root”).
It cannot be said unequivocally that a large pond is a luxury, and a small one is a budget option or an opportunity to save money. A small pond does not always mean cheap, sometimes even the opposite. Each type has its own advantages. Therefore, let's focus on the key points:
Tip: the aspect ratio will determine the harmony of the pond.
- coastal zone (100-400 mm). Designed for planting plants and entering the pond;
- shallow (400-1000 mm). For plants growing deeper. Tip: Nymphea or winter-hardy water lily grows well at this depth;
- deep-sea (over 1 m). Necessary in those ponds where it is planned to breed fish. The area of the deep-water zone depends on the type and quantity of fish, but should be at least 20% of the pond area.
Tip: The lowest point of reservoirs should be below the freezing level of the soil. This is especially important for those ponds in which fish live. Thus, she can safely spend the winter in an ice-free pond.
Tip: plants should not occupy more than 50% of the pond area.
Ponds - from small to large
Moving forward in the field of studying dacha reservoirs, we gradually reached one of key issues how to make a pond with your own hands. Any construction begins with the choice of material.
The market offers a lot building materials to create a pond. And craftsmen advise making a pond from scrap materials; this will allow you to build a small pond in your dacha without any special financial costs.
Let's consider all the materials suitable for building a garden pond.
 Concrete pond.
An expensive option that allows you to operate the pond for a long time. Pouring a pond with concrete (constructing a concrete bowl) is a method that is more suitable for constructing a swimming pool.
 Plastic bowl (container).
 A more suitable option. Made of PVC (polyvinyl chloride) or fiberglass, the form allows you to quickly complete all arrangement work and operate the pond from 5 to 30 years, depending on the quality of the bowl.
The purchased form allows you to make a pond in 3 stages: dig a pit, install a bowl and fill the voids with sand.

The plastic bowl for the pond is characterized by ease of installation, durability and frost resistance.
Their minus is high cost, difficulty of transportation (with a large volume) and the need to have basic installation skills. Otherwise, the bowl is very easy to damage. Please note that plastic bowls are destroyed under the influence of ultraviolet radiation.
Tip: the clear shape of the plastic bowl limits the possibility of creating a landscape pond on the site (subjective opinion).
 In this subgroup, the best option is a bowl (shape) for a pond made of fiberglass, reinforced with a rubber base. The undoubted advantage of fiberglass is reliability and maintainability.
 Polymer film.
 Provides unlimited possibilities in terms of choosing the shape of the reservoir. The simplest and most affordable material in this category is polyethylene film. It is available and cheap, but will not last long.
 PVC film has a longer life. At correct installation and with proper care it will last more than 10 years.
  Tip: instead of PVC film, you can use advertising banners (transparencies). They are trying to get rid of used banners and they can be bought inexpensively.
  Butyl rubber pond film. The most reliable material (rubber) for waterproofing a reservoir. Experts recommend butyl rubber membrane (EPDM) for those who have a rocky bottom, a lot of roots, or a significant pool depth. The service life of butyl rubber is 50 years. It can withstand repeated freezing.
  Bath pond
An old bathtub is an ideal container, specifically designed to hold water. It can be painted in a bright color and installed in a beautiful corner of the garden. Or you can dig deep into the soil and get a small country pond even with a fountain.
 Pond from a tire (pond from a tire or from a wheel)
 Another simple way to make a mini pond in the garden.
How to make a pond from a tire with your own hands is shown in the photo.

 Pond from a basin
The method is so simple that its construction is often done by women or even children. The basin holds water easily. Like a bathtub, it can be installed on the ground or deepened. The main thing in arranging a pond from a basin is the decor. And then, the garden mini-pond will decorate the area no worse than a full-fledged reservoir.
 Decorative pond from plastic bottles.
Suitable for those who want to combine two in one: create a decorative pond and eliminate the buzzing of mosquitoes.
Material prepared for the website www.site
Please note that the choice of material for a pond has a direct impact on the design, appearance and lifespan of the pond.
Tip: when choosing material for a pond, make sure that it is environmentally friendly.
To make a simple pond at the dacha, you need to prepare a level, a cord (for marking), pegs, a hose for watering, a shovel and a cart for removing soil.
For a more technologically advanced (capital) reservoir, pond equipment will be required:
As you can see, there are more than enough materials to create a pond on your own. We will focus on how to make a pond at the dacha from PVC film. The choice is due to the fact that the film takes shape better, it is quite affordable, working with it does not require special skills, and the film can be repaired.
Advice: so that the film does not tear in winter time, it is necessary to provide a deep-water part (below the depth of soil freezing), which will serve as a kind of compensator.
PVC film colors:
When choosing a film, pay attention to:
Tip: The deeper the pond and the more complex its shoreline, the stronger and thicker the film should be. The presence of stones or tree roots is also a reason to choose a stronger film.
Tip: For pond depths greater than 1.5 m, the best solution is to use butyl rubber (EPDM or synthetic rubber, as it is also called). The rubber film is stretchable, resistant to UV and mechanical damage. Withstands from 40 to 80 °C.
Pond film calculation
How and with what to glue PVC film for a pond
The film for the pond is glued with a special glue (for example, Tangit (Tangit) PVC-U) or with adhesive tape, for example, Quick Seam 3.
Advice: it is better to immediately adjust the geometry of the pond to the size of the film.
Before you start digging a pit for a pond, you need to draw a sketch on paper and also transfer it to the surface of the ground. It is advisable to indicate the depth and width of shelves for plants or steps. This technique will allow you to avoid problems during the construction of the pond. It is convenient to apply markings with a garden hose (it is flexible, bright, and easy to adjust) or sand.

Tip: after marking the ground, cover the resulting area with a light film and look at it from different corners of the area. You may actually have to make adjustments to the future pond.


The pit structure includes:
Advice: since the excavated soil needs to be put somewhere, you can arrange alpine slide or level the surface of the area where there are depressions.
During excavation work, you must constantly ensure that the banks are on the same line. If you are planning a waterfall, then you need to maintain the required height difference.

Advice. If you need a building level (level) of great length, you can make it yourself. To do this, you need to lay a regular building level 500 mm long on a long board.
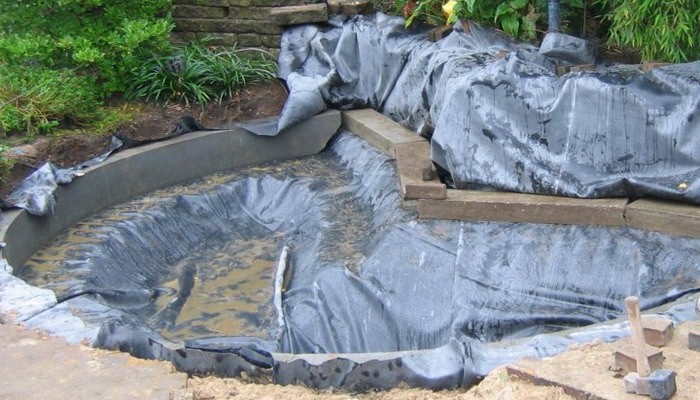
After the pit is dug, its bottom and walls are well compacted (this is necessary to give it shape) and proceed to waterproofing. Waterproofing for a pond is needed to prevent water from escaping into the soil.
Tip: Some users prefer to do without isolation. In practice, this results in water levels that are inconsistent.
There are several ways to form a substrate:
Proper laying of the film does not exclude the installation of a sand cushion at the bottom of the future pond. According to professionals, such a pillow eliminates the possibility of damage to the film by roots or stones.
Advice. It is better to lay the film on a hot day. As it heats up, it will become more pliable.
Considering the topography of the bottom and banks of the reservoir, everyone will be faced with the fact that the film will be laid in folds. At the same time, users advise making one large fold, rather than many small ones. The formed fold can be pressed down with stones or glued to the main part of the film.
 It is important that the laid film lies on the surface of the pit freely, without tension. Otherwise, after filling the pond with water, it may stretch even more and tear.
In order to secure the film, it is enough to dig an auxiliary trench. Having laid the film, you can secure it with rods and fill the trench with crushed stone.
After the film is laid, the pit is filled with stones.
Tip: choose a large stone for the bottom. The flat bottom of the stone will prevent the film from tearing. For walls, it is better to use rounded stones, since flat ones slide.
Upon completion of the work, the pit is filled with water. Moreover, it must be supplied without pressure to the middle of the pit.
Only after the water in the pit has stood for 1-2 days can the film be cut off.
A homemade pond in the garden will look well-groomed and reliable only when there are beautiful and durable banks.
Depending on the type of soil, the shore of the pond should have a slope:
Practical users believe that the optimal slope for the shore of a reservoir is 45°. This angle will prevent the shore from crumbling and prevent ice from bulging during freezing/thawing.
When finishing and decorating the banks of the pond, take into account the plants that will be planted on them. Since they all grow at different depths, care should be taken to ensure that planting shelves are formed at a certain depth.
In the process of digging a pit, every owner will inevitably face the question of how to strengthen the shore of the pond.
The following engineering methods are suitable for strengthening the shore:
For a flat coast:

Craftsmen advise using a more conventional chain-link mesh, the cells of which are filled with earth with clover seeds (or other perennial grasses) or strengthening the shore of the pond with plants and bushes.
For a steep bank:

Biological methods can strengthen the shore just as well. The photo shows plants that can not only strengthen the shore, but also decorate an artificial pond.

Advice. For greater reliability, it is better to combine engineering and biological methods strengthening the shore of the reservoir.
 The pond at the dacha will become a full-fledged design element garden decor only upon its final finishing.
To make a country pond look natural or decoratively decorate a shaped pond, you can use:
Advice: it is better to alternate the laying of large stones with the laying of smaller ones, thus avoiding uniformity in the design of the bank.
Tip: gravel paths require more maintenance because... they are washed away by rain and grass grows through them.


Tip: You can clean your pond quickly and effectively in winter. To do this, it is enough to split the ice and transport it along with the silt outside the pond.
A pond based on a special plastic bowl can survive the winter, because the bowl can withstand significant temperature changes. And so that it does not deform from pressure, created by ice, just place a few empty plastic bottles in the container. The bottles must first be tightly closed with lids. To prevent the bowl from collapsing, 1 bottle per 1 bottle is enough. square meter containers.
But what about those who have a film pond - will the film crack from frost? If the depth of the pond exceeds the freezing depth of the soil, there is no need to worry. To protect smaller bodies of water, you can also use empty bottles.
Important! All equipment and plants must be covered for the winter.
Conclusion
In this article we covered everything key points creating a pond with your own hands, starting from the idea and ending with care. We hope that we have dispelled doubts and given confidence in our abilities. Go for it! And by the beginning of the season you will have a wonderful water corner in your suburban area.
Beautiful pond on garden plot Many summer residents dream of building one. However, not everyone can boast of a large area of land, trying in vain to place a vegetable garden, fruit trees, as well as several flower beds with their favorite flowers. In addition, the construction of a pond involves significant costs, which not everyone can afford.
A small charming pond is not difficult to build yourselfOur photos show various options artificial reservoirs on summer cottages. Among them you can find budget ones and you can choose one of the simplest ones. In addition, the choice of option should be determined by the composition of the soil, as well as the presence free space in the garden or yard. It’s easy to build a mini pond with your own hands if you have the appropriate building materials on hand. Available materials can serve as the main argument in finding a solution.
To prevent water from escaping from a homemade pond, it must be sealed. A good way is to use film. If you want to save money, you can use leftover plastic film that was purchased for greenhouses, but such a pond will only last a few years.
If it is possible to purchase a butyl rubber-based film, which is designed specifically for constructing ponds, the life of the pond will significantly increase. A compromise option is dense polyvinyl chloride film.
It happens that the remnants of the film are scattered pieces - in this case they can be glued together to obtain a coating of the desired size. To do this, it is advisable to use a special glue, which can also be used to seal cuts and other material defects.

 A film pond allows you to build a pond of any shape and size
 In addition to the main material, you will need sand, geotextile and stones. To arrange a pond with your own hands, you should act according to the plan:
Important: it is best to work with film in the summer, on a hot day. This will make all manipulations with the material easier, since it will be softer.

 A small pond made of a plastic bowl under guard
 If you don’t want to work with film, you can speed up the work on building a small pond. To do this, you should choose a ready-made PVC bowl. Similar containers are sold in construction stores and may vary in shape and size. In addition, plastic inserts differ markedly in price and quality. Low-quality plastic quickly breaks down under the influence of frost and ultraviolet radiation sun. The choice is yours. Below are instructions for installing a reservoir with your own hands:

 The easiest way to make a small pond is from a plastic bowl
 The method of constructing an artificial pond from concrete is suitable for those who know how to work with concrete. Such a pond has an undoubted advantage over its counterparts - it is reliable and durable. However, it will not be possible to move it to another place; therefore, before starting work, it is worth thinking carefully about its configuration and choosing the most suitable place on the site. Let's take a closer look at how to build a concrete pond with your own hands:
As soon as upper layer When the concrete is completely dry, you can pour water into the pool. Then start decorating it - planting plants on the banks, introducing fish or arranging lighting.
Budget options for creating ponds in the countryside involve using all kinds of available materials, instead of buying a bowl or film. Some craftsmen build a pond from an old cast iron or children's bathtub, while others were able to adapt car tire or an old basin. The pond will turn out to be quite small, but caring for the mini pond is not difficult. It is easier to change the water than in a large tank, and with the help of plants in tubs and decorative stones it can be easily turned into a blooming oasis.
After many years of use, the bathtub loses its original appearance. If there are no through holes in the bowl, it can be used in the country as a makeshift pond. To build a small pond without high costs, you need:

 If the bathtub is installed correctly, the pond will last for many years
 If you decide to build a pond from old bath, it can be made quite unusual. We propose to create a two-level pond with your own hands, the construction of which will require a little more effort. Work plan, step by step:
 A two-level pond is more difficult to make, but no one will guess that a bathtub is used in the pond
 After preparing the place for the bath, bricks should be laid at the bottom of the pit - several bricks in each corner, on which the bath is installed. This precaution will prevent the bulky container from sagging. Next, you should check how level the bathtub is installed and make sure that its edge is level with the ground. There is empty space between the walls of the bathtub and the pit. It must be covered with sand, which must be moistened and compacted thoroughly.
If it is possible to use old tire, you can easily and quickly build a miniature tire pond with your own hands. A tire from a KAMAZ wheel or tractor will make it possible to make the reservoir much larger.
First you need to dig a pit of such a size that the tire can easily fit into it. Before installing it in the hole, it is necessary to cut it with a knife top part rubber. You should end up with a bowl with a hole at the bottom. Next, you need to take the film, cover the bottom and sides of the tire with it, bringing the edges up. They need to be tucked over the edges of the tank. All that remains is to pour water into the finished tire pool and decorate its edges with plants and stones. In a similar way, you can build a pond from a plastic basin.

 A tire pond will not take up much space and will be an excellent garden decoration.
 Today there are many ways to decorate a mini pond. Among them are the installation of plaster figures on its banks, the laying of decorative stones and tiles. Any body of water will be decorated with greenery, which can be placed around it directly in flowerpots. In other cases, soil is poured on the banks of the lake, interspersed with stones. Moisture-loving perennials are planted in the ground, which over time form beautiful thickets on the shore.
 A small waterfall and beautiful lilies decorate and enliven the pond
 If you want to land aquatic plants, we need to strive to ensure that they do not grow too large. Otherwise, the surface of the pond will be completely covered with greenery. Experts recommend using water hyacinth for this purpose.
You can also decorate the pond with a bridge and install lanterns around it. Another way to enliven the water of an artificial pond is a fountain or waterfall. All this can be built later, the main thing is to take into account the possibility of modernizing the pond at the stage of choosing a place for the pond.
In the process of creating a pond at your own dacha, many questions arise; general recommendations are not enough. Let's consider these questions.
First, let's define what is meant by this phrase:


A properly made pond occupies at least 10th of the site. Deep - it warms up poorly and is simply dangerous, shallow - it blooms. On the forums of summer residents, the optimal size of a reservoir is recommended to be 2.5 - 3 m in diameter, 1.5 m in depth. The hole is dug manually or using machinery. Next, waterproofing is done.
Ecopond - involves natural waterproofing, called clay castle. Only this natural material contributes to the functioning of a living ecological system. This is a good way to make a pond without film:

There are a few simple ways arrangement of miniature reservoirs on the site. 

Since the shape is a wave-like configuration, transitions during burial are taken into account. Special steps are made, one wider than the other. After installation, the voids are filled with earth.
The form is set slightly above ground level, a layer of sand of approximately 20-30 cm is poured under it, but first markings are made on the ground. Then you can start digging a pit. How to do this can be clearly seen in the pictures below.

Important! Three zones are provided in the pit bowl: deep, 1.8-2.0 meters (below the freezing level of the ground). She is being prepared so that she can successfully winter. Medium – for plants. Small – in summer such places warm up well, fry and living creatures accumulate here, and microflora multiplies.
If you are digging a pond for swimming, you do not need to deepen the bottom, it is made smooth.
The Landscape Constructions company recommends first filling the bottom with sand and laying it on top. geotextiles. 
Among the existing options for waterproof coatings, they usually choose butyl rubber film. Main argument– durability. It lasts up to 20 years.

For your information! In specialized stores you can buy a ready-made plastic mold for a reservoir of 1000 liters or more.
A pit is not necessary for a pond; it is enough to make a dam using a stream or a drainage area where water flows. Running water constantly fills the reservoir. They block it in the narrowest place. First, a ditch is dug, the bottom is lined with rich clay, and compacted. Then a clay wall is erected and buried into the bottom and edges of the ravine. The dam crest is raised one meter above the future water level, and the rapids are made steep. 
Dams are built from natural materials: stone, gravel, logs, sometimes concrete. The base is supposed to be wide so that the structure can withstand water pressure.
When constructing such structures, remember about floods and consider water drainage in extreme situations.
The embankment is filled with a width of half a meter to 4 meters, a height of at least 0.5 m. The dam is filled only after the dam has settled.
Concrete dam. It is reinforced with rods, angle iron, and steel mesh. For concreting, waterproof cement is used, liquid glass and PVA glue are added. 
A ravine next to an area along the bottom of which a stream flows and overflows during floods can be turned from a potential enemy into a friend and helper. The ravine is blocked from bank to bank by an embankment. Rain, spring, or river water gradually accumulates in front of it, forming a water surface.
We present such a positive experience step by step:
Such a water oasis requires virtually no costs, will avert the threat of flooding, and will decorate a vacation spot. 
In autumn, especially tender and valuable plants are removed from the pond, and ornamental fish are moved to the aquarium. The pond will freeze at low temperatures, it is impossible to counteract nature, but it is possible to make it easier for fish to winter in the reservoir and ensure an influx of oxygen. 
Used here floating aerator, however, its effect is effective only at low subzero temperatures. 

Such bodies of water are called quarry ponds or gravel pits. Usually these are old neglected quarries in which peat or stone was mined. The water in them stagnates, and the fish are mostly small fish. Used for fish breeding when it is possible to provide a constant flow of water. Specialized farms on quarry ponds produce up to 2 quintals of fish per hectare. Such reservoirs are of interest to entrepreneurs. 
The easiest way to feed a reservoir is from a well. The owner of such a pond shared this scheme, with the help of which a good idea was realized, on a dacha forum. Water circulates and its consumption is small.

Straight, curved, hanging over the surface of the water - the bridge can be anything. Wood, concrete, stone, metal and their combinations are suitable for structures. Even the smallest bridge will enliven the area, become a continuation of the path, and add an unusual line to the landscape. 

A simple bridge is easy to make:

Alexander Pisanets talks about how to make a filter for a pond in the video below.
For decorating man-made ponds landscape designers They actively use all kinds of stones. With their help, you can disguise the artificial materials used in the construction of a pond in your country house, as well as give the pond a more natural and picturesque look.

We are offering to you brief instructions on the choice of stones for arranging reservoirs and methods of laying them.
Stones are widely used to give a pond a finished look. They find application:

Below is one example of decorating reservoirs with stones.
|
Image |
Description |
|
|
Granite. Widely distributed in nature a natural stone, which will look appropriate when decorating the thresholds of streams, waterfalls, and ponds. May have a light gray or pinkish tint. |
|
|
Marble. Chic decorative stone. Depending on the type of impurities, it is green, blue, red, yellow or black in color. Can be used in the form of slabs (polished or not) for cladding, installation. |
|
|
Limestone. Sedimentary rock of grayish-white color without shine. Given its ability to dissolve in water, alkalizing it, limestone is used for dry work, for example, for laying along the contour of the coast or paving paths. |
|
|
Sandstone. Sandstone slabs in gray, red or yellow shades are often used to construct thresholds decorative streams, installation of man-made hills for waterfalls, lining of fencing of reservoirs and as a covering for garden paths. |
|
|
Basalt. Natural stone of black or grayish color, having a dense or porous structure. Most often, basalt is used in the construction of waterfalls and for paving paths. |
|
|
Gneiss. Close to granite in composition, greenish-gray gneiss stones have a characteristic layered structure. This allows them to be used when decorating the bottom and coastal parts of a reservoir and forming a waterfall. |
|
|
Dolomite. This mineral can be colorless, white or yellowish. Thanks to its glass luster, it is perfect for decorating fountains, springs and waterfalls - structures where water moves. |
The video below shows an example of decorating a reservoir with stones: there was a place for both springs and a waterfall.
Those who are not going to carry heavy boulders or hire lifting equipment for this purpose can use artificial stone. He is decorative item made of fiberglass, hollow inside and having a hole in the bottom.
Externally, such stones are practically indistinguishable from natural ones; they have a characteristic relief and color. Their main use is camouflage. pumping equipment, hatches, various technological units. But they can also be used as an independent element of landscape design, for example, this applies to huge decorative boulders.

Even with the help of one stone you can make a good waterfall. These words are confirmed in the video below.
Stone laying is carried out in two ways: with and without mortar. The use of cement mortar is justified if it is necessary to strengthen the banks of a reservoir, arrange a stream bed, or build a complex structure for a waterfall or fountain. In these cases, use a mixture of sand and cement of at least M300 grade in a ratio of 3:1.

Dilute the mixture with water to the consistency of rich sour cream. To give the solution characteristic waterproofing properties, add up to 10% liquid glass to it, then mix thoroughly. Apply the solution in a layer required thickness, then moisten the stone and fix it in the desired position.

Immerse smooth round stones in the solution 2/3 of the volume - this will prevent them from subsequently falling out of the nest. After three days, the masonry mortar will acquire sufficient strength.
Laying natural stone is a real art. Even if you plan to strengthen the masonry with mortar, try to assemble it without it first. This way you can choose the optimal size and shape of the bricks for your design. Quality finish stone suggests the presence minimum thickness masonry joint from mortar, which is achieved by carefully thinking through each step.
The approach to laying stones when decorating and strengthening the banks of a pond is largely determined by the slope of the underwater part of the coastline. If it does not exceed 30 degrees, then the stones can be laid without mortar, but for a more dense fixation you need to use fatty clay. In other cases, it is better to use cement-based mortar.

Alternatively, you can lay a row of stones up to 0.5 m in height, after which pour cement mortar. Only after it has set can you continue working on the same principle.


Resist the temptation to turn your pond into a rock-lined pool! Don't forget that moderation is important in design. Pay more attention to plants that will delight you with their greenery and flowers.


