Leveling the floor for tiles different rooms living space - in the bathroom, bedroom, kitchen - you can do it yourself. There are no particular difficulties in this process, just listen to the advice of professionals.
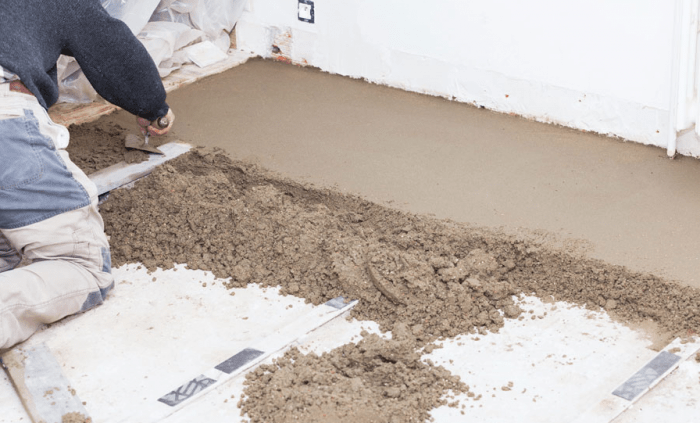
Achieve it perfectly flat surface it is possible in two ways - using special mixtures sold in hardware stores, and by arranging a new concrete screed. The second technique is considered effective and inexpensive to implement. For this you will need to prepare a mixture of cement and water. The ratio of sand and cement is 3 to 1. You need to add enough water to make the solution relatively thick.
Experts recommend using grade 400 cement and also adding additional cement to the mixture being prepared. a small amount of lime glass or expanded clay. These additives increase the strength of the screed. This technique is usually used when leveling floors with large holes, significant slopes, uneven areas, and swellings.
Pouring a new concrete screed has a number of advantages (cheapness, availability of materials), but these days this leveling method is rarely used, since it is a “wet” process and requires serious labor costs. In addition, installing a new concrete foundation is a lengthy operation. The floor filled with the mixture dries up to 20–22 days. These days, you simply will not be able to enter the room where the screed is being made, which brings a lot of inconvenience.
It is much easier and more convenient to level the floor under the tiles in the bathroom or in another room using modern self-leveling ready-made mixtures.
Self-leveling ready-mix
These compounds are created for quick and high-quality leveling. They come in three types:
Self-leveling mixtures dry completely in a couple of days. They are a set of polymer components in dry form, which must be dissolved in a given volume of water (the specific amount of liquid is indicated on the packaging) and distributed over the surface to be treated.
The leveling compounds we are interested in are usually packaged in bags of 25 and 20 kg. One such package is enough to raise one square of the floor base by 1 cm. Knowing this, you can easily calculate the required amount of mixture to level the floor in a bathroom or other room.
Now let's look in detail at how to level the floor under the tiles. Next, we will fully describe the technology for carrying out such work with our own hands.
The first step is to empty the room of all things and objects. If you plan to level the floors in the bathroom, you will also need to dismantle all plumbing fixtures that may interfere with the work. Then you should ventilate the room well. As soon as you start leveling, this can no longer be done - the room must be constant temperature(not lower than +5 °C!) and humidity, as well as a complete absence of drafts.
After ventilation, you need to close the doors and windows and cover them with some damp cloth (you can use regular sheets). This is done so that dust does not spread throughout the home during work. Now you can start cleaning the room. You have to clean the floors from paint and oil stains, remnants of old coating, and debris. Cleaning must be very thorough. Otherwise, the new floor will be uneven after all the measures taken.

Cleaning the floor from paint and oil stains
If your old concrete floor has potholes, voids, gaps, large and small chips, they definitely need to be filled. All excess putty is then removed and the treated areas of the surface are cleaned with sandpaper. Before using the putty composition, it is recommended to treat the concrete floor with a primer (special primer composition). It is distributed over the entire surface with a wide spatula. The important thing here is to apply the primer as evenly as possible. This is not difficult to do; the composition is quite thick and easily distributed over the base.
Next you need to take measurements. Their purpose is to determine the magnitude of floor unevenness. Such measurements are optimally carried out using laser level. This miracle device needs to be placed on the highest section of the floor base (determined visually) and it will project a height mark throughout the room. All you have to do is screw the self-tapping screws into the floor at the points that the level indicates to you, and stretch a thin rope between them. It will point to the zero mark.
When the base has large differences in height, it needs to be filled with rough floor screed. It is also recommended to lay thin metal mesh. It will make the base more durable. The mesh is almost always installed in the bathroom; it does not need to be used in other rooms (provided that it is necessary to raise the floor level to a height of up to 20 mm).
We are proceeding to the main stage of the planned work. First, stir the finished mixture with water in the proportions recommended by the manufacturer of the composition. It is advisable to perform the procedure with a drill on which a mixing attachment is installed. Turn on the device at the lowest speeds. You are unlikely to be able to mix the mixture properly manually, so using a drill is prerequisite. Important tip! Prepare a self-leveling compound in small portions, since the mixture hardens quite quickly.
Apply the prepared composition to the floor. Start performing the operation from the far wall, approaching the exit from the room. Immediately it is necessary to smooth the mixture with a spatula. And then it is advisable to use a needle roller to roll it. In this case, no air bubbles will form inside the applied layer, and the surface will be absolutely flat. The thickness of the coating is specified by the manufacturer. Apply exactly the layer that is recommended (thickness varies from 0.5 to 2 cm).
Hardening of the leveling composition, as already mentioned, occurs within several days (in the bathroom, the floor can dry for 4 days, and in dry rooms - no more than 2-3). All that remains is to lay the porcelain stoneware or ceramic tiles onto the concrete floor you have leveled. You have completed the task and now you can advise your friends how to level the floor under the tiles.
If you decide to renovate your bathroom or create a new room in your home, then you should know that there are special requirements for walls, floors and finishes due to high humidity. In this room, as in any other room, repair work begins with arranging the floor, or rather, leveling it. The thing is that in order to lay any finishing material, the floor must be smooth, without bumps, grooves, cracks and other defects. If you do the work yourself, then you will find our recommendations on how to level the floor in the bathroom useful. The video offered at the end of the article will tell you more clearly about the features of alignment.

Before leveling your bathroom floor, there are two things you should consider: important points, which affect the correctness of further repairs:
Worth knowing: Renovation work in the bathroom can be divided into 3 stages: first, we remove the old tiles, do the leveling, and move on to laying a new face covering.

When you have knocked down the old tile, you need to decide the fate of the screed. The screed does not need to be removed if it is fairly smooth, without defects or cracks. Please note that you will have to waterproof this surface and lay a new one. flooring, therefore the height of the finished floor should remain below the floor level in the entire apartment or house. Otherwise, the screed will also have to be dismantled.
To improve the quality of renovation in the bathroom, it is better to remove everything that was on the floor slab - flooring, old screed, waterproofing. When breaking the screed, be careful not to damage the floor slab itself. The smoother and stronger the surface concrete slab, the better, so it is necessary to carefully seal all the cracks and crevices, remove exfoliated parts of concrete, knock down protrusions, bumps and cut off the mounting loops (if any) with a grinder.
After completing the preparatory work with your own hands, do not forget to vacuum the surface and remove all debris, because even the slightest particles of dust can prevent the new waterproofing from adhering to the slab. To improve the adhesion of the new layer and prevent dust, the base can be coated with a primer.

Any leveling of the bathroom floor begins with waterproofing work. Previously, waterproofing in the bathroom was done using roofing felt. But since this material is not durable and efficient, it is better to choose more reliable modern products. For this you can use:
Attention: the selected material must be applied not only to the floor of the room, but also to the walls to a height of at least 100-150 mm.
After installing the waterproofing, we determine the height difference on the floor in the bathroom. This will allow you to correctly calculate the required height of the screed so as not to significantly raise the floor level in this room. For alignment, you can use one of the methods described below.

To level a surface with your own hands with a height difference of 3-7 cm, it is best to use cement screed, poured along the beacons. The sequence of actions is as follows:
First you need to understand the concepts and remember that the brand of cement and the brand of screed are not the same thing. SNIP requirements usually indicate the brand of screed, which can be seen in the table below. The resistance of the screed to static loads on the surface directly depends on the proportions of cement and sand.
| Brand of Portland cement | Proportions cement:sand | Brand of screed |
|---|---|---|
| M300 | 1:3 | M100 |
| M300 | 1:1 | M200 |
| M400 | 1:3 | M150 |
| M400 | 1:1 | M300 |
| M500 | 1:3 | M200 |
| M500 | 1:2 | M300 |
| M600 | 1:3 | M300 |
| M600 | 1:4 | M200 |
To level the floor in an apartment, a grade of screed M150 - M200 will be sufficient, since the room will not experience heavy loads. Based on the table, you need to purchase cement grade M300 or M400. If you don’t want to prepare the mixture yourself, then you can purchase ready-made mixtures of the appropriate brand, which you just need to fill with water, but their cost is 2-3 times more expensive than the cost of sand and cement separately.
Important! The choice of screed brand directly depends on the size of the tiles. If a large one is used floor tiles 50x50 cm or more, then you can make a grade of screed M150, but if the size of the tiles is small, then we recommend increasing the strength of the screed to M200.
If desired, the beacons can be left in the screed or removed for reuse. Wait until the poured solution dries to such a state that you can safely walk on it without leaving marks. Use shoes without treads or, as a last resort, use small sheets of plywood, placing them under your feet. 
You remove the beacons using a spatula, which can be used to cut the surface of the screed along the beacons. Fill the remaining grooves from the beacons with mortar and smooth them with a spatula to the level of the main plane. After removing the beacons, you can pour a thin control layer of screed from a liquid solution by rolling it out with a needle roller.

If the height differences in the bathroom are significant, then to level such a floor with your own hands it is better to use a screed with expanded clay. It will allow you to raise the surface to the desired height without overloading the ceiling.
This method is rarely used, since height differences in the bathroom are rare. However, in some houses (with joists on the floor slabs) it may be necessary to raise the finishing surface to a significant height and not put too much stress on the old slabs. In this case this method fits perfectly. The sequence of actions is as follows:

If your bathroom has height differences on the base of more than 3 cm, then you can use the most easy way leveling – self-leveling mixtures. Choose a special composition for rooms with high level humidity. Leveling work is carried out in the following sequence:

The desire to level the floor without removing old tiles is often driven by savings and the desire not to stir up excess dirt. In practice, there are cases when it is simply impossible to knock down old tiles. Such cases include:
However, there are situations where removing old tiles is highly recommended to prevent future problems. Such cases include:
If the floor level can be raised by no more than 1.5 centimeters, then it is recommended to level it without a screed. Here, tile adhesive will serve as a screed, which is applied to a previously prepared surface and the tiles are immediately laid level.
If the old tiles are held very tightly and there is no need to remove them, then you can start leveling the floor. Surface preparation according to old tiles carried out using self-leveling mixtures. If the tile does not have a smooth glaze coating, then it must be thoroughly washed with soapy water and degreased with acetone or gasoline. Then cover the entire surface with primer and pour in the self-leveling mixture, rolling it out with a needle roller.
Important! It is strongly recommended that before pouring the self-leveling mixture, you clean the seams on the old tiles, or it is better to remove them altogether using a grinder with a stone disc. It is enough to cut the seams by 5-8 mm, clean them with a vacuum cleaner and fill them well with primer. This will ensure reliable fixation of the poured floor and increase its resistance to mechanical loads.
Are you planning to lay tiles in the bathroom or other place? If you're worried about an uneven floor, let's find out how to level the floor and lay the tiles on a level base...
To level the floor and lay floor tiles you will need the following tools and materials.
1) - A container for diluting leveling agent and tile adhesive.
2) - Overlay spatula, wide spatula 25-30cm + notched spatula
3) - Drill with mixer attachment for preparing leveler
4) - Needle roller (when leveling a large area)
5) - Tile cutter
6) - Pliers or pliers (break off the tiles when adjusting)
7) - Safety glasses
8) - Tape measure, square and marker (pencil)
9) - Short and long level (at least 1 meter)
10) - Rubber spatula (for grouting joints)
11) - Sponge (for grouting)
12) - Grout for joints
13) - Primer
14) - Leveler for rough leveling (if the height difference is more than 1.5 cm)
15) - Self-leveling leveler
16) - Tile adhesive
17) - Ceramic floor tiles + crosses (used to create a joint of a certain width)
First, you need to determine whether the floor is level. To determine the slope of the floor in a small room, a level is enough. Applying the level to different directions from the walls to the center, find out if there is a slope.
If there is a slope and it is large enough, we will need to pre-level the floor. For rough leveling of the floor there are special levelers, they are called “For rough leveling”
How to determine how much floor leveler you need?
To do this, you can follow a simple scheme; one bag of leveler weighs on average 20-25 kg. According to the instructions of different manufacturers, on average, one bag is enough to raise the level by 1 cm over an area of 1 m2. In any case, we read the material consumption on the packaging and, taking into account the data obtained, we make own calculations.
Preparing the floor for leveling
Before leveling the floor, it must be cleaned of dirt and dust, after which the floor must be thoroughly primed and allowed to dry. It is best to use an impregnating primer.
Leveling the floor
A small volume of the floor can be leveled without the use of special metal beacons. The main thing is to know exactly where the floor has the biggest dip.
To simplify the work, you can first make beacons from gypsum in the form of rounded convexities, aligned to the level, pouring the leveler you will be guided by them, trying not to overfill the leveler more than necessary.
Leveler for rough leveling It is best to prepare the floor in a round and tall bucket. The dry mixture is poured into a bucket with the required amount of water and stirred with an electric mixer. The solution should not be too liquid.
Filling should be done from the far wall, moving towards the exit.
Using a level, the slope is checked, and with a wide spatula the leveler is smoothed over the entire floor area.
After the layer of coarse leveler has been laid, it must be allowed to dry and covered with primer.
Self-leveling leveler
Now it’s time for a self-leveling leveler; this leveler fully lives up to its name, since when the floor is poured with it, it spreads in the direction that has a slope, due to which the base is completely leveled.
Self-leveling leveler is prepared in the same way as coarse leveler, the only difference is that it has a more liquid and flowable consistency. When filling the floor with a self-leveling leveler, we use the same principles as with a rough one.
To facilitate the spreading of the leveler onto large areas You can use a needle roller; it removes air from the solution and allows it to spread more evenly.
The self-leveling leveler dries quite quickly; in any case, the base must be completely dry before laying the tiles, after which it must be primed.
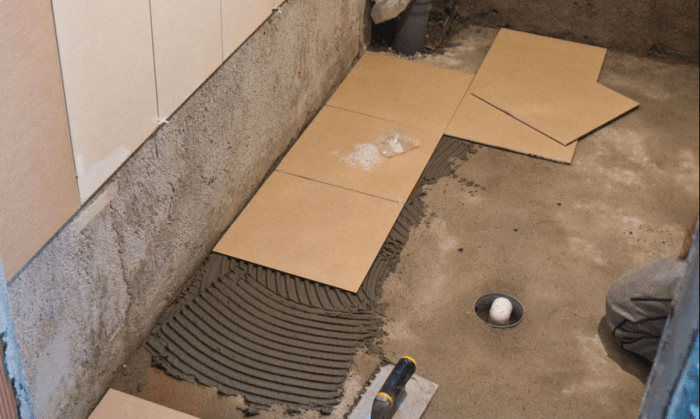
Laying ceramic tiles on the floor.
If you do not pursue the goal of laying out a certain type of pattern on the floor, then it is best to start laying tiles from the farthest corner.
Before using ceramic tiles, you can soak them in water, this will increase the movement time of the tiles when laying them.
We prepare tile adhesive in small portions, since the adhesive quickly dries out during the process and becomes unusable. Apply the adhesive with a notched trowel to the floor so that 1-2 tiles can be laid.
If the floor is not level or slopes, you can continue laying the tiles by increasing the thickness of the adhesive layer. The main thing is not to increase the thickness of the glue to the unacceptable dimensions specified in the manufacturer’s instructions.
Therefore, you need to check in advance using a long level whether the tiles are expanding the adhesive layer.
We place the tile on the glue, pressing a little and screwing it in, if you need a seam, then do not forget to install crosses between the tiles, laying 2-3 tiles in a row and checking their horizontal position using a level.
Gradually laying row by row, we move towards the exit from the room.
How to cut ceramic tiles.
We cut off tiles that do not fit using a tile cutter. After making several passes along the cutting line with a tile cutter, we break off the tiles.
If you need to remove a small part of one of the sides from an already cut piece of tile, you can use pliers or pliers, first wearing safety glasses.
Grabbing the edge of the tile with pliers, break off piece by piece along the entire length.
You can cut a corner fragment in a tile using a grinder with a stone disc; to do this, you need to make a cut on one side, and use a tile cutter to make a notch on the other, after which the fragment easily breaks off.
Remove any remaining adhesive from tiles and joints in a timely manner
When laying tiles, keep the seams and the tiles clean, try not to leave excess glue on the tiles and especially in the seams; if there is excess glue, remove them.
The seam can be cleaned with a spatula, using a cloth or sponge. Remove the glue before it dries.
After laying all the tiles, the adhesive must be given time to dry; to do this, see the instructions on the packaging of the tile adhesive. And only after the glue has dried can you begin to grout the joints and then grout them.
Jointing and grouting
After laying the tiles on the glue, no matter how carefully you work, the glue can still appear somewhere in the seams; in order for the grout to lay evenly and the seams to be beautiful and even, it is necessary to grout the seams.
Jointing can be done using an overlay spatula.
Having cleared the seams of crosses, excess glue and debris, you can begin grouting the seams.
By diluting the dry grout with water, we obtain a paste-like mass, pouring part of the mixture onto the floor, and using a rubber spatula, disperse the grout along the seams.
The movement of the spatula in relation to the seam should be made obliquely. After treating the entire floor (if this is not very large plot), let the grout dry a little, after which we wash off the excess grout from the tile with a damp, thoroughly wrung-out sponge and, running along the seam, form it; the seam should not be recessed or protruding.
The sponge must be rinsed constantly; for this it is advisable to have a bucket of water with you. Having rinsed the entire tile with a sponge in this way, let the grout dry completely, after which the tile can be finally washed.
Nickname:
|
Pros won’t use hovercraft because it’s expensive; it’s easier to level the surface normally and place it under a notched trowel. |
|
|
Anonymous| August 6, 2016 20:57:56 I forced my pro to try the SVP and now it only works with it. |
Nickname:
Please enter a unique code:Taking out a mortgage, where to start?
Today, tile is the most common finishing material. And this is not surprising, because she has wonderful specifications. If you follow the technology of its laying, it will last for decades. One of important stages work that should be done - leveling the floor under the tiles. The final result will largely depend on how well this work is done. Therefore, in this article, we invite you to familiarize yourself with the features of this technology. We invite you to consider several technologies for leveling floors under tiles.
In order for the tile to hold firmly and for a long time, it is necessary to create a flat surface. Among other things, the base must be protected from moisture penetration. Especially when we're talking about about leveling the bathroom floor. Many residents of private houses and apartments, in search of a cheap way to level the floor under tiles, often resort to dubious technologies that cannot guarantee quality. Some people use tile adhesive to level the floor.
However, when choosing, you need to focus on several constituent factors. First of all, the degree of unevenness of the rough screed is determined. If the difference is more than 40 mm, then preference should be given to a full-fledged cement-sand screed. If in your case the floor difference is small, then you can get by with a more simplified method of leveling the floor. For example, you can purchase a self-leveling mixture. You can also use tile adhesive. Due to a small layer, you can level out the existing difference.
In general, there is a basic principle of how to level a floor under tiles. There are several sequential stages, including:
After this, the surface is primed. This stage is considered one of the most important, because without a good primer it will not be possible to achieve high-quality adhesion. If necessary, the floor is waterproofed (depending on the number of floors and the purpose of the room where the screed will be poured). Further, the sequence of work will depend on the screed manufacturing technology. For example, beacons are installed and screed is poured over them.
In this article, we invite you to consider several ways to level the floor under tiles:

OSB board allows you to achieve a perfectly flat surface. It is used for flooring parquet, laminate, linoleum and tiles as well as others. finishing materials. Plus, this material provides additional sound insulation. This is achieved due to the multi-layer structure of the floor. Moreover, OSB boards can serve as insulation and waterproofing layer.
If the room already has a rough concrete screed, then lay wooden blocks, which will act as a lag. Plus, in this way it will be possible to level out a small difference in the floor. For achievement best result The slab is laid in two layers. But here you need to take into account its thickness. One OSB board can have a thickness of up to 10 mm. If there are two layers, then the thickness doubles accordingly. When laying the second layer, you must ensure that the seams do not coincide with each other. Therefore, the second layer is placed across and with a slight offset. The material must be glued together special glue, for example, liquid nails.
There is also the option of laying OSB boards directly on concrete surface. But in this case, you need to make sure that the entire surface is horizontal. If the base is relatively flat, then there is no need to lay the material in two layers. The slab can be fixed to the floor with dowels.
Important! When leveling the floor under tiles using OSB boards, it is necessary to arrange expansion joints. This is important, since during operation the base may be slightly deformed. For example, a stove can absorb moisture and then release it. The width of the expansion joint should be up to 3 mm.

One of the cheapest and available ways how to level the floor under the tiles - pouring a concrete screed. In this case, concrete is prepared using sand, cement and water. To increase the quality and strength of the entire structure, it is necessary to add some additives, such as expanded clay, lime glass, and the like. Among other things, you can use ready-made mixtures. But this mixture is suitable for leveling the floor under the tiles if the unevenness is minor. If it is necessary to level the floor of a large area, it is better to use a cement-sand mixture.
Interesting! If you use a cement-sand screed to level the floor under the tiles, it will take about two weeks for the screed to dry. As for ready-made self-leveling mixtures, the drying process is much faster.
The drying speed of self-leveling mixtures is very fast and reaches up to four days. This was made possible thanks to the presence polymer additives, which ensure rapid hardening of the entire surface. With all this, such a coating has excellent adhesion to the future flooring. Self-leveling mixtures are divided into several categories:
All these compounds provide high-quality adhesion to the entire surface.

If you prefer a cement-sand screed, then you may need the following material and tools:
This is the basic set of tools you will need when making a screed.
Important! If the screed layer is large, it may be necessary to lay a metal mesh. It is necessary to prevent cracking of the screed.
Leveling the floor under the tiles can be done directly during the process of laying the tiles on the floor. The technology is to immediately level the floor with a layer of glue when laying tiles. To do this, first prepare the floor surface. For example, if there are cracks or other damage, they should be leveled. If the rough coating makes a hollow sound when you tap it, then it will have to be completely removed. If the base is ready and has a slight difference, then it is enough to remove the old coating, prime the floor surface and remove all any dirt.
Next you need to think about the layout of the tiles. Make the calculation so that the smallest pieces of tile extend as far as possible along the edges of the room. Immediately before laying, you need to find the lowest point in the room. This is exactly what we should start from. For ease of work, you can pull a rope, which will be a kind of beacon.
After completing all the calculations and measurements, you can proceed directly to laying the tiles. If the layer is thick enough, then the tile adhesive should be relatively dense and have a low level of fluidity. This is important so that the laid tiles do not sink. During the laying process, be sure to check everything by level. In this case, you can level the floor with the tile itself using glue.
So, here we are, looking at all the features of how to level a floor under tiles. Each of the listed methods is relevant. You need to decide which of these tile floor leveling methods is most affordable for you. We hope this article has provided you with food for thought. Be sure that you can complete all the work yourself and without the involvement of specialists. Additionally, we invite you to watch the prepared video on how to properly level the floor under the tiles.
Any major renovation begins with leveling the floor and walls, since in Russian apartments, especially in the secondary real estate market, uneven surfaces are, unfortunately, commonplace. It is especially important to prepare the perfect floor before laying tiles: tiles or porcelain stoneware, in bathrooms, toilets, kitchens and hallways. Often this requires completely dismantling the old coating and screed.
Most cheap way making the floor level means re-making the concrete screed. Construction mixture You can make it yourself from sand, cement and water. Additives such as expanded clay or lime glass increase the strength of the structure. In addition, ready-made dry mixes are also available for sale. for various purposes, which are enough to be diluted with water in the right proportions and start installation immediately. Concrete screed is indispensable if you need to level a surface with a large slope, holes and swellings.
However, for complete drying concrete covering it takes one to three weeks. In addition, when choosing this method of floor screed, you will have to take care of waterproofing and subsequent sanding of the surface.
Modern developments make it possible to reduce the drying time of the coating to three to four days, and also save you from unnecessary hassle and additional time spent on finishing the floor. This opportunity is provided self-leveling mixtures. This is a special polymer composition that is easily distributed over the surface, quickly hardens on it and provides ideal adhesion to the monolith.
Mixtures are divided into three categories:
Self-leveling compounds are sold in packages of 20 and 25 kg. To lift 1 m² per centimeter, you will need one such bag. Thus, you can roughly calculate how much material you will need to carry out repair work. More detailed information is provided by the manufacturer on the packaging, so take the time to study it before starting repairs.
To carry out construction and repair work, you will need a level, a container for preparing a leveling mixture, a drill with an attachment and the ability to set low speeds, measuring cups or household scales, suitable spatulas (wide 30 cm spatulas with a long handle are best suited), a metal mesh for reinforcement, dry mixture in the required quantity.
It would be a good idea to purchase a needle roller: it will allow you to get rid of air bubbles that reduce the strength of the future structure. Also, special needle soles will not hurt, they will allow you to move around the room without carrying construction waste with you.
First, you need to prepare the room for renovation: take out the furniture, dismantle the plumbing. You should also ventilate the room in advance, since in the process construction work you will not have this opportunity: when leveling the floor, drafts should not be allowed under any circumstances, high humidity and temperature drops below + 5 degrees. After airing, close the windows and hang a damp sheet on the door to prevent dust from spreading throughout the apartment.
To ensure that the new floor covering is as durable and reliable as possible, It is important to take the time to clean. Carefully remove everything that may interfere with the floor screed: dust, debris, remnants of the previous coating, stains of paint and oils. By neglecting this step, you risk making the new floor as uneven as the old one. Use the vacuum cleaner properly and Special attention to the corners of the room.
If there are chips, cracks, voids, potholes or other defects in the monolithic base, before starting work they must be puttied, and then the excess dried putty must be removed with sandpaper.
You can easily find a suitable putty in any hardware store. Ideally, it is advisable to prepare and apply a primer mixture, also called a "primer". It acts as a base and impregnation, and also improves adhesion to the leveling compound. Thanks to the special composition of the primer, the leveling solution will dry faster and more evenly. Distribute it evenly using wide spatula and let dry. Prevent the formation of puddles by promptly spreading the thick mass on the floor.
After the room has been cleaned and any defects have been thoroughly covered, you can start measuring. It's best to use a laser level: this device projects a height mark along the entire perimeter of the room, so you don't have to make long calculations and crawl along the floor with a tape measure. It is enough to install the device at the highest point in the room, and then screw the self-tapping screws into the floor required height in increments of 20-30 cm and tie a regular rope between them so that you can always see the zero mark.
In the absence of a laser level, a less technologically advanced water level will do, but in this case it is advisable to purchase a long meter, at least 1 meter.
If you want to make the floor stronger, do not forget to lay down a metal mesh. It is placed on the floor overlapping, and the pieces are connected to each other with wire. The mesh is needed when you need to raise the level by more than 2 cm. It enhances the adhesion between the monolith and the future floor covering. To correct minor defects, you can do without it.
When all preparatory work completed, you can proceed directly. Prepare the self-leveling mixture according to the instructions on the package. For optimal results, carefully follow the proportions specified by the manufacturer. A mixture that is too thin will take longer to dry and will not provide the required strength. If, on the contrary, there is less water than necessary, all the work on leveling the floor under the tiles will go down the drain: the mixture will form lumps, and the surface will have to be leveled again.
To thoroughly mix the composition, use a mixer attachment and a drill at low speed or a concrete mixer, if you have such an opportunity. It is not advisable to prepare the entire mixture at once, as it hardens quite quickly. It is better to mix in small portions - for one or two rows.
The resulting mixture must be spread across the floor, starting from the far wall in parallel and gradually moving towards the door. Smooth the solution with a spatula, and then roll it with a needle roller to prevent air bubbles from forming inside the composition.
Please note that the mixture begins to set within 10-20 minutes after pouring, so be quick and do not be distracted from your work. It is also advisable not to cover the entire room with the solution at once, but to distribute it gradually in order to better smooth out and form an even floor. Of course, you can work in pairs or hire a team of specialists who will do everything necessary much faster.
If you are working on your own, try to pour a new strip before the previous one dries, so that the surface is smooth and seamless. You can also try pouring the leveler in indented strips. As you spread the mixture, the excess will fill the gaps and leave no seams on the floor.
The composition must be applied in a layer of 5 to 20 mm so that the resulting surface is strong enough and dries quickly. If you use a thinner layer, the floor will be fragile and unreliable, and large volumes of mortar will extend the repair indefinitely, since the composition will harden for too long and unevenly. During the process, do not forget to check the level so as not to deviate from the zero mark.
After application, the mixture will harden within 24 hours and dry completely in 3-4 days, provided that you have not violated temperature regime in room. More detailed information about the properties of the composition is indicated by the manufacturer on the packaging. When the self-leveling compound has dried, you can begin tiling the floor.


