
The prototype of this gymnastic device was the most common household ladder, familiar to everyone from childhood. These were the ones they used to climb into the attic of a house or go down into the cellar. But even the most simple exercises It turned out to be so effective that even those who lead a sedentary lifestyle managed to improve their health. Today the topic of our article is a do-it-yourself wall bars: how exactly it can be made for children and adults, what features will have to be taken into account, what materials can be used, and how to simplify your work as much as possible.
It is believed that this sports equipment was invented by Finnish peasants who often needed to go down into glaciers - large pits in which fish were stored. In the upper part of such devices, a thickening was made or a special one wider than standard steps a bar on which a basket or other container with food could be hung. It was from there that this type of staircase was later distributed throughout the world. However, due to the fact that at that time the area belonged to Sweden, the name for the stairs was assigned to the name that has remained to this day.
Today city dwellers are suffering from sedentary lifestyle life, physical inactivity and successfully decimating our ranks. Moreover, if complex fashionable ones have quite high cost, then making a wall bars with your own hands for children and adults will not be difficult. You will need basic skills in working with wood or metal, a standard minimum set of tools, as well as materials.
To perform a minimum set of exercises, it will be enough to simply firmly attach an ordinary household ladder to ceiling beam or, as many do, to the door frame (removable option). However, the construction of a new wall bars implies different technical features, allowing you to do a much broader set of exercises than what the old Finnish peasants practiced during the long winter.


First of all, this concerns the standardization of sizes that are optimal for gymnastic exercises.
When planning to make such sports equipment, you need to remember that any piece of equipment, even with the smoothest, slowest exercises, is subject to dynamic loads that are several times greater than standard weight those who work on them.
At the same time, static loads come more from adults, and dynamic loads from active, nimble children and teenagers. To ensure that no one gets injured due to a broken device, you need to check its strength very carefully. This is done using a special weight suspended from the middle of any crossbar.
Technologically, the projectile can be made from the most different materials. Behind wooden version It’s nice to hold with your hands, and even in the interior of an ordinary city apartment it looks quite organic. For more high loads, for example, to perform exercises with additional weights or stops, you can make metal sleds. Plastic option sports equipment is only suitable for a children's sports ground at home, no more.
Since most men and even some women who attended general labor lessons in childhood or were taught by their parents know how to work with wood, it is worth starting lessons on making a wall bars with your own hands with diagrams and drawings from wood.


For crossbars, standard cuttings are suitable for gardening tools(shovels, rakes, hoes, brooms). Most often they are made of oak, hornbeam or beech, but they can also be glued, thin-layered, similar to plywood. The latter material is no less durable than others.
Such cuttings do not always have a perfectly round cross-section, so they will have to be processed. If it’s difficult to do it yourself or you don’t have the tools, you can go to the nearest carpentry or furniture workshop, where for little money they will not only grind you, but also cut the crossbars to the required length.
The side posts of the projectile are also called bowstrings. A regular construction board will do for them. It is necessary to ensure that it is completely free of knots and other defects that significantly reduce the strength of the finished structure.
Using a tape measure and a pencil, you need to mark the holes on the bowstrings, and then select them. It is optimal to use the most common drill for furniture joints, it just gives out a hole diameter of 35 millimeters. In this case, the side fastening of the crossbars is done using self-tapping screws, but the most experienced can also use confirmats (furniture screws).
It won’t hurt when assembling the stairs, but before you screw everything together, glue all the parts. This increases the reliability of the design significantly. You can use special wood glue, but regular PVA will do; it glues well not only paper, but wood too. That is, the algorithm is as follows: we prepare everything, assemble it, drill the necessary holes, disassemble it, coat the joints with glue, assemble it, fasten it with self-tapping screws and anchors. The entire structure must be reinforced with metal corners so that it does not move apart over time.
It is not difficult to secure such a simple ladder. The easiest way is to install a special traverse between the walls, screw metal hooks to the structure, and hang everything on the prepared support. You can use special flat metal staples attached to anchors or self-tapping screws with dowels. For the rest, follow the video instructions, everything is thoroughly and clearly described there.
The end of the supporting bracket, on which the entire structure will be supported in the future, is under no circumstances allowed. They will definitely get loose. Eventually they will fall out and you will have to redo everything.
Many fear that difficulties will arise with the most basic operations - drilling holes for crossbars, as well as installing stops and a horizontal bar for performing exercises on the apparatus.
Finding quality boards for these elements is not as easy as it seems. Usually suitable material the manufacturer selects it at the stage of cutting the logs. Such material goes on sale at a much higher price than regular construction boards.
If you find good boards If it doesn’t work, you can glue plywood layers or even lumber waste to strengthen them as much as possible. You will have to spend much more time on gluing and sawing, but the strength of the racks will be very enviable.


Many people prefer to make a Swedish wall built into the doorway. No, you will no longer have to climb between the crossbars to get to another room, since the design is meant to be collapsible.
Bowstrings for this option can be made from any board 15 millimeters thick, or even from ordinary plywood. The main load here will go to doorjamb, therefore there are no special requirements for them.
It is better to choose a more durable material for the crossbars for the stairs in the doors - metal. However, many say that even durable beech, oak and hornbeam planks last quite a long time under moderate loads.
A crossbar fixed in the upper part, while allowing you to perform pull-ups and hold your legs at an angle while hanging, significantly expands the functionality of the equipment. But even here it is possible various options, and almost anyone can, if they really want to, make a horizontal bar for a wall bars with their own hands.


This is the simplest option for attaching a horizontal bar with a wooden holder. Anyone who has reached this stage will definitely be able to cope with its production. However, it is worth taking into account that this type of bar is intended only for children or calm pull-ups by adults, without unnecessary movements, additional weights or sudden movements, or exercises with stops.


In the photo above, there are other options for making or simply attaching a horizontal bar or hanging hand rest to perform more complex exercises. For self-made wooden structures you need to choose only the highest quality, dense and durable wood, otherwise it simply will not withstand the load. Please note that the standard “movement” of the horizontal bar forward, relative to the ladder, will be 60-65 centimeters. Otherwise, the exercises will be inconvenient, especially for an adult.

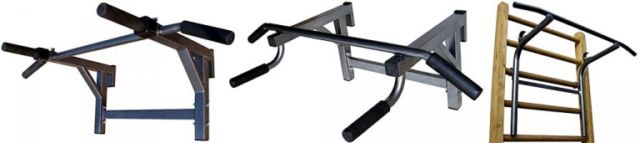
For those who do not want to bother with such a responsible and important work, it is proposed to purchase a standard structure made of wood or metal in the store. All that remains is to secure it in advance assembled wall, then you can practice without worrying that something will break and you will get injured.


Above in the photo there are correct options for attaching a horizontal bar or stop to the wall. It is best to secure the structure with specially cut plywood scarves, 22-35 millimeters thick.
They are screwed to the bowstrings (stands) with through screws, of which there should be at least four pieces, or even better, take five, placing them as indicated in the figure. With this fastening, the horizontal bar or stop will definitely not fall off suddenly - at first they will loosen for a long time, which will definitely not go unnoticed by you.


For advanced athletes who need to perform more challenging exercises, regular wooden walls may not be suitable. They are much less durable than metal ones. The same applies to people with large body weight, regardless of whether it is muscle mass or excess fat. The figures above show drawings of the so-called female (left) and male (right) options.
All consoles and bowstrings there are made of a special professional pipe with dimensions 80x40x3, and the crossbars themselves are made of ordinary pipe round section 40x2. It is necessary to take into account your own capabilities, because not everyone knows how to work with metal. Although, in principle, welding work can be eliminated by securing all joints with bolts. More detailed information is available in the video below.
Most often, home craftsmen attach their sports equipment to corners and screws directly to the wall. This is not entirely correct, since as soon as just one of them breaks for any reason, the entire ladder will simply fall off - all the other fastenings simply will not withstand the load.
You also need to remember about the correct deepening of the anchors into the wall. We must not forget about the dowels.


As already mentioned, the weight of the children is small, and therefore they cannot create very large static loads on the projectile. But the dynamic ones here will literally go off scale, because the children are very energetic and perform not only the necessary movements, doing memorized exercises, but also simply fool around. At the same time, if the child is not alone, then most likely they will hang on the ladder as a whole “camp”, and on top of that they will arrange tags when their feet cannot touch the floor.
All this requires additional fastening force, although usually such equipment is not high, so the lever arm when lifted from the wall is also small. But you need to remember that it is not advisable to tightly embed a children's wall into the wall. Before you know it, the child will grow up. Then the “toy” version will have to be changed to a real adult one or simply removed. There are two options for attaching shells.


This design option takes into account the elasticity of the materials of the staircase itself. Therefore, it is very important that the racks (strings) are quite strong in diameter. For this it is better to take solid wood, thickness from 3.0 centimeters, or glued options from 2.4 centimeters. On-site installation is quite simple; we will provide an abbreviated algorithm for it.
The glue hardens very quickly. Therefore, after just an hour and a half, not every adult, not to mention children, will be able to move or even slightly loosen the structure.
However, for those who find the previous option not reliable enough, there is another option for securing a children's wall bars, namely, point-blank at the same two points. You can do it yourself; you don’t need an assistant to lift the structure. However, it should be taken into account that top part(attachment points) must have high ultimate rigidity in three planes. All this is important because the option works on the principle of a lever that is stuck at a dead point.
![]()
![]()
Despite the fact that it would seem that two dots are enough, pay attention to the picture. It matters whether you use a solid construction of the bowstrings or whether they have “ears” that are additionally screwed to the machine or the ladder itself. All additional articulation points are potential places for loosening. Therefore, it is better to attach the projectile to the wall in a similar way at four points.
Another reliable option, when the inventory can no longer be shifted even by minimum distance, this is a mixed mount. This means that first it is screwed to the wall using anchors or self-tapping screws as standard, and then it is further expanded between the floor and the ceiling. This is truly the most reliable and also safe for further activities.
Many craftsmen they say that the easiest way, and at the same time cheaper and faster, is to make such sports equipment from ordinary plastic water pipes. However, making a wall bars from polypropylene pipes with your own hands, you need to remember that all types of plastics that are used in everyday life tend to “get tired” very quickly. That is, they are not able to withstand even static loads for a long time, so this option is definitely not suitable for adults.
Of course there are different variants very durable newfangled materials, for example, carbon fiber, but their cost will hardly seem affordable to you. In addition, then for cutting, drilling, and soldering the material, you will also need to purchase additional special equipment, which is unlikely to be useful ever again.
The functionality of a homemade wall bars can be easily changed at your own discretion. After all, a child, and even more so a teenager, will be bored just doing pull-ups on the horizontal bar. To do this, you will need to make or buy it yourself. optional equipment, which is hung or attached to the main structure.
Many people make it easier for themselves to replace a child’s wall with an adult one in the future. To do this, just install great option, and already buy or make special children’s modifications for it. In the future, they are simply removed, without harm to the main projectile, walls, or floor.
No one wants to see themselves or their child injured while using a projectile. Therefore, you need to adhere to certain operating rules.
In addition, please note that for the long service life of the wall bars, it should always be kept clean. The structure must be maintained in accordance with the materials used. For example, wood may require an updated layer of stain and varnish over time, and metal may require rust removal and painting.
This is the most necessary set for a complete workout at home. This complex will also be useful for those who have small children, because... Climbing stairs helps prevent the development of flat feet. It can also be equipped with a cotton rope for climbing, hanging staircase, rings for children, parallel bars and other sports equipment.
To make a wall bars with your own hands, you need to have a minimum number of tools (grinder, tape measure, welding machine etc.) and detailed drawings. Anyone who has a garage with tools can easily make a wall bars with their own hands.
I made this package collapsible so that in case of moving or shipping, the packaging would take up a minimum amount of space. The largest element has a length of no more than 1.6 m. The weight of the entire complex turned out to be 42 kg; if you use wooden crossbars, the weight can be significantly reduced.

The Swedish wall is fastened in two ways: to the wall with dowels through the plate and by expansion into the ceiling. This equipment is designed for a ceiling height of 2.5 m. You can adjust the height according to your ceiling height.
Reinforced horizontal bar with wide grip. The horizontal bar is designed for a load of 120 kg.


Detail drawings, made in simple design, everyone can figure them out, even without an engineering education, and you can easily make a wall bars with your own hands. The 3D model is made to scale and you can easily insert it into your design project; it will look stylish in your interior. So, I give away the detailed drawings and 3D model for a purely symbolic price. You will receive a folder with all materials.
Children have always been highly active; they are avid lovers of outdoor games and unusual pastimes. But, unfortunately, not every parent can afford to arrange a separate room for their child with a study area, a sports corner (which is especially necessary for the younger generation) and allocate a comfortable place for privacy.
A wall bars would be an excellent option even for a small apartment. Making it with your own hands is not difficult. But it will allow children to have fun, without harm to health and the environment.
To set up a sports corner you will need:
Having prepared everything necessary materials and tools, you can start working. You can make a wall bars with your own hands according to any project, or you can think about the location yourself and supplement the design with the elements you like (for example, a rope, rings, a rope ladder, an abdominal bar or a horizontal bar).
Creating such a sports corner at home makes it possible to maximize your imagination both in configuration and in finishing options, creating, for example, a multi-colored wall or a plain one, covering it with varnish.
By thinking in advance about the sequence of performing the necessary steps, you can significantly save time. Any construction project or repairs require careful preparation, including the Swedish wall. You will also have to make the drawings yourself, but this is not difficult. But they will help reduce preparation time and avoid possible defects due to inaccurate parameters and non-compliance with relevant indicators.
When purchasing racks, you should immediately think about the method of fastening them and, if possible, ask the factory to additionally round the corners and make recesses so that the crossbars are held together more firmly.
The crossbars should be attached to the posts at an angle of approximately eighty degrees. This arrangement will provide the greatest strength to the structure and enable it to withstand sufficient weight.
The choice of material for the wall bars should be based on the expected weight of the children, since each type of wood has its own strength. How large quantity children will play there, the more reliable the design must be so that there are no injuries.
Do-it-yourself wall bars are most often made from pine lumber and pine cuttings (for arranging steps). The racks and crossbars are fastened using furniture bolts. They firmly hold the structure and withstand heavy loads. On each side you need to use 4-5 such bolts.
To save money and not waste time on complex processing, you can use ready-made cuttings for shovels as steps suitable diameter. For young children, it will be enough to purchase about one and a half dozen cuttings 120 cm long.

Depending on the chosen width of the staircase (most often it is 80 or 100 cm), the material is cut, and recesses are made in the main posts using a drill and a suitable pen - holes into which the steps will be inserted. If the diameter of the handle is slightly larger than the hole, you can grind off its end.
Important! Need to pay Special attention to the depth of the holes, since to avoid defects it must be the same in absolutely all recesses. Although the wall bars are made with your own hands, they require maintaining all dimensions with their exact observance.
To ensure that the crossbars do not rotate and, accordingly, the wall is as safe as possible, you need to glue the ends to the holes of the racks. For the convenience of this stage, it is recommended to prepare a template in advance, then there will be no inaccuracies with measurements and the work will take much less time.
Depending on your capabilities and personal preferences, you can choose to paint the wall or varnish it. Each option has both its advantages and disadvantages.
Painting allows you to create different color combinations, decorate the racks with patterns or designs. Before finishing you need to carefully prime all surfaces, this will extend the life of the structure and improve its performance.
It is advisable to paint in two layers. In this case, the first one must dry completely (takes about two days). It is the large amount of time that is the disadvantage of this finishing method.
It is much faster to coat the wall bars with varnish. But such sports section will look traditional, there will be no opportunity to fully express your imagination.
Having understood this issue, everyone must independently choose the option that is suitable for themselves. A children's wall bar, built with your own hands, will delight not only your children, but also you, as it will become a real masterpiece.
The structure is attached to the wall using metal corners. To each rack on different heights fasteners are screwed in; ideally there should be three of them. Suitable holes are pre-drilled in the wall into which anchor bolts will then be driven.

Having placed the wall bars in the prepared place using a hammer, you need to hammer the anchors into the wall through the holes in metal corner. At this stage, the wall bars are almost made with your own hands.
For greater comfort and variety, it can be installed on a wall bars additional elements. They can be rings, a rope ladder, and more.
Handmade production rings can cause great difficulties, so it would be more rational to purchase them at a sports store. Alternatively, you can order them to be manufactured at the factory.
To arrange the stairs and rope, you can also purchase ready-made ropes and secure them to the crossbar yourself. The rope ladder must be firmly fixed to the crossbar, and its steps must be tied in a special way so that they do not move and are held securely in the designated place.

With the proper approach to the matter, you will get a comfortable, compact and beautiful wall bars. It will be easy to calculate the dimensions and draw up a drawing with your own hands, as well as to build the wall itself. In addition, the parameters can be changed according to individual characteristics apartments. You can create an additional pull-up bar. To arrange it, you can use a cutting of a larger diameter or a metal crossbar.
Photos of the finished sports corner will help you understand how to more conveniently arrange it in your apartment without spending a lot of effort and money.

The photo below shows a full-fledged sports corner for children of different ages.

Alternatively, you can create simple design the width of the entire wall.

This variety of options makes it possible to create combined option, which will contain all the necessary elements.
You can purchase such a corner in a store for an amount of about ten thousand rubles. Making a wall bars yourself will cost several times less. According to preliminary calculations:
Such savings will allow you to create a surprisingly useful place for children to play, without damaging family budget significant harm.
Experienced workers can use metal reinforcement as a basis for the structure by welding its elements. A do-it-yourself metal wall bars can also be made if desired; it is also more durable and strong. Due to the characteristics of the material, the structure is able to withstand much greater weight.

However, having equipped such a corner in your apartment, you should carefully study the strength of the walls so as not to cause significant damage that could pose a danger to health and life.
If you are a fan healthy image life and dream that your child will adopt your life credo from you, then installing a children's sports complex at home will be the most the best solution. The child will be able to warm up without going far from lessons, and also in the cold season, when going out on the horizontal bar in the yard with friends is problematic.
Moreover, sports equipment will help the youngest users develop faster and more harmoniously. Let's talk today about these irreplaceable household accessories, look at what manufacturers offer us today, and also tell you how to make a Swedish ladder with your own hands.

Let's first talk about how the presence of such an unpretentious equipment in the house can change a child's life, taking into account both positive and negative aspects.
Although the Swedish ladder for children can be used from the first years of life, this process should be approached carefully and carefully. The fact is that young children have a poorly developed sense of self-preservation, and they can get injured simply by expressing their curiosity.
The Swedish ladder is the very first apparatus that will be available to a child. As it grows, you can add more and more complex details.
Advice! Be sure to secure your baby until you are personally convinced that his grip has become reliable and he is confidently holding on to the bars. Be sure to secure yourself with a sports mat that will soften a possible fall and protect you from unnecessary injuries.

Along the way, one should not forget about the psychological formation of a small personality. As soon as the child has become independent, stop hovering over him like a hen.
Do not pay attention to minor falls that will not cause harm to the child's health. Let him learn to rise on his own and strengthen his fighting spirit.

And in order to avoid the risk of injury, take care of high-quality, durable equipment, and allow your child only to use equipment that is appropriate for his age.

At an older age, a child interested in sports will be able to independently determine what he needs to supplement his staircase with.

Staircase - wall bars
The Swedish ladder itself is a compact structure, firmly attached to the wall. The most interesting thing about it is that it is also the basis of a real sports complex, which can be equipped with various equipment.
Let's list the most common ones:


The rest of the projectiles are of the type of log or support platform for strength exercises we do not consider them, since they have a narrow specific application and are not suitable for all users.
Now let's talk about the types of children's sports complexes, and let's figure out how to make a Swedish ladder with your own hands.
Conventionally, sports stairs can be divided into children's and adults. Both of them can be organized in the form of a complex, firmly attached to load-bearing walls and floors, or a compact exercise machine that can be freely moved around the apartment.

Let's look at them all, and we'll start with options for children:


Now let's go over the options for home exercise equipment for adults.


We have named only a small part of home sports equipment. For more details, you can watch the video in this article.
As you can imagine, the price of many of the above products can be very high. What should you do if you want to install DSK? If you are a “hands-on” person, then the problem can be solved! You can assemble a Swedish ladder for a young champion with your own hands, and it’s not that difficult to do.

Here is a list of all the tools and materials that will be required for the job:
|
|
Durable polished boards with a cross section of 40x150 mm, two pieces. We will make bowstrings from them. If you can’t find sanded boards, then take what you have, but you will have to process them yourself. Make sure that there is no rot or cracks on the boards, as they will experience mechanical stress. Additionally, slats of a smaller cross-section may be needed to complicate the design, for example, for a horizontal bar. |
|
|
We will use it to create steps, a horizontal bar and a trapezoid. Give preference to options made from hard wood that can easily support the weight of not only a child, but also an adult. The diameter of the slats must be at least 35 mm. Determine the quantity yourself based on the assumption that the steps will be located at a distance of 20 cm from each other. |
|
|
To secure steps. |
|
|
A strong rope with a diameter of at least 1 centimeter. We use it to create a rope ladder and trapeze. Also suitable as a replacement wooden steps on the Swedish stairs. |
|
|
You can buy gymnastic rings at a sporting goods store and attach them to an existing structure. |
|
|
Powerful steel corners for attaching bowstrings to the wall. Minimum quantity – 4 pieces. |
|
|
We use them to connect corners to walls. |
|
|
Using a bolted connection, we connect metal and wooden parts designs. |
|
|
We will use a hammer drill to drill holes in the wall. By installing a drill chuck in it and switching it to drilling mode, you can drill holes in wood. If there is no chuck, then look for an electric drill. |
|
|
We will use drills to drill holes for the steps and bolted connections. You may also need to buy a metal drill to expand the holes in the steel corner to the desired size. |
|
|
We use it for cutting workpieces. |
Additionally, you may need: sandpaper of different grades for sanding structural elements; kit wrenches; screwdriver or Phillips screwdriver; jigsaw; rubber for feet.
You can refuse to use paint and varnish products - just sand the surface well. The fact is that kids love to try everything, and it is not advisable for particles of varnish to get into the stomach, besides, such a coating becomes slippery if you walk on it in socks.

To protect wood from dirt and give it a beautiful shade, it is better to use natural impregnations based on natural oils and wax.
So here you go step-by-step instruction How to assemble a simple Swedish ladder:

Install standard option, or make a horizontal bar for a house with stairs - this is your personal choice. Any wooden structure can be made by a home craftsman, the main thing is to carefully develop the design and use high-quality materials that can withstand loads. We wish you success in your endeavors!


