Construction works cannot be classified as a cheap event. Adding to the complexity is that finishing technologies are regularly improved - therefore, new requirements are being put forward for the quality of the interior. What initially seemed like a bold decision and almost avant-garde, after a couple of years has real chances go into the category of dense archaism. Due to the desire of many home craftsmen to make the ceiling in the kitchen themselves, economy class finishing options in this case look more preferable.
This is also due to the fact that kitchen coverings in the interior quickly lose their presentation, and to some extent they can be considered as a kind of consumables.
On the one side, kitchen area The apartment serves as a kind of workshop. And it is not profitable to greatly increase the cost of its maintenance.
On the other hand, this place often serves as a common area where family members regularly gather and often receive their closest guests. Hence the desire to make the kitchen interior attractive and cozy is understandable.
The atmosphere and specifics of the operation of the room dictate the following requirements for the ceiling, which cannot be avoided:
First of all, an economy house implies that all work will be carried out on its own and with the help of the tool base that an ordinary home builder has (or may have). Consequently, some types of finishing, even popular ones, are eliminated.
Such impracticable projects include various options such as artistic carvings or suspended ceilings - it is unlikely that anyone will display artistic skills of the required level or accidentally find them in storage at home heat gun corresponding power for the latter option.
Therefore, after weeding out the most expensive and technically difficult projects, there will not be many techniques left for self-repair of the ceiling:

The final choice can be influenced by a variety of factors: the size of the budget, the presence of any personal preferences, the degree of proficiency in craft skills, the possibility of attracting assistants, the types of lamps used in the room lighting system, the height of the ceilings, the condition of the original surface and other little things that can be worn in the room. Each specific case has an individual character.
Even this moment may be important and decisive: a new building or an apartment in an old building is undergoing renovation. But the most important condition: you need a strong desire to complete the entire range of work with your own hands, on your own.
Let's start with regular painting. The simplest option in terms of execution technique, and, of course, extremely budget-friendly. It has been used in homes for centuries. And it’s still quite viable.
The bonus of this solution is its versatility: it can be used as the main (and only) way to improve (or renew) the ceiling, but it is also suitable as an additional measure that brings the same drywall or even suspended ceilings to its logical conclusion - however, only fabric ones.
In a very classic interpretation, the ceiling is simply whitewashed. What is it suitable for:
Lime is good because it adheres to the surface a little stronger than chalk whitewash, is able to mask minor surface flaws and has weak antiseptic properties. Although it has a yellowish tint.
The chalk is a little whiter, but not as durable. But in terms of price it has absolutely no competitors.
Cretaceous or lime whitewash apply big swing brush or spray with a spray bottle. In this case, both a completely modern spray gun (but not all of them can work with such a large suspension) and an ancient attachment to a vacuum cleaner are suitable - if anyone has one that has been preserved as a legacy of past years.
Artificial ultramarine - blue - must be added to whitewash to counteract the yellowness of the whitewash after drying. A little more ultramarine will go into the lime.

And before “spraying”, you should strain the resulting solution through gauze - spray gun nozzles do not tolerate large impurities well.
Important! If whitewashing is applied to an old coating, then the chalky surface is whitened with chalk, and the chalky surface is renewed with lime.
If this condition cannot be met, then the old ceiling paint is thoroughly washed off warm water and a spatula. And then they prime. Previously, vitriol or a weak solution of custard glue (flour or starch paste) were used, but today there are a lot of inexpensive primers in stores with and without antiseptics.
Any composition for painting is suitable. By the way, they are primed for any painting.
Chalk and lime have one common disadvantage - they get dirty. Old methods with the addition of skim milk or casein, of course, still work today, but it is much easier to get by with water-based paints.
In common parlance, this is a water-based emulsion. This also includes more advanced compositions based on latex, acrylic and silicone.
An important difference: latex and silicone can withstand washing after drying. Plus, they make the surface vapor-tight (air also does not pass through).
In general, they are traditionally used more on the street as facades. But it’s also good to use them in the kitchen - the ceiling can then be washed. In this case, it is better to be careful with acrylic - it can be washed off inadvertently.
Of course, finishing with paints can also be done with a regular paint brush. But it's better to use a roller. The roller itself and the cuvette for it can be found in almost every hardware store. Yes, and they are inexpensive. It is better to take a fur roller.
The painting technique is simple: with a roller in two layers. Moreover, the layers are mutually perpendicular. The edges near the walls (where it cannot be reached with a roller) are painted with a flat brush.
Cuvette for painting works has a recess for paint and a small inclined surface with ribbing for even distribution of paint over the roller and removal of excess. If you don't clean it up, there will be leaks. Although in the field, instead of the same ditch, a sheet of plywood or drywall is often used. But it’s still more convenient with a factory cuvette.
Whitewashing, of course, has the beauty of simplicity. But if there are serious surface imperfections, they cannot be hidden, even if you pay close attention to the coloring. For example, fallen rust or defects in floor slabs cannot be hidden in this way. Something more radical is required.
Plaster has been known since antiquity and has changed very little in composition and method of application. But working with it requires some skills.
First of all, you should remember that the surface under plaster must be primed. This is necessary in order to ensure reliable adhesion of the base to the applied coating and to get rid of dust - dust weakens adhesion. And the primer binds it.

Second point. Choose the right composition. Now there is no need to be tricky with the selection yourself optimal ratio components - indoor plaster is sold in stores.
For ceilings, mixtures based on gypsum or lime are better suited. You shouldn't use cement-based ones - they're tricky for ceilings. Plaster, by the way, can remove very serious unevenness and differences.
If the imperfections of the ceiling can be covered with a relatively small layer, then there is no point in fussing with plaster. Enough putty. True, putty is different from putty.
It’s better to focus on those compounds that are traditionally used with drywall. They apply nicely and stick well to the surface. The question of which is better is governed by budget and personal preference. Some people praise Knauf, others prefer Volma.
We hide large irregularities under the base composition. When working with it, you should try to apply layers as evenly as possible, without waves. When hardened, base putties provide a durable surface, which is difficult to level. By the way, they work in thin layers. Thick ones will crack - basic putties exhibit slight shrinkage.
A layer of finishing putty is required on top of the base putty - it does not shrink, and can be sanded for leveling.
After all layers have dried, the ceiling is primed. And there you can either paint it or cover it with wallpaper. More on that a little later.
Here's a video showing how to putty a ceiling. Of course, the master puts putty on drywall, but putty on a simple floor slab looks exactly the same. Will it take more layers and time?
Probably even cheaper than whitewashing is covering the surface with plastic tiles. They differ slightly in material, pattern and shape, but the essence is the same - a lightweight plate correct form made of thin plastic. Sits on special glue.
Many people believe that it is better to leave the ceiling under the tiles as is - they will hide everything. This is a misconception. The curvature of the surface, for example, will only become more noticeable. As well as asymmetrical walls or incorrect geometry.
It is better to start the tiles from the middle - so that the same dimensions are cut along the edges. But if you plan to install furniture up to the ceiling near a wall, then you can start pasting from the wall opposite the furniture. It's easier.

Sometimes tiles not made of plastic, but cork, are used for the ceiling. In some cases it is justified, but in a small kitchen it does not look very good - the height is visually lost a little due to the lumpy surface. By the way, the rule is the same as for the plastic analogue: special glue (like the domestic 88) and a flat ceiling.
Frame ceilings, somewhat reminiscent of an ancient coffered structure, are widespread. The idea is simple: a supporting frame is suspended, into the sockets of which lightweight panels are inserted.
For a long time, frame ceilings were presented on the market with the only type “Armstrong”, but today you can purchase beautiful panels made of wood or laminated MDF. The installation technology for all types is approximately the same.
Communications and lighting devices are easily hidden behind frame ceilings - the distance to the ceiling allows.
First, the frame is attached. Its installation begins from the perimeter. Why do you need to accurately mark a strictly horizontal line around the entire perimeter?
Best for those works will do laser level, but if you don’t have one at hand, then mark it with the old faithful water level. Marks are placed in all corners that are connected by marking lines with a chalk cord. Ordinary general construction levels with bubbles are not suitable for such work - their accuracy is too limited even for the best examples.
Having secured the frame around the perimeter, installation of the main frame begins. It is attached to the ceiling with special hangers that allow you to adjust the height. At the same time, it is important to ensure that everything internal corners the frame came out strictly straight. Otherwise, it will be a pity to look at such a ceiling.
The height of the frame is adjusted with hangers - until it is all clearly aligned with the horizon at one level. And only then they insert it on regular places decorative tiles.
This ceiling is good for its maintainability and the fact that communications can be hidden behind it. But you have to put up with the loss of height - the gimbals need room to maneuver.
A plasterboard ceiling works well. With the help of this simple material you can create multi-level structures of various configurations. True, it is almost impossible to do this alone - you will need helpers.

Again it all starts with the frame. And here minimum required There is noticeably less space than in the case of a suspended frame. In theory, this is 4 cm - 3 cm frame and 1 cm sheet of drywall itself.
Again it all starts with the frame. Along the perimeter of the room, an initial profile is attached to the walls under the ceiling. Again strictly on the horizon. A wall profile is inserted into the grooves of the initial profile in increments of 60 cm. They are built from the same profile crossbars with the same step of 60 cm. At the intersection of the slats, special fastenings are placed - the so-called “crabs”. Well, the entire structure is attached to the ceiling using special hangers and dowel-nails.
The frame elements are fastened together using a cutter (a cross between a riveting press and a punch) or using drill-tip screws with a press washer. The latter are less convenient.
Then plasterboard leaves (or gypsum board) are attached to this frame using self-tapping screws of a slightly different configuration. Afterwards, the seams are glued with a reinforcing mesh and putty with the same compounds: base and finishing putties. And then they paint or paste over it.
The coating is strong and durable. True, you will again have to put up with some lowering of the ceiling level. You can, of course, glue plaster to a special assembly adhesive(sometimes a basic putty for drywall is used), but with this method it is extremely difficult to accurately maintain the level over the entire plane.

Wallpaper is probably the most unpretentious way to cover surface imperfections. And it requires the least amount of preparatory work. Therefore, if anyone doubts own strength and wondering what kind of ceiling to make in your kitchen, then feel free to hang wallpaper.
There are special ceiling wallpaper, but ordinary wall ones can also be suitable - if the drawing suits you. And so you can do simple ones, for painting. It must be glued end to end. The overlap on the ceiling looks sloppy. Well, the glue is a little thicker than for wall variations.

Over time, however, the wallpaper canvas shrinks and shrinks, causing cracks to form between the canvases. Therefore, if possible, it is worth taking non-woven ones. They are more elastic and less susceptible to aging.
Textured or smooth - a matter of taste. By the way, the wallpaper better later paint it anyway. And then you can tint it from time to time - just to renew the coating.
When wallpapering, it is worth remembering the direction of natural light. It is better to orient the seams away from the window, and not across - this way they will be less noticeable.
Wallpaper with texture covers surface imperfections better than smooth wallpaper. So if there are visual complaints about the ceiling, then choose wallpaper that is “flatter” and more textured.
There is a wallpaper option that is more similar in the method of applying it to putty. The so-called “liquid wallpaper”. Essentially, it is a polymer adhesive with a fiber filler. Apply with a spatula - preferably a transparent plastic one. It hides small cracks well, but is powerless against developed terrain. Application requires some skill, but it comes quickly in the process.
A ceiling made of plastic panels turned out to be quite practical in the kitchen. Lightweight, inexpensive, easy to wash. And easy to install.

Plastic ceiling panels in the interior can look very noble.
Again, the entire structure is attached to the frame. Almost like under drywall, but it is enough to run the slats in the center in only one direction - across the plastic ceiling panels.
Wood is an excellent material, but it is very unstable subject to fluctuations in humidity and temperature. And the fungus feels great on it. Therefore, it is better to use metal on the frame.
One more moment. Panels are often fastened to wooden slats with staples from a mounting stapler. But this is an extremely unreliable method - over time, the brackets will slip out as the wood either swells or dries. The vibrations are minor, but over time they will be enough for the brackets to slip out.
The initial profile for plastic is attached to the initial profile from below, in the very corner, with self-tapping screws - this is a U-shaped strip with one “leg” slightly longer. It’s into the edge that protrudes the most that they drive the screws. And then the edge of the ceiling panel goes into it.
The panels must be fastened with self-tapping screws to the ceiling profile. Otherwise, the panel will sag, or even the entire ceiling will be torn out of the initial profile. They are fastened in the same way as the initial one - from the inside of each panel near the groove (from the other edge of the panel there is a ridge) there is a strip protruding beyond the overall dimensions. This is what is intended for self-tapping screws.

Slat ceilings are very similar in design. These are the same panels, only the slats in them are made not of extruded plastic, but of metal - steel or aluminum with colored polymer coating. Although there are mirror elements made of polished metal. The slats can be alternated or used uniformly - as required by the interior design.
Metal ceilings are more interesting and durable than plastic ones, although their price is higher. In addition, such ceilings visually expand the room - this property can be useful in small, narrow kitchens.
They do the same principle wooden ceilings from the lining. Here for the frame wooden slats and they will fit. Although the same metal frame holds it up with no less success.

The tree will have to be protected paint coating, since wood is very porous and will simply absorb all kitchen fumes. Oil and wax will not work. Something with a denser and more durable film is better. Yacht varnish, for example.
Sometimes, instead of lining, they install… laminate on the ceiling. The most common laminate flooring. The idea is absurd only at first glance. In fact, it looks very interesting. In addition, the laminate is mounted without a frame, directly to the ceiling (into a ridge or using mounting adhesive), so there will be no loss in height.

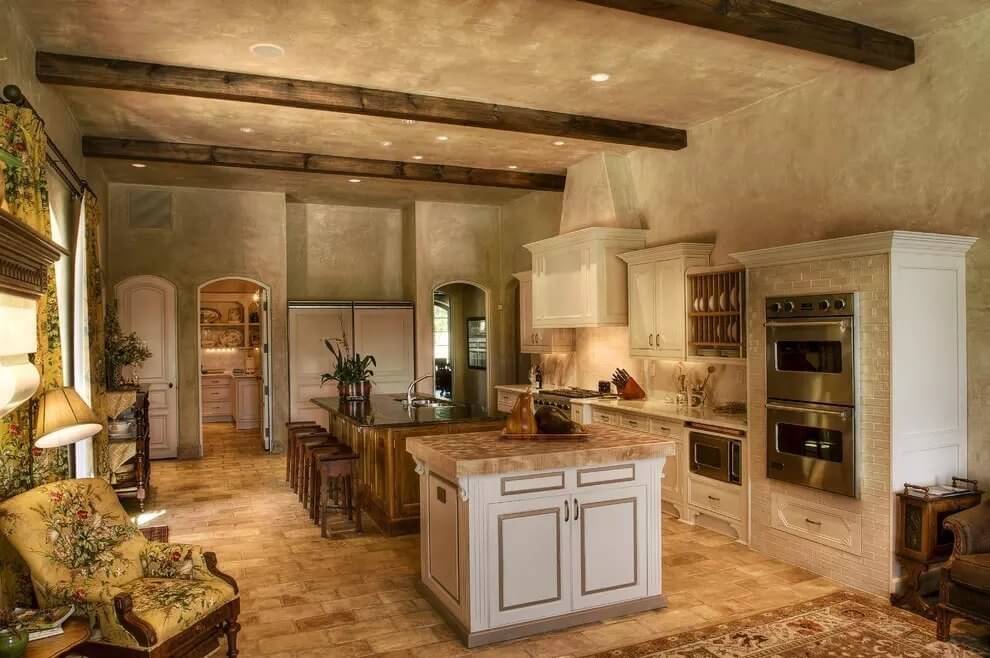
A woman's best years are spent in the kitchen. A joke, of course, but there is a certain amount of truth in it. The serious requirements that the kitchen places on the choice of material for the ceiling are not surprising: even the highest quality hood will not save you from high humidity, temperature changes and rising vapors. Are you planning a renovation, but don’t know which ceiling is best for your kitchen? Then we come to you - and offer detailed story about popular materials for decorating a room that is vital for everyone with specific photos in the interior.
About 10-15 years ago, the problem of choosing ceilings for the kitchen did not arise at all: in most cases, the imagination of property owners came down to traditional whitewashing or painting and was based primarily on the meager supply on the market.
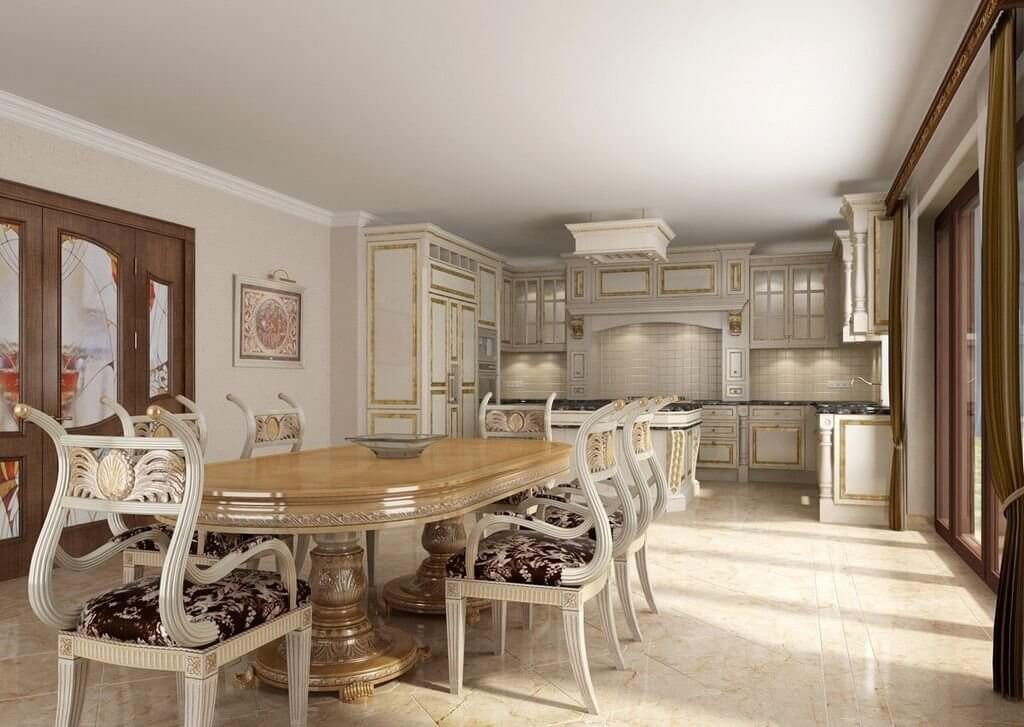
 Now the situation has changed dramatically, and there is a wide choice finishing materials is already taken for granted. Well, it’s the owners’ turn to take the emerging problem of choice for granted!


 We have already found out above that the ceiling in the kitchen is permanently exposed to high humidity air, hot steam and soot, which is inevitable during regular cooking. From this follows the obvious conclusion: when deciding which ceiling is best to make in the kitchen, you need to start first of all from the practicality of one or another option. Of course, no one has canceled the aesthetic and decorative qualities - we have not been living in the Soviet Union for a long time, which means that the ideal option would be a logical compromise between the categories we mentioned above.

 Let's consider options that are more or less suitable for the ceiling in the kitchen.

 Among the advantages of whitewashing:
 We do not recommend!

 Pros:
Pros:


 Advantages of wallpaper for the ceiling in the kitchen:


 Let us note other advantages of using plasterboard on the ceiling:
 It should be noted that it is best to make the ceiling in the kitchen from moisture-resistant plasterboard and be sure to entrust this matter to professionals. In this case, the long service life we stated above takes place in practice. In all other cases, you can quite expectedly experience problems with suspended structure.
 Recommended with reservations!


 Let's mention the other advantages of using plastic to finish the ceiling in the kitchen:
 A common version of plastic panels is rack type. These are narrow and long panels that create a pleasant atmosphere in your room and easily fit into even the most complex interior.

 Also, white plastic has one significant disadvantage - it is the fairly rapid appearance of yellowness as a result of prolonged and regular exposure ultraviolet rays. Unfortunately, this color deformation cannot be corrected.

 Otherwise, this is a current, inexpensive and very reliable option for the kitchen.
 Note to housewives: A plastic panel with a glossy surface requires more intensive care than a matte one.
 Describing all the advantages of using suspended ceilings in the kitchen will be long and boring, but we will try to be concise:

 Manufacturers today offer such a wide selection of textures that even a seasoned designer can get confused, not to mention more down-to-earth people for whom performance comes first. Therefore, if you are faced with a choice of which suspended ceiling is best to make in the kitchen, you need to familiarize yourself in advance with all the options in the advertising brochures of the relevant service provider in your city.


 Most often, the debate is around glossy and matte stretch ceilings.
The former actively dominate the market, offering a beautiful mirror effect that can visually seriously enlarge even the most modestly sized kitchen.

 The latter are very similar to ordinary whitewashed ceilings and attract less attention, inviting you and your kitchen guests to focus solely on the interior.


 What will you choose? This is a separate question that you should definitely think about carefully!


 Photo: vk.com
The kitchen area is constantly exposed to high humidity and temperature changes. This most strongly affects the ceiling, since vapors, soot, and hot air rise upward. In order not to have to deal with repairs every year, you need to make the ceiling in the kitchen with your own hands, taking into account these factors, choosing the appropriate materials.
The ceiling in the kitchen must withstand high and low temperatures, have water-repellent properties, and be easy to clean. Do not use flammable materials or materials with a porous surface. Additionally, you should take into account the possibility of flooding from above and choose a structure that can retain a large volume of water. Or vice versa, choose the type of ceiling that is easiest to restore.

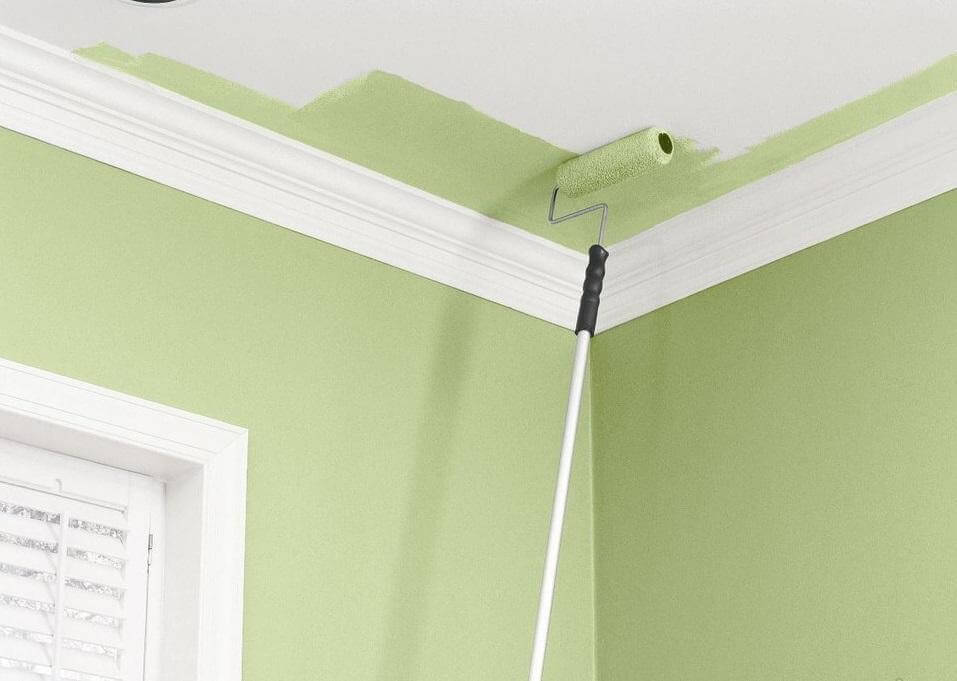
The easiest way is plastering and painting. and the painted ceiling does not fade for a long time original appearance, does not warp when exposed to moisture, is not afraid of temperature fluctuations and is easy to clean. If water leaks from above, the damaged area can be restored in a matter of hours. Both paint and putty are quite affordable, and you can do all the finishing yourself.

Plastic panels are considered an acceptable option for kitchen ceilings. They do not burn, have very low hygroscopicity, and are easy to clean. To avoid deformation from high temperatures, the panels should be fixed with movable fasteners - clamps. It is better to give preference to seamless panels with a glossy finish, on which less soot and dust accumulate. In addition, the plastic ceiling is not afraid of flooding: water almost does not pass through the tight joints and flows out at the corners of the structure.

Stretch ceilings made of PVC film are also well suited for kitchens. They look great, are not afraid of moisture and heat, are easy to clean, and most importantly, retain water when flooded. This coating also has its disadvantages: the film can be easily damaged by any sharp object, the cost of the canvas is quite high, and it will not be possible to install it yourself.


The methods described are the most practical and easy to implement. Such ceilings are easy to care for and retain their attractive appearance for a long time. Of course, a lot depends on the intensity of use of the kitchen and quality. The less evaporation, the less impact on the ceiling covering, and vice versa.
The kitchen is the room where you not only cook, but also spend most of your time chatting with family and friends over a cup of tea. That is why it is so important to create not only a comfortable interior for preparing and eating food, but also a comfortable one from the point of view of being there. In addition, do not forget that this room still has an aggressive environment, which consists of various types of fumes, and as a result - increased humidity in the room. And for the selection of finishing materials, especially those used on the ceiling, appropriate requirements must be put forward.

There are a great variety of materials for finishing the ceiling. But not all of them are suitable for use in the kitchen. High humidity high temperatures, soot in the kitchen with a gas stove - all this negatively affects the ceiling coverings, as a result, the entire appearance of the kitchen deteriorates. To prevent this from happening, when choosing, you need to consider the following:


Finding a ceiling covering that will meet all the requirements is difficult, but you still need to get at least somehow closer to the ideal.

In Soviet times, in the Khrushchev era, the most popular ceiling decoration in the kitchen was painting it with enamel. It emphasized all the irregularities ceilings, thereby giving a terrible look to the entire kitchen as a whole. Then the ceilings began to be leveled, the enamel was replaced water-based paint in different color solutions, and the look of the kitchen has changed for the better.

But time passes, fashion changes, new technologies are introduced, and in modern reality such coating fades into the background, giving the opportunity to more modern materials with the best parameters be used in the interior of the kitchen.

What kind of coating should be in your kitchen will be determined not only by the interior, but also by your wallet, because the budget for using this or that material for finishing the kitchen differs significantly.

Whitewashing ceiling tiles, whether in the kitchen or in any other room, has long been no longer relevant. New, more technologically advanced materials replaced lime and chalk. This is due to the fact that, firstly, the whitewash did not tolerate the aggressive environment of the kitchen; secondly, it could not be washed, and the yellowed coating had to be whitewashed; thirdly, the whitewash quickly began to crack and crumble. But using whitewash also had its advantages. It hid the unevenness of the ceiling well, it was easy to do the work yourself, a budget option.

Whitewashing was replaced by painting with water-based paint. This made the ceiling coating more resistant to moisture and temperature changes. It became possible to wash it. At the same time, painting ceiling tiles with paint is no more difficult than whitewashing. But the disadvantages also remain. The paint coating also begins to crack after a short time. Over time, the white color is lost. If there is high humidity or if there is flooding, the paint will peel off the ceiling. It will not be possible to partially repair such a ceiling. If cracking or peeling occurs, you will have to repaint it completely.

The ceiling in the kitchen can also be covered with wallpaper. But this is a short-lived coating, even if washable ones are used.

The disadvantages of wallpapering a kitchen ceiling are as follows:

The advantages are that:

If you still decide to wallpaper the ceiling in the kitchen, it is better to choose vinyl. Such wallpaper will perfectly hide all the unevenness, and can be easily washed with soapy water.

Nowadays finishing of the kitchen ceiling is gaining popularity. liquid wallpaper. They are more durable than regular ones and can be repaired if necessary.

Big choice will help you choose shades this type wallpaper to suit any interior, and plaque and yellowing will be almost invisible.

Very popular as a budget option. It does not require preliminary preparation; the tiles are simply glued to the ceiling. This is a durable coating, and if you choose beige-colored tiles, the yellow coating will not be visible on them.


Suspended ceiling made from moisture-resistant plasterboard will look great. It will help not only level the ceiling, but also delimit the space between the kitchen area and the dining room. With the help of such a ceiling, you can implement almost any design project, play with lighting and decor.

Advantages:

The disadvantages include the fact that when installing this ceiling, the height of the kitchen decreases by an average of 10-20 cm. Also, the finishing coating will need to be updated periodically. In addition, constant humidity can cause cracks to form at the joints of drywall sheets. To avoid this, you need to use a CD moving ceiling system, but this is not cheap. And if there is flooding, even moisture-resistant drywall will deteriorate, and the entire ceiling will have to be completely redone.


Order suspended ceiling should only be done by specialists, since its installation requires certain calculations. If done incorrectly, the entire drywall structure may collapse.

Ceilings made of plastic panels are very popular due to their practicality and durability. He is not afraid even of flooding. If one of the panels becomes unusable, it is easy to replace. Plastic panels do not require additional finishing. To complete the finishing, you will need guides, the panels themselves and a sealant that will be used to seal the joints. This is a relatively inexpensive material for finishing a kitchen ceiling.

But not everything is so rosy in the use of plastic panels. Cheap models may highlight harmful substances, especially with low heat. In addition, PVC materials tend to turn yellow when exposed to sunlight. The surface of the panels must be washed frequently, since if the grease dries, it will be difficult to wash it off, especially since abrasive substances can scratch the surface.


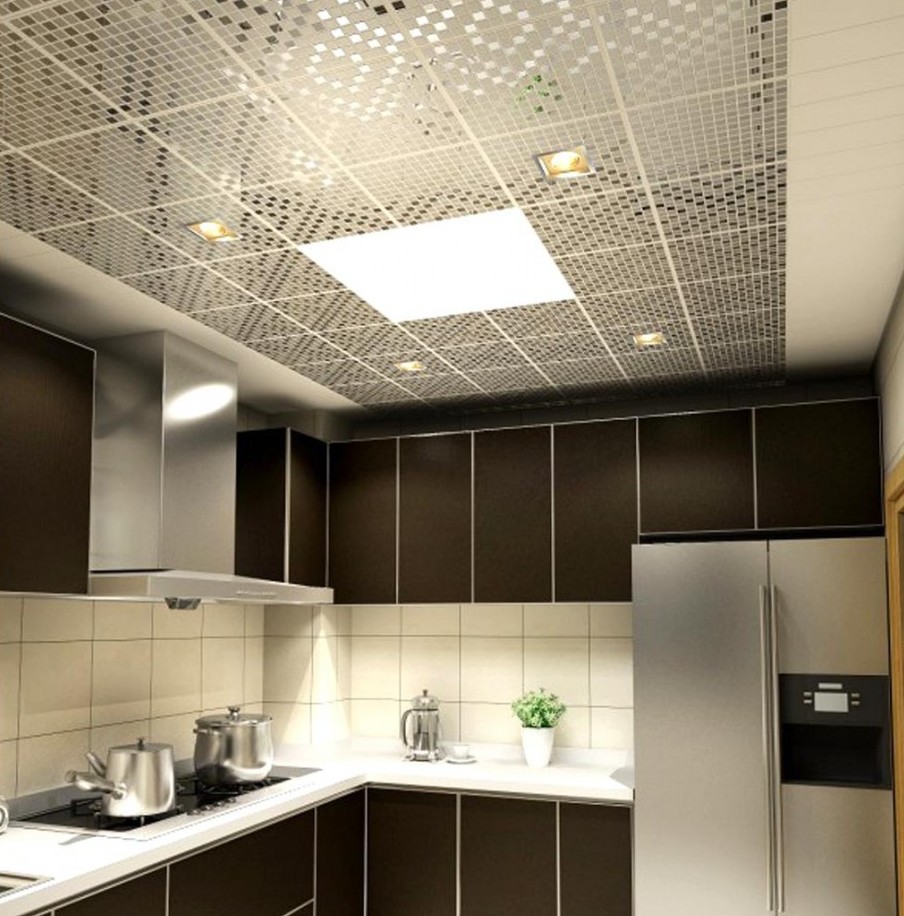
The use of slats is another option for finishing the ceiling in the kitchen. Depending on the chosen design, you can apply this material white, beige or metallic colors. The slatted ceiling can be plastic or aluminum, and the latter option is preferable for the kitchen, but it is also more expensive.


Typically, this arrangement system with closed seams is used in the kitchen. This is due to the fact that fat and fumes will accumulate in open seams, and washing them out is very problematic.

You can assemble this type of ceiling yourself. It is made in the form of a designer.

Stretch ceilings are gaining more and more popularity every day, including in the kitchen. But installation of this structure can only be carried out by a specialist using certain equipment.


As a result of installing a stretch ceiling, we obtain a coating that meets the following requirements:

But there are also disadvantages here:

When installing suspended ceilings, you should only contact well-known specialists who have positive experience in performing this type of work, since the installation is carried out using gas cylinders and there are frequent cases of explosions.


If you decide to install suspended ceilings in your kitchen, you will be offered many options in different colors and textures.

But the main question is which surface to choose for the kitchen, glossy or matte.


Glossy ceiling kitchen space is now at the height of fashion. It can act as the main accent in the interior, but fit it into all options design solutions Not sure it's going to happen.

You should choose a ceiling for your kitchen after carefully weighing all the pros and cons. According to reviews, the majority vote for the use of tension covering. This is due to the fact that, unlike the others, it is much more practical, it can be chosen to suit any kitchen. But you can use other options. It just depends on your personal preference.

Choosing a ceiling for the kitchen is an extremely important matter. We spend a lot of time in the kitchen, there is always a lot of activity here, and we want the walls, appliances, stools with a table, and the ceiling to be the most beautiful. But moisture, grease, soot and endless drafts will sooner or later reach the very durable coating, so when renovating a kitchen, there simply shouldn’t be any small details. It’s easy to get confused among the types of materials for construction purposes, so many people are tormented by the question - how to make a ceiling in a brand new kitchen?
The kitchen in the average apartment is a high-risk area.
When choosing which ceiling to give preference to in the kitchen, you need to take into account several factors:
Today, there are more than a dozen different types of ceilings for kitchens, and each of them has its own advantages and disadvantages. Let's look at the most popular and practical options.
When deciding which kitchen ceiling is the best, when renovating, most people still give preference to the good old classics - a white plastered surface. This coating has many advantages, but it also has its own nuances.
Pros:
Of the minuses:

Paint on the kitchen ceiling - great option, if the surface is sufficiently smooth. The main thing is to buy a quality washable repair product.
Pros:
Of the minuses:

Washable wallpaper for kitchen ceilings is a fairly budget option and an opportunity to implement various design ideas ceiling. Today, this option for the kitchen is being chosen more and more often.
Pros:
Of the minuses:
There are practically none; problems will arise only if you buy ordinary ones for the ceiling. paper wallpaper: with high humidity and drafts, they can peel off at the top.

Inexpensive and attractive polystyrene foam tiles have already reached the peak of fashion, but many still stop at this option when deciding what kind of ceiling to make in the main room.
Pros:
Of the minuses:

Coverings made of slats and PVC panels are almost the most popular types of ceiling for a dining room today. These materials have a lot of advantages and virtually no disadvantages.
Pros:
Of the minuses:

Today in stores you can find quite unusual material For ceiling repair: tiles different types: pressed, extruded, laminated, injection.
Pros:
Of the minuses:

Plasterboard (or false) ceilings are most often made by those people who dream of implementing the most daring interior ceiling ideas in the dining area.
Pros:
Of the minuses:

Stretch ceilings in the kitchen are the choice of those who want to get the most spectacular and unique cuisine. This coating is at the height of fashion today, and every year there are more and more supporters of suspended kitchen ceilings.
Pros:
Of the minuses:

The modern repair market offers all sorts of options. ceiling coverings for any buyer. All that remains is to evaluate your financial capabilities, decide which qualities of the future ceiling are most important to you, decide on the design - and choose perfect material for the future shelf will not be difficult.


