![]()
![]()
![]()
![]()
![]()
![]()
![]()
![]()
![]()
![]()
![]()
![]()
![]()
![]()
![]()
There are many reasons why a house has to be built on a site with high groundwater. But the consequence is always the same - if you do not install protection against flooding, then every spring water will flow to the site, eroding the soil, foundation and basement of the house.
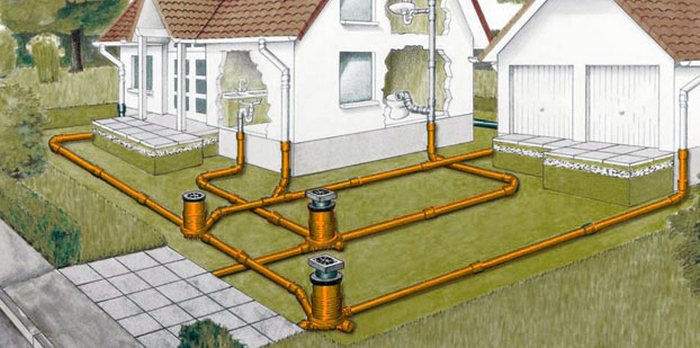
It will help you solve the problem correctly installed system drainage and storm sewerage. If the groundwater level is known at the stage of purchasing the site, then it is most profitable to plan the arrangement of drainage and storm water along with the construction of the house itself. In such cases, you can save money and make stormwater and drainage in one trench.
![]()
Carrying out stormwater and drainage sewer Even at the construction stage, you can get rid of many problems in the future Source pro-remont.org
The main task of a “storm drain” (i.e. a storm system) is to collect water from the roof – rain or melt water – using interconnected gutters and pipes. The storm drain consists of two parts - external (gutters under the roof) and underground (receivers and pipes that drain water from the house). The part that is located in the ground receives water from the roof and blind area, and then is discharged from the site.
Drainage sewerage is needed to collect excess water from the ground, i.e. drain it. The main task of drainage is to prevent the groundwater level from rising and to prevent flooding of the site.
Since both systems provide for the discharge of water into special storage tanks, the combined scheme of drainage and storm water looks very attractive in terms of functionality and economy. The collected water can be used for technical purposes, such as irrigation.
It is important!“In the same trench” does not mean that the same pipes are used for stormwater and drainage. This scheme is strictly prohibited for the reason that during seasonal increases in the amount of precipitation, the storm drain is systematically overfilled. If the same pipe works as a drainage pipe, then at best the drainage will temporarily cease to function.
The systems have completely different structures, with only pipes and wells having similar elements. At the same time, they differ not only in structure, but also in the method of installation.
It is located only underground, and therefore belongs to the closed type of sewer systems. The only elements that are partially located above the surface are wells.
![]()
There are several factors that determine whether a site needs a drainage system or not. It is done in the following cases:
if the aquifer is located high enough on the site;
the soil is clayey or loamy;
floods often occur in the area where the site is located;
settling in buried foundation;
The site is located in a lowland.
If one of these conditions is met, then most likely without drainage there will be problems with flooding or high humidity basement and foundation.
The drainage system consists of the following elements:
Drains(drainage pipes for sewerage, made of geotextile and having perforations through which water enters the drainage).
Sand traps(prevent pipes from becoming clogged if silt and sand frequently enter).
System drainage. Conducts water purified from silt and sand directly into drainage wells.
Several types wells.
After the wells, where the water is purified, it enters a common storage tank, and then it is either used for personal needs or discharged into the waste system.
Materials from which drains are made:
Plastic. Durable, not very expensive, very strong and resistant to low temperatures.
![]()
This is what a plastic drainage intermediate well looks like Source kostroma.moydom.ru
On our website you can find contacts of construction companies that offer design and installation services for water supply and sewerage. You can communicate directly with representatives by visiting the “Low-Rise Country” exhibition of houses.
Asbestos cement. Cheap, but very short-lived - after just a few years, growths may appear on asbestos-cement pipes.
Ceramics. Before the advent of plastic, ceramics were the best option
Standards pipes:
marking SN 2-4 (depth up to 3 meters);
marking SN 6 and what goes above for depths up to 5 meters.
An example of arranging a drainage system is shown in the video:
“Storm drain” consists of two parts – upper and lower. The system includes:
gutters, into which water enters from the roof, and which lead it further;
funnels and vertical pipes. Water enters the funnels and then flows through vertical pipes into the lower part of the “storm drain”;
clamps to strengthen pipes when connecting them;
tees and swivel elbows, which connect horizontal and vertical pipes with each other; a funnel can also be attached there;
wells.
The system is assembled like a construction kit; you need to draw up a drawing of the system, carefully fasten the parts together and get a finished storm drain.
The most common types of gutters used are: materials:
galvanized iron;
plastic (PVC).
What the storm drain will be made of is selected depending on the structure of the house, its architecture and the material from which the roof is made. You can add mesh and anti-icing cable to the gutters to prevent ice from clogging the water outlet in the spring.
![]()
Arrangement anti-icing system on the roof of the house Source rmnt.ru
For the manufacture of intermediate and main wells, the following materials are used:
PVC(expensive but very effective option);
Brick and stone(durable, but must be assembled correctly);
Reinforced concrete rings(difficult to install);
Their design is exactly the same as that of a closed drainage.
The entire system is installed in one trench. The drainage and storm sewer scheme on the site is quite simple. Through the junction tee, water from the outside and inside (precipitation and groundwater) will flow into the drainage well.
Drainage pipes run throughout the site, collect water and then it is discharged into wells, where it is pumped out of the site. In the “storm drain”, water is collected and discharged into a collector drain, after which, through the well mentioned above, it enters the main pipe system, which exists independently of the drainage, but in one trench (perforation is not needed for the storm system). Through the main pipe system, water enters the bypass well, in which, just like in the drainage, it is pumped out by a pump.
![]()
Usually the main well is located at the lowest point of the site and water from it has to be pumped out with a pump Source dp32.ru
Connecting stormwater and drainage systems is very beneficial, all that is required is a wide trench, all that is necessary is to designate a place for a drainage main, in which water from both systems will flow along different paths so that they are not overloaded.
Through the junction tee, water from the outside and inside (precipitation and groundwater) will flow into the drainage well.
Storm drainage: point drainage. Point elements are necessary for collecting precipitation, be it rain, melted snow, or melted hail. Water can be sent through gutters to the drainage system, and then sent into special ditches with grates, through which water will be removed from the site. This is very important when the building is located on a slope, since when choosing correct angle there will be no need to build additional gutters, but discharge water directly into the ditches.
With linear drainage, water is discharged through gutters and funnels into a special main system consisting of pipes that are suitable for drainage and storm sewerage. Further along this main system, the wastewater enters the collector, and then, depending on the project, the water may go into a storage tank, or maybe beyond the site.
![]()
At deep drainage, water from rising groundwater, gradually, in separate parts discharged into the well, and from there it is pumped out and discharged. This system has 3 types:
Horizontal;
Vertical;
Wall-mounted. If there is a basement in the house or ground floor, it is necessary to drain groundwater from them. Wall drainage works most effectively - a moisture collector is installed near the walls, and the wall itself is carefully waterproofed.
Both systems require regular inspection and cleaning of silt, sand, clay and other debris. Seasonal inspections are required - in late autumn when the rainy season ends and at the end of winter to ensure that the drainage capacity is not compromised. Despite various filters, sand traps and debris nets, dirt still gets inside. They are found everywhere: in pipes, gutters and wells. If left unattended, the system will simply become clogged and stop functioning.
![]()
Timely cleaning of the pipes of the drainage and storm water disposal system at the dacha will avoid many problems Source dp32.ru
To clean the pipe, just turn on the pump at maximum power and run ordinary water from a hose through the pipes; it will collect all the dirt and bring it into the well. You can pour water into the gutters and it will also collect all the dirt and then flow through the vertical pipes. The stronger the pressure, the more dirt and debris will come out.
Already in the pump, all the water is pumped out with an even more powerful pump or suction pump; when all the water runs out, it will be necessary to clean the walls. Most often, this ends with flushing, but if the system has not been looked after for a long time, it happens that you have to manually clean the walls and bottom of the well using a scraper. Therefore, regular cleaning is necessary to ensure that both systems operate reliably.
Proper installation of a combined system must be carried out according to a pre-created project, which specifies the nuances regarding connection to the site and synchronization of the operation of wells, so that both drainage and stormwater work properly both in normal mode and during overload.
When installing, the following nuances must be taken into account:
Arranging a drainage system is quite an expensive pleasure. If something goes wrong and after a few years the drainage stops working, then you will have to spend no less money to restore it than to install a new one, especially considering that you will have to “pick it apart” landscape design. As a result, drainage installation should be done by professionals.
During the flood period, each of the systems will be overloaded. Since they collect moisture from different sources, drains must be laid for each system separately. This can be done in one trench, but different depths. A common well can be used to collect water.
When digging trenches for drains, you should definitely take into account that the bottom of the hole will be covered with crushed stone and sand. This means that if it is necessary to place a drain at a certain depth, the hole must be dug deeper to the thickness of the layers of sand and crushed stone.
![]()
The pit for the drainage system well must be deep enough Source besplatka.ua
Typically, water is collected in a storage tank (pit or reservoir), from where it is used for technical needs or pumped into reservoirs or simply away from the site. If perforated pipes are used for drainage, the outlet pipes are always solid. When combining them vertically in one trench, the perforated ones are laid on the bottom, and the regular ones on top.
If main and drain pipes are combined horizontally in a trench, then they are laid parallel, at a short distance from each other (so that if the main pipe is damaged, water from there does not enter the drainage system and overload it).
About the installation of a stormwater system and drainage in the following video:
Reading time ≈ 3 minutes
High-quality storm drainage is important system private house. It ensures rapid drainage of melt or rain water, eliminating their accumulation in the ground around the building. The presence of such a system prevents premature destruction of the foundation and the formation of puddles in the yard. There are both budget and more expensive and reliable options for storm drainage. You can install each of them yourself.
The production of storm drains, as in the photo, must begin with drawing up drawings, defining optimal type system, selection of its components. The most simple solution is the installation of ground gutters made of concrete, which will drain precipitation outside the area being developed. This system is optimal for small country houses.

Storm drainage can be laid with your own hands and underground or have combined type(ground + underground). It is optimal to carry out work on the installation of such systems immediately after the construction of a house or when arranging a yard adjacent to the building. Naturally, removing asphalt or tiles to make a storm drain is inconvenient: the procedure will take too much time and lead to a significant waste of money.

The storm drainage system created at the dacha or near a private house should consist of a roof drain and pipes/gutters on the territory. Therefore, the main elements of the system include:

For underground installation, it is recommended to use metal-plastic pipes: they have a long service life, are reliable and affordable. Downpipes are usually made of steel and covered protective paint. Sand traps, trays and gutters can be made of concrete, plastic, steel.

First of all, the owner must draw up detailed diagram, which will indicate the locations of the elements. Additionally, you need to calculate the required number of pipes, sand traps, and water inlets. Next, install the storm drain according to the following instructions:

To ready system coped with the assigned tasks, it is necessary to take into account the characteristics of the region when choosing elements. For areas where rain is a common occurrence throughout the year, it is recommended to use drainage components with increased dimensions. Otherwise, problems with water drainage may occur.
Sometimes for a summer resident the long-awaited rain at the height of the season becomes real natural disaster. As a result of a prolonged summer rain, as well as during a spring flood, a real lake may form on the site.
In order to avoid stagnation of water, a system for collecting and draining it from the territory is needed. If you build a storm drain with your own hands, then the costs of its construction will be minimal.
The article presented for review details the principle of the drainage system. atmospheric water, the components of the structure are described. We will tell you how best to build it and how to maintain it. Taking into account our advice, organizing a storm drain will not cause the slightest difficulty.
Storm drainage is a specific design. The water discharged through this system contains both small and large debris. Therefore, there must be primary cleaning in the storm drain.
The system may differ in the volume of water it is able to accept, design, and duration of effective operation.
Image gallery
Storm sewerage is a system of canals, water inlets, sand traps, inspection and collector wells built in the ground. It is designed to collect and drain rainwater from the territory.
The installation of a storm drain will prevent watering of the site during flood periods and during heavy rainfall, which is especially important for areas with clay soils
The storm drain will protect the underground parts of structures from erosion by water and will prevent subsidence of the foundations due to eroded soil underneath them.
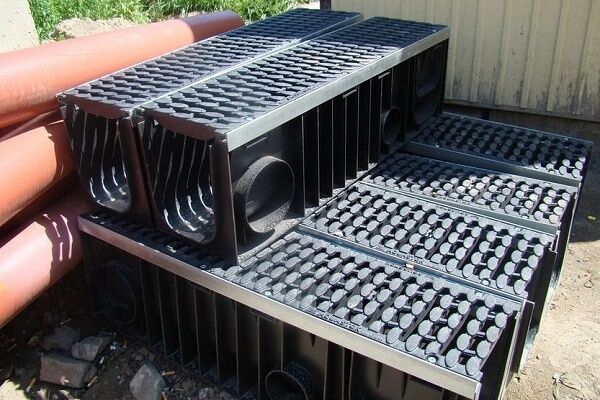
A wide range of components are now produced for storm sewer installations, from which you can easily assemble a system of any degree of complexity
Point storm water inlet
Construction of canals and installation of storm water inlets
Protecting the foundation from weakening
Components for assembling a storm system
Based on the design of the system, 3 types of storm drains can be distinguished:
Storm drainage of the first type is made in the form of drainage trays built into the coating. Through them, water flows to a specially designated place or is simply drained into the garden. The second type of system is located below the zero point, which requires significant excavation work and corresponding financial investments.
Surface drainage can fit perfectly into the landscape design of a dacha, and even become its decoration. Use the system in small areas
Such a storm drain is installed mainly during the development of a site, since it is a freezing option that is easier to implement. The system is not buried very deeply - up to a meter maximum, but both in winter and in early spring it is not involved in work.
To prevent the sewage system from freezing, the pipes are buried below the freezing point. With the third type of storm drainage, the sewerage elements are partially located both on top and in the soil.
Experts say that the choice of such an expensive option as a closed storm drain must be justified. This decision can be justified by high requirements for territory design
Storm drain design is always individual. It is unlikely that there will be areas with absolutely similar conditions. They will always differ, if not in relief, then in layout, soil properties, and the number of outbuildings.
Storm drains are needed both at enterprises and in private properties. The difference in their design is that large-scale systems are combined with the discharge of treated water, which is used for the needs of the enterprise
Storm drainage can be point or linear. The first option involves collecting water from surfaces that do not absorb moisture, such as the roof, hard surface areas. The wastewater then flows into receiving tanks, and then enters the drainage system.
With the linear method of drainage, water is drained into trays located near paths and platforms. A simplified version of a storm drain consists of the following elements:
All elements included in the system are equally important. If any of them fails, the efficiency of the entire structure decreases.
Image gallery
Point storm inlets are designed to receive precipitation at one point. They are cheaper and easier to install, but require underground pipes to carry water into the sewer system
Point-type rainwater inlets are positioned so that they receive water collected from the roof by the drainage system. Sometimes at these points the storm drain is even connected to the drain
The drainage of rainwater collected by point sewerage is carried out through a pipeline laid in the ground. This circumstance minimizes the priorities of simple installation of storm water inlets
The disadvantages of a point storm system are the possibility of soil subsidence with a change in the slope of the pipeline, the difficulty of determining a leak if it occurs, and the need to protect the pipes in the form of paving a developed area
Point type storm water inlet
Connection to drainage system
The principle of point sewerage
Paving a storm drain area
The purpose of a rainwater inlet is to collect moisture coming from pipes and yard coverings. This element is the first to absorb the entire volume of water coming from the drainpipes. When choosing a rainwater inlet, we are guided by such data as the average volume of precipitation, its intensity, topography, and the area occupied by the storm drain.
Image gallery
The method of installing a storm sewer depends on the type of water intake device chosen for its construction
A system with point water intakes located directly under the drain risers is arranged in the form of pipes laid in the ground
A storm drain with linear water intakes is a network of channels covered with a grid made of steel alloy, plastic or cast iron, depending on the required load-bearing capacity
Both point and linear water intakes are covered with protective and decorative grilles. They are needed for ease of movement around the site, preventing accidents and protecting the system from clogging with leaves, branches, dust
Storm drain with linear water inlet
Point rainwater system
Installation of storm drainage trays
Protective decorative grille
You can buy a cast iron or plastic storm inlet. The former are preferable in case of heavy loads, while the latter are attractive due to their moderate cost, low weight, simplifying installation. More cheap option- make a rainwater well for storm drainage at your dacha yourself from brick.
The walls of the pit are lined with brick, leaving a hole for the pipe, then plastered from the inside. Better yet, leave a gap between the soil wall and the cover and fill it with concrete. The bottom of the rainwater inlet must be concreted.
No storm drain can do without a rainwater inlet. It preserves both the foundation of the building and the covering around it. If you try to save money on its installation, then water falling on the foundation will lead to shrinkage and cracks on the walls of the building
Do this important element and from concrete rings. Then the bottom ring can be purchased with a finished bottom and you won’t have to fill the slab. Sometimes factory rain inlets go on sale complete with a basket, siphon, and decorative grille.
Most often used for private construction, storm water inlets made of plastic or composite materials They are produced in the shape of a cube, each side of which is 30 -40 cm. There are adapters for inserting pipes from below and on all sides of the product.
In order not to clog the pipes with debris falling through the grid cells, rainwater inlets are equipped with baskets. Once they are full, they are removed and cleaned, then returned to their place.
The design of the factory rainwater inlet includes partitions dividing it inner space into compartments and creating a water seal. As a result, the unpleasant odor from decaying organic matter does not penetrate outside.
The efficiency of a point storm drain depends not only on its volume, but also on the installation location. It should be located under a drain or in a place where moisture constantly collects. If it is installed under a pipe, then the jets must accurately hit the center of the grate, otherwise some of the water will fall on the foundation or yard surface in the form of splashes.
Rain and melt water in any case contains a certain percentage of insoluble particles. If sand traps are not included in the scheme, dirt will settle in the sewer and it will cease to function fully. Flushing the system is expensive.
A sand trap is a chamber installed behind point receivers in places where water is discharged into underground pipes. It is designed in such a way that the flow of water entering it reduces its speed.
As a result, under the influence of gravity, suspended particles sink to the bottom, and the liquid released from them leaves through a special hole. The shape of the sand catcher is a trap with many chambers located horizontally or a chamber in a vertical design.
Image gallery
Point storm water inlets are equipped with devices for retaining sand and filtering water. In fact, such a system does not require additional sand-collecting components
In combined stormwater systems, sand traps are installed in linear sections and before discharge into the collector/absorber.
The dimensions and volume of sand traps depend on the volume of collected water and the class of the storm sewer itself
Regardless of the size, all types of sand catchers are equipped with devices for collecting sand, allowing you to empty the device in a simple and accessible way
The sand trap is built into the rain inlet
Sand traps in combined systems
Sand catcher for public storm drainage
Trap device for household system
If the blind area around the house has already been completed, but the drainage system has not been taken care of, drainage gutters, which are also called linear rainwater inlets, can be used as a way out of the situation. Channels made of concrete or plastic are laid outside the blind area parallel to the paths and roof overhangs with a slight slope.
In linear drainage channels Water comes in from roof gutters and from the entire yard covered with asphalt or slabs. Such a sewer can cover much more objects than a point one. When purchasing ready-made trays, you need to pay attention to the following: important parameters‚as permissible load class and mechanical strength limit.
The tray, at first glance, is a very simple product, but if the calculation is done incorrectly, the system will not work fully. It is necessary to take into account the throughput of the storm drain, the type of coating, and the degree of contamination of the drained water.
The weakest products are marked A15. This means that their use is permissible when maximum load up to 1.5 tons. They are installed around the perimeter of the house, in pedestrian and bicycle areas. Trays of class B125 can handle loads of up to 12.5 tons without compromising their integrity. They will not be damaged under the weight of a passenger car, so they are appropriate in the garage area.
For private construction, you should not buy massive concrete gutters; plastic trays are quite suitable here. They have strength classes A, B, C. The material for their manufacture is polyethylene or polypropylene.
An important parameter when selecting trays is the hydraulic section, denoted by the abbreviation DN. It must correspond to the diameter of the pipes supplied to these elements. For plastic gutters, the DN value ranges from 70 to 300.
The length of the standard tray is 1 m. The products are equipped locking system With its help, gutters can be lined up in one line, connected to pipes or made into branches. A rational choice for a summer house, private home - models from DN100 to DN200.
Image gallery
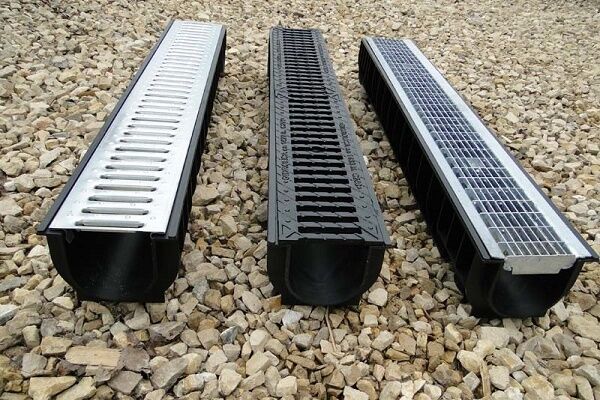
Manufacturers of kits for assembling storm sewers offer a wide selection of trays, differing in throughput and material used in manufacturing.
To equip areas with pedestrian traffic, storm sewer system components are made from galvanized steel. This is not the most durable option, attracting mainly due to its simplicity of construction.
Concrete and polymer-sand products will last at least 50 years. They handle transport loads without problems, including the weight of cargo units. However, due to the weight of the trays and the need to use construction equipment for installation, they are rarely used in the private sector
Trays made of frost-resistant polypropylene are actively in demand in the landscaping of suburban areas. They do not deform and do not lose strength in the range of -40º - (+65º) C. Ideal for self-improvement of the territory
Trays with different capacities
Construction of a storm drain from steel parts
Concrete gutters
Practical plastic option
For storm sewerage, according to SNiP, pipes made of metal, asbestos or plastic can be used. Most often, for private homes and cottages, the choice is made of plastic pipes. They are lightweight, decorative, do not corrode, their installation is simple, but the mechanical strength of the material is low compared to metal.
Having chosen the material, you need to decide on the diameter of the pipes.
The initial value is the largest volume of drained rain and melt water. This parameter is determined by the formula:
Q=q20×F×Ψ
Here: Q is the required volume, q20 is the coefficient characterizing the intensity of precipitation within 20 seconds. (l per second per 1 ha). F is the area of the farmstead in hectares, if the roof is pitched, the area is calculated on the horizontal plane. Ψ - absorption coefficient.
Different surfaces have their own absorption coefficient. For execution independent calculations its value can be taken from the table
Based on the calculated value and using the Lukin tables, not only the diameter but also the slope of the system is found.
At correct selection diameter of the pipes, the storm sewer will cope with the task even in moments of the heaviest rainfall. If flows from several gutters enter the pipe, they are all summed up. Professional practitioners for pipes with a cross-section of 110 mm and gutters of the same diameter usually use a slope of 20 mm/linear. M.
If the pipe is connected to a storm inlet, the slope value is slightly increased to avoid stagnation of liquid, and when entering the sand trap, the slope is reduced. This slows down the flow of water, and suspended particles settle to the bottom in greater quantities.
Water in a sewer system of this type drains by gravity, which occurs due to the formed. There are no pressure pumps here, so you don’t have to look for a team of professionals to install a storm drain at your dacha or country yard.
The owner can do all the work himself. It is written in detail about the calculations for organizing storm drainage, the contents of which we recommend that you familiarize yourself with.
As in any system consisting of underground pipes, there must be a well in the storm sewer.
Its installation is advisable in the following circumstances:
Wells are also provided at established intervals of straight sections of the system. If the diameter of the well does not exceed 150 mm, then the next one is located at a distance of 30 to 35 m. With a diameter of 200 mm - from 45 to 50 m, and if the diameter is 0.5 m, the interval is increased to 70-75 m.
The diameter of a well in a private house does not exceed 1 m. The deeper the well, the larger its diameter should be.
Some owners lay out wells the old fashioned way from brick or reinforced concrete rings. Others prefer more advanced materials - plastic and fiberglass. By design wells are either collapsible or solid.
They have the shape of a cylinder with a completely sealed bottom and a hole at the top. There are nozzles for connecting pipes. Several assembled storm water inlets are also used as wells.
All fluid flows are redirected to the collector after combining them into one. The choice of material for this storm drainage element is individual and depends on the preferences and capabilities of the owner
To redirect the collected water to ground treatment facilities or to a sewer, a collector is included in the system. Sometimes his role is played by a big one. It is converted into a storage tank by hermetically sealing the outlet pipes. To use water, a submersible pump is used.
Large cross-section pipes are also used for the collector - reinforced concrete or plastic with all pipelines connected to them. On construction market You can also purchase a ready-made container for underground use. There are multi-chamber tanks where rain and melt water are treated according to the same principle as in septic tanks.
Image gallery
If the site does not have conditions for the disposal of collected water into the ground, then storm water is redirected to a public system or an off-site drainage ditch.
If the conditions and size of the site allow, the collected rainwater is disposed of through an absorption well. When constructing a well in sandy loam soils, the walls are assembled from perforated rings to increase the outflow rate
An almost free, but quite suitable option for discharging rainwater is a filter well made from old tires
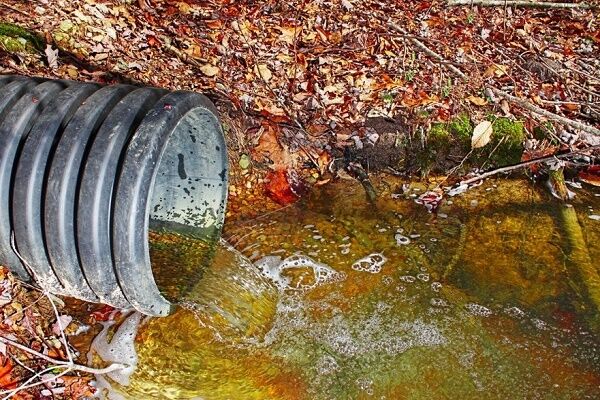
The easiest way to collect and drain rainwater is into a public drain. It doesn't need serious cleaning
Collector well for redirecting water
Absorption well made of perforated rings
Budget option for an absorption well
Discharging rainwater into a drain
The storm drain is installed using the same technology as a conventional sewer system. In any case, the installation of a storm sewer system is preceded by calculation and selection of necessary materials. Before rainwater enters the pipes, it collects on the roof of the house, so it is logical that the construction of a drainage system begins from the top point of the building.
To install gutters on the roof, mark the upper and lower points, between which a fishing line is pulled. Gutters will be installed along this route taking into account the slope. The direction of their installation depends on the location of the drainage pipes.
To fix gutters and pipes, brackets are installed, securing them with self-tapping screws. To ensure that water gets into the drain, funnels are needed at the lowest points. When assembling trays and pipes, sealant is applied to the joints. Sometimes there are factory seals on the edges of the parts, then when they are joined, a tight connection is obtained.
Water collected from the roof by gutters is carried through vertical downpipes into the storm drain. The cycle of work on installing a linear storm drain, regardless of its technical complexity, includes a number of traditional stages, these are:
Image gallery
We are developing a trench for the installation of storm drainage. We dig the soil by hand, destroy the asphalt with special equipment or an ordinary crowbar
We fill the bottom of the trench with moving concrete to the depth of the tray so that the tray shelves are flush with the surface. We give the bottom of the trench a slope of 2 - 3 cm per 1 m. The slope should be directed towards the collector well
Having beaten off the storm sewer lines with twine stretched between the pegs, we assemble a system of trays with a protective and decorative grille. We level the channels according to the design slope figure until the concrete begins to harden
We install sand traps in the places indicated in the project and connect them to the channels laid in the trenches
We construct formwork from boards along the side of the trench and pour concrete mortar between it and the tray laid in the trench
While filling the free space in the formwork with concrete, we level the poured mass. At the same time, we check the slope and, if necessary, adjust the position of the trays
We expect the solution to harden for at least 14 days, it is better to wait 28 days. At this time, it should be covered with polyethylene and periodically sprayed with water.
Upon completion of the technological break, we dismantle the formwork, level the site with sand and gravel, pave it with paving slabs or the coating of your choice
Stage 1: Development of the trench manually or using machinery
Stage 2: Laying concrete mortar at the bottom of the trench
Stage 3: Assembling the storm drain tray
Stage 4: Installation and connection of sand traps
Stage 5: Construction of formwork and pouring concrete
Step 6: Leveling the System During Pouring
Step 7: Process break for hardening
Step 8: Paving the site with the selected surface
The first step is to mark the pipeline, consisting of channels, receivers, and wells. Pegs are driven in at the locations of all elements. To see the full picture, a cord is laid between the pegs. The second stage is digging a trench and small depressions for storm water inlets. A sand cushion is placed at the bottom.
If there is a threat of roots growing in the places where the pipeline is laid, the bottom is covered with geotextiles. The installation process begins with the installation of wells and collectors.
Next are smaller elements - rainwater inlets, sand traps, trays. All this is combined with pipes of the calculated diameter under a slope selected from the table or recommended by SNiP. When laying the pipeline, sagging is unacceptable.
The assembled structure is tested. Water is poured onto each section to check the tightness of the joints. The amount of water poured in and out should be approximately the same. A defect such as sagging may be detected, which will be indicated by a significant difference in the volumes of water at the inlet and outlet.
If tests do not reveal problems, the system is covered with a sand-cement layer and soil. Sometimes some parts of the storm drain are combined with the drainage system. In this case, the pipes of the first must be on top of the second pipeline, but they can approach the same collector.
To ensure that the area does not turn into a swamp after each rain, and the foundation is not washed away by seasonal flows of melt water, it is necessary to ensure the removal of excess moisture. Equipped with your own hands will cope with this perfectly. It’s not difficult to make one on your plot or dacha, it’s just important to correctly calculate the quantity necessary materials, view and select the appropriate storm drain design.
Few people doubt that the installation of a storm drain is a necessary process, because melt and rain flows destroy not only the foundation and paths, but also significantly impoverish the soil. In terms of its design, the storm drain represents the following set of elements:
The latter is worth talking about separately, precisely because the issue of discharging excess water arises very often and in all its “completeness.” There are three possible solutions:
There are three types of system:
Important! Before choosing a specific type of storm drain, it is necessary to carefully study the area: the level of water saturation of the soil, the amount of precipitation, the possibility of laying a pipe system, the terrain, the building plan, etc.
But what needs to be done is to divert the water from the house as far as possible. Let this be the simplest option: installing trays on the roof and gutters to drain streams onto the lawns, as shown in the photo, but the foundation will not be washed away in the event of prolonged rains. If there is a large area paved with tiles (a parking lot), you will have to install a storm drain here too, since puddles accumulate in such spaces, which are difficult to deal with. Several water collection points, equipped with point rainwater inlets, will relieve all worries.

In a private house or country house, sometimes it is necessary to install several drainage systems: sewer, drainage, storm water. Sometimes all systems run in parallel without touching each other, so the desire to combine a storm drain with any structure, while saving on materials, is quite great. For example, use an existing well. But this is not necessary for the following reasons:
As a result: storm drainage in a private house or country house must be a separate system, have its own well/reservoir or natural reservoir for discharge.

All structural elements must be connected into one system, which can consist of a storm drain:
Advice! If there is little rain in your region, then a regular tank is ideal as a reservoir. plastic barrel, buried in the lowest place on the site. It’s convenient to draw water from it, and the tank costs a penny
Important! The receivers are taken outside the blind area, the second end of the trays is connected to the receiver - this The best way remove the water and not disturb the blind area
Important! The diameter of stormwater pipes depends on the power and saturation of precipitation and the branching of the network. Minimum diameter the figure is considered to be 150 mm, the slope level should not be less than 3% (3 cm for each meter of pipeline)
A storm drain in a country house or country plot may not contain all the elements, but they can be used to build a sewer system to drain flows of any complexity and configuration.

First you need to think through the project. If you don’t want to turn to the services of professionals, you can do all the constructive and schematic work yourself in one of the programs or even on a piece of paper. This makes it possible to more accurately understand and correct location all elements. Afterwards you will have to purchase materials and then begin work.
How to make a storm drain with your own hands correctly:
Important! Installation of a storm drain requires lifting the ground, so it is best to carry out the work process simultaneously with the arrangement of drainage and sewer systems, which are also then completed by laying paths and blind areas
These are the main steps, but as shown in the video, you will need to install trays along the paths and linear sewers to remove flows.
You can do without complex structures, even if rain in your region is not the best a rare event. If the soil absorbency is good, it is enough to equip under-roof trays and bring them to the end vertical pipe. At the bottom of the pipe, install a reservoir (barrel) where the water will accumulate. And then use the liquid for irrigation and other technical needs. If the soil absorbency is low, add a point rain inlet at the lowest point of the site and dig a barrel there; gutters for runoff from paths and roofs also go into the barrel. And that’s it, the storm drain is ready. Options for arranging the structures are in the video, and making the simplest system with your own hands is not difficult even for a novice home craftsman.
Storm drainage is a system for collecting and discharging Wastewater. If we consider such a system on the site (it can be installed around the house), then this is not just drainage, but a whole network of branches that collect, filter and accumulate water that fills the yard suburban area. If there is no rainfall, then all the precipitation will flow towards the house, gradually destroying the foundation and the adjacent area. "You can look in our article."
The standard storm drainage system is quite simple: a system of above-ground/underground channels that intersect with each other in several places. The intersection points are called watersheds.
Designed in parallel with l storm sewerage. It is also advisable to carry out the arrangement at the same time. The elements of the deep drainage and stormwater system are placed parallel to each other (in the case of a too deep foundation and drainage pipes are laid, the stormwater system is installed around the perimeter of the house above the drains).
Today we will look at how to install a storm drain with your own hands, what is the principle of its operation and what elements it consists of.
There are several elements of storm drainage, let's look at them.


storm pipes
Now let's look at how storm drainage works. There are two types of it - superficial and deep.

Surface, in turn, can be point and linear. Feature point catchment is that rainwater inlets are installed next to the taps for watering the garden and near the drain elbows. A storm inlet is a box into which water flows from pipes. The rainwater inlet often contains a special basket that traps all the debris in the drains. The basket is cleaned and waste is disposed of after it is removed.

Sometimes stormwater inlets are connected to the sewer system. In such cases, it is necessary to install siphon partitions that protect against unpleasant odor. A grate is placed on the rainwater inlet. It can be metal, plastic, etc., the choice of material depends entirely on future loads.
Linear a collection system, unlike a point collection system, removes waste from the entire yard, while protecting the foundation of the house. Moreover, if the slope of the site exceeds three degrees, then the linear catchment will prevent the washout of the top layer of soil. The main components of such a system are trays, or, as they are also called, gutters.

There are a number of places in the yard where linear system collection needs to be established without fail.
Deep-type drainage is designed to collect and drain groundwater from the site. To install it, drainage pipes are used, which are buried in the ground on a previously prepared “cushion” of sand and gravel. Drainage pipes are perforated, that is, they have many holes in order to absorb moisture that gets into their “action zone”.
Ditches for drainage pipes should be located around the entire perimeter of the yard. The frequency and order in which they will be placed will depend on the characteristics of the soil and the degree of its saturation with groundwater.

Important! To prevent the sand and gravel “cushion” from silting, a layer of geotextile is placed under it - this material allows moisture to pass through, but retains small particles.
All drainage pipes must slope towards the collector. The collector accumulates all the moisture coming through the pipes and “throws” it into the catchment area (a ravine or even a pond nearby).
As already mentioned, water in storm drains moves by gravity, so for efficient work systems should take into account a number of factors:
Important! Drainage pipes must run below the freezing level of the soil.
Based on the data given in the previous paragraph of the article, we need to make a calculation that will allow us to build an effective storm system. If the calculations are correct, then that's it. sanitary standards will be respected.
The basis of the calculation is the maximum volume of water that the system can handle. This volume can be obtained using a simple formula:
D x S xQ20 = V
In the formula, D is the intensity of water absorption by the surface (this information can be found in reference books), S is total area, Q20 is the maximum intensity of precipitation (it is also available in reference books for a specific territory), which is measured in l. per sec. on 1 hectare, and V is the maximum volume of water discharged.
To make it more convenient, we have provided a table below that shows the intensity of moisture absorption various materials(D).
| Slope, % | Diameter | ||
| 10 cm | 15 cm | 20 cm | |
| 1,5-2 | 10,03 | 31,53 | 77,01 |
| 1-1,5 | 8,69 | 27,31 | 66,69 |
| 0,5-1 | 7,1 | 22,29 | 54,45 |
| 0,3-0,5 | 5,02 | 15,76 | 38,5 |
| 0-0,3 | 3,89 | 12,21 | 29,82 |
If one pipe is connected to several gutters at once, then to determine the diameter you simply add the numbers for each of the flows. We will calculate all other elements of the system - trays, gratings, funnels, etc. in the same way as pipes. These elements, made of plastic, are sold in all stores today. If desired, you can order parts from a mechanic - he will make them from galvanized sheet.
If a drainage system already exists, then work begins with the installation of storm water inlets. We install them directly under the drainpipes. It is characteristic that all rainwater inlets form a single system, so we equip them with the required number of holes for pipes. In order to connect the pipes to the receivers, we use elbows.
First we mark the perimeter and dig trenches. Next, we pour a sand “cushion” 10–20 cm thick into the trench. Then we lay the pipes, and, as already mentioned, there should be a slope to the side drainage well(minimum 2%), otherwise the water will not drain by gravity and we will need to install additional pumps. And this, of course, is additional costs.

During installation, in addition to the main elements (pipes, storm water inlets, etc.), we will use:
Finally, we connect all the elements of the system - from pipes and sand traps to the drainage well - into a single network. All that remains is to secure the trays. We cook for them concrete mortar(the ratio of sand and cement is 3:1) and with its help we attach the trays. We put protective gratings on top of them and fill the entire stormwater system.

Important! In order to correctly determine the slope angle, it is better to use a laser or water level.

If the storm drain is clogged, you can turn to specialists for help, or you can try to clean it yourself. Of course, if this happened for the first time, then it is better to have specialists carry out the cleaning - from them you can find out how to remove a blockage of varying degrees of complexity. There are several such methods.
Often, a mechanical or hydrodynamic method is used to clean storm drains. But if the system is open, then cleaning will be much easier:
By the way, if you have a mini-washer on your household, for example, a Karcher, you can use it for washing - the result will also be excellent.


