Beginners often have difficulty finding a cutting to cut. Sometimes they send me large branched branches for grafting; with perennial wood there is sometimes nothing to take from them. So what needs to be cut for grafting?
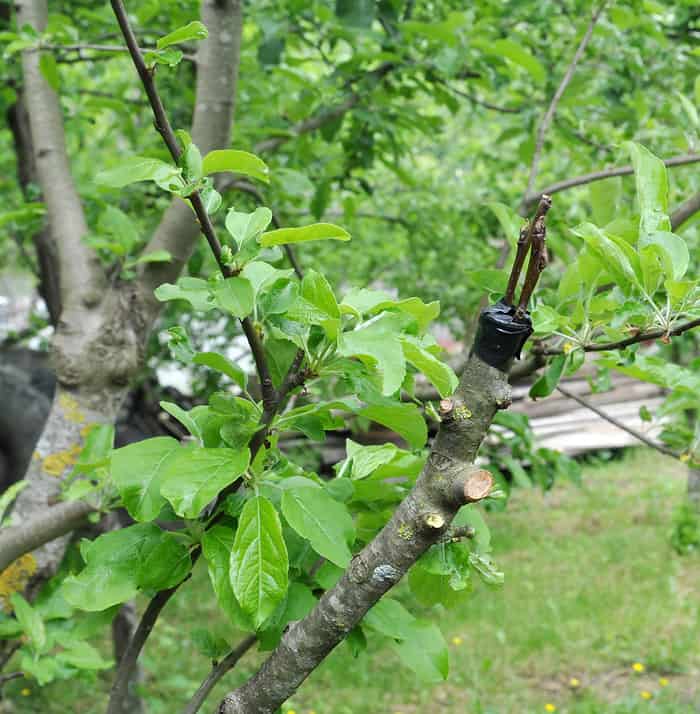
A cutting is called a one-year shoot, that is, this year's growth. This is a shoot, without branches, with smooth, shiny bark (usually). The optimal length is 30-50 cm and the diameter is “about the size of a pencil,” that is, 5-10 mm. Such cuttings are easy to find on young trees, but on adults and especially old fruit-bearing apple, plum, and pear trees with cuttings there may be big problems, since they have almost no annual growth, but there is an abundance of fruitful wood. On such trees you can look for tops (powerful shoots from dormant buds), and, as a last resort, try to cut two-year-old shoots for grafting. The chances of successful vaccination in this case are reduced.
If we cut cuttings from a normally growing, fruit-bearing tree, then first of all we need to take those shoots that will have to be cut out anyway. spring pruning- competitors, shoots going inside the crown, etc. Try not to ruin the tree, do not cut off those branches that in the future will be skeletal branches, the central conductor, etc.


In principle, the requirements for cuttings of different crops are not very different. In some breeds, the cuttings may have slight deviations (for example, too thin) or short. But cherry cuttings have important feature. On short cuttings (length less than 30 cm) there are mainly flower buds and only one apical one - growth buds. If such a cutting is divided and grafted, then nothing good will come of it. Flower buds they will not produce shoots and will only bloom without producing further shoots. Therefore, for grafting cherries, take longer shoots, preferably 40 cm or longer, then they mainly bear vegetative buds.
For spring and even more so for winter grafting, cuttings are usually cut at the beginning of winter. Ideally, after the first slight frost around -10 degrees. In the central regions this is usually December, the middle of the month or towards the end. This is due to several reasons. Firstly, by this time the cuttings are fully matured, the foliage has fallen and all the cuttings have arrived nutrients with measuring sheet plate. Secondly, after slight frosts, the cuttings are hardened and are better stored. There is also an opinion that frost kills some mycoplasmas, which is very valuable. More early dates undesirable, since cuttings cut in October-November are more difficult to preserve before grafting. Although there is positive experience in storing such cuttings, it is still better not to rush. Late cuttings for grafting are acceptable, but if there was no severe frosts, otherwise there is a risk that the cutting will be slightly frostbitten. This may not have any effect on the growth of trees, but the survival rate of such cuttings will either be poor or they will not take root at all. Frost damage is usually clearly visible on the cut of the cutting and if the wood has shades brown tones, then there is little chance of success. It happens that only the buds of the scion are damaged, but the wood is undamaged. Therefore, if necessary, you can check the buds and selectively cut several pieces on different cuttings.


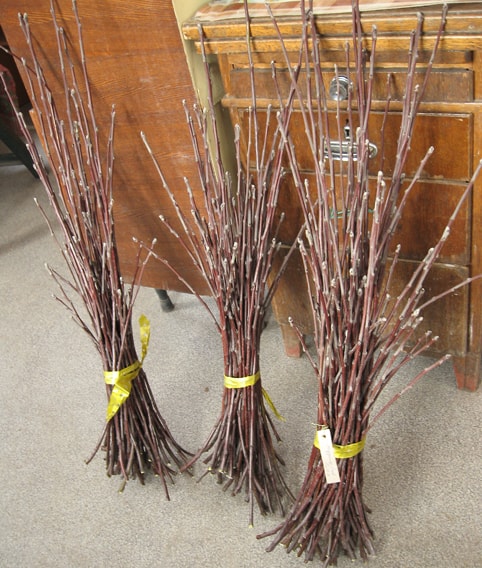
There are quite a few methods for storing cuttings. In my opinion, it is most optimal to store cuttings in the snow. With the establishment of snow cover, the cuttings are tied into a bundle and placed in the snow, making a small snowdrift over them. You can also cover this snowdrift with some kind of heat-insulating material, for example sawdust, or covering material so that the snow does not melt longer. Naturally, they choose the places where the snow lies the longest - on the north side of the buildings. I recommend wrapping the cuttings in some kind of breathable material, such as garbage bags or fiberglass. This will protect against mice, and secondly, it will be more convenient to remove a bunch of cuttings from a snowdrift.
You can also store it in the refrigerator, which is what you do until the onset of stable snow cover. The cuttings need to be tightly wrapped in film to prevent them from drying out and placed against the far wall of the refrigerator. But they can lie in this form for a month or two. For long storage cuttings in the refrigerator, I was once recommended the following method - Wrap the cuttings loosely in film, then a damp cloth and again a layer of film. So my grape cuttings were successfully stored in regular refrigerator till March. There is information about the successful storage of fruit cuttings under turf, and the author of this method cuts the cuttings early, in early November (since he does not visit the site later) and stores them under the turf. A layer of 3-5 cm of turf is cut off, and a pack of tied cuttings is placed under it. Subsequently, this area is naturally covered with snow. Cuttings are also stored in the cellar. The temperature and humidity there are usually optimal for storage; packaging must be selected individually. Or simply sprinkle partially or completely with sand, sawdust or other material.
Shipping of cuttings is usually carried out in winter period and does not cause any difficulties. A bunch of cuttings are tied and wrapped very tightly and as tightly as possible with stretch film. Then they are placed in a regular film postal bag. You can treat the ends of the cuttings with garden varnish or wax, or insulate them in some other way, for additional insurance against drying out, but as practice has shown, this is usually not required. The cuttings successfully withstand 1-2 weeks of shipment. But closer to spring, pear and some stone fruits may begin to germinate in transit, so it is advisable to complete all shipments by the end of February. Sprouted cuttings, as a rule, do not take root.
If the so-called “” at the table is carried out, then it usually starts in November-December (starts with cherries) and until March. With this technology, it is necessary to stratify the grafting - keep it warm for 10-15 days for the components to grow together, and in the early and late stages, crops such as cherries begin to germinate very quickly in the warmth, and in November-December they are in a state of deep dormancy and successfully grow this stage. In principle, tabletop grafting can be carried out before planting, in April, especially for apple trees. That is, we graft cuttings onto rootstocks dug up in the fall, and after 1-2 days we immediately plant them in the field. Such methods have nuances and will not be discussed in this article. The cutting itself for winter grafting is usually paraffinized (dipped for 1-2 seconds in molten paraffin or a 1:1 mixture of paraffin and garden varnish), this prevents the cutting from drying out until it grows together.
Grafting into the crown is generally possible at a very early stage, when the threat of severe frost has passed. According to my observations, grafts in the crown that had not begun fusion, much less growth, successfully tolerated -10 and even lower temperatures, but when fusion has already begun, such temperature drops are already very undesirable. I start grafting from the beginning of April, when the snow melts intensively. I'll finish it by the middle of the month. First, cherries and other stone fruits are grafted, then pome crops. Can be recommended using various materials, such as paper bags. Grafting is possible before summer and even in mid-summer, the main thing is that the grafted cuttings are in the dormant stage, with buds that have not sprouted. Naturally, preserving cuttings until such a period is very difficult and has no practical meaning. Usually all vaccinations are completed by the beginning of May. When grafting at a later date, the following types of problems arise: hot weather quickly dries out the grafted cuttings, which do not receive nutrition from the rootstock. For fusion, at least minimal, time is needed, under the most ideal conditions it is 7-10 days.
In general, when grafting all crops, the same processes occur. The grafter achieves maximum coincidence of the cambium layer (a thin layer of cells between the bark and wood) on the rootstock and scion, tightly connecting them with the help of a strapping. The grafting site must be airtight. The end of the cutting is also sealed (varnished or waxed the entire cutting). But different cultures are grafted differently. The easiest way to grow together are pomegrafts, especially pears. Stone fruits have a slightly lower survival rate; cherries are more capricious than plums and cherry plums. Crops such as lilac are even more difficult to graft. Hazelnuts and, for example, birch (to obtain, for example, weeping standard forms) the lot of professionals. For complex crops, it is necessary to carefully select the timing of grafting and methods. In general, look for an approach.
In the end, I would like to advise beginning grafters to start with simpler crops, for example, grafting pear and apple trees. The first positive results will give you confidence and increase interest in this exciting activity.
Cuttings (scions) are segments or entire annual shoots that grew during the growing season, became woody and entered winter. They are cut, stored, and then used for grafting.
In practice, cuttings for grafting are prepared in the fall, as soon as sap flow has stopped, the trees have shed their leaves and entered a dormant state. And you can prepare cuttings at the beginning of winter, right up to mid-January.
Mostly in February, thaws occur, after which the cut cuttings take root worse or do not take root at all. This is explained by the fact that as soon as the sun warms up, plastic substances from the top of the shoot begin to move down, moving into the branch.
If such a shoot is cut off and then connected to the rootstock, it will not take root, because it no longer contains plastic substances for the growth of callus and the fusion of graft components. And besides, during the winter, young shoots can freeze.
Select for scions the best, well-ripened shoots with a diameter of at least 5-6 mm, with an apical growth bud and leafy lateral buds (leaf buds are smaller and elongated, flower ones are shorter, convex, thicker).
It is better to cut shoots into cuttings below the growth neck, in fact, with a 1-2 cm piece of 2-year-old wood. Under these conditions, the scions will be better preserved and will take root well.
Cut shoots should be stored immediately. To do this they are wiped damp cloth, sorted by size, tied into small bundles, which are placed in a new, clean plastic bag and stored in appropriate conditions.
Cuttings should not be short (8-10 cm); thin, crooked, damaged ones, those from overgrowing branches, or from “tops” are also not suitable.
You should not cut off shoots for grafting that have grown in a thickened, especially on the northern side, part of the crown or are woven into a neighboring tree, as well as from trees of completely unknown varieties and from nowhere.
For grafting, as reliable ones, you can use the tops of freshly broken or cut branches, if they are not dry.
 An old, ancient, proven method thousands of times, when cut cuttings are stored in damp sand, sawdust, peat or other substrate, in a cool dry place, at a low positive temperature, periodically moistening the substrate.
Before grafting, such cuttings remain fresh, swollen, as if they had just been cut from a tree, and take root well.
Can be stored in the refrigerator one or even two compartments below the freezer. However, it is still better to put a cloth soaked in rain, digested or spring water in a plastic bag, which will retain the necessary air humidity. While the refrigerator is defrosting, transfer the bag to a cool place.
Cuttings can also be stored in a trench, in the snow, suspended on a balcony, veranda, even on a tree, but somewhat insulated and always wrapped in a sterilely clean bag.
Particular care must be taken to ensure that the cuttings do not germinate at the end of storage. If the buds are only slightly swollen, the cuttings can still be grafted. And vice versa, cuttings with a cone, swollen or even sprouted buds will never take root, because plastic substances have already been used for the development of the kidneys, and there is nothing left for the formation of callus.
Sometimes grafting is successful when cuttings are cut and immediately transferred from tree to tree before sap flow begins in the mother tree. But this method is less reliable and requires careful monitoring of the condition of the trees, reliable shading and moistening of the grafting site on the scion. Therefore, gardeners rarely use it.

The cutting of any fruit tree is not just a piece of a twig, but a real shoot with several buds, which has a truly amazing ability to grow into a full-fledged tree. But in order to achieve such a result, you should know certain nuances associated with the selection and correct preparation of cuttings. Below is a detailed description of how to correctly select and prepare apple tree cuttings for grafting in the spring (detailed photo and video instructions are attached).
Because the we're talking about When it comes to creating a full-fledged tree, it is necessary to approach the issue of choosing a suitable cutting very seriously. It is important to observe one simple condition: the mother tree must be productive and consistently bear fruit. It is worth choosing annual shoots (it is important that they ripen well) from that part of the crown that is located on outside and is actively warming up sun rays.
Advice. Shoots located on the south side of the tree take root better. Such cuttings are distinguished by the presence of small internodes and well-developed eyes in the leaf axils.
Try to cut cuttings from the middle tier of the crown, since the upper ones will be too thick and massive for grafting, and the lower ones will not give the required growth.
As for the timing of the correct preparation of apple tree cuttings for spring scion, gardeners have differing opinions. Thus, some believe that the preparatory process is carried out at the beginning of winter, and necessarily before mid-January: shoots cut later are unlikely to take root well.
Other gardeners believe that optimal period For cutting cuttings from an apple tree, you can safely consider the end of winter and even the beginning of spring. It is important to take into account weather: So, the air temperature should not be below -10 degrees. This - optimal conditions for hardening annual shoots.
You can also prepare young shoots almost before grafting, but the plant should not yet have blossoming buds. According to reviews experienced gardeners, best result achieved by using cuttings prepared at the beginning of winter.
A cutting that is optimally suitable for harvesting as a scion should have the following external characteristics:
If you are new to gardening and want to try grafting a new plant from an apple cutting, it would be a good idea to take note of a few useful tips from experienced gardeners:
Some gardeners do not understand: why is it necessary to make cuttings so early and store them for a long time? And this is necessary so that the buds on the shoots left in a state of “rest” can be awakened at the right time. That is why you should know certain subtleties in order for the cuttings to remain viable by the time spring vaccination.
We bring to your attention the simplest and at the same time effective ways storing cuttings until spring:
Advice. To prevent rodents from getting into your “good”, wrap the twigs metal mesh, nylon stockings or plastic mesh.
Well, and finally, one piece of advice that should be taken into account by those who plan to store cuttings in a moist substrate. Beginner gardeners often have questions regarding optimal indicator humidity of the substrate for storing cuttings. Checking this is quite simple: you need to pick up a little substrate with your hand and squeeze it in your fist. If you feel moisture, but water does not flow, then the humidity is optimal.
These are all the subtleties that you should know in order to plant healthy and fully viable apple tree cuttings in the spring. Good luck!
Every gardener dreams that the harvests will always be good, that new varieties that attract them will easily take root, and that the “old” favorite trees will remain productive for as long as possible. But this is quite possible. With the help of vaccination! Many people are afraid to graft trees on their own, believing that the process is too complicated. In fact, everything is simpler than it seems. Subject to certain rules.
Do you want to figure out how to prepare cuttings for grafting an apple tree? Read this article more carefully and learn everything about which shoots should be cut, where to store them and how to then check for “professional suitability”.
First, let’s briefly talk about what vaccination is and why it is needed. Grafting - connecting parts different plants through their fusion. The result is a tree with the desired characteristics. Why is this being done? Vaccination allows:
Is it worth giving up such amazing opportunities? Hardly. So let's learn how to graft trees yourself!
Cuttings should be taken from apple trees that produce a stable harvest for 15-20 years. Select annual, mature branches. It is good if they are from the outer part of the leafy “cap”, well illuminated by the sun's rays. It is recommended to cut the cuttings from the south side.
It is believed that the best cuttings come from the middle tier.
The upper shoots for the scion are too powerful, the lower ones are too weak. When harvesting, try to choose shoots with the fewest flower buds.
If you try to create a “portrait” of an ideal cutting, it should look like this:
Experts advise cutting shoots from trees that have been constantly pruned. They give good growth with clear lateral buds. Cuttings cut together with a small part of two-year-old bark are better stored and take root faster.

If cuttings are taken from young plants whose crown is not fully formed, they are cut from branches that need to be eliminated in the spring. Thin shoots with poorly developed growth buds are not suitable for grafting.
If possible, prepare more cuttings than originally planned (in case some specimens do not survive the winter).
Cuttings are harvested in late autumn or in early spring. Autumn collection carried out after the plants have shed their leaves. The first frost brings with it many benefits. During this period, the branches harden, the trees prepare for “sleep,” and many pathogens die. Another advantage of taking cuttings in the fall is that the cut shoots will remain undisturbed.
If it was not possible to cut the cuttings in winter, you can do it in the spring. If the winter was very cold, you need to check whether the branches have frozen. In addition, blanks can be cut in the summer, immediately before the grafting procedure.
There are several storage methods. Everyone is free to choose the most acceptable one for themselves.

In areas with cold snowy winters cuttings are stored outside. To do this, dig a hole 25 cm deep in a dry place, the bottom of which is covered with pine needles. The cuttings are placed on such a “pillow” and covered with spruce branches, dry leaves or straw. If the depth of the snow cover is 50 cm, you do not need to dig a trench. The shoots are stored in a snowdrift, which is covered with straw. To prevent the grafting material from being spoiled by rodents, it can be wrapped in a metal mesh.

If there is little snow in winter, the shoots are stored in sawdust. Cuttings placed in plastic bottles or propylene pipes, laid on a layer of wet sawdust, covered with another layer of the same sawdust (20 cm) on top. When the peculiar “bed” freezes, dry sawdust is poured on top, and a film is laid on top. If you want to protect the contents of the “sandwich” from pests, then moisten the sawdust not with water, but with carbolic acid or creolin.

An old proven method. The storage substrate can be anything - sawdust, sand, peat, moss. Most often they are stored in sawdust and sand. In the first case, the cuttings are placed in dark bags, and then covered with sawdust. In the second case, the shoots are placed in a horizontal position in wooden boxes with holes for ventilation, and sand is poured on top. Any substrate must be moistened from time to time. It is important to maintain the following indicators: temperature: from -2 to +1 degrees, air humidity - 65%.
The shoots are wrapped in damp cloth, placed in a bag and placed in the refrigerator. It’s good if there is a temperature setting of up to +2 degrees. Please note that the shoots are stored in the refrigerator, not the freezer. Don't tie the bag too tightly - leave a little space for air.

Anything can happen to cuttings over a long period of storage. Most often, gardeners face problems such as:
Remember, frozen, sprouted, dried and rotted shoots cannot be used for grafting. Check their condition approximately once every 3 weeks and, if necessary, adjust the environmental conditions (moisten the substrate, change temperature regime, remove mold, disinfect).

Trees begin to be grafted at the time of active sap flow - in late April-early May. For a positive result, the scion (cutting) must still be “sleeping,” and the rootstock (the plant on which the shoot is grafted) must be “awake.” That is why cuttings are pulled out of the shelter 2-3 days before grafting, not earlier. And then it comes important point- you must make sure that the cuttings are suitable for subsequent work. So how?  should healthy shoots look like?
The bark is smooth and even. Dry and wrinkled “skin” indicates death. The handle is elastic. If, when bent, it crunches and breaks, then, alas, it did not pass the “safety test”. In cross section, the wood is light green. If it is brown, then the grafting material is spoiled.
The buds fit tightly to the cuttings. Their scales are smooth. When cut, the bud is green, without dark spots. It’s easy to determine whether the branches are frozen or not. Make a cut from the bottom and place the cuttings in water. If they are healthy, then the water will not change color, but if they are frozen, the water will turn yellow.
That's all. Now you know how to collect cuttings, where to store them and how to determine whether they survived the winter, which means the grafting will be successful. Try it!
1.March, or rather its second half, is the right time to start pruning fruit trees. The sun is already high enough, the day has lengthened significantly, and severe frosts can no longer be expected. The right time go out into the garden with pruning shears and a garden saw to tidy up the trees, which have become fairly overgrown over the previous summer. Simultaneously with pruning, you can begin to prepare cuttings for spring grafting into the crown or onto the rootstock you have grown. During pruning, there is enough material to select suitable cuttings.
2. At this time, the trees are still dormant, the buds- they sleep, and there are enough plastic substances in the wood to remain in a viable state until grafting. The grafting operation is carried out at a time when sap flow in the tree has already begun; at this time, buds are already beginning to bloom on the grafted trees. The rootstock cutting attached to them immediately receives nutrients, and the growth process proceeds quite quickly. However, if the cutting is taken from a tree on which the buds have already blossomed, then the likelihood of it drying out increases significantly, even if it was immediately grafted into a new place.


Rules for storing cuttings
So, the cuttings are prepared. Now you need to save them until the time of vaccination, that is, until the onset of sap flow (April-May). To do this, the cuttings are tied into bundles according to variety, with labels attached to them.
Then the bunches are put into dark plastic bags and put into the basement. Before placing in a plastic bag, the bundles can be wrapped in a damp cloth.
The temperature in the basement should be close to zero. However, not everyone has such a room, and not every gardener needs such a number of cuttings. In this situation a small amount of cuttings can be stored in the refrigerator in the fruit compartment. And if there are a lot of cuttings prepared, you will have to bury them in the snow (in a snow pile).
To do this, make a snowdrift about a meter high on the north side of the house or barn. Dig a hole in it almost to the ground, place bunches of cuttings there, and cover with snow. To prevent the snow from melting, place a layer of straw or sawdust on top of the entire surface of the snowdrift for as long as possible. Thus, you can save the cuttings until the onset of stable above-zero temperatures, when grafting can begin.


